AR Blue Clean AR 143 S-Q2 Guide

Questions, problems, missing parts?
1600 PSI
Electric Pressure Washer
ASSEMBLY, CARE AND
USE INSTRUCTIONS
Model AR 143 S-Q2
READ CAREFULLY
IMPORTANT: RETAIN THESE INSTRUCTIONS
AND ATTACH RECEIPT TO MANUAL FOR FUTURE
REFERENCE.
94627-KN
Before returning to your retailer, call (1-866-235-5112)
service department. They are available from 8:00 a.m. -
5:00 p.m., CST, Monday - Friday. www.arblueclean.com

2
TABLE OF CONTENTSTABLE OF CONTENTS
SPECIFICATIONS
Model
Max PSI
(lbs/sq. in.)
Max GPM
(Gal/per min) Cold Water Volts Amps
Weight (lbs.)
AR 143 S-Q2 1600 1.2 ✔120 12
PRODUCT SPECIFICATIONS
...................................................................................................... 2
Package Contents ............................................................................................................. 3
Hardware Contents ........................................................................................................... 3
Safety Information............................................................................................................. 4
Assembly Instructions....................................................................................................... 6
Operating Instructions .....................................................................................................10
Care and Maintenance ................................................................................................... 12
Pump Saver ..................................................................................................................... 13
Troubleshooting............................................................................................................... 14
Limited Warranty............................................................................................................. 15
Replacement Parts List .................................................................................................. 16
Frequency
(Hz)
60 16.3

3
PACKAGE CONTENTSPACKAGE CONTENTSPACKAGE CONTENTS
HARDWARE CONTENTS
PART DESCRIPTION QUANTITY
I Variable Spray Nozzle Lance 1
J Extension Lance 1
K Nozzle Cleaning Wire 1
L 1
M Fixed Brush 1
N O-Ring Replacement Kit 1
AA Screws 2
PART DESCRIPTION QUANTITY
A Spray Gun Holster 1
B Handle 1
C Power Washer Unit 1
D Cord Hook 1
E High Pressure Hose 1
F Spray Gun 1
G Spray Gun Lock/Unlock 1
H Foam Cannon 1
AA
Screws
Qty. 2
OFF/O
ON/I
1600MAX
PSI
750ml
600ml
450ml
300ml
150ml
E
F
H
B
C
K
A
J
I
L
M
G
DN
AA
PW909142S
Note: Screws are located in
package with manual.
15'' Extension Lance

4
SAFETY INFORMATION
4
SAFETY INFORMATIONSAFETY INFORMATION
Please read and understand this entire manual before
attempting to assemble and operate product.
This manual contains information that relates to
PROTECTING PERSONAL SAFETY and PREVENTING
EQUIPMENT PROBLEMS. It is very important to read this
manual carefully and understand it thoroughly before
using the product. The symbols listed below are used to
indicate this information.
DANGER
Potential hazard that will result in serious injury or
loss of life.
WARNING
Hazard that could result in serious injury or loss of
life.
CAUTION
Potential hazard that may result in moderate injury
damage to equipment.
Note: The word “Note” is used to inform the reader of
something the operator needs to know about the tool.
WARNING
To reduce the risk of injury, the user must read
and understand the instructions before using
this product.
cisab,tcudorpsihtgnisunehW–gninraW.1
precautions should always be followed, including the
following.
2. Read all the instructions before using the product.
serusserpdeelbdnatcudorpehtpotsotwohwonK.3
quickly. Be thoroughly familiar with the controls.
4. Keep operating area clear of persons.
peeK.troppuselbatsnunodnatsrohcaerrevotonoD.5
good footing and balance at all times.
6.
the manual.
.7
8.
To avoid personal injury and/or damage to property
and to maximize your power washer experience,
carefully follow all of the safety tips, instructions,
warnings and safeguards and become familiar with
all of the controls. Be sure you know how to quickly
bleed off the pressure from all parts of your power
washer and how to turn off the power washer.
This power washer conforms to CSA and other safety
and consumer standards. DO NOT modify or rebuild
any part of your power washer.
9. DO NOT use your power washer when you are under
carefully and only when you are alert.
10. Watch your balance and footing while using your
power washer. Surfaces become slippery when wet
and are extra slippery when using a detergent or
cleaner.
11. NEVER operate the power washer in bare feet,
sandals, or open-toed shoes.
12. When using the power washer near children, make
sure they are closely supervised by an adult to avoid
injury. NEVER let a child use the power washer.
13.
clear of the stream of high pressure water. The
powerful spray can cause blindness or blast holes in
the skin. It can break a window if you are too close
when you pull the trigger on the spray gun.
14. ALWAYS wear eye protection to prevent injury to
eyes when operating the power washer.
15.
16. The power washer is equipped with a Ground Fault
Circuit Interrupter (GFCI) which greatly reduces the
chance of electric shock while the unit is in use. If
replacement of the plug or cord is needed, use only
identical replacement parts.
nehwnoitceridefasaninugyarpsehttnioP.71
beginning a power washer session.
18. REVEN spray directly at a person, animal,
device or the unit itself.
19.
and lance with two hands when pulling the trigger
(one hand to pull the trigger and the other to
stabilize the gun assembly) until you get used to the
“kickback” from the spray gun.
20.
21. NEVER
22. NEVER use the power washer in areas that contain
combustible dust, liquids or vapors.
23. Avoid contact of the pressure hose with sharp
objects and examine the hose regularly. Replace
if damaged. Due to the high pressure involved, it
cannot be repaired if cut or damaged.
24.
washers and follow instructions on the detergent’s
label. Dish or laundry soap is too thick and will
clog the nozzle of your foam cannon.
electrical
Warning-
To avoid mishaps or injury, ALWAYS use the trigger
safety lock when not using the power washer even if
only stopping briefly.
When you turn the power switch to off, water
pressure may remain in the system. To discharge
the pressure, point the spray gun in a safe direction
and pull the trigger.
or

25.
5
SAFETY INFORMATIONSAFETY INFORMATION
5
Double Insolated Product
SAFETY INFORMATION
KEEP THESE INSTRUCTIONS FOR FUTURE REFERENCE.
CAUTION
Store the power washer indoors to prevent
the water in the unit from expanding under freezing
conditions. When the water freezes and expands, your
power washer will be damaged and become inoperable.
Or, if storing outdoors, it is recommended you use
pump saver (not included) to protect pumps.
27. NEVER use hot water with your power washer. It will
overheat and damage the high pressure pump.
28. NEVER leave the power washer unattended while it
is powered “ON”.
30. NEVER use a water supply to your power washer
that exceeds 150 PSI maximum.
31. NEVER disconnect the high pressure hose from the
power washer while the system is pressurized.
32. NEVER permanently engage the trigger mechanism
on the spray gun.
33. NEVER operate the power washer unless all
components are properly and securely connected.
34. NEVER allow the power washer pump to run for
more than one minute after you have turned off the
water supply. This can cause the motor and pump to
overheat and fail.
35. NEVER use lances or other parts that are not
36. NEVER use an extension power cord since it defeats
the effectiveness of the GFCI and increases the
chance of electrocuting the operator.
37. NEVER spray any electrical outlet with your power
washer.
.gnisuerofebdrocrewopehttcepsnI.83 DO NOT use it if
it is damaged.
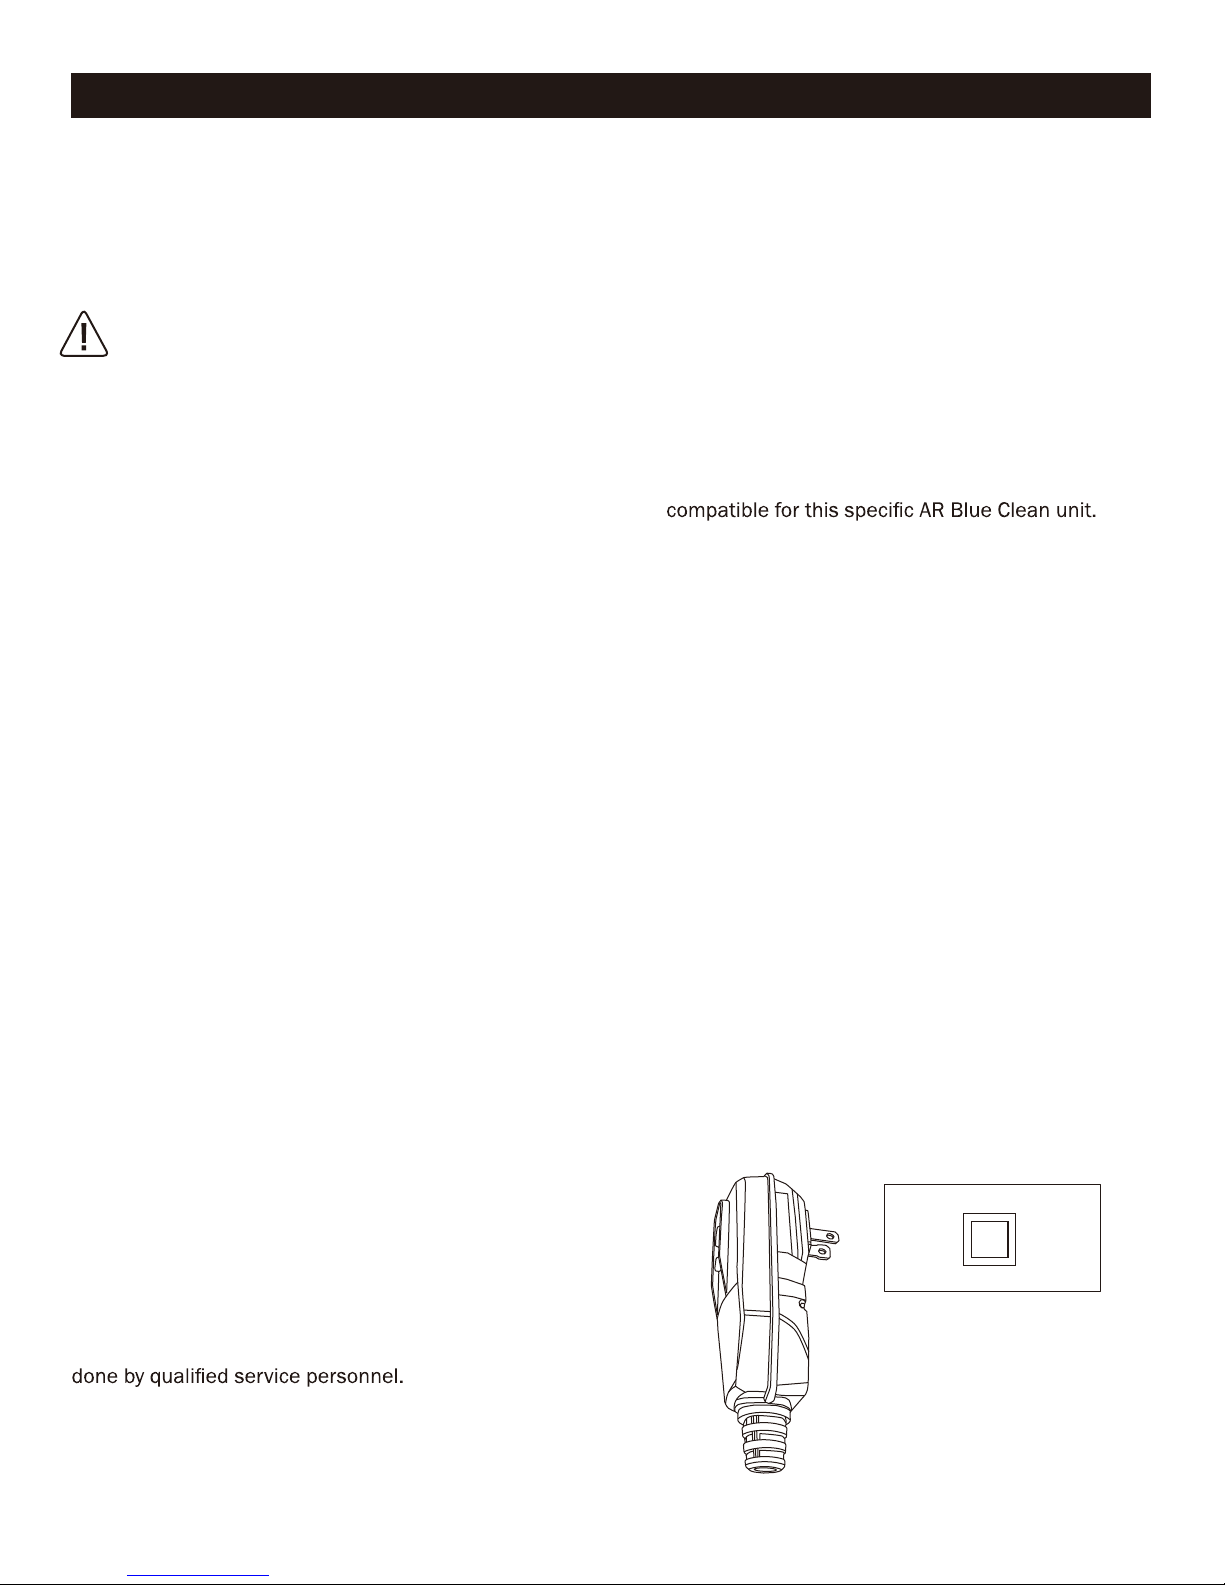
Servicing of a Double-Insulated Appliance
Ground Fault Circuit Interrupter Protection:
In a double-insulated product, two systems of insulation
are provided instead of grounding. Grounding means
are not provided for a double insulated product, nor
should grounding means be added to the product.
Servicing a double-insulated product requires extreme
care and knowledge of the system, and should only be
Replacement parts for a double-insulated product must
be identical to the original parts.
A double-insulated product is marked with the words
“Double Insulation” or “Double Insulated”. Product
may also be marked with symbol shown here.
26. Warning-If connection is made to a potable water
system, the system should be protected against
backflow.
This pressure washer is equipped with a ground-fault
circuit-interrupter (GFCI) built into the plugs of the
power-supply cord. This device provides additional
protection from the risk of electric shock. Should
replacement of the plug or cord become necessary,
use only identical replacement parts that include GFCI
protection.
Protect eyes, lungs, and skin from exposure to
detergent.
29. ALWAYS turn the water supply on before turning
the power washer power to on. Running the pump
dry will cause damage to the internal components.

6
PREPARATION
6
PREPARATION
Before beginning assembly of product, make sure all
parts are present. Compare parts with package contents
list and hardware contents list. If any part is missing or
damaged, DO NOT attempt to assemble the product.
Estimated Assembly Time: 5 minutes.
Tools Required for Assembly (not included): Phillips
screwdriver.
ASSEMBLY INSTRUCTIONS
PREPARATION
1
C
B
AA
OFF/O
ON/I
1600MAX
PSI
2
C
A
Power Washer Unit Assembly
Install handle (B) to power washer unit (C). Secure
with screws (AA).
Note: Do not use a power screwdriver. When the
screws are completely tight, give a small final clockwise
twist of the screwdriver. Do not overtighten.
Screws x 2
AA
AA
Screw
Qty. 2
Slide spray gun holster (A) onto left side, when facing the
power washer unit (C) as shown.
Note: This step does not require any screws.
Hardware Used:
Please call customer service at 1-866-235-5112.
Replacement parts will be sent no charge.

7
ASSEMBLY INSTRUCTIONS
OFF/O
ON/I
1600MAX
PSI
3
C
D
Slide cord hook (D) onto right side, when facing
the power washer unit (C) as shown.
Note: This step does not require any screws.
4
C
E
High Pressure Hose Assembly
Screw high pressure hose (E) clockwise onto bottom
front of power washer unit (C). Pull back collar and insert
o-ring post into water outlet far enough so collar can
thread onto outlet threads until hand tight. If it takes
fewer than six turns you have not properly tightened the
power washer in front of you to ensure that the threads
are started correctly. Failure to properly tighten high
pressure hose will result in the hose slipping or popping
off immediately upon turning unit on. Do not worry about
damage if this occurs–just reinstall and take extra care
Note: DO NOT use pliers or locking pliers to tighten.
5
E
F
Connect the other end of high pressure hose (E) to
spray gun (F) by inserting the silver metal tip of high
hose is locked into spray gun by slightly pulling on
hose. The hose is now securely attached to spray gun.
2
1
6
E
F
To release hose (E) from spray gun (F), press button on
the underside of gun toward trigger guard. The hose will
slide out from connection.
Note: DO NOT press button on underside of gun when
connecting hose to gun. This is the hose release button,
and hose will be unable to connect.

8
PREPARATIONASSEMBLY INSTRUCTIONS
Locking Spray Gun (Before Lance Installation)
To lock trigger of spray gun (F), point gun away from you
and press bottom half of lock button to engage lock.
Squeeze or pull trigger to make sure it is locked.
ALWAYS leave lock button in locked position when not
in use. This ensures the gun is in “safe” mode until it is
ready for use. To unlock, press top half of lock button to
release.
Note: The trigger lock prevents trigger from being ac-
cidentally engaged.
Lock
Unlock
7
F
F
1
2
8
J
F
Extension Lance Installation
With spray gun (F) in locked position, attach extension
lance (J) directly to spray gun. Insert lance extension
into gun, pushing together and turning clockwise
simultaneously. Turn the extension collar clockwise
to lock into place. To remove extension lance (J), turn
extension collar counterclockwise to unlock, then push
together and turn counterclockwise to release.
Note: The extension lance must be inserted in gun
before using any of the other attachments, and
in place for storage. It is recommended that once the
extension is connected to leave it in place.
2
1
9
I
J
M
H
750ml
600ml
450ml
300ml
150ml
L
Variable Spray Nozzle Lance, Roto Spray Lance, or
Fixed Brush Installation
Note: Push the safety lock button to lock the trigger
when changing lances to ensure that they do not
accidentally eject with force during removal.
Insert Foam Cannon (H), Variable Spray Nozzle Lance (I),
15''
Extension Lance (L), or Fixed Brush (M) into the end
the extension lance (J) by inserting and pushing together,
turning clockwise simultaneously. To remove push
together and turn counterclockwise.
of

9
ASSEMBLY INSTRUCTIONS
10
1
750ml
600ml
450ml
300ml
150ml
2
H
Foam Cannon Installation
foam cannon
into high pressure top. If you do not see the straw, look
inside the foam cannon and attach it to the high
eeS.dednemmocererastnegretedrehsawerusserP•
page 11 for more information.
• DO NOT use thick or gel-like detergents as they will
clog the and can cause damage.
pressure top.When using foam cannon, fill it with a
properly formulated detergent or cleaner with a water
ratio according to instructions on the container.
foam cannon
1
J
H
11
2
Note: Always lock spray gun when changing
the foam cannon to ensurn it does not eject
with force.
Insert foam cannon (H) into extension lance (J),
push in and turn clockwise.
13
C
12
750ml
600ml
450ml
300ml
150ml
C
H
Foam Cannon Storage
Store the foam cannon (H) on the back of the power
washer unit (C).
Attach a standard garden hose to the black collar of the
garden hose adapter located on the back of the power
washer unit (C).The water is now connected to your
power washer.
Note: Flush out garden hose before connecting
to garden hose adapter.

10
OPERATING INSTRUCTIONSOPERATING INSTRUCTIONS
• Release the safety lock button on the spray gun by
pressing the top half of the safety lock button. While
pointing the spray gun in a safe direction, squeeze
the trigger on the spray gun until there is a steady
stream of water, letting the water and air out of the
hose.
Unlock
F
• Turn the power switch to the “ON” (|) position. The
unit will turn on for 1 - 2 seconds and shut off. This is
a normal function of the auto start feature.
OFF/0
ON/I
OFF/0
ON/I
• Begin power washing by squeezing the trigger on
the spray gun all the way into the handle.
• Release the spray gun trigger to stop the power washer.
erofebpotsetelpmocaotemocotrotomehtwollA•
squeezing the trigger again.
•
• Always test a small area to avoid chance of damaging
the surface.
• Make sure the “ON/OFF” switch is in the “OFF”
position. The power switch has international symbols
for ‘on’ and ‘off’: On (|) Off (O).
• Unwind the power cord completely and plug the GFCI
into a grounded 120 volt outlet.
• Turn on water supply at the faucet to completely open.
Squeezing and releasing the trigger rapidly will cause
the auto start feature to miss an on/off cycle that may
prevent it from working properly. Use slow deliberate
trigger pulls to avoid such symptoms.

11
OPERATING INSTRUCTIONSOPERATING INSTRUCTIONSOPERATING INSTRUCTIONS
Operation Tips
• If you hear the motor run intermittently when the
trigger is not being squeezed, that is normal. The
pump is priming itself so it is ready to operate when
the trigger is squeezed. Turn off the power washer if
• The o-rings on the bayonet end of the nozzle lance
should be cleaned regularly and lubricated with non-
water soluble grease such as petroleum jelly.
• Keep the nozzle cleaning wire for use in unclogging
the nozzle. If you lose the cleaning wire, a
straightened paper clip also works.
How to Avoid Damaging Surfaces
• Damage to surfaces being cleaned occurs because
the impact force of the water pressure exceeds
the durability of the surface. Bare wood can be
penetrated, paint can be peeled off, etc. You can vary
the force of your power washer by controlling:
1. The angle of the surface being cleaned.
2. The distance of the nozzle from the surface being
cleaned.
•NEVER use a narrow high pressure stream of water on
soft surfaces susceptible to damage.
H
J
Adjusting Soap Levels on Foam Cannon
Twist knob to adjust the level of soap as indicated on
the top of the Foam Cannon (H). Twist toward the
higher concentration of bubbles for more soap, or the
opposite direction for less.
• When using the variable spray nozzle, the spray
pattern and intensity can be adjusted for each task by
twisting the spray nozzle at the far end of the lance.
Detergents
• Use detergents designed for power washers. These
can be purchased online at our website www.
arblueclean.com. Hardware stores or home centers
also have power washer detergents for different
cleaning projects. The cleaning solution should be the
consistency of water in order to prevent clogging your
detergent bottle and nozzle.
• This system applies detergent under low pressure.
The cleaning power of the detergents is enhanced
when applied with low pressure and enough time is
given to break down dirt and grime. The combination
of low pressure and chemical action is very effective
and can be better than scrubbing if applied properly.
ALWAYS spray detergent on a dry surface. DO NOT
detergent and reduces its cleaning ability. DO NOT
allow detergent to dry on surface. On vertical surfaces
being cleaned, apply detergent to lower surfaces and
work your way up to prevent detergent from causing
streaks in the dirt and grime. Rinse detergent by
pressure washer from bottom up for same reason.
• If a stain is particularly tough, it may be necessary
to reapply the detergent and use a bristled brush to
scrub the stain. Power washing after brushing should
successfully clear the stain.

CARE AND MAINTENANCE
12
Cleaning Garden Hose Adapter
• The screen inside the adapter should be cleaned
periodically. Remove it by dragging a thumb over the
screen with enough pressure to pull the screen and
washer out. Rinse it with clean water and then place
it back in the adapter.
Storage
• When your pressure washer session has been
completed, turn off the power switch located on
the front of the power washer. Unplug the power
cord from the outlet. Turn off the water supply.
Pull the trigger on the spray gun 2-3 times to
drain out the excess water and to release any
remaining water pressure. Disconnect the garden
hose adapter from the water inlet. DO NOT allow
through it.
• Remove high pressure hose from spray gun.
• Remove lance from the gun. Place the gun in the
holster on the side. Lances are placed into any of
the slots in the back of the unit.
• Make sure to discard any remaining detergent
from the bottle. Residual chemical will stick to
the container which could become cotaminated,
and can cause the detergent injector to clog and
not function properly. Flush the bottle and nozzle
head with fresh water to prevent clogging.
• Hook the power cord around the cord hook on the
right side of the machine when facing it.
• The pressure hose is stored on the hose hook
located on the back of the handle.
•sitierehwrehsawrewopehterotsTONOD
exposed to freezing temperatures unless you
use an antifreeze designed for pumps. Store the
power washer indoors to prevent the water in the
unit from expanding under freezing conditions.
When the water freezes and expands, your power
washer will be damaged and become inoperable.
Or, if storing outdoors, it is recommended you use
pump saver (not included) to protect pumps.
Cleaning Nozzles
• Turn off the unit.
• A clogged or partially clogged nozzle can cause
significant reduction of water pressure coming out of
the nozzle and/or cause the unit to pulsate while
spraying.
• Turn off the water supply to the unit.
• Relieve any pressure trapped in the hose by
squeezing the trigger 2-3 seconds, and then lock the
spray gun by pushing the lock button.
• Remove the lance from the extension lance.
• Take off the variable spray nozzle lance. Rotate the
nozzle to open up the metal blades.
• Using the nozzle cleaner wire provided (or an
unfolded paper clip), insert the wire into the
nozzle hole and move back and forth until debris
is dislodged.
• Tap quick connect end of lance on hard surface
several times.
•
garden hose and highest pressure available
(either standard water nozzle or use your thumb
over the nozzle to create water pressure for back

CARE AND MAINTENANCE
13
PUMP SAVER
1
2
Pump Saver is a product that protects and prolongs
the life of the pump. This will keep the internal parts
of the pump lubricated and protected from freezing
while being stored in ALL climates. It also assists with
protection from internal corrosion. The AR Blue Clean
part #is: PW64511(16oz. bottle). Order online at
www.arblueclean.com
Pump Saver Instructions
Turn unit off and disconnect the gun before adding
pump Saver. Unscrew threaded top from bottle to
remove seal and reattach threaded top to bottle.
Remove black cap from bottle.
1) Place top of pump saver bottle onto the garden hose
adapter.
2) Secure pump saver bottle by turning in a clockwise
direction.
3) Turn the power on.
Note: Instructions on Pump Saver Bottle are generic
and not model specific.
4) Squeeze bottle to help it into the pump.
5) Turn power off when pump saver exits the machine’s
water outlet.

CARE AND MAINTENANCE
14
PROBLEM CORRECTIVE ACTION
Unit will not turn on. 1. The GFCI module on the end of the power cord must be plugged directly into an outlet.
2. Do not use an extension cord.
.nodenrutsihctiwsrewopehterusekamdetcennoCICFGehthtiW.3
Note: When power switch is turned on, the power washer will turn on by itself for 1-2
seconds and shut off. This is normal.
The high pressure
(HP) hose will
not connect/stay
connected to the
spray gun. Is this a
spray gun problem?
eveelsrebburehtsimelborpehT.melborpehttonsinugyarpseht,sesactsomnI.1
into the spray gun. It should “click” into place and will not come out until the hose is
released by pushing in the lever on the underside of the gun. You may cut away the end
of the sleeve with a sharp knife if unable to move the sleeve down. Be careful not to cut
or puncture the hose.
2. Do not push in the release button when connecting the high pressure hose.
The unit is running
but there is no water
Why is water leaking
where the high
pressure
h
ose connects
to the spray gun?
I can’t remove the
lance from the spray
gun. What should I
do?
ehtdnasecnalllA.1 are attached and rem
foam cannon oved from the extension
lance in the same manner. Insert the quick-release end of the lance/ foam cannon
into the extension lance. Press the extension lance and lance together (about a 1/8”)
and turn clockwise. The lance will lock in place. Remove the lance by reversing this
procedure. Press the extension lance and lance together and turn counter clockwise.
The lance will slide out.
nodneelzzonehthtiwnoitisopthgirpunaniecnaldnaecnalnoisnetxeehtdloh,rO.2
follow the removal process again. You may also spray soapy water or a lubricant in the
area where the lance connects to the extension lance.
If you have any questions regarding the product,please call customer service at 1-866-235-5112.
TROUBLESHOOTING
1. Power should NOT be turned on until water comes through the spray gun. Doing so will
damage the motor.
2. Check the water source.
3. Eject the nozzle from the lance to determine if clog is coming from the nozzle.
(If nozzle is clogged, see nozzle cleaning instructions under “Cleaning nozzles”.)
4. Take off the lance and just spray out of the spray gun. This will indicate if the problem is
with the lance.
5. Check Garden Hose Adapter for loose connection and the filter for debris.
1. Make sure there is an o-ring at the end of the metal tip of the high pressure hose. If
no o-ring is present, the connection between the hose and spray gun will leak. O-Ring
Replacement Kit (L) is included with purchase. Additional O-Ring Kits are available
online at www.arblueclean.com or call Customer Service at 1-866-235-5112 to
place an order.

C
15
ARE AND MAINTENANCE
LIMITED WARRANTY
ARE AND MAINTENANCE
LIMITED WARRANTY
This product has a 2 (two) year warranty. Please read the following carefully to understand what each warranty
entails:
This product is under warranty to the original retail consumer against defects in material and workmanship for a
period of 1 (one) year and is a complete “bumper to bumper” warranty including the spray gun, the high pressure
hose and all accessories from the date of purchase. The warranty is not transferable or assignable. This warranty
covers replacement parts. This limited one year warranty applies only to products used in consumer applications
and is void in rental or any commercial application. Reasonable care must be used in conformity with operation and
maintenance instructions in the owner’s manual. Failure to follow these instructions will void
to state.
The second year of the warranty only covers manufacturer defects.
Warranty Process
Keep your original receipt of purchase in case of warranty claim.
If your power washer develops a problem, contact Customer Service:
• Call our toll-free number at 1-866-235-5112. Customer Service is available Monday - Friday,
8:00 a.m. - 5:00
p.m., Central Standard Time (CST). A Customer Service Representative will work with you to fix the problem.
If the power washer needs to be returned for repair, shipping costs must be paid by the customer. A Return
Merchandise Authorization (RMA) Number will be issued for the return. Upon receiving the power washer, the
company will repair or replace the unit. We will send unit back to customer at no charge.
Please note: Power washers sent to the company without an RMA Number will NOT be accepted and will be
shipped back at the expense of the sender.
this warranty.
PROBLEM CORRECTIVE ACTION
The power washer
turns on for
2 seconds, shuts
off, and will not turn
back on. Do I have a
defective unit?
1.
the accessories are assembled properly, and the power switch is turned on, the power
washer may turn on for 1 - 2 seconds to prime the pump. It automatically shuts off and
waits for the spray gun trigger to be pressed. When the trigger is pressed, water starts
automatically turns the power washer on.
2. Turn the power switch to off, hold in the trigger on the spray gun, so that you have a
steady stream of water. While you are holding the trigger open on the spray gun, at the
same time, turn the power switch on.

LIMITED WARRANTY
16
REPLACEMENT PARTS LIST
For replacement parts, call our customer service department at 1-866-235-5112, 8:00 a.m. - 5:00 p.m., CST,
Monday - Friday or order online at www.arblueclean.com
PART DESCRIPTION PART #
G Cord Hook PW4220590
H Gun Holder PW4220580
I Fixed Brush PW40787
J GFCI Assembly PW4221160
K Handle PW4220570
L Garden Hose Adaptor
O O-Ring Kit PW909142S
PART DESCRIPTION PART #
A Foam Cannon (25 oz.) PW4620270
B Hose PW4620240
C Spray Gun PW4120391
D Variable Spray Nozzle
Lance
PW4120410
E Extension Lance PW4120400
F
B
D
E
H
CG
J
K
F
OPW909142S
A
I
750ml
600ml
450ml
300ml
150ml
L
15'' Extension Lance
PW4221570
PW3082860
Table of contents
Other AR Blue Clean Washer manuals