manuals.online logo
Brands
  1. Home
  2. •
  3. Brands
  4. •
  5. Areca
  6. •
  7. Enclosure
  8. •
  9. Areca ARC-8042-12 User manual

Areca ARC-8042-12 User manual

Other manuals for ARC-8042-12

1

Other Areca Enclosure manuals

Areca ARC-4038 Series User manual

Areca

Areca ARC-4038 Series User manual

Areca Thunderbolt ARC-8050T2 User manual

Areca

Areca Thunderbolt ARC-8050T2 User manual

Areca ARC-8042-12 User manual

Areca

Areca ARC-8042-12 User manual

Popular Enclosure manuals by other brands

Antec Veris Fusion Remote Max Specification sheet

Antec

Antec Veris Fusion Remote Max Specification sheet

ENERMAX iVektor.Q ECA 3371 Series user manual

ENERMAX

ENERMAX iVektor.Q ECA 3371 Series user manual

Lindy 43095 user manual

Lindy

Lindy 43095 user manual

SICK C4000 Select operating instructions

SICK

SICK C4000 Select operating instructions

Geeek A60 PLUS installation guide

Geeek

Geeek A60 PLUS installation guide

OVE SYDNEY 48 installation manual

OVE

OVE SYDNEY 48 installation manual

SilentiumPC Armis AR5 Hardware installation

SilentiumPC

SilentiumPC Armis AR5 Hardware installation

Pulsar 17/TRP80/DSPR Assembly instructions

Pulsar

Pulsar 17/TRP80/DSPR Assembly instructions

MSI MPG SEKIRA 500X quick start guide

MSI

MSI MPG SEKIRA 500X quick start guide

Antec Dark fleet DF-10 user manual

Antec

Antec Dark fleet DF-10 user manual

Peavey DS 1502 Specifications

Peavey

Peavey DS 1502 Specifications

D-Link ShareCenter Pro DNS-1550-04 user manual

D-Link

D-Link ShareCenter Pro DNS-1550-04 user manual

Rosewill RX82-U(JBOD) user manual

Rosewill

Rosewill RX82-U(JBOD) user manual

QNAP SAS JBOD CLI 1.0 user guide

QNAP

QNAP SAS JBOD CLI 1.0 user guide

GAMDIAS Talos P1 Quick installation guide

GAMDIAS

GAMDIAS Talos P1 Quick installation guide

Auvs KR615 user manual

Auvs

Auvs KR615 user manual

Antec AR300 user manual

Antec

Antec AR300 user manual

CommScope FDH 3000 user manual

CommScope

CommScope FDH 3000 user manual

manuals.online logo
manuals.online logoBrands
  • About & Mission
  • Contact us
  • Privacy Policy
  • Terms and Conditions

Copyright 2025 Manuals.Online. All Rights Reserved.

www.areca.com.tw Quick Installation Guide
ARC-8042-12
12-bays 12Gb/s SAS to SAS Desktop RAID Subsystem
Checklist
Inspect ARC-8042-12 enclosure. If it appears damaged, or if
any items of the contents listed below are missing or
damaged, please contact your dealer or distributor.
Step 1: Unpack the ARC-8042-12 Unit
1 x Power cord
1 x RJ11 to RS-232 DB9 cable
1 x RJ-45 LAN cable
48 x drive mounting screws (4 per drive tray)
1 x ARC-8042-12 quick installation quide
•
•
•
•
Step 2: Install SAS/SATA Drives
Secure the drive to the tray by four of the mounting screws,
then slide them into enclosure.
Step 3: Connect to Host Computer or Next JBOD
The ARC-8042-12 has two SFF-8644 SAS IN Port connectors
and two SFF-8644 SAS Expansion Port connectors.
Host Port Connection
Connect ARC-8042-12 to a single host using a SFF-8644 cable.
Expansion Port Connection
ARC-8042-12 contains two expansion ports. Expansion port
supports being attached to JBOD. The maximum drive no. is
512 through this RAID subsystem with JBOD enclosures.
Enclosures installed with SAS disks or SATA disks can be
included in the same daisy-chain.
Step 4: Connect Monitor Port
This section describes how to establish a management
connection to the ARC-8042-12. The SAS RAID subsystem is
normally delivered with LCD preinstalled. Your ARC-8042-12
SAS RAID subsystem can be configured by using the LCD with
keypad, a serial device (terminal emulation) or LAN port.
※RS232C Port Connection
The ARC-8042-12 JBOD enclosure can be configured via a
VT-100 compatible terminal or a PC running a VT-100 terminal
emulation program. You can attach a serial (Character-Based)
terminal or server com port to the SAS JBOD enclosure for
access to the text-based setup menu.
Please configure the SW1(2-1) settings on the RAID controller
to define the Terminal connector function for RAID controller
and expander.
RS-232C Monitor Port Location
SW1-1 Terminal Port (J5) Function
SW1-2
OFF Expander TerminalOFF
ON Expander DebugOFF
OFF Controller TerminalON
ON Controller DebugON
The SAS RAID subsystem package includes one RJ11-to-DB9
serial data cable. Use the RJ11 serial port on the controller
module to establish the serial communication link.
※LAN Port Connection
The SAS RAID subsystem has embedded the TCP/IP & web
browser-based RAID manager in the firmware. User can
remote manage the SAS RAID subsystem without adding any
user specific software (platform independent) via standard
web browsers directly connected to the RJ45 LAN port. Connect
Ethernet port of the SAS RAID subsystem using the included
LAN cable and then to a LAN port or LAN switch.
•
TEL:886-2-87974060 FAX: 886-2-87975970
Technical Support: [email protected]
Sales Information: [email protected]
12
S
A
S
2700-1M8042-0010
Step 5: Power Up the Enclosure
If you need more detail information, please download ARC-8042 user manual from the
website below:
• http://www.areca.com.tw/products/8042.htm
• http://www.areca.com.tw/support/main.htm
If you need more detail information, please download ARC-8042 user manual from the
website below:
• http://www.areca.com.tw/products/8042.htm
• http://www.areca.com.tw/support/main.htm
Your SAS RAID subsystem can be configured by using the LCD
with keypad, a serial device (terminal emulation) or LAN port.
※Method 1: RS-232 Port Management
You can attach a serial (Character-Based) terminal or server com
port to the RAID subsystem for access to the text-based setup
menu via a VT-100 compatible terminal or a PC running a VT-100
terminal emulation program to configure RAID sets and volume
sets. The firmware-based terminal array management interface
can access the array through this RS-232 port.
The manufacture default password is set to 0000. To ensure
proper communications between the RAID controller and the
VT-100 Terminal Emulation, please configure the VT100 terminal
emulation settings to the values shown below:
For additional information on using the RS-232 port to configure
the RAID subsystem see the Chapter 5 of VT-100 Utility
Configuration.
Step 6: Configure RAID Volumes
※Method 2: LCD Panel with Keypad (Optional)
You can use LCD front panel and keypad function to simply
create the RAID volume. The LCD status panel also informs you
of the disk array’s current operating status at a glance. The LCD
provides a system of screens with areas for information, status
indication, or menus. The manufacture default password is set
to 0000. The initial screen is as following:
For additional information on using the LCD to configure the RAID subsystem see the
LCD manual. You can download it from the website below:
http://www.areca.us/support/download/RaidCards/Documents/Manual_Spec/LCD_
manual.zip
For additional information on using the LCD to configure the RAID subsystem see the
LCD manual. You can download it from the website below:
http://www.areca.us/support/download/RaidCards/Documents/Manual_Spec/LCD_
manual.zip
Form Factor
Disk Port
Power Supply
Weight
External Port
Cooling Fan
Dimension(W/H/D)
Desktop 12-bay
Management
12 x 12Gb/s SAS/SATA
2 x SFF-8644 Host Port / 2 x SFF-8644 JBOD Port
2 x 2700rpm
270W
8.1 x 12.2 x 11.4 in (206x310x290 mm)
20.8 lbs / 9.5Kg
1 x 6-pin UART RJ-11 connector / 1 x RJ-45 LAN connector / LCD module
Using the included power cord, connect the power supply to a
suitable AC power source. There is one main power on/off switch
located on the rear side of the RAID subsystem. This on/off power
switch is used to apply or remove power from the power supply
to the RAID subsystem.
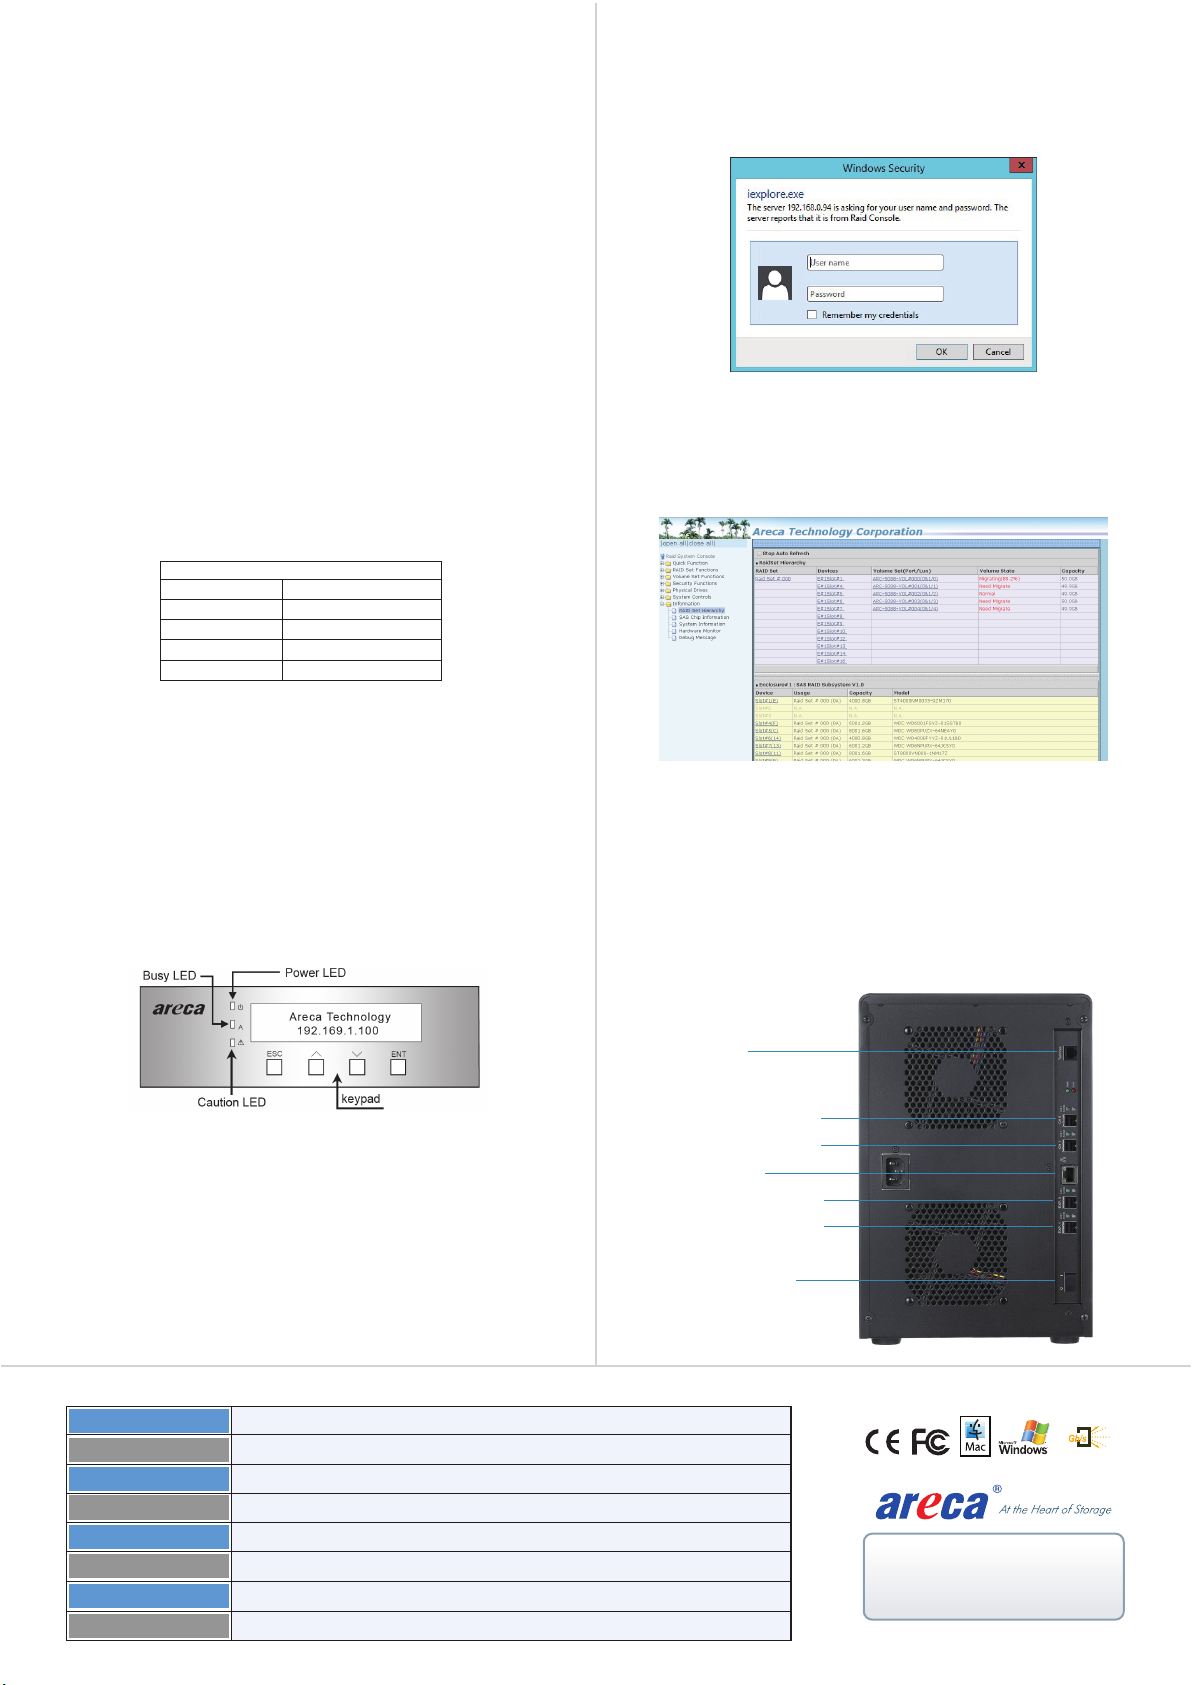
※Method 3: LAN Port Management
User can remote manage the ARC-8042 RAID subsystem without
adding any user specific software (platform independent) via
Type the User Name and Password. The RAID controller default
User Name is “admin” and the Password is “0000”. After entering
the user name and password, click the button to access the
McRAID storage manager.
See the chapter 6 of Web Browser-based Configuration on the
user manual detailing the McRAID Storage Manager to customize
your RAID configuration.
Baud Rate
Terminal Requirement
Data bits
Connection Null-modern cable
115,200
8
Stop
Flow Control
1
None
standard web browsers directly connected to the Gigabit Ethernet
RJ45 LAN port. The IP address default shows in the LCD screen.
Launch the Web Browser-based RAID manager by entering
http://[IP Address] in the web browser.
RS232
SAS Port0 (CH0)
SAS JBOD Port 0
SAS Port1 (CH1)
SAS JBOD Port 1
LAN Port
Power On/Off