Ariston Chef Plus MWA 25 B User manual

EN Operating Instructions

INSTALLATION
Prior to connecting
Check that the voltage on the rating plate cor-
responds to the voltage in your home.
• Do not remove the microwave inlet protection
plates located on the side of the oven cavity wall.
They prevent grease & food particles from ente-
ring the microwave inlet channels.
• Place the oven on a stable, even surface that
is strong enough to hold the oven and the
food utensils you put in it. Use carefully when
handling.
• Position the oven at a distance from other he-
ating sources. For sufcient ventila-
tion there must be a space of at
least 30 cm above the oven. Ensure that
the space underneath, above and around the
ovenisemptytoallowforproperairow.The
microwave oven shall not be
placed in a cabinet.
• Ensure that the appliance is not damaged.
Check the oven door closes rmly against the
door support. Empty the oven and clean the inte-
rior with a soft, damp cloth.
Do not operate this appliance if it has a dama-
ged mains cord or plug, if it is not working pro-
perly, or if it has been damaged or dropped. Do not
immerse the mains cord or plug in water. Keep the
cordawayfromhotsurfaces.Electricalshock,reor
other hazards may result.
• Do not use extension cord: If the power supply
cordistooshort,haveaqualiedelectricianor
serviceman install an outlet near the appliance.
This appliance MUST be Earthed or this could
result in the risk of electric shock. It MUST be
connected to a properly installed earthed socket or
fusedearthedswitchedspur.Consultaqualiedelec-
trician or serviceman if the earthing instructions are
not completely understood, or if doubt exists as to
whether the microwave oven is properly earthed.
AFTER CONNECTING
• The oven can be operated only if the oven door
isrmlyclosed.
• Poor television reception and radio interference
may result if the oven is located close to a TV,
radio or aerial.
• The earthing of this appliance is compulsory. The
manufacturer will accept no responsibility for in-
jury to persons, animals or damage to objects
arising from the non-observance of this require-
ment.
• The manufacturers are not liable for any pro-
blems caused by the user’s failure to observe
these instructions.
IMPORTANT SAFETY INSTRUC-
TIONS READ CAREFULLY AND
KEEP FOR FUTURE REFERENCE
• Do not heat, or use ammable materials in or
neartheoven. Fumescancreatea rehazard
or explosion.
• Do not use your microwave oven for drying texti-
les,paper,spices,herbs,wood,owers,fruitor
other combustible materials. This could result in
re.
• Metallic containers for food and beverages are
not allowed during microwave cooking.
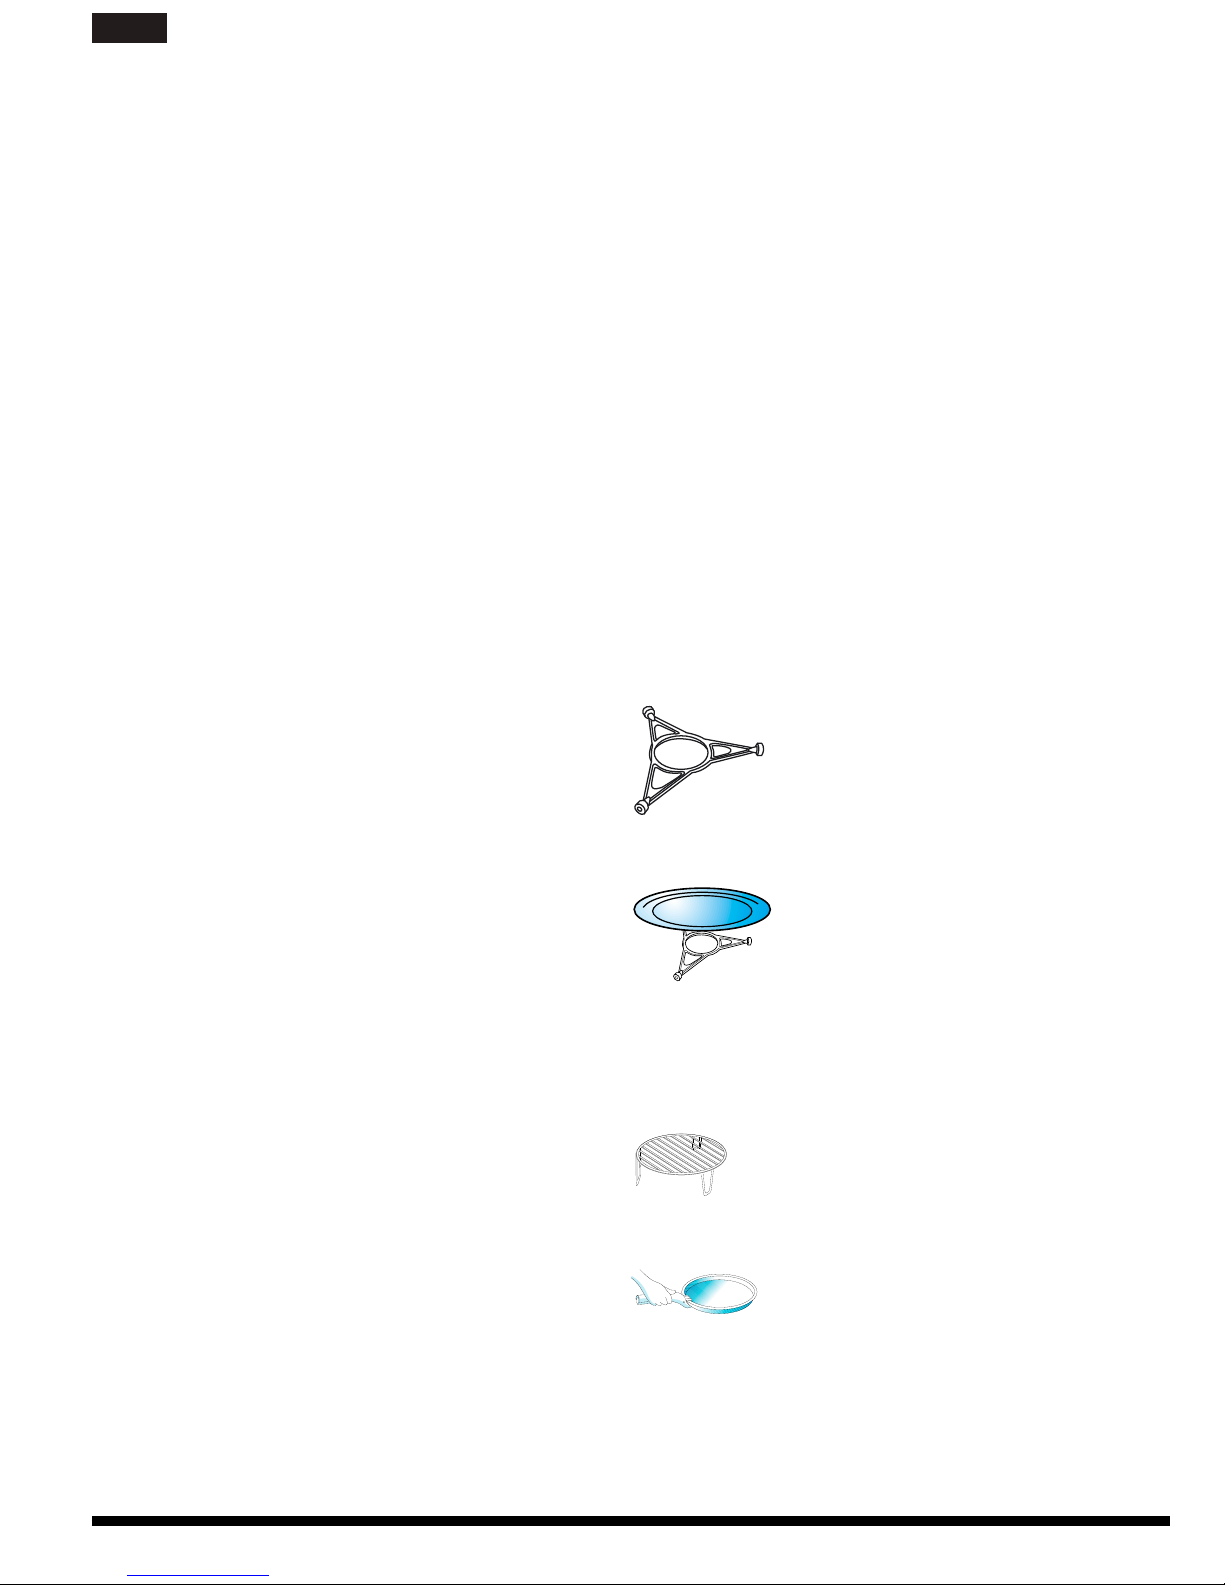
• Care should be taken not to displace the turnta-
ble when removing containers from the applian-
ce.
• If material inside / outside the
oven should ignite or smoke is
emitted, keep oven door closed
and turn the oven off. Discon-
nect the power cord or shut off
power at the fuse or circuit bre-
aker panel.
• Donotover-cookfood.Thiscouldresultinre.
• Do not leave the oven unat-
tended, especially when using
paper, plastic or other combu-
stible materials in the cooking
process. Paper can char or burn
and some plastics can melt if
used when heating foods. Do
not leave the oven unattended
if you are using a lot of fat or
oil since they can overheat and
causeare!
• Do not use corrosive chemicals or vapors in this
appliance.Thistypeofovenisspecicallydesi-
gned to heat or cook food. It is not designed for
industrial or laboratory use.
22
en
hotpoint.co.uk

• Do not hang or place heavy items on the door as
this can damage the oven opening and hinges.
The door handle should not be used for hanging
things on.
• The Microwave oven is intended
for heating food and beverages.
Drying of food or clothing and
heating of warming pads, slip-
pers, sponges, damp cloth and
similar may lead to risk of injury,
ignitionorre.
• This appliance can be used by
children aged from 8 years and
above and persons with redu-
ced physical, sensory or mental
capabilities or lack of experien-
ce and knowledge if they have
been given supervision or in-
struction concerning use of the
appliance in a safe way and un-
derstand the hazards involved,
Children shall not play with the
appliance. Cleaning and user
maintenance shall not be made
by children unless they are older
than 8 and supervised. Keep
the appliance and its cord out
of reach of children less than 8
years.
• This appliance is not intended
for use by persons (including
children) with reduced physi-
cal, sensory or mental capabi-
lities, or lack of experience and
knowledge, unless they have
been given supervision or in-
struction concerning use of the
appliance by a person responsi-
ble for their safety.
• Children should be supervised
to ensure that they do not play
with the appliance.
• Do not use your microwave oven
for heating anything in airtight
sealed containers. The pres-
sure increases and may cause
damage when opening or may
explode.
• The door seals and the door
seal areas must be regularly
inspected for damage. If these
areas are damaged the applian-
ce should not be operated until
it has been repaired by a trained
service technician.
• The appliances are not intended
to be operated by means of an
external timer or separate remo-
te-control system.
• Do not use your microwave oven
for cooking or reheating whole
eggs with or without shell since
they may explode even after mi-
crowave heating has ended.
PRECAUTIONS
GENERAL
• This appliance is intended to be
used in household and similar
applications such as :
-Staffkitchenareasinshops,ofces
and other working environments;
- Farm houses;
- By clients in hotels, motels and
other residential environments;
- Bed and breakfast type envi-
ronments.
No other use is permitted (e.g. hea-
ting rooms).
• The appliance should not be operated without
food in the oven when using microwaves. Ope-
ration in this manner is likely to damage the ap-
pliance.
33
en
hotpoint.co.uk

• The ventilation openings on the oven must not
be covered. Blocking the air intake or exhaust
vents may cause damage to the oven and poor
cooking results.
• If you practice operating the oven, put a glass
of water inside. The water will absorb the micro-
wave energy and the oven will not be damaged.
• Do not store or use this appliance outdoors.
• Do not use this product near a kitchen sink, in
a wet basement, or near a swimming pool, or
similar.
• Do not use the cavity for any storage purposes.
• Remove wire twist-ties from paper or plastic
bags before placing bag in the oven.
DEEP-FRYING
• Do not use your microwave oven for deep-frying,
because the oil temperature cannot be control-
led.
• Use hot pads or oven mitts to prevent burns,
when touching containers, oven parts, and pan
after cooking. Accessible parts may become hot
during use, young children should be kept away.
LIQUIDS
• e.g. beverages or water.
Overheating the liquid beyond
boiling point can occur without
evidence of bubbling. This could
result in a sudden boil over of
the hot liquid.
• To prevent this possibility the following steps
should be taken:
1. Avoid using straight-sided containers with
narrow necks.
2. Stir the liquid before placing the container
in the oven and let the teaspoon remain in
the container.
3. After heating, allow standing for a short
time, stirring again before carefully remo-
ving the container from the oven.
• After heating baby food or li-
quids in a baby bottle or in a
baby food jar, always stir and
check the temperature before
serving. This will ensure that the
heat is evenly distributed and
the risk of scalding or burns can
be avoided.
• Ensure the Lid and the Teat is removed before
heating!
ACCESSORIES
GENERAL
There are a number of accessories
available on the market. Before you
buy, ensure they are suitable for mi-
crowave use.
Ensure that the utensils you use are oven proof and al-
low microwaves to pass through them before cooking.
When you put food and accessories in the microwave
oven, ensure that they do not come in contact with the
interior of the oven.
This is especially important with accessories made of
metal or metal parts.
If accessories containing metal comes in contact with
the oven interior, while the oven is in operation, spar-
king can occur and the oven could be damaged.
Always ensure that the turntable is able to turn freely
before starting the oven. If the turntable isn’t able to
turn freely you should use a smaller vessel.
TURNTABLE SUPPORT
Use the turntable support under the
Glass turntable. Never put any other
utensils on the turntable support.
•
Fit the turntable support in the
oven.
GLASS TURNTABLE
Use the Glass turntable with all
cooking methods. It collects the
dripping juices and food particles that
otherwise would stain and soil the
interior of the oven.
• Place the Glass turntable on the turntable
support.
WIRE RACK
Use the Wire Rack when cooking with
Grill or Combi grill.
CRISP PLATE
Place the food directly on the Crisp
Plate. The Crisp Plate may be
preheated before use (max. 3 min.).
Always use the Glass Turntable as support
when using the Crisp Plate.
Do not place any utensils on the Crisp Plate since
it will quickly become very hot and is likely to cause
damage to the utensil.
44
en
hotpoint.co.uk

CRISP HANDLE
Use the Crisp Handle to remove the hot
Crisp Plate from the oven.
PLATE COVER (accessory sold separa-
tely)
The Cover is used to cover food during cooking and re-
heating with microwaves only and helps to
reduce spattering, retain food moisture
as well as reducing the time needed.
Use the cover for two level reheating.
MAINTENANCE & CLEANING
Cleaning is the only maintenance normally required.
It must be carried out with the microwave oven di-
sconnected.
Failure to maintain the oven in a
clean condition could lead to dete-
rioration of the surface that could
adversely affect the life of the ap-
pliance and possibly result in a ha-
zardous situation.
Do not use metal scouring pads,
abrasive cleansers, steel-wool
pads, gritty washcloths, etc. which
can damage the control panel, and
the interior and exterior oven sur-
faces. Use a cloth with a mild de-
tergent or a paper towel with spray
glass cleaner. Apply spray glass
cleaner to a paper towel.
Do not spray directly on the oven.
At regular intervals, especially if spill
overs have occurred, remove the
turntable, the turntable support and
wipe the base of the oven clean.
This oven is designed to operate with the turntable
in place.
Do not operate the microwave oven when the turnta-
ble has been removed for cleaning.
Use a soft and damp cloth with mild detergent to cle-
an the interior surfaces, front and rear of the door and
the door opening.
Do not allow grease or food particles to build up
around the door.
For stubborn stains, boil a cup of water in the oven for
2 or 3 minutes. Steam will soften the marks.
Adding some lemon juice to a cup of water, placing
this on the turntable and boiling for a few minutes can
eliminate odors inside the oven.
Do not use steam cleaning appliances when cleaning
your microwave oven.
The oven should be cleaned regu-
larly and any food deposits removed.
The ceiling beneath it may need regular cleaning. This
should be done with a soft and damp cloth with mild
detergent.
DISHWASHER SAFE:
• Tu r n t a b l e S u p p o r t • W i r e R a c k
•CrispHandle•GlassTurntable
TROUBLE SHOOTING GUIDE
If the oven does not work, do not make a service call
until you have made the following checks:
• The Turntable and turntable support is in place.
• The Plug is properly inserted in the wall socket.
• The Door is properly closed.
• Check your Fuses and ensure that there is po-
wer available.
• Check that the oven has ample ventilation.
• Wait for 10 minutes, then try to operate the oven
once more.
• Open and then close the door before you try
again.
This is to avoid unnecessary
calls for which you will be charged.
When calling for Service, please give the serial num-
ber and type number of the oven (see Service label).
Consult your warranty booklet for further advice.
If the mains cord needs repla-
cing it should be replaced by the
original mains cord, which is availa-
ble via our service organization.
The mains cord may only be repla-
ced by a trained service technician.
Service only to be carried out by a trained servi-
ce technician. It is hazardous for anyone other
than a trained person to carry out any service or repair
operation, which involves the removal of any cover,
which gives protection against exposure to microwa-
ve energy. Do not remove any cover.
55
en
hotpoint.co.uk

qMicrowave button
wBread Defrost button
eCrisp button
rJet Reheat Menu button
tJet Defrost Menu button
yDisplay
uAuto clean button
iMinus button
oStop button
aGrill button
sCombi Grill button
dFavourite button
fChef menu button
gClock button
hPlus button
jJet Start button
kOK button
q
w
e
r
t
y
u
i
o
a
s
d
f
g
h
j
k
MWA 25 B
2@
2# 2$ 2%
2) 2!
1(
l
2^ 2&
lCrisp icon
;Jet Defrost Menu icon
2) Jet Reheat Menu icon
2! Chef Menu icon
2@ Microwave power (watt)
2# Microwave icon
2$ Grill icon
2% Clock setting / Time selection icon
2^ Food Type selection icon
2& Weight (grams) icon
1
109
8
7
6
5
4
3
2
66
en
hotpoint.co.uk

Depending on the selected function, it could be
needed to add / stir / turn food during cooking. In
these cases the oven will pause cooking and it
will ask you to perform the needed action. When
required, you should:
ADD / STIR / TURN FOOD
START PROTECTION / CHILD LOCK
This automatic safety function is activated one
minute after the oven has returned to “Stand-by
mode”.
When the safety function is active the door must
be opened and closed in order to start the cook-
ing,
otherwise the display will show “door”.
PAUSE OR STOP COOKING
To pause cooking:
The cooking can be paused to check, turn or stir
the food by opening the door. The setting will be
maintained for 5 minutes.
To continue cooking:
Close the door and press the Jet Start button
ONCE. The cooking is resumed from where it
was paused.
If you don’t want to continue cooking you can:
Remove the food, close the door and press the
Stop button.
When the cooking is finished:
A beep will signal once a minute for 10 minutes
whenthecookingisnished.PresstheStopbut-
ton or open the door to cancel the signal.
i
STAND-BY MODE
The oven is in Stand-by mode when the clock is
displayed (or, if the clock has not been set, when
the display will show “:”).
DOOR
1. Open the door.
2. Add / Stir / Turn the food (depending on the
required action).
3. Close the door and restart by pressing the
Jet Start button.
• If the door is not opened within 2 mi-
nutes since the request to Add food, the
oven will stop and it will go in Stand-by mode.
• If the door is not opened within 2 minutes
since the request to Stir or Turn the food, the
oven will continue the cooking process (in this
casethenalresults maynotbetheoptimal
ones).
CLOCK
•If the clock has not been set after plug in,
the clock will shows “12:00”.
•During the setting of the clock, if you press the
Stop button or if the setting is not completed after
a long time, the oven will exit from setting mode
and the setting will be invalid, display will shows “:”.
To set the Clock of your appliance:
1. Press the Clock button.
2. Press the Plus/Minus buttons to set the
hours.
3. Press the OK/Jet Start. The minutes will start
blinking.
4. Press the Plus/Minus buttons to set the min-
utes.
5. Press the OK/Jet Start button.The clock is
set.
Note:
The first time the appliance is plugged in (or after
a power failure), the prodct will automatically enter
the Clock Setting mode; in this case, please follow
the above procedure starting from step No.2.
77
en
hotpoint.co.uk

This function allows to start the Microwave function
at maximum power (800 watt) for 30 seconds, simply
pressing the Jet Start button. It is suggested for quick
reheating of food with a high water content such as
clear soups, coffee or tea.
1.Press the Jet Start Button.
Pressing the Jet Start button the Microwave
function will start at maximum microwave
power (800 Watt) for 30 seconds.
Each additional pressing will increase the cooking
time of 30 seconds.
If you have already selected a cooking function (e.g.:
Grill), press Jet Start to start the selected function.
JET START
•Itispossibletochangethepowerlevelandthe
duration time even after the cooking process
has been already started. To adjust the power level,
simply press the Microwave button repeatedly. To
change the duration time, please press the Plus/
Minus buttons, or press the Jet Start button to
increase the duration time of 30 seconds.
Microwave function allows to quickly cook or re-
heat food and beverages.
1. Press the Microwave button. The maximum
power level (800 W) will be shown on the
display and the watt icons starts blinking.
2. Press Plus/Minus buttons to set the power.
3. PresstheOKbuttontoconrm.
4. Press Plus/Minus buttons to set the cooking
time.
5. Press the OK/Jet Start button. The function
will start.
MICROWAVE
AUTO CLEAN
BEFORE STARTING THE CYCLE:
1. Put 235ml water into a container (see our
recommendations in the below section).
2. Place the container directly on the
middle of Glass Turntable.
TO START THE CYCLE:
3. Press the Auto Clean button,the cleaning cycle
duration will be visible on the display.
4. Press the Jet Start button to start the function.
WHEN THE CYCLET IS FINISHED,a beep will signal once
every 10 seconds for 10 minutes when the cleaning cycle
is finished.
5. Press the Stop button or open the door to cancel
the signal.
6. Remove the container.
7. Use a soft cloth or a paper towel with mild
detergent to clean the interior surfaces.
•For a better cleaning result,it is recom-
mended to use a container with a diameter of
17- 20cm, and a height that is lower than 6.5cm.
•Itisrecommendedtouseacontaineroflightplas-
tic material that is suitable for the microwave.
•Asthecontainerwillbehotafterthecleaningcy-
cle is complete, it is recommended to use a heat re-
sistant glove when removing the container from the
microwave.
•Forabettercleaningeffectandremovalofun-
pleasant odors, add some lemon juice to the water.
•TheGrillelementdoesnotneedcleaningsince
the intense heat will burn off any splashes, but the
ceiling beneath it may need regular cleaning. This
should be done with a soft and damp cloth with mild
detergent.
•IftheGrillisnotusedregularly,itshouldberunfor
10 minutes a month to burn off any splashes, in or-
der to reduce the risk of fire.
This automatic cleaning cycle will help you to to clean
the microwave oven cavity and to remove unpleas-
ant odors.
Once the cooking process has been started:
- To adjust the power: press the Microwave button
then press the Plus/Minus button to adjust the value.
- To increase time/decrease time: press the Plus/Mi-
nus buttons, or press Jet Start button to increase the
cooking time of 30 seconds.
88
en
hotpoint.co.uk

POWER SUGGESTED USE:
800 W Reheating of beverages, water, clear soups, coffee, tea or other food with a high water content. If
the food contains egg or cream choose a lower power.
650 W Cooking of sh, meat, vegetables etc.
500 W More careful cooking e.g. high protein sauces, cheese and egg dishes and to nish cooking
casseroles.
350 W Simmering stews, melting butter.
160 W Defrosting.
90 W Softening ice cream, butter and cheeses. keep warming.
This function uses a powerful quartz grill to brown
foods, creating a grill or a gratin effect.
Grill function allows to brown foods like cheese toast,
hot sandwiches, potato croquettes, sausages, veg-
etables.
1. Press the Grill button.
2. Press Plus/Minus buttons to set the cooking
time.
3. Press the OK/Jet Start button. The function
will start.
GRILL
•Forfoodlikecheese,toast,steaksandsau-
sages, place food on the high Wire Rack.
•Ensurethattheutensilsused are heat resistant when
you use this function.
•Do notuse plasticutensils when grilling. They will
melt. Items of wood or paper are not suitable either.
•Becareful,nottotouchtheceilingbeneaththegrill
element.
This function combines Microwave and Grill heating,
allowing you to cook gratin in less time.
1. Press the Combi Grill button.
2. Press Plus/Minus buttons to set the Microwave
power (see the table below).
3. Press the OK button to confirm.
4. Press Plus/Minus buttons to set the cooking
time.
5. Press the OK/Jet Start button. The function will
start.
Once the cooking process has been started:
- To adjust the power: press the Microwave button
then press the Plus/Minus button to adjust the val-
COMBI GRILL
• Do not leave the oven door open for long
periods when the Grill is in operation, as this
will cause a drop in temperature.
•Ifyoucooklargegratinswhichrequirestoppedturn-
table rotation, then turn the dish after approximately
half the cooking time. This is necessary for getting
colour on the whole top surface.
•Ensurethattheutensilsused are microwave safe and
heat resistant when you use this function.
•Do notuse plasticutensils when grilling. They will
melt. Items of wood or paper are not suitable either.
•Becareful,nottotouchtheceilingbeneaththegrill
element.
•Ifyoucooklargefoodsuchaspoultry,pleaseuse
microwave and oven safe dish, put the dish on turn-
table directly.
POWER LEVEL SUGGESTED USE:
650 W Vegetables
500 W Poultry
350 W Fish
160 W Meat
90 W Gratined Fruit
ue.
- To increase time/decrease time: press the Plus/Mi-
nus buttons, or press Jet Start button to increase
the cooking time of 30 seconds.
99
en
hotpoint.co.uk

CRISP
This exclusive Whirlpool function allows for
perfectly golden brown results both on the top and
bottom surfaces of the food. Using both Microwave
and Grill cooking, the Crisp Plate will rapidly reach
the right temperature and begin to brown and crisp
the food.
The following accessories are designed to be
used with the Crisp function:
- the Crisp Plate
- the Crisp Handle to manage the hot Crisp Plate.
Use this function to reheat and cook pizzas,
quiches, and other dough based food. It is also
good for frying bacon and eggs, sausages,
potatoes, french fries, hamburgers and other
meats etc. without adding oil (or by adding only a
very limited quantity of oil).
1. Press the Crisp button.
2. Press Plus/Minus buttons to set the cooking
time.
3. Press the OK/Jet Start button. The function
will start.
Use only the provided Crisp Plate with this func-
tion. Other available Crisp Plates on the market will
not give the correct result when using this function.
•Ensurethat the Crisp Plate is correctly
placed in the middle of the Glass Turntable.
•TheovenandtheCrispPlatebecome very hot
when using this function.
•DonotplacethehotCrispPlateon any surface
susceptible to heat.
•Becareful,nottotouchtheceilingbeneaththe
Grill element.
•UseovenmittensortheCrispHandlewhenre-
moving the hot Crisp Plate.
•Beforecookingfoodthatdoesnotrequirea
long cooking time (pizza, cakes…), we recom-
mend to pre-heat the Crisp Plate 2-3 minutes in
advance.
BREAD DEFROST
This exclusive Whirlpool function allows you to
defrost frozen bread.
Combining both Defrost and Crisp technologies,
your bread will taste and feel as if it were fresh-
ly baked.
Use this function to quickly defrost and heat fro-
zen rolls, baguettes & croissants.
Bread Defrost can be used if the net weight is be-
tween 50g-500g.
The following accessories must be used with this
function:
- the Crisp Plate
- the Crisp Handle to manage the hot Crisp Plate.
1. Press the Bread Defrost button.
2. Press Plus/Minus buttons to select the
weight.
3. Place the empty Crisp Plate on the Glass
Turntable, close the door and press the OK/
Jet Start button. The display will show “PRE
HEAT” and the oven will use Microwaves
and Grill in order to preheat the Crisp Plate.
When the temperature will be reached, a
message (“ADD”) will inform you that you
can add your bread.
4. Place your bread on the Crisp Plate, close
the door and press the OK/Jet Start button.
The function will start.
•Ensurethat the Crisp Plate is correctly
placed in the middle of the Glass Turntable.
•TheovenandtheCrispPlatebecome very hot
when using this function.
•DonotplacethehotCrispPlateon any surface
susceptible to heat.
•UseovenmittensortheCrispHandlewhenre-
moving the hot Crisp Plate.
• Only use the provided Crisp Plate with this
function. Other available Crisp Plates on
the market will not give the correct result
when using this function.
•Fordetailsrequestedtoadd/stir/turnfood,
see table in page 7.
1010
en
hotpoint.co.uk

This function allows you to quickly defrost food
automatically.
Use this function to defrost Meat, Poultry, Fish,
Vegetables and Bread.
1. Press the Jet Defrost Menu button.
2. Press the Plus/Minus buttons to set the food
type (see the below table) and press the OK
button to confirm.
3. Press Plus/Minus buttons to set the food
weight.
4. Press the OK/Jet Start button. The defrost-
ing cycle will start. The duration of the func-
tion will be automatically calculated on the
basis of the selected food and weight.
JET DEFROST MENU
FOOD TYPE WEIGHT SUGGESTED USE
p 1 Minced
meat 100g - 2000g Minced meat,cutlets, steaks or roasts.
After cooking, allow food to rest for at least 5 minutes for better results.
p 2 Poultry 100g - 2500g Whole chicken, pieces or fillets.
After cooking, allow food to rest for 5-10 minutes for better results.
p 3 Fish 100g - 1500g Whole, steaks or fillets.
When finish cooking, allow food to rest for 5 minutes for better results.
p 4 Vegetables 100g - 1500g Larger, medium and small cut vegetables.
Before serving, allow food to rest for 3-5 minutes for better results.
p 5 Bread
(standard) 100g - 550g Frozen rolls, baguettes & croissants.
Allow food to rest for 5 minutes for better results.
p 6
Bread
Defrost*
(using
Crisp
Plate)
50g- 500g
The exclusive Whirlpool function to defrost frozen bread. Combining both Defrost
and Crisp technologies, your bread will taste and feel as if it were freshly baked.
Use this function to quickly defrost and heat frozen rolls, baguettes & croissants.
Place the empty Crisp Plate on the Glass Turntable, close the door, then select
the Bread Defrost program, set the bread weight and press the OK button.
The display will show “PRE HEAT” and the oven will use Microwaves and Grill
in order to preheat the Crisp Plate. When the temperature will be reached, a
message (“ADD”) will inform you that you can add your bread.
Place your bread on the Crisp Plate, close the door and press the Jet Start
button. The function will start, turn food when oven prompts.
• Arrange the thicker, denser food to the center
of the plate and the thinner or less dense food
the outside of the plate. Place thin slices of meat on top
of each other or interlace them.
• For food not listed in this table and if the weight
is less or more than recommended weight, you
should choose manual function with lower micro-
wave power (like microwave 160W).
• Due to food variability, the cooking duration is set on
an average shape, we always recommend to check
the internal doneness of food and in case prolong the
cooking time to achieve proper doneness.
• Waiting 1-2 minutes before serving the reheated food
will improve the results, especially for frozen food.
• Plastic foil should be scored or pricked with a fork, to
relieve the pressure and to prevent bursting, as steam
builds-up during cooking.
• Place food onto a microwave safe and heatproof din-
ner plate or dish.
In order to achieve the best possible results the
product will ask you to turn/stir the food when nee-
ded. See “Add / Stir/ Turn food” chapter on page 7.
1111
en
hotpoint.co.uk

1. Press the Jet Reheat Menu button.
2. Press the Plus/Minus buttons to set the food
class (see the below table) and press the
OK button to confirm.
3. Press Plus/Minus buttons to set the food
weight.
4. Press the OK/Jet Start button. The reheating
cycle will start. The duration of the function
will be automatically calculated on the basis
of the selected food and weight.
Note: after a certain time, the display could ask
you to add / stir / turn the food for a better reheat.
See “Add / Stir / Turn food” chapter on page 7.
This function allows you to automatically reheat
your dishes.
Use this function to reheat: soup, sauce, chilled
pizza, plated meal, beverage.
JET REHEAT MENU •Arrange the thicker, denser food to the
center of the plate and the thinner or less
dense food the outside of the plate.
•Placethinslicesofmeatontopofeachotheror
interlace them.
•Duetofoodvariability,thecookingduration
is set on an average shape, we always recom-
mend to check the internal doneness of food and
in case prolong the cooking time to achieve prop-
er doneness.
•Waiting1-2minutesbeforeservingthereheat-
ed food will improve the results, especially for
frozen food.
•Plasticfoilshouldbescoredorprickedwitha
fork, to relieve the pressure and to prevent burst-
ing, as steam builds-up during cooking.
•Placefoodontoamicrowavesafeandheat-
proof dinner plate or dish.
FOOD TYPE WEIGHT HINT
p 1 Soup 250 - 1000g
Cover the dish, leaving an air ventilation.
Stir the food when prompted by the microwave.
Allow to rest for 3 minutes before serving.
p 2 Sauce 250 - 1000g
Cover the dish, leaving an air ventilation.
Stir the food when prompted by the microwave.
Allow to rest for 3 minutes before serving.
p 3 Chilled pizza 200 - 600g
Remove the pizza from the package, arrange the pizza on a mi-
crowave safe dish.
Stacking multiple pizzas is not recommended.
p 4 Dinner plate 250 - 350g Cover the dish, leaving an air ventilation. Allow to rest for 3 min-
utes before serving.
p 5 Beverage 150ml - 600ml Put a metal spoon in the cup to prevent over cooking.
1212
en
hotpoint.co.uk

RECIPE INITIAL
STATE
WEIGHT
AMOUNT
DURATION
PREPARATION
q
Popcorn
Room
temperature 100g3min Place bag on turntable. Only pop one bag at a time.
w
Rice Mixed
Frozen 300-650g 6 -11min Remove the food package. Put the food in a microwave safe dish,
stir the rice when oven prompts
e
Pasta Mixed
Frozen 250-550g 5-10min Remove the food package, Put the food in a microwave safe dish,
stir the food when oven prompts
r
Mixed Vegetables Frozen 150-600g 4-12min Put the food in a microwave safe dish, Add 2 tablespoons water to
food. Stir the food when oven prompts
t
Frozen Lasagna Frozen 300-600g 14-18min Remove any aluminum foil, put food in a microwave and oven safe
dish, then put in the oven.
y
Buffalo wings /
Chicken nuggets
Frozen 250-500g 8-12min Remove package.Put food in the Crisp Plate. Turn food when
oven prompts
u
French fries
Frozen 250-500g 10-22min Put the food into Crisp Plate. Stir food when oven prompts
i
Frozen Pizza Frozen 250-750g 7-12min Remove package, put food in the Crisp Plate.
o
Quiche
Room
temperature 950g 19min
Prepare the ready made pastry 370g, line the Crisp Plate with the
pastry. Prick it. Put it in the oven and preheat the plate. Prepare
the stuffing: 4 eggs ,150ml crème fraiche, 100g diced bacon, 130g
(3½dl) grated cheese (Gruyere or similar) , black pepper and
ground nutmeg for season. Mix all the ingredients. When oven
prompts, add the stuffing, Place back into the oven and continue
the cooking.
a
Breaded fish/
Fish sticks
Frozen 250-500g 8-11min Lightly grease the Crisp Plate. Add food when Crisp Plate is pre-
heated. Turn food when oven prompts.
s
Cordon Bleu/
Chicken Cutlets
Frozen 100-400g 5-11min Lightly grease the Crisp Plate. Add food when Crisp Plate is pre-
heated. Turn food when oven prompts.
A selection of automatic recipes with pre-set cook-
ing parameters values to offer optimal cooking re-
sults.
1. Press the Chef Menu button.
2. Press and hold Plus/Minus buttons to select
the food type (see the below table).
3. Press the OK button to confirm.
4. Depending on the food class, the display could
ask you to set the Weight. Use the Plus/Minus
buttons to set the asked values.
5. Press the OK/Jet Start button. The function will
start.
CHEF MENU
•For large amounts/pieces of food like
roasts and oven baked fish a standing time
of 8 - 10 minutes is recommended.
•For food like vegetables, hot dogs and steamed
fish recommended standing time is 2 - 3 minutes.
•For details requested to add/stir/turn food, see
table in page 7.
The duration of the function will be automatical-
ly calculated on the basis of the selected ofod
and weight.
1313
en
hotpoint.co.uk

TECHNICAL SPECIFICATION
Supply Voltage
240 V/50 Hz
Rated Input Power 1750 W
Outer dimensions (HxWxD) 310X 520 X 390
Inner dimensions (HxWxD)
222 X336 X331
Recycling and Disposal Informa-
tion
As part of Hotpoint’s continued commitment to
helping the environment, Hotpoint reserves the
right to use quality, recycled components to keep
down customer costs and minimise material
wastage.
Please dispose of packaging and old products
carefully.
Register your new product and receive 1 addi-
tional year FREE!
AsanadditionalbenetofowningyourHotpoint
product, we are offering 1 years additional free
guarantee. To be eligible for this you will need to
contact us to register your product within 28 days
of purchase. If you do not register your appliance
within the 28 days you will still be entitled to 1
years manufacturer’s guarantee. Please refer to
thecerticateofguaranteeformoreinformation.
DISPOSAL OF OLD
ELECTRICAL APPLIANCES
The European Directive 2012/19/UE
on Waste Electrical and Electronic
Equipment (WEEE), requires that old
household electrical appliances must not
be disposed of in the normal unsorted
municipal waste stream.
Old appliances must be collected separa-
tely in order to optimise the recovery and
recycling of the materials they contain
and reduce the impact on human health and the
environment.
The crossed out “wheeled bin” symbol on the
product reminds you of your obligation, that when
you dispose of the appliance it must be separately
collected. Consumers should contact their local
authority or retailer for information concerning the
correct disposal of their old appliance.
FAVOURITE
The Favourite function provides you with an easy
way to quickly store and
recall a favourite cooking cycle.
•If some parameters (i.e.: type of food,
weight...) have not been selected when
the Favourite has been saved, the Favourite will
store the default value of the selected cooking
function.
•Fordetailsrequestedtostir/turnfood,see“Add
/ Stir / Turn food” chapter on page 7.
TO RECALL a Favourite:
1. Press the Favourite button.
TO SAVE a Favourite:
1. Select a cooking function and it’s parameters (e.g.:
watt, type of food, weight...) without starting the
cooking cycle.
2. Press and hold for a few seconds the Favou-
rite button.
3. A beep will be played and the function will
be stored.
Note: it is possible to replace an existing
Favourite with a new one,repeating the above
procedure.
Note: when the appliance is plugged in or after
a power failure, your Favourite function will be
reset to default value (i.e.: Microwave function,
800W, 2 minutes).
1414
en
hotpoint.co.uk

1515
en
hotpoint.co.uk

MWA 25 B
W10863442
Table of contents
Other Ariston Microwave Oven manuals