Aspenta Vectu User manual

OWNER’S MANUAL
PERSONAL EMERGENCY GPS LOCATOR

2
CONTENTS
CONTENTS OF THE PACKAGE.........................................................................................................................................3
SAFETY ...........................................................................................................................................................................3
GETTING STARTED .........................................................................................................................................................4
USING VECTU.................................................................................................................................................................7
myAspenta WEB/MOBILE APP.....................................................................................................................................10
GENERAL USAGE TIPS ..................................................................................................................................................15
SUPPORT......................................................................................................................................................................15
CARE AND PREVENTIVE MAINTENANCE......................................................................................................................15
LIMITED WARRANTY....................................................................................................................................................15
FCC COMPLIANCE ........................................................................................................................................................16
NOTICES.......................................................................................................................................................................16
A PRODUCT OF

3
CONTENTS OF THE PACKAGE
①
Vectu Personal Emergency GPS Locator with installed SIM card & integrated rechargeable
battery
②
Micro USB cable
③
Quick Start Guide
SAFETY
ELECTROMAGNETIC COMPATIBILITY
Magnetic fields in the vicinity of Vectu may cause disturbances in data transmission and should be avoided to
prevent malfunction or damage to the device.
NOTE –NATIONAL LAWS ON GPS TRACKING
You agree to use Vectu only for lawful purposes. Certain states/countries may have legislation which restricts the
GPS tracking of people, animals or objects. You are responsible for complying with all applicable federal, state and
local laws. If you are located outside of the United States, you are responsible for complying with the laws of your
country or legal jurisdiction with respect to your use of our Products and Services. Aspenta International bears no
responsibility or liability for any use of its Products or Services that may be unlawful in the United States or
elsewhere.
SAFETY ADVICE
When in a hospital or other health care facility, observe the restrictions on the use of mobile devices, such as
cellular phones. Do not operate this device where you are not able to operate your mobile / cellular phone.
THE BATTERY AND ITS USE
Vectu is powered by a rechargeable lithium ion battery. To prevent malfunction or damage, it is advisable to follow
these recommendations for the use of rechargeable batteries:
Do not remove or replace the original battery
To avoid irreparable damage to the battery and circuits, do not expose the device to heat sources.
DISPOSAL
Batteries are a source of pollution. When you decide to dispose of Vectu, seek advice from your local electronics
recycling authority.
TEMPERATURES
While charging, Vectu should not be exposed to temperatures below 0°C or above 45°C. During normal use, Vectu
should not be exposed to temperatures below -20°C/-4 F or above 55°C/131 F. Vectu should not be exposed to
direct sunlight for long periods, and should be stored at temperatures between -20°C/-4 F and 55°C/131 F.
Hello!
Thank you for purchasing the Vectu Personal Emergency GPS Locator.
Before using your device for the first time, read this owner’s manual carefully and retain it for future
reference.

4
GETTING STARTED
Vectu® Personal Emergency GPS Locator is designed for families and caregivers looking for an effective and
affordable way to stay connected with their loved ones. It will never transmit nor record location unless help
button is pushed - it will then send an alert to predefined contacts predefined in myAspenta app and transmit
location updates every minute. GPS-enabled Vectu also uses GSM cellular networks to report whereabouts and
allows you to keep track of your loved ones anywhere in the world, where GSM cellular reception exists (excluded
Japan, S. Korea and N. Korea).
We deliver Vectu with an installed SIM card and first years’ service fee included – no service contract
required, no roaming charges, no activation fee.
CHARGE
①
Plug the micro USB cable to the device and connect it to USB port or an electrical outlet using AC adapter.
②
Status light blinks rapidly red indicating to slide the power switch to the ON position. Within 15 seconds
status light will blink yellow indicating charging.
③
Charge until status light turns solid yellow.
For best results it is preferable to charge Vectu from a normal socket rather than connection to a PC. You will need
to charge Vectu for at least 1 hour from a normal socket prior to first use.
Note: The device will not charge if the power switch is in OFF position –status light blinks red rapidly. If the battery
is completely drained, allow few minutes for the status light to turn on.
DOWNLOAD APP OR ACCESS ONLINE
①
Download and install free myAspenta mobile app, or visit myAspenta online at myAspenta.com.
If you already have myAspenta account, simply login with your username/email address and password.
myAspenta lets you locate and manage multiple devices from a single account, whether yours or shared
with you. You may also share your device with other myAspenta users.

5
For Android 2.3 and higher
Go to Google Play, search for myAspenta and follow the instructions.
For iOS 7.0 and higher
Go to App Store, search for myAspenta and follow the instructions.
For other smartphones and computers access online
Go to myAspenta.com.
②
If you need to create a new account, you will be asked to enter your
• First and Last Name
• Email Address and Mobile Phone Number (where device notifications will be sent)
• and create username and password which you will use to login
For your security, establishing myAspenta account is a two-step process, requiring verification of your email
address. Your account is not complete until you click on the link provided in the verification email.
ACTIVATE
①
Access the myAspenta app you just downloaded or the
myAspenta.com online portal and login.
②
Select the ‘+’ button to add a Vectu device.
③
Add Vectu by typing 12 characters
serial number provided on the back
of the device. Choose device name
and select ‘next’.
If you are using myAspenta mobile
app you may also add Vectu via
Bluetooth*. To do so make sure
that Bluetooth feature on your
phone is enabled and the device power switch is in the ON
position. Double click the help button - status light will blink
white indicating Bluetooth activity.
*The Bluetooth feature will only work with
smartphones that support Bluetooth 4.0 and are
running Android 4.3/iOS 7.0 and higher

6
④
You may designate up to four phone numbers and four
email addresses to receive notifications.
By default notifications will be also sent to the email
address and phone number specified during myAspenta
account creation. Visit your account settings to update
notification and contact settings.
⑤
You may also share Vectu with friends and family having
myAspenta account. To do so, simply type username or
email address of the user you wish to share your device
with.
myAspenta users you have shared Vectu with will be able
to view device location, reports and receive in-app
notifications.
INITIAL SYSTEM TEST
Perform an initial system test to evaluate operational condition of the device and readiness of those you’ve chosen
to receive notifications.
①
Make sure that the power switch is in ON position
②
Press and hold the help button for two seconds - status light will turn blue and blink red afterwards as
Vectu goes through network registration process. Once location is acquired the status light will turn off.
③
Wait until status light blinks blue five times indicating that the help alert was successfully delivered to
the server (if the status light doesn’t blink blue in 60 seconds, repeat step 2).
④
Verify that the help alert was received by you and designated contacts (if any).
⑤
Log onto myAspenta account and verify that you can view device location on the map along with last
seen date/time.
⑥
You can also view your notifications history via myAspenta web or mobile app.
It is advisable to carry out initial system test in a completely open space, with the help button facing upwards. If
the status light blinks red for more than 5 minutes, switch the device off and on and repeat above steps.
Vectu uses GPS and GSM technology to determine its location. If the device is indoors or if the GPS signal is
not strong enough, the GPS location data may not be received. In that case the device location will be based
on the cellular network signal (GSM location), this location is not accurate, but rather an approximation of
the device location. If GPS signal is not available, shaded circle around the marker on the map represents
accuracy of the location.

7
USING VECTU
In order to protect your privacy, Vectu reports location ONLY when the help alert was initiated. It will
then enter tracking mode and transmit location updates every 60 seconds until the device is switched
off or the battery is drained.
TURN VECTU ON/OFF
To turn the device ON, slide the switch to the ON position and briefly press the help button. If the device has
successfully been turned ON, the status will blink yellow for 5 seconds indicating battery level (see ‘Checking
Battery Level’ section below for details). The status light turns off when the device enters standby mode and is
ready to use.
To turn the device OFF, slide the switch to the position OFF (when device is turned OFF it cannot send or receive
communications).
SENDING HELP ALERT OR CHECK-IN
To check-in or to ask for help from friends and family in critical situation
①
Press and hold the help button for two seconds - status light will turn blue and blink red afterwards as
Vectu goes through network registration process. Once location is acquired the status light will turn off.
②
Wait until status light blinks blue five times indicating that the help alert was successfully delivered to the
server (if the status light doesn’t blink blue after 60 seconds, repeat step 1).
Device owner and designated email addresses/phone numbers (if any) will receive a notification with a link to view
the location using Google Maps. The device will also start reporting location every 60 seconds.
MONITORING THE DEVICE STATUS
Status Light
Event
Solid Yellow*
Fully charged
Blinks Yellow once/second*
Charging (35% full or less)
Blinks Yellow twice/second*
Charging (35%-65% full)
Blinks Yellow three times/second*
Charging (65% full or better)
Solid Red
Low Battery
Blinks Red slowly
Connecting to network
Blinks Red rapidly**
Not charging (slide the power switch to ON
position to initiate charging)
Solid blue for 5 seconds
Help alert initiated
Blinks Blue 5 times
Help alert delivered to server
Blinks White
Bluetooth ON
Solid White
Firmware update in progress (Bluetooth ON)
*Device is connected to external power source in standby mode **Device is connected to external power
After initiating help alert, the status light will blink red until it connects to the network and gives an estimated
position. In the complete absence of a signal, the status light will blink red continuously.

8
CHECKING BATTERY LEVEL
To check the battery level when the device is not connected to external power, briefly press the help button and
observe the status light.
• blinks yellow once/second - 35% full or less
• blinks yellow twice/second - 35%-65% full
• blinks yellow three times/second - 65% full or better
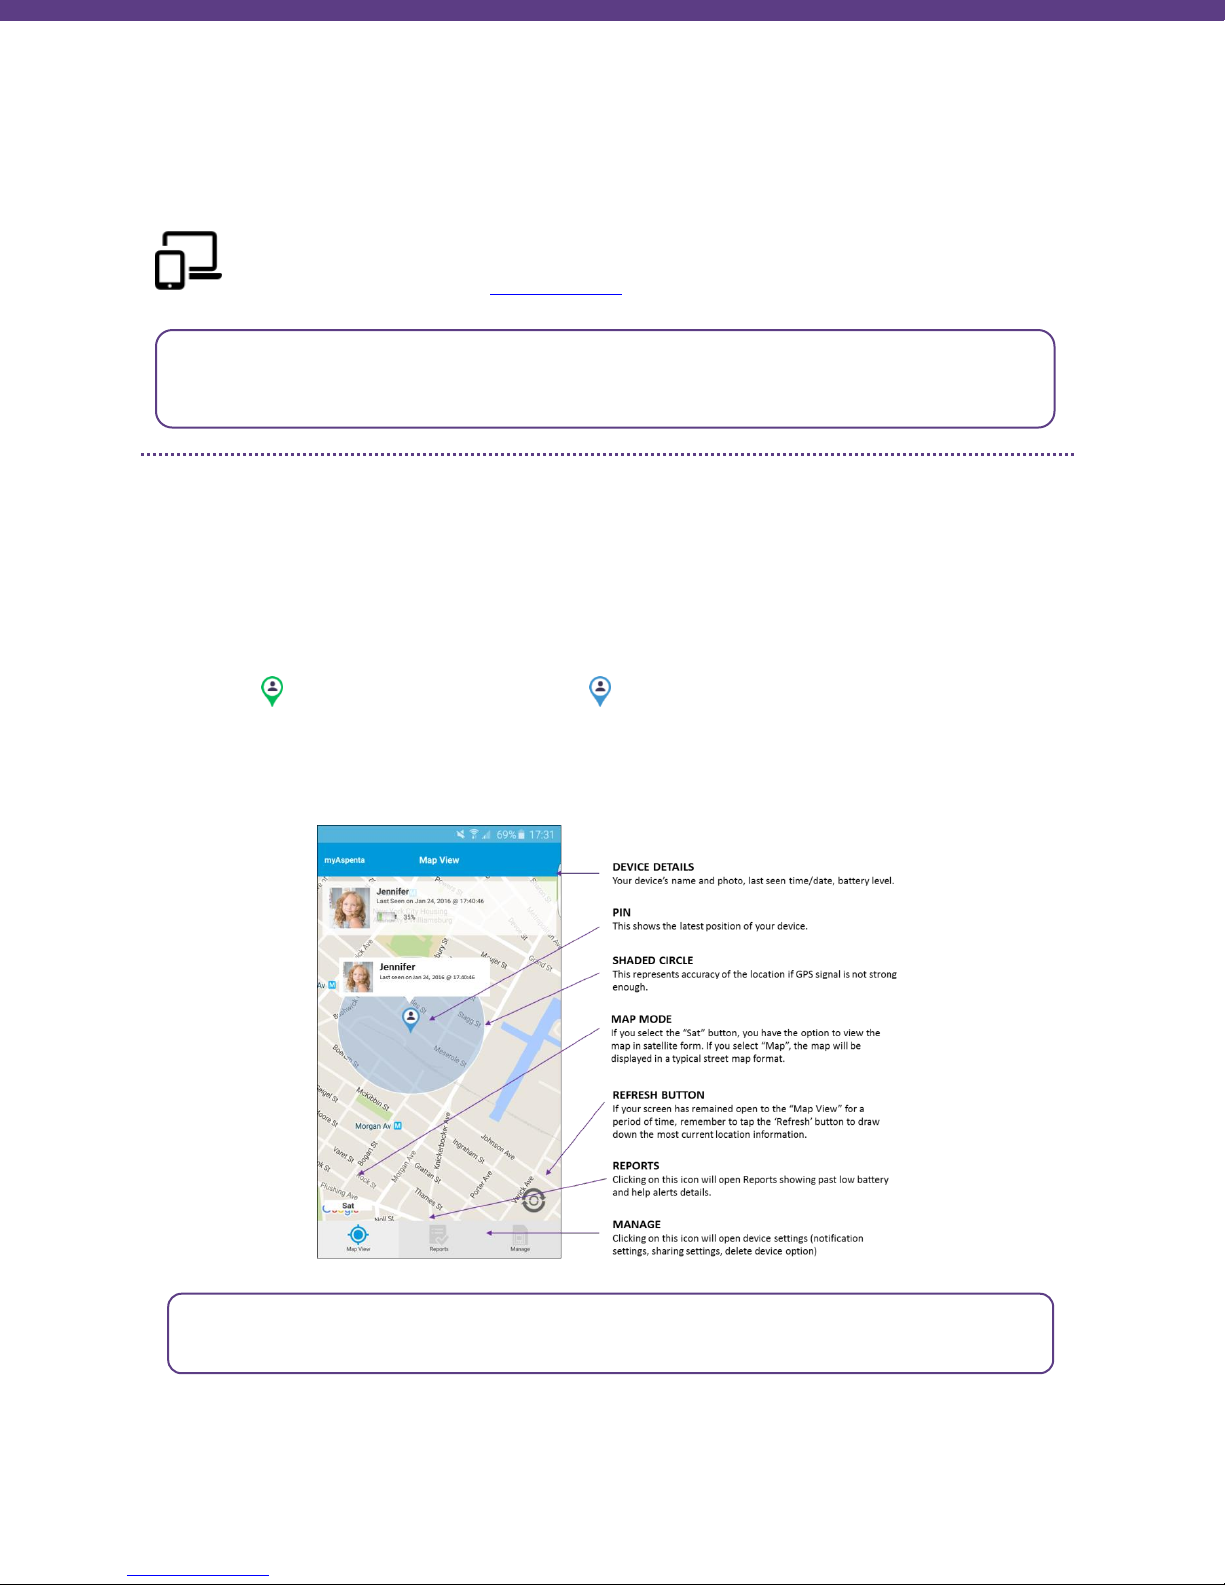
You may also view battery level using myAspenta app, it is updated regularly once the help button is pushed.
Status light will turn solid red when the battery level is under 15%.
NOTIFICATIONS
Notifications let device owner and pre-defined contacts know of an event experienced by the device –those
depending on your settings can be delivered by SMS, email and in-app notification. myAspenta users with whom
you have shared your device will automatically receive in-app notifications.
Help Alert - when the help button is pressed for two seconds or more, alert recipients will be notified that
the device user needs assistance.
Low Battery Alert - low power notification when the battery life drops below 15% in TRACKING MODE.
BATTERY LIFE
Battery operated devices require the user to achieve a balance between battery life and performance. There is,
however, a direct and inverse relationship between the frequency of updates and the overall battery life, with
more frequent updates resulting in a shorter battery life. Many factors affect battery life. These factors include,
but are not limited to: region (rural or suburban), proximity to cell towers, indoor use versus outdoor use, cell
phone inhibitors placed in public areas such as schools, areas next to military bases, etc.
When your Vectu locator indicates low battery (status light is red), recharge your battery as defined in the previous
section titled “Getting Started”.
FIRMWARE UPDATES
To help keep Vectu up-to-date, firmware updates happen periodically and can be performed ONLY through the
myAspenta mobile app. Firmware update feature will only work with smartphones that support Bluetooth 4.0 and
are running Android 4.3/iOS 7.0 and higher. You will receive in-app notification once firmware update is available.
Follow below outlined steps in order to update your device’s firmware.
Mode
Battery Life
Standby
Up to 336 hours
Tracking
Up to 3 hours of continuous location updates
Low battery alert is also sent when the device is in STANDBY MODE and the battery life drops below 55%,
45% and 35%.

9
①
Enable Bluetooth on your phone. Tap “More” button in the
Home view and select “Firmware Update”. Number in the
brackets indicates that new firmware is available.
②
Select desired device and tap “Ready for download” to
download the firmware. Once completed you will see
‘Ready for Install” note. Tap again on the device image to
proceed.
③
Enable Bluetooth on your device by double clicking the help
button. Tap “VectuPEL” in myAspenta app to initiate
firmware update (it might take up to one minute for the
device to appear on the list).
④
Once completed perform INITIAL SYSTEM TEST (page 6) to
verify firmware update.
SUBSCRIPTION RENEWAL
Vectu comes with first years’ service fee included. Service fee is required after the first year. You will receive
reminder email & in-app notifications prior subscription expiry. To renew your subscription:
myAspenta web app: go to “User Settings” and select “Subscriptions”
myAspenta mobile app: select “Subscriptions” from the main app menu
In case subscription has expired the device will be deactivated and cease to function. It is your responsibility to
ensure that the subscription is renewed.

10
myAspenta WEB/MOBILE APP
In this section you will find information needed to start using the myAspenta app. In the following
pages you will find two sub-sections: one for myAspenta mobile app (Android, iOS), the other for a
web platform accessed from myAspenta.com.
MOBILE APP
MAP VIEW
When you open myAspenta app and select your device, you will immediately go to the map view:
IF HELP ALERT WAS INITIATED you will see current/last seen position of the device - location will be
automatically updated every 60 seconds until battery is completely drained of the device is switched off.
IF DEVICE IS IN STANDBY MODE you will see last known location.
Green marker represents GPS location, blue marker represent GSM location (location based on the GSM
triangulation, this location is not accurate, but rather an approximation of the device location).
Note: If the device was never used you will see a note “Location information not available”. You will need to
perform initial system test to view location on a map –see Page 6.
The first time you log into the myAspenta web or mobile app, you will be directed to the “Home” page. It
is recommended that you go directly to the “User Settings” to complete User Preferences –time zone,
measurement units and notification preferences.
You can view more than one device at a time in MAP VIEW by simply taping device details box at the
top of the screen and selecting desired devices.

11
REPORTS
To view reports, go to the “Reports” tab. You may display following records: power and battery alerts, help alerts.
Choose desired date and report type to view the details. You may select any record and the location of the device
at given time will be displayed on the map.
We retain historical information for past 90 days.
MANAGE DEVICE
Users you share your device with cannot modify device notification or sharing settings. Those users are able to
remove themselves from viewing shared device at any time.

12
WEB APP
MAP VIEW
When you open myAspenta app and select your device, you will immediately go to the map view:
IF HELP ALERT WAS INITIATED you will see current/last seen position of the device - location will be
automatically updated every 60 seconds until battery is completely drained of the device is switched off.
IF DEVICE IS IN STANDBY MODE you will see last known location.
Green marker represents GPS location, blue marker represent GSM location (location based on the GSM
triangulation, this location is not accurate, but rather an approximation of the device location).
Note: If the device was never used you will see a note “Location information not available”. You will need to
perform initial system test to view location on a map –see Page 6.
REPORTS
To display the report details, click the “Reports” button. The reports tab display following records: help alert, low
battery, location updates. Choose desired date and report type and click submit, you may select any record and
the location of the device at given time will be displayed on the map. We retain historical information for 90 days.
If you wish to maintain a record, print the report or save the downloaded file.

13
DEVICE INFORMATION
In order to change device name or upload a picture go to “Device Information” tab within “Manage” menu. You
may also delete the device. Deleting device removes permanently history and reports. You will no longer be able to
view device location or receive notifications.
SETTING UP NOTIFICATIONS RECIPIENTS
You can add additional trusted individuals to help monitor your Vectu Personal Emergency GPS Locator and receive
notifications -click “Manage” button and select “Notification Settings”. You can add up to four email addresses and
up to four phone numbers to receive notifications. Click “Save” button to save notification settings.
To edit notification settings, simply click the EDIT button located after the particular email address/phone
number. You may DELETE () particular email address/phone number at any time.
By default notification will be also send to the email address and phone number specified in your “Account
Information”. Visit “User Preferences” section to update notification preferences.

14
DEVICE SHARING
You may also share your device with your friends of family members. To access the sharing preferences go to the
device “Manage” view and select “Sharing Settings”. Type username or email address of the user you wish to share
your device with. Click “Save” button to save sharing preferences.
In case this person is not registered yet, you may send an invitation to join myAspenta. Once this individual creates
an account, you will be able to share your device.
You may stop sharing your device at any time by clicking the ‘x’ button. Users you have shared your device with
can also unshare the device.
Users you have shared your device with will be able to view device location, reports and receive in-app
notifications.

15
GENERAL USAGE TIPS
Vectu includes installed SIM card and works worldwide, anywhere GSM cellular reception exists
(excludes Japan, S. Korea and N. Korea).
GPS devices work by receiving satellite signals from the open sky. For optimal operating conditions, your Vectu
locator needs to be in clear, unobstructed view of the sky in order to have a line of sight to a group of satellites.
When placing the locator in an item such as a briefcase, luggage, or backpack, please ensure that there is no solid
material (e.g. metal objects) above or surrounding the locator which may block or weaken the signal it receives
from the sky. GPS satellites are in constant motion, rising and setting. Under certain conditions this means a
location position that was obtainable fifteen minutes ago in a specific location may not be obtainable in the next
try. In this instance there is no fault with the device. Please wait a while before trying to obtain a new location.
SUPPORT
If you have any questions or comments, please contact our Customer Care:
+1 888-497-1329 Monday through Friday, 8am - 4pm (PST), Closed on holidays
www.vectu.com/faq is updated regularly with answers to Frequently Asked Questions (FAQs)
CARE AND PREVENTIVE MAINTENANCE
Please review the Care and Preventive Maintenance section carefully.
This Product should be kept clean and dry at all times. Do not clean with liquid or aggressive solvents, but
rather a clean dry cloth.
This Products should only be stored and operated within the specified temperature range
Avoid leaving the Product in direct sunlight for extended periods of time.
To minimize the risk of damage, avoid dropping and operating in high-shock and high-vibration
environments
This Product uses an internal, non-user replaceable battery. Do not remove or attempt to remove this
non-user replaceable battery.
Replace chargers with worn or frayed cables.
You should only use Aspenta approved AC chargers and accessories for this Product.
REPAIRING OR MODIFYING YOUR DEVICE
Never attempt to repair or modify Vectu device, it does not contain any user‐serviceable parts. Attempting to
disassemble your device may cause damage that is not covered under the warranty. Service should only be
provided by Aspenta or an authorized Aspenta service provider.
LIMITED WARRANTY
This product is warranted to be free from defects in materials and workmanship under normal use for 12 months
(24 months for European Customers) from the date of purchase. For full details regarding the Limited
Warranty and warranty claim procedures, visit vectu.com/warranty.

16
EXCEPT AS PROVIDED ABOVE, THE PRODUCT IS SOLD “AS IS” WITHOUT ANY EXPRESS OR IMPLIED WARRANTIES
FOR THE PRODUCT WHATSOEVER, INCLUDING, WITHOUT LIMITATION, ANY IMPLIED WARRANTIES REGARDING
THE CONDITION, DESIGN, SPECIFICATIONS, WORKMANSHIP, MERCHANTABILITY OR FITNESS FOR A PARTICULAR
PURPOSE OF THE PRODUCT, OR ANY WARRANTIES THAT THE PRODUCT IS FREE FROM LATENT DEFECTS OR
DEFICIENCIES, OR THAT THE PRODUCT IS FREE FROM INFRINGEMENT OF ANY PATENT, TRADEMARK, COPYRIGHT
OR PROPRIETARY RIGHT OF ANY THIRD PARTY AND SUCH WARRANTIES ARE HEREBY EXPRESSLY DISCLAIMED.
THIS LIMITED WARRANTY PROVIDES THE SOLE AND EXCLUSIVE REMEDY FOR ANY DEFECTS IN THE PRODUCT. IN
NO EVENT SHALL WE BE LIABLE FOR ANY INDIRECT, CONSEQUENTIAL, SPECIAL, INCIDENTAL OR PUNITIVE
DAMAGES, WHETHER IN CONTRACT, TORT, NEGLIGENCE, STRICT LIABILITY OR OTHERWISE. OUR LIABILITY IS
LIMITED TO THE AMOUNT YOU PAID FOR THE PRODUCT THAT IS THE SUBJECT OF A CLAIM. THE APPLICABILITY OF
THE ABOVE LIMITATIONS AND EXCLUSIONS MAY VARY FROM STATE TO STATE, OR COUNTRY TO COUNTRY.
FCC COMPLIANCE
This device complies with part 15 of the FCC Rules. Operation is subject to the following two conditions: 1) This
device may not cause harmful interference, and 2) this device must accept any interference received, including
interference that may cause undesired operation. This device meets the FCC Radio Frequency Emission Guidelines
and is certified with the FCC as FCC ID number: 2ADTO-PST-001.
This Product generates, uses, and can radiate radio frequency energy and, if not used in accordance with the
instruction manual, may cause harmful interference to radio communications.
NOTICES
Information in this document is subject to change without notice. This document is provided “as is” and Aspenta
International Inc. (“Aspenta”) and its affiliated companies and partners assume no responsibility for any
typographical, technical or other inaccuracies in this document. Aspenta reserves the right to periodically change
information that is contained in this document. However, Aspenta makes no commitment to provide any such
changes, updates, enhancements or other additions to this document to you in a timely manner or at all. Visit the
Aspenta Web site (www.aspenta.com) for current updates and information concerning the use and operation of
this and other Aspenta Products.
The Service is provided at our discretion. We can modify or cancel it or take corrective action at any time without
prior notice and for any reason, including, but not limited to, installation of required updates to the service or
Aspenta Products or your violation of any of the Terms of Service. Aspenta may also change these Terms of Service
from time to time, which changes shall become effective upon posting to the Aspenta Web site. To stay up‐to‐
date, please make sure to check the Aspenta Web site.
Except as expressly provided herein, no part of this manual may be reproduced, copied, transmitted, disseminated,
downloaded, or stored in any storage medium, for any purpose without the express prior written consent of
Aspenta. Aspenta hereby grants permission to download a single copy of this manual onto some form of electronic
storage medium to be viewed and to print one copy of this manual or any revision hereto, provided that such
electronic or printed copy of this manual must contain the complete text of this copyright notice. Further, any
unauthorized commercial distribution of this manual or any revision hereto is strictly prohibited.
©2015 Aspenta International Inc. All rights reserved. Aspenta and Vectu are registered trademarks of Aspenta
International Inc. All other trademarks are property of their respective owners.

17
DECLARATION OF CONFORMITY FOR EUROPEAN CUSTOMERS
Hereby, Aspenta International, Inc. declares that this Product is in compliance with the essential requirements and
other relevant provisions of Directive 1995/5/EC. To view full Declaration of Conformity, visit www.vectu.com.
vectu.com
@myVectu
myVectu
Other manuals for Vectu
1
Table of contents
Other Aspenta GPS manuals