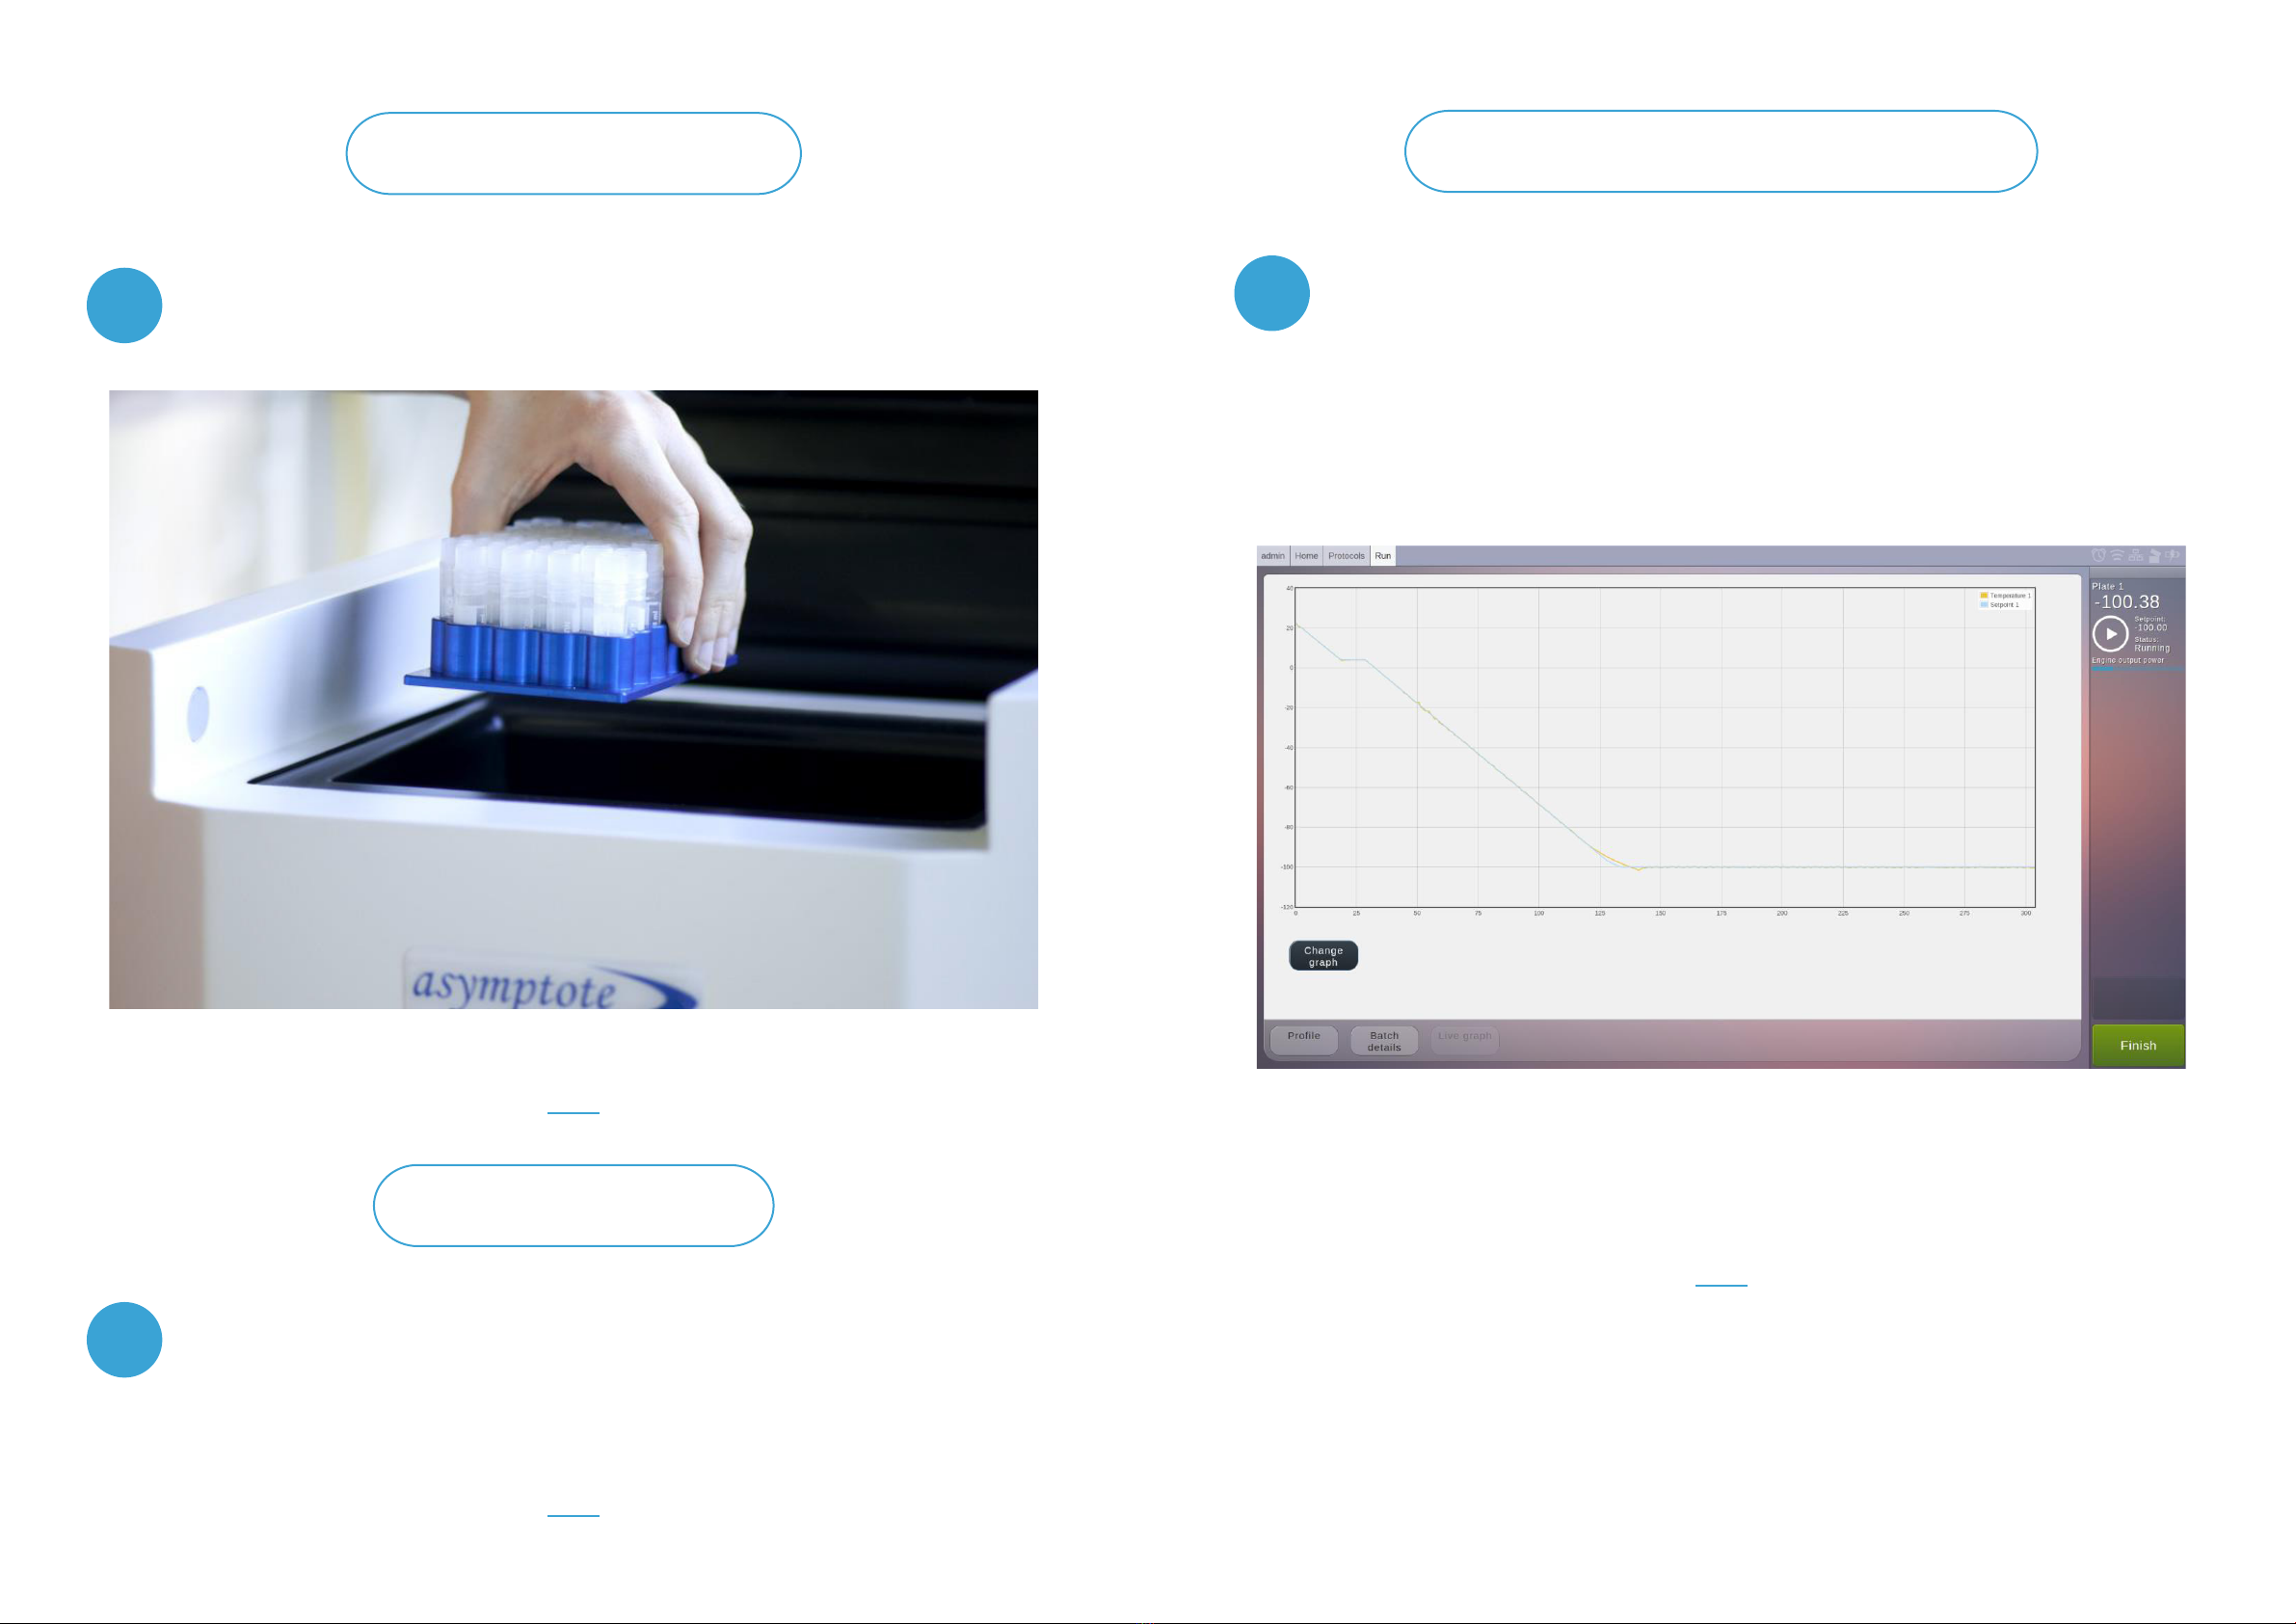
Asymptote VIA Freeze Series User manual

VIA Freeze
Quick start guide for the VIA Freeze controlled rate freezers

Version control Introduction
Version Date Authors Comments
1.0 1st July 2014 P Gyring
C Creasey
S Milne
Document creation
1.1 14th September 2014 C Creasey
M Bateman
Addition of unpacking
instructions
This is a quick start guide for the VIA Freeze controlled-rate freezer. The guide briey covers unpacking
and setting up the freezer, as well as the work ow normally required to run a freezing protocol and
examine the result. This work-ow can be summarized as follows:
1. Turn system on
2. Log in
3. Select a protocol to run
4. Entering batch data for the run
5. Load samples onto SBS plates
6. Load SBS plates into freezer compartment
7. Start run
8. Unload samples when freezer has reached end temperature
9. Leave the lid off to allow the system to dry out
10. Finish run
11. The system will switch on the internal heater to dry out the system, this will take
approximately 30mins and can be left unattended.
12. Examine and export recorded data from run
13. Go back to the main menu screen, see Figure 3, and either:
i) Log out and leave system switched on
ii) Shut down and when instructed by the system switch off and then unplug if
required
For in-depth descriptions of this and other functionality, please consult the full VIA Freeze manual.
In particular, the manual provides further detail about managing user accounts, customizing freezing
protocols, error handling and remote access, as well as GAMP (Good Automated Manufacturing
Practice) and FDA guidelines compliance.
Contents
Version control 2
Introduction 3
1. Unpacking and powering on 4
2. Switching on 7
3. Logging in to the system 9
4. The main menu 11
5. Selecting a protocol to run and entering batch data 12
6. Loading SBS plates 14
7. Starting a run 14
8. End of a run, unload and nish 15
9. Examine and export result 16
10. Logging out and shutting down 17
2 3

Unpacking and powering on
11.4
1.3
1.1 1.5
1.2 1.6
On receipt from the couriers check the
crate on all sides for damage and check any
shockwatch and tip and tell indicators to
see if the unit has been shocked or tipped
excessively during transit. If damaged take
photographs of damage and notify the
couriers as soon as possible, an insurance
claim may need to be made if the VIA
Freeze is actually damaged.
Remove all screws from the front panel.
Remove all screws from the top panel of
the crate, using Pozidrive PZ2 screwdriver.
Carefully remove front panel and place to
one side.
Carefully remove top panel and place to
one side.
Remove all screws from the back panel.
Carefully remove back panel and place to
one side.
Unpacking
4 5

1.8
2
1.7 1.11
1.9
2.1
1.10
While supporting the remaining panels,
remove all screws.
Remove the remaining panels and place to
one side. Please ensure the case contains
the following:
a. VIA Freeze system
b. Mains cable
c. Correct sample loading plates
(depends on system and your
order details)
d. Manual
e. Warranty card
With scissors, carefully pierce the foil and
cut along the seam. Pull the foil packaging
away from the VIA Freeze to avoid
accidentally scratching its surfaces
Slide the foil to the base of the unit.
Lift out of foil packaging and off the crate
base. We recommend two people lift the
VIA Freeze Duo (40kg/ 88lb) and VIA Freeze
Quad (64kg/ 141lb). We also recommend
that since the bespoke packaging crate is
designed for multiple use it is kept by the
user. This in the event that the unit needs
to be shipped in the future.
In the unlikely event that something
unforeseen has happened during shipping
we recommend performing a portable
appliance test for electrical safety before
plugging the unit into the electrical supply
outlet.
Switching the unit on and
validating basic operation
Unpack the power cable and plug into the
IEC socket at the back of the unit. Ensure
the system has 15cm (6”) clearance at the
rear for the fan inlets and electronics panel.
As the system vents warm air from the cryo-
chamber through the underside of the unit,
ensure the surface the system is placed on
is a rm surface free of obstruction. Do not
place on a fabric surface.
System VIA Freeze Research VIA Freeze Duo VIA Freeze Quad
Weight 14kg (31lb) 40kg (88lb) 64kg (141lb)
Table 1 VIA Freeze System weights
The freezer should be taken out from this box and placed either on the oor or on a suitable desk,
which is strong enough to carry the freezer in a safe manner (unit weights are shown in Table 1). For
the VIA Freeze Duo and Quad, we recommend having two or more persons available when moving
the system. If required, carrying straps can be afxed to the blue carrying handles to aid lifting and
transport of the unit. The VIA Freeze Research can be safely moved by a single person.
6 7

2.3 Wait for the system to boot up (this can take a minute or so) and you should be presented
with the startup login screen which indicated that the system has correctly booted up and
the temperature sensor on the top right hand side of the screen is reading approximately
room temperature or the temperature that the unit has been stored at.
2.2 Switch on the power switch.
Logging in to the system
3
When pressing a text input eld on the touch screen, an on-screen keyboard will appear,
see Figure 2. To log in, use this keyboard to enter your username and password in the
relevant elds, accept the eld as input, then press the ‘Log in’ button.
Two types of user accounts exist, ‘User’ and ‘Admin’, and you can log in as either from the
login screen. If you log in as an Admin, you will have access to certain system settings,
which a normal User account is not able to view. For the purposes of this document, it
does not matter which user type you log in as. Please consult the manual for the default
usernames/passwords.
Figure 2 An onscreen keyboard appears when entering text
3.1
8 9

Figure 3 The main menu, as it appears when logged in as an Admin user. ‘System Settings’
will not appear if logged in with a User rather than Admin account.
The main menu
The menu window is the main point of interaction and changes according to what menu is currently
selected. When changing menus, the navigation bar will update to show the current menu location.
The status column shows the current status of the system. You will be able to see the temperature
of the engine plate(s), the setpoint(s) (when running) that are being controlled to, the engine output
percentage(s) (zero when not running), and the mode the plates in. This data is all updated every few
seconds. The system modes most commonly encountered are
1. Standby The default mode, both engines and heaters are not powered
2. Running A controlled rate freeze protocol is running
3. Heating Heaters are on, this is used to drive away condensation after a protocol run and
quickly prepare for the next run
There are also two buttons at the bottom of the status column. On the main menu these are blank and
have no function. On other menus, and depending on state, these buttons will change and present you
with various options, such as navigating back to the parent menu, or starting/stopping a run.
In general the menu window is used to select a menu, whereas the two buttons on the status column
are used for navigating back (cancelling) and conrming actions.
The main menu, as shown below, has three main areas: The navigation bar along the top,
the status column on the right-hand side, and the menu window lls the remaining space.
The login is managed on a session basis, akin to when logging in to online banking. If this session
expires, you will be redirected back to the login menu, and you will have to log in again. A session
expires if left inactive for 15 minutes.
4
Navigation bar
Menu window Status column
3.2 If the login attempt failed, e.g. because the wrong password was entered, an error
message will be shown and the display will remain on the login menu. Otherwise, the
main menu will appear on the display, see Figure 3.
10 11

Selecting a protocol to run and entering batch data
The run protocol menu has three tabs, which can be accessed via buttons on the bottom.
The default is the protocol details tab; see Figure 5, which shows the protocol behaviour
in detail. If the protocol is suitable, press ‘Select protocol’ at the bottom of the status
column, which will change the menu window to the batch details tab, see Figure 6.
Figure 4 Select Protocol Menu
Figure 5 Run protocol menu, showing the protocol details tab. Use this to examine the
protocol and ensure it is the correct protocol to run.
Figure 6 Run protocol menu, batch details tab. Use this menu to enter details about the run,
such as name, barcodes and comments, before starting the run.
This changes the menu window to the select protocol menu, see Figure 4. Here you can
select one of the stored cooling protocols, whether they are pre-installed or customized
(see manual). Up to six protocols are shown at one time, and you can use the bottom
arrows to scroll and see more protocols. Select any protocol by pressing its icon. This
takes you to the run protocol menu.
5From the main menu, press ‘Select and Run Protocol’
5.1
On the batch details menu, it is necessary to enter a name for the run, and barcodes and
comments can optionally be added.
5.2
12 13

Loading SBS plates
Starting a run
End of a run, unload and finish
As shown in Figure 7, before proceeding, load your samples onto the SBS plates and
place the SBS plates in the cryo-compartment of the freezer. Then ensure the lid is
properly closed.
The system is now ready to be started, which is done by pressing ‘Start’ in the bottom
of the status column. The menu window will change to the live graph tab, and a graph
will be shown of the temperature, see Figure 8. The button ‘Change graph’ allows you to
swap between graphing the current temperature/setpoint, and the current rates of those
values, i.e. the cooling rates.
While the system is running the user is able to abort or hold the run, if desired, which is
explained in detail in the manual. However, the system can be safely left on its own until
the run is nished. At this point, the green button at bottom of the status column will
illuminate ‘Finish’, as in Illustration 7. The lid can now be opened and the SBS plates
removed. Once this is done, and the samples have been dealt with satisfactorily, press
‘Finish’. The Stirling engines will turn off, and the heaters come on for a set period of time.
Figure 7 Loading a SBS plate
Figure 8 Run protocol menu, live graph tab. When the system is running, this shows a graph
of current temperature or cooling rate, which updates in real-time.
6
7
8
14 15

Examine and export result
The report consists of two parts:
1. a pdf document that contains data about the result, including name, barcodes, comments,
user who started/nished the run, and graphs of temperature, setpoint and cooling rates.
2. a csv le which contains the raw temperature data logged during the run, and which is easily
imported into a spreadsheet e.g. Excel.
Please consult the manual for how to validate and digitally sign reports.
It is also possible to click any of the result items in the list. Doing so changes the menu window to the
result details menu. This menu is broadly similar to the run protocol menu and provides the same data,
but it is not possible to start a run from the result detail menu. It is however possible to add comments
to the result log, and it is also possible to examine graphs in more detail, see Figure 10.
This concludes the work ow required to run a protocol and view/export the result report.
Once a run has been completed, from the main menu press ‘Protocol Reports’ to enter
the result menu, see Figure 9. From this menu it is possible to export a result report.
Selecting a result item and pressing ‘Export’ will give you the choice of exporting a report
to USB or to an email address chosen by the user. The latter requires email functionality
to be set up, please consult the manual for this.
From the main menu, press ‘Log Out’ or ‘Shut Down’ to respectively log out of the system
or shut it down completely. If logged out, it is not possible for an unauthorized user to
make any further changes to the system. If shutting down, please wait until the screen
shows that a successful shut down has been completed and it is safe to switch off and
unplug the power cable.
Figure 9 Result menu. This menu displays a list of completed freezing protocols, and allows
the user to ex- amine the logged data in more detail.
Figure 10 Result detail menu. The graph of logged temperatures allows the user to examine
the result in more detail.
Logging out and shutting down
9
10
16 17
Other manuals for VIA Freeze Series
1
This manual suits for next models
3
Table of contents
Other Asymptote Freezer manuals