ATLANT 50Y88 User manual

OPERATION MANUAL
AUTOMATIC WASHING MACHINES
GEBRAUCHSANWEISUNG
VOLLAUTOMATISCHE
WASCHMASCHINEN
РУКОВОДСТВО ПО ЭКСПЛУАТАЦИИ
МАШИНЫ СТИРАЛЬНЫЕ
АВТОМАТИЧЕСКИЕ
50Y88
50Y108
60С88
60С108

3
Esteemed Customer,
The present Operation Manual describes technical features of the household automatic washing
machine (hereinafter referred to as “the Machine”) and gives necessary information on its operation
and helpful tips on how to make your laundry. Having carefully read the Operation Manual before
switching on and using the Machine, you will be able to operate it properly.
Be sure to keep the Operation Manual throughout the whole service life of your Machine.
1 GENERAL INFORMATION
The Machine is intended to launder textile items by using low-foaming washing powders and synthetic
detergents, and to rinse and spin them in the household conditions. All the operations with the items are
performed automatically according to the preset washing program.
The Machine is intended for operation in the household conditions (at home) only. Operating it for
industrial purposes (in restaurants, cafes, offices, kindergartens, hospitals, etc.) is forbidden.
The Machine should be operated at:
- ambient temperature of (25 ± 10) °C and maximum relative humidity of 75%;
- nominal voltage 220 - 230 V and frequency of (50 ± 1) Hz in single-phase AC electric mains.
- water pressure from 0,05 to 1 MPa in the water-supply system.
ATTENTION! Temperature drop in the room below 0°C may result in freezing of the water inside
the Machine and its failure.
The Machine is Class I electric shock protection device, therefore it must be connected to the electric
mains through a two-pole socket with a grounding contact and minimum current capacity of 16 A.
To install a socket with a grounding contact, address an entity authorized to carry out these works.
The protecting system in the filling hose stipulated in the machine depending on the model determines
the water leakage when the hose is damaged – water supply is terminated to the machine from the water
line, washing is stopped and a malfunction is shown on the display.
The basic technical characteristics of the Machine are listed in Table 1.
The manufacturer reserves the right to improve the design of the Machine and introduce its new versions
while keeping its basic specifications unchanged.
If transported at ambient temperature below 0°C, the Machine should stay for at least 24 hour at room
temperature before connecting to the electric mains.
ATTENTION! The manufacturer (seller) should not be made liable (including during the warran-
ty period) for any defects or damage arising due to violation of operation or storage conditions, or
resulting from force majeure circumstances (fire, natural calamity, etc.).
2 DESCRIPTION OF THE MACHINE
The basic parts of the Machine are shown in Fig. 1.
The control panel of laundry washer with notations of functions is shown in Fig. 2.
Switching the Machine on and program selection are made by turning the Wash Program Selector
Knob (Fig. 2).
With putting the button
(Fig. 2) the indicator on the button lights and the laundry washer runs
owing to chosen program.
The Machine has audio (sound) signalling. The audio signal accompanies the start and the end of the
Machine cycle, and also is heard at setting non-compatible functions and at accidental pressing of the button
during the Machine operation under the preset program.
The Machine has an electronic control system, which contributes to a uniform distribution of washed
items in the drum before every spin to avoid excessive vibration and noise.
The door has an anti-closing blocking in case of accidental switching the Machine on, for example,
by children.

4
5
Figure 1
PROGRAM SELECTION
Washing program is selected by the Selector (Knob), which turns in both directions – clockwise and
contraclockwise. Around the Selector on the Control Panel the names of the programs are written. The basic
parameters of the programs are specified in Table 4. The Selector is set exactly to the respective mark of the
selected program.
After setting the Wash Program Selector to the mark
, the Machine is switched off and the selected
program is cancelled.
OPTIONAL FUNCTIONS OF THE MACHINE
To select an optional function, press the button of the needed function – the respective indicator will
go on. After repeated pressing, the light indicator goes out, the function is off.
ATTENTION! When the selected function is incompatible with the set program, the indicator will
not go on and the function will not be off (three audio signals will be heard).
Figure 2 – Control Panel
START/PAUSE button
Wash program selector
Dispenser drawer
Figure 3
PRE-WASH
ADDITIONAL RINSE
STOP WITH WATER
LIGHT PRESS
PRE-WASH
WASHING
RINSING
RINSE HOLD
SPINNING
START/PAUSE button
Wash program stage indicators
Buttons of a choice of additional functions;
Indica-
tors of
additional
functions
Filet cap
Door
Gasket
Control panel
Dispenser drawer
Dispenser drawer
Drum
Drum
Table 1
Product fiche for household washing machines according to Delegated Regulation (EU) 1061/2010.
Brand name
ATLANT
Model
50Y88
50Y108
60С88
60С108
Energy consumption class
1
А+
А+
А+
А+
Washing efficiency class
A
A
A
A
Wringing efficiency class
2
D
С
D
С
Annual energy consumption [kW·h/year]
3
165
165
190
190
Annual water consumption [l/annum]
3
8800
8800
9900
9900
Consumption per cycle 6 kg Cotton 60°C [kW·h/l], Programme time [min.]
-
-
1,05 kW·h/50 l , 147 min.
Consumption per cycle 3 kg Cotton 60°C [kW·h/l], Programme time [min.]
-
-
0,80 kW·h/40 l, 140 min.
Consumption per cycle 3 kg Cotton 40°C [kW·h/l], Programme time [min.]
-
-
0,65 kW·h/40 l, 87 min.
Consumption per cycle 5 kg Cotton 60°C [kW·h/l], Programme time [min.]
0,92 kW·h/43 l, 145 min.
-
-
Consumption per cycle 2,5 kg Cotton 60°C [kW·h/l], Programme time [min.]
0,70 kW·h/37 l, 135 min.
-
-
Consumption per cycle 2,5 kg Cotton 40°C [kW·h/l], Programme time [min.]
0,52 kW·h/37 l, 85 min.
-
-
Remaining moisture [%]
<72
<63
<72
<63
Power Left on/Power off [W]
1,0/0,5
1,0/0,5
2,0/1,0
2,0/1,0
Maximum rotational speed during the wringing [rpm]
800
100
800
1000
Maximum loading in the cotton washing mode [kg]
5,0
6,0
Water supply system pressure [MPa]
0,05 – 1,0
Voltage/Frequency [V/Hz]
230/50
Nominal power consumed [W]
1900
2100
Overall dimensions [H/W/D mm]
846х596х475
846х596х565
Net weight [kg]
62
62
63
63
Noise level: Washing / Wringing [dB(A)]
59/68
59/73
59/68
59/73
1
A + + + (highest efficiency) to D (least effective).
2
A (highest efficiency) to D (least effective).
3
On the basis of 220 standard washing cycles within a year when washing cotton at 60 °C and 40 °C at full or partial loading

6
7
Pre-wash
The function is provided for washing of heavily soiled (very dirty) cotton items. When switching the
function on, the items will be washed additionally in the water with detergent at the temperature
of 30 ºC. It ensures a high quality dirt removal during the basic wash.
Additional rinse
The function is provided for washing children’s clothes, items of people, who are detergent
allergic, or for washing in a very soft water, in which a detergent is rinsed insufficiently. When the
function is included into the Wash Program, one more rinse will be added.
Light press
he function is provided to reduce the creasing level of fabrics during washing and spinning and
to ease subsequent ironing. The function ensures a delicate washing mode and careful spinning
with minimum number of wrinkles after washing.
Stop with water in the tank
The function is used, when items of a fine texture are washed, and when there is no possibility to
take items from the Machine immediately after washing, not to get them crumpled. When the fu-
nction is switched on, the Machine will stop automatically after the last rinse (before water drain).
SOUND ALARM TURN ON/OFF
To turn off the machine operation sound alarm, simultaneously press the buttons
and
and
hold during 3 seconds. To turn the sound alarm on, press the buttons
To turn off the machine operation sound alarm, simultaneously press the buttons
and
To turn off the machine operation sound alarm, simultaneously press the buttons
again.
ANTI-CLOSING DOOR BLOCKING
The anti-closing door blocking prevents from accidental Machine
operation, for example, by children. To lock the door, turn the lock (Fig.
4) by a screwdriver clockwise up against the stop – the lock will move
forward and prevent to close the door. To cancel the locking before
washing, perform all the actions in the reverse sequence.
3 PREPARATION FOR OPERATION
PREPARATION FOR INSTALLATION
ATTENTION! Not to damage the Machine, never move it by holding the dispenser drawer, door
or gasket.
For transportation purposes, the drum of the Machine is fixed by locking bolts and spacer bars. Unsc-
rew the four bolts with a spanner and take out the spacer bars (Fig. 5). If the spacer bars remain inside the
Machine and would not get out, remove the back panel 1 (Fig. 6) with a cross-blade screwdriver and take
the bars out. Reinstall the panel. Close the holes with plastic plugs, including in the kit. Keep the bolts and
spacer bars for future transportation.
NEVER operate the Machine with open spacer bar holes in the rear wall of the body.
INSTALLATION OF THE MACHINE
The Machine should be installed on a solid, even and dry surface. Soft flooring (carpets, polyurethane-
based coatings) is not recommended as it promotes vibration and degrades ventilation of the Machine.
When installed on a wooded floor, the Machine should be first placed onto a wooden slab at least
15 mm thick that is reliably bolted to the floor.
To increase the stability of the Machine during its operation on a wooden floor, it is recommended to
install the Machine in the corner of the room.
Figure 4
Lock
Door
The Machine should be levelled precisely horizontally by screwing its adjustable supports 1 in or out:
loosen lock nuts 2 of the supports with a spanner, adjust the height of the supports, and tighten the lock
nuts (Fig. 7). A wrong installation of the Machine by its horizontal level and low tightening of the lock nuts
may be in the future a source of vibration and excessive noise during its operation.
CONNECTING TO WATER SUPPLY AND DRAINAGE
Prior to connect the Machine to water supply, open the tap and let water flow and flush any sand and
rust from water supply pipes.
The Machine is connected only to the cold water supply system through a water supply tap with a
¾-inch threaded branch pipe.
Connect the filling hose to the threaded branch pipe of the water supply tap, having first checked the
presence of filter 1 (Fig. 8) in the hose and its clean condition, and to electric valve 1 (Fig. 9) of the Machine,
having tightly screwed the nuts manually.
If the filling hose has a
protecting system
in accordance with figure 8a, attention should be paid to
the colour in a special window of the hose.
The yellow colour of the window shows the good state of
the hose.
In the process of washing, the water supply tap should be completely open (Fig. 10).
The draining hose (Fig. 11) should be at least 60 cm and at most 90 cm above the floor level. It this
requirement is not observed, the Machine would not work.
For draining water directly into the sewerage, the draining hose should be fixed above the sewerage
elbow (trap) into the sewerage pipe with internal diameter of at least 40 mm to avoid reverse suction of
drain water into the Machine.
The draining hose may be connected directly to the trap (Fig. 12), if it has a branch pipe for this pur-
pose.
When draining water into the sink or bath the hose (Fig. 13), fix the hose in the bending point by a
special clamp supplied with the Machine. The hose should not be immersed into water.
ATTENTION! After connecting to the water supply and sewerage, the filling and draining hoses
Figure 8
Figure 9
Figure 5
Figure 6
Figure 7
1
2
1
1
1
Figure 8a
1

8
9
should not be bent or pinched.
After connecting the Machine to water supply and sewerage, check the tightness of the filling hose
connections: the connection points should be dry.
4 MACHINE OPERATION
FIRST WASHING
Every Machine has been tested by the manufacturer, therefore, a little amount of water may remain in
the Machine. To clean the Machine from inside and remove the water that might remain after tests, perform
the fist washing cycle without any items.
Make your first washing by setting the Wash Program Selector Knob to the mark «Cotton 90 ºC».
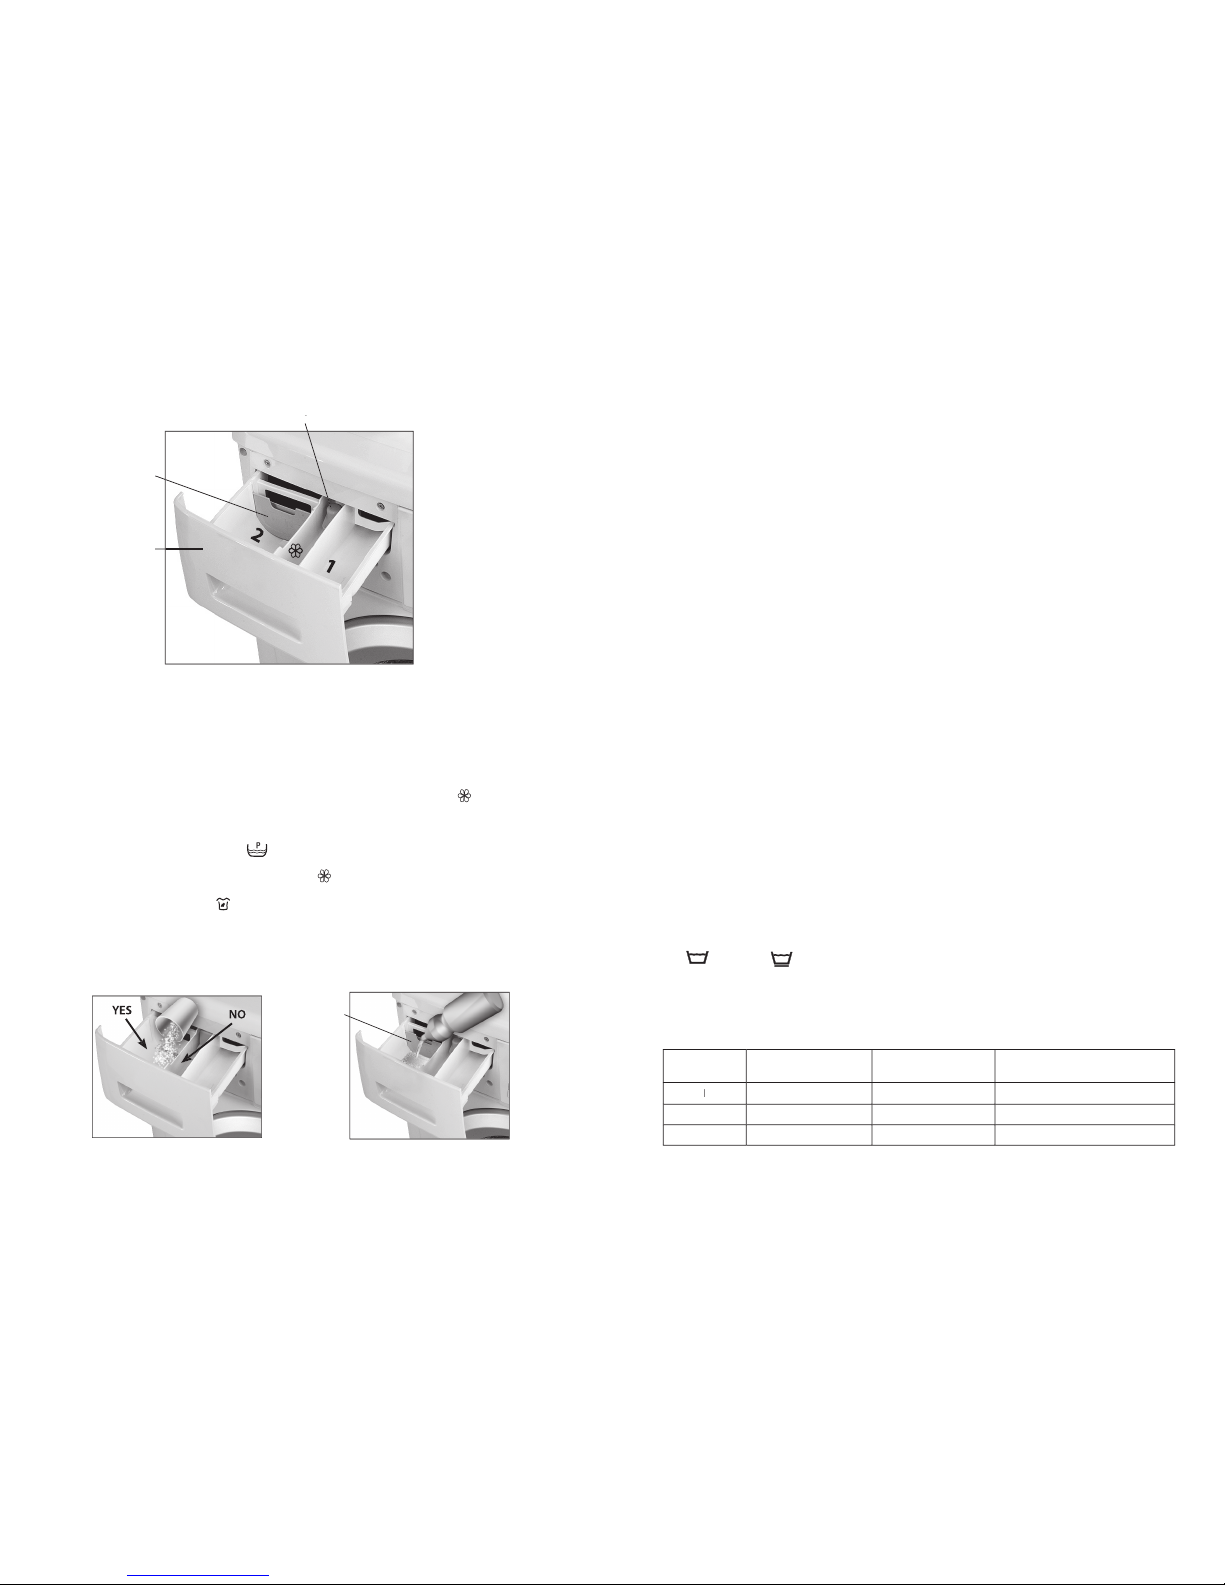
ATTENTION! For the first washing, add 1/2 of the recommended dose of washing powder (dete-
rgent) into compartment 2 of the dispenser drawer (Fig. 14), making account of the manufacturer’s
guidelines as to the maximum items loading.
PREPARATION AND LOADING OF ITEMS
Prior to start washing:
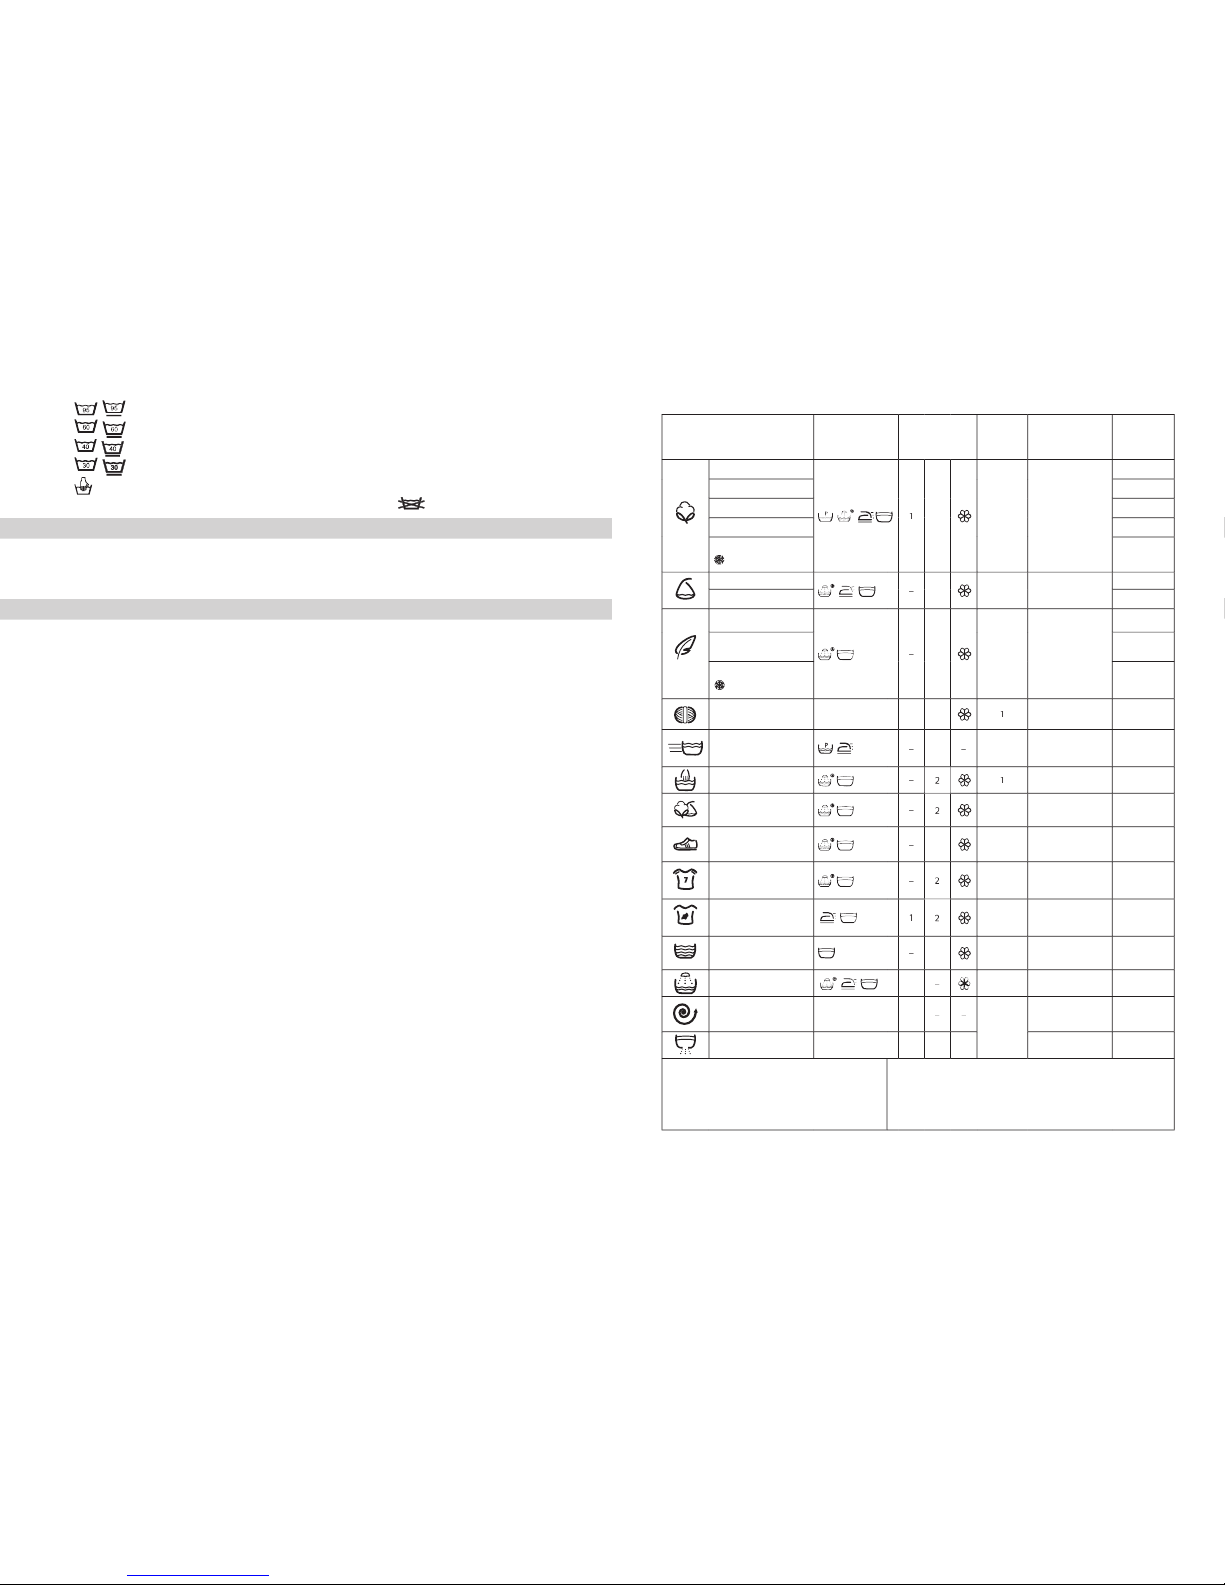
- sort out the items, having separated the coloured ones from the white ones;
- distribute the items according to the fabric care labels;
- check that the pockets of your items of clothes be empty, the damaged and torn parts be repaired,
and zippers, belts, buckles and hooks be closed or locked, and all the hard-removable spots be removed
in advance;
- be sure to shake all the sand out of the clothes (pockets, cuffs);
- turn the items with applications attached inside out.
ATTENTION! Penetration into the Machine of metal objects (coins, clips) together with clothes
may be a cause of damage of the rubber gasket and plastic drum of the Machine.
Prior to washing, put small items (socks, handkerchiefs, etc.) and delicate clothes (thin tights, stockings,
etc.) into a special net or a pillowcase.
It is recommended to wash uplifts (bras) with plastic inserts (which are fit for machine-washing) in
a special bag, since inserts may get into the Machine interior through drum openings and damage the
mechanisms.
Examine the drum for absence of foreign objects and occasional presence of domestic animals
(pets).
Load your clothes items into the drum. For better results of washing and spinning, it is recommended
to wash big and small items together.
ATTENTION! At non-uniform distribution of items in the drum, the spinning speed will drop
automatically, or no spinning will take place (it would not switch on).
NEVER load the machine only with the items made of fabrics, which absorb a lot of water (terry (Turkish)
towels, gowns, mats, etc.), to avoid overloading.
ATTENTION! Close the door of the Machine until you hear a clear click of the lock (anti-closing blo-
cking should be removed). The items should not be pinched between the door and the sealing gasket.
MIN 60 CM
MAX 90 CM
Figure 11
Figure 12
Figure 13
ORDER OF OPERATION
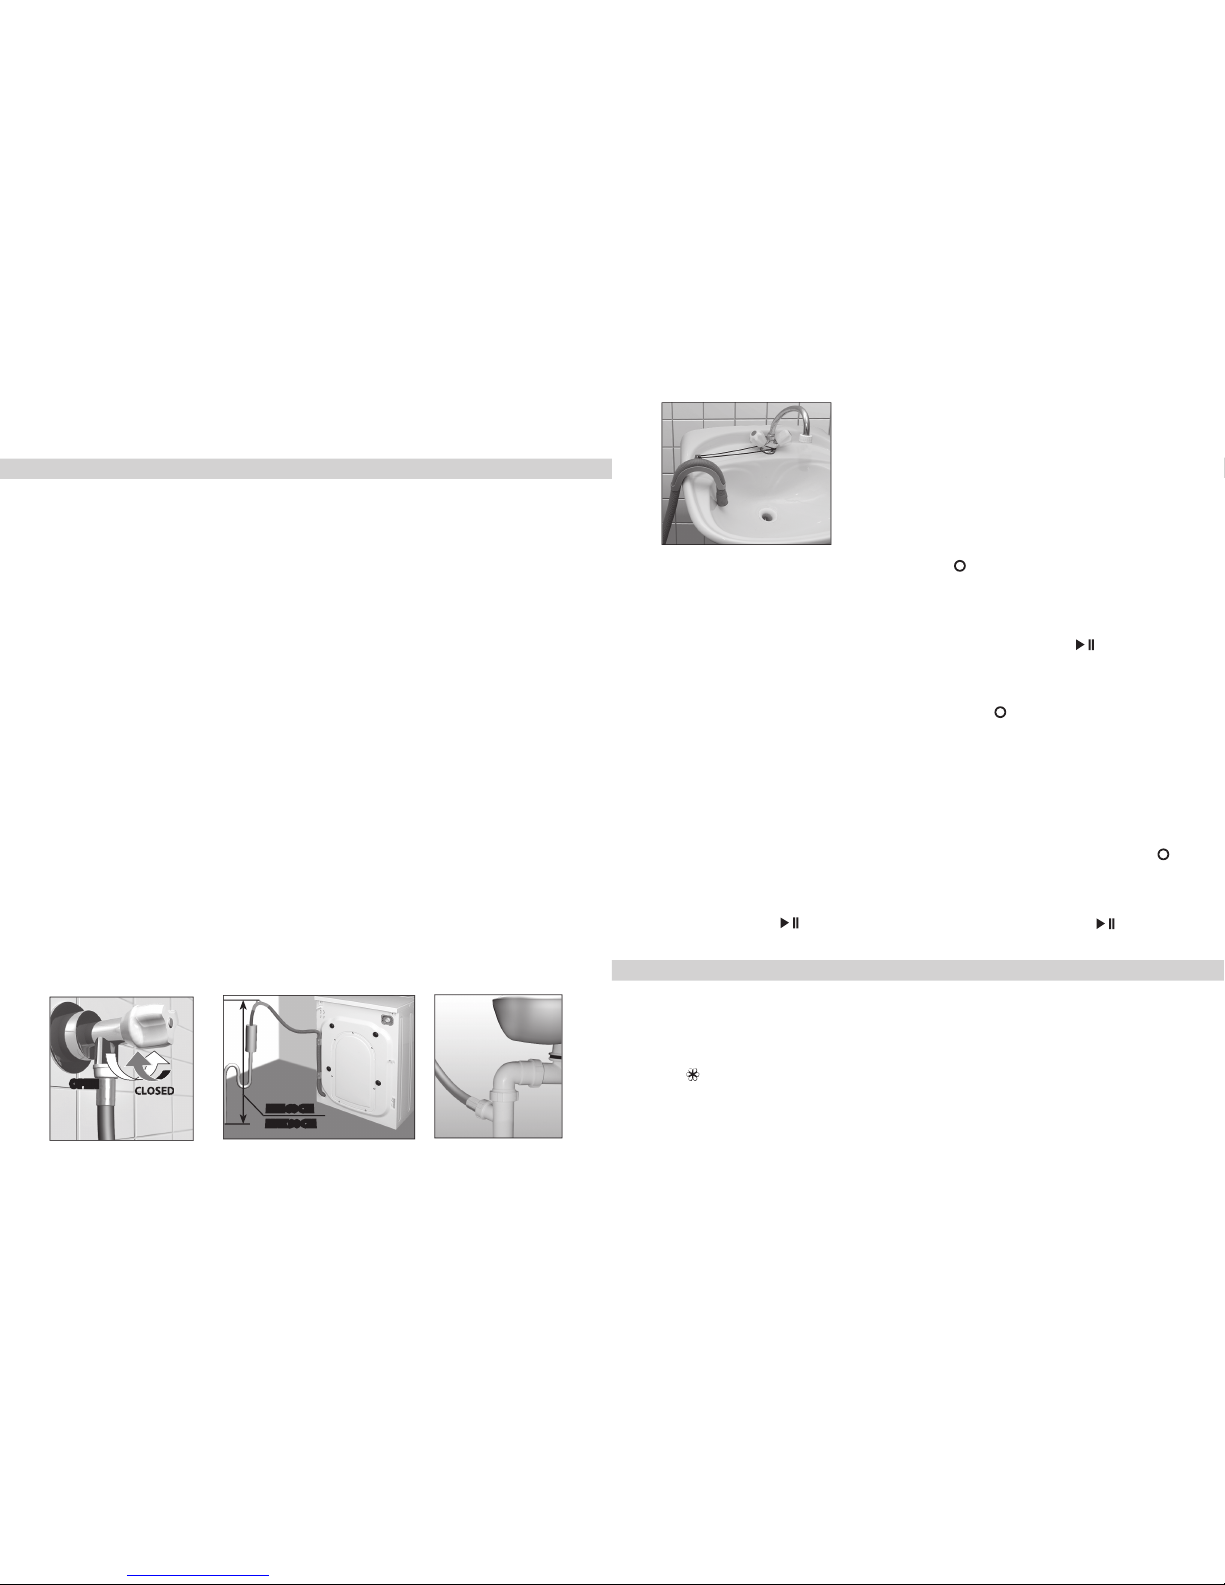
Check for correct installation of the filling and draining hoses.
If the Machine was not in use for a long time, drain off the stag-
nant water by unscrewing the nut and disconnecting the hose from
the water supply tap. Connect the filing hose.
Open the water supply tap.
Load the respective compartments of the drawer with the washi-
ng powder intended for automatic washers, and any special treatment
substances. Close the drawer.
Insert the electric power plug into the socket (receptacle) of the
electric mains.
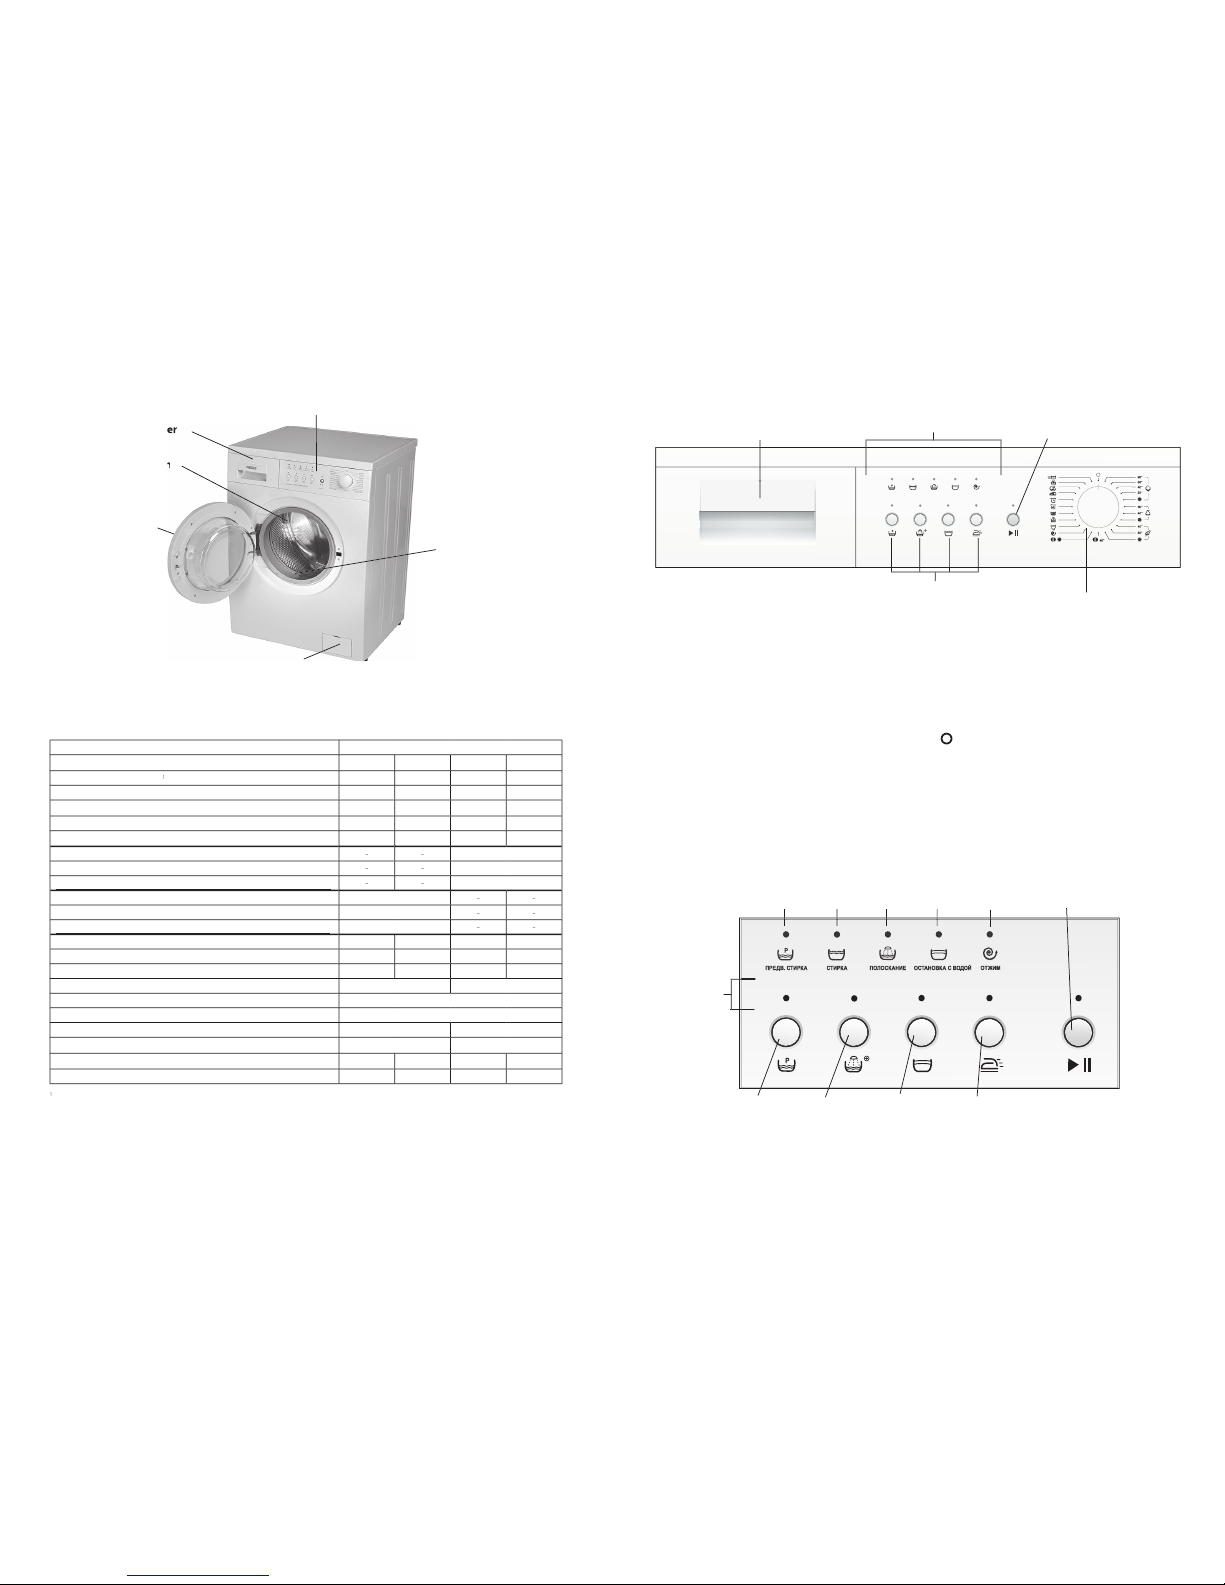
For switching the Machine on, rotate the Wash Program Selector
away from its position
and set it to the mark corresponding to the
selected program). The display indication zones highlight the basic
program parameters
The averaged laundry time corrected by electronic system depending on the real conditions during
program operating.
If necessary, you may set optional functions, select the temperature and spinning rotation speed.
To start the Machine operation under the selected program, pres the button
– the indicator
illuminates on the button and sound signal is generated. The door locking device operates, and the display
starts showing the indicators of the washing program and program operations.
After the end of the last washing operation, the door blocking device will switch off – a triple sound
signal will be heard with a one-minute interval.
Upon termination of washing, set the Program Selector into the
mark – the Machine will switch off.
Take the plug out of the mains socket and close the water supply tap.
Open the door and take your items out.
Move the drawer out a little and leave the door opened a little, until the internal parts of the machine
get dry. To avoid unpleasant smell from appearing in the Machine, the door should remain open till the next
laundry. It is recommended to fix the door anti-closing blocking.
ATTENTION! A drop (interruption) of electric power supply during washing does not effect further
Machine operation: once the power is resumed, the Machine will go on with the program from the
interruption moment.
PROGRAM CHANGE
To make changes in the earlier selected program, set the Wash Program Selector Knob into the mark
.
The Machine is switched off and the program underway is cancelled. Set the Knob to the setting of the
new program.
It is recommended to check the presence of the washing powder in the drawer, and to add it, if necessary.
If it is required to stop the Machine without changing the program (for example, to add items into the
drum), keep the button
pressed for 2 seconds – until blinking of the indicator in the
button and
a sound signal, and in about 2 minutes the door blocking device will switch off.
5 RECOMMENDATIONS AND TIPS
USE OF SYNTHETIC DETERGENTS (SDs)
The machine has a drawer for loading washing powders or detergents (Fig. 14). The drawer has three
compartment marked with figures and a symbol as follows:
1 – for pre-washing and bleaching agents;
2 – for the basic washing;
- for special treatment substances (conditioners, softeners, starchers, aromatizers, etc.).
Take for your washing the SDs, bleachers and conditioners intended for automatic washers, and take
into account the manufacturer’s guidelines.
ATTENTION! In is not recommended to use gelbleachers for your washing.
Select the dosage of SDs with account of the weight of the items, their dirtiness and water hardness.
ATTENTION! SD overdosage, and use of the SDs intended for manual washing may result in exc-
Figure 10
OPEN
CLOSED
This manual suits for next models
3
Table of contents
Languages: