Audible Rush Jam-Pac Premium Plus User manual

WARRANTY
Audible Rush, Inc. provides a limited 90 day warranty on all of its Jam-Pac, Jam-Lite Music Docks, and
accessories. This warranty guarantees that the products are free from defects in workmanship and
materials, under normal use and condions, for a period of 90 days from the date of purchase. Should
your product fail to funcon sasfactorily, please see our FAQ page. If you sll connue to have an
issue, please CONTACT US to have one of our experts try to help.
Disclaimer of warranty: This warranty is valid only if the product is used for the purpose for which it was
designed. It does not cover damage caused by misuse or abuse; accident; the aachment of any unau-
thorized accessory; alteraon to the product; improper installaon; unauthorized repairs or modica-
ons, improper use of electrical/power supply; loss of power; dropped product; malfuncon or damage
of an operang part from failure to provide manufacturer's recommended maintenance; transportaon
damage; the; neglect; vandalism; or environmental condions; loss of use during the period the prod-
uct is at a repair facility or otherwise awaing parts or repair; or any other condions whatsoever that
are beyond the control of Audible Rush, Inc. A product that requires modicaons to work in another
country other than the country for which it was designed, manufactured, approved and/or authorized,
or repair of products damaged by these modicaons is not covered under this warranty. This warranty
is valid only in the United States of America and does not extend to owners of the product other than to
the original purchaser. In no event will Audible Rush, Inc. or any of its aliates, contractors, resellers,
their ocers, directors, shareholders, members or agents be liable to you or any third party for any
consequenal or incidental damages, any lost prots, actual, exemplary or punive damages. In no
event shall this warranty require more than the repair or replacement of any part or parts which are
found to be defecve within the eecve period of warranty.
SPECIFICATIONS
Jam-Pac™, Jam-Pac Premium Plus™ are trademarks of Audible Rush, Inc. All Rights Reserved.
Copyright Audible Rush 2011, Patents pending. JAM055-802 v2.6
MAINTENANCE
Clean your unit with a so cloth moistened with mild soap and water. Stronger clean-
ing agents, such as benzene, thinner or similar materials will damage the surface. To
clean the transparent player protecve lm, use only water or cleaning soluons ap-
proved for use with coated eyeglasses. DO NOT USE household window cleaner or
you will damage the appearance and funcon of the lm.
Jam-Pac Premium Plus™
Handlebar Bag Music System
User Manual
For quesons and installaon help go to
www.audiblerush.com/support
IMPORTANT SAFETY INSTRUCTIONS
DO NOT OPERATE CONTROLS ON YOUR PHONE, MP3 PLAYER OR THE MUSIC DOCK
unless you are stopped and out of the way of all trac. DO NOT LOSE CONCENTRA-
TION ON WHAT IS AROUND YOU. MAINTAIN SAFE OPERATION OF YOUR BIKE AND/
OR OTHER ACTIVITIES AT ALL TIMES. DO NOT TEXT, MAKE CALLS OR CHANGE NAVI-
GATION SETTINGS WHILE RIDING.
DO NOT OVERLOAD YOUR STORAGE BAG. Total weight of addional items in your
bag must not exceed 3 pounds. Steering may be aected by weight of bag; exercise
cauon unl you are adjusted to handling the bike with bag in place.
Water, moisture, heat: Do not charge your unit near water. Do not use your unit
(even if not charging) near water such as swimming pools, bathtubs or sinks. Heat:
Do not expose to excessive heat such as radiators, heat registers, stoves, etc.
Service: The unit and charger should be serviced by qualied service personnel when
dropped, damaged, exposed to rain or other liquids, the charger, cable or plug has
been damaged or unit does not funcon normally. User should not aempt to ser-
vice the unit or charger. Charger: ONLY USE AUDIBLE RUSH SUPPLIED CHARGER.
High output digital 12 volt amp with rotary volume control, max output: 97dB at 0.5 meter
Rechargeable 3300 mAh Lithium Ion integrated power pack
Works with any MP3 player, music capable phone or smartphone (check size limit below)*
Holds player in reach under clear touch-screen compable scratch resistant lm
Quick-release handlebar mount w/rotaon-stop cable, ts 7/8” (22.5mm) to 1.25” (31.8mm)
Works with phone’s hands-free and GPS navigaon features, charges select smartphones
Max player size* 5.59” x 2.85” x 0.75” (142mm x 72.5mm x 19mm)
Audio cable plug (removable cable) 1/8” (3.5mm) stereo 3 conductor TRS
Charge me / Play me (approximate) 2-4 hours / 9+ hours depending on volume
Auto shut-down me (approximate) 30 minutes
AC charger 100-240VAC in, 12.6v, .4A out, posive (+)TIP
USB charger (will not t all smartphones) 4.5-5.5v, 500mA-850mA (1.4A max), 30 sec mer
Bag exterior Black nylon, quiet zipper pulls, integrated carry
handle, removable shoulder strap
Bag interior (approximate)
Storage:10”x4”x3.5” (254x102x89mm)
External pocket: 5”x4.5”x1” (127x114x25mm)
with Internal mesh pocket
Size and weight (approximate) 11” x 5” x 10” (279 x 127 x 254mm), 2.1 pounds
Regulatory FCC class-B, CE, UL, RoHS, lead free
TM
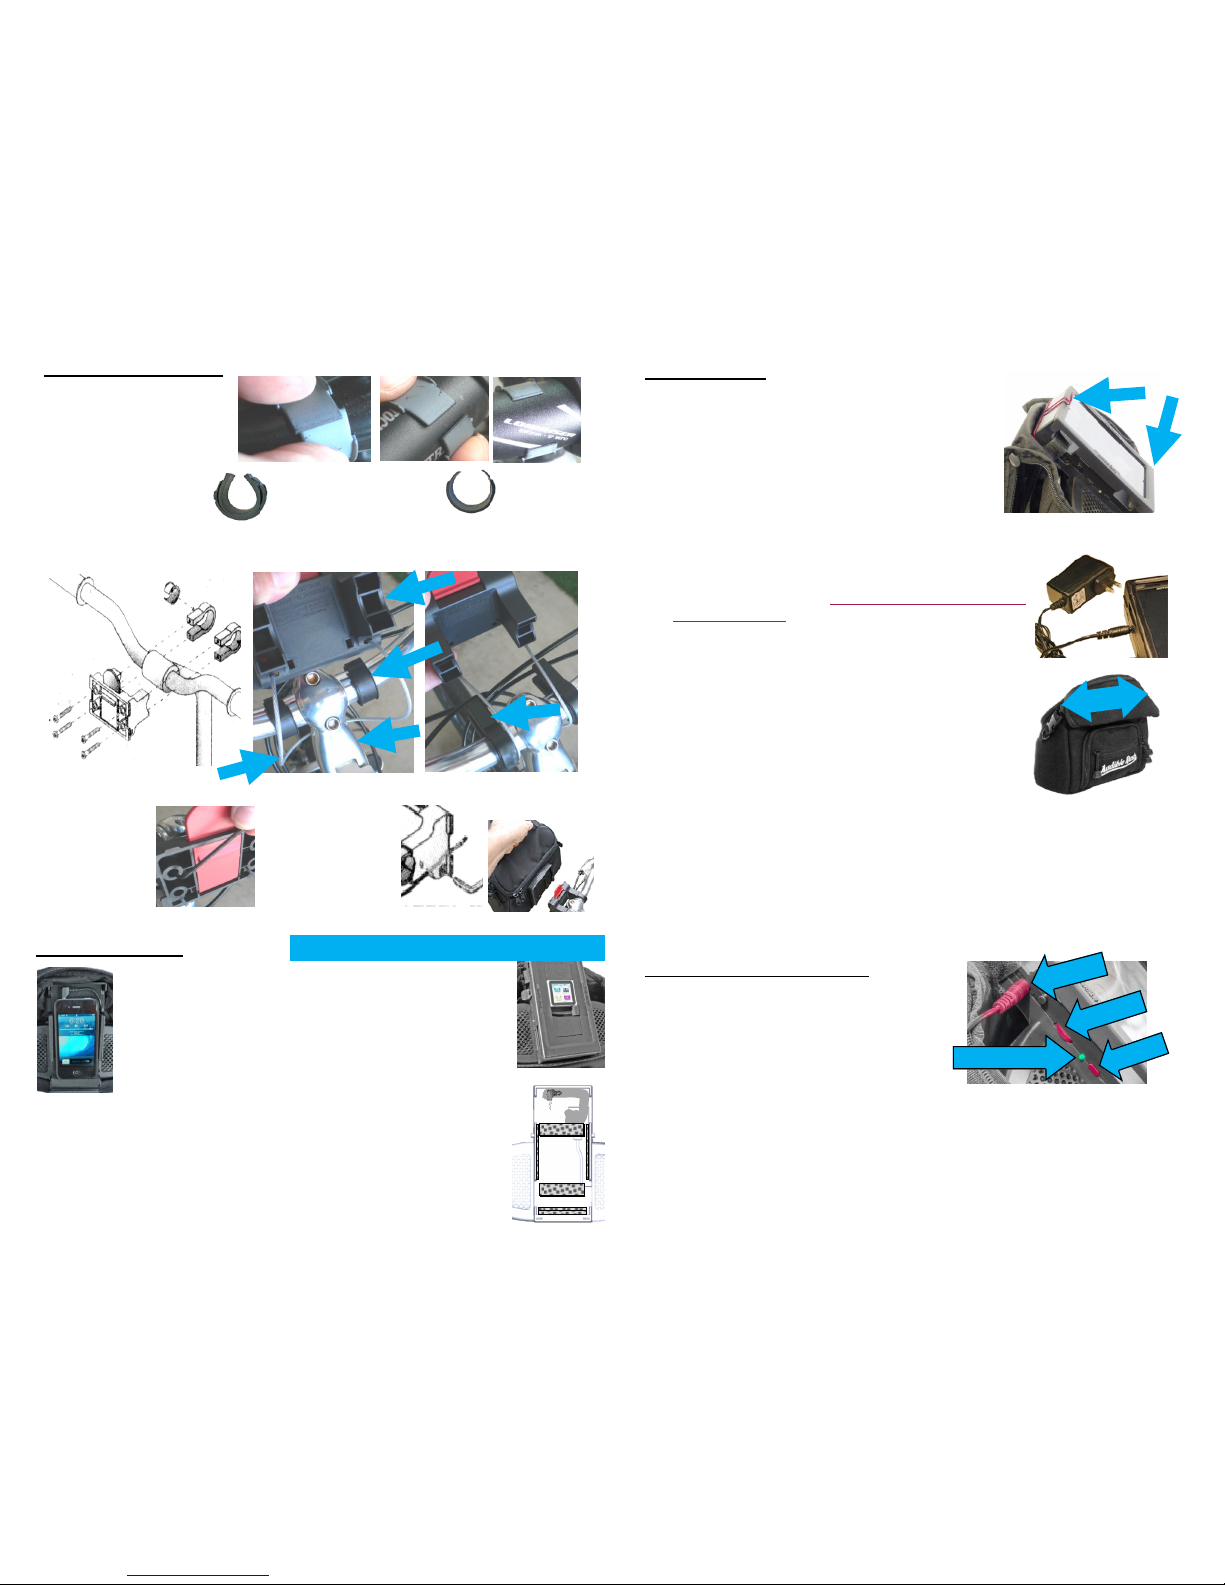
BRACKET INSTALL OPERATION
1. Open player cover. With the Jam-Pac amp turned
o, plug the audio cable into the headphone jack of
player and Install player under hinged cover per
‘PLAYER INSTALL’ instrucons. Dress excess audio
cable into space under player deck.
2. Set player volume high on player, around 90% to
95% level.
3. Close player cover and secure latch.
4. Recharge player BEFORE EACH USE using the supplied
Lithium Ion charger by inserng the charger cable into
the side opening shown. ONLY USE AUDIBLE RUSH SUP-
PLIED CHARGERS as safety circuits are included to pre-
vent baery overload and possible property damage
from overcharged Lithium Ion cells. When connected to
the Jam-Pac, the charger lights red while acve and
turns green when baery is full. It will take 2-4 hours
to reach full charge.
5. Slide Jam-Pac into mount and unzip cover. Fold cover
as shown and secure in place with bag side buckles.
Buckles can be adjusted to hold the cover ght against
bag front.
6. Press the on/o buon momentarily. LED lights green
indicang amp is on. If no music plays for about 30 minutes, the unit will shut
o to save baery power.
7. Use Jam-Pac thumbwheel to set desired volume level.
8. In the event of rain, pull over, zip cover closed and connue listening.
USB PLAYER CHARGER OPERATION
a. Using a toothpick or paper clip, slide the USB
CHARGER MODE SWITCH according to your
player: A= Apple products, B=all others. Posi-
on C is reserved for future use.
b. Aach USB cable (supplied with your
smartphone charger) to Jam-Pac USB power port. Dress cable between into
lower storage compartment. Bring cable back up from compartment and plug
into phone’s charger port, leaving excess cable in lower compartment.
c. With Jam-Pac o, and USB charger connected to player, hold on/o buon for
about 10 seconds or unl your player indicates it is receiving a charge. The
USB charger will automacally shut down aer about 30 minutes. To restart the
charger, simply power Jam-Pac o and again, hold on/o buon for 10 seconds.
This can be repeated as desired.
Buckles ( 2)
Use plasc spac-
er rings plus 3”
rubber strips
Use plasc
spacer
rings only
Do not
use any
spacers
1) Determine which spacers
to use: Temporarily snap
plasc spacer ring over bar
and pinch closed with n-
gers. If it looks like the
picture, then...
3) Insert 4 screws.
Place mount in ver-
cal posion and
ghten so that
bracket does not
rotate on handlebar.
4) Adjust one end of
cable so it is ush
and ghten set
screw. Pull other end
of cable ght
(remove all slack)
and ghten set
screw. Trim excess cable.
Cable
Stem
Spacers
Clamps
2) Place spacers (if any) around each side of handlebar. Wrap cable under stem, feeding
ends into far 2 holes in bracket. Place 2 clamps over spacers and slide bracket over clamps.
Bracket
5) Clip on.
PLAYER INSTALL
Jam-Pac comes set for iPhone- Insert audio cable in player audio jack.
Set player volume to 90%. Close and secure player cover latches.
For MP3 players such as iPods- Remove boom thin player insert.
Replace with thick player insert, followed by medium player insert
with cutouts. This raises player so controls will operate through the
clear lm. Insert audio cable in player audio jack, roung cable BE-
TWEEN layers of insert. Store excess cable under base.
For other players– 1. Connect audio cable: Route cable either up or
down inside channel. Store excess cable under base. 2. Snug Player: Remove back-
ing from self adhesive Install Strips and place on sides, top and boom of player
base walls creang a snug t for player. Use mulple layers of Install Strips as nec-
essary. 3. Set Player Height- Player must be posioned against underside of player
cover window when cover is closed in latched posion. This allows player controls
and touch screen to operate through the clear lm. Place 1 or 2 sets of Install Strips
on oor to raise player. Stack several Install Strips as necessary.
IMPORTANT: Set player volume to 90%
Latch
Hinge
Charge
Volume
On/O
Power On LED
Table of contents


