AUDIFIED LINDA AUDIO RockStack User manual


š
Linda RockStack
1
Table of contents
Introduction 2
The cooperation story 2
How It Works 2
Software Installation 2
Software Uninstallation 3
Opening the plug-in 3
Working with Linda RockStack 4
Control overview 4
Preset management 5
Services menu 5
Recommended Workflow 6
Signal Flow 6
Detailed controls description 7
Technical info 8
Specification 8
Requirements 8
Conclusion 8

š
Linda RockStack
2
Introduction
Thank you for purchasing Linda RockStack.
RockStack is a guitar amplifier and cabinet simulation which will transform your clean guitar tone
into a professional sounding mix-ready clean, rock, or metal guitar tone.
The cooperation story
LINDA AUDIO brought the idea and concept of the product, combining excellent programming
skills and sense for perfect sound, based on long experience playing in rock bands.
áUDIFIED provided the graphics and distribution of the product, maintaining the original
idea and approach.
How It Works
While most guitar amp simulations focus on the perfect emulation of some real-world hardware
models, RockStack is designed with a different goal in mind. It helps you find your favorite guitar
tone efficiently and without stumbles. It is both versatile and simple, and you can quickly find and
dial mix-ready quality tones for rock, metal, and other genres, all in one simple and intuitive
interface. RockStack also features an effective cabinet simulation and inspiring modulation and delay
effect modules. With all of this, RockStack is all you need to get a professional-sounding guitar sound
for your next record or a valuable extension to a collection of guitar software effects.
Of course, there is also full-featured preset management. You may save your corrections to the
prepared sounds to presets inside the Linda RockStack or utilizing the DAW project storage.
Software Installation
Download the recent version of the plug-in:
http://services.audified.com/download
‣Windows: The downloaded file is packed, unzip it. Run the installer and follow the on-screen
instructions. You can select the destination path and the installed plug-in format during the
process.
‣Mac: Mount the downloaded disk image and run the installer. You can select the installed
plug-in format by clicking the Customize button. Plug-ins are installed in the standard
locations and the control app appears in the Applications folder.

š
Linda RockStack
3
Software Uninstallation
‣Windows: Navigate to the Linda RockStack program folder in the Start menu and run the
uninstaller.
‣Mac: Open the provided disk image and run the uninstaller.
Opening the plug-in
AUDIFIED Linda RockStack works in all major digital audio workstations (recording applications) as a
plug-in.
To open the plug-in, locate the plug-in selection (usually a hierarchic menu). Linda RockStack is listed
in the Distortion group or in the AUDIFIED group when the manufacturer sorting is offered.
š
Linda RockStack
4
Working with Linda RockStack
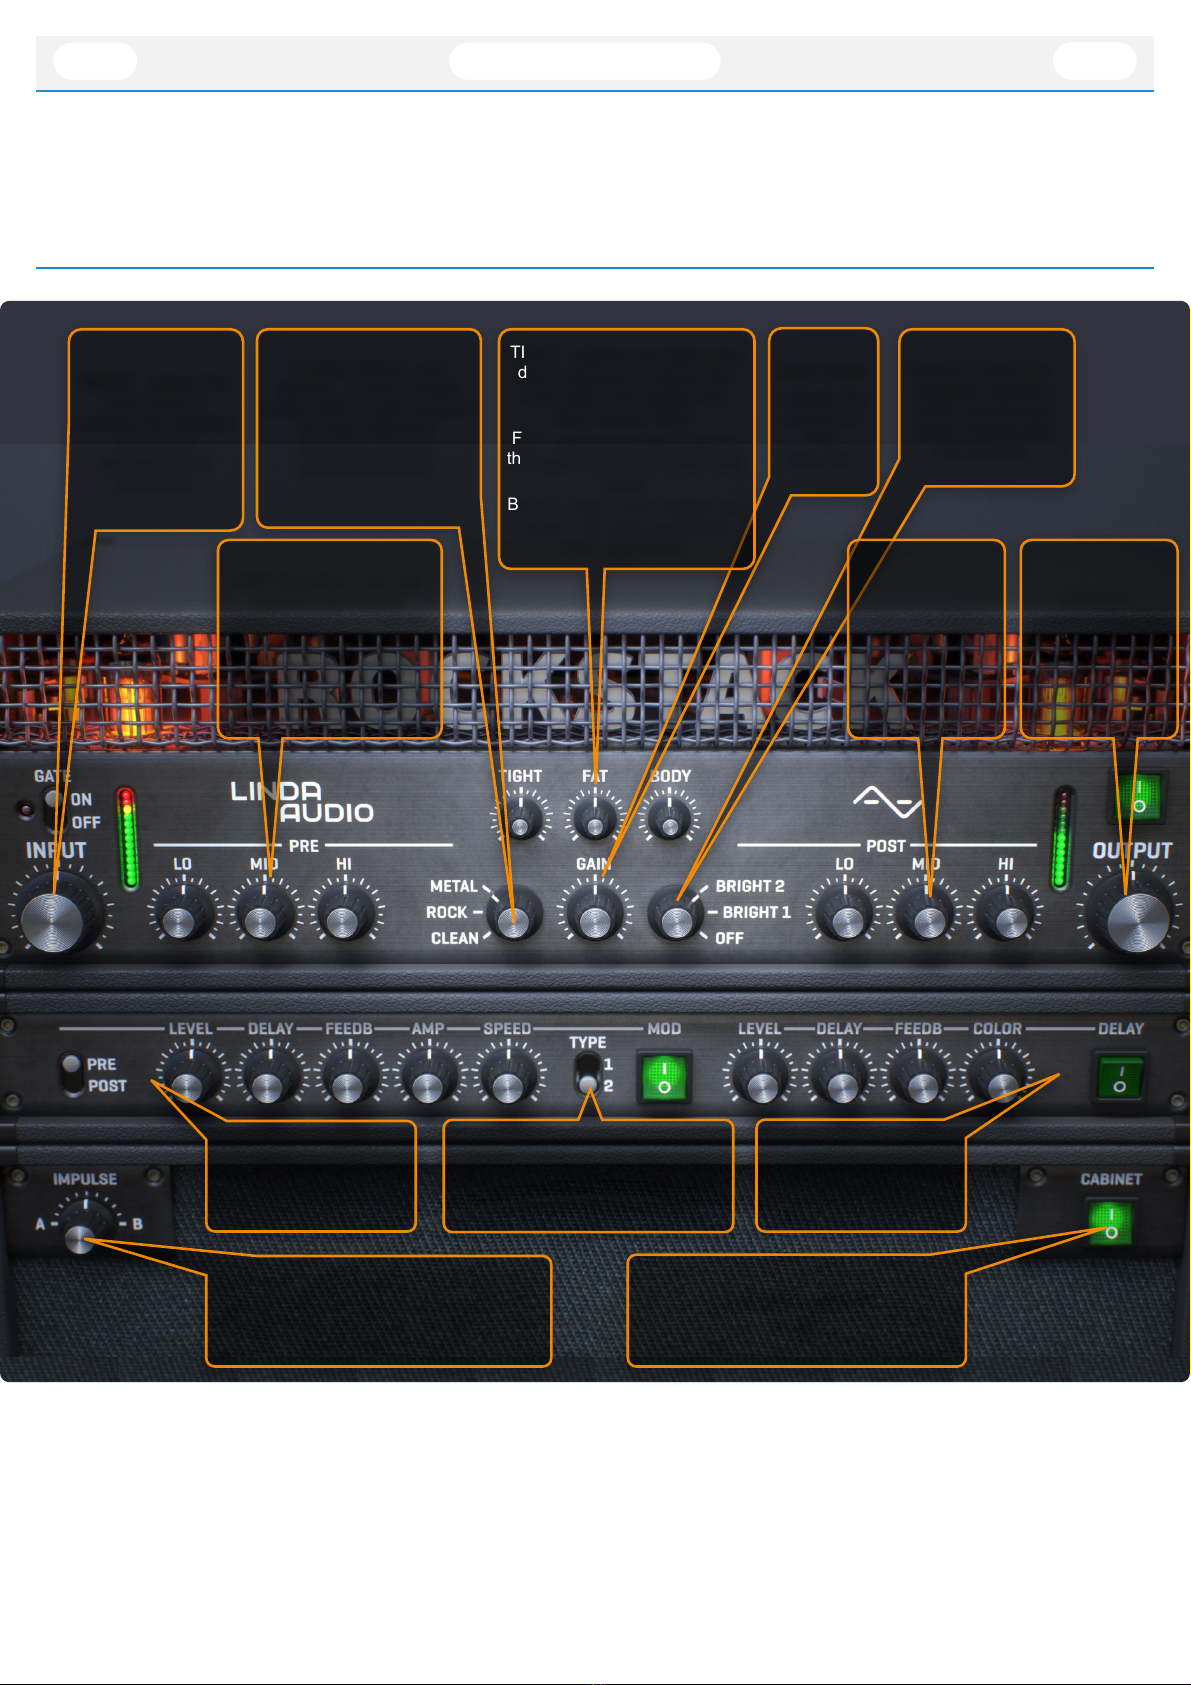
Control overview
"
TYPE I - there is one delay line.
TYPE II - there are two delay lines,
creating a richer chorus effect.
BRIGHT SWITCH -
engages algorithm
which accentuates
higher frequencies
dynamically.
Gain knob
adjusts the
amount of
amp
distortion.
TIGHT - affects how fast is the
drive response to signal (the
more tight - the quicker the
drive amount falls).
FAT - adds even harmonics to
the signal and some lower mid-
range.
BODY - adds some middle and
higher mid-range and some
more aggression.
INPUT - adjust the
input level to
achieve the desired
amount of
saturation and
dynamics.
MOD module
with controls
CLEAN, ROCK, and
METAL - 3 drive modes
which differ in gain amount
but also distortion
character and pre-
equalization used.
PRE Equalizer - not only
shapes input signal
frequencies but in ROCK
and METAL drive modes
also significantly affects
the drive level and
character.
POST Equalizer -
shapes output
signal
frequencies.
OUTPUT-
compensates for
the overall output
volume.
DELAY module
with controls
CABINET module
on/off
IMPULSE - cab simulation consists of two
carefully selected and processed cabinet
impulse responses A and B, which can be
continuously blended

š
Linda RockStack
5
Preset management
Presets can be loaded and saved in the display area.
‣The left button offers a selection from a preset list, structured in several submenus.
‣The mid button opens a menu allowing to save or delete user presets.
Please note that the parameters in the utility panel are not included in presets.
Services menu
The display contains the Services button (wrench symbol), opening the Services menu.
The Services menu allows to access:
‣User manual
‣Product updates
‣Audified web site
‣Support area on the Audified web
‣Feedback form on the Audified web
‣Product version and other info
‣Oversampling (1x, 2x, 4x)
‣Copy - Paste: Allows to copy all plug-in settings and paste them quickly to another instance
of the plug-in.

š
Linda RockStack
6
Recommended Workflow
Basic
1. Choose one of the factory presets
2. Adjust the Input level according to your preferences and working headroom, so the Input
meter stays in green for clean tones, or you can push it to yellow or even reds for more
overdriven sounds
3. Done
Advanced
1. Adjust the Input level according to your preferences and working headroom, so the Input
meter stays in green for clean tones, or you can push it to yellow or even reds for more
overdriven sounds
2. Find the best sounding combination of Drive Mode and Bright that fits your taste
3. Adjust input frequencies with PRE EQ. Find the right proportion of bands that brings the
distortion character to suit your taste
4. Adjust the FAT parameter, which introduces even harmonics and brings up some lower mid-
range.
5. Adjust BODY parameter to introduce some more aggressive distortion and to bring up some
middle and higher mid-range
6. Find the best sounding combination of Impulse blend and POST EQ settings to suit your
taste
7. Switch GATE on for higher-gain tones if unwanted noise is an issue
8. Compensate for the overall output volume by adjusting the Output level
9. Add MOD FX to achieve chorus/flanger/vibrato effect
10. Add DELAY FX by your taste
11. Done
Signal Flow
Input ➡Gate ➡Pre Mod FX ➡Drive Mode select ➡Pre EQ ➡Gain ➡Bright select
➡Fat ➡Body ➡Tight ➡Post EQ ➡Post Mod FX ➡Delay FX ➡Cabinet

š
Linda RockStack
7
Detailed controls description
Amp module
INPUT - adjust the input level to achieve the desired amount of saturation and dynamics. For
clean tones, the amplifier works best if the input meter stays in green, For higher-gain sounds,
the amplifier works best if the input meter lights with a yellow led most of the time when
playing. If pushed too hard, the tone becomes over-compressed and over-saturated.
CLEAN, ROCK, and METAL - 3 drive modes which differ in gain amount but also distortion
character and pre-equalization used.
BRIGHT SWITCH - engages algorithm which accentuates higher frequencies dynamically. It is
very sensitive to the input signal level (this can be adjusted by INPUT). Bright I is more focused
on higher midrange while Bright II accentuates more high frequencies and slightly bass
frequencies as well.
PRE Equalizer - not only shapes input signal frequencies but in ROCK and METAL drive modes
also significantly affects the drive level and character. The overall distortion character is affected
by the amount and also by the relative proportion of all three bands. For example, if you lower
bass and mid-bands and raise a high-band, the tone will have a kind of rock crunch character.
While if you keep bass and high-bands at noon and rise mid-band, the tone will move towards
some creamy singing rock lead.
POST Equalizer - shapes output signal frequencies.
GATE - features a low pass filter on the input signal controlled by an envelope follower. It is
particularly useful for higher-gain sounds, whereas for ddd lower-gain sounds, you should turn
it off.
TIGHT - affects how fast is the drive response to signal (the more tight - the quicker the drive
amount falls).
FAT - adds even harmonics to the signal and some lower mid-range.
BODY - adds some middle and higher mid-range and some more aggression.
OUTPUT- compensates for the overall output volume.
MOD module
Set up this modulation section to be chorus, flanger, or vibrato.
TYPE I - there is one delay line.
TYPE II - there are two delay lines, creating a richer chorus effect.
PRE - the effect is introduced before the gain stage.
POST - the effect is introduced after the gain stage.
LEVEL - how much is the effect mixed to the dry signal.
DELAY- delay of the modulated signal.
FEEDB - feedback amount of the delay line.
AMP - the amount of the delayed signal modulation.
SPEED - the speed of the delayed signal modulation.
š
Linda RockStack
8
DELAY module
Delay effect with overdrive and filter in a feedback loop.
LEVEL - how much is the effect mixed to the dry signal.
DELAY- delay of the delayed signal.
FEEDB - feedback amount of the delay line.
COLOR - the amount of the overdrive and resonance of the filter in the delay loop.
CABINET module
IMPULSE - cab simulation consists of two carefully selected and processed cabinet impulse
responses A and B, which can be continuously blended, therefore providing a vast palette of
final sound shaping.
Each module can be switched on or off (bypassed).
Technical info
Specification
‣AAX, AU, VST3
‣macOS, Windows plug-ins
Requirements
‣macOS 10.11 and newer (64bit format delivered)
‣Windows 7 and newer (32 bit and 64bit format delivered)
‣120 MB of disk space required
Conclusion
We are confident that you can now work with Linda RockStack. However, if anything seems unclear or you need
assistance, feel free to contact us at
http://services.audified.com/support
Thanks for using AUDIFIED products.
Table of contents
Other AUDIFIED Music Equipment manuals


