Auria EQ4088P User manual
EQ4088P
In order to avoid accident and risk,Please read the“Important
safety notice”to know how to use the TV before using.
USER GUIDE
40”Wide Screen Digital LCD TV


Contents
Important Safety Instru ................................................................................. 1
WARNING......................................................................................................................................1
..........................................................................................................................................1
Important......................................................................................................................................1
REGULATORY INFORMATION........................................................................................................1
GENERAL INFORMATION ........................................................................................ 3
Accessories....................................................................................................................................3
of Remote-Control Unit..............................................................................3
Viewing the Control Panel ............................................................................................................4
Remote Control.............................................................................................................................5
Install the TV Base
...........................................................................................................................
..4
Names of each part.......................................................................................................................6
CONNECTIONS ........................................................................................................ 7
Installing an Antenna ....................................................................................................................7
Satellite/Cable TV Set-Top Box ................................................................................8
Watching Cable TV........................................................................................................................8
DVD ons ........................................................................................................................ 9
Playing the DVD .......................................................................................................................... 9
PC ...........................................................................................................................10
How to Use as PC monitor ..........................................................................................................10
Digital AmpliĮer .....................................................................................................10
Basic Use ...............................................................................................................11
Powering the LCD TV ..................................................................................................................11
Input Source ................................................................................................................11
............................................................................................................12
the Menu ...................................................................................................................12
Customizing the PICTURE Se ..............................................................................................14
Customizing the SOUND
..................................................................................................17
Customizing the CHANNEL Se gs
.................................................................................................17
Customizing the PARENTAL CONTROL ngs
.........................................................................20
Customizing the SETUP Se gs
...................................................................................................21
Customizing the OTHERS ............................................................................................23
Customizing the MEDIA Menu ......................................................................................24
PC Mode ................................................................................................................26
Trouble ....................................................................................................27
.........................................................................................................28

ImportantSafetyInstructions
WARNING
TOPREVENTDAMAGEWHICHMAYRESULTINFIREORELECTRICSHOCKHAZARD,DONOT
EXPOSETHISAPPLIANCETORAINORMOISTURE.
Caution
Theseservicinginstructionsareforusebyqualifiedservicepersonnelonly.
Toreducetheriskofelectricshock,donotperformanyservicingotherthanthatcontainedin
theoperatinginstructionsunlessyouarequalifiedtodoso.
Anychangesormodificationsnotexpresslyapprovedbythepartyresponsibleforcompliance
couldvoidtheuser’sauthoritytooperatetheequipment.
Important
OneFederalCourthasheldthatunauthorizedrecordingofcopyrightedTVprogramsisan
infringementofU.S.copyrightlaws.
CertainCanadianprogramsmayalsobecopyrightedandanyunauthorizedrecordinginwholeor
inpartmaybeinviolationoftheserights.
REGULATORYINFORMATION
ThisequipmenthasbeentestedandfoundtocomplywiththelimitsforaClassBdigitaldevice,
pursuanttoPart15oftheFCCRules.Theselimitsaredesignedtoprovidereasonableprotection
againstharmfulinterferencewhentheequipmentisoperatedinaresidentialinstallation.This
equipmentgenerates,usesandcanradiateradiofrequencyenergyand,ifnotinstalledandused
inaccordancewiththeinstructionmanual,maycauseharmfulinterferencetoradio
communications.However,thereisnoguaranteethatinterferencewillnotoccurinaparticular
installation.Ifthisequipmentdoescauseharmfulinterferencetoradioortelevisionreception,
whichcanbedeterminedbyturningtheequipmentoffandon,theuserisencouragedtotryto
correcttheinterferencebyoneormoreofthefollowingmeasures:
Reorientorrelocatethereceivingantenna.
Increasetheseparationbetweentheequipmentandreceiver.
Connecttheequipmentintoanoutletonacircuitdifferentfromthattowhichthereceiveris
connected.
Consultthedealeroranexperiencedradio/TVtechnicianforhelp.
1) Readtheseinstructions.
1

2) Keeptheseinstructions.
3) Heedallinstructions.
4) Followallinstructions.
5) Donotusethisapparatusnearwater.
6) Cleanonlywithdrycloth.
7) Donotblockanyventilationopenings.Installinaccordancewiththemanufacturer’s
instructions.
8) Donotinstallnearanyheatsourcessuchasradiators,heatregisters,stoves,orother
apparatus(includingamplifiers)thatproduceheat.
9) DonotdefeatthesafetypurposeofthepolarizedorgroundingͲtypeplug.Apolarizedplug
hastwobladeswithonewiderthantheother.Agroundingtypeplughastwobladesand
athirdgroundingprong.Thewidebladeorthethirdprongisprovidedforyoursafety.If
theprovidedplugdoesnotfitintoyouroutlet,consultanelectricianforreplacementof
theobsoleteoutlet.
10) ProtectthepowercordfrombeingwalkedonorpinchedparticularlyatPlugs,
conveniencereceptacles,andthepointwheretheyexitfromtheapparatus.
11) Onlyuseattachments/accessoriesspecifiedbythemanufacturer.
12) Useonlywiththecart,stand,tripod,bracket,ortablespecifiedbythemanufacturer,or
soldwiththeapparatus.Whenacartisusedcautionwhenmovingthecart/apparatus
combinationtoavoidinjurytipͲover.
13) Unplugthisapparatusduringlightningstormsorwhenunusedforlongperiodsoftime.
14) Referallservicingtoqualifiedservicepersonnel.Servicingisrequiredwhentheapparatus
hasbeendamagedinanyway,suchaspowerͲsupplycordorplugisdamaged,liquidhas
beenspilledorobjectshavefallenintotheapparatus.Theapparatushasbeenexposedto
rainormoisture,doesnotoperatenormally,orhasbeendropped.
15) Theapparatusshallbedisconnectedfromthemainsbyplacingthepower/standbyswitch
inthestandbypositionandunpluggingthepowercordoftheapparatusfromtheAC
mainsreceptacle.
16) ThesocketͲoutshallbeinstalledneartheequipmentandshallbeeasilyaccessible.
17) ThisproductshallneverbeplacedinabuiltͲininstallationsuchasabookcaseorrack
unlessproperventilationisprovidedorthemanufacture’sinstructionshavebeenadhered
to.
18) Theapparatusshallnotbeexposedtodrippingorsplashingandthatnoobjectsfilledwith
liquid,suchasvases,shallbeplacedontheapparatus.
2
GENERAL INFORMATION
Figures and illustra in this User Manual are provided for reference only and may diīer from
actual product appearance. Product design and ƐƉĞĐŝĮca ons may be changed without no in
order to enhance product performance.
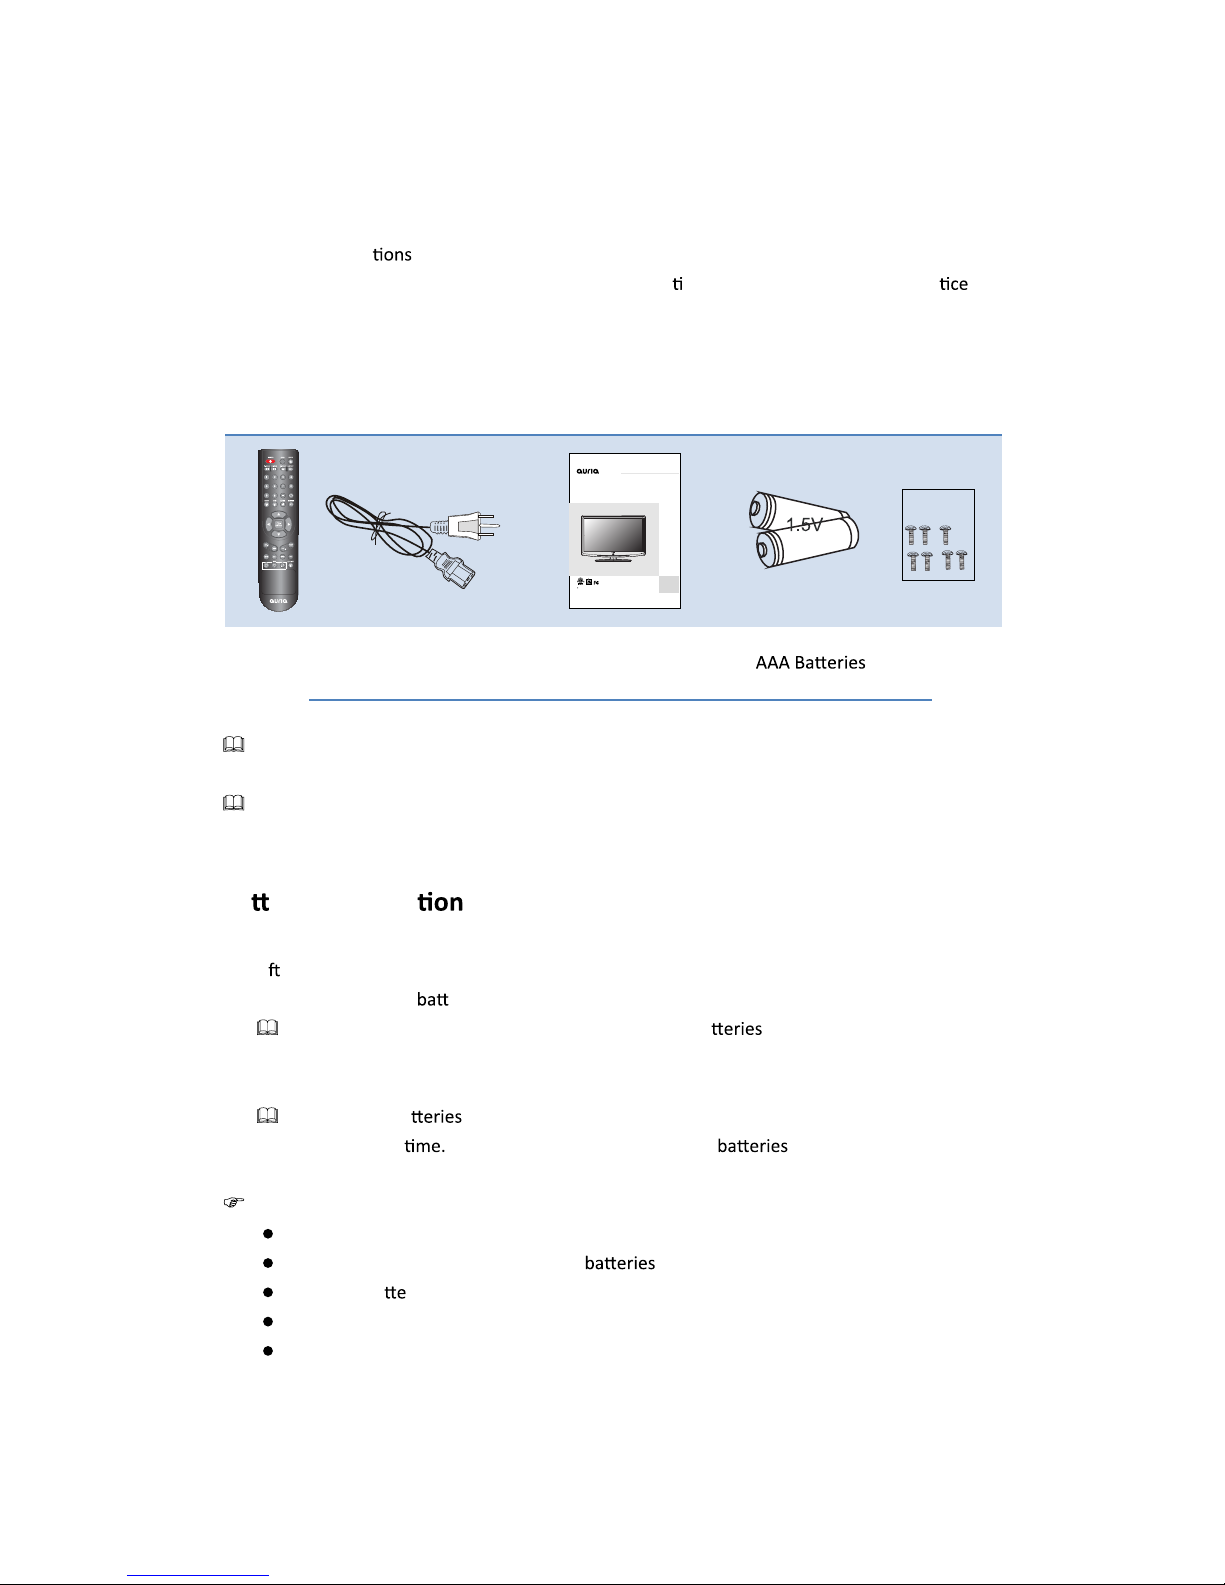
Accessories
Remote Control Power Cord User Manual
Please make sure the following items are included with your LCD TV. If any items are missing,
contact your dealer.
The items color and shape may vary depending on the model.
Ba eries Installa of Remote-Control Unit
1. Li the cover at the back of the remote control upward as shown in the Įgure.
2. Install two AAA size eries.
Make sure to match the “+ ”and “-” ends of the ba with the diagram inside the
compartment.
3. Replace the cover.
Remove the ba and store them in cool, dry place if you won’t be using the remote
control for a long (Assuming typical TV usage, the should last for about one
year.)
If the remote control
doesn’
t work, check the following:
Is the TV power on?
Are the plus and minus ends of the reversed?
Are the ba ries drained?
Is there a power outage or is the power cord unplugged?
Is there a special Ňuorescent light or neon sign nearby?
3
EQ4066P
In order to avoid accident and risk,Please read the“Important
safety notice”to know how to use the TV before using.
USER GUIDE
40”Wide Screen Digital LCD TV
Accessories Bag
Screws M4x16

Viewing the Control Panel
The product color and shape may vary depending on the model.
Youcanuseabu on by pressing the side panel bu ons.
4
1. POW
POWER
ER: Press to turn the TV on and oī.
2.
SOURCE: Toggles between all the available input sources. In the on-screen menu, use
this bu on as you use the ENTER bu on on the remote control.
3.
MENU: Press to see an on-screen menu of your TV's features.
4. CH+/-: Press to change channels. In the on-screen menu, use the CH+/- bu ons as you would
use the Ÿ/źbu ons on the remote control.
5. VOL+/-: Press to increase or decrease the volume. In the on-screen menu, use the VOL+/-
bu ons as you would use the Ż/Źs on the remote control.
Install the TV Base
a.Open the box,and make sure all necessary parts are in the box.
c
b.Take out seven screws (M4x16) in the accessories bag.
M4x16,7PCS
Accessories Bag

Remote Control
5
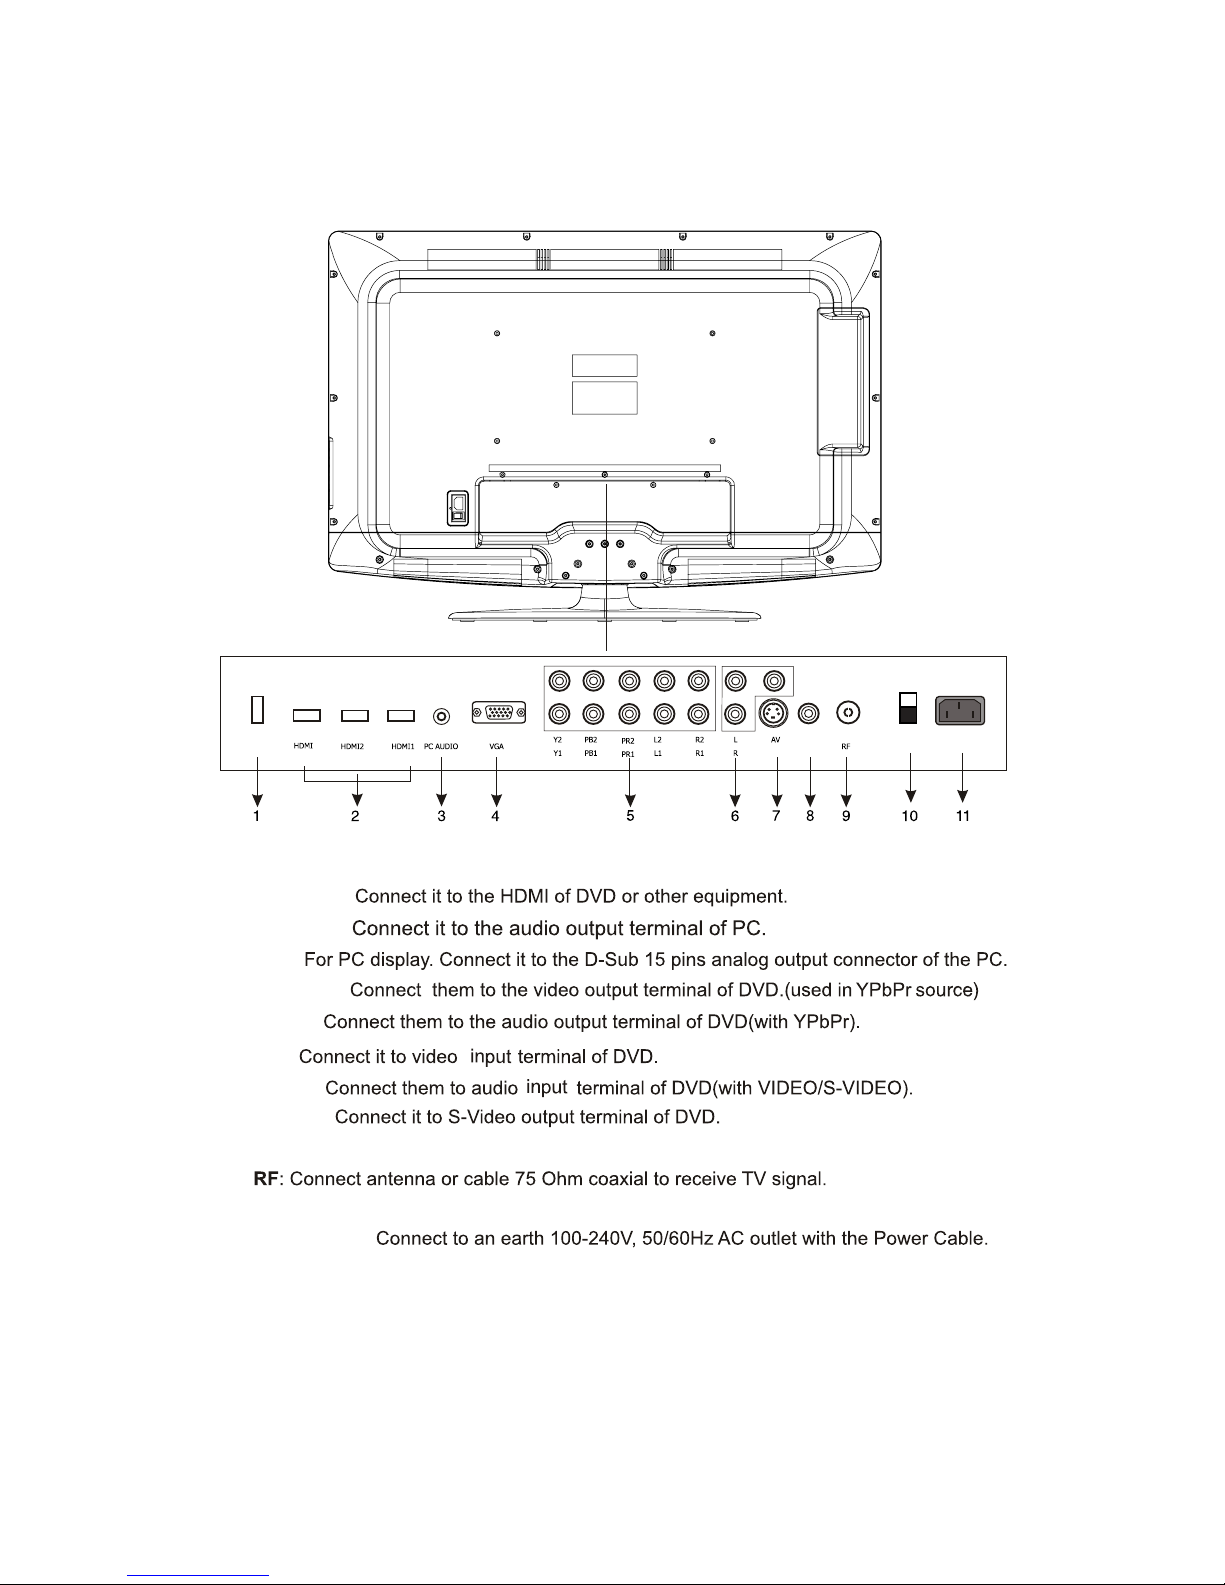
Names of each part
6
11.
1.
2.
3.
4.
5.
6
7.
8.
9.
10. SWITCH: Turn on/off the power supply.
HDMI1/2/3:
VGA:
YPbPr 1/2:
R/L 1/2:
S-Video:
COAX :
AV :
R/L In :
AC Power IN:
USB: USB jack.
PC-Audio˖
Digital Audio output.
S-Video
COAX
USB Switch AC Power IN
3
CONNECTIONS
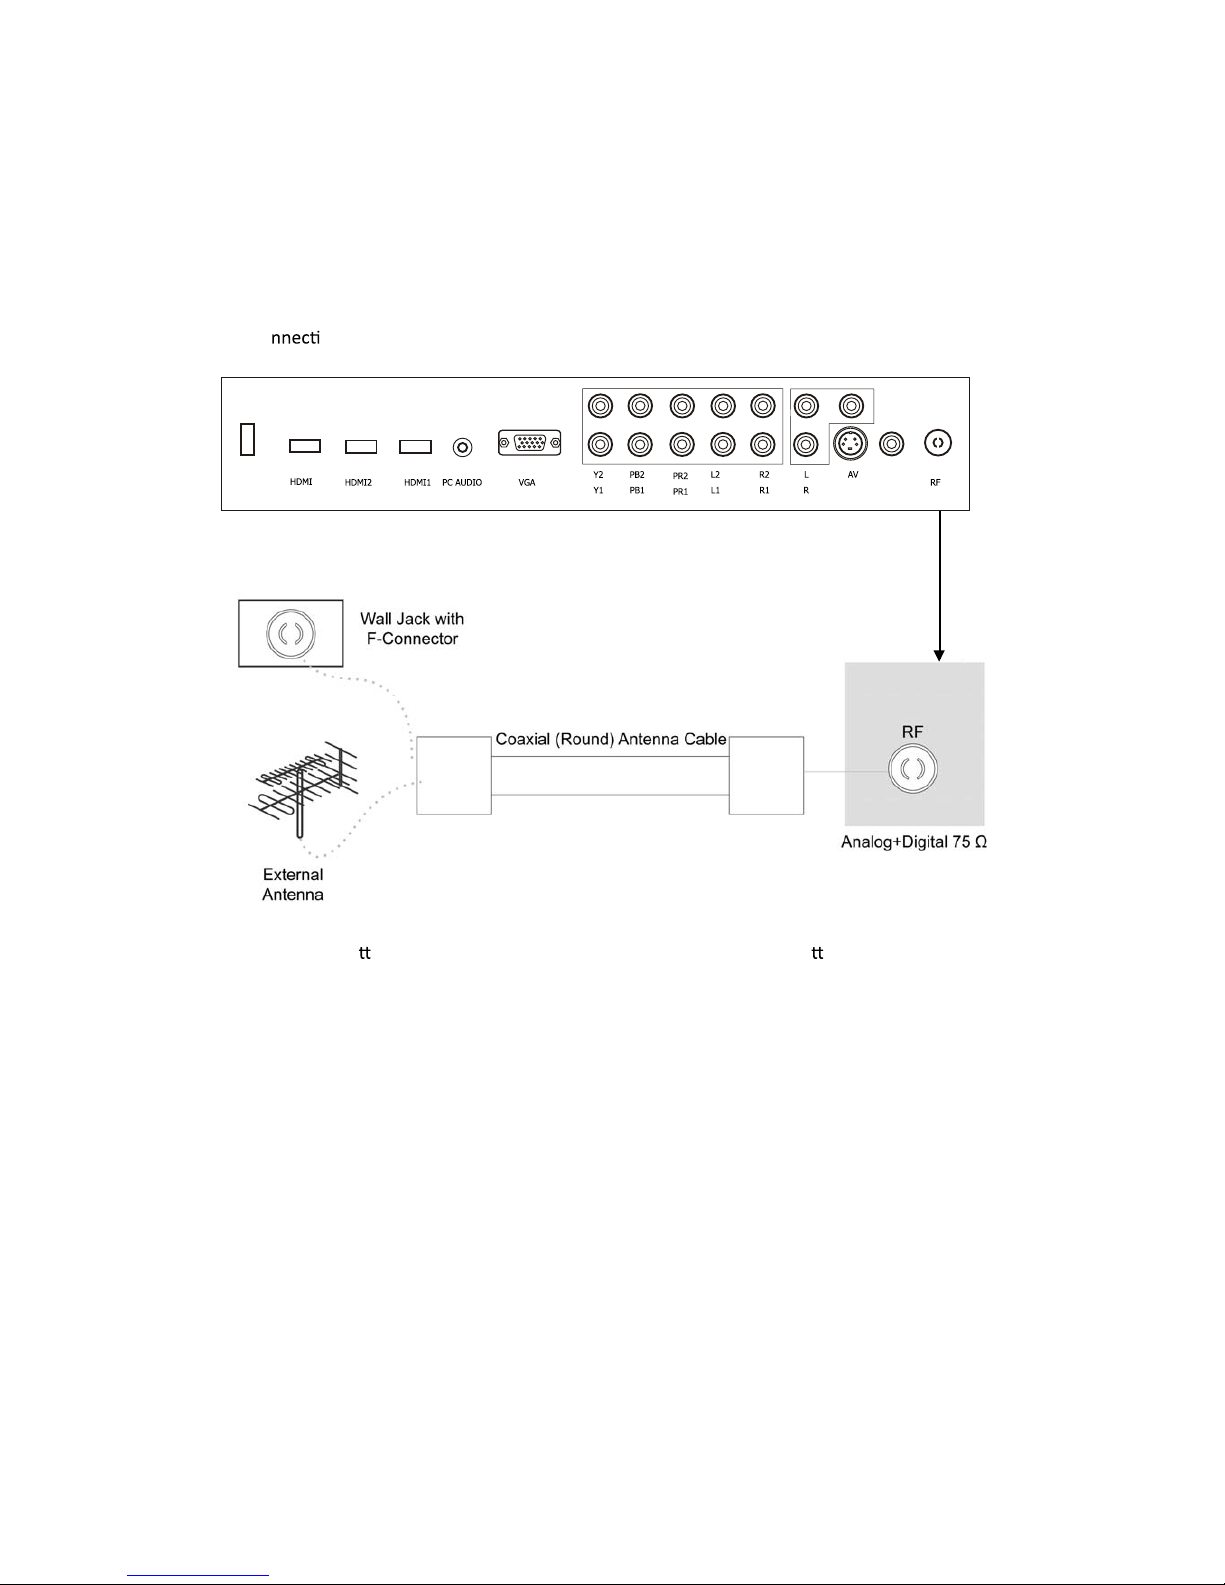
Installing an Antenna
For co ng to ATSC or NTSC broadcasts
Press SOURCE bu on on the remote control to select TV, then press Źbu on to conĮrm.
Then you can receive the ATSC/NTSC signal.
7
S-Video
COAX
USB 3

Satellite/Cable TV Set-Top Box Connec
to the Composite terminal
In order to watch Cable TV, Subscribe to your local Cable TV company and install a separate
receiver (SET-Top-Box)
terminals of other equipment diīer by manufacturer and model.
Connect the LCD TV's Composite In terminal to the cable broadcas receiver Composite Out
terming using the Composite cable. (Make sure the color of terminals and the color of cable are
the same.)
to the HDMI terminal
Watching Cable TV
1. Turn on the LCD TV and press SOURCE bu on on the remote control.
2. Use Ÿ/źbu onstomoveto"AV".
If HDMI has been connected, select "HDMI".
3. Turn on the cable broadcas receiver and select the channel you wish to view.
8
RCA Video and Audio Cable
Cable broadcasting
receiver
Cable broadcasting
receiver
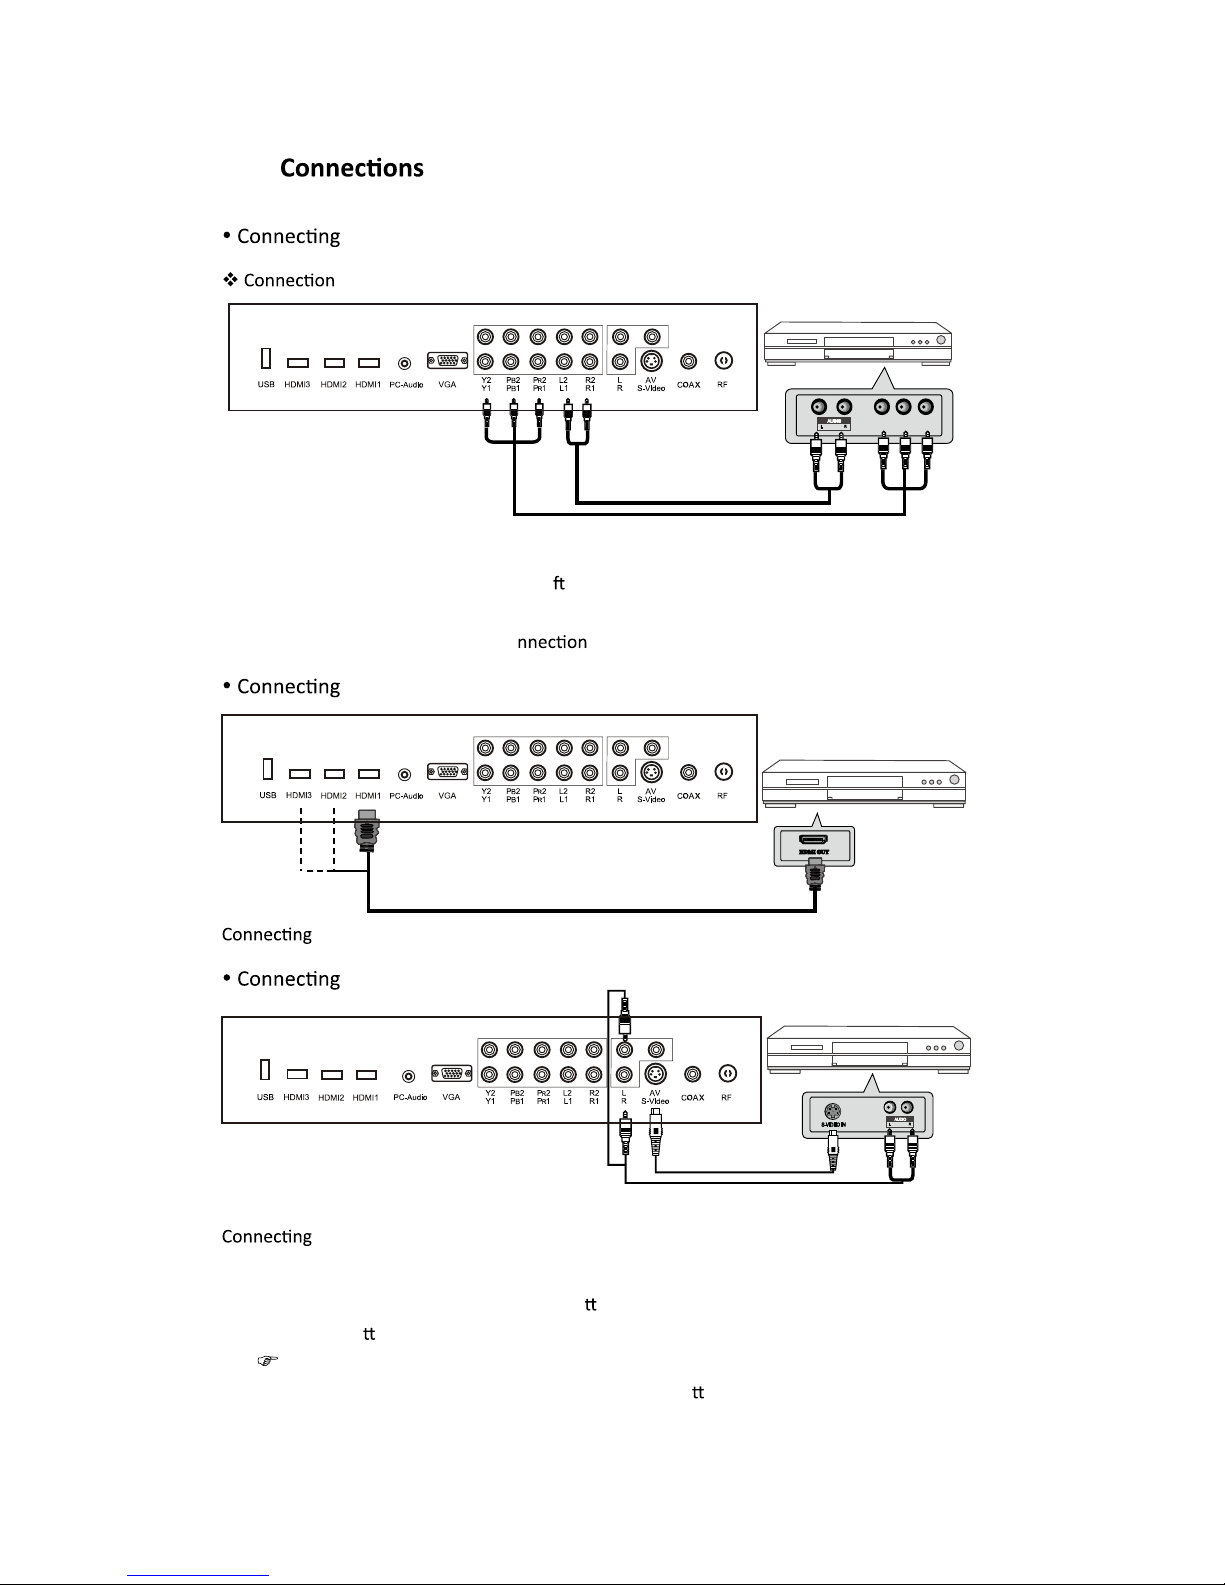
DVD
to the Component terminal
terminals of other equipments diīer by manufacturer and model.
1. Connect LCD TV's Y, Pb, Pr terminal to DVD's Video Out terminal using the external cable.
2. Connect LCD TV's Audio terminals (le & right) in AV1 to DVD's Audio Out terminal using the
Audio cable.
3. It must match the component co cable Y, Pb, Pr between the LCD TV and DVD Player.
to the HDMI terminal
from HDMI terminal to HDMI terminal.
to the S-VIDEO terminal
from HDMI terminal to S-VIDEO terminal.
Playing the DVD
1. Turn on the LCD TV and press SOURCE bu on on the remote control.
2. Use Ÿ/źbu ons to move to 'YPbPr'.
If HDMI has been connected, select 'HDMI'.
3. Turn on the DVD, insert the DVD disc and press Play bu on.
9
S-Video Cable
Audio Cable
DVD
DVD
Cable
Audio Cable
YPbPr
YPbPr
DVD
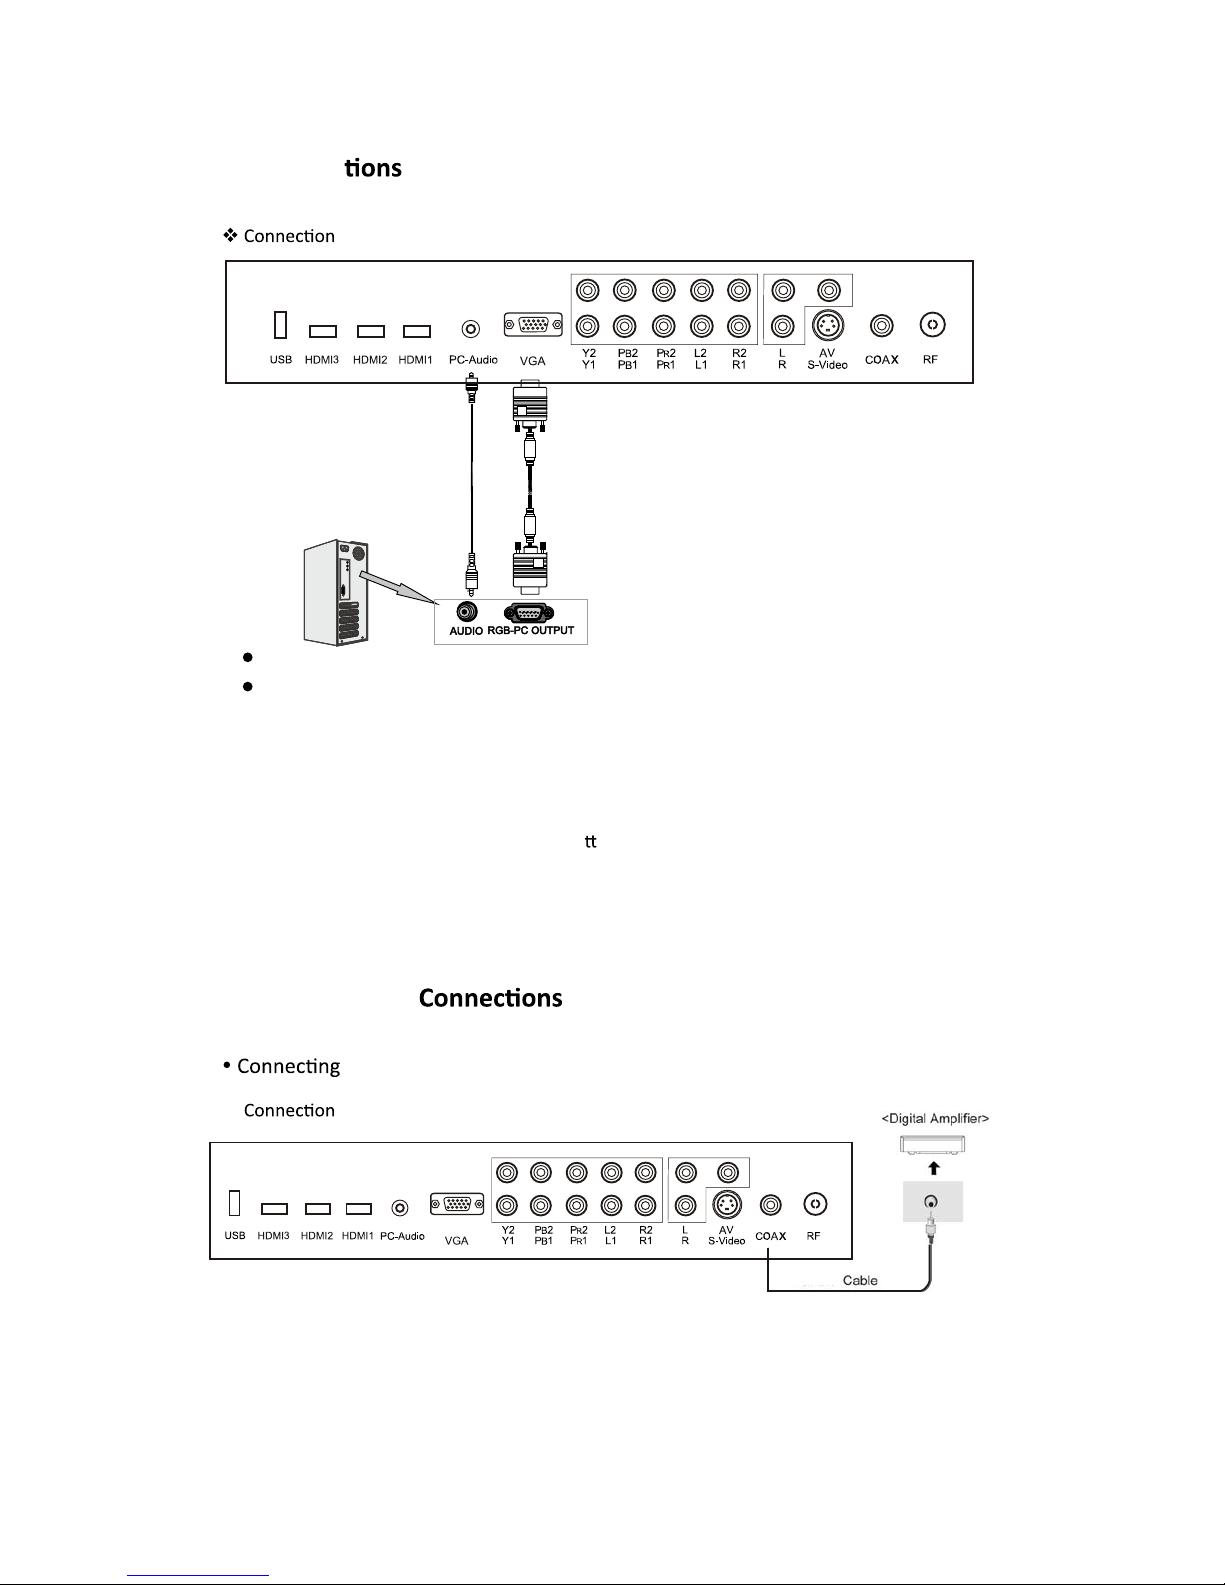
PC Connec
terminals of other equipments diīer by manufacturer and model.
Connect LCD TV's PC Input terminal to PC's RGB terminal using the D-Sub cable.
Connect LCD TV's PC Audio terminal to PC's Audio terminal using the Audio cable.
(Only for PC's with Audio terminal)
How to Use as PC monitor
1. Turn on the LCD TV and press SOURCE bu on on the remote control.
2. Use Ÿ/źto move to 'VGA'.
Digital AmpliĮer
to the Digital ŵƉůŝĮĞƌ
10
terminals of other equipments diīer by manufacturer and model.
Coaxial

Basic Use
Powering the LCD TV
Power on/oī
To turn the LCD TV on:
Press the 'POWER' bu on.
To turn the LCD TV oī:
Press the 'POWER' bu on on the LCD TV.
To turn on/oīby remote control:
Press the 'POWER' bu on of the remote control.
Input Source
You can select between the TV signal and the input signal of other equipments
connected to the TV.
Use this to switch to the input source you wish to view.
Press SOURCE bu on on the remote control.
Use Ÿ/źbu ons to move to the desired input source.
Press Źbu on to select.
11
To turn on the LCD TV
Be sure to turn off the power and unplug both units
from the wall outlet before making any connections.
Power on
Power off
AV
YPbPr1
YPbPr2
S-Video
HDMI1
HDMI2
HDMI3
VGA
Media
Applica
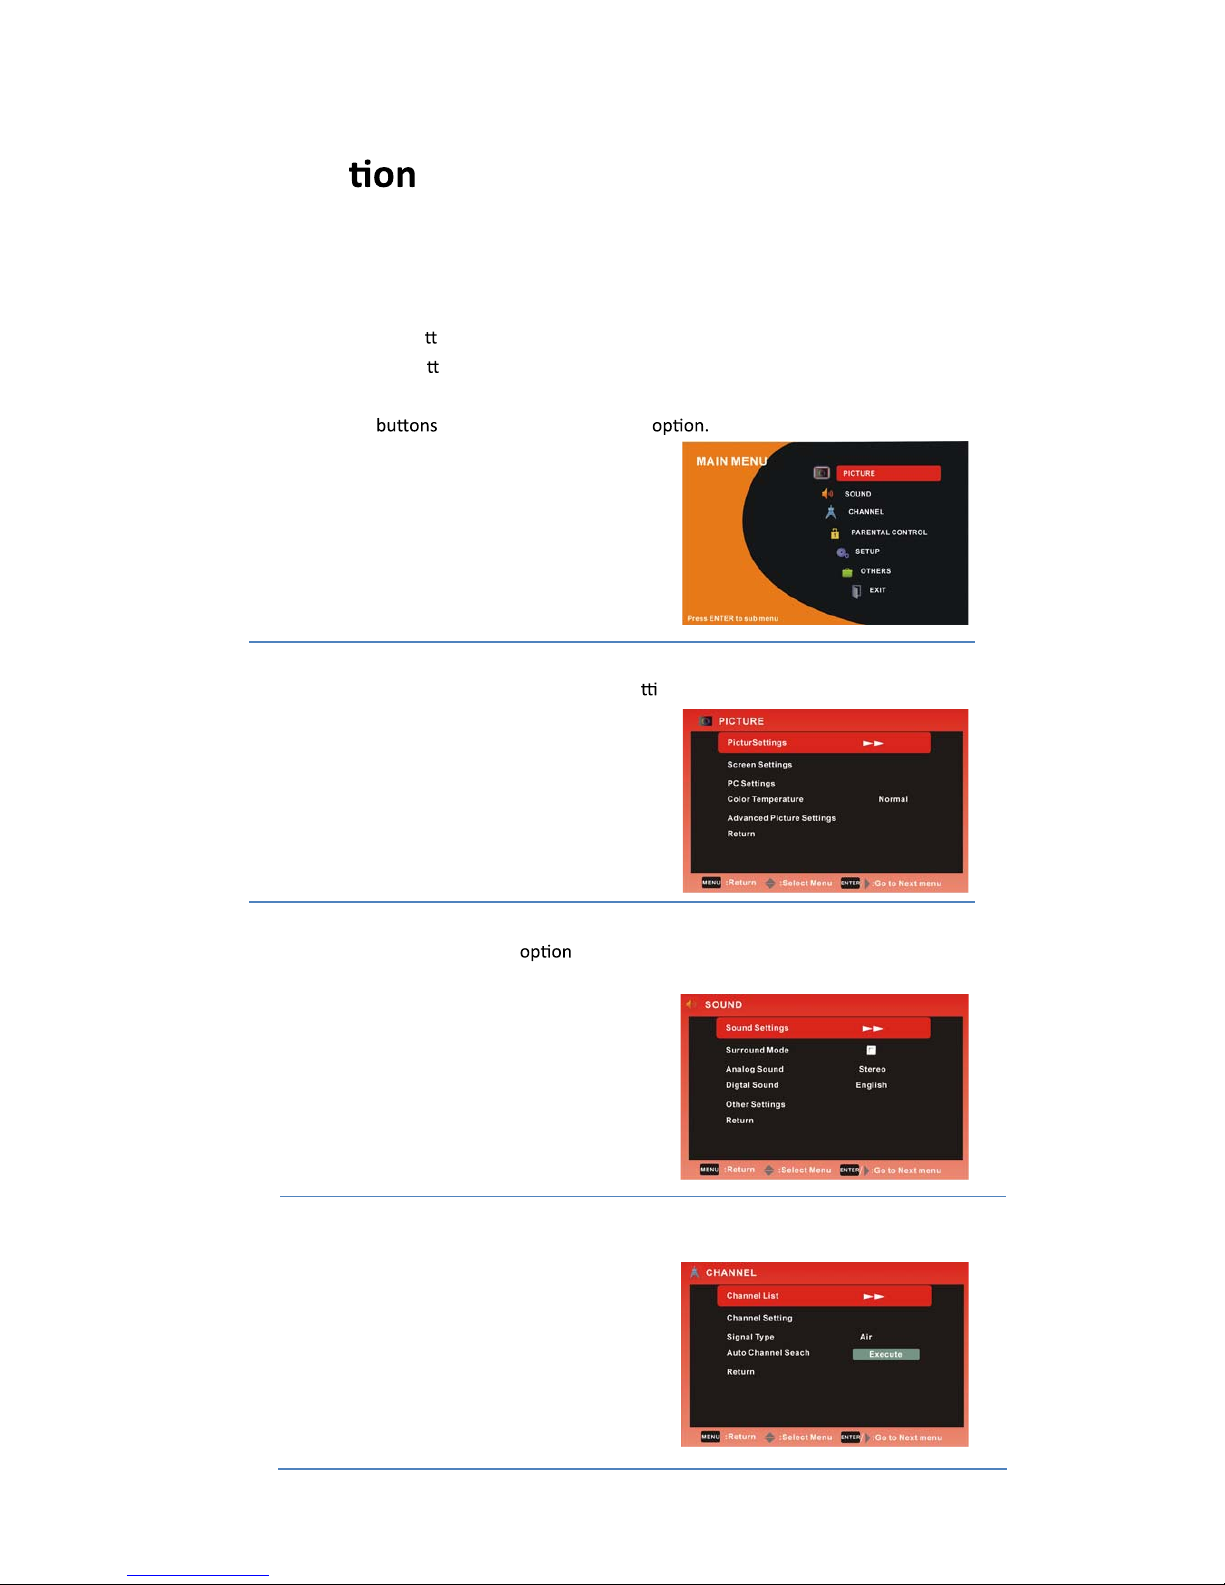
Select on screen menu
1. Press the POWER bu on to turn the LCD TV on.
2. Press the MENU bu on on the remote control, the on-screen menu will appear on the
screen.
3. Use the
Ż
/
Ź
to select your main menu
PICTURE MENU:
Allows you to make adjustments your picture se ngs. (Select TV sources for example)
SOUND MENU:
Allows you customize the sound s and eīects. (Select TV source for example)
12
CHANNEL MENU:
Allows you to search channels and set up a variety of channel ŽƉƟŽŶƐ. (Select TV source)
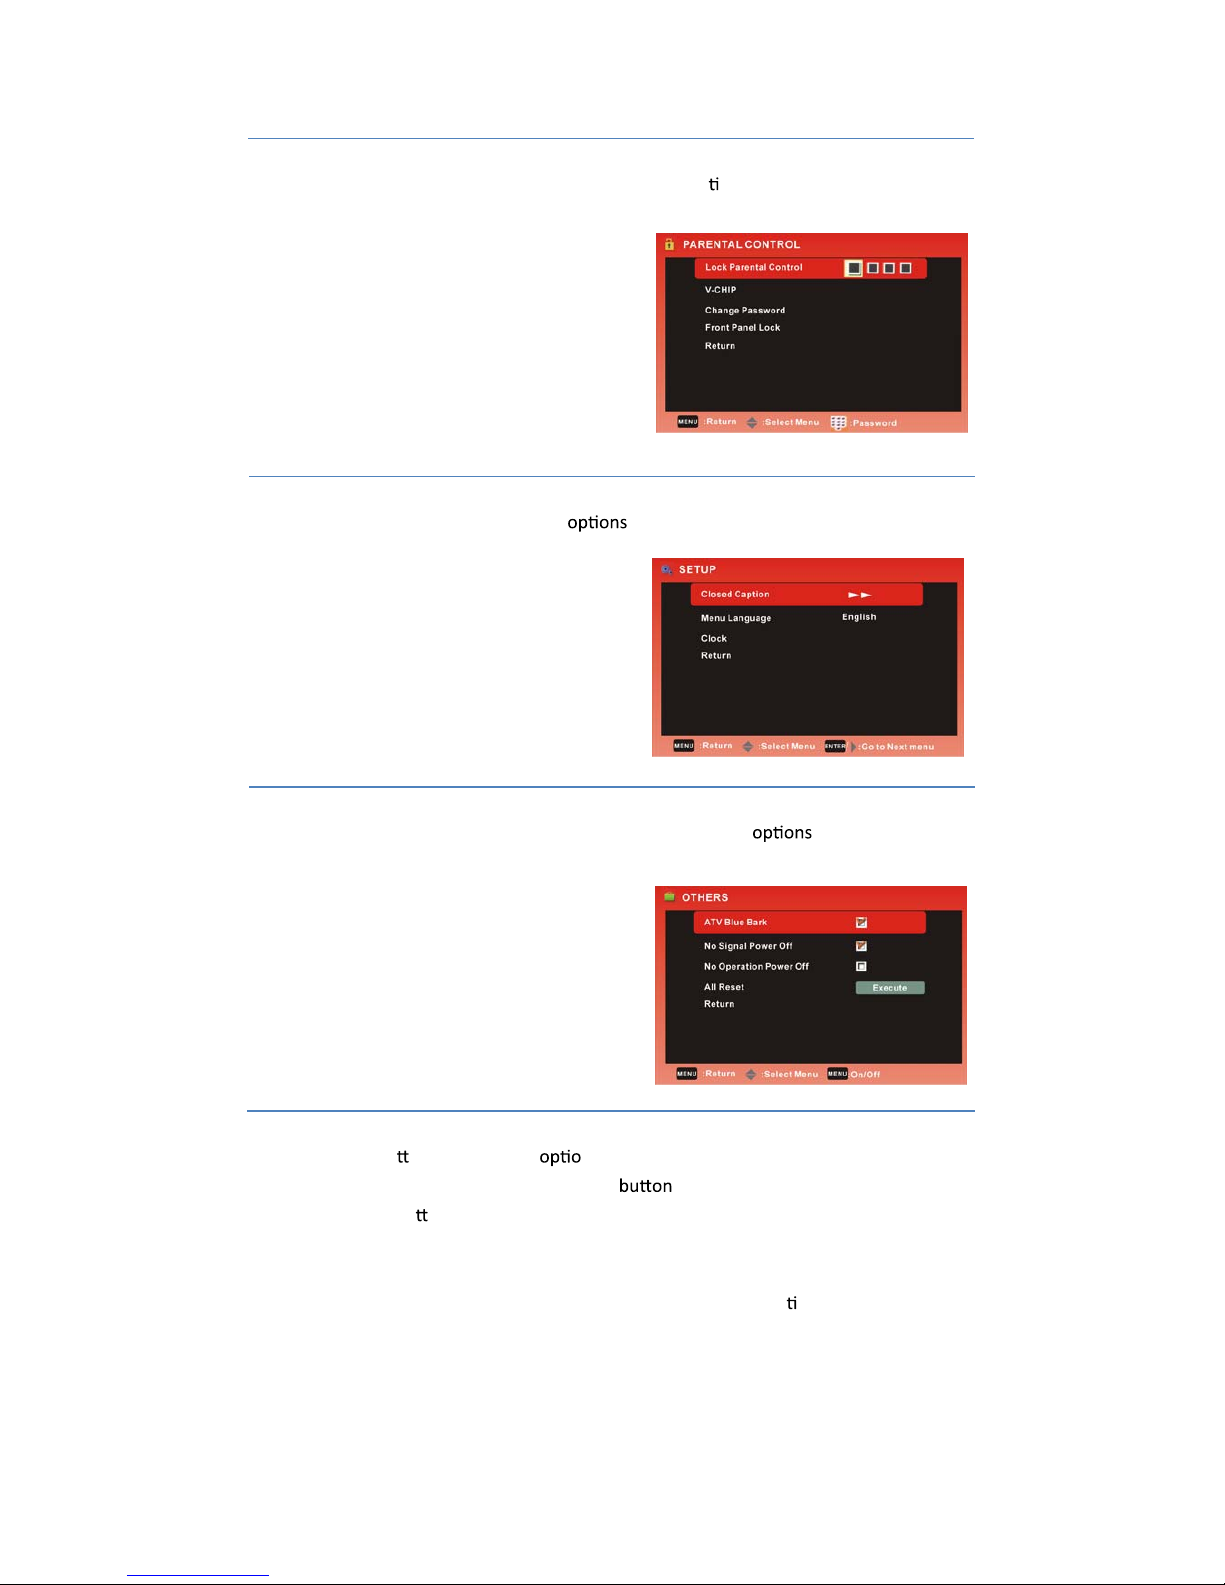
SETUP MENU:
Allows you to set up a variety of setup . (Select TV source)
PARENTAL CONTROL:
Allows you to set up a variety of PARENTAL CONTROL op ons. (Select TV source)
OTHERS MENU:
Allows you to search OTHERS and set up a variety of channel . (Select TV source)
4. Use the
Ÿ
/
ź
bu ons to select an n of the sub-menu, and press the Źbutton.
While in adjustment mode, use the
Ż
/
Ź
to change the value of the item.
5. Press the MENU bu on to exit the menu.
Note:
Only when you input the suitable signal, the relevant items can be ac vated.
13

W/dhZŵĞŶƵŽƉƟŽŶƐ
WŝĐƚƵƌĞ^ĞƫŶŐƐ
/ŶƚŚŝƐŵĂŶƵĂůƚŚĞK^;KŶ^ĐƌĞĞŶŝƐƉůĂLJͿŵĂLJďĞĚŝīĞƌĞŶƚĨƌŽŵLJŽƵƌdsƐďĞĐĂƵƐĞŝƚŝƐũƵƐƚ
ĞdžĂŵƉůĞƚŽŚĞůƉƚŚĞƵƐĞƌǁŝƚŚƚŚĞdsŽƉĞƌĂƟŽŶ
WƌĞƐƐEdZǁŚĞŶƚŚĞWŝĐƚƵƌĞ^ĞƫŶŐƐŝƚĞŵŝƐŚŝŐŚůŝŐŚƚĞĚdŚĞŶLJŽƵǁŝůůŐŽƚŚĞƐƵďͲŵĞŶƵ
ĂƐĨŽůůŽǁŝŶŐ
WƌĞƐƐƚŽƐĞůĞĐƚƚŚĞĚĞƐŝƌĞĚŵĞŶƵŝƚĞŵWƌĞƐƐEdZƚŽƉƌŽĐĞĞĚŝĨŶĞĐĞƐƐĂƌLJ
WƌĞƐƐƚŽĂĚũƵƐƚƚŚĞŝƚĞŵƚŽƚŚĞĚĞƐŝƌĞĚůĞǀĞů
tŚĞŶLJŽƵŚĂǀĞĐŚĂŶŐĞĚƚŚĞƐĞƫŶŐƐLJŽƵĐĂŶĞdžŝƚĨƌŽŵƚŚĞŵĞŶƵďLJƉƌĞƐƐŝŶŐDEh
Picture Mode
WƌĞƐƐ ďƵƩŽŶƚŽƐĞůĞĐƚWŝĐƚƵƌĞDŽĚĞƚŚĞŶƉƌĞƐƐďƵƩŽŶƚŽĂĚũƵƐƚ
;ǀĂŝůĂďůĞƉŝĐƚƵƌĞŵŽĚĞDŽǀŝĞhƐĞƌLJŶĂŵŝĐ^ƚĂŶĚĂƌĚͿ
ƌŝŐŚƚŶĞƐƐ
WƌĞƐƐ ďƵƩŽŶƚŽƐĞůĞĐƚƌŝŐŚƚŶĞƐƐƚŚĞŶƉƌĞƐƐďƵƩŽŶƚŽĂĚũƵƐƚ
ŽŶƚƌĂƐƚ
WƌĞƐƐ ďƵƩŽŶƚŽƐĞůĞĐƚŽŶƚƌĂƐƚƚŚĞŶƉƌĞƐƐďƵƩŽŶƚŽĂĚũƵƐƚ
Color
WƌĞƐƐ ďƵƩŽŶƚŽƐĞůĞĐƚŽůŽƌƚŚĞŶƉƌĞƐƐďƵƩŽŶƚŽĂĚũƵƐƚ
Tint
WƌĞƐƐ ďƵƩŽŶƚŽƐĞůĞĐƚdŝŶƚƚŚĞŶƉƌĞƐƐďƵƩŽŶƚŽĂĚũƵƐƚ
^ŚĂƌƉŶĞƐƐ
WƌĞƐƐ ďƵƩŽŶƚŽƐĞůĞĐƚ^ŚĂƌƉŶĞƐƐƚŚĞŶƉƌĞƐƐďƵƩŽŶƚŽĂĚũƵƐƚ
Ż
/
Ź
Ż
/
Ź
Ż
/
Ź
Ż
/
Ź
Ż
/
Ź
Ż
/
Ź
Ż
/
Ź
Ż/Ź
Ż/Ź
Ż/Ź
Ż/Ź
Ż/Ź
Ż/Ź
Ż/Ź
14

.Press to select the desired menu item. Press ENTER to proceed if necessary.
.Press to adjust the item to the desired level.
Screen Size
Press
(Available Screen Size: WaterGlass,Cinema,Full,Normal)
AutoWide
Auto Adjust
Press
Press
Clock
Press
Press
Reset
Press
to the factory mode.
Ż/Ź
Ż/Ź
Ÿ/ź
Ÿ/ź
Ÿ/ź
Ż/Ź
Ż/Ź
Ż/Ź
Ż/Ź
Ÿ/ź
Ÿ/ź
Ÿ/ź
Ÿ/ź
Ÿ/ź
Ÿ/ź
15

Color Temperature
SABC
Press
(Available SABC: Low, MediumKī,igh)
Film Mode
Press
(Available Film Mode:KŶKīͿ
Press
16
Ż/Ź
Ż/Ź
Ż/Ź
Ż/Ź
Ż/Ź
Ÿ/ź
Ÿ/ź
Ÿ/ź
Ÿ/ź

Surround Mode
Then you will go the sub-menu as following.
.Press to select the desired menu item. Press ENTER to proceed if necessary.
.Press to adjust the item to the desired level.
Press
Analog Sound
(Available Analog Sound: SAP, Stereo, Mono)
Sound Mode
Press
Bass
Press
Treble
Press
Balance
Press
17
Ż
/
Ź
Ż/Ź
Ż
/
Ź
Ż
/
Ź
Ż
/
Ź
Ż
/
Ź
Ż
/
Ź
Ż
/
Ź
Ż/Ź
Ż/Ź
Ż/Ź
Ż/Ź
Ż/Ź
Other manuals for EQ4088P
1
Table of contents
Other Auria LCD TV manuals


