Auria EQ5588 User manual

EQ5588
USER GUIDE

Contents
ImportantSafetyInstructions ................................................................................. 1
WARNING......................................................................................................................................1
Caution..........................................................................................................................................1
Important......................................................................................................................................1
REGULATORYINFORMATION........................................................................................................1
GENERALINFORMATION ........................................................................................ 3
Accessories....................................................................................................................................3
BatteriesInstallationofRemote‐ControlUnit..............................................................................3
BaseAssemblyGuide....................................................................................................................4
ViewingtheControlPanel ............................................................................................................5
RemoteControl.............................................................................................................................6
Namesofeachpart.......................................................................................................................7
CONNECTIONS ........................................................................................................ 8
InstallinganAntenna ....................................................................................................................8
Satellite/CableTVSet‐TopBoxConnections ................................................................................9
WatchingCableTV........................................................................................................................9
DVDConnections ........................................................................................................................10
PlayingtheDVD ..........................................................................................................................10
PCConnections ...........................................................................................................................11
HowtoUseasPCmonitor ..........................................................................................................11
DigitalAmplifierConnections .....................................................................................................11
BasicUse ...............................................................................................................12
PoweringtheLCDTV ..................................................................................................................12
SelectingInputSource ................................................................................................................12
Application ............................................................................................................13
OperatingtheMenu ...................................................................................................................13
CustomizingthePICTURESettings..............................................................................................15
CustomizingtheAudioSettings ..................................................................................................16
CustomizingtheTIMERSettings .................................................................................................17
CustomizingtheSETUPSettings .................................................................................................18
CustomizingtheLOCKSettings ...................................................................................................21
CustomizingtheCHANNELSettings............................................................................................24
PCMode ................................................................................................................27
Troubleshooting....................................................................................................28
Specifications.........................................................................................................29

ImportantSafetyInstructions
WARNING
TOPREVENTDAMAGEWHICHMAYRESULTINFIREORELECTRICSHOCKHAZARD,DONOT
EXPOSETHISAPPLIANCETORAINORMOISTURE.
Caution
Theseservicinginstructionsareforusebyqualifiedservicepersonnelonly.
Toreducetheriskofelectricshock,donotperformanyservicingotherthanthatcontainedin
theoperatinginstructionsunlessyouarequalifiedtodoso.
Anychangesormodificationsnotexpresslyapprovedbythepartyresponsibleforcompliance
couldvoidtheuser’sauthoritytooperatetheequipment.
Important
OneFederalCourthasheldthatunauthorizedrecordingofcopyrightedTVprogramsisan
infringementofU.S.copyrightlaws.
CertainCanadianprogramsmayalsobecopyrightedandanyunauthorizedrecordinginwholeor
inpartmaybeinviolationoftheserights.
REGULATORYINFORMATION
ThisequipmenthasbeentestedandfoundtocomplywiththelimitsforaClassBdigitaldevice,
pursuanttoPart15oftheFCCRules.Theselimitsaredesignedtoprovidereasonableprotection
againstharmfulinterferencewhentheequipmentisoperatedinaresidentialinstallation.This
equipmentgenerates,usesandcanradiateradiofrequencyenergyand,ifnotinstalledandused
inaccordancewiththeinstructionmanual,maycauseharmfulinterferencetoradio
communications.However,thereisnoguaranteethatinterferencewillnotoccurinaparticular
installation.Ifthisequipmentdoescauseharmfulinterferencetoradioortelevisionreception,
whichcanbedeterminedbyturningtheequipmentoffandon,theuserisencouragedtotryto
correcttheinterferencebyoneormoreofthefollowingmeasures:
Reorientorrelocatethereceivingantenna.
Increasetheseparationbetweentheequipmentandreceiver.
Connecttheequipmentintoanoutletonacircuitdifferentfromthattowhichthereceiveris
connected.
Consultthedealeroranexperiencedradio/TVtechnicianforhelp.
1) Readtheseinstructions.
1

2) Keeptheseinstructions.
3) Heedallinstructions.
4) Followallinstructions.
5) Donotusethisapparatusnearwater.
6) Cleanonlywithdrycloth.
7) Donotblockanyventilationopenings.Installinaccordancewiththemanufacturer’s
instructions.
8) Donotinstallnearanyheatsourcessuchasradiators,heatregisters,stoves,orother
apparatus(includingamplifiers)thatproduceheat.
9) Donotdefeatthesafetypurposeofthepolarizedorgrounding‐typeplug.Apolarizedplug
hastwobladeswithonewiderthantheother.Agroundingtypeplughastwobladesand
athirdgroundingprong.Thewidebladeorthethirdprongisprovidedforyoursafety.If
theprovidedplugdoesnotfitintoyouroutlet,consultanelectricianforreplacementof
theobsoleteoutlet.
10) ProtectthepowercordfrombeingwalkedonorpinchedparticularlyatPlugs,
conveniencereceptacles,andthepointwheretheyexitfromtheapparatus.
11) Onlyuseattachments/accessoriesspecifiedbythemanufacturer.
12) Useonlywiththecart,stand,tripod,bracket,ortablespecifiedbythemanufacturer,or
soldwiththeapparatus.Whenacartisusedcautionwhenmovingthecart/apparatus
combinationtoavoidinjurytip‐over.
13) Unplugthisapparatusduringlightningstormsorwhenunusedforlongperiodsoftime.
14) Referallservicingtoqualifiedservicepersonnel.Servicingisrequiredwhentheapparatus
hasbeendamagedinanyway,suchaspower‐supplycordorplygisdamaged,liquidhas
beenspilledorobjectshavefallenintotheapparatus.Theapparatushasbeenexposedto
rainormoisture,doesnotoperatenormally,orhasbeendropped.
15) Theapparatusshallbedisconnectedfromthemainsbyplacingthepower/standbyswitch
inthestandbypositionandunpluggingthepowercordoftheapparatusfromtheAC
mainsreceptacle.
16) Thesocket‐outshallbeinstalledneartheequipmentandshallbeeasilyaccessible.
17) Thisproductshallneverbeplacedinabuilt‐ininstallationsuchasabookcaseorrack
unlessproperventilationisprovidedorthemanufacture’sinstructionshavebeenadhered
to.
18) Theapparatusshallnotbeexposedtodrippingorsplashingandthatnoobjectsfilledwith
liquid,suchasvases,shallbeplacedontheapparatus.
2
GENERALINFORMATION
FiguresandillustrationsinthisUserManualareprovidedforreferenceonlyandmaydifferfrom
actualproductappearance.Productdesignandspecificationsmaybechangedwithoutnoticein
ordertoenhanceproductperformance.
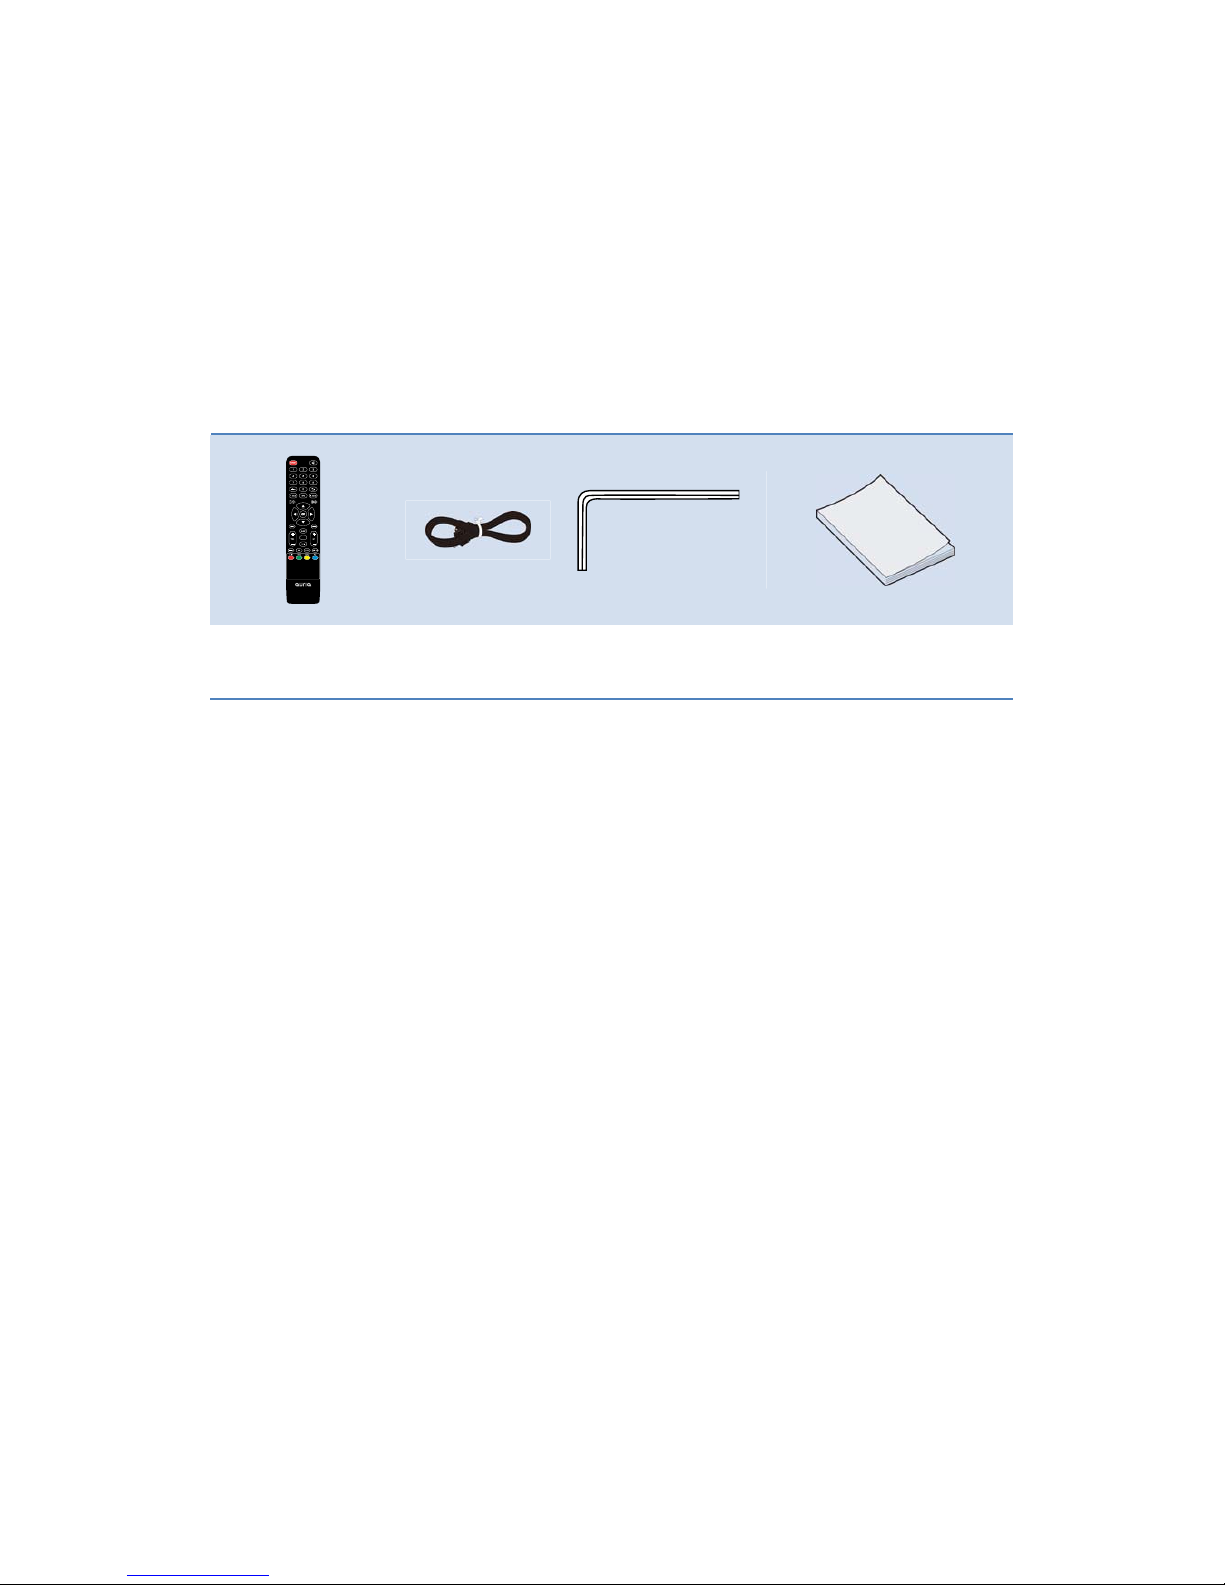
Accessories
RemoteControlPowerCordScrewdriverUserManual
PleasemakesurethefollowingitemsareincludedwithyourLCDTV.Ifanyitemsaremissing,
contactyourdealer.
Theitemscolorandshapemayvarydependingonthemodel.
BatteriesInstallationofRemote‐ControlUnit
1. Liftthecoveratthebackoftheremotecontrolupwardasshowninthefigure.
2. InstalltwoAAAsizebatteries.
Makesuretomatchthe‘+’and‘‐’endsofthebatterieswiththediagraminsidethe
compartment.
3. Replacethecover.
Removethebatteriesandstorethemincool,dryplaceifyouwon’tbeusingtheremote
controlforalongtime.(AssumingtypicalTVusage,thebatteriesshouldlastforaboutone
year.)
)Iftheremotecontroldoesn’twork,checkthefollowing:
zIstheTVpoweron?
zAretheplusandminusendsofthebatteriesreversed?
zArethebatteriesdrained?
zIsthereapoweroutageoristhepowercordunplugged?
zIsthereaspecialfluorescentlightorneonsignnearby?
3
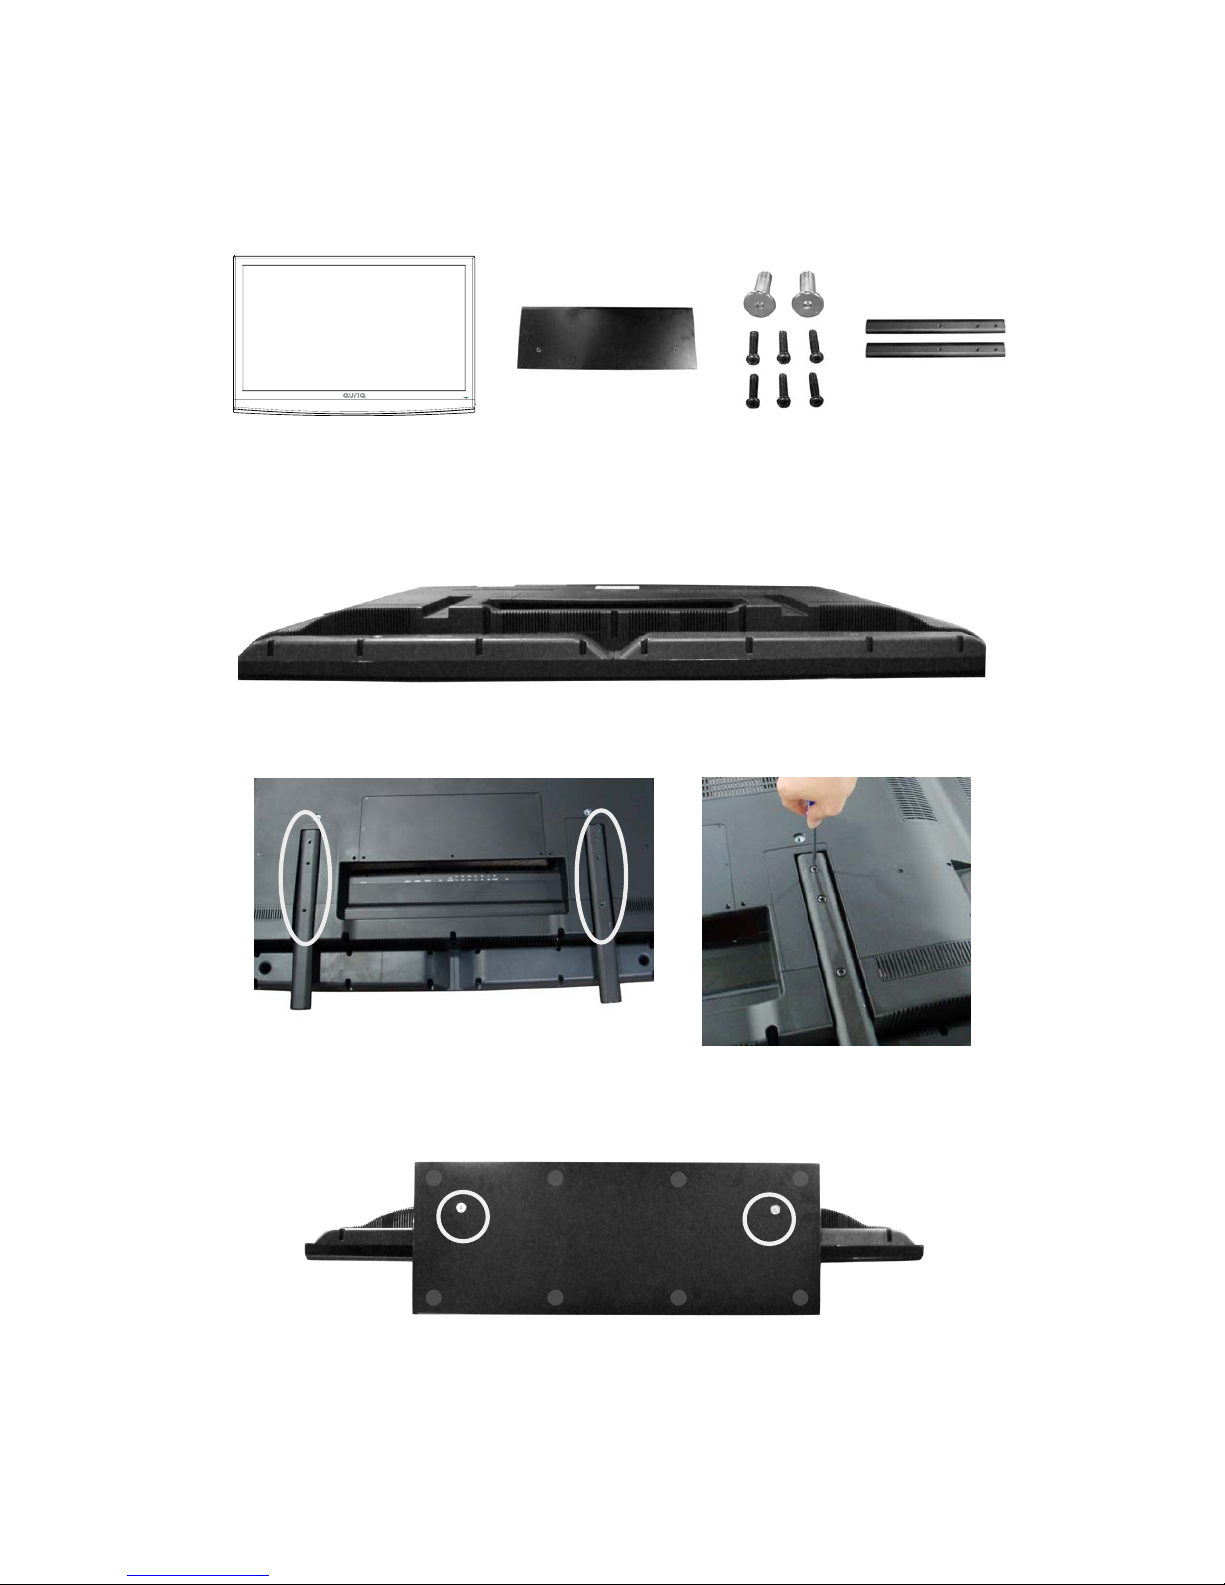
BaseAssemblyGuide
PackageList
TV Base
Base Screws
Stand Screws Standards
1. CarefullyplacetheTVfaceddownonasuitablesurfacewithasoftclothorcushionwiththe
basemountingfacingtowardsyou(Fig1).
Fig1
2. PlacethetwostandardsontotheTV,andfitthesixstand screwsprovidedintotheholesas
showninFig2.
Fig2
3. PlacethebaseontotheTV,andfitthetwobasescrewsprovidedintotheholesasshownin
Fig3.andcompleteasshowninFig3.
Fig3
4

ViewingtheControlPanel
Theproductcolorandshapemayvarydependingonthemodel.
Youcanuseabuttonbypressingthesidepanelbuttons.
1. POWER:PresstoturntheTVonandoff.
2. INPUT:Tog g lesbetweenalltheavailableinputsources.Intheon‐screenmenu,usethis
buttonasyouusetheENTERbuttonontheremotecontrol.
3. MENU:Presstoseeanon‐screenmenuofyourTV’sfeatures.
4. CH+/‐:Presstochangechannels.Intheon‐screenmenu,usetheCH+/‐buttonsasyouwould
usethe▲/▼buttonsontheremotecontrol.
5. VOL+/‐:Presstoincreaseordecreasethevolume.Intheon‐screenmenu,usetheVOL+/‐
buttonsasyouwouldusethe◄/►buttonsontheremotecontrol.
5

RemoteControl
1. POWER:TurnstheTVonandoff.
2. MUTE:Presstotemporarilycutoffthesound.
3. NEMERICBUTTONS:Presstochangethechannel,or
inputpasswordnumber.
4. ‐/‐‐:Presstoselectadditionalchannels(digital)being
broadcastbythesamestation.Forexample,toselect
channel‘5‐3’,press‘5’,thenpress‐/‐‐and‘3.’
5. : Presstoswitchbetweenthecurrentandthe
previouschannel.
6. P. M O D E : Presstoselectthepicturemode.
7. INFO:PresstodisplayinformationtotheTVscreen.
8. S.MODE:Presstoselectthesoundmode.
9. MTS:Presstochoosestereo,monoorSeparateAudio
Program(SAPbroadcast).
10. ZOOM:Presstocyclethroughthedifferentzoomof
themainpicture.
11. ▲/▼/◄/►/ENTER:Usetoselecton‐screenmenu
itemsandchangemenuvalues.
12. MENU:Presstodisplaythemainon‐screenmenu.
13. SOURCE:Presstodisplayandselecttheavailablevideo
sources.
14. VOL+/‐:Presstoincreaseordecreasethevolume.
15. CH+/‐:Presstochangechannels.
16. SLEEP:PresstosetuptheTVautoturnofftime.
17. EXIT:Presstoexitthemenu.
18. FREEZE:Presstofreezepicture.It’snotavailableon
DTVmode.
19. CC:Presstocontrolthecaptiondecoder.
20. FAV:PresstodisplayFavoriteChannelListsonthe
screen.
21. ADD/DEL:Presstoadd/removethehighlighted
channelasfavorite.
22. LIST:PresstodisplayChannelListsonthescreen.
23. EPG:PresstoshowtheElectronicProgramGuide
menu.
24. AUTO:AutoadjustthepictureinPCmode.
25. PC:PresstoselectthePCmodedirectly.
UniversalRemoteCodes:11423,10017,11265,10178,10856,11178..PleasealsorefertoLG
codes.
6
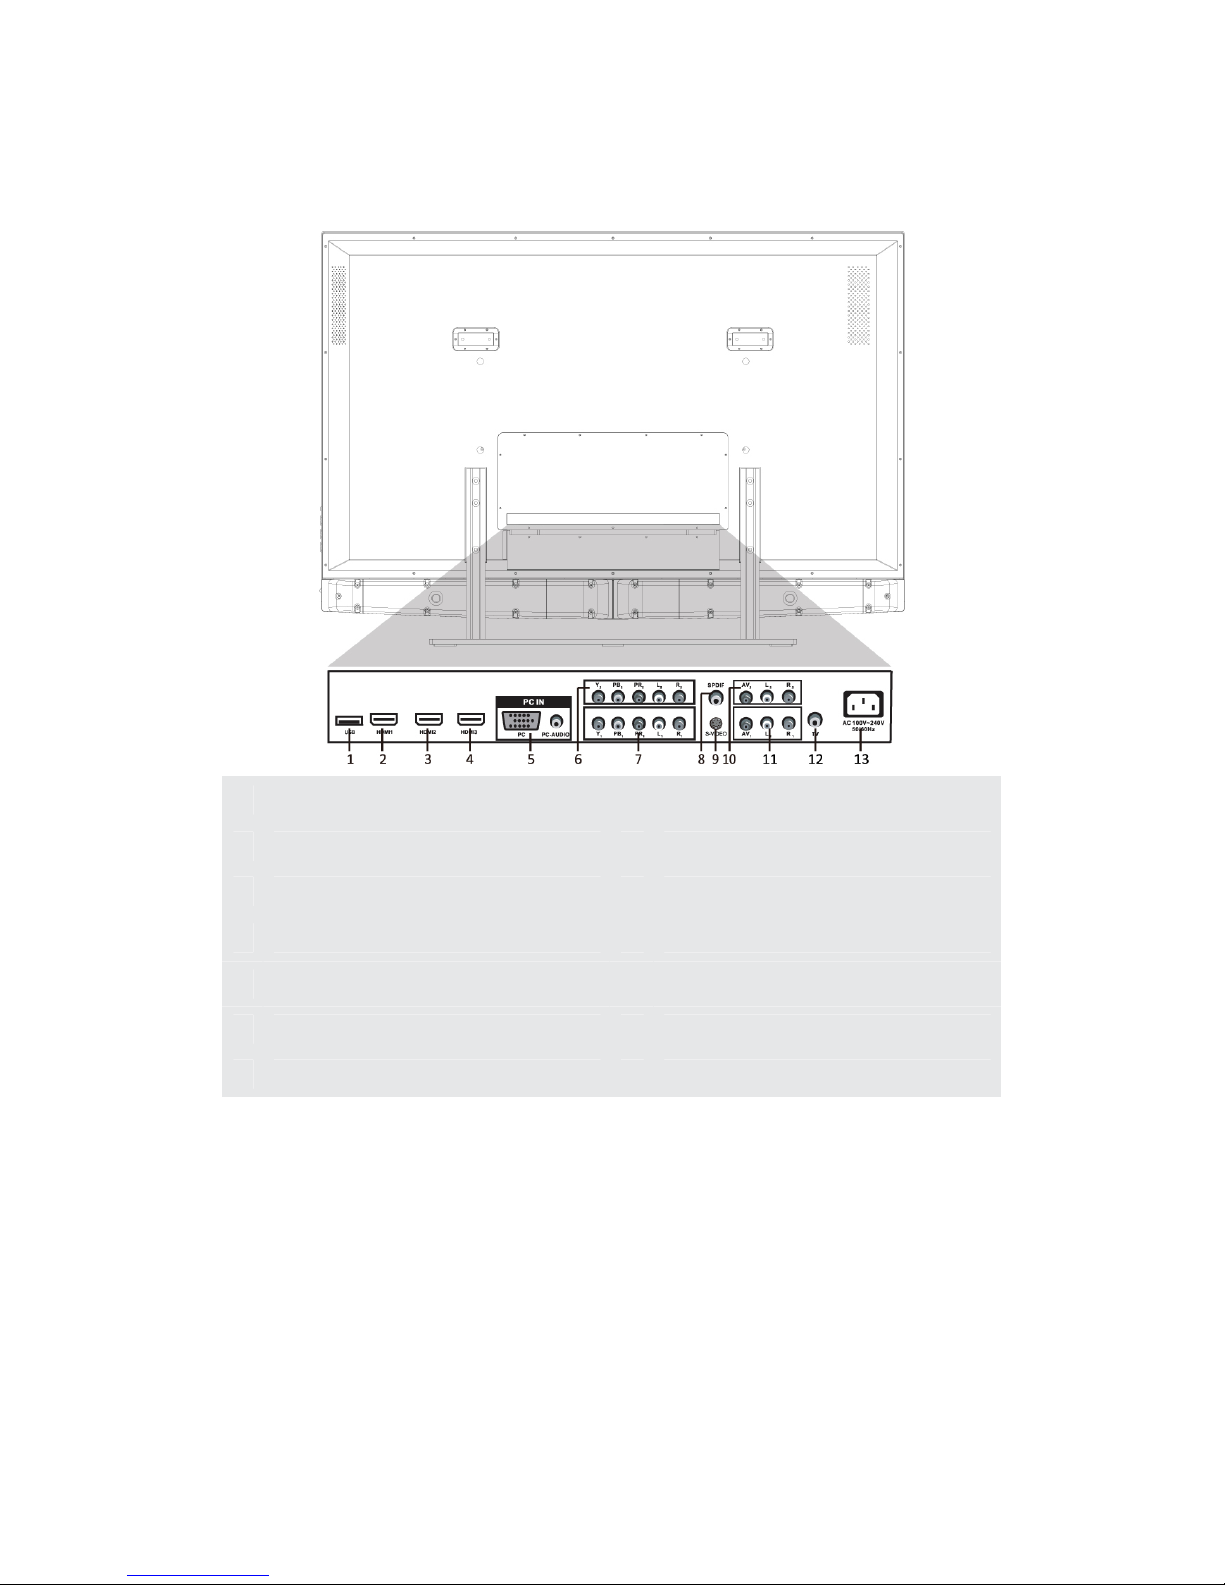
Namesofeachpart
1USB(Onlytoupdatethesoftware)8SPDIF
2HDMI1jack9S‐VIDEO
3HDMI2jack10 AV2INandAUDIO2(R/L)
4HDMI3jack11 AV1INandAUDIO1(R/L)
5PCandPCAUDIOjack12 TV
6Y2,Pb2,Pr2andAUDIO(R/L)jack13 ACinput
7Y1,Pb1,Pr1andAUDIO(R/L)jack
Theproductcolorandshapemayvarydependingonthemodel.
7

CONNECTIONS
InstallinganAntenna
ForconnectingtoATSCorNTSCbroadcasts
PressSOURCEbuttonontheremotecontroltoselectTV,thenpress►buttontoconfirm.
ThenyoucanreceivetheATSC/NTSCsignal.
8
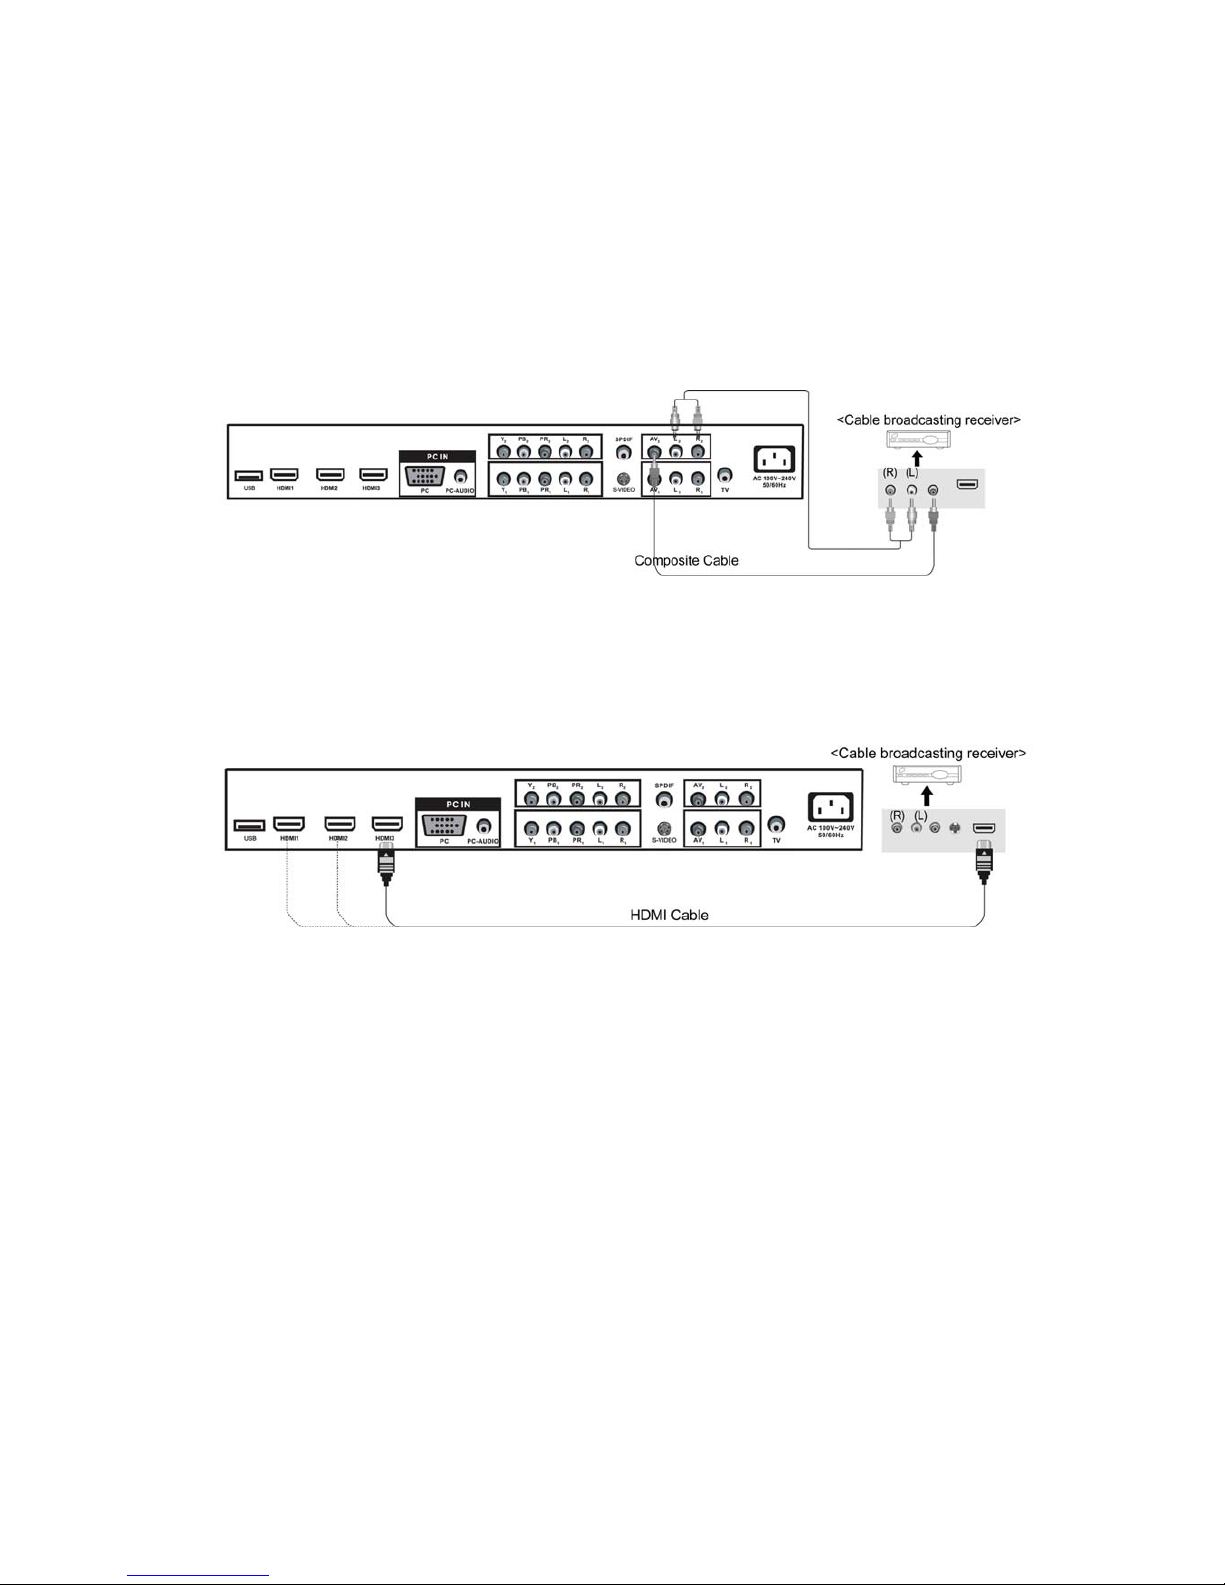
Satellite/CableTVSet‐TopBoxConnections
yConnectingtotheCompositeterminal
InordertowatchCableTV,SubscribetoyourlocalCableTVcompanyandinstallaseparate
receiver(SET‐Top‐Box)
Connectionterminalsofotherequipmentdifferbymanufacturerandmodel.
ConnecttheLCDTV’sCompositeInterminaltothecablebroadcastingreceiverCompositeOut
termingusingtheCompositecable.(Makesurethecolorofterminalsandthecolorofcableare
thesame.)
yConnectingtotheHDMIterminal
WatchingCableTV
1. TurnontheLCDTVandpressSOURCEbuttonontheremotecontrol.
2. Use▲/▼buttonstomoveto“AV ”.
)IfHDMIhasbeenconnected,select“HDMI”.
3. Turnonthecablebroadcastingreceiverandselectthechannelyouwishtoview.
9

DVDConnections
yConnectingtotheComponentterminal
Connectionterminalsofotherequipmentsdifferbymanufacturerandmodel.
1. ConnectLCDTV’sY, Pb,PrterminaltoDVD’sVideoOutterminalusingtheexternalcable.
2. ConnectLCDTV’sAudioterminals(left&right)inAV1toDVD’sAudioOutterminalusingthe
Audiocable.
3. ItmustmatchthecomponentconnectioncableY, Pb,PrbetweentheLCDTVandDVDPlayer.
yConnectingtotheHDMIterminal
ConnectingfromHDMIterminaltoHDMIterminal.
yConnectingtotheS‐VIDEOterminal
ConnectingfromHDMIterminaltoS‐VIDEOterminal.
PlayingtheDVD
1. TurnontheLCDTVandpressSOURCEbuttonontheremotecontrol.
2. Use▲/▼buttonstomoveto“YPbPr”.
)IfHDMIhasbeenconnected,select“HDMI”.
3. TurnontheDVD,inserttheDVDdiscandpressPlaybutton.
10
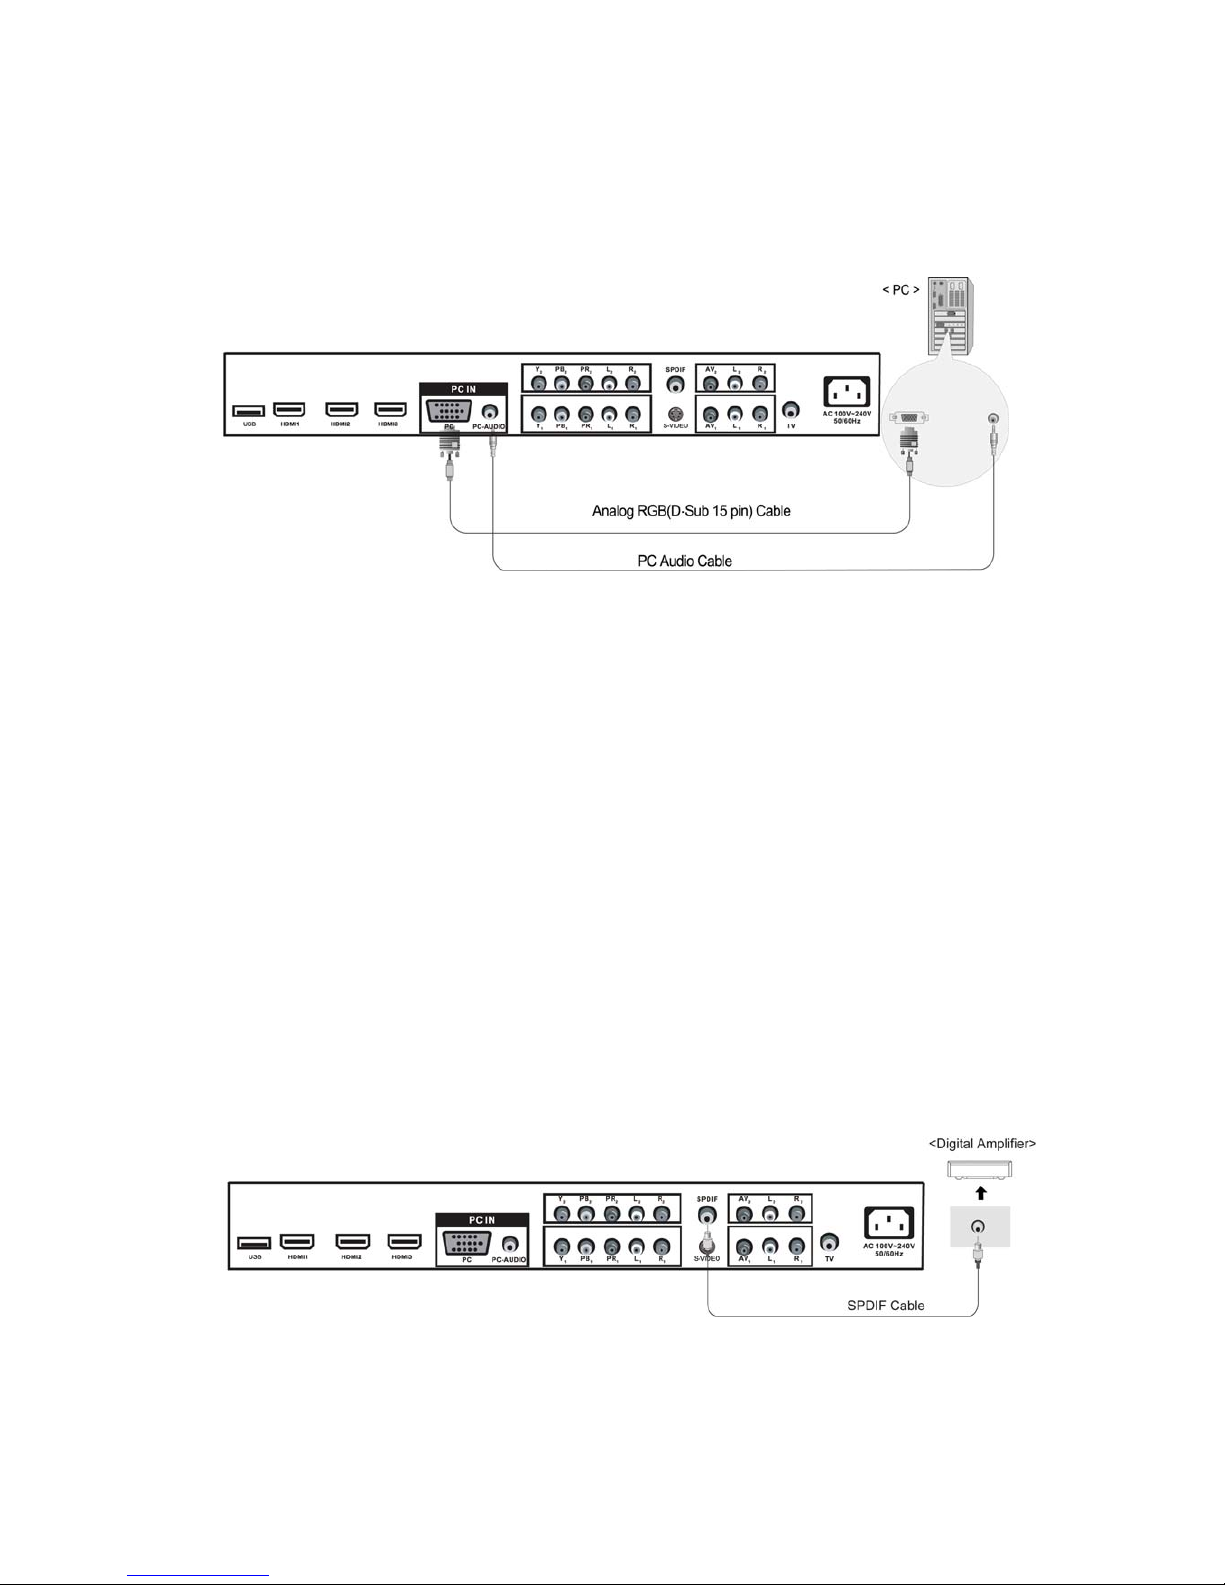
PCConnections
Connectionterminalsofotherequipmentsdifferbymanufacturerandmodel.
zConnectLCDTV’sPCInputterminaltoPC’sRGBterminalusingtheD‐Subcable.
zConnectLCDTV’sPCAudioterminaltoPC’sAudioterminalusingtheAudiocable.
(OnlyforPC’swithAudioterminal)
HowtoUseasPCmonitor
1. TurnontheLCDTVandpressSOURCEbuttonontheremotecontrol.
2. Use▲/▼tomoveto“VGA”.
DigitalAmplifierConnections
yConnectingtotheDigitalAmplifier
Connectionterminalsofotherequipmentsdifferbymanufacturerandmodel.
11

BasicUse
PoweringtheLCDTV
yPoweron/off
ToturntheLCDTVon:
Pressthe“POWER”button.
ToturntheLCDTVoff:
Pressthe“POWER”buttonontheLCDTV.
Toturnon/offbyremotecontrol:
Pressthe“POWER”buttonoftheremotecontrol.
SelectingInputSource
YoucanselectbetweentheTVsignalandtheinputsignalofotherequipments
connectedtotheTV.
Usethisfunctiontoswitchtotheinputsourceyouwishtoview.
)PressSOURCEbuttonontheremotecontrol.
)Use▲/▼buttonstomovetothedesiredinputsource.
)Press►buttontoselect.
12

Application
OperatingtheMenu
1. PressthePOWERbuttontoturntheLCDTVon.
2. PresstheMENUbuttonontheremotecontrol,theon‐screenmenuwillappearonthe
screen.
3. Usethe◄/►buttonstoselectyourmainmenuoption.
PICTUREMENU:
Allowsyoutomakeadjustmentsyourpicturesettings.(SelectTVsourcesforexample)
SOUNDMENU:
Allowsyoucustomizethesoundoptionsandeffects.(SelectTVsourceforexample)
TIMERMENU:
Allowsyoutosetupvarietyoftimeroptions.(SelectTVsource)
13
SETUPMENU:
Allowsyoutosetupavarietyofsetupoptions.(SelectTVsource)
LOCKMENU:
Allowsyoutosetupavarietyoflockoptions.(SelectTVsource)
CHANNELMENU:
Allowsyoutosearchchannelsandsetupavarietyofchanneloptions.(SelectTVsource)
4. Usethe▲/▼buttonstoselectanoptionofthesub‐menu,andpressthe►button.
While in adjustment mode, use the ◄/►buttontochangethevalueoftheitem.
5. PresstheMENUbuttontoexitthemenu.
Note:
Onlywhenyouinputthesuitablesignal,therelevantitemscanbeactivated.
14

CustomizingthePICTURESettings
SelectTVsourceforexample.(PressSOURCEbuttontoselectTVmode)
1. PressthePOWERbuttontoturntheLCDTVon.
2. PresstheMENUbuttonontheremotecontroltodisplaytheMainmenu,andusethe◄/►
buttonstoselectthePICTURE.
3. Usethe▲/▼buttonstohighlightanindividualPICTUREoption,usethe◄/►buttonsto
changethesetting,andpresstheMENUbuttontoexitthemenu.
ThePICTUREmenuincludesthefollowingoptions:
PictureModeCycleamongpicturedisplaymodes:Standard,Dynamic,Soft,Personal.
ContrastControlthedifferencebetweenthebrightnessanddarkestregionsofthe
picture.
BrightnessControltheoverallbrightnessofthepicture.
ColorControlthecolor.
TintControlsthetint.
SharpnessIncreasethissettingtoseecrispedgesinthepicture;decreaseitforsoft
edges.
ColorModeCyclesamongcolormodes:Normal,Cool,Warm.
15

CustomizingtheAudioSettings
SelectTVsourceforexample.(PressSOURCEbuttontoselectTVmode)
1. PressthePOWERbuttontoturntheLCDTVon.
2. PresstheMENUbuttonontheremotecontroltodisplaytheMainmenu,andusethe◄/►
buttonstoselecttheAUDIO.
3. Usethe▲/▼buttonstohighlightanindividualAUDIOoption,usethe◄/►buttonsto
changethesetting,andpresstheMENUbuttontoexitthemenu.
TheAUDIOmenuincludesthefollowingoptions:
SoundModeAllowyoutoselectamong:Standard,Music,MovieandPersonal.
BassControltherelativeintensityoflowerpitchedsounds.
TrebleControltherelativeintensityofhigherpitchedsounds.
BalanceToadjustthebalanceoftheleftandrightsoundtrack,orturnoffthevolume
oftheleftandrightsoundtrack.
SurroundAllowyoutoselectbetweenOffandOn.
AVCToturnonorofftheAVCfunction.
SPDIFTypeAllowyoutoselectbetweenPCMandRAM.
AudioLanguageAllowyoutoselectaudiolanguageamong:English,FrenchandSpanish.
16

CustomizingtheTIMERSettings
SelectTVsourceforexample.(PressSOURCEbuttontoselectTVmode)
1. PressthePOWERbuttontoturntheLCDTVon.
2. PresstheMENUbuttonontheremotecontroltodisplaytheMainmenu,andusethe◄/►
buttonstoselecttheTIMER.
3. Usethe▲/▼buttonstohighlightanindividualTIMERoption,usethe◄/►buttonsto
changethesetting,andpresstheMENUbuttontoexit.
TheTIMERmenuincludesthefollowingoptions:
SleepTimerAllowyoutosetupthesleeptimeramong:5min,10min,15min,
30min,45min,60min,90min,120min,180min,240minandoff.
TimeZoneAllowyoutosetupthesleeptimeramong:Pacific,Alaska,Hawaii,
Eastern,CentralandMountain.
DaylightSavingTimeAllowyoutoturnonoroffthedaylightsavingtime.
ClockSettheInternalClock.
17

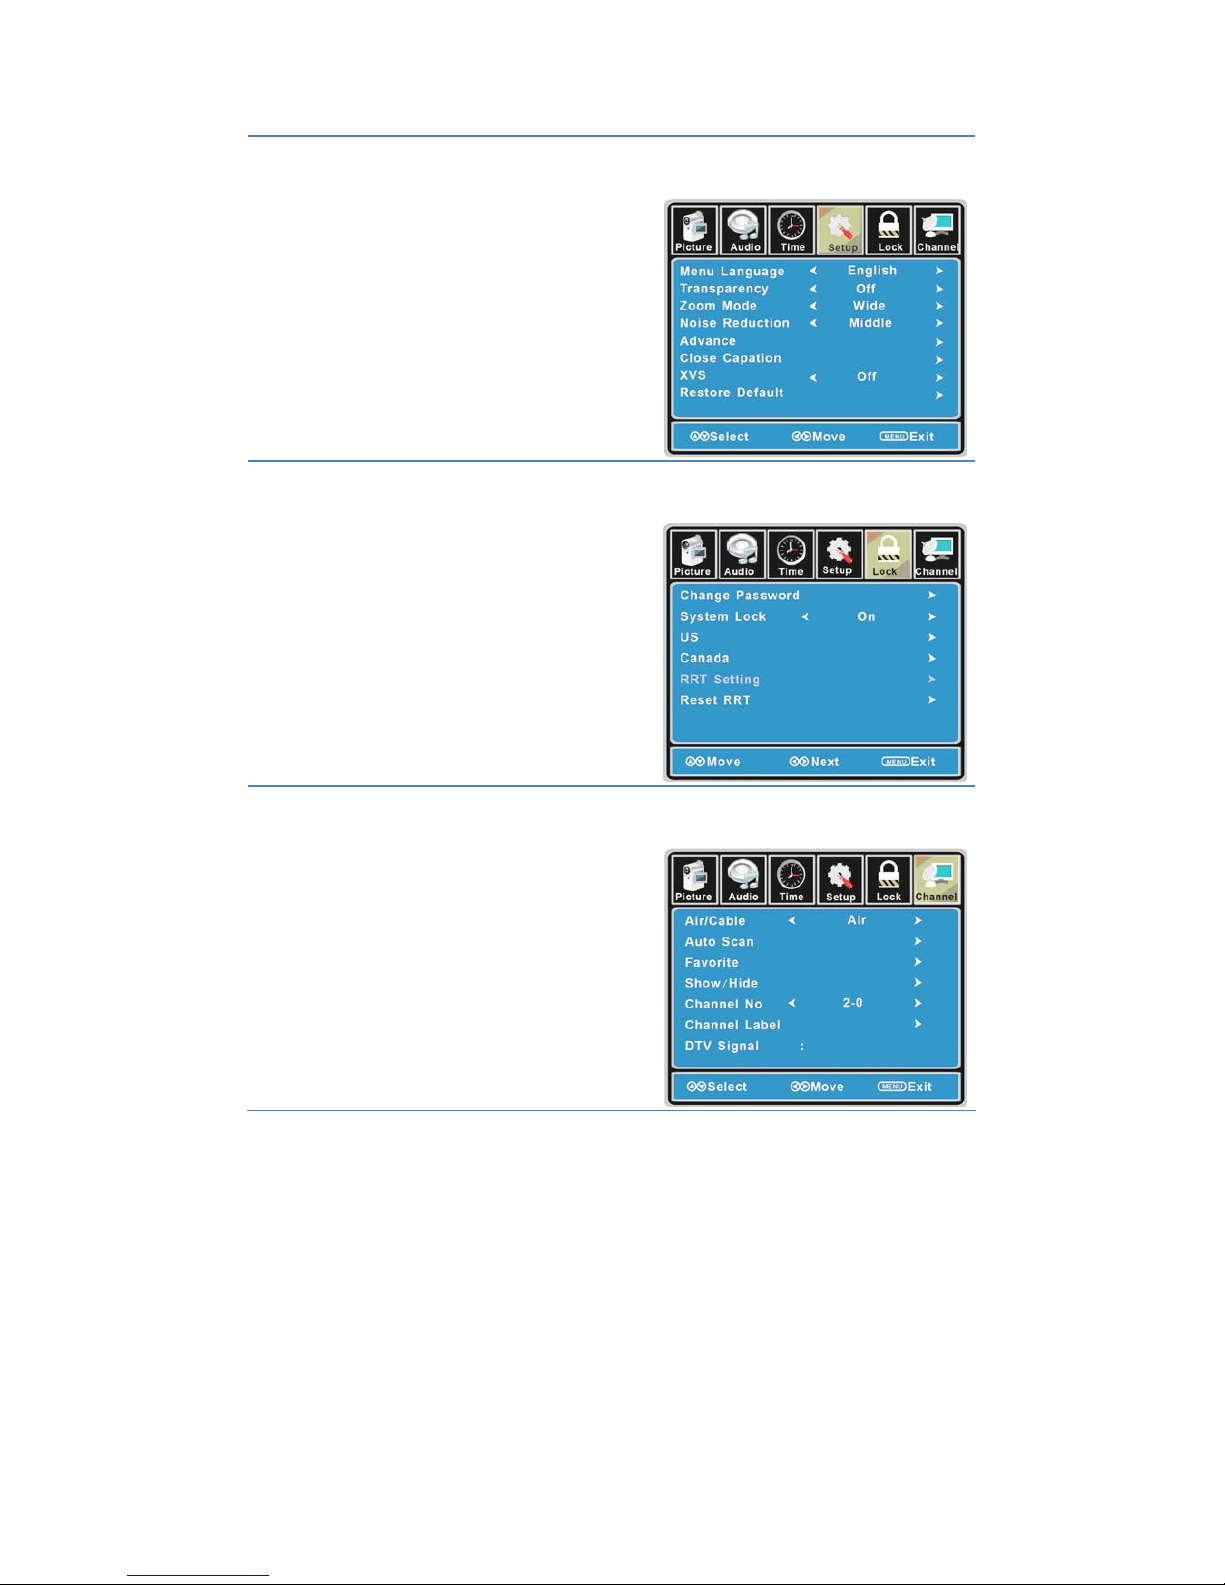
CustomizingtheSETUPSettings
SelectTVsourceforexample.(PressSOUCEbuttontoselectTVmode)
1. PressthePOWERbuttontoturntheLCDTVon.
2. PresstheMENUbuttonontheremotecontroltodisplaytheMainmenu,andusethe◄/►
buttonstoselecttheSETUP.
3. Usethe▲/▼buttonstohighlightanindividualSETUPoption,usethe◄/►buttonsto
changethesetting,andpresstheMENUbuttontoexit.
TheTIMERmenuincludesthefollowingoptions:
MenuLanguageAllowyoutoselectmenulanguageamong:English,FrançaisandEspañol.
TransparencyAllowyoutoturnonoroffthetransparencyfunction.
ZoomModeAllowyoutoselectthezoommodeamong:Normal,Cinema,Wideand
Zoom.
NoiseReductionAllowyoutoselectthenoisereductionmodeamong:Strong,Off,Weak,
Middle.
AdvanceInputPCsignalfirst,thenpressSOURCEbuttontoselectVGAmode,press►
buttontoconfirm.
18
This manual suits for next models
1
Table of contents
Other Auria LCD TV manuals


