Austro Flamm Mo Duo User manual

Benutzerhandbuch / user instructions/
Istruzioni per l’uso / manuel d’instructions
Mo Duo / Clou Duo


english
Table of contents
1. Important information for the Stove User......................................................................................1
2. Requirements for Operating Your Wood-Burning Stove..............................................................2
2.1. External combustion air supply.......................................................................................................2
2.2. Connection to the chimney .............................................................................................................2
2.3. Fuel .................................................................................................................................................3
2.4. Electrical connection.......................................................................................................................3
3. Initial Operation, Using the Stove...................................................................................................4
3.1. Operating the stove via touch display.............................................................................................4
3.2. User control of the stove by means of the AUSTROFLAMM control knob...................................12
3.3. Operating the stove using the IR remote control ..........................................................................13
3.4. Operating the stove using the APP and smart phone...................................................................13
4. Operating modes of the stove.......................................................................................................14
4.1. Functional diagram of your combi stove.......................................................................................14
4.2. Pellet mode...................................................................................................................................15
4.3. Firewood mode .............................................................................................................................15
5. Warnings and error messages......................................................................................................17
5.1. Resetting warnings and errors......................................................................................................17
5.2. Safety temperature limiter.............................................................................................................18
6. Cleaning and Maintenance ............................................................................................................19
6.1. Stove models with automatic riddling grate ..................................................................................19
6.2. Cleaning of the flue gas passes –Mo Duo...................................................................................20
6.3. Cleaning of the flue gas passes –Clou Duo.................................................................................21
6.4. Adjusting the closing force of the firebox door..............................................................................22
6.5. Adjust position of ash container door............................................................................................22
6.6. Adjusting the firebox door .............................................................................................................23
7. Replacement of the storage battery .............................................................................................24
8. Warranty ..........................................................................................................................................24
9. Electrical connection diagram ......................................................................................................25
9.1. For models with a permanently rotating feeder motor ..................................................................25
10. Technical Data ................................................................................................................................28
10.1. Mo Duo..........................................................................................................................................28
10.2. Clou Duo .......................................................................................................................................29

1english
1. Important information for the Stove User
•The information in this manual is of a general nature. National and European standards, local and building
regulations, and fire safety provisions must be observed.
•Please read this manual carefully before installing, operating and working on the stove. Keep the manual in
a safe place, and ensure that it is available at all times.
•Compliance with the regulations contained in this manual guarantees safety for both individuals and equip-
ment, economical operation and a long service life. The stove has been designed according to EN 14785
and EN13240 standards.
•Original parts may not be modified or replaced with parts from other manufacturers. In doing so, the war-
ranty is forfeited.
•When carrying out work on, or intervening in, the stove, the power supply must be disconnected.
•All diagrams and drawings supplied are for explanatory purposes only; the manufacturer pursues a policy of
continuous improvement and updating of the product, and may make changes without prior notice.
•All dimensions in this manual are indicated in mm.
•CAUTION: Initial operation of the appliance should be carried out exclusively by authorised service part-
ners.
•Your heating appliance is not suitable for use as a ladder or stand.
•Please note that the surfaces of the stove heat up considerably during operation. Always use protective
gloves to operate the stove. Make children aware of the dangers and keep them away from the fireplace
during operation.
•No waste (of any kind) or other residue may be placed in the stove. Only the recommended pellets or logs
(see section .. Fuel) may be burned.
•It is forbidden to place inflammable items on or near the heating appliance.
•Do not place any laundry on the stove to dry. Clothes horses or similar objects must also be placed at a suf-
ficient distance from the heating appliance →Fire hazard!
•While your heating appliance is in operation, the use of highly flammable and explosive materials in the
same or adjacent rooms is prohibited.
•It must be ensured that there is a sufficient supply of combustion air and that the flue gases are discharged
safely. Therefore, always check whether the chimney is clogged, particularly after a longer period of inactiv-
ity.
•In the transition period, i.e. when outside temperatures are higher, a sudden rise in temperature can lead to
disruptions in the chimney draught causing the heating gases to be incompletely extracted. In such a case,
switch off the stove.
•The convection grille must never be closed, not even partially.
•Ventilation devices that are operated together with the fireplace in the same room, or in a group of rooms,
can cause problems.
•The stove must be cleaned and serviced regularly (see section Cleaning and Maintenance).
•Repairs to your stove may only be carried out by qualified personnel trained by the manufacturer.
•Replace spare parts as required and subject to condition. Check all electrical and electronic components
regularly for damage or wear.
•Safety devices must not be bypassed.
•If the wrong fuel is used, or if the fuel is too damp, the chimney may catch fire due to deposits in the chim-
ney. In such an event, close all air openings on the fireplace immediately, and inform the fire brigade. After
the fire has burned down, have the chimney checked by a specialist for cracks or leaks.
•Under certain conditions, pellet appliances are also suitable for multiple flues in chimneys. Your master
chimney sweep will inform you of these requirements and carry out the appropriate inspection.
•Please note that the installation room must have at least one door / window leading to the outside, or be di-
rectly connected to such a room. Other fireplaces and extractor hoods may not be operated with fireplaces
dependent on ambient air.

2english
2. Requirements for Operating Your Wood-Burning Stove
2.1. External combustion air supply
Every combustion process requires oxygen. This oxygen is extracted from the environment of the heating appli-
ance.
The exterior shell of modern buildings is very dense. As a result, insufficient fresh combustion air flows in, mak-
ing an external supply of combustion air essential. This is also important if ventilation systems are used in the
house.
Some appliance types may also be connected via the floor.
A pipe or hose with Ø125mm must be used to connect the external combustion air supply. The length of the
pipe should not exceed 5m. This connection pipe may contain
a maximum of three elbows.
If connected directly to the external wall, attention must be
paid to the formation of condensate and to
the provision of wind protection at the inlet.
A lack of combustion air can cause poor combustion, in-
creased soot formation and increased ash incidence.
2.2. Connection to the chimney
The information contained in this manual is of a general na-
ture. National and European standards, local and building reg-
ulations, and fire safety provisions must also be observed and
complied with.
The stove must be connected to a flue approved by the chim-
ney sweep. Care must be taken to prevent condensation from
entering the stove.
The flue pipe must be connected in line with the technical data sheet.
If you have any questions, please contact your dealer.
•The chimney must be laid out according to the technical data of the stove (see section: Technical Data).
•The horizontal length of the flue gas pipe should not exceed 2.5 m.
•A maximum number of 3 x 90° elbows should not be exceeded. Each elbow should be provided with a
cleaning aperture.
•The chimney must be resistant to condensation.
•The chimney must provide at least 3-12 Pa draught to ensure the flue gases are sufficiently extracted,
even in the event of a power failure.
symbolic image,
for dimensions see
technical data
NOTE!: The combustion air connection is marked on the back
of the appliance with a supply air symbol.
NOTE!: The flue connection is marked with an exhaust gas
symbol on the back of the appliance

3english
2.3. Fuel
Pellets
We recommend using ENplus-A1 approved pellets.
When storing the pellets, it is essential that they are kept in a cool, dry place and free from contamination.
Damp pellets impair combustion and clog the screw conveyor.
Firewood
Only use untreated, dry wood.
The wood moisture content should be < 15 %.
Basically, the amount of firewood fed determines the heat output. If signifi-
cantly too much wood is fed, this can lead to overheating and damage to the stove. Damp wood causes poor
combustion and exhaust gas values, as well as soiling of the viewing glass and the flue gas ducts.
2.4. Electrical connection
Your stove is designed for connection to a 230 V -50 Hz mains supply.
The connection cable is included in the accessory pack.
The mains socket is located on the back of the appliance and is protected
by a T2.5 A glass-tube fuse.
The power consumption of your appliance is indicated on the type plate.
NOTE!: Using inferior quality pellets
or other material will impair the functioning of your pellet
stove and invalidate the warranty.

4english
Error Warning
Timer active
active
Temp. unit
Home screen
Tank level indicator
Current
room temperature
Delay timer
Menu with
heat output setting
Hybrid start active
SmartSpot is
connected
Target temperature
Stove operating status
3. Initial Operation, Using the Stove
First steps:
1. The stove must be connected to the flue. There must be a sufficient supply of combustion air.
2. Remove the accessories from the pellet hopper and the firebox. Fill the hopper with pellets and close
the hopper lid.
3. Plug in the power cable and set the toggle switch on the back of the stove to "I ".
4. The display will now show the Austroflamm logo. This is followed by the main operating menu with tem-
perature indicators and hopper level.
5. Before the initial start, the pellet worm conveyor must be filled. To do this, open and close the firebox
door. (Confirm the subsequent question on the display: “Have you inserted firewood?” with “YES”.)
Next, start the manual filling process. For more detailed information, see the menu item: Manual pellet
feed. This process takes about 5 minutes.
6. To start the stove in pellet mode, press the rotary knob for longer than 2 seconds or press “START” on
the display.
3.1. Operating the stove via touch display
Display −Room temperature indicator, various functions
By pressing the appropriate symbol, it is possible to switch to the desired setting or function.
The desired temperature can be set by pressing the buttons at 0.2 °C intervals between 5 °C and
40 °C. The setting is accepted immediately. The current room temperature is measured Standard
necessary by the black, room- temperature sensor cable on the back of the appliance.
The warning or error icons appear only when a warning or error is detected. The error is displayed in
detail by touching the icon.
The icon "Heating time activated" is only displayed if heating times are programmed in the timer menu.
The "Hybrid start activated" symbol indicates that your stove is ready for firewood operation via pellet
ignition.
The optionally available SMART SPOT - a radio-controlled thermostat - works in the stove.
Release Ash drawer

5english
Press the "Release ash pan" button to close the riddling grate. This process
takes about 90 seconds. The ash pan can then be removed.
This function is only possible in the "OFF" operating mode.
Display –Heat output indicator, further function menus
By pressing the appropriate icon, it is possible to switch to the desired setting or function.
The desired heat output can be set by pressing the buttons . This setting is accepted immediately.
By pressing the Start / Stop button for longer than 2 seconds, the stove is activated or stopped.
Display –Status indicator
By pressing the Start / Stop button for longer than 2 seconds, the stove is activated or stopped.
Function –Air distribution module, fan speed control
An air distribution module is available as an option for the RUBY model. This allows an additional room to be
heated using warm air. The warm air is extracted in front of the rear wall of the firebox.
For installation and any other information, please contact your Austroflamm dealer.
Start / Stop function
Room temperature indicator
Status bar
Heat output level
Back to room
temperature indicator
Air distribution module
(optional)
Start / Stop
function
Tips
Settings
Statistics
Heating times
6english
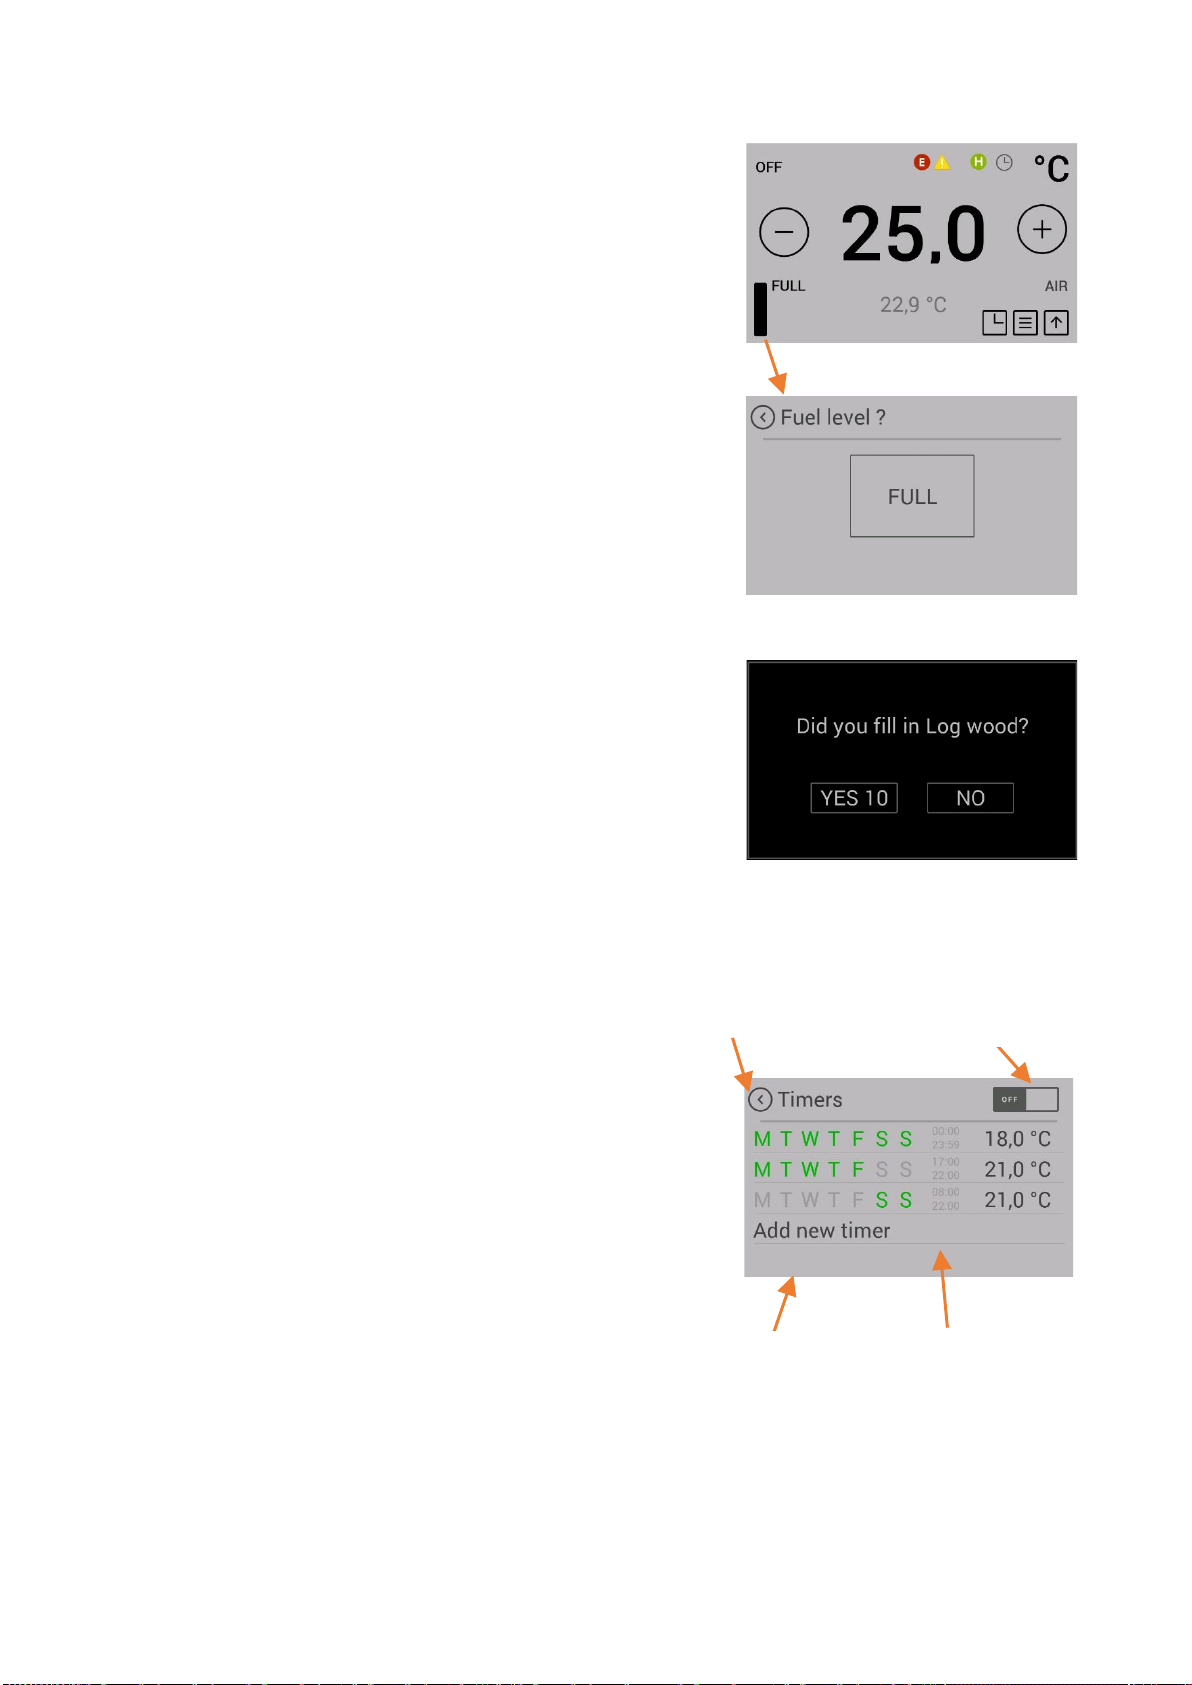
Function- Fill level indicator
The fill level indicator informs you of the fill level of your pellet hopper. If
the fill level falls below a certain value, a warning is shown on the dis-
play. The fill level indicator must be updated manually each time the pel-
let hopper is filled.
Care should be taken to prevent the hopper from becoming completely
empty, otherwise the fire will go out unintentionally and you the screw
conveyor will have to be filled manually before the next pellet start.
The fill level indicator is calculated according to the size of the pellet
hopper of your stove and the corresponding operating time. To ensure
the stove functions correctly, always fill the tank to the top, while setting
the indicator to "FULL" at the same time.
Press the fill level icon in the room temperature indicator to set the dis-
play to "FULL".
This function can be deactivated in the setting "Menu item: Fuel".
'Did you fill in Log wood?'
The answer to this key question will affect the further functioning and
mode of operation of your stove. It will appear each time you close the
firebox door.
Tap 'Yes' to switch to firewood mode or if you have put on new firewood.
If you make no selection, 'YES' will be automatically selected after 10
seconds.
Tap 'NO' if you have not inserted any firewood.
For example, if you have only cleaned the glass pane or the firebox.
For more information on how the stove reacts in various operating statuses please refer to the instructions start-
ing at subsection 4.1 Functional diagram of your combi stove.
Function- Timers, setting heating times
By pressing the "TIMERS" button in the menu list, the "Heating
times" menu can be accessed.
Activate the heating times by pressing "ON" at the top right of the
display.
A maximum of three heating times per day can be saved.
A total of six different heating times can be saved.
activate heating times
back
Set a new heating time
Edit heating time

7english
Setting a new heating time or editing the heating time
Set the weekdays, heating time start, heating time end and room temperature as required.
Save the heating time by pressing the "Save" icon. You will then return to the heating time list.
To delete an existing heating time, proceed as follows: Highlight the heating time and press the "Delete heating
time" icon.
The timer function may only be activated after specifying the desired heating period. When specifying the heat-
ing period, please note: The timer must be set for the future.
It is possible for specified heating periods to overlap in time.
If individual heating times overlap, the heating time of a higher set temperature is activated with different tem-
perature settings.
Example of heating times for an entire week
Weekday
Times
Temp.
TIMER 1
Monday –Sunday
00:00 –23:59
18°C
TIMER 2
Monday –Friday
06:00 –08:00
22°C
TIMER 3
Monday –Friday
17:00 –22:00
22°C
TIMER 4
Saturday –Sunday
07:00 –22:00
22°C
Note: Only 3 heating periods may be specified for each day of the week.
00
01
02
03
04
05
06
07
08
09
10
11
12
13
14
15
16
17
18
19
20
21
22
23
Mon
18°C
22°C
18°C
22°C
18°C
Tue
18°C
22°C
18°C
22°C
18°C
Wed
18°C
22°C
18°C
22°C
18°C
Thu
18°C
22°C
18°C
22°C
18°C
Fri
18°C
22°C
18°C
22°C
18°C
Sat
18°C
22°C
18°C
Son
18°C
22°C
18°C
Back without saving
Delete heating time
Save
Desired
temperature
End of heating
time
Start of heating time
Weekdays
8english
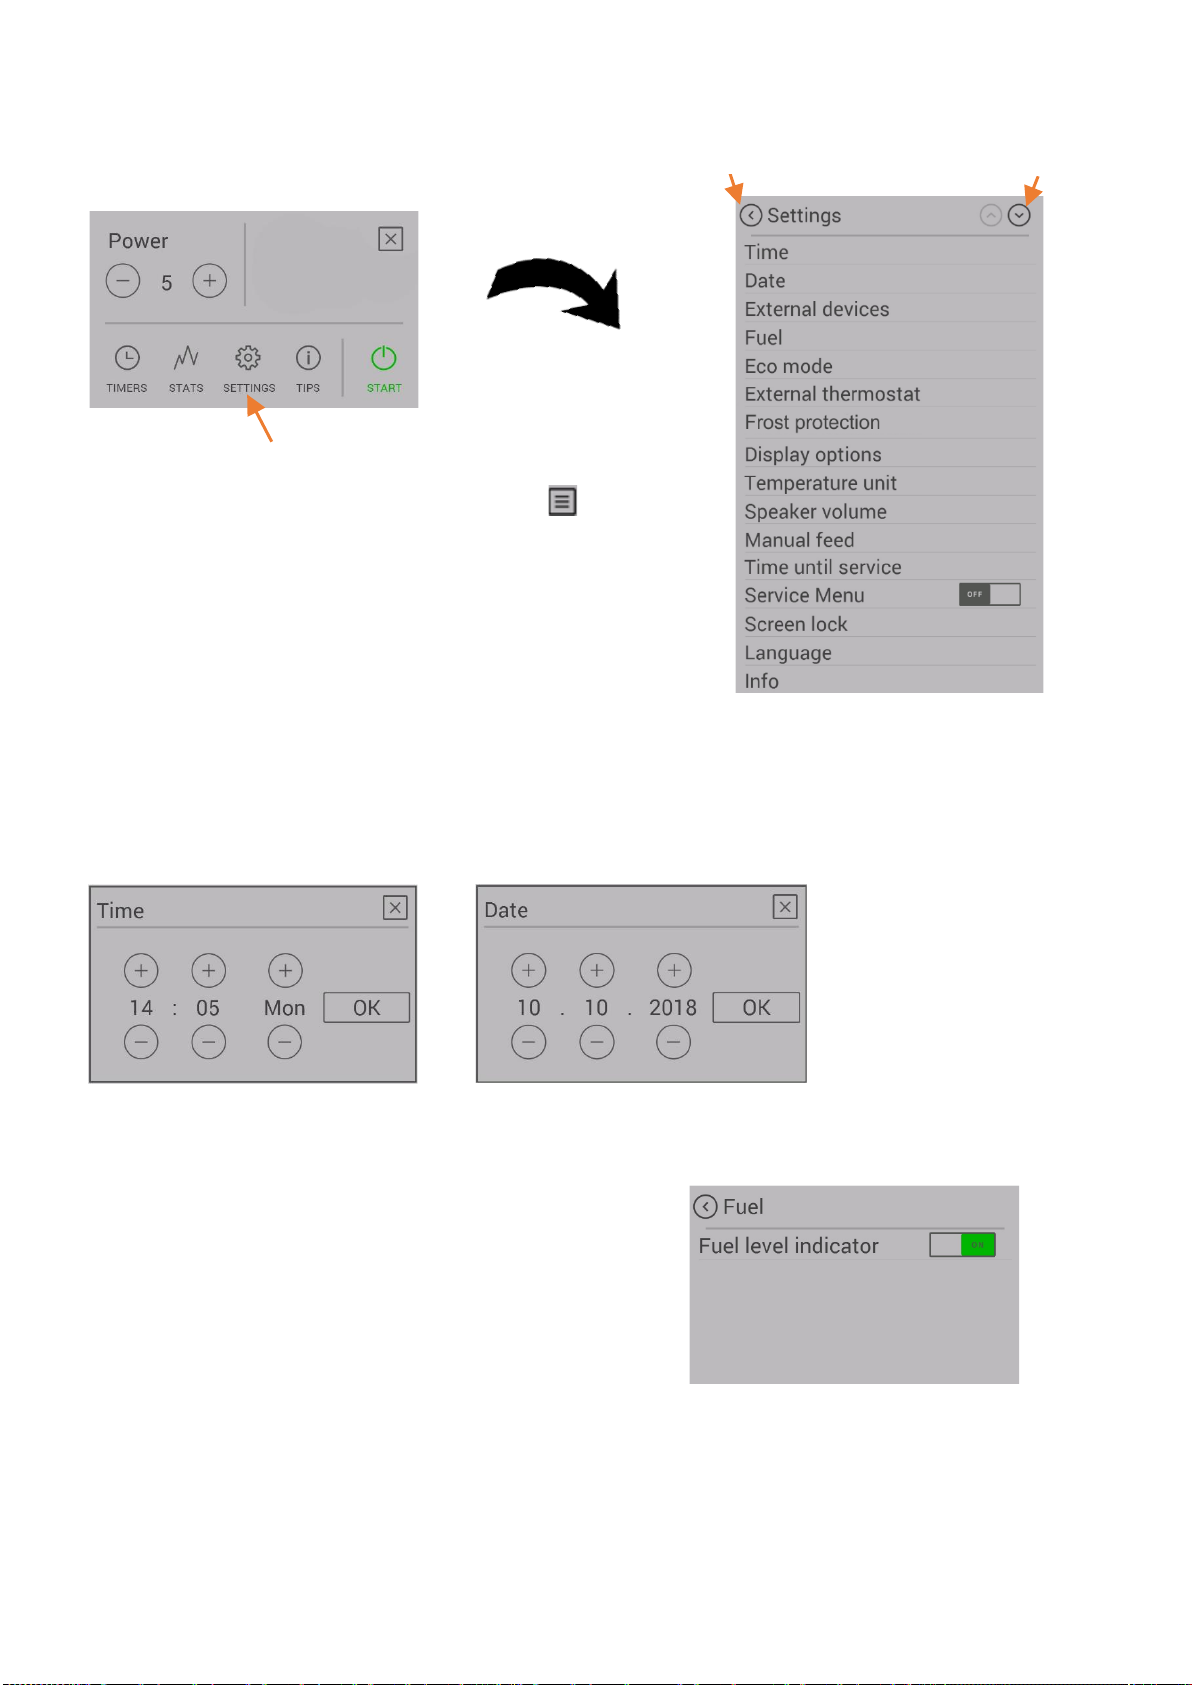
Display - Settings
By pressing the “SETTINGS“ button in the menu list ,
the “Settings” menu can be accessed.
It is now possible to scroll up or down the list.
By pressing the desired menu item, the function is activated.
Menu item: Time / Date
Setting the time of day is necessary for the correct heating time, the statistics function and for logging errors.
Set the hours, minutes, day of the week, month and year, and confirm the setting with OK.
Menu item: Fuel
In this submenu, the "fill level indicator" can be deactivated.
When deactivated, the bar on the display disappears.
The low fill level warning no longer applies.
Back
Scroll list

9english
Menu item: Bluetooth devices
The "SMART SPOT" radio-controlled room thermostat is available for
your pellet stove. This SMART SPOT works via Bluetooth technology.
When used, it must be activated once by selecting this menu item.
Linking the 'Austroflamm knob' with the stove
Tap 'Link'.
A search for a new device is per-
formed.
Then briefly press
the knob once
The link will be confirmed after a
few seconds.
You can now operate the stove by
means of the control knob.
If a connection cannot be established at the first attempt, try a second time.
Menu item: Eco mode
The ECO MODE allows the stove to be switched ON and OFF automati-
cally at certain temperature settings specified by you.
The cut-off and restart temperatures can be set in the ECO-MODE
menu item.
.
In order to avoid starting / stopping the appliance too frequently, the temperature limits should not be set too
tightly. The stove should burn for at least one hour to reach the operating temperature.
As standard setting, we recommend a restart temperature of 1°C and a cut-off temperature of 0.5°C.
10 english
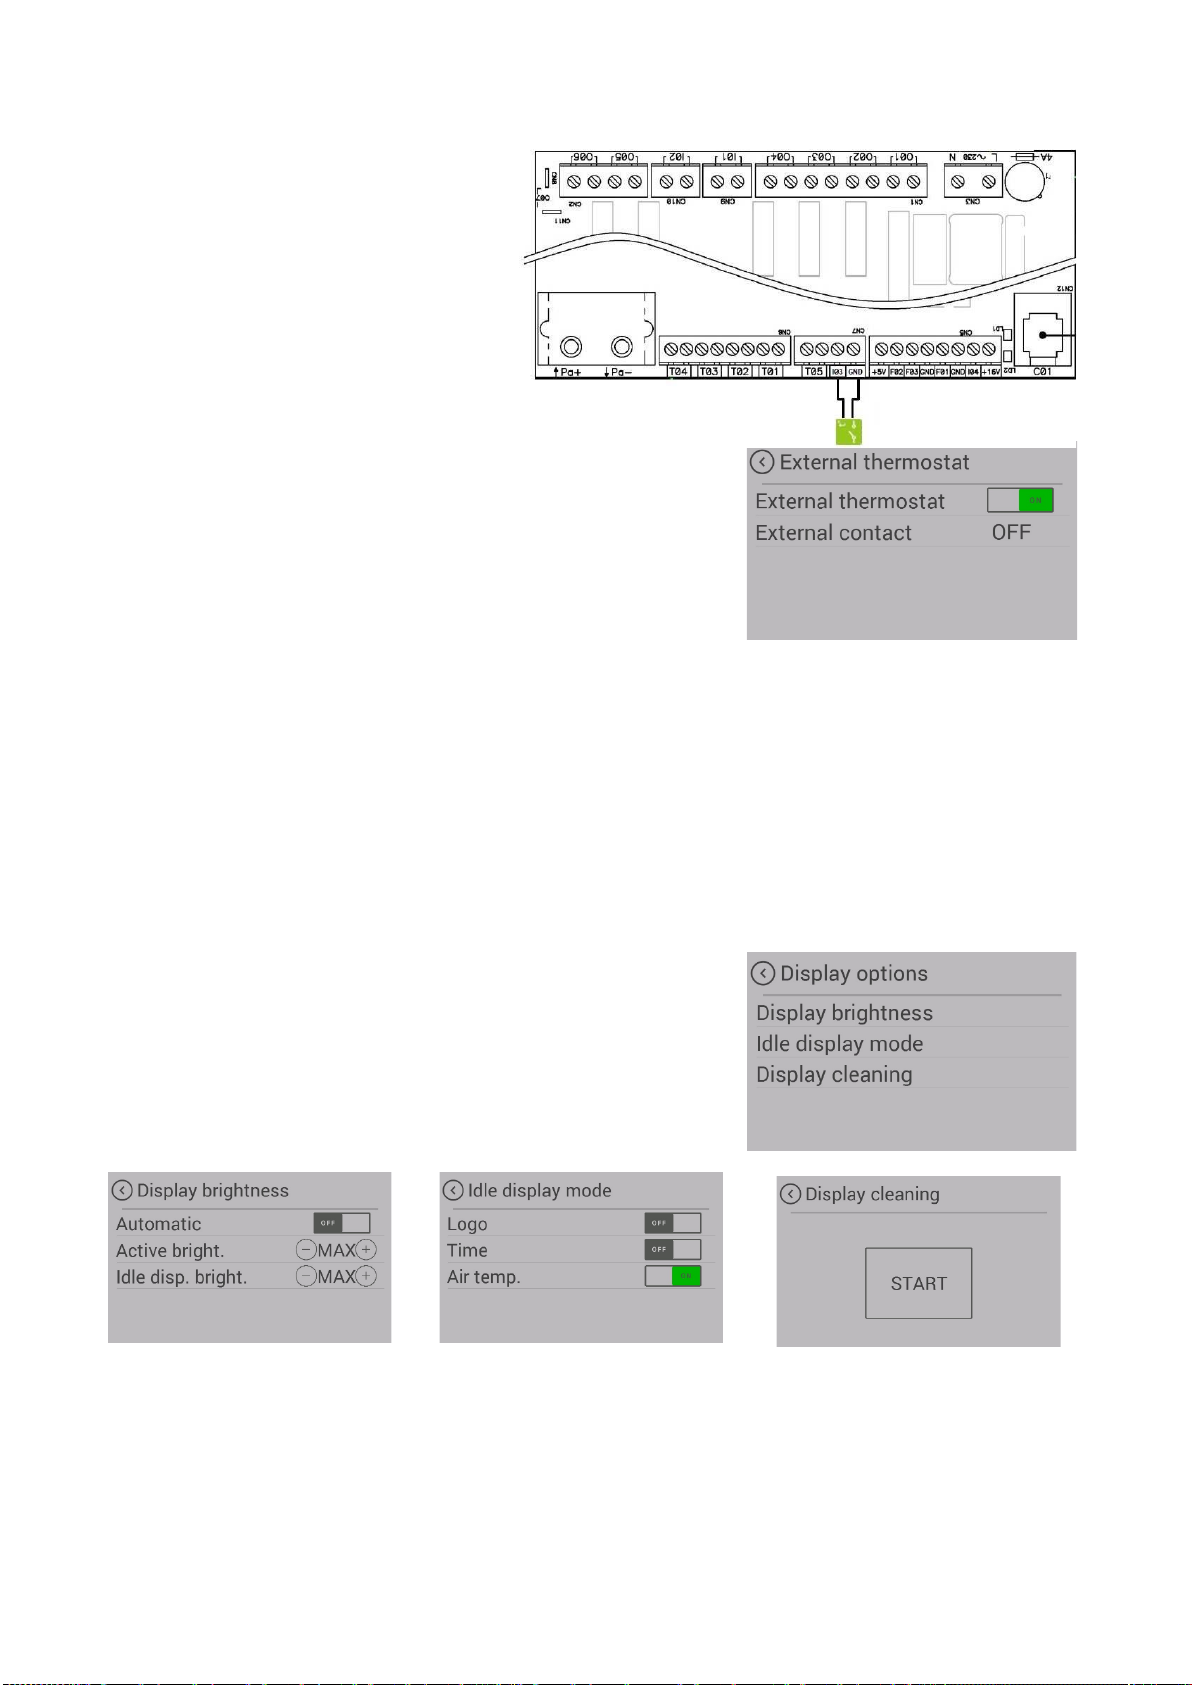
Menu item: External thermostat
The stove can also be controlled by an
external thermostat, if required.
Connect the potential-free contact of the
thermostat at input "I03" & "GND" on the main
control unit.
A 2-pin plug is available as an option.
(Art.No. 728151)
The function must then be activated in the
Settings/ External thermostat menu.
The display "External contact" shows whether the external thermostat is
switched ON or OFF.
The stove starts / stops after a slight delay.
The external thermostat must be connected to the slots "I03" & "GND"
(direct current series) on the control unit.
It applies the temperature control after being activated in the menu item "External thermostat".
CAUTION: To activate the external thermostat, the stove must be started once manually after the thermostat
has been installed.
Menu item: Frost protection
The frost protection menu is used to start the stove automatically at a preset temperature.
The menu only works when the timer function has been activated.
Menu item: Display options
The following display options can be selected:
Adjusts the display brightness dur-
ing operation and sleep mode.
If nothing is pressed on the display
for 30 seconds, the display
changes to the set sleep mode. If
multiple selections are made,
these are displayed alternately.
To make sure that no function is
started unintentionally when clean-
ing the display, press "Start". The
display is locked for 30 seconds.

11 english
Menu item: Temperature unit
This menu item makes it possible to switch between the
temperature indicator in °C and Fahrenheit.
Menu item: Volume
Select the volume for the button sound, or the beep for warnings and er-
ror messages.
Your appliance is delivered with a default volume of 3.
Menu item: Manual pellet feed
A MANUAL PELLET FEED option is available to fill the worm conveyor
with pellets during initial operation, or after the worm conveyor has run
out of fuel.
If the worm conveyor is empty, the filling process can take up to 5
minutes.
MANUAL PELLET FEED can be activated at any time on appliances
equipped with a BURN POT.
On appliances with a riddling grate, this function is only available after
the stove has been started in IGNITION PHASE 2.
Menu item: Service due
Here you can see how many maintenance-free hours of operation your
stove still has until a service is necessary.
The service must be carried out by an approved Austroflamm technician.
Menu item: Service menu
This menu is reserved for the Austroflamm service technician.
Menu item: Display lock
This provides you with the option of restricting functions on the display.
("Child safety").
LOW
Low locking level. Menu functions are deactivated. The heat output can
no longer be changed. However, the stove can still be started / stopped.
HIGH
The entire stove is locked. Starting / stopping is no longer possible.
To cancel the lock, switch back to the setting "Display lock" and deacti-
vate the function.

12 english
Menu item: Language
Select the language you require on your control panel.
Menu item: Info
Here the hardware and software status of the individual components are
displayed.
When servicing, please have the
- ”Stove software version" and the
- "Stove model number" at the ready.
Menu item: Heating statistics
In the heating statistics, the usage data are displayed. These can be dis-
played for different periods of time.
Menu item: Tips
Here you will find important "tips" for operating your stove correctly, and
answers to questions relating to possible problems.
3.2. User control of the stove by means of the AUSTROFLAMM control knob
Your stove can also be operated using the rotary control.
Important information: If the control knob does not react, go to the settings for 'Bluetooth devices' and check
whether the AUSTROFLAMM control knob is linked. If not, proceed in accordance with the instructions provided
under 'Add Bluetooth devices'.
Pressing the control knob Turning the control knob
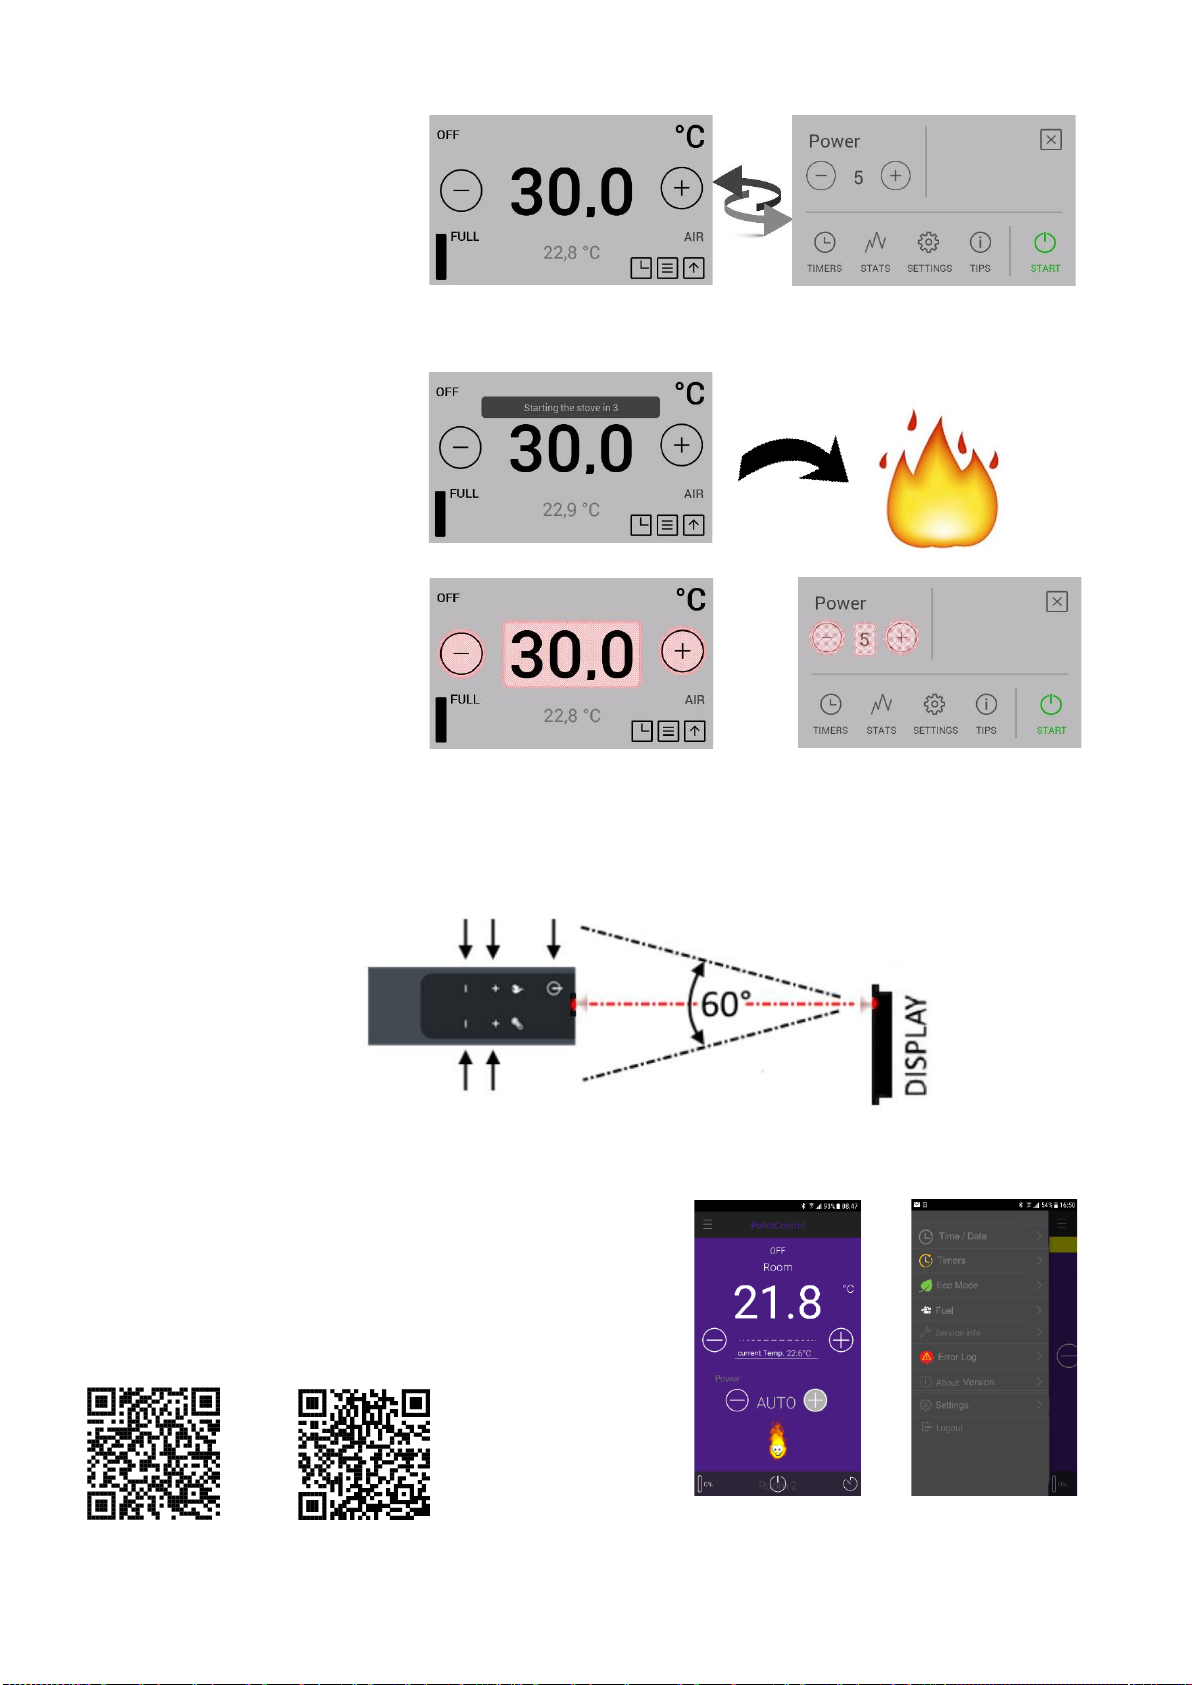
13 english
Short press
By briefly pressing the control knob,
you can switch between the 'Heat
output' and 'Room temperature'
screen views.
If the control knob is pressed in one of the setting menus or during display-idle mode, the display always
switches to the 'Room temperature' display.
Long press
A long press of the control knob will
cause a countdown to appear after
the stove is turned ON or OFF.
Turning the control knob
By turning the control knob,
depending on the selected
display view, the required
target temperature or the
heat output of your stove
can be set.
3.3. Operating the stove using the IR remote control
Your stove is supplied with an IR remote control, which can be used for the functions below. The following func-
tions are available to you using this control:
Ensure "visual contact" between the remote control and the control panel.
3.4. Operating the stove using the APP and smart phone
To install or set up the data connection, please refer to the instruc-
tions for your WLAN module, or follow the installation instructions
of the Austroflamm PelletControl app.
Download the required "Austroflamm PelletControl" app here and
then start it:
Apple iOS Google Play / Android
Set temperature - +
Power level - +
On / Off
14 english
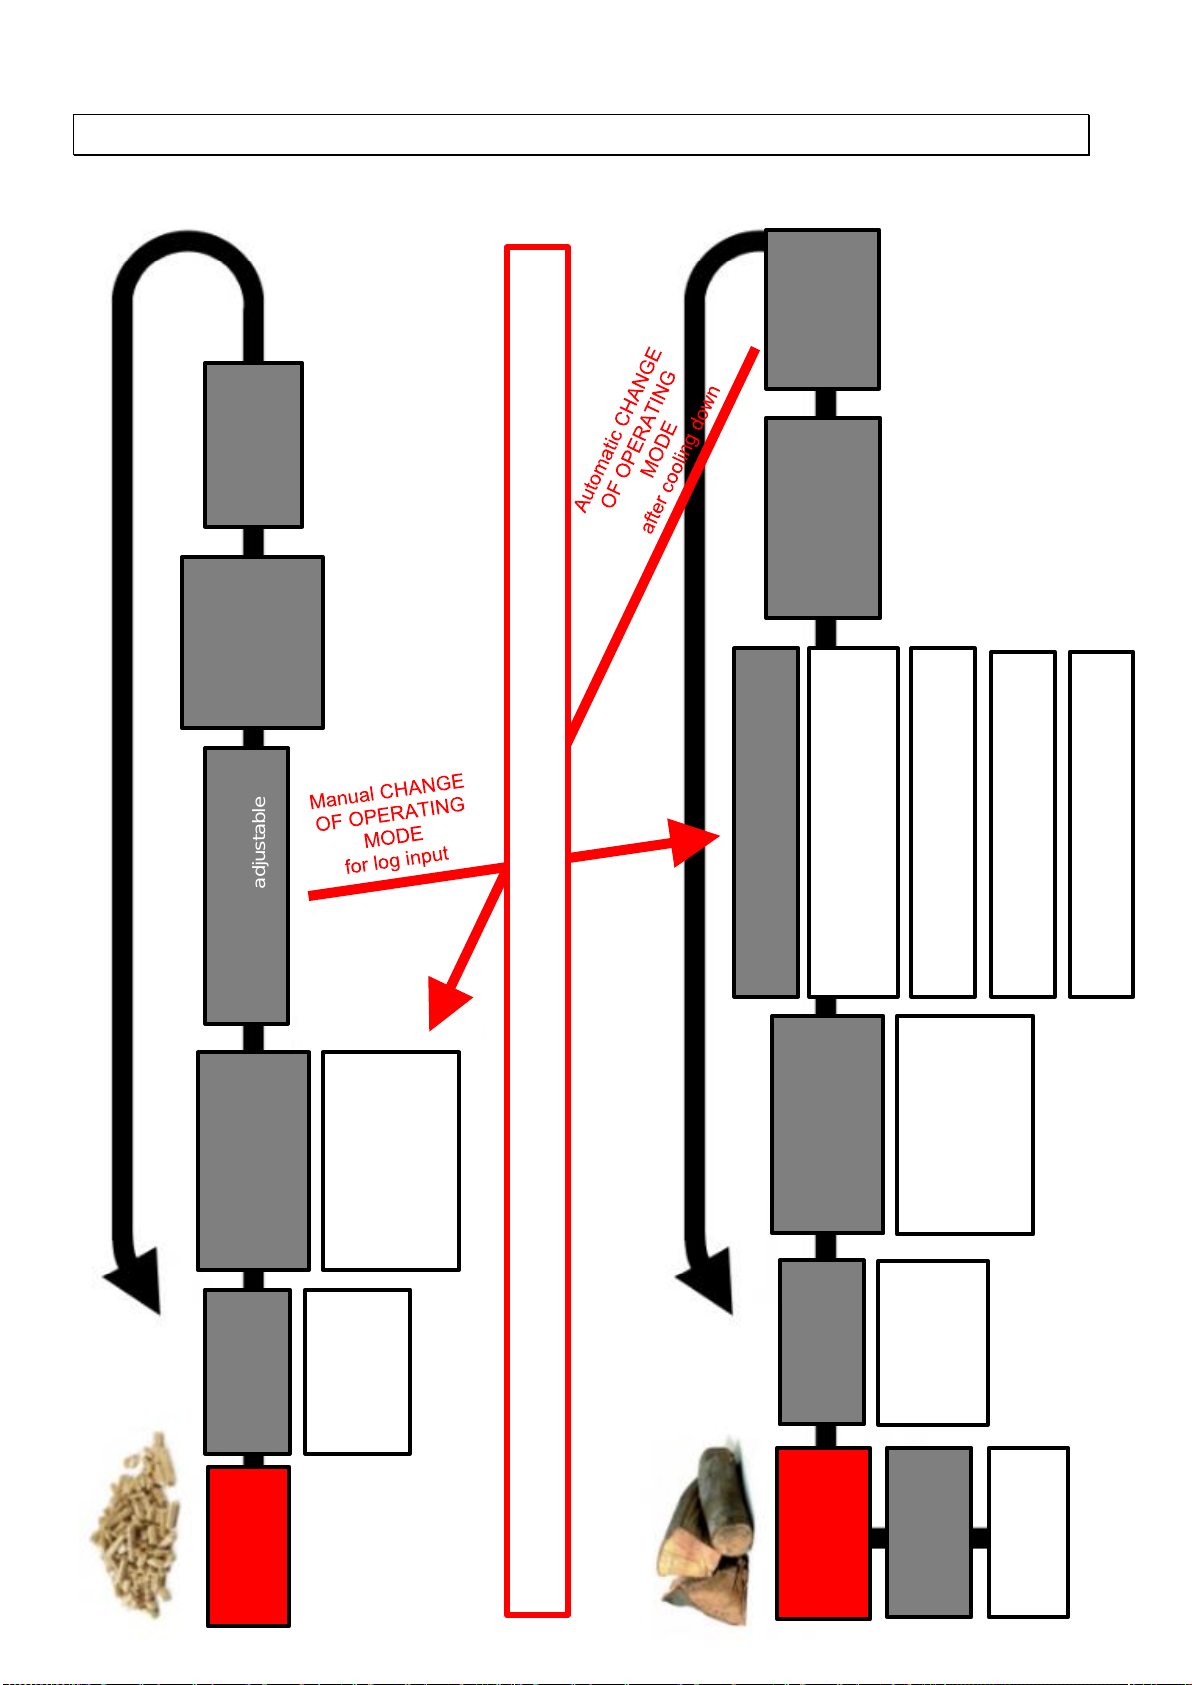
4. Operating modes of the stove
4.1. Functional diagram of your combi stove
COOLING
Firebox
without electri-
city
FIREWOOD START 1-
max. combustion air supply
COOLING
Firebox
PELLET
MODE
PELLET MODE
manually adjustable
OFF
with
DISPLAY, RC,
TIMER, APP,
ECO MODE
FIREWOOD
MODE
HYBRID START-
renewed supply of pellets to kindle
firewood
FIREWOOD MODE
with automatic
combustion control
FIREWOOD MODE
automatic start cycle
Release of FIREWOOD MODE
IGNITION PHASE 1
IGNITION PHASE 2
IGNITION PHASE 3
Release for manual
control operation
IGNITION PHASE 1
IGNITION PHASE 2
IGNITION PHASE 3
Release for manual
control operation
with
DISPLAY, RC,
TIMER, APP,
ECO MODE
START
with
DISPLAY, RC,
TIMER, APP,
ECO MODE
START
START
PELLET IGNITION
automatic start
cycle
FIREWOOD START 2-
min. combustion air supply
PELLET IGNITION
automatic start cycle
OPERATING MODES - OPTIONS FOR SWITCHING BETWEEN >>> PELLET MODE || FIREWOOD MODE <<<
15 english
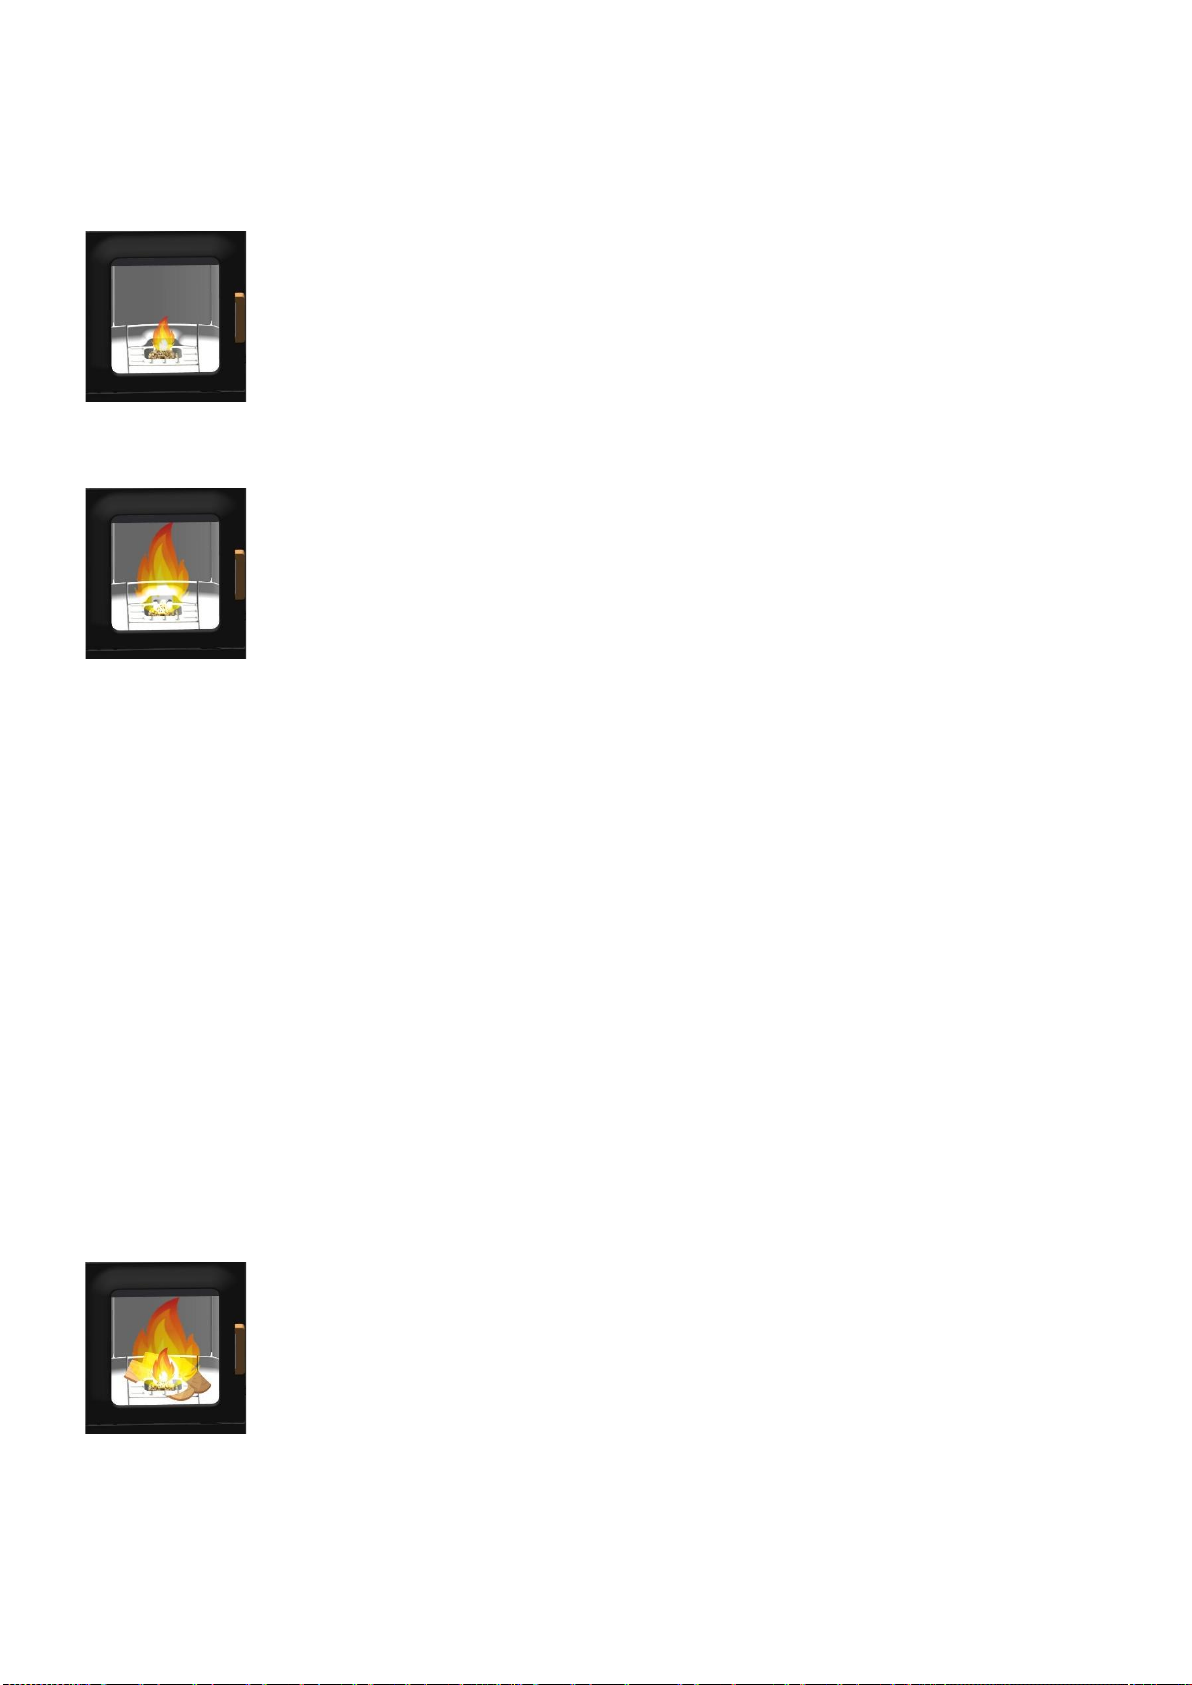
4.2. Pellet mode
Automatic Ignition
The stove can be started with the Start/Stop button in the status display or heat output dis-
play.Optionally, it can be started via IR remote control or via the app.
Pellet ignition is fully automatic and occurs in several phases. These phases are shown on
the display. (Positioning the riddling grate - filling the burner pot - ignition phase 1 - increas-
ing the temperature in the firebox - ignition phase 2 - monitoring ignition - ignition phase 3 -
release or control by the user - full combustion phase).
Pressing the Start/Stop button during the ignition phase terminates ignition. An error mes-
sage "E102" will be displayed if ignition is interrupted.
Pellet mode
In pellet mode, the pellet quantity and combustion air are supplied in accordance with the
heat output setting.
The room temperature required must be specified in the room temperature display. Once
this is attained, the stove automatically regulates to the lowest output level or switches OFF,
if the ECO function is enabled. (See Settings/ECO mode.)
Tapping the 'STOP' button switches the stove to the burn-out or cooling-down phase.
The current room temperature is measured by means of the wired temperature sensor on
the rear side of the unit.
In pellet mode, a fluctuating flue draught or increasing fouling of the flue gas passes is auto-
matically compensated by the flue gas fan. An error message is output only in extreme
cases.
If the door is opened and closed again during pellet mode, the system switches to the oper-
ating phase 'Hybrid start'.
4.3. Firewood mode
Heat output setting firewood ↔ amount of firewood
The heat output setting influences the automatic combustion process. To ensure optimal combustion, the output
should be selected to match the amount of firewood inserted.
Output level 1: Ember maintenance (no firewood combustion)
Output level 2: approx. 1.0 kg of wood
Output level 3: approx. 1.4 kg of wood
Output level 4: approx. 1.7 kg of wood
Output level 5: approx. 2.0 kg of wood
Hybrid start
The hybrid start is used to ignite the firewood via pellet ignition. Here, pellets are injected
and the air dampers for the combustion air supply are opened. This ensures that the fire-
wood placed inside the stove burns optimally.
CAUTION: Make sure that the combustion recess is not completely covered with firewood
(risk of deflagration).
After a few minutes the stove switches to the operating phase 'Firewood start I' to continue
inflaming the firewood.
If the door is opened and closed again during 'Hybrid start'" and then 'NO' is tapped on the
display, the stove switches back to pellet mode.

16 english
Firewood start I
Upon elapse of the 'Hybrid start' the furnace switches to this operating phase. Here it is en-
sured that all pellets combust in the combustion bowl and that the firewood continues to be
inflamed.
If the firebox door is opened and closed again when the stove is idle (and the question "Have
you inserted firewood?" is answered with "Yes" on the display), the stove also changes to the
operating status "Firewood start I".
In this operating phase, all air dampers are fully open and the flue gas fan rotates at a given speed. After attain-
ing a specific firebox temperature and the elapse of a specific time, a switch to 'Firewood start II' is performed.
If no temperature increase is detected, the stove automatically switches to the 'OFF' state
again. However, the stove remembers that firewood has been inserted. (A small green icon
appears on the display.) After the next pellet ignition, the stove automatically switches over
to 'Hybrid start'.
Firewood start II
In this operating status, the riddling grate is opened after approx. 2 minutes. As a result,
the primary air damper is closed and the firewod continues to be fanned until a certain tem-
perature in the firebox is reached (depending on the selected heat output). Once this tem-
perature has been obtained, the stove switches to the status "Firewood mode".
Firewood mode
In this operating status, the stove automatically controls combustion of the firewood.
Depending on the output setting, the stove will attempt to maintain a specific firebox tem-
perature. If this cannot be achieved, automatic switching to the next lower output level is
performed in the background (not visible on the display). This achieves optimal combustion
and ember maintenance of maximum duration in the burn-out process.
Power setting 1 is not suitable for burning newly inserted firewood.
This level is intended only for the purpose of achieving maintenance of the embers for as long as possi-
ble.
If the heat output is changed on the display, the combustion control is restored to the preset output.
If you change the heat output on the display, the combustion control is reset to the output setting.
If the firebox door is opened and closed again, the query 'Have you inserted firewood?' is
shown on the display.
If you answer this with a 'Yes', a switch back to the status 'Firewood start II' is performed.
This ensures the lighting-up of the new firewood.
If you answer this with a 'No', the stove remains in firewood mode status. Automatic control
is continued without having to light new firewood.
If no further firewood is put on, the stove automatically switches to burn-out and finally closes the dampers.
If the stove is not yet turned on at this point in time and the room temperature setting has not yet been
attained, the stove will start automatically again in pellet mode.
Firewood mode with non-electrical operation
In an emergency the stove can be heated with firewood, without any electricity. In this emergency mode, the
secondary damper is fully open at all times. Manual control is not possible.
CAUTION: for non-electrical operation a flue draught of at least 12 Pa is required.
Use sufficient kindling wood when lighting the fire, and when in heating mode, ensure the firewood added is of
the right dimensions.

17 english
5. Warnings and error messages
Alarms are displayed in yellow on the control panel. The pellet stove can continue to be used when an alarm is
indicated. Alarms are displayed in red. The pellet stove is inoperable when an error is displayed.
Warning code,
Error code
Description
Solution
Alarm - A001
Fuel fill level low
Refill pellets;
reset the fill level indicator to "FULL".
.
Alarm - A002
Service due
Maintenance by a service technician is necessary.
Alarm - A003
Flue gas temperature
Flue gas temperature too high; service technician required.
Alarm - A004
Weak battery
Replace the storage battery (CR2032) of the control unit.
The battery must be replaced every 2 years as part of the
service.
Error- E002
IR
communication error
Infrared sensor malfunction;
contact service technician.
Error- E004
Communication error
Communication error between the control unit and the display;
check data cable plug connections.
Error- E101
Failed ignition
Restart.
Error- E102
Negative pressure too
low
or too high
Possible causes:
1. The automatic start process was terminated manually.
2. Supply air pipe, burner pot, flue gas outlets, flue gas fan or
flue pipe clogged.
3. Chimney stack dirty.
4. Chimney draught too strong.
Error- E107
Firebox sensor
Firebox temperature sensor cable defective;
call customer service.
Error- E108
Safety switch I01
error
RESET the safety temperature limiter (STB)!
Caution: STB can only be reset after cooling below 105°C.
Error- E109
Safety switch I02
error
1. Pellet hopper lid is open.
2. Riddling grate not closed.
3. Jumper on IO2 not correctly plugged in.
If the fault persists, contact the service technician.
Error- E110
Defective room tem-
perature sensor
Room temperature sensor defective. Replace sensor.
Contact service technician.
Error- E113
Excessive flue gas
temperature
Chimney fan and flue gas ducts are clogged;
cleaning is required.
Error- E114
Firebox temperature
too low
Possible causes:
1. Failed ignition.
(Empty the burner pot and restart the appliance).
2. The hopper is empty (refill the fuel hopper).
3. DC side of the control unit must be earthed.
((The furnace body has generated millivolts).
Error- E115
System shut down
Software must be reloaded.
Contact a service technician.
5.1. Resetting warnings and errors
This manual suits for next models
1
Table of contents
Popular Oven manuals by other brands

Frigidaire
Frigidaire FEB27S7F Factory parts catalog

Whirlpool
Whirlpool AKZM 693 - PROGRAM manual

Tecnolec
Tecnolec PRO60ESTF Instructions for use

Frigidaire
Frigidaire PLEB30S8A Factory parts catalog

BBQ Guru
BBQ Guru Onyx use and care manual

Defy
Defy GEMINI PETIT CHEF MULTIFUNCTION THERMOFAN owner's manual


Black & Decker
Black & Decker TRO480SS Use and care book

Ariston
Ariston 7 Cuochi operating instructions

Amica
Amica 10222.3EHiTsDpHbQaX instruction manual

Ariston
Ariston OK 897E LSC X AUS operating instructions

Nectre Fireplaces
Nectre Fireplaces N550 Operating instructions manual

Smeg
Smeg FS9606AS user manual