BarrelHouse 18C Use and care manual
OWNER’S MANUAL
+ ASSEMBLY INSTRUCTIONS
A PRODUCT OF BARREL HOUSE COOKER, LLC
PATENT PENDING
1/2018 — #1015BHOM18C
WWW.BARRELHOUSECOOKER.COM
MODEL 18C
Your Guide to Barrel House Cooking
Pg. 2
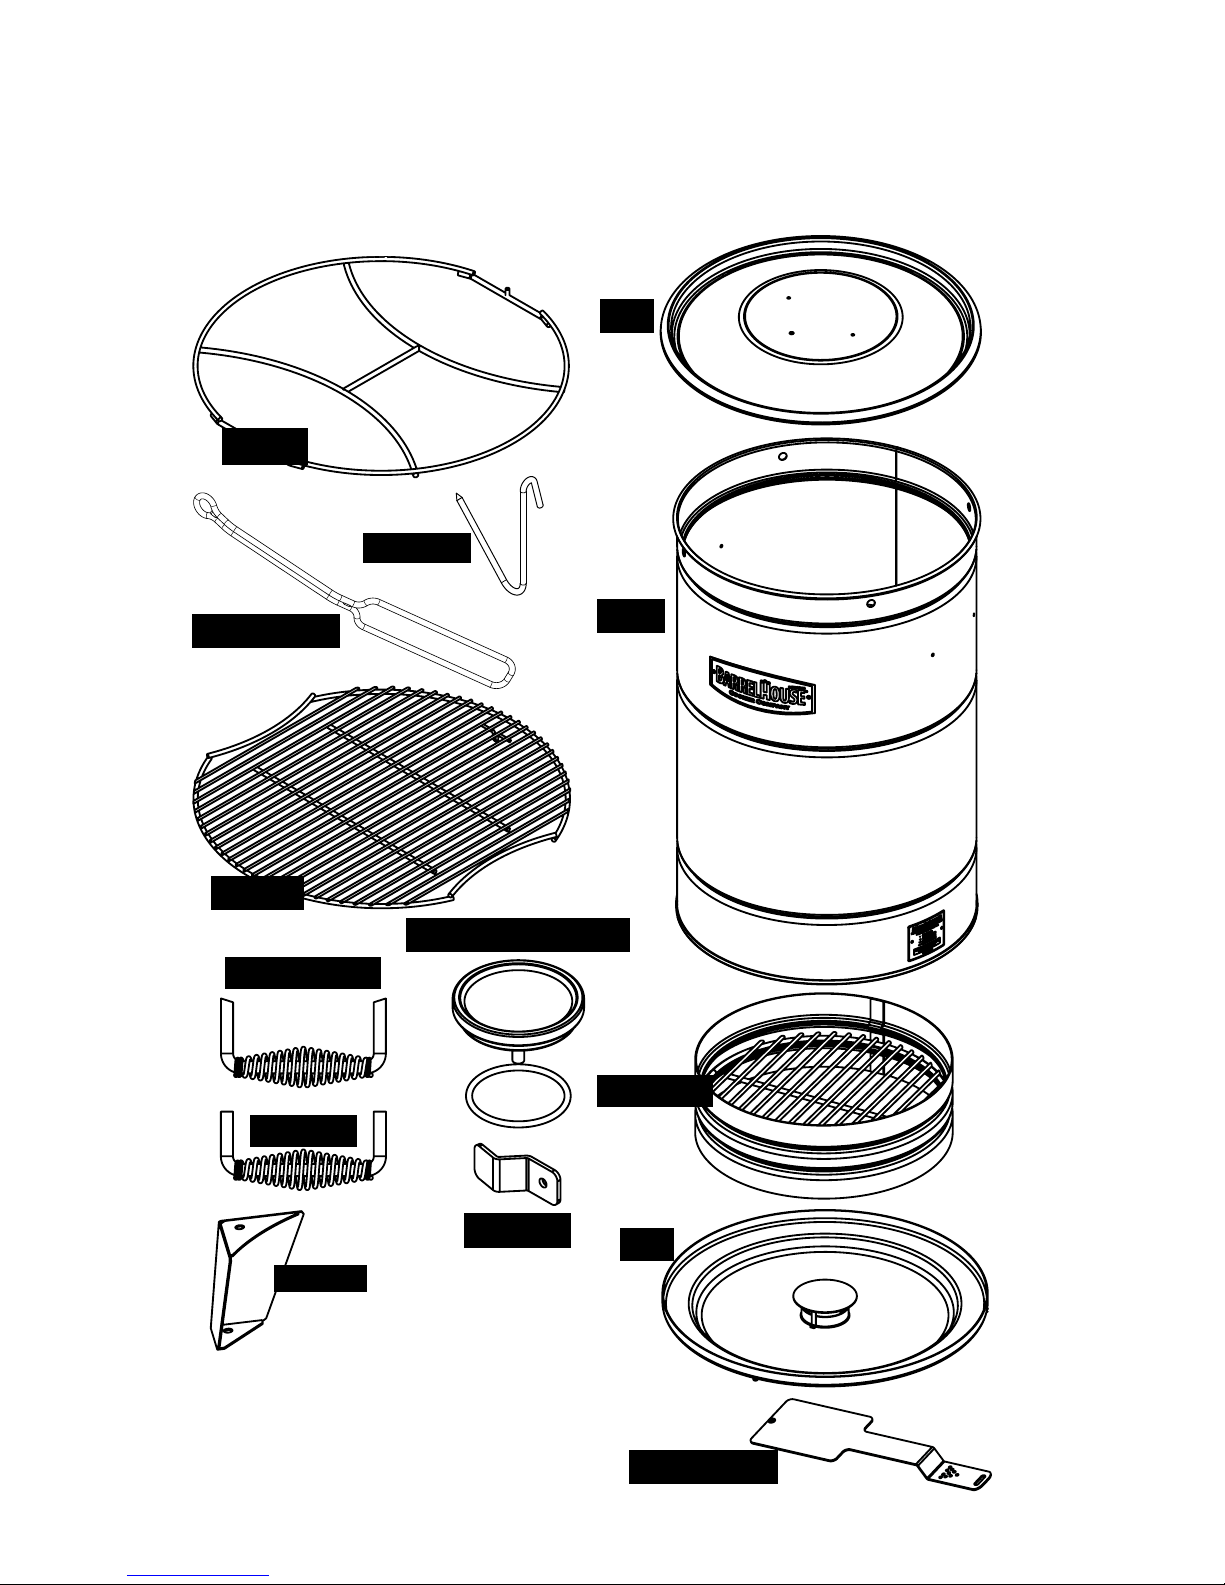
18C PARTS LIST
Accessory Wand Barrel
Lid
Base
Damper Slider
Lid Cleat
Thermometer & Gasket
Everythingyou'llneedforassemblyandcooking.Questions?Call1-844-508-2665.
H-Frame
Full Grate
Hook x 8
Feet x 4
Side Handle x 2
Top Handle
Coal Basket
Included Hardware:
7 - Screws
4 - Nuts
12 - 3/4" Washers
(Angled Ends)

Pg. 3
SAFETY & IMPORTANT REMINDERS
WARNING! DANGER!
Failure to follow these instructions may lead to serious injury or death.
• Do not use indoors. This cooker is designed for outdoor use only.
• Do not attempt to move the unit while it is hot.
• When in use, the cooker must be placed on a solid, level, heat tolerant, non-
combustible surface, at least ve feet away from buildings, out from under
coverings, and out of the general trac path. Several non-combustible round
or square pavers can be used to protect the oor surface.
• Do not use with gasoline, alcohol, or other highly volatile uids.
• Do not leave infants, children, or pets unattended near a hot cooker.
• When using a drip pan, use extreme caution. Spilling or tipping the pan with
grease inside while the cooker is hot will cause a re and may cause bodily harm.
• Do not put fuel/charcoal directly into the bottom of the base. Always place
fuel/charcoal in the coal basket in the base.
• Ensure that ashes and debris have been emptied from the base and coal basket
before each use.
• Neveraddlighteruidorcharcoalsaturatedwithlighteruid(matchlight)tohot
or warm coals.
• Donotwearclothingwithloose,owingsleeveswhilelightingorusingthecooker,
• Donotuse inorunderrestrictiveoutdoorenclosurebecausedangerouscarbon
monoxide fumes may accumulate.
• Never touch the cooking grates, frames, hooks, coal basket, or the cooker to
determine if they are hot. Barbecue mitts or hot pads should always be used to
protect hands while interacting with grates, hooks and frames.
• Use proper barbecue tools with long, heat-resistant handles.
• Keep the air intake at the proper elevation setting, and keep the lid closed
afterinsertingthefoodtoavoidare-ups duringcooking.Forhightemperature
cooking do not open the lid completely. As needed and according to cooking
instructions, set the lid o center to slightly keep it open. ALWAYS CLOSE LID
WHEN DONE COOKING. Grease are-ups may occur when the lid is not closed.
• Do not use as a burn pit; the porcelain enamel coating may not stand up to the
excessive heat and may shatter.

Pg. 4
TABLE OF CONTENTS
Barrel House Cooker Parts List.............................................. 2
Safety Warnings.................................................................... 3
Quick Start Guide.................................................................. 5
Assembly Instructions........................................................... 6
Complete Instructions
Elevation Setting.......................................................... 7
Lighting & Fuel.......................................................... 8
Hooking & Hanging................................................... 9
Cooking & Removal................................................... 9
Hibachi Grill & Charcoal Disposal.................................... 10
Grate Placement Options............................................. 11
Additional Accessories......................................................... 12
Cooking Guide.................................................................... 14
Troubleshooting Cooking Temperature................................. 15
Barrel House Cooker Care.................................................... 18
Warranty............................................................................ 18
Parts Diagrams................................................................... 19
Contact & Follow Us!........................................................... 20
Pg. 5
When you see this symbol, visit barrelhousecooker.com/videos
to watch a how-to video on the topic.
QUICK START GUIDE
1. Unpack and assemble the cooker (pg. 6).
2. Set air intake slider on cooker base to your elevation (pg. 7).
3. Light a full basket of charcoal briquettes for ONLY 15-20
minutes before closing lid (pg. 8).
4. Hang food or set on grates, and close the lid. "Versatility"
5. Wait suggested time for the type of food being cooked (pg. 14).
6. Afterwaitingthesuggestedtime,checkmeattemperature,then
cook to preference and remove.
NOTE:The results depend on how the charcoal is lled and started.
Only let the coals start for 15-20 minutes before inserting
food and closing the lid. "Lighting"
Visit barrelhousecooker.com/videos to watch our
how-to videos for set-up, lighting, cooking, and more.
Start on page 7 for complete instructions.
It is important to follow the instructions for lighting.
This method of lighting ensures the cooker operates at the correct
temperature for the entire cook. This smoker is engineered to
stay within the correct temperature range by itself for the entire
cook (6+ hours) without are-ups or fussing when set-up and lit
as instructed.
SAFETY NOTE: When in use, the cooker must be placed on a solid, level, heat
tolerant,non-combustiblesurface,atleastvefeetawayfrombuildings,outfrom
undercoverings,andoutofthegeneraltracpath.Severalnon-combustibleround
or square pavers can be used to protect the oor surface.
For complete safety instructions, see pg. 3.
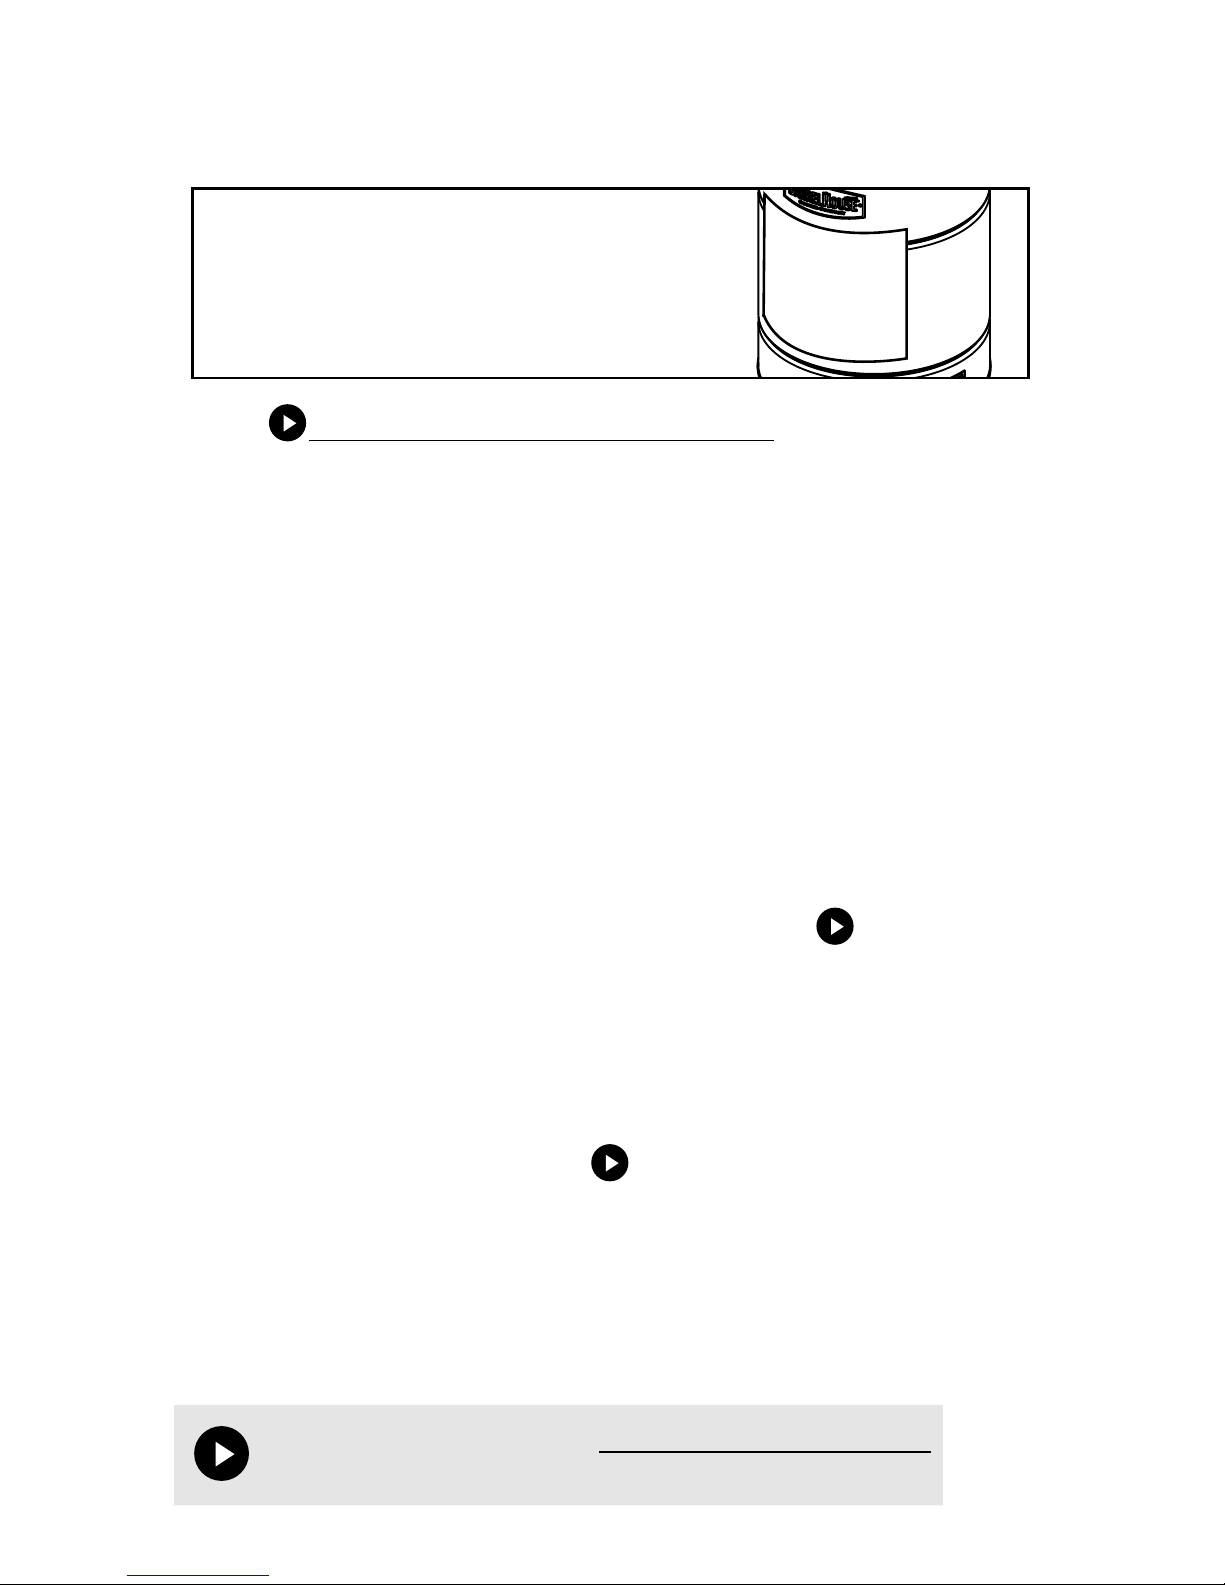
Best way to remove sticker:
During your rst cook, when the barrel is
warmed up, the sticker will come o easily.
Use heat resistant gloves and be careful
handling the barrel when the surface is hot.
Pg. 6
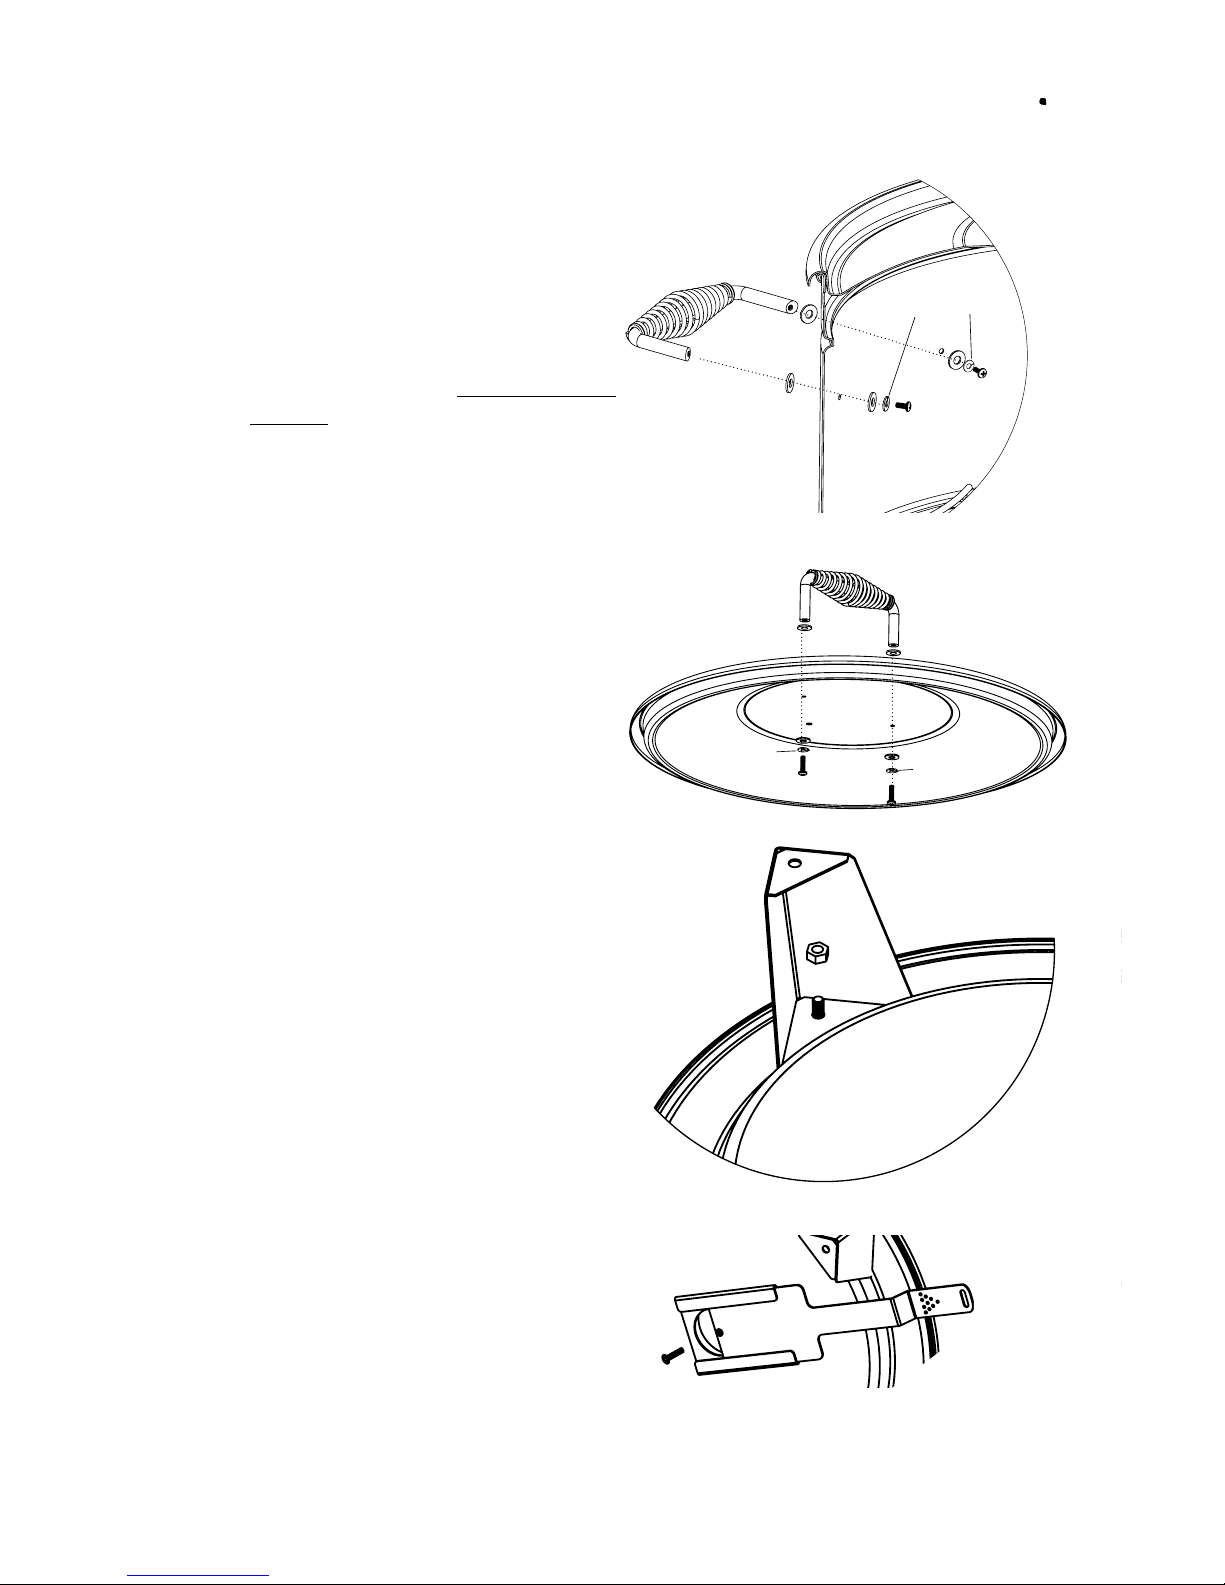
ASSEMBLY INSTRUCTIONS
INSTALLING FEET
1. Align handle (with angled ends)
and washers on outside of barrel.
2. From inside barrel, angle & insert
screws with a at washer on both sides
and lock washer closest to the screw head.
Be sure to tighten well.
1. Align handle (with at ends)
and washers to holes on top of lid.
2. From underside of lid, attach
handle with washer, lock washer
and screw. Tighten well.
1. The wider side of the feet sit on the
under side of the base.
2. Set the foot on base aligning it with
a threaded stud.
3. Thread 10mm nut on to stud.
Do not over tighten.
INSTALLING SIDE HANDLES
INSTALLING TOP HANDLE
INSTALLING DAMPER
1.Slidedamperintodamperkeeperon
the bottom of the base with the
angled step going upward.
2. Thread screw all the way in while
damper is half open. The screw
does not actually attach to anything
other than the damper slider. It sim-
ply prevents slider from being pulled
out too far
NOTE: ONLY USE INCLUDED 3/4" WIDE WASHERS.
NOT SMALLER WASHERS THAT MAY BE INCLUDED.
Lock Washer
Lock Washer
Lock Washer

Pg. 7
COMPLETE INSTRUCTIONS
ELEVATION AIRINTAKE SETTING
INSTALLING THERMOMETER & CLEAT
Properly setting the air-intake
is the key to getting the cooker
to cook at the optimal temp
and to assure there are no are-
ups. Pull the intake slider out to
reveal the dots that represent
yourcity'selevation.UseGoogle
tondyourlocation'selevation.
1 DOT = 0 - 2,000’
2 DOTS = 2,000 - 5,000’
3 DOTS = 5,000 - 8,000’
4 DOTS = 8,000 - 10,000’
Asdesired,theelevationsetting
can be adjusted to let in more
or less air. When the slider is
completelypulledout(showing
4 rows of dots) the air intake is
fully open.
Bottom view of the
air intake slider.
1. From the top of the lid, insert thermometer through the gasket.
2. From inside barrel attach cleat
(point it to center of lid ) and bolt.
3. Be sure to tighten well,
but do not over tighten.
A

Pg. 8
LIGHTING & FUEL
1. Remove the charcoal basket from the base and empty any ash or debris.
2. Set charcoal basket on the base and ll the charcoal basket to the top.
We suggest using Kingsford Original briquettes or something similar.
Warning: Never use charcoal pre-saturated with charcoal lighter uid (match
light). It may cause varied cooking results and petrochemical avored food.
3. For best cooking results it is important to follow the instructions.
Within 15-20 minutes of lighting the coals the lid should be closed.
This forces the charcoal to burn slowly. Light the coals one of two ways.
1) LIGHTER FLUID: Coat top layer of coals with lighter uid, then immediately
light. After 10 minutes, set the barrel on the base and leave the lid open.
After 5-10 more minutes, insert the food and close the lid.
2) CHARCOAL CHIMNEY: Place about 1/4 of the coals in the chimney and set it
onasolid,non-combustiblesurfacesuchasanothergrillorpaver.Lightpaperor
startercube under thechimney.After10-15 minutes,pour the burningcoalson
top of the unlit coals and place barrel on base with lid open. After 5-10 minutes,
close lid.
NOTE ABOUT THERMOMETER
The thermometer provides the benet of being able to baseline the start up
temperature and ensure the cook is within the desired range when properly
started. While the top thermometer will typically read between 220-260°F, the
actual temperature the food is cooking at is typically between 275-315°. The
actualtemperaturewillvarydependingonanumberofthings and timing during
thecook.Thelidthermometerdoesnotaccuratelyreectthetemperaturewhere
the food is cooking because it is at the top of the barrel above the exhaust ports,
and the intended cook area is below the exhaust ports.
ADDING WOOD
We do not recommend replacing charcoal with wood, however, for an additional
avor prole, you can add small wood chunks or chips while meat is cooking.
Small amounts of wood go a long way to creating avor in the enclosed pit envi-
ronmentoftheBarrelHouseCooker.To add wood,either drop it in fromthetopor
liftothebarrel.KeepinmindthatKingsfordOriginalBriquettesalreadyproduce
a mild smoky taste.
USING LUMP HARDWOOD CHARCOAL
Lumporhardwoodcharcoalburnshotterthanbriquettes,butitstillproducesthe
same results with a slightly dierent avor prole. For additional avor, small
wood chunks can be added to lump during the cook.
"Lighting"
When you see this symbol, visit barrelhousecooker.com/videos
to watch a how-to video on the topic.
Pg. 9
Recipes and cooking instructions for a variety of foods
can be found at barrelhousecooker.com/recipes
COOKING & REMOVAL
1. Cook meat for the suggested time (pg. 12).
2. At the end of the suggested cooking time, open the lid and use the
Accessory Wand to slightly lift the hooked meat to check the
meat’s internal temperature with a thermometer.
3. If the desired temperature has been reached (pg. 12),
remove the meat.
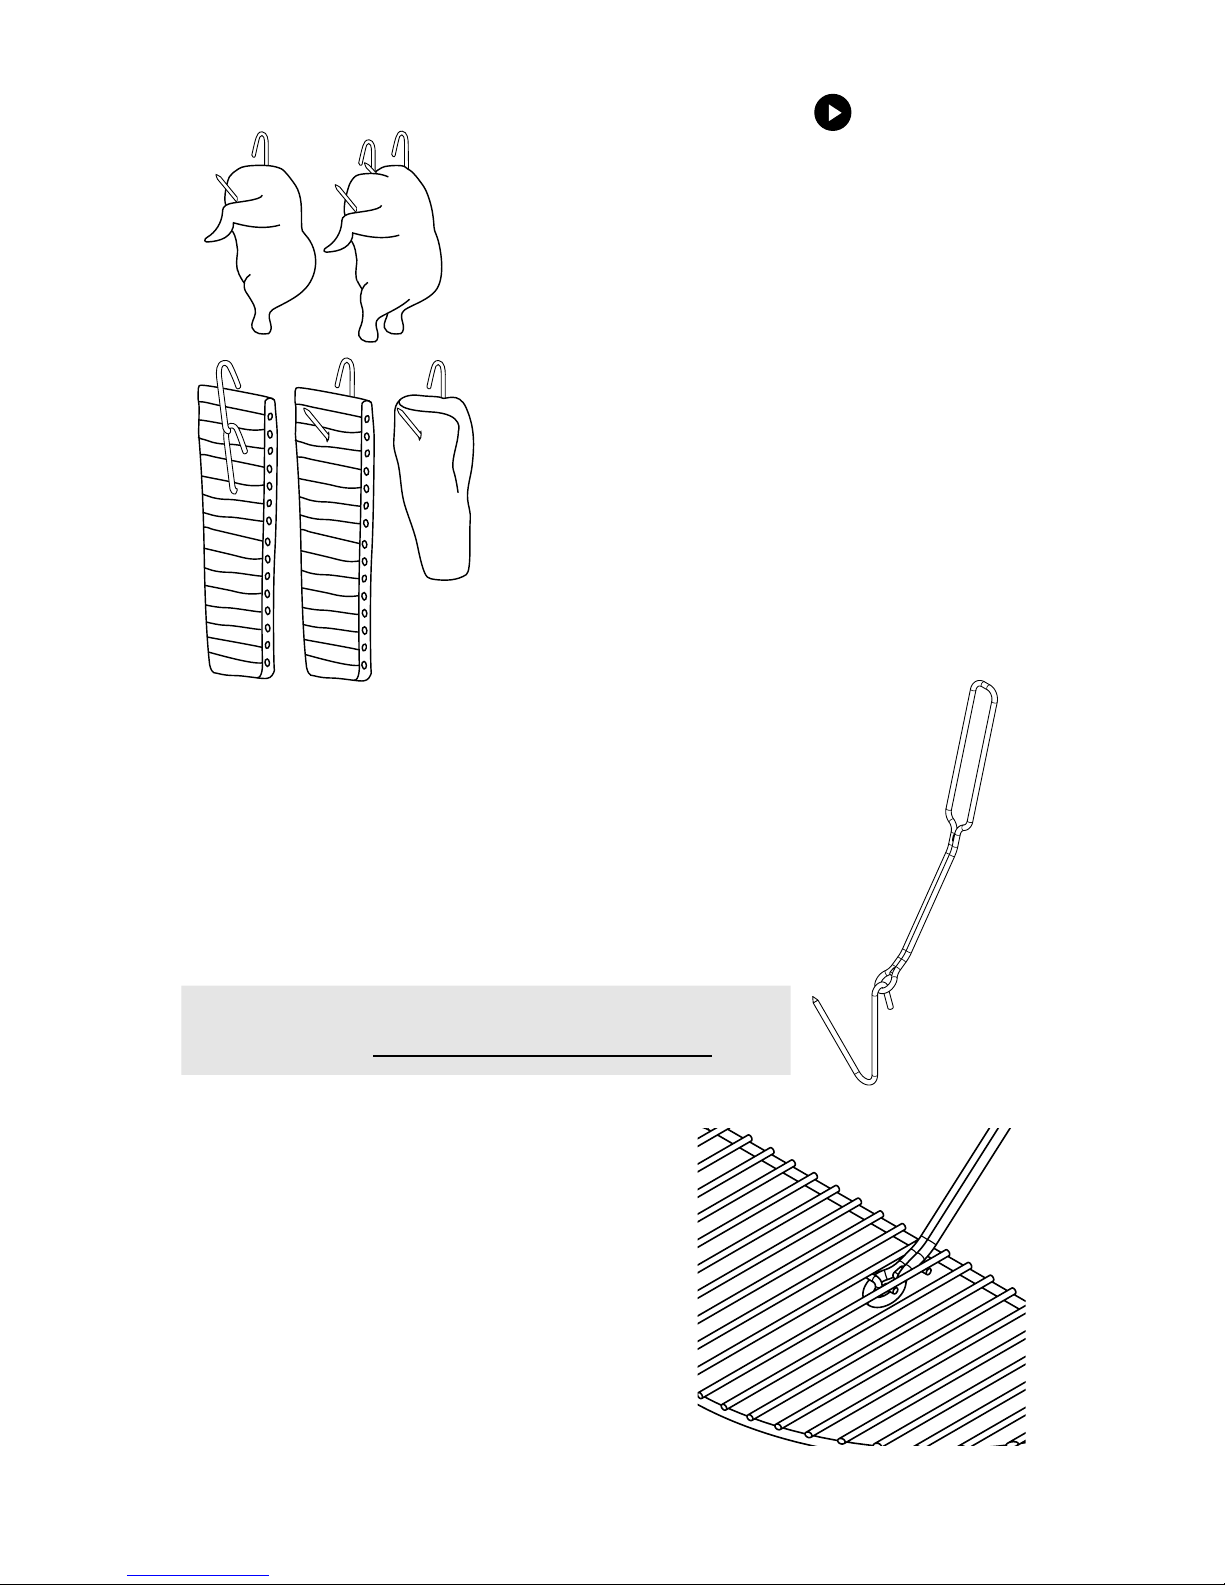
HOOKING & HANGING
Hangingmeat is bestforair convectionand allows juices
to trickle down, basting the meat, keeping it tender.
1. Prepare meat and insert the hooks. Make sure the
hook is a couple inches down from the top of the
thickest end of the meat.The hook should go all the
way through the meat with the point aiming up.
Boneless Meat: Hook the thicker end.
Half Chicken: Hook under the breast bone. Leg will
be at the bottom.
Whole Chicken: Use two hooks, one under each
breast bone. One from inside, one from outside.
Ribs: Hook the thick side two or three ribs down.
Optionally, use a second hook daisy chained to the
rst and sticking out another three ribs down. If
desired, a grate can be placed at the lowest level as
a precaution.
2. Hang the hooked meat on the H-Frame inside the
cooker. Space the meatout and away fromthe sides
of the barrel.
3. Close the lid.
USING ACCESSORY WAND
• AuniqueconnectionbetweentheAccessory
Wand and some grates and accessories
allows easy removal from inside the barrel.
• Remove food from grates and accessories.
• Insert the wand into the accessory
connection allowing the circle end of the
wand to go around the tab.
• Lift the accessory out of the barrel.
• Use caution when cooker is hot, and protect
hands and arms with a long cooking mitt.
"Versatility"

Pg. 10
CHARCOAL EXTINGUISHING & DISPOSAL
1. To extinguish the coals, close the lid and let the cooker continue
to run. Do not use water to extinguish coals inside the cooker
because if the temperature cooled too quickly it may crack the
porcelain nish.
2. Dispose cold ashes into metal or concrete waste bins that does
not contain plastic, paper, or greenery.
HIBACHI GRILL
Barrel House makes it easy to sear, reverse sear, and grill with the hibachi feature.
This feature can be used at the start or end of a cook, or as a stand alone grill
without the barrel. This also makes a perfect portable grill.
How to Use the Hibachi:
1. Remove the barrel and set aside.
2. Set the full grate on top of the charcoal basket. The parallel supports t
inside the diameter of the basket, holding the grate in place.
NOTE: When using the hibachi for grilling, use a single layer of charcoal to keep
the heat at a manageable temperature and distance from the meat.

Pg. 11
FRAME & GRATE PLACEMENT OPTIONS
1. Lift the barrel from base and set it to the side.
2. Arrangethegrate/framesasdesiredinthebarreldependingonwhatisbeing
cooked. There are several levels to cook on.
NOTE: Air movement is critical in this system. Do not ll-up a level with food, or
it will create a ceiling eect and change the cooking dynamics.
A. The H-Frame is
most often used
at the top level to
hang meat. This
maximizes capacity,
cooks evenly, and
smokes the meat.
B. The Full Grate is
most often used in
the middle level for
smoking or baking
a wide variety of
foods.
NOTE: Food quantity and placement aects air ow and results. To guarantee air
owsfreelytoptobottomfollowthisgeneralguide:usethecookerforsmokingby
hangingmeatonthetoplevel(A),orsetfoodonthemiddleleveltosmokeorbake
(B), or use the grate on the top level without the lid for grilling (C).The coal basket
can be set on a frame at the middle level to grill more directly, and only requires a
few briquettes.
C. The coal basket can
be put on the H-Frame
at the middle level.The
Full Grate can be used
onthetoplevelwithout
the lid on for grilling
traditional foods like
burgers, hot dogs,
wings, etc.

Pg. 12
ADDITIONAL ACCESSORIES
TAKE YOUR BARREL HOUSE TO THE NEXT LEVEL!
EZ-Load Turkey Plus Kit
EASIEST way to cook any size poultry in
your Barrel House Cooker. Simply hang
it in the cooker and lift it out when done
cooking.
Features multiple levels for stacking
whole chickens. Support bars thread on
to dierent levels.
Hanging a pork shoulder or ham makes it
easierto removethan cooking on agrate.
BBQue CanTM
Grill, smoke, or roast on any BBQ or
smoker - even hang it in a Barrel House
Cooker! Works with gas or charcoal grills.
Makes cooking lots of small or chopped
foods easy.
.Shrimp
.Nuts
.Meatloaf
.Bread
.Gold Fish
.Chex Mix
.Meatballs
.Kabob Ingredients
.Wings
.Vegetables & More!
Neverlosefoodthroughthe gratesagain!
Enjoy grilled or smoked foods you've
never been able to try before.
Accessories sold separately at barrelhousecooker.com.

Pg. 13
BHC O-Grate
Allows creative and eective ways to
cook a variety of food on the BHC 18C
using the following modular accessories.
(Each accessory sold separately)
Drumstick Rack
Hang up to 15 drumsticks at once!
Use two side-by-side to cook 30.
(Requires purchase of O-Grate)
Slotted Grill Grate
Cook delicate foods like shrimp and
vegetables. Use two for double the space.
(Requires purchase of O-Grate)
Half Grill Grate
Createagrillareaatthemiddle levelwhile
hanging food from the H-Frame on the
opposite side. Or use two Half Grill Grates
to create a complete grill.
(Requires purchase of O-Grate)
Cover for BHC 18C
This durable Cooker Cover is custom
made for the Barrel House 18C. It slides
over the cooker while the lid is closed and
is designed to protect the cooker from
wind, rain, snow, and dust.

Pg. 14
COOKING GUIDE
Cook Times
(approximate, cook to preference)
Meat Internal Temp.
(Degrees Fahrenheit)
Brisket (14 lbs) 5-7 hours (+resting time) 200
Chicken (Pieces) 30-90 min (depending on
thickness)
165 (boneless breasts)
175 (thighs/legs)
Corn-on-the-Cob 30-45 min
Fish (cook on
middle level)
30-45 min 130-145 (aky, tender,
slightly translucent)
Ham 2-3hours(dependingonsize) 140
Kabobs 30-60 min
Lamb (Leg, Boneless) 2-2.5 hours 140 Medium
Pizza 30-45 min
Pork Ribs
3-4 hours (2-5 racks)
4-5 hours (6-8 racks)
Bones Slightly Stick Out
Pork Shoulder 5-6 hours 195-200
Pork Tenderloin 45-60 min 140-145 Medium
Potatoes/Vegetables 90-120 min (whole potatoes)
60 min (vegetables)
Prime Rib 2.5-3 hours 130 Medium
Rib Eye Steak (Hung) 20-30 min 140 Medium
Tri-Tip 45-60 min (1), 2 hours (4) 140 Medium
Turkey 15 min/lbs 165-175 (breast)
Whole Chicken 2-3 hours (2), 3-4 hours (4) 165-175 (breast)
Cook to suggested time, check meat temperature, and then cook to preference.
For recipes and cooking instructions, visit barrelhousecooker.com/recipes.
For recipes and cooking instructions, visit barrelhousecooker.com/recipes.

Pg. 15
TROUBLESHOOTING TEMPERATURE
This smoker is engineered to stay at the correct temperature range by itself for
the entire cook (6+ hours) without are-ups, or fussing with it when set-up and lit
as instructed.
The cooking process is dierent than other outdoor BBQs, smokers, and cookers. Give the
process time to work, the temperature will uctuate some, but the results will be amazing
every time.
NOTE ABOUT THERMOMETER: The thermometer provides the added value of being able
to baseline the start up temperature and ensure the cook is within the desired range when
properly started. While the top thermometer will typically read between 220-260°F, the
actual temperature the food is cooking at is typically between 275-315°. The actual
temperature will vary depending on a number of things and timing during the cook.The lid
thermometerdoesnotaccuratelyreectthetemperaturewherethefoodiscookingbecause
it is at the top of the barrel above the exhaust ports, and the intended cook area is below the
exhaust ports.
Barrel Cooker Runs Too Hot?
One or more of the following issues can aect the temperature of the cooker.
THE COOKER
Elevation Setting Correct?
Be sure the air intake setting is at the proper opening based on your elevation. If the
intakeisopenedmorethansuggested,thecoalswillburnhotter.Correctingthesetting
should bring the temperature down slowly.
Lid and Base Seated Properly?
Be sure the lid sits down all the way around the top of the barrel. Be sure the base is not
bent causing it to not sit ush around the bottom of the barrel.
Brand New Barrel House
There is a slight chance a brand new cooker may run hotter for the rst cook due to the
porcelain coating. If you experience this, the food will still turn out great. The cooker
will become seasoned, which will bring the temperature down on subsequent cooks.
Thermometer Working Properly?
Thermometerscangobad,butyoumaytrycleaningtheprobetoseeifthatresolvesthe
problem.Otherwise,itmaybecoveredunderwarranty(seepg.18).Visitourwebsitefor
more information on replacing a bad thermometer.
THE WEATHER
Direct Sun and Hot Days
Ambienttemperaturesaectthecookingtemperatureofthebarrelcooker.Theresults
willbethe same,butthetiming willbealittledierent.Formoreconsistenttimes,keep
thebarrelcooker in theshadeon hot days,and in the sunoncolderdays.The wind may
alsoaectthecookingtemperaturebycoolingthebarreldown.Theeectofweatheris
not overly dramatic but does play a part in the cooking time and temperature.

Pg. 16
Wind Blowing Air into the Coals
The cooking temperature will increase if air is being forced through the bottom intake
hole. Set up a wind block, or place barrel in a sheltered area.
THE PROCESS: What the Cooker Does
Temperature Naturally Rises During a Cook
As meat heats up, the ambient temperature in the barrel usually increases. Less energy
isbeing usedtocook themeat sothe airgets hotter. If thetemperaturegoesbeyondthe
cooking range there may be other factors to consider.
Temperature Fluctuations
It is normal to see spikes in the temperature but it will not aect the results of the cook.
Spikes usually calm down within 30 minutes. Some of the reasons for temperature
spikes are:
•Asbriquettesburn,theyashandbecomesmallercausingthemtorearrangeandmake
hot spots.
• There may be a temporary hot spot from grease or a wood chip.
• Opening the lid, no matter how little or quick, introduces air into the system and the
coals heat up.
Probe Temperature Varies
Duringthecookingprocessthetemperaturewithinthebarreluctuates,buttheendre-
sult is a consistent cook top to bottom. At times throughout the cook, it is hotter toward
the middle and other times toward the top. This is normal as the meat heats up, as coals
breakdown and air moves.
THE PROCESS: What You Do
Keep the Lid Closed
Try to limit opening the cooker except when necessary to check the meat, add wood, or
to add/remove food.The additional air this lets into the cooker raises the temperature
and can change the cooking dynamics if opened too frequently or for too long.
Some Fuels Burn Hotter
Somecharcoalbrandsandtypes burn hotter. For instance,lumpcoalhas thereputation
ofproducingmoreheatthanbriquettecharcoal.Consideranalternativeproductsuchas
Kingsford Original.
WHAT NOT TO DO
NEVER pour water over hot coals in the cooker.The result will be meat coated in ash and
could lower the temperature too quickly which may crack the porcelain nish.
TEMPERATURE TOO HOT CONT'D.

Pg. 17
Barrel Cooker Runs Too Cool?
Afterthemeathaswarmedup duringthecookingprocess,thelidthermometershouldbe
over 220°F (note that the temperature where the meat is cooking is substantially hotter
than what the lid thermometer reads). Here are a few things to consider if the cooking
temperature on the lid will not go over 220°F during a cook:
THE COOKER
Air Intake Properly Set?
Be sure the air intake is open according to your city's elevation. If there is not
sucient air, the temperature will be low.
Not Enough Charcoal?
Using less than a full basket of charcoal (about 8 lbs) may result in not enough heat
ormayend up cookinglowand slow (still greatresults,but takes much longer). Make
sure the charcoal basket is lled level to the top with charcoal before lighting.
See pg. 8 for lighting instructions.
Thermometer Working Properly?
Thermometers can go bad, but you may try cleaning the probe to see if that resolves
the problem. Otherwise, it may be covered under warranty (see pg. 18). Visit our
website for more information on replacing a bad thermometer.
THE WEATHER
Damp, Cool Days
The Barrel Cooker may require more air on a damp, cold day compared to a sunny,
warm one. Oset the lid for a couple minutes, then reset it. Wait 10 minutes to see
how the temperature is aected.
Wind May Reduce Air Intake
Thecookingtemperaturemayactuallydecreasedependingonhowthewindismoving
around the barrel. Set up a wind block, or place barrel in a sheltered area.
THE PROCESS: What the Cooker Does
Temperature Naturally Rises during a Cook
As meat heats up, the ambient temperature in the barrel often increases. Give the
process time to play out. If the temperature never gets to 220°F there may be other
factors to consider.
THE PROCESS: What You Do
Give the Coals a Boost
Encourage the coals by giving them a boost of air. Oset the lid for a couple minutes,
then reset it. Wait 10 minutes to see how the temperature is aected.
Increase Air Flow into Cooker
Adjust the bottom air intake, opening it up slightly more.The elevation or conditions
may require it.
Amount of Meat or Temperature of Meat
Thecookermaybeoverloadedwithmeat,notallowingthecookingprocesstomature.
See manufacturer’s recommendations for meat quantity. A full barrel of very cold
meat should cook ne when given more time for the temperature to rise.
TROUBLESHOOTING COOKING TEMPERATURE

Pg. 18
BARREL HOUSE COOKER CARE
INTERIOR: Within a couple uses, the inside of the barrel and lid will be seasoned. It is not
necessary to regularly clean o this coating, as the porcelain enamel protects the cooker.
Approximatelyonceayear,thoroughlyheatthebarrelandbrushtheinteriordown.Forany
build up in the base, use a plastic scraper.
THERMOMETER: Regularly clean the thermometer probe on the underside of the lid.
It is common for there to be condensation in the thermometer due to changes in the
surrounding environment. It will eventually dry out on it's own.
EXTERIOR: Make sure the cooker is cool and coals are completely extinguished. Wash the
outsideofthecookerwithamilddetergent,softsponge,andwater.Rinsewellandwipedry.
GRATES/FRAMES/ACCESSORIES: All grates, frames, accessories, and hooks are
dishwasher safe. However, it is not necessary to wash after each use.
WARNING: Porcelain enamel can chip or shatter when dropped or hit with force.
WARRANTY
Barrel House Cooker Company hereby warrants to the original purchaser or intended
recipient of this Barrel House Cooker that it will be free from defective parts from the date
of purchase for three years when assembled and operated in accordance with the printed
instructions accompanying it.
Barrel House Cooker Company may require reasonable proof of purchase date. Please
register the cooker online or keep the receipt. This Limited Warranty shall be limited to
the repair or replacement of parts which prove defective under normal use. Barrel House
Cooker Company requires satisfactory proof of a defective part. If Barrel House Cooker
Company conrms the defect and approves the claim, Barrel House Cooker Company will
elect to repair or replace such parts without charge. If required to return defective parts,
transportationchargesmustbeprepaid.BarrelHouseCookerCompanywillreturnpartsto
the purchaser, postage prepaid.
ThisLimitedWarranty does not coveranyfailures or operatingdicultiesdue to accident,
abuse, misuse, alteration, misapplication, vandalism, improper installation or improper
maintenance or service, or failure to perform normal and routine maintenance. Barrel
Housemakes every eort to utilizematerials thatretardrust,however, the materialcan be
compromised by various substances and conditions beyond Barrel House’s control. High
temperatures, excessive humidity, chlorine, industrial fumes, fertilizers, lawn pesticides
and salt are some of the substances that can aect metals and metal coatings. For these
reasons, the Limited Warranty does not cover rust or oxidization, unless there is a loss of
structural integrity on the grill component.
Deterioration or damage due to severe weather conditions such as hail, hurricanes,
earthquakesortornadoes,discolorationduetoexposuretochemicals,eitherdirectlyorin
the atmosphere, is not covered by this Limited Warranty.
There are no other express warranties except as set forth herein, and any applicable
implied warranties of merchantability and tness are limited in duration to the period of
coverageofthisexpresswrittenLimitedWarranty.Someregionsdonotallowlimitationon
how long an implied warranty lasts, so this limitation may not apply to you.

Pg. 19
18C PARTS DIAGRAM
1
Partsandfeaturesvarydependingonmodel.Seewebsiteforinformation.
1. Top Lid Handle
2. Thermometer
3. GasketforThermometer
4. Barrel Lid
5. Top Handle Screws
& Washers
6. Lid Cleat
7. Lid Cleat Nut
8. Barrel Body
9. Side Handles Screws
& Washers
10. Side Handle
11. Charcoal Basket
12. Ash Collection Base
13. Damper Slider
14. Damper Slider Screw
15. Feet
16. Feet Nut
2
3
14
4
7
5
68
10
9
11
12
13
15
16

Pg. 20
VISIT US!
SEE WHAT’S NEW
Barrel House Cooker Company is working hard to provide you more ways to
cook. Visit our website to see what’s new!
• Videos • How-To’s • New Products
• Recipes • Events • Promos
Visit www.barrelhousecooker.com today!
FOLLOW US!
STAY IN TOUCH
• Get the latest news on tips, recipes,
giveaways and more.
• Let us know how much you love
your cooker and see what others
are saying.
• Sign up for our newsletter!
• Use #BHCbbq when sharing a photo
for a chance to be featured on our
social media pages!
REGISTRATION
Register your Barrel House Cooker upon receiving it for warranty purposes.
To register, visit www.barrelhousecooker.com/register
#BHCbbq
@barrelhouseco
Visitbarrelhousecooker.com/social-media
to see what everyone's been cooking!
BARREL HOUSE COOKER, LLC
34970 MCMURTREY AVE
BAKERSFIELD, CA 93308
18445082665
SALESBARRELHOUSECOOKER.COM
WWW.BARRELHOUSECOOKER.COM
Table of contents
Popular Cooker manuals by other brands


Bosch
Bosch COOKIT MCC9555CWC user manual

Rinnai
Rinnai RETS-320A Operating, servicing and installation instructions

Buffalo
Buffalo GF239 instruction manual

AFK
AFK EIP-2000.2 instruction manual

Siemens
Siemens Fornuis HX74W536N instruction manual

Falcon
Falcon Classic 110 Dual Fuel Instructions for use and installation


