BCP SKY4313 User manual

SKY4313
Ver. 2
INSTRUCTION
MANUAL
Stainless Steel Compact
Dishwasher

Thank you for choosing us! Since 2002, Best
Choice Products has been bringing customers
high-quality products at the absolute lowest
price. With everything ranging from instruments
and toys to furniture and outdoor, we’ve got
your everyday living essentials covered. We’re
centered around a customer-first philosophy –
with free shipping, exceptional customer
service, and a catalog sourced with you in mind.

| 3
NOTICE
• Do not allow children to operate this appliance. Keep appliance out of reach of children.
• Close supervision is necessary when appliance is used near children.
• Place on a stable and level surface.
• Item is intended for indoor, household use only.
• Ensure that your voltage is consistent with specifications.
• This appliance is not intended for use by people (including children) with reduced physical, sensory, or
mental capabilities, unless they have been given supervision or instruction concerning use of the
appliance by a person responsible for their safety.
• If any parts are missing, broken, damaged, or worn, stop using this product until repairs are made and/or
factory replacement parts are installed.
• Do not use this item in a way inconsistent with the manufacturer’s instructions as this could void the
product warranty.
• Only use with a grounded 3-prong outlet.
• Do not modify the plug provided with this appliance.
• Do not use with an extension cord or adaptor plug.
• Do not abuse, sit on, or stand on any part of the dishwasher.
• Make sure all enclosures and door are tightly closed before operating.
• Do not place heavy objects or weight on the door when it is open.
• Do not run power cord over sharp edges/corners or a hot surface.
• Keep appliance away from direct sunlight and other sources of heat (stove, heater, etc.).
• Do not allow water to touch the internal electric components.
• Do not run dishwasher without filters properly installed.
• Do not use if the plug, power cord, or any components are damaged.
• Ensure hands are dry when removing the plug from the wall outlet.
• Stop operation immediately if unit emits abnormal sounds or movements.
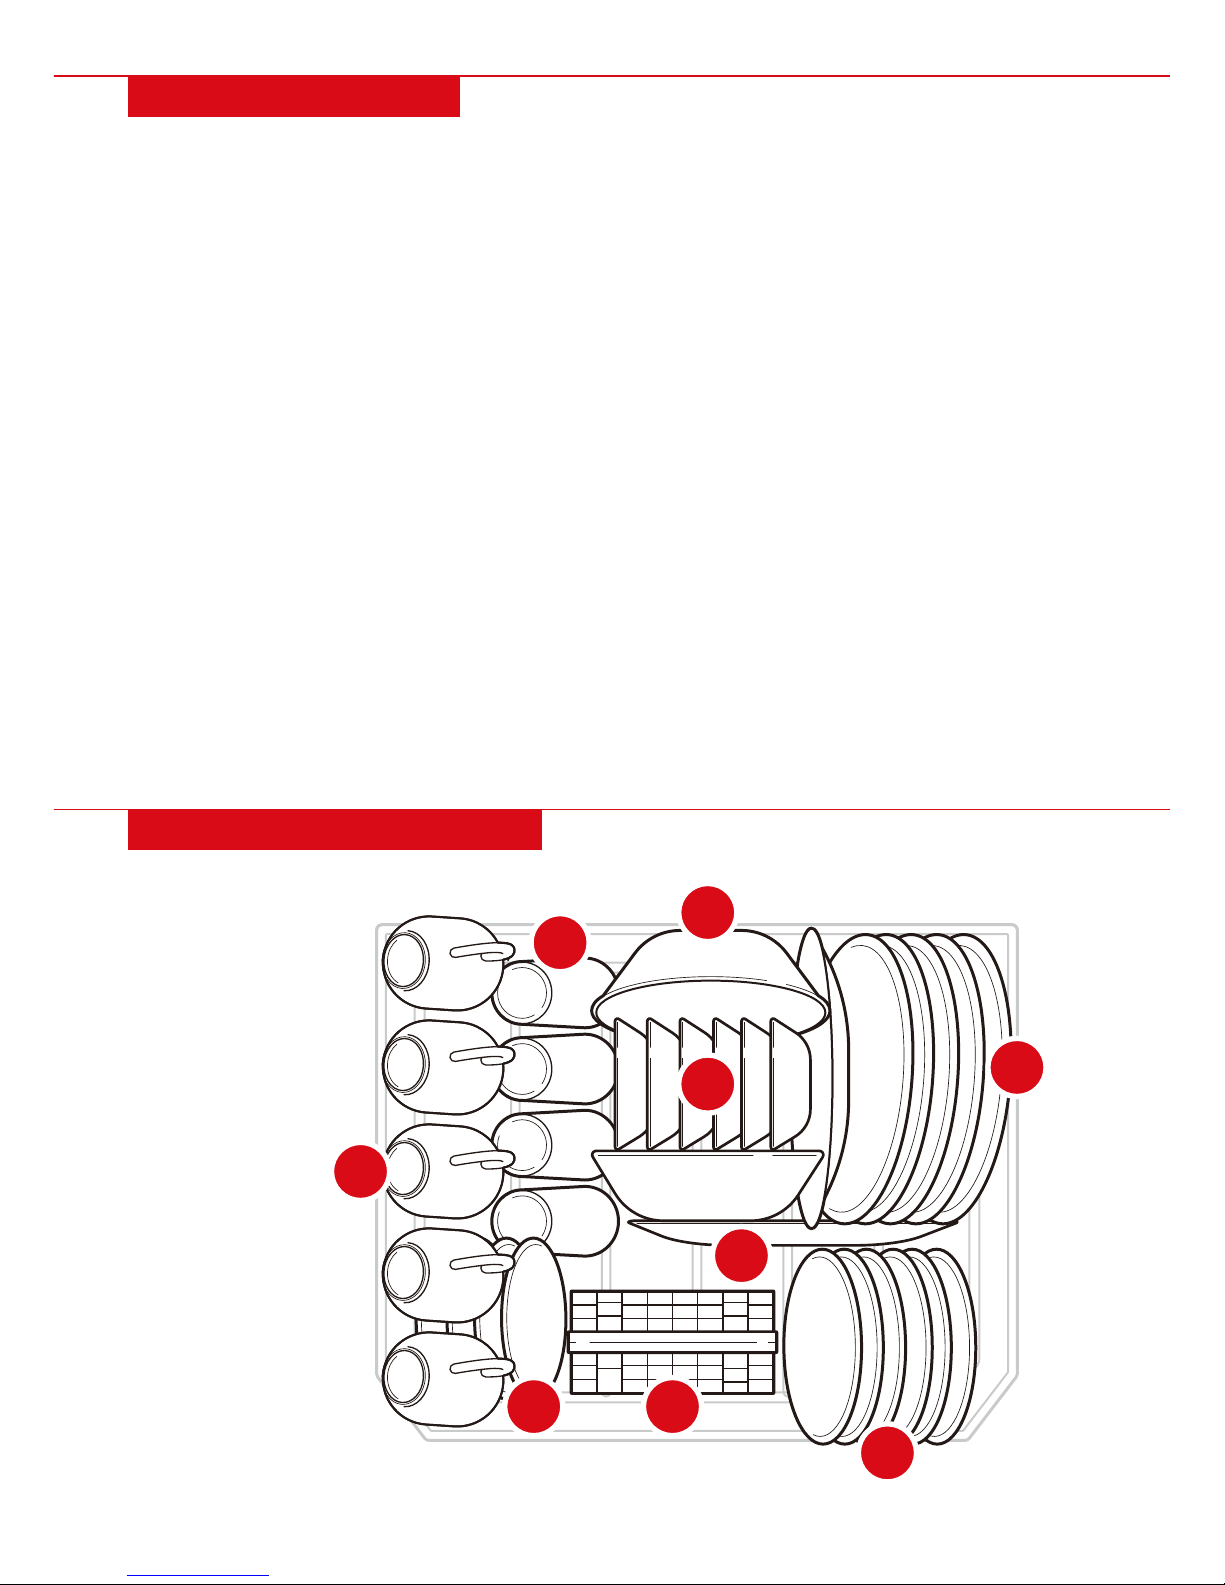
• Only wash a maximum of 6 place settings per load.
• Only use with mild dishwasher detergent. Do not use hand soap, dish soap, or laundry detergent.
• Keep soap and detergent out of the reach of children.
• Detergent tablets require longer washing programs to fully dissolve tablet.
• Only wash dishwasher safe items. Do not wash plastic items unless they are labeled dishwasher safe.
• Some types of glass may dull after repeated washing.
• Glazed patterns may fade after repeated washing.
• Silver and aluminum parts may discolor after washing.
• Opening door will automatically pause operation. Make sure movement completely stops before
opening door.
• Do not leave door in open position as this could be a tripping hazard.
• After a washing program finishes, check that the detergent dispenser is empty.
• Do not immediately remove items from the dishwasher after washing; allow items to cool for 15 minutes
to avoid damage.
• If moving the dishwasher, keep in an upright, vertical position.
WARNING
USAGE TIPS
Please retain these instructions for future reference.

SPECIFICATIONS
Min. Inlet Water Pressure
Max. Inlet Water Pressure
6 psi
145 psi
DIAGRAM
RACK
CUP SHELF
UTENSIL BASKET
DETERGENT
DISPENSER
RINSE AID
DESPENSER
FILTER ASSEMBLY
INLET
DRAIN OUTLET
POWER CORD
SPRAY ARMS
4|

CONTROL PANEL DIAGRAM
ACCESSORIES
POWER CONTROL PANEL START/PAUSE
DELAY:
Delay start of washing
program from 1 to 24 hours
WASHING PROGRAM:
Cycle through dierent
washing programs
RINSE AID INDICATOR:
Turns on to indicate
rinse aid level is low
PROGRAM ENDING
INDICATOR
WATER INLET HOSE
WASHING PROGRAMS
(See page 11)
DRAIN HOSE
FAUCET
ADAPTOR
FAUCET
WASHER
| 5
QUICK CONNECT ADAPTOR
INLET HOSE
CONNECTION
DRAIN HOSE
CONNECTION
FAUCET
ADAPTOR
LOCKING
COLLAR
PRESSURE
RELIEF VALVE

INSTALLING DISHWASHER
1
2
Place the dishwasher on a stable and level surface near a wall outlet and water supply tap with
drain (e.g. a kitchen sink).
Screw the faucet adaptor onto the water supply tap. Make sure there are no leaks.
6|

INSTALLING DISHWASHER
3
4
Connect the six-sided connection of the drain hose to the drain outlet on the back of the
dishwasher. Do not over-tighten.
Connect the star-shaped connection of the inlet hose to the inlet on the back of the dishwasher.
Do not over-tighten.
| 7

INSTALLING DISHWASHER
5
6
Connect the drain hose and inlet hose to the corresponding connection points on the quick
connect adaptor.
Attach the quick connect adaptor to the faucet adaptor. Pull down the locking collar, press the
quick connect into the faucet adaptor, then release to lock. Make sure there are no leaks.
NOTE: Water will drain periodically throughout the washing program.
8|

ADDING DETERGENT
ADDING RINSE AID (OPTIONAL)
1. Open the detergent dispenser to reveal two detergent compartments.
2. Deposit dishwasher detergent in the appropriate compartment, then close the lid.
NOTE: For most loads, 1 tablespoon of detergent is adequate.
NOTE: The rinse aid indicator fills according to the level of rinse aid (a full dot indicates full, half dot
indicates half full, etc.).
1. Twist the cap counterclockwise to open.
2. Adjust the dial to set the amount of rinse aid. A setting of 3 is recommended, but if dishes are still
spotted, adjust to 4.
3. Deposit rinse aid. Do not overfill the compartment.
4. Align the arrow and twist the cap clockwise to close.
1
2 3
4
MAX
LEFT
COMPARTMENT
RIGHT
COMPARTMENT
RINSE AID
INDICATOR
(Capacity: 0.5 ounce)
(Capacity: 1 ounce)
| 9

DISH LOADING EXAMPLE
DISH LOADING TIPS
• Scrape o leftover food before loading in dishwasher.
• Load items such as cups, glasses, pots/pans, etc. face down.
• Curved items, or those with recesses, should be loaded at a slant so water can run o.
• Place utensils securely so they cannot fall over.
• Do not cover smaller items with larger items.
• Do not place small items in dishwasher as they could fall during washing.
• Do not allow a glass item to touch another glass item.
• Load large items directly on the rack.
• Load sharp items carefully so they do not damage the door seal.
• Load knives and sharp utensils into the basket with the sharp end pointing down.
• Load long items horizontally on the rack.
• Make sure the spray arms spin freely and their rotation is not obstructed.
• Do not overload the dishwasher.
Items that are NOT dishwasher safe:
• Utensils with wood or mother-of-pearl
• Items with a metal trim
• Plastic items that are not heat resistant
• Older utensils with glued parts
• Bonded items
• Pewter or copper items
• Crystal glass
• Steel items
• Wood platters
• Items with synthetic fiber
1. Cups
2. Large bowls
3. Drinking glasses
4. Saucers
5. Small bowls
6. Platters
7. Large plates
8. Small plates
9. Utensil basket
1
7
8
9
6
5
4
2
3
10 |

1. Plug the dishwasher into a wall outlet. Slowly turn on the water supply to full pressure.
- When you turn on the water supply, the inlet hose will be pressurized.
2. Load dishwasher and add detergent/rinse aid.
3. Turn power on and press the washing program button to select your desired washing program.
4. Press start to begin the washing program.
- You can change the washing program if the wash cycle is just starting. Press and hold the washing
program button to enter standby and select a dierent program.
5. Do the following to add an item during a washing program:
- Press the pause button, wait for operation to stop, then open the door and add the item.
- Close the door and press the start button to continue washing.
6. Machine will sound and automatically stop after the washing program finishes.
7. When finished, turn o the appliance and shut o the water supply.
8. Press and hold the pressure relief valve to release pressure from the inlet hose. Continue until water
stops flowing.
- Warning: Water may be very hot; take care when releasing pressure.
9. Remove the quick connect adaptor and faucet adaptor.
10. Partially open the door to circulate air inside the dishwasher. Allow items to cool for 15 minutes, then
remove them from the appliance.
- Do not immediately remove items from the dishwasher after washing.
WASHING
PROGRAM DESCRIPTION SPECIFICATIONS DETERGENT TIME RINSE AID
For normally
soiled loads
For heavy
soiled loads
Pre-wash (2),
Wash (2),
Rinse (2),
Dry
Pre-wash (2),
Wash,
Rinse (2),
Dry
Pre-wash (2),
Wash,
Rinse (2),
Dry
Pre-wash,
Wash,
Rinse (2),
Dry
Pre-wash (2),
Wash,
Rinse (2)
Pre-wash,
Wash
For lightly
soiled loads
For lightly
soiled glass and
tableware
For rinsing
items that will
not be washed
immediately
A short wash for
lightly soiled
loads without
drying
0.5 oz.
0.6 oz.
0.6 oz.
0.6 oz.
0.5 oz. 70 min.
45 min.
24 min.
110min.
100 min.
75 min.
–
YES
YES
YES
YES
YES
NO
HEAVY
NORMAL
ECONOMY
GLASS
SPEED
RINSE
SETTINGS
| 11

CLEANING AND STORAGE
MAINTENANCE
• After every use, shut o water supply and leave the door partially open to circulate air.
• Always unplug appliance from wall outlet before cleaning and maintenance.
• Wipe down exterior of machine with a soft, damp cloth. If necessary, use a mild detergent or
white vinegar.
• Do not clean with sharp objects, scouring pads, or harsh cleaners.
• Routinely operate/rinse the dishwasher with 1 cup of white vinegar to remove deposits and scaling.
• Routinely clean the seals of the dishwasher.
• If appliance has not been used for an extended period, run a washing program with dishwasher empty
before normal operation.
• In cold temperatures, do the following to prevent freezing:
- Disconnect hoses and drain water
- Wipe up water inside appliance
• Store machine in a cool, dry place away from direct sunlight.
Spray arms:
• Regularly clean the nozzles of the spray arms to prevent them from clogging.
• Hold middle of a spray arm and pull up to remove. Rinse under running water to clean nozzles.
• Reinsert spray arms and check to make sure the arms turn freely.
Door:
• Use a soft, damp cloth to wipe around the inside edge of the door to clean the door seal.
• Do not use a spray cleaner as it could damage the lock and electrical components.
Filter Assembly:
• Once a week, remove and clean the filter assembly.
- Twist counterclockwise to remove the filter assembly.
- Use a brush to remove food remnants and items caught in filters, then rinse with water.
- Reinsert filter assembly and twist clockwise to lock in place.
COARSE FILTER
FINE FILTER
MAIN FILTER
12 |

TROUBLESHOOTING
ERROR CODES
REASON
Not properly plugged in
Door not properly closed
Drain hose kinked
Blown fuse/tripped
circuit breaker
Make sure properly plugged in
Straighten drain hose
Sink clogged
Filter blocked Clean inlet
Unclog sink, make sure draining well
Replace fuse, reset circuit breaker
Fully close door
Improper detergent
Used detergent with
color additive
Use detergent without
color additive
Only use specified dishwasher detergent
Spilled rinse aid Clean rinse aid
PROBLEM
White film on interior
Knocking/rattling noise
during operation
Dishes not clean
Cloudy glassware
Black/gray marks
Stained interior
Soap suds in dishwasher
Dishwasher not starting
Water not pumped
from dishwasher
SOLUTION
Hard water minerals
Spray arm knocking against item
Items or utensils not secure
Clean interior with sponge and
mild detergent
Rearrange items
Rearrange items
Soft water, too much detergent
Aluminum rubbed against dishes
Use less detergent, select glass
washing program
Handwash with mild detergent
Not loaded correctly Rearrange items (see dish loading tips)
Washing program not
powerful enough Select appropriate washing program
Not enough detergent Use more detergent
Items are blocking the path
of spray arms
Rearrange items so spray arms
rotate freely
Filters/nozzles blocked Clean filters, clean spray arm nozzles
Items not
drying completely
Items loaded improperly Rearrange items
Not enough rinse aid Refill rinse aid dispenser
Items removed too soon Open door and let items cool
before removing
Washing program not optimal Select a longer washing program
with higher temperature
Items with low-quality coating Do not use these items with dishwasher
Detergent left
in dispenser
Items blocking
detergent dispenser Rearrange items
REASON
Long inlet time because faucet
closed, water intake restricted, or
water pressure too low
Overflow because of leaking,
overfilling, improper soap
Make sure water supply is open and water
pressure is adequate
Clean up leak and restart operation
PROBLEM
E1
E4
SOLUTION
| 13

Earn points while you shop. Join today!
bestchoiceproducts.com
Give your friends 15% o their first order! For each
successful referral you’ll receive 100 points.

Check out more great products:
bestchoiceproducts.com

All items can be returned for any reason within 60 days of the receipt and will receive a full refund as long
as the item is returned in its original product packaging and all accessories from its original shipment are
included. All returned items will receive a full refund back to the original payment method. All returned
items will not be charged a re-stocking fee.
All returned items require an RA (Return Authorization) number, which can only be provided by a Best
Choice Products Customer Service Representative when the return request is submitted. Items received
without an RA may not be accepted or may increase your return processing time. Once an item has been
received by Best Choice Products, refunds or replacements will be processed within 5 business days.
All returns must be shipped back to the Best Choice Products Return Center at the customer’s expense. If
the reason for return is a result of an error by Best Choice Products then Best Choice Products will provide
a pre-paid shipping label via email. Boxes for return shipping will not be provided by Best Choice Products,
and is the customer’s responsibility to either use the original shipping boxes or purchase new boxes.
Pictures may be required for some returns to ensure an item is not damaged prior to its return. Items
returned are not considered undamaged until they are received by Best Choice Products and verified as
such. All damages to items are the customer’s responsibility until the item has been received by and
acknowledge by Best Choice Products as undamaged.
PRODUCT WARRANTY INFORMATION
Manufacturer and seller expressly disclaim any and all liability for personal injury, property damage or
loss, whether direct, indirect, or incidental, resulting from the incorrect attachment, improper use,
inadequate maintenance, or neglect of this product.
HELP CENTER
Product Assembly
Product InquiryChat Support Returns & Refunds
Orders FAQ
WARNING
Question about your product? We're here to help. Visit us at:
help.bestchoiceproducts.com
CHAT
US!
Table of contents
Popular Dishwasher manuals by other brands

Kenmore
Kenmore 630.1390 Series Use & care guide

Kenmore
Kenmore 66517032402 installation instructions

Maytag
Maytag MDB7851AWQ - 24 Inch Full Console Dishwasher Dimension Guide

Elba
Elba EBDW 1251 A SS instruction manual

Electrolux
Electrolux ESL 4200LO operating instructions

Frigidaire
Frigidaire FDB345LBS1 Service data sheet

Winterhalter
Winterhalter STR series operating instructions

Blue Seal
Blue Seal SG 4 E2 Instructions for use and maintenance

Bosch
Bosch SGV63E03UC operating instructions

Kenmore
Kenmore ULTRA WASH 665.1599 Series Use & care guide

Frigidaire
Frigidaire GLDB756AS0 Service data sheet

Whirlpool
Whirlpool DU800DWG manual