Benchmark BM3775 User manual

BM3775
MANUAL
TM

This product is supported by Midland Power. Contact us
directly for assistance and warranty help. Do not return this
product to store.
You must register online for your warranty to be valid.
It only takes a minute, do it now while you still have your
purchase receipt.
Support for your product is available online, including parts,
service center locations, and live expert advice.
Or call us anytime at 1-877-528-3772.
TM
MC
Register Your Product Online
www.benchmark.midlandpowerinc.com/
register-warranty
Visit us online at
www.benchmark.midlandpowerinc.com

Thanks for choosing the BEM3775!
You're excited to get started, we'll keep this brief.
READ THIS ENTIRE GUIDE BEFORE USING THIS
PRODUCT AND SAVE FOR LATER USE.
This user guide contains important instructions including safety,
setup, operation, and maintenance that must be followed. All
information in this guide is based on information available at
the time of print. This guide or revised editions can be found on
our website for download. No part of this publication may be
reproduced without written permission.
©2023 Benchmark. All Rights Reserved.
BEM3775_Manual_EN_2023-02-02

TABLE OF CONTENTS
1. Safety 1
2. Learn More About Your Mower 5
2.1 Component Identification 5
2.2 Control Functions 6
2.3 Make Sure You Have Everything 8
3. Getting Started 9
3.1 Unpacking 9
3.2 Connecting the Battery 10
3.3 Installing the Seat 11
3.4 Installing the Steering Column 12
3.5 Charging the Product 13
4. Starting the Riding Mower 15
4.1 Start the Riding Mower 16
4.2 Stop the Riding Mower 18
4.3 Reverse Mowing Operation (RMO) 19
5. Using Your Riding Mower 20
5.1 Installing the Mulch Cover 20
5.2 Adjusting the Cutting Deck Height 21
5.3 Setting the Cruise Control 22
5.4 Slope Operation 23
5.5 Mowing Tips 24
6. Maintenance 26
6.1 Maintenance Schedule 27
6.2 Removing the Cutting Deck 28
6.3 Replacing Cutting Blades 30
6.4 Tire Air Pressure 31
6.5 Replacing Tires 31
6.6 Adjusting the Brakes 32
6.7 Replacing Batteries 33
7. Transportation & Storage 35
8. Troubleshooting 37
9. Technical Specifications 40
10. Limited Warranty 41

1
1. SAFETY
WARNING!
FOLLOW THESE INSTRUCTIONS CAREFULLY!
Before use, read and understand the installation and operation
instructions in this manual to become familiar with how this
riding mower works. Failure to follow all instructions listed below
may result in electric shock, fire, and/ or serious injury.
1.1 OPERATOR SAFETY
WARNING!
Properly clean and maintain the equipment.
Operate the riding mower according to instructions for safe and
dependable service.
Before operating, read the user guide carefully. Otherwise, personal
injuries or equipment damage may result.
NEVER run the equipment in an enclosed area.
Keep children, pets and machinery with rotating parts away during
operation.
DO NOT operate machine in explosive atmospheres, such as in the
presence of ammable liquids, gases or dust.
DO NOT operate riding mower in rain or snow.
Use personal protective equipment and always wear eye protection.
Keep your hair and clothing away from moving parts.
Ensure the switch is in the OFF position before connecting to power
source and/or battery pack, picking up or carrying the tool.
Know how to stop the riding mower quickly and understand operation
of all the controls. NEVER permit anyone to operate the generator
without proper instructions.
DO NOT operate the riding mower if damaged. Have the machine
repaired before use.
Keep handles and grasping surfaces dry, clean, and free from oil and
grease.
NEVER carry passsengers or children, even when the blades have
stopped.
Keep hands and feet away from the cutting area, which is located under
the mower deck and inside the side discharge chute. Keep clear of the
side discharge chute opening at all times.
BM3775

2
NEVER leave a running product unattended. Always turn off the blades,
engage the parking brake, stop the motor, and remove the start key
before dismounting.
Stop the blade when crossing gravelly surfaces to avoid discharging
gravel and rocks.
DO NOT mow in reverse unless absolutely necessary. Always look down
and behind before and while reversing.
1.2 BATTERY AND CHARGER SAFETY
WARNING!
Risk of fire, explosion, or burns. DO NOT charge battery packs
that show signs of leaks. Dispose of them properly.
Recharge only with the charger specied by the manufacturer.
Use machine only with specically designated battery packs. Use of any
other battery packs may create a risk of injury and re.
NEVER touch both terminals with metal objects and body parts as short
circuit may result.
Under abusive conditions, liquid may be ejected from the battery;
avoid contact. If contact accidentally occurs, ush with water. If liquid
contacts eyes, additionally seek medical help. Liquid ejected from the
battery may cause irritation or burns.
DO NOT use a battery pack or tool that is damaged or modied.
Damaged or modied batteries may exhibit unpredictable behaviour
resulting in re, explosion or risk of injury.
DO NOT expose a battery pack or tool to re of excessive temperature.
Exposure to re or temperature above 60°C may cause explosion.
Charging improperly or at temperatures outside the specied range may
damage the battery and increase the risk of re.
DO NOT attempt to destroy or disassemble battery pack or remove any
of its components.
NEVER service damaged battery packs. Service of the battery packs
should only be performed by the manufacturer or authorised service
providers.
Keep cord and charger away from heat to prevent damage to housing or
internal parts.
Keep charger and charger plug free of contamination and dirt.
DO NOT pull the charger cord rather than the plug when disconnecting
from the charge port. Damage to the cord or charger could occur and

3
create an electric shock hazard. Have damaged cords replaced by an
authorized service center immediately.
1.3 RIDING ON SLOPE SAFETY
WARNING!
Slopes are a major factor related to loss of control and tip-over
accidents, which can result in severe injury or death. Operation
on all slopes requires extra caution. If you cannot back up the
slope or if you feel uneasy on it, DO NOT mow it.
NEVER attempt to ride on a steep slope or mow a slope that is greater
than 15°.
Mow up and down; not across the face of slopes.
Avoid holes, ruts, bumps, rocks, property stakes, or other hidden
objects. Uneven terrain could overturn the product.
Use a slow speed so you will not have to stop suddenly or accidentally
accelerate while on a slope.
DO NOT mow on wet grass when on a slope.
Avoid starting, stopping, or turning on a slope. If the tires lose traction,
disengage the blades and proceed slowly straight down the slope.
DO NOT try to stabilize the product by putting your foot on the ground.
DO NOT use the product near drop-offs, ditches, excessively steep
slopes, or embankments. The product could suddenly roll over if a
wheel goes over the edge or if the edges caves in and result in death or
serious personal injury.
1.4 MAINTENANCE SAFETY
WARNING!
Use only original manufacturer’s replacement parts, accessories
and attachments. Failure to do so can cause possible injury, can
contribute to poor performance, and may void your warranty.
Service on the product and the charger must be performed by qualied
repair personnel only.
Remove the start key from the product before storing, servicing, or
changing accessories. Such preventive safety measures reduce the risk
of starting the product accidentally.
Keep the product free of grass, leaves, or other debris build up.
DO NOT use water to clean the product. Use an air moving device, such
as a compressor or leaf blower to clean the product.
BM3775

4
Always wear heavy-duty gloves when checking or clearing a blockage.
Keep blades sharp and guards in place and in working order.
The cutting blades continue to rotate for a few seconds after the motor
is shut off. When servicing the blades, be aware that even though the
power source is switched off, the blades can still be moved.
To prevent serious personal injury, prevent damage to the product, and
to maintain best performance, replace damaged, bent, cracked, or
unevenly worn out blades.
Make sure all nuts, bolts and screws at frequent intervals for proper
tightness to ensure that the product is in safe working condition.
Check the brakes before each use and frequently during use. Adjust and
service as required.
After each use, clean the product with a soft, dry cloth. Any part that
is damaged should be properly repaired or replaced by an authorised
service centre.
1.5 OTHER SAFETY TIPS
WARNING!
Clean all foreign materials from the product. Store the product in a cool,
dry, and well- ventilated place that is inaccessible to children.
Remove the stard key and store in a separate location out of the reach
of children.
Keep the product away from corrosive agents such as garden chemicals
and de-icing salts. DO NOT store the product outdoors.
5
2. LEARN MORE ABOUT YOUR MOWER
This section will show you how to identify key parts of your lawn mower. Going over
the terminology below will make sure we’re on the same page.
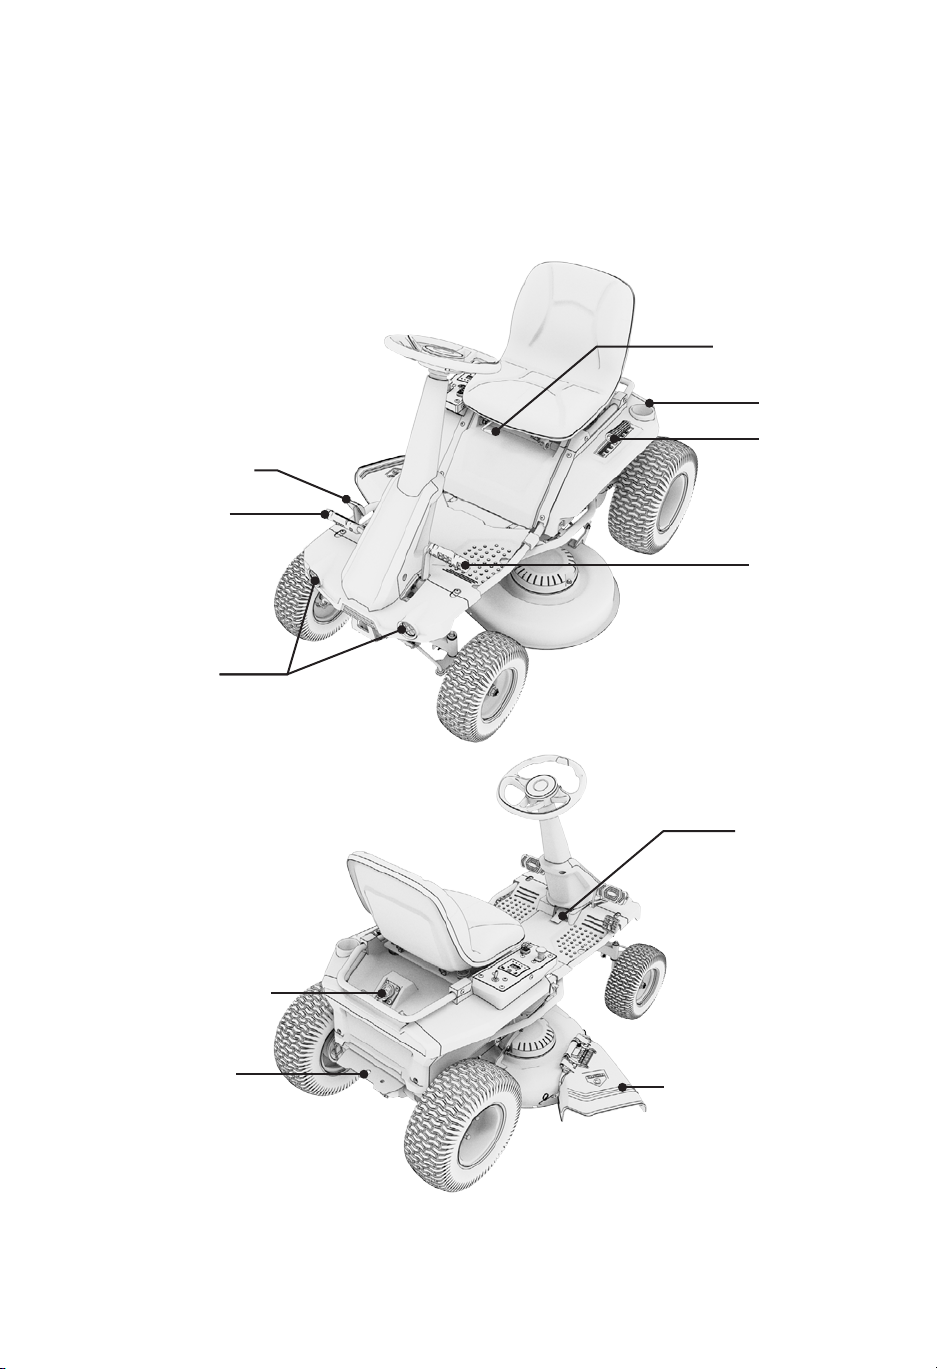
2.1 COMPONENT IDENTIFICATION
Headlights
Accelerator
Pedal
Brake Pedal
Seat Adjustment
Lever
Charging Socket
Parking Brake
Cutterhead
Lifting Handle
Cup Holder
Reverse Pedal
Trailer board
Side Discharge Chute
BM3775

6
2.2 CONTROL FUNCTIONS
Accelerator Pedal
Controls the forward movement and speed of the riding mower.
Brake Pedal
Slow down and stop the movement of the riding mower.
Charging Socket
When charging, rst connect the wire between the power supply and
the charger, and then connect the charger and the mower.
Always leave charger plugged in while not in use.
When powered, the LED indicator on the charger will illuminate to
indicate the charger’s status.
Cruise control button
Press to continue forward at a set speed without needing to press the
accelerator pedal.
Cutterhead Lifting Handle
Raise or lower the height of the cutting deck.
Mower Motor Switch
Lift the switch upwards to start the mower blades.
Push the switch to stop the mower blades.
0 25% 50% 75% 100%
Mower Motor Switch
Battery Indicator
Headlight Switch
Power Switch
USB Port
Run Time
Reverse Mowing
Option
Cruise Control
Button

7
NOTE
For cutting in reverse, the reverse mode option (RMO) must also be
activated.
Parking Brake
Step on the parking brake and then the brake pedal. After hearing the
sound, the riding mower will be locked in the braking position.
Power Switch
Insert the start key and turn it to “ON” position to operate the riding
mower.
Turn the key to “OFF” position and remove it to fully stop the riding
mower.
Reverse Mowing Option (RMO)
Press the RMO button to allow the mower to cut when maneuvering in
the reverse direction.
NOTE:
The blades will automatically disengage if mower is operated in reverse
without pressing the RMO button.
Reverse Pedal
Controls the back movement and speed of the riding mower.
Seat Adjustment Lever
Rotate the seat adjustment lever to adjust the position of the seat.
Run Time
Tracks the running time of the riding mower.
USB Port
The USB charging port can provide total 5V 2A DC power to your
devices.
BM3775

8
2.3 MAKE SURE YOU HAVE EVERYTHING
Make sure your mower has everything listed in the table below.
Part Name Quantity
Riding Mower 1
User Guide 1
Seat Assembly 1
Steering Column Assembly 1
Battery Charger 1
Start Keys 1
Decorative tube 1
Wrench 10-13 1
Wrench 13-15 1
Allen wrench 1
9
3. GETTING STARTED
Setup of your riding lawn mower is designed to get you up and running as quickly as
possible. Cut the four corners of the carton from top to bottom instead of attempting
to lift it out of the box.
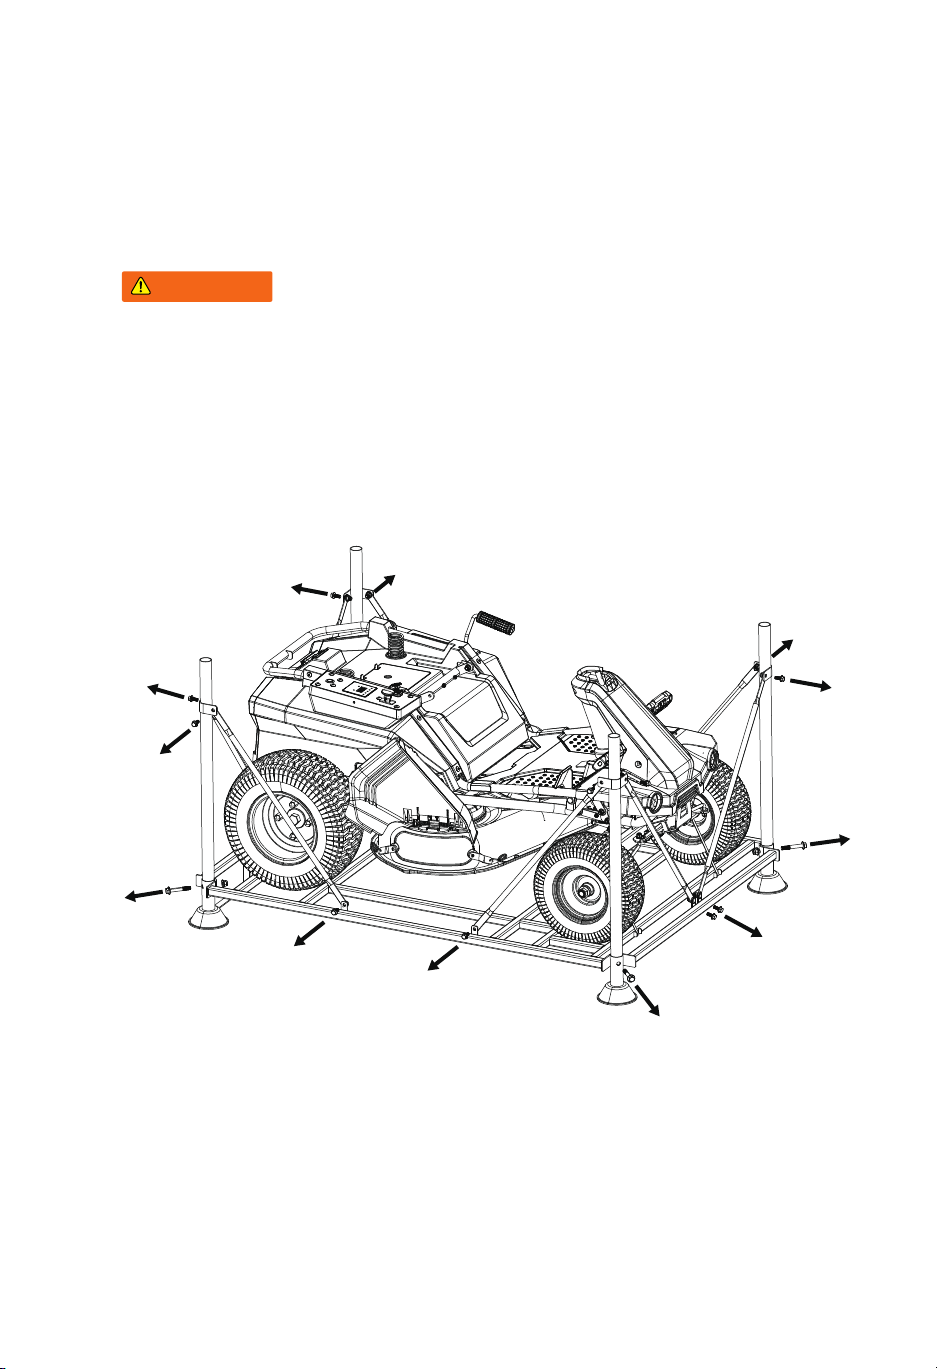
3.1 UNPACKING
WARNING!
If any parts on the 2.3 section are already assembled to the
product when you unpack it, verify that the part is assembled
correctly and properly tightened. Use of a product that may have
been improperly assembled could result in serious personal
injury.
To prevent accidental starting that could cause serious personal
injury, always remove the start key from the product when
assembling the parts.
1. Remove the bolts securing the corner and side braces to the frame bottom,
then lift the braces to remove.
2. Cut the nylon straps securing the front and rear wheel axles to the frame.
3. Remove the boxes containing loose parts, assembly hardware, and
documentation.
4. Remove and set aside all accessible packaging and wrap from the unit and
BM3775
10
parts. DO NOT discard the packing material until you have carefully
inspected and satisfactorily operated the product.
NOTE
The product should be assembled while positioned on the frame
bottom.
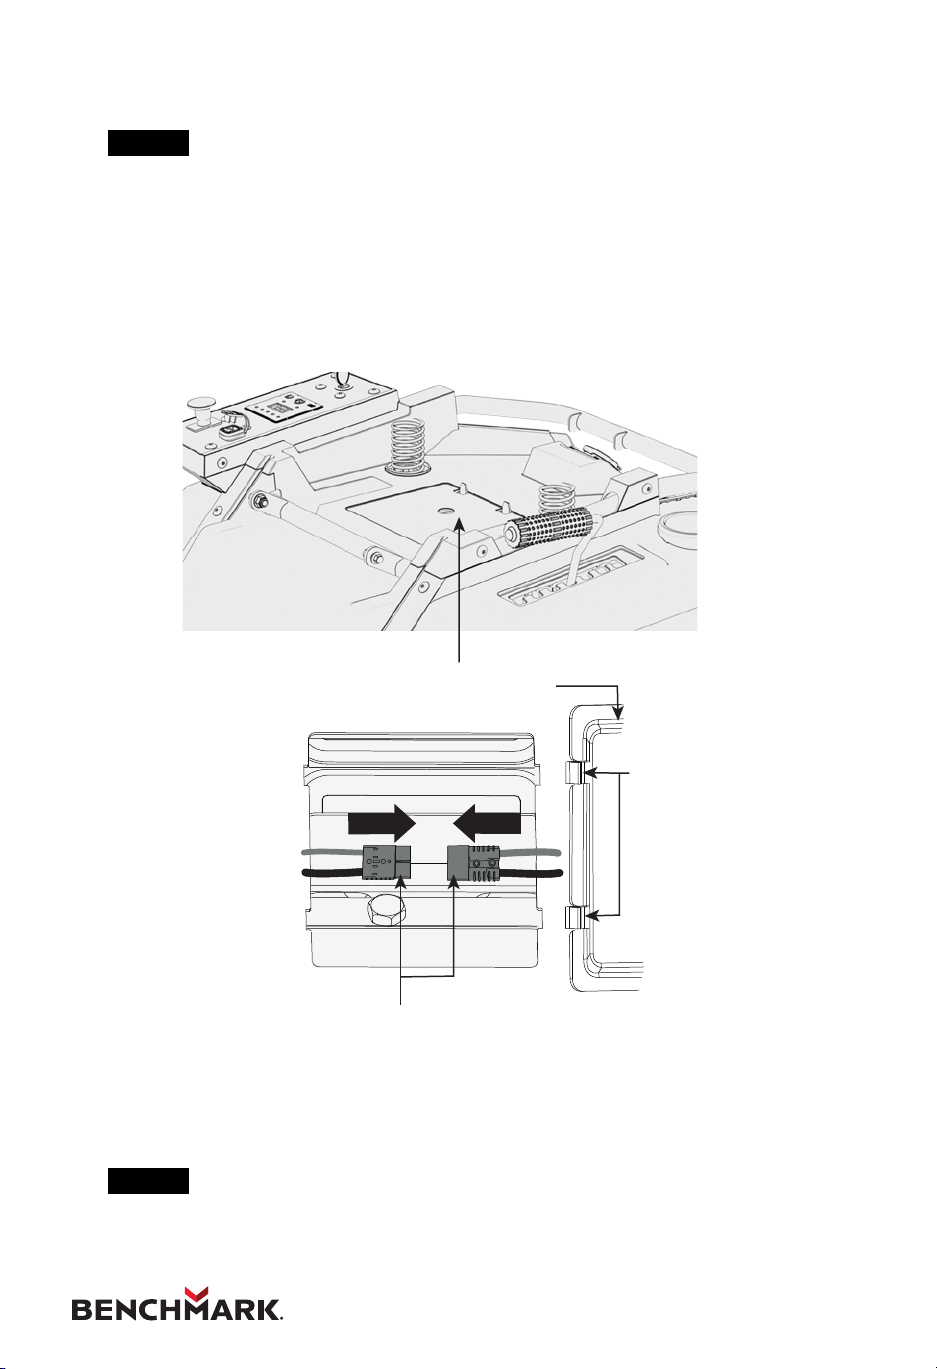
3.2 CONNECTING THE BATTERY
When shipped from the factory, the product’s batteries are disconnected. Follow the
instructions below to connect the battery.
1. Press the tabs on the wiring cover, and lift the cover.
2. Connect the two ends of the battery quickconnect plug together.
NOTE
Before reinstalling the wiring cover, install the seat as described in the
next section.
Battery Quick-connect Plug
Wiring Cover
Tab

11
3.3 INSTALLING THE SEAT
WARNING!
Inspect the product carefully to ensure that no breakage or
damage occurred during shipping. Assembling the product with
damaged, missing, or incorrect parts could result in serious
personal injury.
1. Place the seat assembly over the mounting brackets, aligning the holes as
shown. Install and securely tighten the bolts and ange nuts.
2. Route the seat safety interlock cable through hole in the wiring cover, then
connect to the plug on the mower.
3. Reinstall wiring cover, and ensure that it is securely seated.
Battery Quick-connect Plug
Wiring Cover
Tab
Wiring CoverSafety Interlock Cable
Steering Wheel Cover
Flange Nut
Flat Washer
Steering Wheel Hub
Bushing
Decorative Tube
Shaft
Bolt
Lower steering rod
Steering Wheel
Flange Washer
BM3775

12
Adjusting the Seat
Before operating the riding mower, adjust the seat position to ensure that your feet
can step in the accelerator pedal or brake pedal rmly.
1. Sit down on seat and lift the seat adjustment lever.
2. While holding the lever, slide the seat to the desired position.
3. Release the lever and make sure the seat is locked in position.
3.4 INSTALLING THE STEERING COLUMN
1. Put the shaft into the lower steering rod to align the shaft and lower
steering rod mounting holes. After inserting the bolts, tighten them with
Wiring CoverSafety Interlock Cable
Steering Wheel Cover
Flange Nut
Flat Washer
Steering Wheel Hub
Bushing
Decorative Tube
Shaft
Bolt
Lower steering rod
Steering Wheel
Flange Washer

13
Flange nut. The recommended torque is 25 ± 2N.m.
2. After installing the shaft, put the decorative tube on the shaft.
3. Put ange washer, bushing, ange washer, Steering wheel hub on the shaft.
4. Then install steering wheel and at washer in the order and direction as
shown in the gure. The mounting points of the steering wheel and
the steering wheel base are aligned and xed with ange nut. The
recommended torque is 24 ± 2N.m.
5. Finally install the steering wheel cover on steering wheel
Once assembly is complete, set the cutting deck to its maximum height, then
position a ramp next to the frame bottom, and slowly and carefully drive the product
off the frame.
NOTE
Use care when driving the product off or the frame, and step on the
brake pedal as needed to control the speed. The product freely rolls if
it is moved on an inclined surface without stepping on the brake pedal
or engaging the parking brake. Failure to follow these instructions can
result in loss of control and result in death, serious personal injury, or
property damage.
If no ramp is available, slowly and carefully drive the product off the
frame in reverse while looking down and behind. Driving the product off
the frame in the forward direction without a ramp can cause damage to
the cutting deck.
3.5 CHARGING THE PRODUCT
Mower batteries must be charged overnight before rst use. To verify mower
batteries are fully charged, check the battery level indicator.
NOTE
Charger input power specication: AC 100V~ 240V, frequency 50/60Hz.
The charger is equipped with a plug featuring a grounding pin and must
be plugged into a matching standard three prong outlet that has been
properly installed and grounded in accordance with all local codes and
ordinances.
In order to prolong the service life of the battery, it is recommended to
charge it once every three months.
When the battery power is lower than 25%, the mowing motor will
automatically shut down.
BM3775

14
1. First connect the wire between the power supply and the charger. If
equipped with a lter, connect the lter between the power supply and the
charger.
2. Connect the charger to the mower.
3. See the chart below to determine the meaning of the light colours.
4. When you are ready to mow, disconnect the charger from the power supply,
then disconnect the charger from the mower.
Light Description
Red Battery charging.
Green Battery charge complete.
1 2 3
1
4
2 3
1 2 3
ON
OFF

15
4. STARTING THE RIDING MOWER
WARNING!
Clear the area before operating the product. If anyone enters the
mowing area, stop immediately and do not return to mowing until
the bystanders leave the area.
Use caution when crossing over gravelly paths or driveways.
Before crossing, stop the blades and set the cutting deck to the
maximum height to minimize the possibility of ricochet. Drive
slowly to avoid loss of traction and control.
DO NOT attempt to change the direction of operation while the
mower is in motion. Always come to a complete stop before
changing the mower direction.
BM3775
16
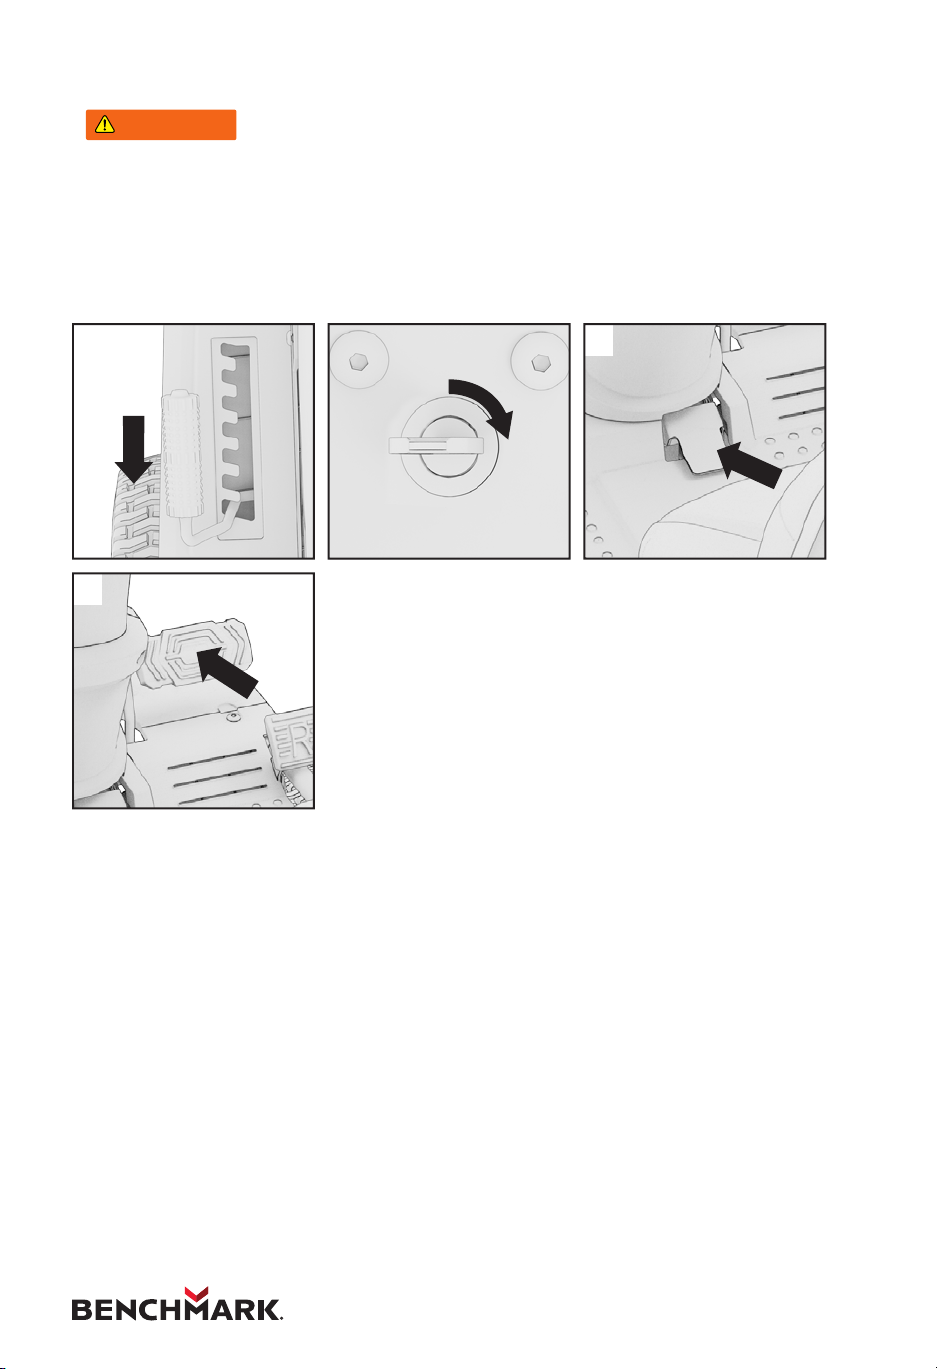
4.1 START THE RIDING MOWER
WARNING!
Be certain that you have correctly set your intended direction of
travel with the direction control switch before pressing the
accelerator pedal. Failure to do so could result in you driving the
mower in an unintended direction, which could cause loss of
control or an accident resulting in death, serious personal injury,
or property damage.
1. Set the cutterhead lifting handle to the maximum height.
2. Insert key to power switch, and turn the key to the ON position.
3. Disengage the parking brake.
4. Press on the accelerator pedal to drive to desired location.
1 2 3
1
4
23
1 2 3
ON
OFF
Table of contents
Languages:
Other Benchmark Lawn Mower manuals


