besrey XN/MS-2246A User manual

Model: XN/MS-2246A
Electric Breast Pump
User Manual
support@besrey.com
IMPORTANT! READ CAREFULLY ANDKEEP
IT FOR FUTURE REFERENCE
Ver.02

Contents
EN ----------------------------------------- 01-17
ES ----------------------------------------- 17-34

Overview ------------------------------------
Specifications -------------------------------
Control Panel -----------------------------
Cleaning and Sterilizing Before Use --------
How to Assemble the Breast Pump ---------
How to Use the Breast Pump ---------------
Using the Expressed Milk ----------------------
Storing the Expressed Milk ---------------------
Trouble Shooting ---------------------------
Care and Maintenance ------------------------
Disposal --------------------------------------
04
04
05-07
08-10
10-12
12-13
14
14
14-16
17
17

- 01 -
WARNING
WARNING! Please read this manual carefully before using the product.
It is recommended you consult with a licensed healthcare professional before using the pump
if you have an active implanted device that would be affected by a magnetic field (e.g.
pacemaker, implantable cardioverter defibrillator)
Pumping can induce labor. Do not pump until after giving birth. If you become pregnant while
breastfeeding or breast pumping, consult with a licensed healthcare professional before
continuing.
All breast pump components that come into contact with breast milk should be disassembled,
washed, and sterilized for the first time use and before each use.
Drinking water is recommended for cleaning breast pump components that come into contact
with breast milk.
The parts that come in contact with breasts and breast milk should be disassembled and
cleaned as soon as possible after each use to prevent the growth of bacteria that may be
caused by residual milk.
All parts should NOT be exposed to ultraviolet light and should NOT be sterilized at excessively
high temperatures (<100°C/212°F) for a long time (<5 minutes).
Keep the pump dry. Clean the pump unit with a soft cloth, don't rinse/disinfect it.
Take care when cleaning thesilicone flangeand diaphragm. The breast pump will not function
properly if they get damaged.
•
•
•
•
•
•
•
•

You should avoid rubbing or inserting objects when cleaning the silicone diaphragm. Other-
wise, it may be damaged.
Do not disassemble the pump unit; pump repairs can only be performed by an authorized
service provider.
Never use the pump if it has been damaged, is not working properly, or the pump unit has
been dropped into water.
This is a single-user pump and therefore should not be used by more than one individual.
Sharing the pump among multiple users may present a health risk.
Do not use the pump while sleeping or being overly drowsy.
This product contains small parts and a cable that may present a hazard. Keep out of reach
of children.
The pump should not be used while lying down or engaging in strenuous exercise or activities
with the risk of harm.
Operation is subject to the following two conditions:
(1) This device may not cause harmful interference, and
(2) this device must accept any interference received, including interference that may cause
undesired operation.
Note: This equipment has been tested and found to comply with the limits for a Class B digital
device, pursuant to part 15 of the FCC Rules. These limits are designed to provide reasonable
protection against harmful interference in a residential installation. This equipment generates,
uses and can radiate radio frequency energy and, if not installed and used in accordance with
•
•
•
•
•
•
•
- 02 -

the instructions, may cause harmful interference to radio communications. However, there is no
guarantee that interference will not occur in a particular installation. If this equipment does
cause harmful interference to radio or television reception, which can be determined by turning
the equipment off and on, the user is encouraged to try to correct the interference by one or
more of the following measures:
Reorient or relocate the receiving antenna.
Increase theseparation between theequipment and receiver.
Connect the equipment into an outlet on a circuit different from that to which the receiver is
connected.
Consult thedealer or an experienced radio/TV technician for help.
—
—
—
—
- 03 -

Dust Cover x2
Flange x2
Breast Shield Body x2
Diaphragm x2
Diaphragm Cap x2
Tubing x2
USB-C Cable x1
Pump Unit x1
Duckbill Valve x2
Milk Bottle x2
Milk Bottle Lid x2
Teat x1
Teat Cap x1
Model: XN/MS-2246A
SPU: BR-HL003
Power Input: 5V 2A
Rated Power: 10W
Battery: 3.7V
Charging Port: Type C
Charging Time: 2.5 Hours
Suction Mode: 3Modes
Suction Level: 9Levels
Suction Cycle: 3Cycles (Slow/Middle/Fast)
Specifications
- 04 -
Overview

Control Panel
Left Suction Level
Press "+" or "-" to adjust
between 9 levels.
Press "+" and "-" together to
activate/deactivate the
child lock.
Side Switch Button
(Left/Dual/Right)
Power Button
Long Press:
ON/OFF
Short Press:
Pause/Resume
Timer
2-in-1 Mode
Child Lock Mute
Battery Status
- 05 -
User Mode Status
Expression Mode
Stimulation Mode
Left Side Cycle &
Cycle Button
Mode Switch Button
(Expression/Stimulation/2-in-1)
Right Suction Level
Press "+" or "-" to adjust
between 9 levels.
Press "+" and "-" together to
mute/unmute.
User Mode Button
Long Press: Start/End Recording;
Status icon blinks.
Short Press: Activate/Deactivate;
Status icon stay on or off.
Right Side Cycle & Cycle Button

Fully charge the device before first use. Long press the power button “ ” to turn on the pump
unit, and the battery status icon “ ” will stay on to show the remaining battery. Charge the
pump unit with the USB cable and power adapter (not included) when the battery is low (one
bar of power).
When the pump is turned on, press the side switch button “ ” to choose which side to pump
or to begin pumping on both sides; press the cycle button “ ” to select theoptimal suction cycle.
Press the mode switch button “ ” to select a preferred mode. The icon " " will remain visible
while in stimulation mode. After 2 minutes, the pump will automatically switch to expression
mode, and the icon " " will remain visible. The 2-in-1 mode “ ” scientifically combines the
above two modes to simultaneously stimulate and express breasts; use this mode as needed.
1.
2.
3.
- 06 -
Note: This pump is powered by a built-in li-ion battery. When the
battery status indicator shows one bar of power, it is recommended
to charge the pump as soon as possible using a certified 5V 2A
adapter (not included).
Night Light Button
Charging Port

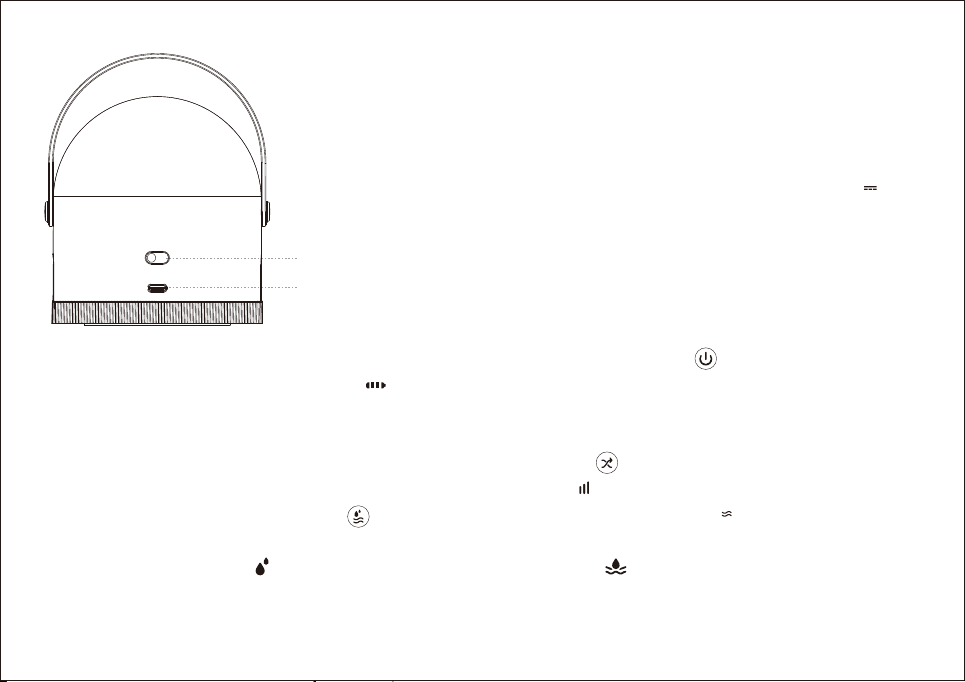
When your nipples feel the suction power in any mode and at any suction level, press "+" or "-"
to adjust the suction to a comfortable level. There are 9 suction levels to choose from.
Press the "+" and "-" buttons on the left side together to lock the buttons and prevent acciden-
tal activation or adjustment. To mute or unmute the control panel, press "+" and "-" on the right
side simultaneously. When the child lock is enabled and the panel is muted, the status icons ""
and " " remain visible; otherwise, these icons become invisible.
While the pump unit is pumping, long press the user mode button “ " to begin recording; the
status icon “ ” will blink to show that it is recording your pumping process. When you're done
recording, long press the user mode button “ " to stop recording. You can use this function to
personalize and save your own pumping process. To repeat the saved pumping process,
activate user mode by short pressing the user mode button “ " and the pump will detect and
run the saved pumping process automatically. If no saved pumping process can be detected,
it will beep and exit user mode after short pressing the user mode button “ ".
When finished pumping, long press the power button “ ” to turn off the pump. Alternatively,
the pump will shut off automatically after 30 minutes of pumping if no further operation.
4.
5.
6.
7.
- 07 -

Cleaning and Sterilizing Before Use
The components that come into contact with breast milk are not provided sterile and must be
cleaned and sterilized for the first use. Moreover, these components must be cleaned after each
use to avoid the buildup of dry milk residue which can lead to the growth of bacteria that can be
harmful to you and your baby.
Clean and sterilize these milk-contact components before first use and after every use: flange,
breast shield body, milk bottle, milk bottle lid, milk bottle teat, and duckbill valve.
- 08 -
Washable
WARNING: Always take apart components before cleaning or sterilizing. After cleaning, make
sure the components are completely dry.
WARNING: If the duckbill valve is clogged with milk, clean it gently with a cotton swab. Never
rub or knead it with your fingers.

Droplets can damage the electronics inside the pump unit. The pump unit, tubing, and the tubing
air vents on both sides should always be kept dry.
- 09 -
Do not get wet!
Warning: Do not submerge the
pump unit in water or any other liquid!
Wipe the pump unit only with a clean,
damp but not dripping cloth.

- 10 -
Washable
The diaphragm and diaphragm cap do not come in contact with milk and should only be cleaned
as needed.
Be careful not to get diaphragm and diaphragm cap to come in contact with milk. If there are
milk droplets inside these parts, stop pumping immediately to avoid getting milk droplets inside
the pump unit. Then clean these parts with water only and let them dry completely before using
them again.
Warning: Do not use diaphragm, and diaphragm cap until completely dry.
How to Assemble the Breast Pump
Step 1. Assemble components on the breast shield body: ①Insert the flange into the breast
shield body. ②Put the diaphragm into the breast shield body, then secure the diaphragm cap
onto the breast shield body.

- 11 -
Step 2. Secure the duckbill valve on the breast shield body.
Step 3. Carefully screw the milk bottle into the base of the breast shield body.
Insert the dust cover
into the flange when
not in use to prevent
dust buildup.

- 12 -
Step 4. Insert one end of the tubing into one tubing vent of thepump unit and the other end into
theair vent on thediaphragm cap. Repeat theprocess to insert another tubing ifdouble pumping.
How to Use the Breast Pump
Step 1.Removethe dust cover and bring
the flange to your breast.
Warning: Check that the tubing sets are
securely attached to the diaphragm cap and
the pump unit.

- 13 -
Step 2.Place thebreast flange onto your
breast. Check that theflange size fits your
breast and nipple. Your nipplemust be
centered in thesiliconeflangetunnel
before pumping to avoid discomfort.
Step 3. When you're ready, turn on the pump and set
a comfortable suction level to begin pumping.Do not
try to express with an intensity setting that is too high
or uncomfortable. If excessive discomfort or pain is felt
during pumping, stop pumping, detach the flange
around your nipple and discontinue thesession.
Contact your healthcare professional if you express
minimal or no milk, or if the expression is painful.
Warning: Fit the flange tightly
against your breast to prevent air
leakage. Do not let the tubing get
knotted when pumping.
Note: To express milk when there is breast engorgement, use the lower suction level first to make
thebreasts unobstructed, then switch to thehigher suction level, otherwise you may express
minimal or no milk. In case of pain or discomfort during pumping, reduce the suction level or stop
using thepump.

Use clean, food-grade, and sterilized breast milk storagebags or containers to store expressed breast
milk.Make sure the containers are madeofglass or BPA-free plasticand have tight-fitting lids.
Never store breast milk in disposable bottle liners or plastic bags that are not intended for
storing breast milk.
Clearly label the breast milk with the date it was expressed. Storing breast milk in small
quantities will help avoid waste.
Do not store breast milk in the door of the refrigerator or freezer. This will help protect the
breast milk from temperature changes from the door opening and closing.
•
•
•
•
- 14 -
Using the Expressed Milk
Remove the breast shield cover, then
attach the teat to feed the baby or attach
themilk bottle lid to store the milk.
Storing the Expressed Milk
When storing expressed milk, always follow the guidance of your lactation consultant or health
professional. Here are some generic instructions for milk storage.
Storing Breast Milk
OR

If you don’t think you will use freshly expressed breast milk within 4 days, freeze it right away.
This will help to protect the quality of breast milk.
Leave about one inch ofspace at thetop ofthe container becausebreast milk expands as it freezes.
•
•
Always thaw the oldest breast milk first. Over time, the quality of breast milk can decrease.
There are several ways to thaw your breast milk: a) In the refrigerator overnight. b) Set in a
container of warm or lukewarm water. c) Under lukewarm running water.
Never thaw or heat breast milk in a microwave. Microwaving can destroy nutrients in breast
milk and create hot spots, which can burn a baby’s mouth.
If you thaw breast milk in the refrigerator, use it within 24 hours when the breast milk is com-
pletely thawed.
Once breast milk is brought to room temperature or warmed, use it within 2 hours.
Never refreeze breast milk after it has thawed.
•
•
•
•
•
•
- 15 -
Thawing Breast Milk
Place the sealed container into a bowl of warm water or hold it under warm, but not hot,
running water for a few minutes.
Breast milk should not be heated directly on the stove or in the microwave because the
nutrients and antibodies in the milk will be destroyed.
To avoid burns to the mouth of your baby, test the milk’s temperature before feeding it to your
baby by putting a few drops on your wrist.
If your baby did not finish the bottle, use the leftover milk within 2 hours after the baby is
finished feeding. After 2 hours, leftover breast milk should be discarded.
•
•
•
•
Feeding Breast Milk

- 16 -
Trouble Shooting
Malfunctions
Fail to turn on the
pump.
Fail to charge the
pump.
Low suction or no
suction.
Backflow
Cause
1. The battery is damaged.
2. Low battery.
1. The charging port is damaged.
2. The USB cable is damaged.
3. The adapter is not compatible.
1. The diaphragm is damaged or
not securely attached.
2. Didn't fit the flange tightly
against your breast.
3. The tubing and the diaphragm
cap are not securely attached.
4. The breast shield (flange) size
does not match.
1. The diaphragm is damaged or
not securely attached.
2. The duckbill valve is damaged
or not securely attached.
Solution
1. Contact the manufacturer.
2. Charge the pump unit.
1. Contact the manufacturer.
2. Replace the USB cable.
3. Replace the adapter.
1. Contact the manufacturer or securely
attach the diaphragm.
2. Always fit the flange tightly against
your breast when pumping.
3. Ensure that tubing and the
diaphragm cap are securely attached.
4. Before use, measure your nipples to
ensure the breast shield (flange) is the
right size.
1. Contact the manufacturer or securely
attach the diaphragm.
2. Contact the manufacturer or secure-
ly attach the duckbill valve.

- 17 -
Do not place the pump unit in the fridge or freezer.
Do not immerse the pump unit in water or other liquids.
Don’t use a damaged charger, it may cause an electric shock.
Do not clean the washable components in a dishwasher for an excessively long time.
Do not store damp parts, as mold may develop. After cleaning, make sure the components are
completely dry.
Do not expose the pump unit to high temperatures and direct sunlight.
Do not use harsh chemicals to clean the washable components. Use drinking-quality water
and gentle baby dish detergent for cleaning components that come into contact with milk.
Do not expose the device to high/low temperatures, and very high humidity levels. Store the
device in a cool and dry place where it is protected from dust and damage.
This marking indicates that this product should not be disposed with other household
wastes throughout the EU/UK. To prevent possible harm to the environment or human
health from uncontrolled waste disposal, recycle it responsibly to promote the sustainable
reuse of material resources. To return your used device, please use the return and collec-
tion systems or contact the retailer where the product was purchased. They can take this
product for environmental safe recycling.
•
•
•
•
•
•
•
•
Care and Maintenance
Disposal
Table of contents
Languages: