BIGHORN SRFP9624 User manual
24 IN Mini Ranch Fire Pit
Before returning to your retailer, call our customer
service department at , 8 a.m. - 8 p.m., EST, Monday - Friday
ITEM# 258363
MFR# SRFP9624
, or email us at
Questions, problems, missing parts?
1
R
R

A x 1pc B x 4pcs C x 4pcs
D x 4pcs E x 1pc
G x 1pc H x 1pc
F x 1pc
PART DESCRIPTION
Fire Bowl
Leg
Support Ring Section
Table Panel
Cooking Grate
Log Rack
Cooking Grate Stand Bar
Poker
M6 Bolt
Wing Bolt
M8 Nut
M5 Bolt
A
B
C
D
E
F
G
H
1
4
4
4
1
1
1
1
QUANTITY
PART
HARDWARE CONTENTS
DESCRIPTION
AA
BB
CC
DD
12
6
8
4
M6 NutEE 4
M6 WasherFF 8
QUANTITY
Package Contents
2
R
BB x 6pcs CC x 8pcs DD x 4pcs EE x 4pcs FF x 8pcsAA x 12pcs

Safety Information
Please read and understand this entire manual before attempting to assemble, operate
or install the product.
WARNING
FOR YOUR SAFETY
1. This item is for outdoor use only, and shall NOT be used in a building, garage or any other
enclosed area.
2. DO NOT use this fire pit for indoor heating. TOXIC carbon monoxide fumes can accumulate
and cause asphyxiation.
3. This fire pit is NOT for commercial use.
4. This fire pit is NOT to be operated by children.
5. This fire pit is NOT to be used in or on boats or recreational vehicles.
6. Always use in accordance with all applicable local, state and national codes. Contact your
local fire department for details on outdoor burning.
7. When using this fire pit, exercise the same precautions you would with any open fire.
8. The use of alcohol, prescription or non-prescription drugs may impair the consumer’s
ability to properly assemble or safely operate this fire pit.
9. Do NOT use this fire pit without reading this entire document and all WARNINGS, cautions
and instructions.
10. This fire pit is for use with dry, seasoned hardwood. It will burn hotter, more completely
and create less smoke.
11. Do NOT burn charcoal briquette, lump charcoal, manufactured logs, driftwood, trash,
leaves, papers, cardboard, plywood, painted or stained or pressure treated wood.
Avoid using softwoods such as pine or cedar that can throw sparks.
12. Do NOT alter this fire pit in any manner.
13. Do NOT use this fire pit until it is COMPLETELY assembled and all parts are securely
fastened and tightened.
3
R

Warnings
14. Do NOT store or use gasoline or other flammable vapors or liquids in the vicinity of this or
any other appliance.
15. Do NOT store or use an LP gas cylinder within 10 feet (3.05m) of this fire pit while it is in
operation.
16. Do NOT use this fire pit near automobiles, trucks, vans or recreational vehicles.
17. Do NOT use in an explosive atmosphere. Keep outdoor area clean and free from
combustible materials, gasoline and other flammable liquids.
18. Do NOT use this fire pit under an overhead or near any unprotected combustible
constructions. Avoid using near or under overhanging trees and shrubs.
19. Always use this fire pit on a hard level non-combustible surface such as concrete, rock or
stone. An asphalt or blacktop surface may not be acceptable for this purpose. Do NOT use
on wooden decks.
20. Always empty this fire pit before each use.
21. Do NOT wear flammable or loose clothing when operating this fire pit.
22. Do NOT use in windy conditions.
23. Do NOT use gasoline, kerosene, diesel fuel, or lighter fluid to start a fire or enhance an
existing fire.
24. Keep all electrical cords away from a hot fire pit.
25. All surfaces of this fire pit are hot when in operation. To avoid burns, do NOT touch fire pit
,sevolg,sredlohtop(raegevitcetorpgniraewerauoysselnudeloocyletelpmocsahtilitnu
BBQ mittens, hot pads & etc). Never touch ashes or coals to see if they are hot.
26. Do NOT leave a lit fire pit unattended, especially around children and pets.
27. Do NOT attempt to move or store this fire pit until ashes and coals are completely
extinguished.
28. Do NOT remove ashes or coals until they are completely and extinguished.
29. Use heat-resistant gloves or hot pads when contacting handles.
30. Use long, sturdy fire pit tools when adding or moving logs.
31. Do NOT place wood directly into bottom of the fire pit. Place wood only on the .
32. Do NOT overload the fire pit. Do not add additional firewood until the fire burns down.
33. Do NOT lean over this fire pit when lighting or when in use.
34. Do NOT place hot fire pit tools onto combustible surface such as grass, wooden deck or
furniture.
35. Avoid breathing smoke from the fire and avoid getting it into your eyes.
36. This fire pit should be thoroughly inspected and cleaned on a regular basis.
37. After a period of storage and/or non-use, check for signs of damage and creosote build-up.
Do NOT operate until necessary repairs and/or clean up is executed.
38. Death, serious injury or damage to property may occur if the above is not followed exactly.
4
R
COOKING TIPS
WARNING
Do not grasp the cooking grate with your hands while it is hot. Use barbecue mitts for handling.
Do not use water.
Always wash your hands thoroughly with warm soapy water before starting your meal
preparations and after handling fresh meat, fish and poultry.
Defrost meat, fish and poultry in the refrigerator before cooking, not at room temperature.
Thoroughly wash all plates and cooking utensils with warm soapy water.
Keep raw meats separate from cooking foods. Do not use the same plates to handle raw
meats and cooked foods.
Use separate cooking utensils for handling raw meats and cooked foods when grilling.
This product can expose you to chemicals including soot,which is known to the State of
California to cause cancer, and carbon monoxide,which is known to the State of California
to cause birth defects or other reproductive harm. For more information go to
www.P65Warnings.ca.gov.
Warnings
THIS FIRE PIT CAN BE USED AS A GRILL.
FOOD SAFETY TIPS
WARNING
PREPARATION
Estimated Assembly Time: 30 minutes
Tools required for assembly (not included): Phillips screwdriver, Adjustable open end wrench.
Before assembling product, make sure all parts are present. Compare parts with package contents
list and hardware contents list. If any part is missing or damaged, do not attempt to assemble
the product.
5
R
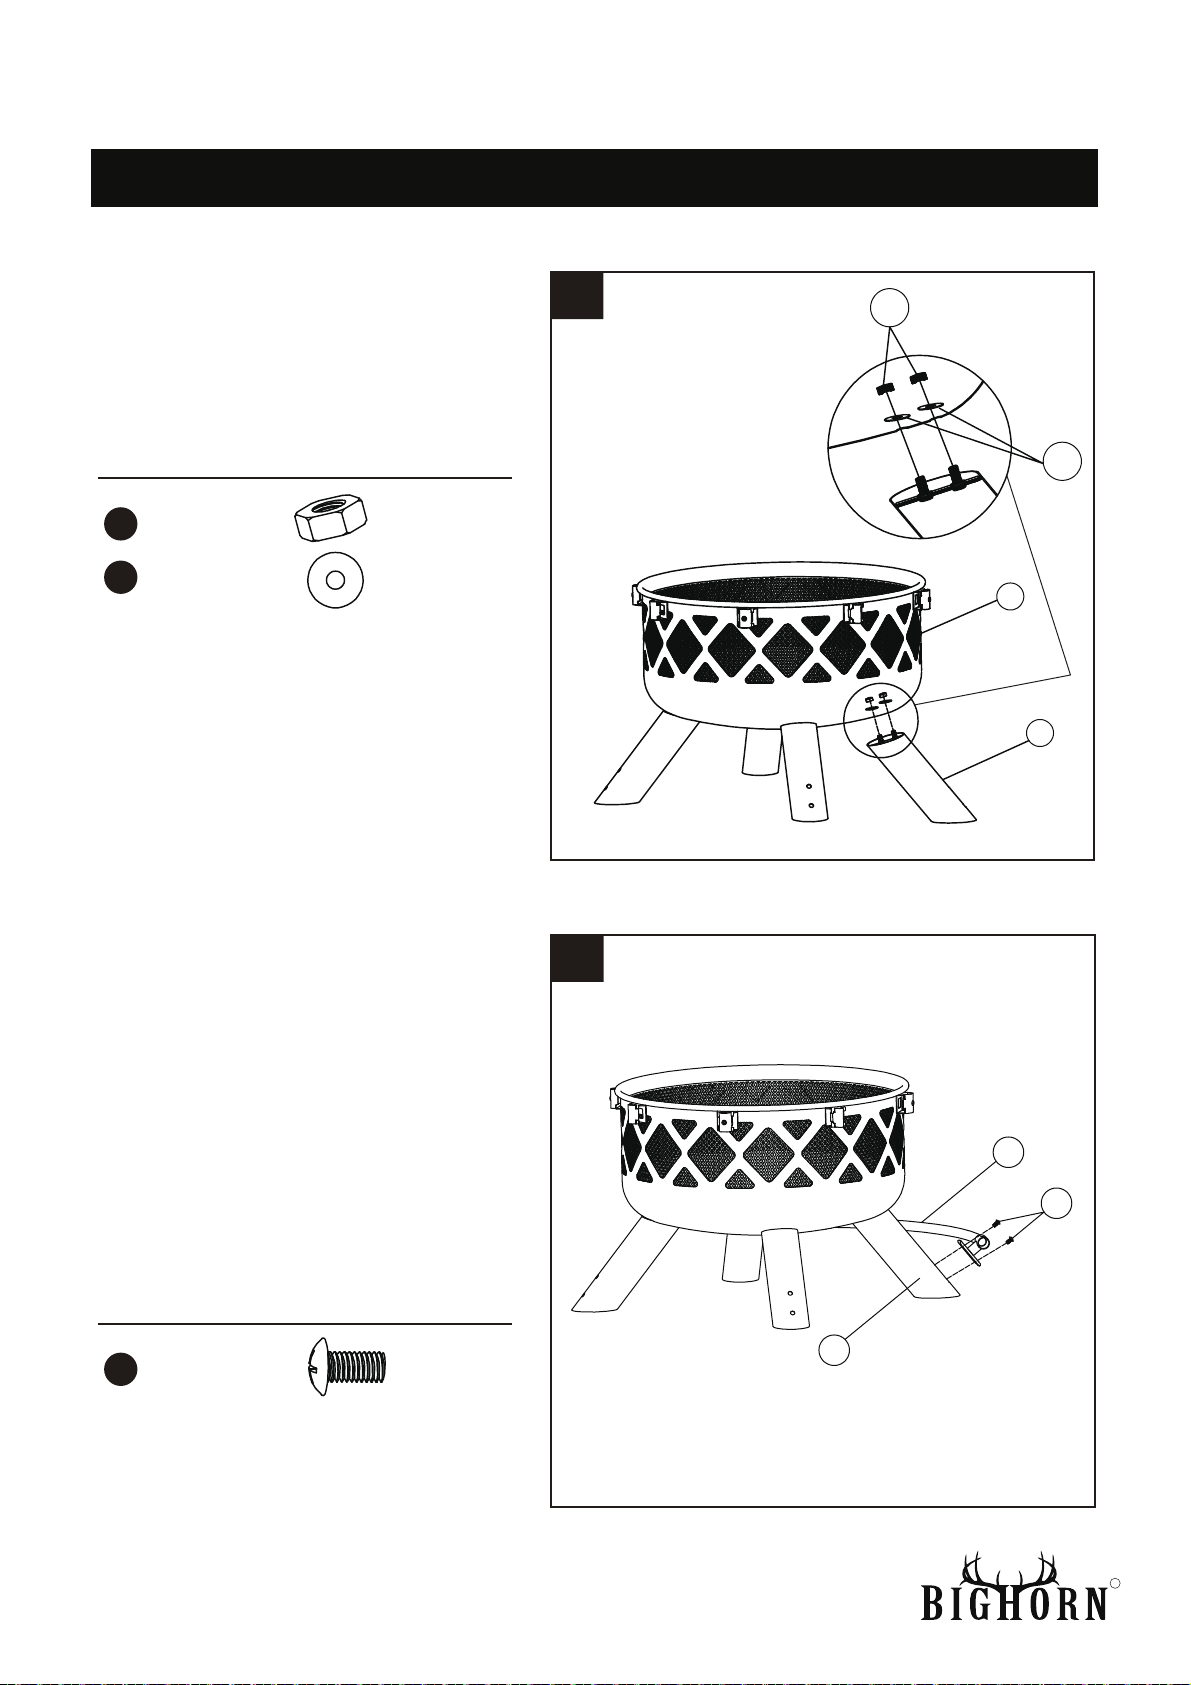
Assembly Instructions
NOTE: Assemble the fire pit on a non-abrasive surface.
Step 2
1
2
Insert one support ring section (C)
into another and attach the support
ring assembly to leg (B) with (2) M6
Bolt (AA) as illustrated. Repeat the
same procedure to install the other
support ring sections (C).
NOTE: Keep all bolts loose during
the assembly of this step until all parts
are installed into the correct position.
Step 1
Attach (4) legs (B) to fire bowl (A) with
(8) M8 Nut (CC) and (8) M6 wahsers
(FF).
Hardware Used
CC M8 Nut x 8
FF M6 washer x 8
Hardware Used
AA M6 Bolt x 8
A
CC
B
C
AA
FF
B
6
R

Assembly Instructions
Step 4
Attach the cooking grate stand bar (G) to
fire bowl (A) with (1) Wing Bolt (BB) to
the fixed brackets on the fire bowl (A)
and put the log rack (F) at the bottom of
the fire bowl (A) as illustrated.
7
Hardware Used
BB Wing Bolt x 1
F
G
BB
4
Insert the pins on table panels (D) into
the fixed brackets on the fire bowl (A).
Attach (4) Wing Bolt (BB) to the fixed
brackets on the fire bowl (A) as illustrated.
3
Step 3
Secure (4) support ring sections (C)
with (4) M5 Bolt (DD).
NOTE: The protruding pin on the table
panel (D) should be placed right upon the
pole on the fire bowl (A).
D
BB
DD
A
C
AA
EE
Hardware Used
x 4
BB Wing Bolt
DD M5 Bolt x 4
EE M6 Nut x 4
AA M6 Bolt x 4
Using (1) AA and (1) EE
to secure (2) table panels
(D) with each other
R
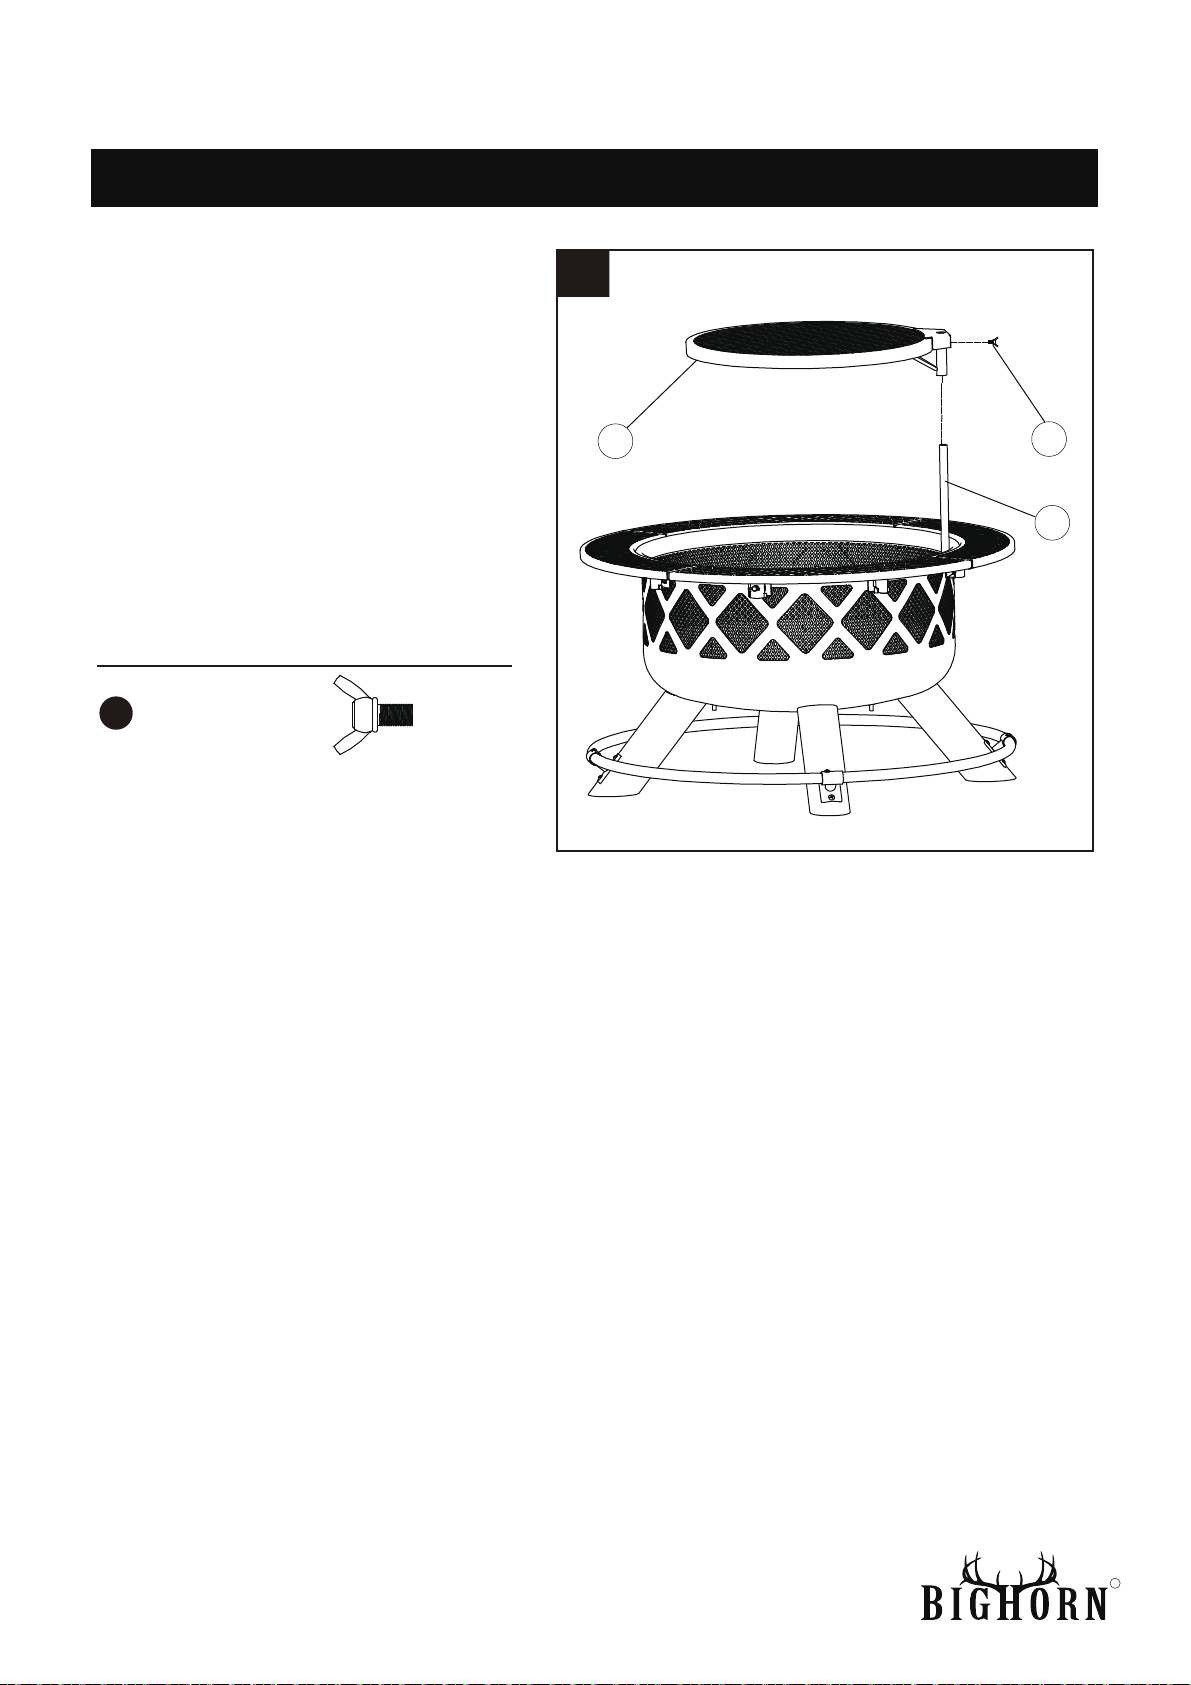
Assembly Instructions
Step 5
Attach the cooking grate (E) to the
cooking grate stand bar (G) with
(1) Wing Bolt (BB) as illustration.
Note: Do NOT move the parts or
change the configuration during use
while the parts are hot.
5
EBB
8
Hardware Used
BB Wing Bolt x 1
G
R

Care and Maintenance
Lighting
1. Make sure there is only a small amount of ash in the bottom of the bowl.
2. Place a layer of dry kindling or a natural fire-starter onto the center of the grate.
3. Place above that a layer of dry seasoned hardwood that is put to lengths no more than 3/4 the
diameter of the bowl.
4. Use a match to light kindling or fire-starter.
Tending the Fire
You may need to shift and/or add logs for an ideal experience.
1. While using a long handled fire pit tool, shift coals and logs to allow additional airflow.
2. Do NOT add gasoline, kerosene, diesel fuel, lighter fluid or alcohol to relight or enhance an existing
fire.
3. Wait until glowing coals have developed before adding any additional wood. If addition wood is
required, place wood on top coals, be careful not to shift ashes.
Extinguishing
1. Allow fire to burn itself out.
2. Do NOT use water to extinguish as this is dangerous and can cause damage to this outdoor fire pit.
Inspecting
This fire pit should be inspected on a regular basis to ensure product safety and longer product life.
Do NOT attempt to inspect this fire pit until the fire is COMPLETELY out and cool to the touch.
1. Check components for any signs of damage or rust.
2. If damage to any component is detected, do NOT operate until repairs are executed.
Cleaning
This fire pit should be cleaned on a regular basis to promote safer experiences and longer product life.
Note: After repeated use, a slight discoloration of the finish may occur.
Do NOT attempt to clean this fire pit until the fire is COMPLETELY out and cool to the touch.
Do NOT use oven cleaner or abrasive cleaners as they will damage this product.
Do NOT clean any part of this fire pit in a self cleaning oven as it may damage the finish.
1. Wipe exterior surfaces with a mild dishwashing detergent or baking soda.
2. For stubborn surfaces use a citrus based degreaser and a nylon scrubbing brush.
3. Rinse and clean with water.
4. Remove built-up creosote from components with a chimney cleaning product.
Storage
Do NOT move or store this fire pit until the fire is COMPLETELY out and cool to the touch.
1. Once the fire is out, coals are cold and fire pit is cool to the touch, remove ashes and properly
dispose.
2. Store the fire pit in a dry location to maximize product life.
3. Store assembled in a location away from children and pets.
9
R

Warranty Information
This warranty is valid for the original consumer purchaser only and excludes industrial,
commercial or business use of the product, product damage due to shipment or failure which
results from alteration, product abuse, or product misuse, whether performed by a contractor,
service company, or consumer. We will not be responsible for labor charges and / or damage
incurred in installation, repair or replacement, nor for incidental or consequential damage.
The appliance has been manufactured under the highest standards of quality and workmanship.
We warrant to the original consumer purchaser that all aspects of this product will be free of
defects in material and workmanship for one year from the date of purchase. A replacement
for any defective part will be supplied free of charge for installation by the consumer. Defects
or damage caused by the use of other than genuine parts are not covered by this warranty.
This warranty shall be effective from the date of purchase as shown in the purchaser’s receipt.
Need help?
call our toll free number at:
1-866-814-0585 or
10
R
This manual suits for next models
1
Table of contents
Other BIGHORN Outdoor Fireplace manuals


Popular Outdoor Fireplace manuals by other brands

First Op International
First Op International FOP-200062 manual

Livoo
Livoo DOC286 instruction manual

Garden Trading
Garden Trading Lyneham Assembly

Mosaic
Mosaic FSMVPT6004 Assembly instructions and user's manual

Paramount Fitness
Paramount Fitness GFP-057 Assembly instructions

Bluesky
Bluesky MAMMOTH owner's manual


