Blanke DIBA-LINE 54 User manual

BLANKE DIBA-LINE
Die Linienentwässerung
Zum Verbleib beim Endverbraucher
MIT REINIGUNGSHINWEISEN*
* To remain with the end user · with CLEANING INSTRUCTIONS / Pour
l‘utilisation du consommateur nal · Avec des informations sur le
nettoyage / Na het inbouwen aan de eindverbruiker geven · Met
reinigingsinstructies

BLANKE DIBA-LINE
Lieferumfang · Content packaging · Inclus dans la livraison · Inhoud van de verpakking
Abbildung ähnlich · similar to g. · voir illustration · Gelijk aan de afbeelding
Für die Rostabdeckung Standard erhältlich / Available for the grid cover Standard / Disponible pour le couvercle de grille Stan-
dard / Voor het afdekrooster standaard verkrijgbaar:
Wasserstopper / water stopper / Arrêt d‘eau / waterstopper 177-900-20 177-900-20
Aqua-Tab-Körbchen / Aqua-Tab bowl / Support de Aqua-Tab / Aqua-Tab-bakje 177-900-06 177-900-06
Abstandhalter / spacer / Ecarteur / Afstandhouder 177-900-22 177-900-22
Endstücke mit Schrauben / End pieces with screws /
Pièces d‘extrémité avec des vis / eindstukken met schroeven 177-900-23 177-900-23
Bemerkungen · Remarks · Remarques · Opmerkingen
1. Bei der Verlegung von Anschlussleitungen ist auf ein Gefälle von 1-2% zu
achten. Bögen von 87° nur für den Übergang in die Vertikale. Bei horizonta-
ler Verlegung sind anstelle eines 87°Bogen 2 Bögen von 45° zu verwenden
(DIN 1986-100 / DIN EN 12056 Gebäudeentwässerung).
2. Auf eine ausreichende Belüftung des Abwassersystems ist zu achten.
3. Bevor der Estrich eingebracht wird, sind alle Verbindungen der Abwasser-
leitung und der Anschlussstutzen auf Dichtigkeit zu prüfen. Die Prüfung
erfolgt ohne Siphon.
4. Beim Zusammenschieben des Siphons darauf achten, dass die Dichtungs-
ringe nicht verschoben werden. Das zum Lieferumfang gehörende BLANKE
Schmiermittel verwenden, um die Dichtungsringe einzufetten.
5. Der mitgelieferte Schutzkern aus Styropor dient als Schmutzstopp. Erst
nach dem Fliesen und Verfugen entfernen. Er dient gleichzeitig als Ab-
standhalter.
6. Bei zusätzlichem Schallschutz kann unter dem Rinnenblock und Estrich die
Trittschallplatte BLANKE TRIBOARD eingebaut werden.
WICHTIG: SIPHON MIT DER ÖFFNUNG NACH UNTEN EINSETZEN!
Siphon Details · Details Siphon · Les détails sur le siphon · Sifon Details
1. Si l‘on installe des lignes de rattachements il faut faire attention à la création
d‘une pente nécessaire de 1-2%. Des coudes de 87° sont à utiliser seulement
pour la passage à la verticale. Pour l‘application horizontale on utilise
deux coudes de 45° au lieu d‘un coude de 87° (DIN EN 12056 drainage
de bâtiments).
2. Il est indispensable de faire attention à une ventilation sufsante du sys-
tème de drainage.
3. Avant d‘appliquer la chape de béton, il est absolument nécéssaire de con-
trôler l‘étanchéité de toutes les connections du collecteur des eaux usées et
du raccord. On fait ce contrôle sans le siphon.
4. Nous vous recommandons de faire attention à ce que les anneaux de joint
ne se déplacent pas au moment du rapprochement du siphon. Utiliser le
BLANKE Produit lubriant qui fait partie du contenu de la livraison pour
graisser les anneaux de joint.
5. L‘enroulement de protection en polystyrène inclu dans la livraison
comme fonction de retenir les impuretés. L‘enlever seulement après le car-
relage et le jointoyage. Il sert en même temps d‘écarteur.
6. Au cas où il faudrait une insonorisation additionnelle on peut utiliser
la natte d‘isolation phonique BLANKE TRIBORD qui est à poser sous le bloc
de drainage et la chape.
ATTENTION: INTRODUIRE LE SIPHON AVEC L‘OUVERTURE EN BAS!
1. While laying the connection tubes please observe a gradient of 1 - 2 %. Cur-
ved parts with 87° only for transition into a vertical. For horizontal laying
use 2 curved parts of 45° instead of one part with 87°(DIN 1986-100 / DIN
EN 12056 drainage of buildings).
2. Make sure the wastewater drainage system is sufciently ventilated.
3. Before laying the screed, we kindly ask you to check any connections of the
sewage pipe and the connecting piece for waterproong. Do this without
the siphon.
4. When pushing together the siphon, please pay attention not to disarrange
the gaskets. Kindly use the included BLANKE Lubricant grease to lubricate
the gaskets.
5. The included protective core made of polystyrene serves as a dirt stop. Ple-
ase only remove after tile setting and grouting. Serves equally as a spacer.
6. For additional noise protection place the step noise reduction and uncou-
pling underlayment system BLANKE TRIBOARD under the mounting block
and the screed.
IMPORTANT: SIPHON TO BE INSTALLED DOWNWARDS WITH THE OPENING!
1. Bij het aansluiten van de afvoorleidingen moet rekening gehouden worden
met een helling van 1 à 2%. Bochten van 87° mogen enkel gebruikt worden
bij een overgang naar een verticale afvoer. Bij een horizontale plaatsing
moet gebruik gemaakt worden van 2 bochten van 45° ter vervanging van
een bocht van 87°.( Din1986-100 / Din EN 12056 gebouwenafwatering)
2. Er dient met een afdoende ontluchting van het lineaire afvoersysteem re-
kening gehouden te worden.
3. Voordat de specievloer wordt aangebracht dienen alle aansluitingen te
worden gecontroleerd of deze waterdicht zijn. Deze controle wordt zonder
sifon doorgevoerd.
4. Bij het inelkaar schuiven van de sifon erop toezien dat de afsluitring niet
wordt verschoven. Het meegeleverde BLANKE siliconenvet gebruiken om
de afsluitringen in te vetten.
5. De meegeleverde en in de afvoer geplaatste polystyreen vuil-stop pas na
het plaatsen van de tegels verwijderen. Deze vuil-stop dient ook als af-
standhouder.
6. Bij bijkomende geluidsisolatie kan onder de gootblok en chape de geluidsi-
solatieplaat BLANKE TRIBOARD ingebouwd worden.
AANDACHT: DE SIFON MET DE OPENING NAAR ONDER INBRENGEN!
D
FNL
GB
Nr. Artikel / Items / Articles / Onderdelen Art.Nr. DN 40 Art.Nr. DN 50
(DIBA-LINE 54 mm) (DIBA-LINE 72 mm)
13 O-Ring / o-ring / joint torique / o-ring 177-900-26 177-900-27
14 O-Ring / o-ring / joint torique / o-ring 177-900-03 177-900-04
6 Siphon, zweiteilig / siphon, 2-parts / siphon, en 2 pièces / sifon, tweedelig 177-900-14 177-900-15
7 Haarsieb / hair sieve / ltre récupérateur de cheveux / haarvangrooster 177-900-01 177-900-02
15 Aufnahme für Siphon / retainer for siphon / recevoir pour siphon / sifon-huis 177-900-10 177-900-11
8 Schraubstutzen u. Dichtung / screw socket / manchon à visser et joint /
schroefdelen met afdichting 177-900-12 177-900-13
1
2
3
5
4 4a
6
8
11
7
12
Nr. Artikel / Items / Articles / Onderdelen Art.Nr. DN 40 Art.Nr. DN 50
(DIBA-LINE 54 mm) (DIBA-LINE 72 mm)
1 Korpus mit integrierter Abdichtungsbahn / body with integrated
waterproong fabric / Drain avec une bande d‘étanchéité prémontée /
de afvoergoot met voorgemonteerde afdichting 177-900-054XXX 177-900-072XXX
2 Installationsblock / installation block / bloc d‘installation / installatieblok 177-900-28 177-900-29
3 Schutzkern / protective core / Enroulement de protection / vuil-stop - -
4 Rosterhöhungsstücke 2,5 mm / riser pieces for grid /
Pièces de réhaussement / stelblokjes voor het rooster (verhogen) 177-900-08 177-900-08
4a Rosterhöhungstücke 5,0 mm / riser pieces for grid / Pièces de
rehaussement / stelbokjes voor het rooster (verhogen) 177-900-09 177-900-09
5 Ferienverschluss / odour lock / cache anti-odeurs / vakantie-slot 177-900-18 177-900-19
6 Siphon / siphon / Siphon / sifon 177-900-14 177-900-15
7 Haarsieb / hair sieve / ltre récupérateur de cheveux / haarvangrooster 177-900-01 177-900-02
8 Schraubstutzen u. Dichtung / screw socket / manchon à visser et joint /
schroefdelen met afdichting 177-900-12 177-900-13
9 Muffe / standard tee / té à manchons / schuifmof - 177-900-25
10 Reduzierstück / socket joints / pièce de reduction / reducer 177-900-35 -
11 Saugheber / vacuum lifting tool / petite ventouse / zuignap-lifter 177-900-05 177-900-05
12 Schmiermittel / lubricant / produit lubriant / siliconenvet 177-900-21 177-900-21
910 8
6
13
14
15
7
15
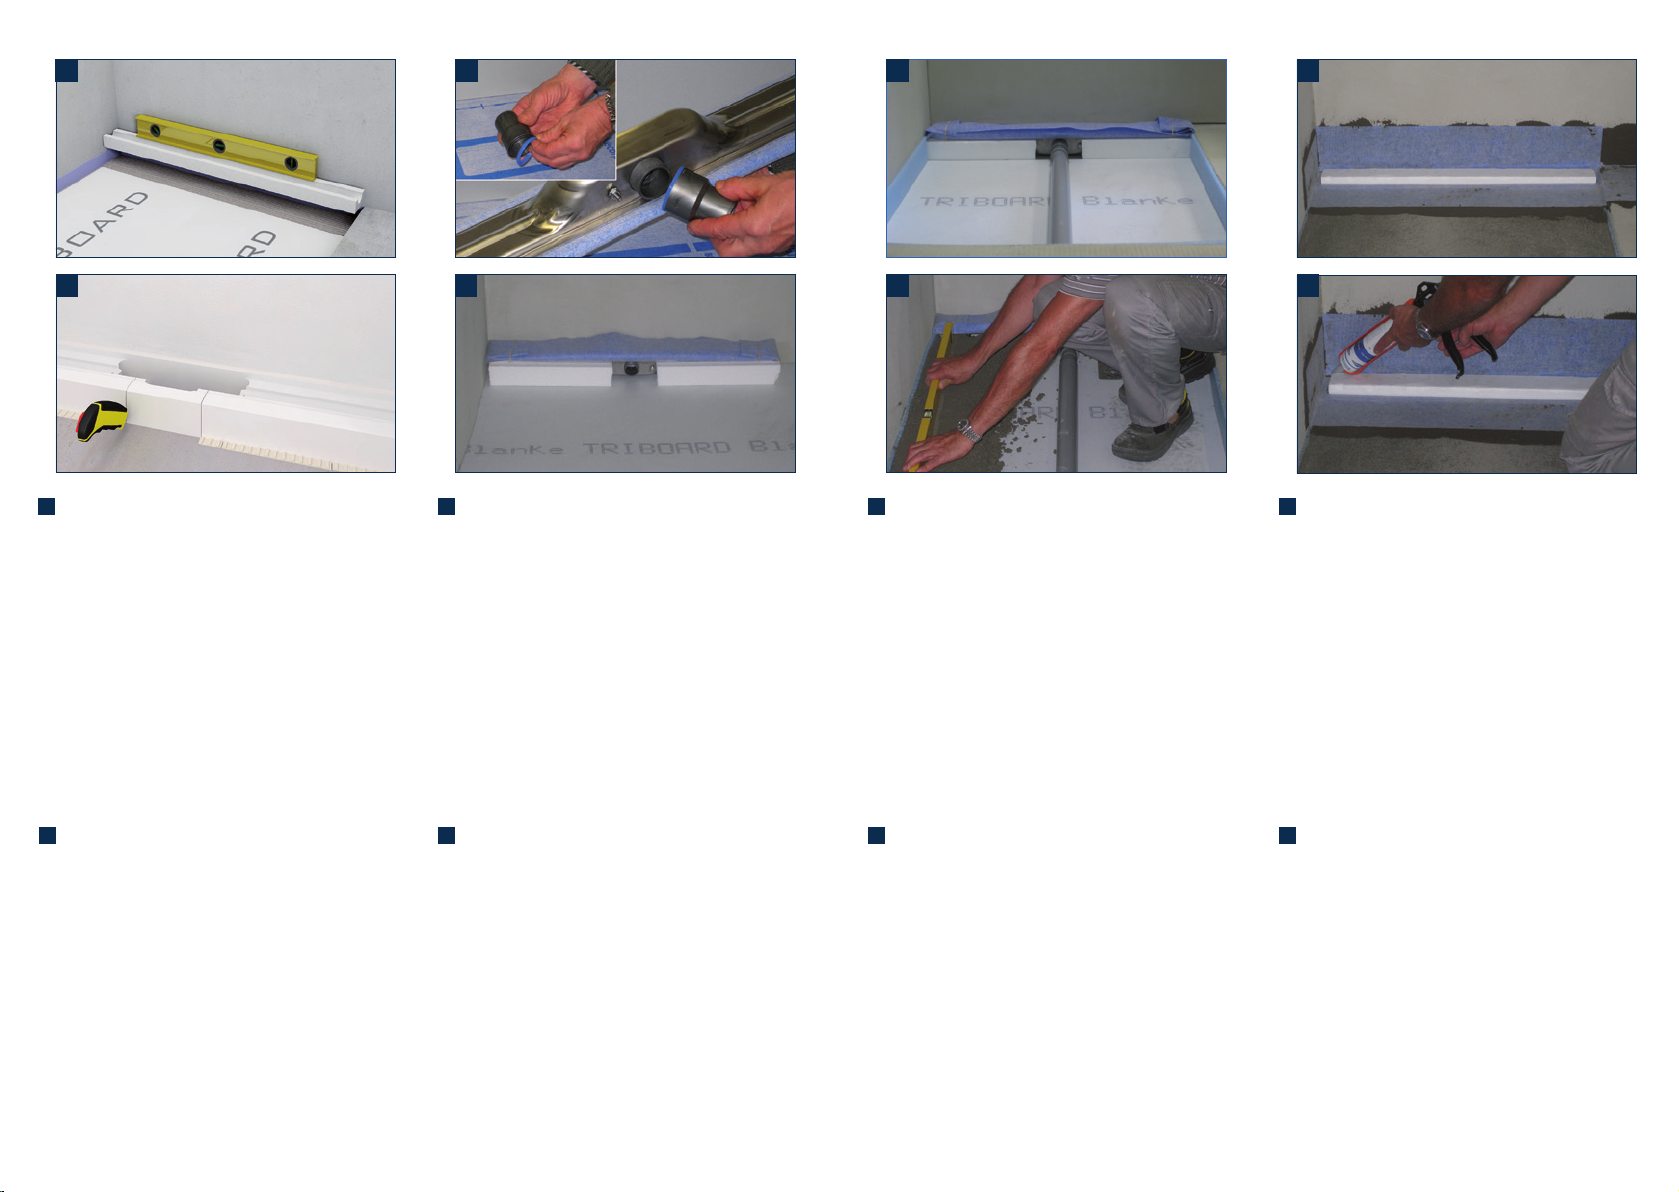
1. Installationsblock auf dem Untergrund mit Flex-
klebemörtel in der erforderlichen Höhe waage-
recht ausrichten und verkleben. Der schmale
Rand des Blocks kommt dabei an die Wand.
2. Installationsblock für Anschlussstutzen aus-
schneiden.
3. Den Silikondichtring in die Nut des Stutzen ein-
legen und handfest auf den inneliegenden Stut-
zen der Rinne verschrauben. Siehe auch „Siphon
Details“.
4. Nach Aushärtung des Mörtels die Rinne einset-
zen und positionieren.
5. Rinne an die Hausentwässerung mit einem Ge-
fälle von 1-2 % anschließen. Auf Dichtigkeit
prüfen! Wenn erforderlich, Potenzialausgleich
anschließen.
6. Der Estrich wird im entsprechenden Gefälle
oberächenbündig mit dem Installationsblock
eingebracht. An aufsteigenden Bauteilen ist ein
Randdämmstreifen anzubringen.
7. Nach Trocknung des Estrichs wird die integrierte
Abdichtung der Rinne mittels Fliesenkleber auf
dem Estrich und am Wandbereich verklebt.
8. Eckbereiche sind zusätzlich mit zugeschnittenen
BLANKE DIBA Corn-A und -I zu versehen und
mit DIBA COLL zu verkleben.
1
2
3
4
5
6
7
8
1. Niveller et encoller le bloc d‘ installation à la
hauteur nécessaire sur la surface à l‘aide d‘un
mortier exible. La partie étroite du bloc doit
être xée au mur.
2. Couper le bloc d‘installation pour les raccords.
3. Insérer I‘ anneau d‘ étanchéité en silicone dans
la rainure et visser la à la main sur le manchon
intérieur du caniveau. Voir aussi „les détails sur
le siphon“.
4. Quand le mortier devient dur, insérer le conduit
et positionner-le correctement.
5. Connecter le conduit avec la canalisation de drai-
nage de l‘immeuble avec une inclination de 1 à
2%. Vérier l‘étanchéité!
6. Appliquer la chape de béton avec l‘inclination
correspondante au ras de la surface du bloc
d‘installation. Il faut installer une bande
d‘isolation de surface où il ya des éléments de
construction ascendants.
7. Une fois que la chape de béton a séché, coller le
joint intégré de la canalisation à l‘aide d‘une colle
de carrelage sur la chape de béton et sur le mur.
8. Nous recommandons d‘utiliser les éléments pré-
coupés BLANKE DIBA Corn-A et -I pour les angles
et de les encoller avec DIBA COLL.
5. Sluit de afvoergoot aan op de centrale afvoer
(hiervoor is een afschot nodig van 1-2%). Contro-
leer op waterdichtheid! Indien nodig, potentiële
effening aansluiten.
6. De specievloer wordt afhellend (1-2%) in de
richting van het installatieblok aan gebracht.
Be-langrijk is om randisolatie toe te passen daar
waar dit noodzakelijk is.
7. Na het uitharden van de specievloer wordt de
reeds op de goot aangebrachte afdichting open-
geslagen en met een tegellijm op de specievloer
en tegen de muur verlijmd.
8. Breng in de hoeken zelf aangepaste BLANKE
DIBA Corn-A en –I hoekstukken aan en verlijm
deze met BLANKE DIBA COLL.
1. Het installatieblok wordt waterpas met een e-
xibele tegellijm op de gewenste hoogte op de
ondergrond aangebracht. Hierbij dient de smalle
zijde van het installatieblok tegen de muur ge-
plaatst te worden.
2. Breng een opening in het installatieblok aan om
de afvoer op de sifon aan te kunnen sluiten.
3. De silicone afdichtring in de groef van de mof
inbrengen en handvast schroeven op de binnen-
kant van de mof in de douchegoot.
4. Na het uitharden van de tegellijm de goot in het
installatieblok plaatsen.
5. Connect the channel to the building drainage
system providing a 1-2% gradient. Test for leaks!
If necessary earth the product.
6. The screed is to be laid with a corresponding
gradient and linear to the surface with the help
of the intallation block. Please use an edge insu-
lating strip in case you have ascending building
parts.
7. After the drying of the screed, you glue the
manufacturer-integrated waterproong fabric of
the channel to the screed and the wall using tile
glue for that.
8. For the edges, please use additionally the BLAN-
KE DIBA Corn-A and -I, which are tailor-cut, and
x them by gluing it with DIBA COLL.
1. Adjust the installation block horizontally on the
surface, at the necessary height, and x it with
tile glue. The smaller side of the blocks needs to
be xed towards the wall.
2. Cut out the installation block for the connecting
pieces.
3. Lay in the silicone sealing ring into the notch of
the socket and x it ngertight to the internal
socket. See also „details siphon“.
4. After the hardening of the mortar, lay the chan-
nel in the correct position on the installation
block.
D
F NL
GB D
F NL
GB
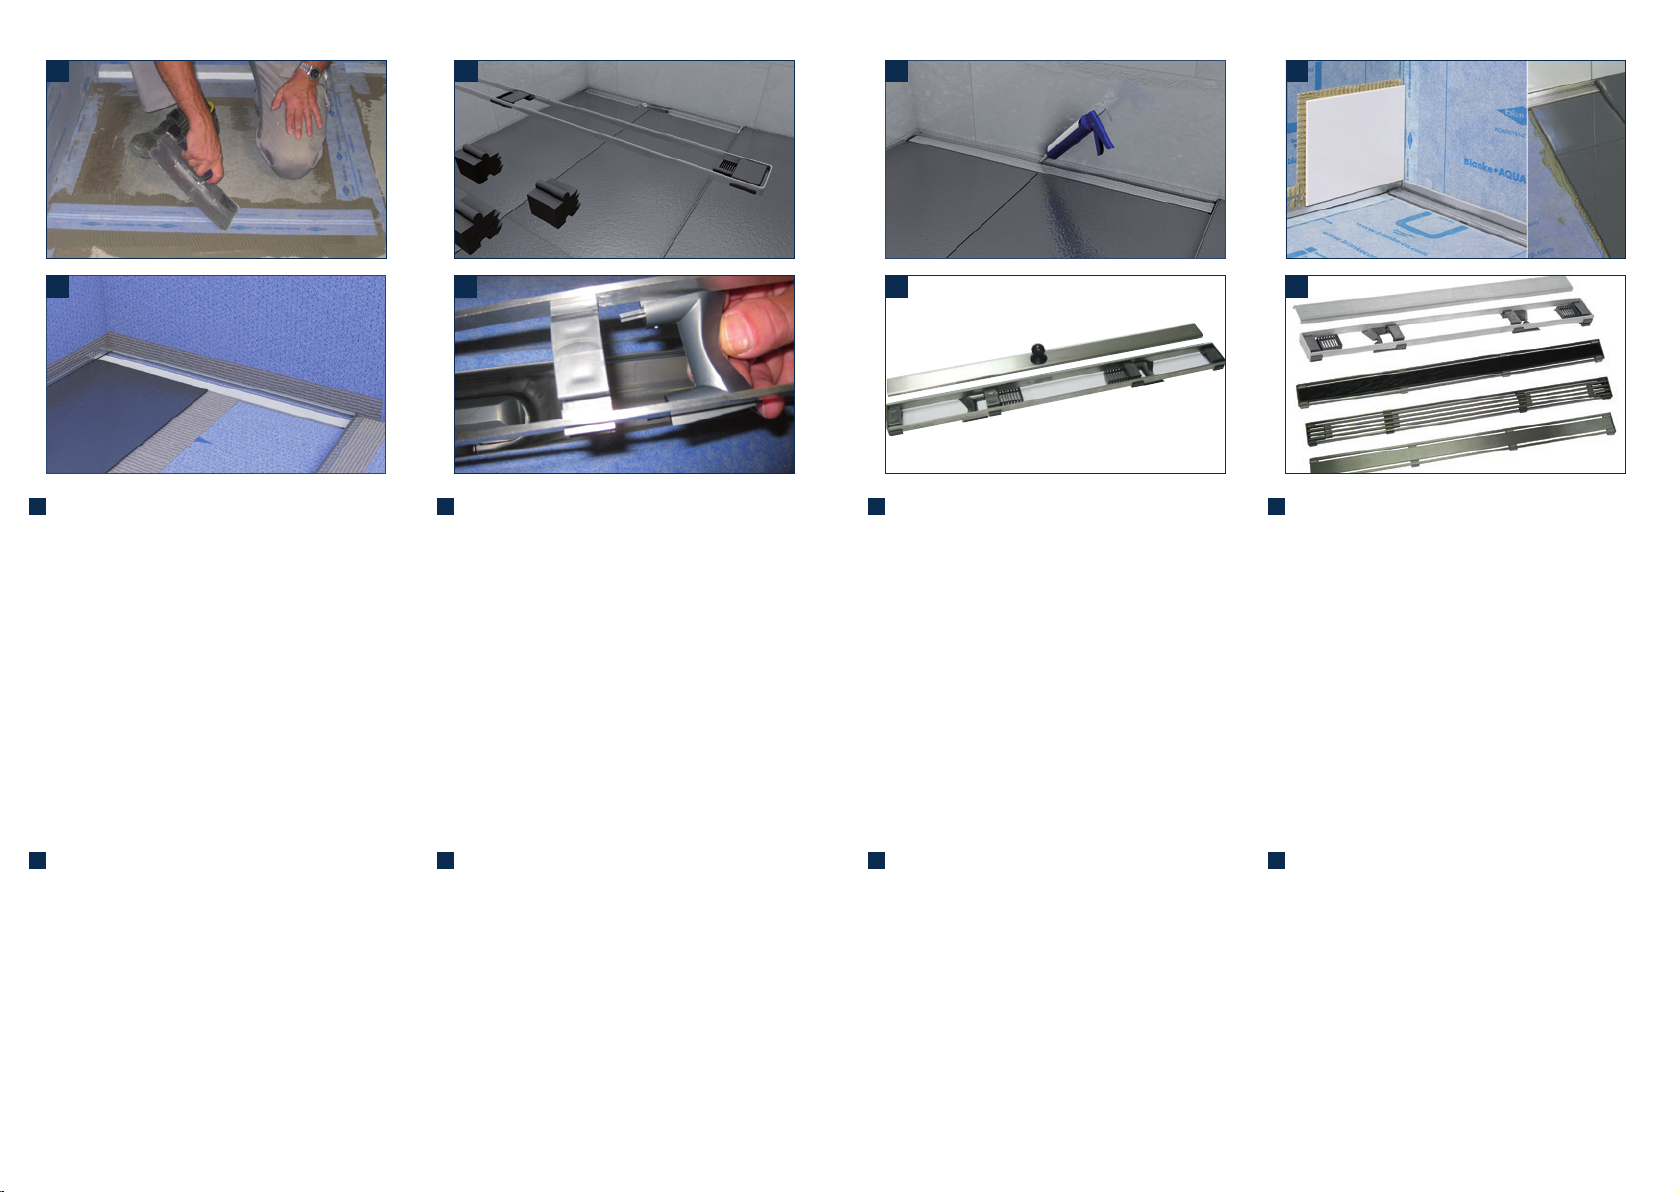
9. Die Flächenabdichtung von Wand und Boden
erfolgt mit der Abdichtungsbahn BLANKE DIBA
100 (s. Verlegeanleitung DIBA) bzw. alternativ
mit Dichtschlämmen. Die Abdichtungsmaßnah-
me ist dabei mind. 5 cm überlappend auf die
integrierte Abdichtung der Ablaufrinne auszu-
führen.
10. Schutzkern aus Styropor erst nach dem Fliesen
und Verfugen entfernen. Er dient gleichtzeitig
als Abstandhalter. Fliesen ohne Fuge bis an den
Schutzkern verlegen, danach Schutzkern her-
ausnehmen.
11. Rahmen mit Abdeckrost in die Rinne setzen. Mit
den Rosterhöhungsstücken individuell an die
entsprechende Fliesenstärke anpassen.
12. Die Wasserstopper (nur 54 mm) in der unters-
ten Ebene der Rosterhöhungsstücke links und
rechts vom Siphon gegen die Wasserablaufrich-
tung einstecken.
13. Die Fuge zwischen Rostrahmen und Fliese mit
neutral vernetzendem Silikon schließen.
14. Die Rostabdeckung kann zur Reinigung leicht
durch den mitgelieferten Saugnapf entfernt wer-
den.
15. Für den sauberen Abschluss empfehlen wir, im
Wand- und Bodenbereich die Systemkomponen-
ten BLANKE AQUA-DEKO, BLANKE AQUA-GLAS
sowie BLANKE AQUA-KEIL / BLANKE AQUA-KEIL
WAND / BLANKE AQUA-KEIL GLAS einzusetzen.
16. Rostabdeckungen für DIBA-LINE: Standard / Be-
iesbar* / Dünnschichtbeläge (* für Fliesenstärken
bis max. 10 mm).
9
10
11
12
13
14
15
16
9. On utilise la bande d‘étanchéité BLANKE DIBA
100 (cf. aussi les instructions de montage DIBA)
pour une étanchéité de la surface du mur et du
sol. Alternativement on peut utiliser des endu-
its étanches. Pour assurer une bonne étanchéi-
té, cette bande doit recouvrir le joint intégré du
conduit d‘écoulement sur au moins 5 cm.
10. Enlever l‘enroulement de protection en poly-
styrène seulement après le carrelage et jointo-
yage. Il sert en même temps d‘écarteur. Installer
les carreaux sans joint jusqu‘à l‘enroulement de
protection, après cela, retirer-le.
11. Mettre le couvercle de grille avec son cadre
dans le conduit. À l‘aide des pièces de rehaus-
sement, ajuster en fonction de l‘épaisseur des
carreaux correspondants.
12. Insérer l‘arrêt d‘eau (seulement à 54 mm) dans
le niveau inférieur des pièces de rehaussement
à gauche et à droite du siphon en sens inverse
du drainage d‘eau.
13. Fermer le joint entre le cadre du couvercle de
grille et le carreau avec une silicone réticulée
neutre.
14. On peut retirer facilement le couvercle de grille
pour nettoyer en utilisant notre petite ventouse
inclue dans la livraison.
15. Pour obtenir des nitions nettes, on vous re-
commande d‘utiliser les composants du système
BLANKE AQUA-DEKO, BLANKE AQUA-VERRE et
BLANKE AQUA-KEIL/BLANKE AQUA-KEIL Mur/
BLANKE AQUA-KEIL VERRE pour tous les do-
maines relatifs au mur et au sol.
16. Couvercles de grille pour DIBA-LINE: Standard/à
carreler* / Revêtements à couches minces (*pour
des épaisseurs de carrelage de 10 mm max.).
13. De voegen tussen het frame van het afdekroos-
ter en de tegels dient met neutraal netwerken-
de siliconen gevuld te worden.
14. Voor het schoonmaken kan het afdekrooster
eenvoudig met de meegeleverde zuignap-lifter
verwijderd worden.
15. Voor de perfecte afwerking tussen wand en
vloer adviseren wij U de systeem-componen-
ten BLANKE AQUA-DEKO, BLANKE AQUA-GLAS
en BLANKE AQUA-KEIL / BLANKE AQUA-KEIL
WAND/BLANKE AQUA-KEIL GLAS te gebruiken.
16. Afdekroosters voor de BLANKE DIBA-LINE:
standaard / tegel-frame* / dunne vloer bekle-
ding (* voor tegels met een maximale dikte van
10 mm).
9. De wand en vloer dienen met BLANKE DIBA
100 (zie de installatieinstructie) of als alterna-
tief met een vloeibaar afdichtmiddel afgedicht
te worden. Belangrijk is hierbij dat middels een
overlapping van 5 cm de afdichting van wand
en vloer te laten aansluiten op de Blanke DIBA
100 welke reeds op de goot is aangebracht.
10. De polystyreen vuil-stop wordt eerst na het
plaatsen van de tegels verwijderd. De vuil-stop
is ook een afstandhouder. De tegels worden
zonder voeg tot aan de vuil-stop geplaatst.
Daarna wordt de vuil-stop verwijderd.
11. Plaats het afdekrooster en het frame in de goot.
Met de verhogingsblokjes het frame met afde-
krooster aanpassen aan de dikte van de tegels.
12. De waterstoppers (alleen bij 54 mm) worden in
de onderste positie van de frame-steunen links
en rechts van het sifon tegen de aooprichting
van het water geplaatst.
9. The transition of the waterproong fabric to
adjacent waterproong matting and tapes is
made with the BLANKE DIBA 100 (see inst-
ruction for installation of the DIBA) or either
sealing slurries. You have to provide at least a
5 cm overlapping zone with the manufacturer-
integrated waterproong fabric of the drain.
10. Remove the protective core made of polysty-
rene only after having installed and grouted
the tiles. At the same time, this core serves as
a spacer. Install the tiles, without providing a
joint, directly up to the protective core. After
that remove protective core.
11. Put the frame with the cover grid into the drain.
The riser pieces allow a perfect alignment of the
grid to any height of tiles.
12. Insert the water stoppers (only in case you
have 54 mm) into the lowest level of the riser
pieces each on the left and the right of the si-
phon and always against the drainage direction.
13. Close the joint between the frame of the cover
grid and the tile with the help of neutral cross-
linked silicone.
14. By using the included vacuum lifting tool, you
can easily remove the cover grid for cleaning
purpose.
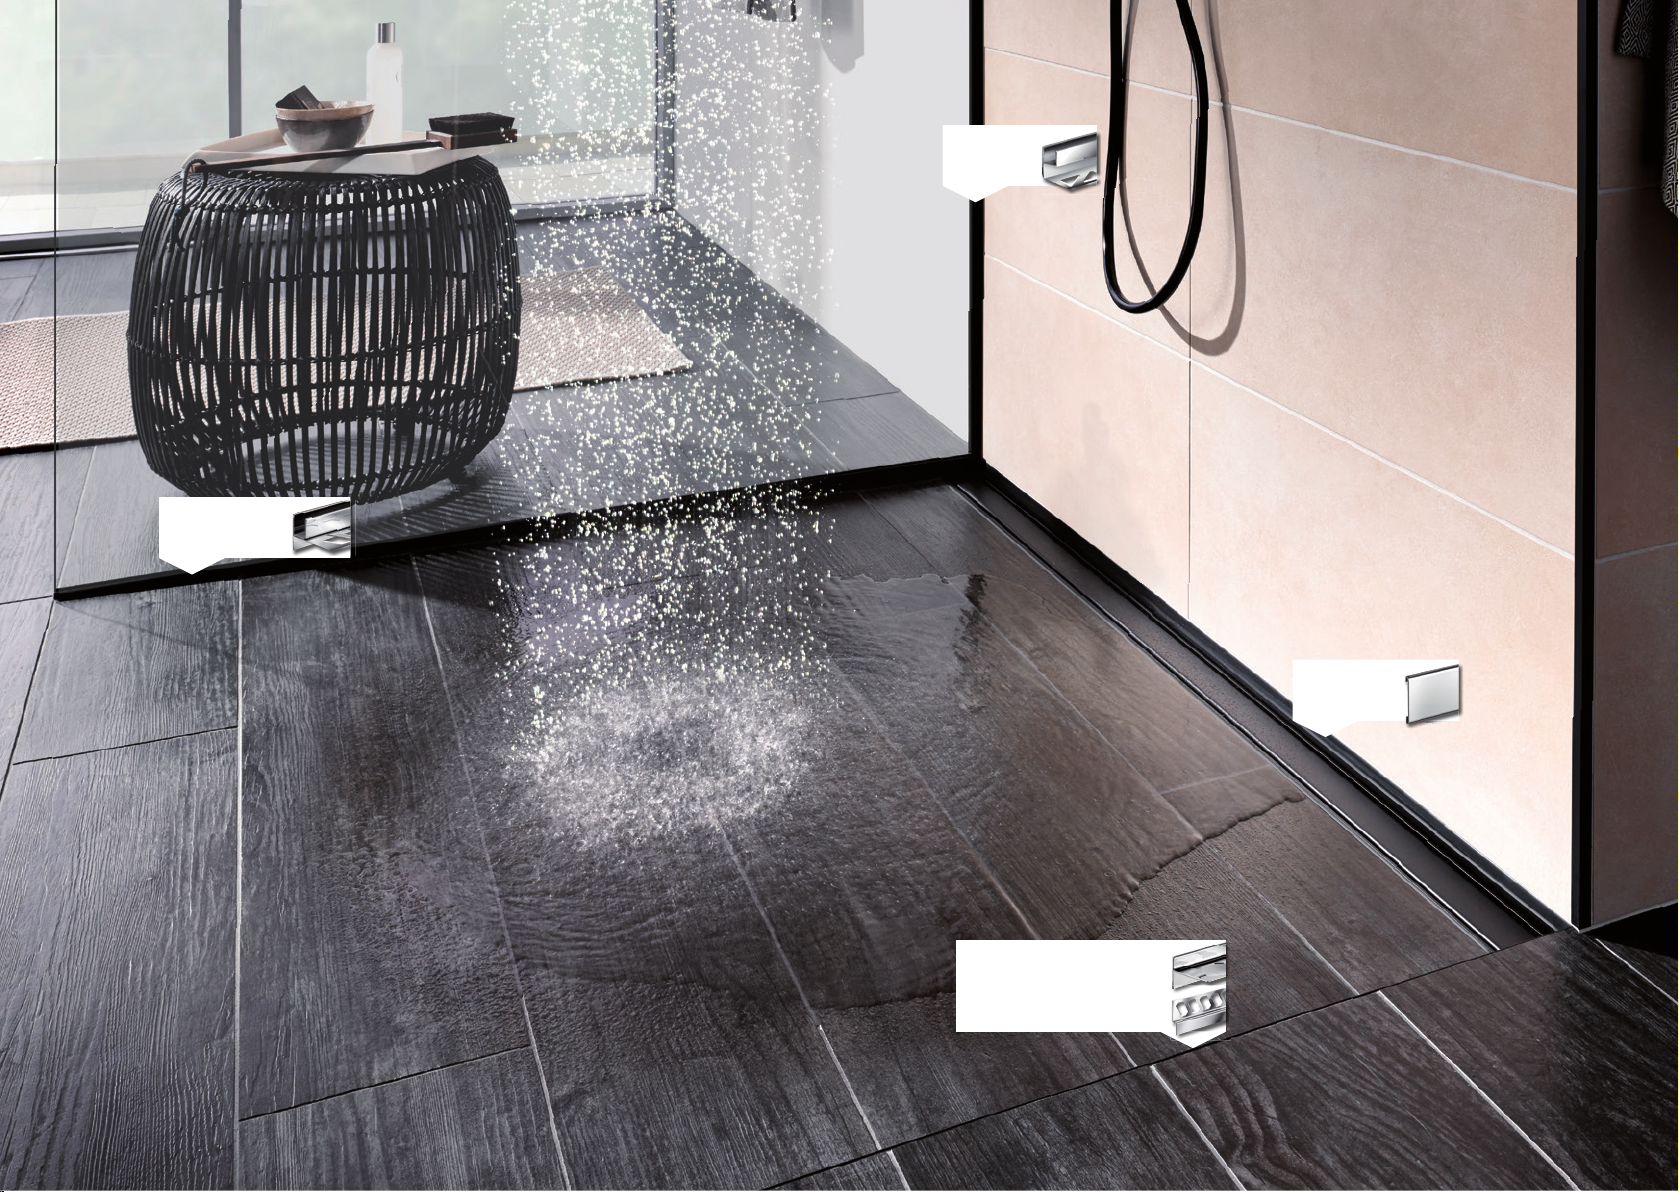
15. As for the wall and oor zone, we recommend to
use the system components BLANKE AQUA-DE-
KO, BLANKE AQUA-GLASS as well as the BLAN-
KE AQUA-KEIL / BLANKE AQUA-KEIL WALL /
BLANKE AQUA-KEIL GLASS for creating a clean
nishing.
16. Cover grid for DIBA-LINE: Standard / to be tiled*
/ for thin nishes (* for tiles of up to 10 mm).
D
F NL
GB D
F NL
GB

Reinigungshinweise · Cleaning instructions · Instructions de nettoyage · Reini-
gingsinstructies
Allgemein
Kalkablagerungen des Wassers, Haare, Hautpartikel, Seifen, Duschgel und Shampoo tragen dazu bei, dass bei täglichem
Gebrauch der Dusche Verschmutzungen im Rinnen- und Ablaufbereich entstehen. Diese Verschmutzungen sind nach
Bedarf zu entfernen.
Reinigung der Rinne
Mit dem zum Lieferumfang gehörenden Saugheber wird die Rostabdeckung an- bzw. herausgehoben. Grobe Verschmut-
zungen in der Rinne mit Hilfe eines weichen Tuches oder Schwammes mit warmem Wasser und milden haushaltsübli-
chen Reinigungsmitteln entfernen. Bei stärkeren Verschmutzungen kann eine Bürste hilfreich sein.
Siphon
Den reinigungsfreundlichen Siphon gleichmäßig links und rechts mit zwei Fingern aus der Aufnahme herausziehen.
Der zweiteilige Siphon kann leicht durch Auseinanderziehen geöffnet werden. Die Einzelteile inkl. Haarsieb unter ie-
ßendem Wasser reinigen. Nach dem Reinigen wird das Haarsieb oben in den Siphon eingelegt und der äußere Körper
über den Grundkörper geschoben. Achtung: Achten Sie darauf, dass sich der Dichtungsring hierbei nicht verdreht, ge-
gebenenfalls fetten Sie den Dichtungsring ein. Den gereinigten Siphon dann wieder in die Siphonaufnahme einführen.
Rostabdeckung
Die Rostabdeckung aus Edelstahl mit einem weichen Tuch und handelsüblichen Edelstahlreinigern säubern. Bei der Rei-
nigung von Edelstahl dürfen keinesfalls Stahlwolle oder Stahlbürsten verwendet werden, da sich durch Abrieb Flugrost
bilden kann. Reinigungsmittel müssen frei von Salzsäure und Chlor sein.
Optionale Reinigungserleichterung: BLANKE AQUATAB
Der Reinigungsstein zum optionalen Einlegen in die BLANKE DIBA-LINE verbreitet während des Duschens einen ange-
nehmen Duft. Der BLANKE AQUA-Tab entspannt das am Boden ankommende Wasser und minimiert die Schaumbildung.
Wasser läuft dadurch schneller ab und hinterlässt weniger Wasserecken. Durch zusätzliche Reinigungsstoffe entsteht
in der Rinne ein höherer Selbstreinigungseffekt, Haare und Flusen in Verbindung mit Seife kleben weniger an. Den Stein
in den zum Lieferumfang gehörenden „Seifenkorb“ einlegen.
Der mitgelieferte Ferienverschluss (7) kann während längerer Abwesenheit vor Gerüchen des austrocknenden Siphons
schützen. Siphon entfernen und Ferienverschluss mit Dichtung in Siphonaufnahme einschieben. Achtung: Vor dem Du-
schen tauschen und Siphon wieder einstecken!
In general
Calcications of the water, hair, particles of the skin, soaps, shower gels and shampoos contribute to a contamination of
the draining zone, when used on a daily basis. You can remove those contaminations at need.
Cleaning of the channel
Please use the included vacuum lifting tool for lifting or removing the cover grid. Use a normal soft tissue or sponge
to remove heavy soiling from the channel. You can use warm water or either a normal cleaner. It can also be helpful to
use a brush in case of really heavy soilings.
Siphon
Take the siphon, which is easily and quickly cleaned, out of the retainer. You can use 2 ngers for that, on the left and
right side. It is easy to open the 2-part siphon by pulling it apart. The individual parts, including the hair sieve, can now
be cleaned under running water. After the cleaning, please insert the hair sieve on the top of the siphon and the exter-
nal part is now pushed into the basic part. Attention: Pay attention to the fact that the gasket must not to be twisted. If
required, lubricate the gasket. Now you can put the cleaned siphon into its retainer once again.
Grid cover
The grid cover made of stainless steel can easily be cleaned with a soft tissue and stainless steel cleaning products
which are usual in the market. When cleaning stainless steel, don‘ t use steel wool or steel brushes, as those can cause
a rust lm due to the abrasion. Remember that the cleaners must be free of hydrochloric acid and chlorine.
Option/Cleaning help: BLANKE AQUATAB
The cleaning tablet can be placed in the BLANKE DIBA-LINE. It provides a pleasant aromatic odour while taking a show-
er. The BLANKE AQUA-Tab softens the incoming water and minimizes foaming. The water ows faster/ easier and leaves
less waterspots. Additional cleaning products improve the self-cleaning effect. Hair and uffs in touch with soap do not
stick to the grid that easily as usual. Put the cleaning tablet into the soap bowl, which is included.
The included odour locks (7) closes the drain permanently from the drain pipe during a long period of absence or inac-
tivity. Off odours do not occur during holidays. Just take out the siphon and put the odour lock with its gasket into the
siphon retainer. Attention: Exchange before taking a shower and put in the siphon again!
Généralités
Les dépots calcaires, cheveux, particules de peau, savons, gels douche et shampooings peuvent causer des encrasse-
ments dans la canalisation et dans l‘écoulement lors d‘une utilisation quotidienne de la douche. On peut enlever ces
encrassements si besoin est.
Nettoyage de la canalisation
À l‘aide de la petite ventouse, inclue dans la livraison, soulever voire retirer le couvercle de grille. Enlever la plus gran-
de partie des encrassements de la canalisation avec un tissu doux ou une éponge douce en utilisant de l‘ eau chaude
et des produits nettoyants à usage domestique courant. Dans le cas d‘ encrassements plus persistants, une brosse peut
être bien utile.
Siphon
Retirer le siphon, facile à nettoyer, en le prenant avec précaution avec les deux doigts à gauche et à droite. On peut
facilement ouvrir le siphon, composé de deux pièces, en le tirant tout simplement. Laver chaque pièce à l‘eau courante
sans oublier le ltre récupérateur de cheveux. Après le nettoyage, placer le ltre au-dessus du siphon et puis insérer
la partie externe sur le corps de base. Attention: Veiller à ce que l‘anneau d‘étanchéité ne se torde pas. Si nécessaire,
graisser cet anneau. Puis remettre à sa place le siphon ainsi nettoyé.
Couvercle de grille
Nettoyer le couvercle de grille en inox avec un tissu doux et des nettoyants pour inox réservés à cet usage. Pour le net-
toyage de l‘inox ne pas utiliser de laine d‘acier ni de brosses métalliques, car il pourrait alors se former une mince cou-
che de rouille par frottement. Il faut veiller à ce que les nettoyants soient exempts d‘acier chlorhydrique et de chlore.
Facultatif: Facilité de nettoyage: BLANKE AQUATAB
Nous vous offrons à titre facultatif une savonnette de nettoyage de la gamme de produits Blanke·DIBA-LINE qui dégage
un odeur agréable lors de la douche. Le cube Blanke·AQUA-Tab adoucit l‘eau qui arrive au sol et diminue la formation
de mousse. L‘eau s‘écoule ainsi plus rapidement et laisse moins de tâches sur le revêtement. Grâces à l‘addition de
substances nettoyantes on obtient un effet d‘autonettoyage dans la canalisation, les cheveux et les peluches mélangés
au savon collent moins et on améliore ainsi l‘écoulement. Mettre la savonnette inclue dans la livraison dans le „support
de savon“ (cela suft pour env. 20 douches).
La cache anti-odeurs (7) , inclu dans la livraison, peut protéger des odeurs désagréables du siphon qui s‘est desséché
après une inutilisation prolongée. Il faut simplement retirer le siphon et insérer le cache anti-odeurs avec le joint dans
l‘insert du siphon. Attention: Avant de prendre une douche, ne pas oublier de retirer le cache-odeurs et de remettre à
sa place votre siphon!
Algemeen
Kalkafzetting van het water, haren, huidschilfers, zeep, douchegel, en shampoo zorgen bij dagelijks gebruik van de
douche ervoor dat er een aanslag in de goot en de afvoer ontstaat. Deze aanslag moet verwijderd worden.
Het schoonmaken van de goot
Met de meegeleverde zuignap-lifter wordt het afdekrooster opgetild en uit de goot genomen. Met behulp van een zach-
te doek of een spons, met allesreiniger en warm water het vuil uit de goot verwijderen. Bij hardnekkig vuil een bostel
gebrui-ken om de aanslag te verwijderen.
Sifon
De reinigings-vriendelijke sifon rechts en links met twee vingers omhoog bewegen en uit het sifon-huis nemen. De uit
twee delen bestaande sifon kan eenvoudig geopend worden. De verschillende onderdelen van de sifon, inclusief het
haarvangrooster, onder stromend water reinigen. Na het reinigen wordt het haarvangrooster weer in de sifon geplaatst
en wordt de sifon in het sifon-huis geschoven.
Pas op! Let op dat de afsluitring niet verdraaid is. Indien dit nodig is dient U het meegeleverde siliconenvet op de
afsluitring aan te brengen. De gereinigde sifon kan daarna weer in het sifon-huis geschoven worden.
Afdekrooster
Het afdekrooster met een zachte doek en roestvrij-staal-reiniger schoonmaken.
Bij het reinigen van het afdekrooster mag geen staalwol of staalborstel gebruikt worden, omdat hierdoor vliegroest kan
ontstaan. Schoonmaakmiddelen mogen geen zoutzuur of chloor bevatten.
Optionele reinigings hulp: BLANKE AQUATAB
Het optionele reinigings-tablet kan in de goot geplaatst worden. Tijdens het douchen ontstaat er een aangename geur.
De BLANKE AQUA-Tab ontkalt het op de bodem aankomende water en reduceert het ontstaan van schuim. Het water
loopt daardoor sneller af waardoor minder vlekken achterblijven. De extra reinigingsstoffen in de BLANKE AQUA-Tab
zorgen voor een zelf-reinigend effect waardoor haren en pluizen in combinatie met zeep minder blijven plakken. Plaats
de BLANKE AQUA-Tab in de meegeleverde zeepbakjes (een tab werkt bij ca. 20 maal douchen).
Het meegeleverde vakantie-slot (7) voorkomt een onaangename geur door het uitdrogen van de sifon wanneer de dou-
che een langere tijd niet gebruikt wordt. Neem de sifon uit het sifon-huis en plaats het vakantie-slot met de afsluitring
in het sifon-huis. Pas op! Vervang voor het douchen het vakantie-slot weer door de sifon.
D
F
NL
GB
BLANKE
AQUADEKO
BLANKE
AQUAGLAS
BLANKE AQUA
KEIL GLAS
BLANKE AQUAKEIL
BLANKE AQUAKEIL WAND

Blanke GmbH & Co. KG
Stenglingser Weg 68-70
D-58642 Iserlohn
Telefon +49 (0)2374 - 507 0
Telefax +49 (0)2374 - 507 4230
E-Mail info@blanke-systems.de
Internet www.blanke-systems.de
DRUVM0008
This manual suits for next models
1
Popular Plumbing Product manuals by other brands

Elkay
Elkay LKB738C installation instructions

Moen
Moen T994 Series quick start guide

Mira
Mira Platinum Installation and user guide

Blanco
Blanco BlancoAxis 511-738 Specification sheet

KWC
KWC DOMO Installation and service instructions

American Standard
American Standard Connosseur 4600.100 Series installation instructions

Moen
Moen ROTHBURY T4211AZ Illustrate parts list

Kohler
Kohler Antique K-100 Homeowner's guide

Oras
Oras IL BAGNO ALESSI Sense 8710F installation guide

Ferguson Enterprises
Ferguson Enterprises ProFlo PFSH305GCP installation instructions

KIBI
KIBI K1-S23 manual

Sterling Plumbing
Sterling Plumbing B173 Specification sheet


