BLASTONE Rotoblast Instruction manual

Rotoblast Internal Pipe Cleaner
www.BlastOne.com
INSTALLATION, OPERATION &
MAINTENANCE MANUAL

2
MANUAL CONTENTS
1. Use protective equipment: Abrasive-resistant clothing, safety shoes, leather gloves, ear protection,
CE-approved air-fed helmet. Air for helmet must be supplied by a breathing air compressor or through
a helmet air lter.
2. Check for possible silicosis hazards. Avoid dust.
3. Do not blast with damaged or worn equipment.
4. Point nozzle only at area being cleaned.
5. Use only proper dry and well-screened abrasives specically intended for blasting.
6. Keep unprotected workers out of the blast area.
7. Before blasting:
• Check ttings and hose for wear.
• Safety-wire couplings together.
• Check helmet lters and air supply.
• Check pop-up valve for alignment.
• Test remote controls.
• Make sure blast machine is adequately grounded.
8. Do not weld on blast machine, this voids approval.
9. Do not substitute Krimetal parts or modied equipment in any way.
WARNING
INTRODUCTION
3 Description
3 Set-Up and Operation
MAINTENANCE
5 Leather Dust Seal (Pos.10)
5 Tungsten Carbide Washer (Pos.12)
5 Nozzles (Pos.29-33)
5 Nozzle Head (Pos.1) and Plug (Pos.2)
5 Brake Lining (Pos.5)
5 Lockring / Bearing Seal (Pos.7 & Pos.9)
TROUBLESHOOTING
6 Troubleshooting
3
INTRODUCTION
DESCRIPTION
The Rotoblast tool cleans the interior of pipes up to 40’ long and ranging in size from 8” (210 mm)
to 35” (890 mm) I.D. The tool connects to most abrasive blasting machines in place of a standard
nozzle. As the tool passes through the length of the pipe being cleaned, abrasive is ejected by two
special nozzles mounted on a rotating head. Optimal rotating speed is controlled by the braking
system. An adjustable centring carriage supports the tool through the pipe internal. The chart
below shows the recommended centring legs, nozzle sizes and compressor capacities for different
pipe diameters.
Failure to perform proper maintenance, particularly when dust seals are involved, will result
in severe damage to this tool. Read all the instructions carefully.
WARNING
SET-UP AND OPERATION
Equipment and materials required:
The system set-up for the Rotoblast operation is the same as for any other blast cleaning
operation, i.e. an air compressor, an optional moisture separator, a blast machine, a helmet air
supply system.
Consult the chart below to determine the proper carriage size.
Abrasive to be used for optimal operation is between 16 (1.2 mm) to 35 (0.5 mm) mesh size,
except for Aluminum Oxide and Silicon Carbide (sand). These two abrasives shorten the tool’s life
unacceptably.
Centering carriage:
The carriage ts to the Rotoblast as one assembly.
It’s consists of two collars, three two-wheel roller bars and four sets of centring legs
(6 legs p/set).
PIPE I.D. NOZZLE SIZE CENTRING LEGS COMPRESSOR SIZE
8” - 10” / 210 mm-260 mm 6.0mmx45 orices 12 cm 250 cfm / 7 cbm
11”-15” / 260 mm-380 mm 8.0mmx45 orices 19 cm 365 cfm / 10.5 cbm
15”-23” / 380 mm-580 mm 9.5mmx45 orices 29 cm 600 cfm / 17 cbm
23”-35” / 580 mm-890 mm 9.5mmx100 orices 46 cm 600 cfm / 17 cbm

4
INTRODUCTION
SET-UP:
Select the appropriate set of centring legs; mount them to the collars and roller bars as shown in.
Nuts and bolts are provided with the Rotoblast set.
• Mount the centring legs on the roller bar according drawing.
• With the centring legs in place at the right angles to the collars, the wheels should be
perpendicular the centre line of the tool.
• Insert the tool in the collar and x it with the locking screws.
OPERATION:
Before operation, check the rotating head on drag.
There should be some drag, caused by the leather dust seal, to protect the ball bearings.
If the head rotates without drag caused by the tightening of the leather dust seal, tighten the rubber
lined nipple (pos.13) at the rear of the unit and lock it with the locking nut (pos.14) for the rear end
plate (pos.11)
Couple the blast hose to one end of the pipe lance and the Rotoblast to the other end with CFT
couplings (pos.22-23) (or leave the lance out). Pipes to be cleaned can be kept in stacks.
Insert the Rotoblast just inside the pipe with the blast hose running through the pipe.
Now apply air only to the tool and check that no air or dust is escaping from the four pressure
relief holes in the rear end plate (pos.3 & pos.11) If so, the pressure on the leather dust seal is
insufcient or it’s worn. A worn-out dust seal causes severe damage to the tool within several
minutes.
Having checked the Rotoblast nozzle’s add abrasive to the air.
The air/abrasive mixture to the tool should be rich. A mixture too lean causes premature wear on
the rotating head. Pull the Rotoblast towards you very steadily. The cleaning result is determined by
the speed of movement. Before cleaning a pipe, always check for drag.

5
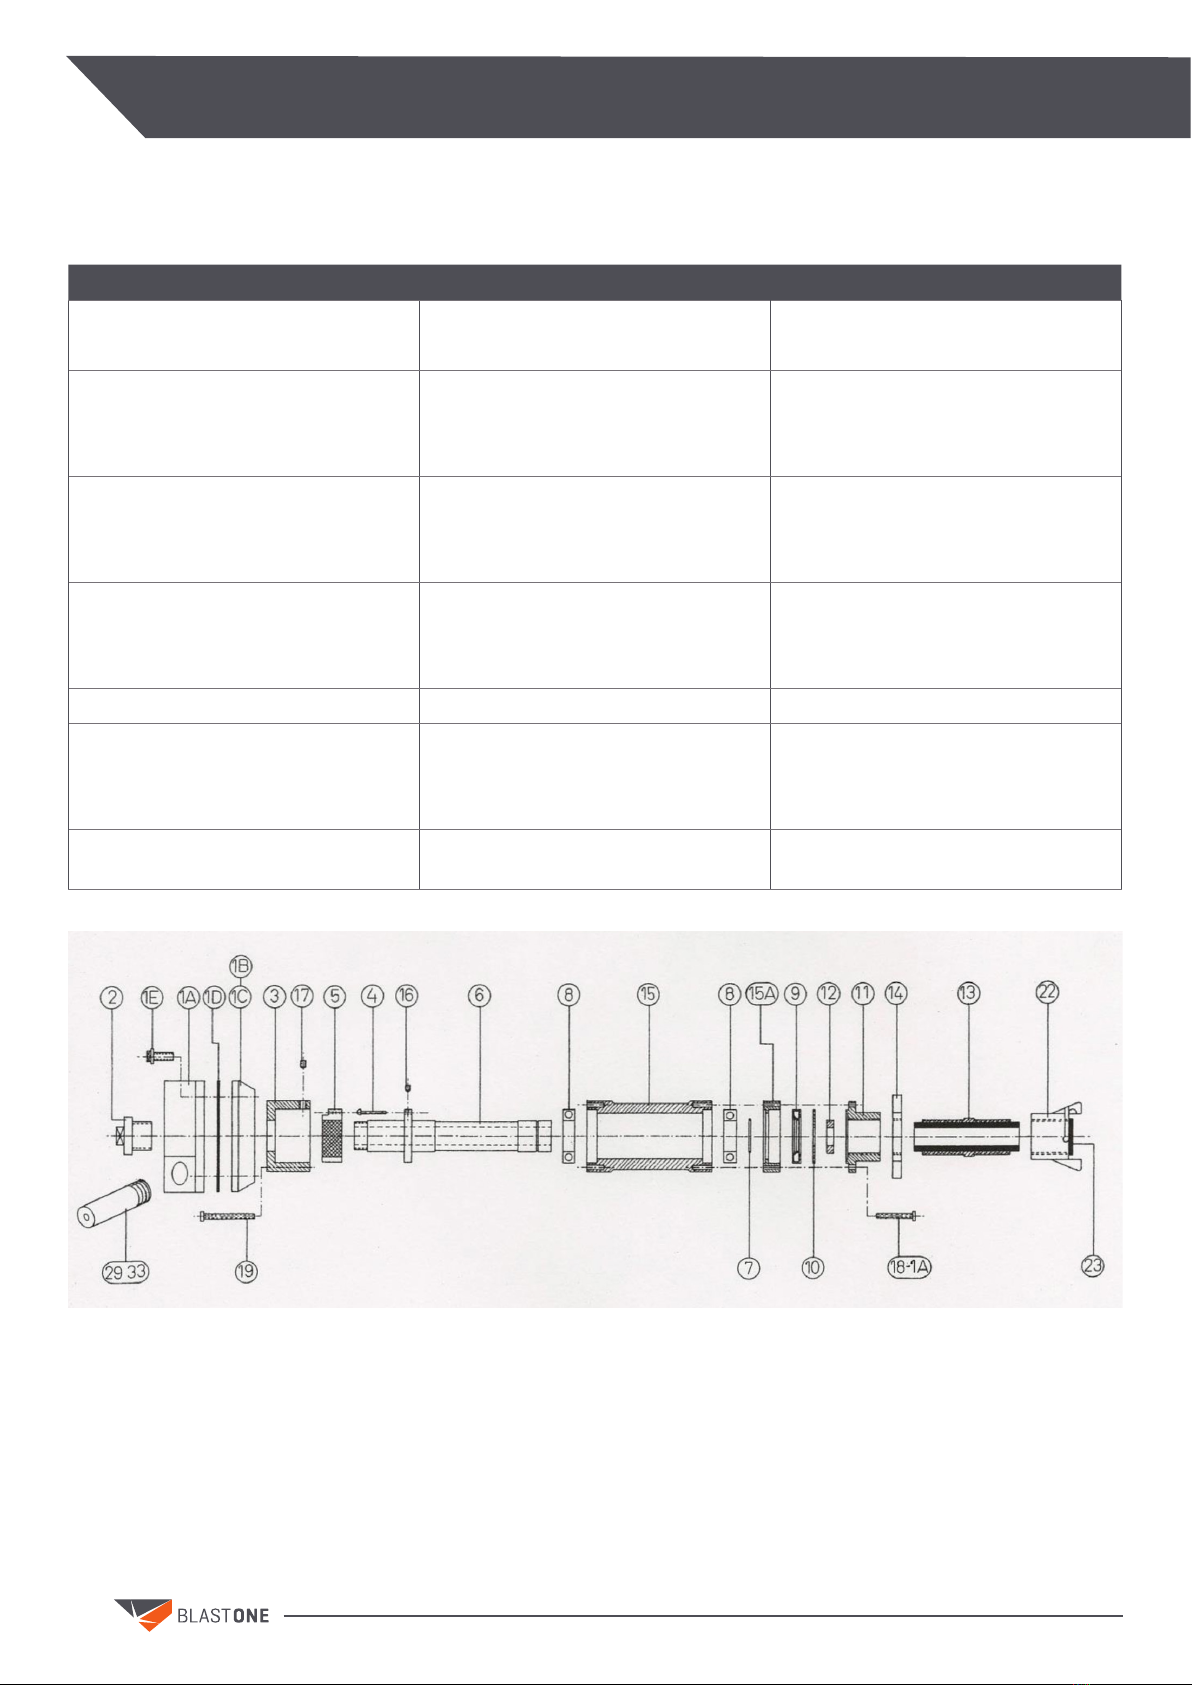
MAINTENANCE
LEATHER DUST SEAL (POS.10)
The seal must be kept under adequate pressure to protect the bearings. It must never be allowed to
wear trough. On a new tool with your choice of abrasive, check the leather dust seal every 3 hours
for wear. Drag should be checked before the cleaning of each new pipe.
To replace the leather dust seal, loosen lock nut (pos.14) and unscrew the rubber lined nipple
(pos.13). Now remove the rear end plate (pos.11).
Be careful with the tungsten Carbide washer (pos.12), do not drop it.
Clean the exposed bearing seal (pos.9) and the grooved end to the tube casting (pos.6).
Lubricate the exposed parts with Vaseline or cup grease and install a new leather seal (pos.10) with
the smooth side towards the bearing seal (pos.9)
Also when you replace the bearing seal (pos.9) position the lip inside the bearing to the end off the
tube (pos.6) on the side off the rera end plate (pos.11). After re-assembly, set the proper drag.
TUNGSTEN CARBIDE WASHER (POS.12)
Replace the washer before the opening gets wider than the one of the tube casting.
NOZZLES (POS.29-33)
Rotate both blast nozzle ¼ turn each day to create even nozzle wear for longer nozzle life.
(Mounting the nozzle you can use Teon tape)
NOZZLE HEAD (POS.1) AND PLUG (POS.2)
Replace the nozzle head plug (pos.2) every 8 hours, unless experienced longer or shorter
life (life is inuenced by operating pressure, type of abrasive and type of nozzle).
Also replace the nozzle head when it’s worn out. When removing or replacing either the nozzle
head or plug, remove the set screw (pos.17) from the brake housing (pos.3) and insert a proper size
screwdriver into the hole to prevent the tube casting from turning.
BRAKE LINING (POS.5)
Inspect this part daily. Replace before it wears so thin that it damages the brake shoe or housing
(pos.3)
LOCKRING / BEARING SEAL (POS.7 & POS.9)
To replace tube casting (pos.6) or bearing (pos.8), the lock ring (pos.7) must be removed from the
tube after the bearing seal (pos.9).
Never re-use the lock ring (pos.7) or bearing seal (pos.9).
6
TROUBLESHOOTING
PROBLEM CAUSE REMEDY
Abrasive or air escaping the holes
in the rear plate.
Leather dust seal is not tight enough.
Leather dust seal is worn out.
Tighten rubber lined nipple (pos.13)
Check leather dust seal (pos.10)
Nozzle head does not rotate or
rotates too slowly.
Insufcient air pressure.
Plugged nozzle.
Excessive pressure on seals.
Check compressor and hoses.
Remove obstruction or nozzle.
Loosen rubber lined nipple (pos.13)
Nozzle head rotates to fast.
Worn out brake (pos.5)
Nozzle are worn out.
Leather dust seal too loose.
Replace brake (pos.5)
Replace Nozzle.
Tighten rubber lined nipple (pos.13).
Vibrating unit.
One nozzle is clogged.
Unbalanced nozzle orices.
Loose centring carriage.
Remove obstruction or nozzle.
Use two identical nozzles.
Tighten all bolts on carriage.
Rotoblast runs hot. Oil residue on brake lining. Clean both brake & housing.
Rotoblast runs too slow and hooks at
point in the cycle.
Damaged leather dust seal.
Damaged brake shoe and / or lining.
Brake housing worn out or damaged.
Change leather dust seal.
Change complete brake shoe (pos.5)
Change brake housing (pos.3)
Rotoblast stopt after minutes of
rotating without abrasive. Damaged bearing under pressure. Change bearings (pos.9 2x)
TROUBLESHOOTING

7
TROUBLESHOOTING
BLASTONE INTERNATIONAL (AUST) PTY LTD
57 Alexandra Place Murarrie
Queensland 4172 Australia
PO Box 3385 Tingalpa DC
Queensland 4172 Australia
Toll Free 1800 190 190
Tel (07) 3329 5000
Fax (07) 3329 5066
Email [email protected]om
www.BlastOne.com
AUSTRALIAN OFFICES
Adelaide |Brisbane |Darwin |Mackay |
Melbourne |Perth | Sydney |Newcastle
BLASTONE INTERNATIONAL
4510 Bridgeway Avenue
Columbus Ohio 43219 USA
Toll Free 800 999 1881
Tel (614) 476 3000
Fax (614) 476 3002
Email [email protected]om
www.BlastOne.com
NORTH AMERICAN OFFICES
Chicago |Columbus |Los Angeles |
Minneapolis
© BlastOne 2022 B3419-1
This manual suits for next models
1
Table of contents

