Blue Aura Blue 1 User manual


INDEX
Safety instructions 3
Front Panel 4
Rear Panel 6
Remote Control 8
Operating Instructions-Connections 10
Operating Instructions-Menu 11
Operating Instructions-Bluetooth Connection 12
Operating Instructions-Preset /RDS 12
Operating Instructions-DAB 13
Specications / Blue Aura Worldwide Guarantee 14
Troubleshooting 15
blue1_man v.01
English

3
This symbol indicates that there are important operating and maintenance instructions in the literature
accompanying this unit.
This symbol indicates that dangerous voltage constituting a risk of electric shock is present within this unit.
Warning: The AC Input connector is used as a safety disconnect device. It must be easily accessible after
installation.
This equipment is a Class II or double insulated electrical appliance. It has been designed in such a way
that it does not require a safety connection to electrical earth.
Correct disposal of this product:
This marking indicates that this product should not be disposed of with other household wastes throughout
the EU. To prevent possible harm to the environment or human health from uncontrolled waste disposal,
recycle it responsibly to promote the sustainable reuse of material resources. To return your used device,
please use the return and collection systems or contact the retailer where the product was purchased. They
can take this product for environmentally safe recycling.
This Hi-Fi system is made of metal and plastic.
Please take care when unpacking the system to avoid
scratching or indenting the material.
Safety Instructions
IMPORTANT – The unit will become
hot when in use. Do not place in an
enclosed area such as a bookcase or in
a cabinet without sufficient ventilation.
Ensure that small objects do not fall through any ventilation grille. If this happens, switch off
immediately, disconnect from the mains supply and contact your dealer for advice.

4
Front Panel
13 05 12
03
04
02
01
10
08
09
07
06
11
5
01. Turn On/Off
By pressing this button, Blue 1 will switch between
standby mode (indicated by the LED indicator in RED)
and on (indicated by the LED indicator in Green)
02. LED Indicator
This LED indicator will show 2 possible status:
a. LED in Green, Blue 1 is turned on and ready to use
b. LED in Red, Blue 1 is in standby mode.
03. Line In
3.5mm stereo input for music player
04. PHONES
3.5mm stereo output for headphones. When plugged-
in, the speaker output will be muted. Turn down the
volume before connecting headphones
05. Display
The following information will be shown on the display
a. Input selected
*CD: CD player
*BT: Bluetooth input
*DAB INPUT: Select DAB/DAB+ Station
*FM INPUT: Select FM Station
*AUX 1/2: Other Analog Audio inputs
*DIGITAL OPT, DIGITAL COAX: Digital inputs
*LINE IN: Front panel 3.5mm stereo inputs
*USB: Playback from USB drive
b. Volume
c. FM Radio station and DAB station
d. CD/USB track name and playback time status
06. Presets
Blue 1 can store up to 40 presets for each of the FM and
DAB bands. All preset bands are available from the front
panel (presets 1-4), or from the remote control. Press
and hold the appropriate button to store the presets.
Press the button to access the stored presets
07. CD Disc Slot
Blue 1 supports Audio CD’s, MP3 les and WMA les played from
CD, CD-R or CD-RW discs. Disc can be inserted into Blue 1 in any
mode (except standby mode.). Insert the CD with label up
08. Stop/Eject
Stop CD playing or eject the CD from Blue 1
09. Play/Pause
Plays and pauses playback tracks
10. IR (infrared sensor)
Plays and pauses playback tracks
11. USB drive socket
Allow Blue 1 to play MP3, WAV, AAC les by using
a USB drive
12. Volume Control Dial
Adjust the playback volume
13. Multi-Functional Dial
Turn left/right and hold: For skipping between tracks
Press and turn, changing different audio sources
6
ON
01 02 03 04 05 06 0807
09
10
11
12
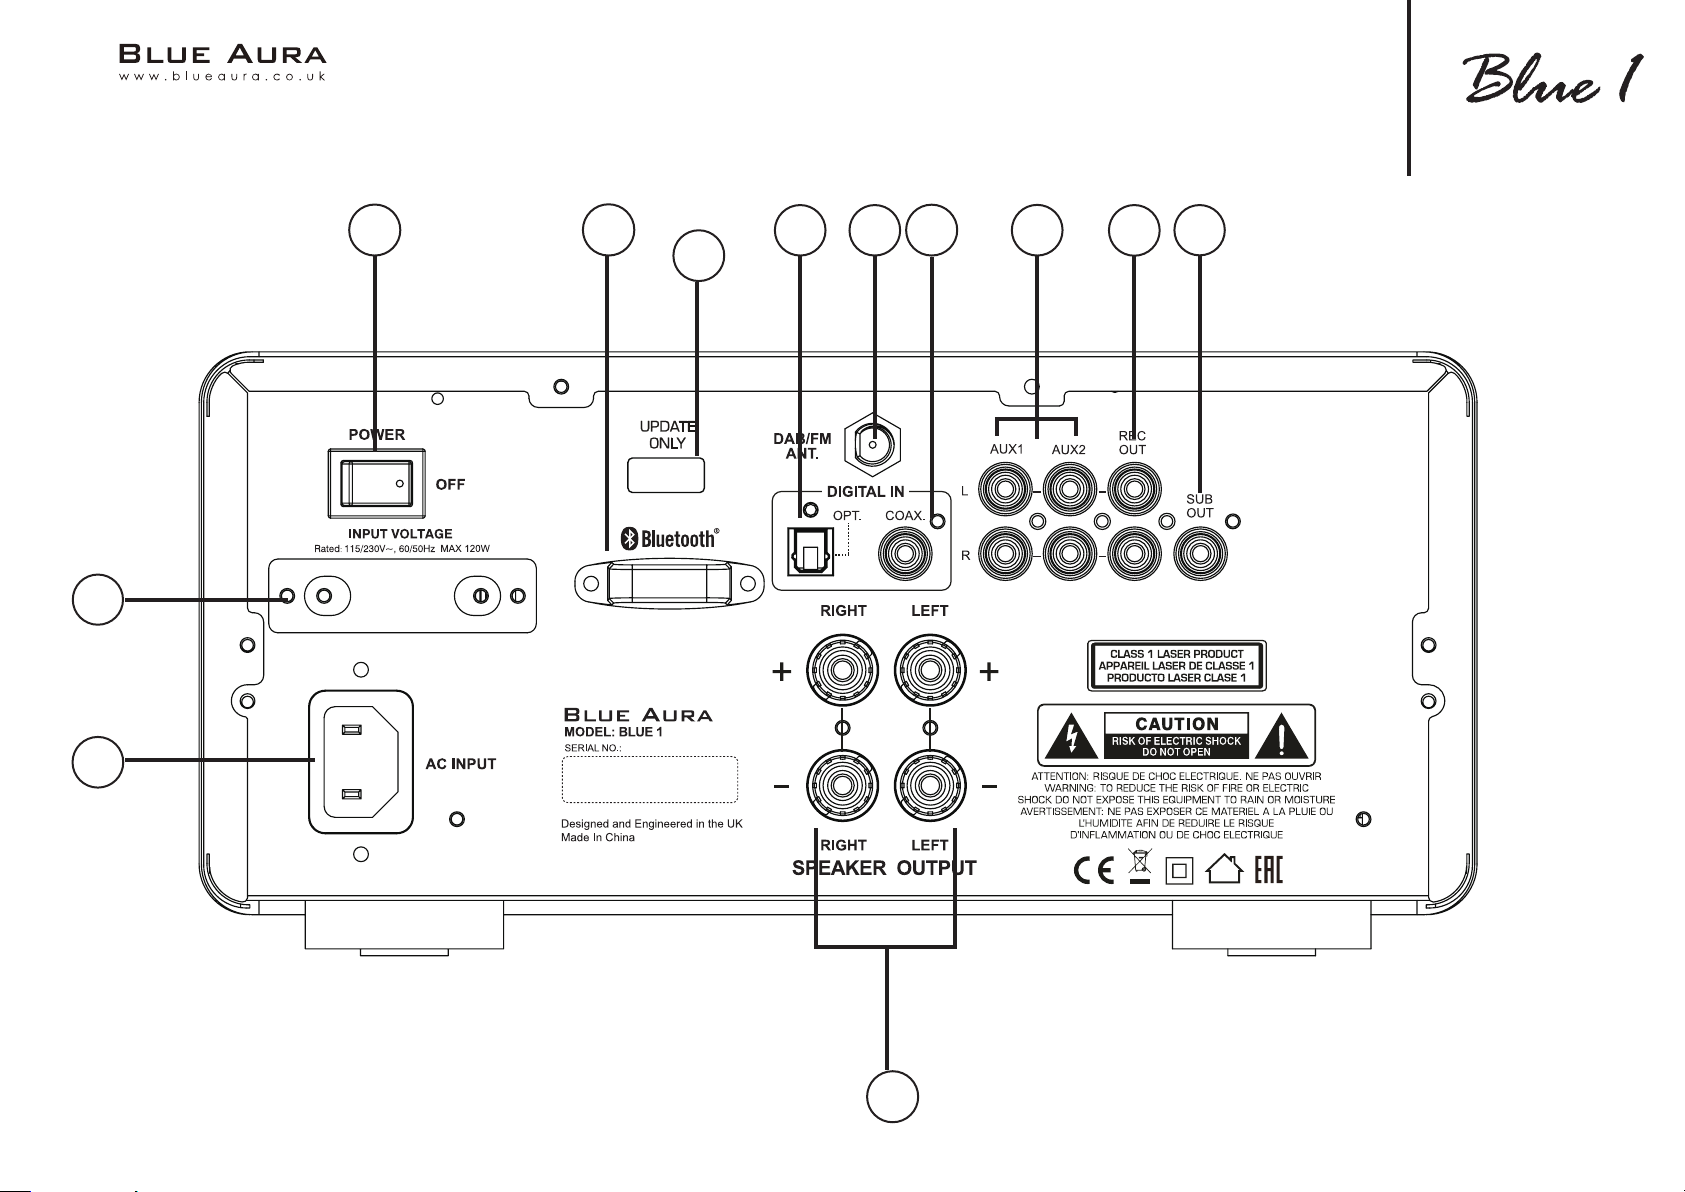
Rear Panel

7
01. Main Switch
Turn on/off Blue1
02. Bluetooth Antenna
For Bluetooth wireless streaming audio from most mobile
devices
03. Digital Input-Toslink Optical
Use a high quality TOSLINK fiber optical inter-connect
cable. This input is suitable for 16-24 bit/96kHz content.
04. DAB/FM Aerial Input
An aerial is supplied in the box. Attach the aerial and
adjust for optimum reception
05. Digital Input-S/P DIF COAXIAL
Use a high-quality digital RCA Phono inter-connect cable.
This input is suitable for 16-24 bit/192kHz content
06. Aux Input
These inputs are suitable for line level source equipment
07. REC Out
This output is suitable for line level input equipment for
audio recording
08. SUB Out
This output is for optional connection to an active
subwoofer
09. Speaker terminals
Connect the speaker wires from your right channel loudspeaker
to the Right + & - terminals and the wires from the left channel
loudspeaker to the Left + & - terminals. Please ensure that all
speaker wires are properly inserted to provide a solid electrical
connection. If the connections are loose, it could affect the sound
quality
10. AC power socket
Plug the AC power cable into an appropriate mains socket once you
have completed all connections to the Blue 1. You now are ready to
enjoy the music
11. Voltage Switch
Change input voltage when needed. To use this switch, you must
turn off Blue 1 and remove the AC power cable. CAUTION! Wrong
input voltage could damage the unit.
12. Update Only
This port is intended exclusively for system updates. (Do
not insert USB drive to this port.)

8
01. STANDBY/ON
By pressing this button, Blue 1 will switch
between standby mode (indicated by the
LED indicator in RED) and ON (indicated by
the LED indicator in Green).
02. Input Selects
By pressing these buttons, Blue 1 will
switch between different inputs
Remote Control
TONE
USB
DAB+ FM AUX1
AUX2 OPT
COAX AUTO
ST/MONO
MENU
DISPLAY
Disconnect
PROGRAM
LOUDNESS
SELECT
01
02
03
04
05
06
08
07
10
16
20
14
13
15
11 17
18
19
09
12
03. MENU
Press to access the main menu, using◄
►▲▼(04) to navigate. Press SELECT (12)
to conrm your setup
05. DISPLAY
CD MODE: Display the CD text or ID3 tag (if
supported by the CD)
Tuner MODE: Display Tuner information
DAB MODE: Display DAB station
information
Bluetooth MODE: Display paired
equipment ID, ID3 track information and
current track title. Pressing this button in
Bluetooth mode will show ID3 information in
following sequence: Title, Performer, Album,
no display
06. TUNING
FM MODE:
Press and hold: Searches for the next station
(Automatic search)
Brief press: Changes the receiving frequency
in 50kHz increments (FM) (Manual search)
DAB MODE:
Press + to select the next station, press – to
select the previous station in the DAB band
07. Numerical Buttons
FM MODE: Direct selection of a preset station
CD MODE: Direct selection of a track
08. MUTE
Switches the sound off, press again to turn on
09. VOLUME
Press + to increase the volume, press – to
decrease the volume
10. TONE/BAL
TREBLE (TONE pressed once):
The treble setting can be adjusted up or
down in 7 steps. Use the ▲and▼ buttons to
adjust the value
LINE IN
9
BASS (TONE pressed twice):
Bass setting can be adjusted up or down in 7 steps. Use
the ▲and▼ buttons to adjust the value
BALANCE:
The stereo balance can be adjusted to the right or left
in 10 steps. Use the ◄◄ and ►► buttons to adjust the
value
11. LOUDNESS
Press for the Loudness function (aurally compensated
volume correction)
12. SELECT
Press to conrm the entry
13. STOP
Press to stop the CD playing
14. CD CONTROL: PROGRAM/RANDOM/REPEAT
PROGRAM
The Stop mode must be activated to program tracks
Programming tracks on a CD in a particular order
RANDOM
Plays the tracks of a CD in random order
15. PLAY/PAUSE
Starts or pauses the playback from a CD/Track
16. SKIP BACKWARDS/SKIP
Press I◄◄ , playback starts at the beginning of the previous track
Press ►►I, Playback starts at the beginning of the next track
17. ST/MONO (in FM MODE only)
Switches between FM-Stereo and FM-Mono for FM stations
In stereo mode, the system will automatically switch to mono
reception when the signal is weak in order to improve signal-to-
noise ratios
Stereo reception is indicated by the “ST” Symbol in the display
18. AUTO (DAB MODE only)
Press to scan the DAB frequency range (band III) for stations.
These can then be accessed via the TUNING buttons
19. EJECT
Stop CD playing and eject the CD
20. Disconnect (Bluetooth)
Stop an existing Bluetooth connection and starts the pairing mode
REPEAT
Track/CD repeat playback (repeat function):
*Press once: The current track is repeated
*Press twice: The entire CD is repeated
*Press again: The repeat function is deactivated
Remote Control

10
Operating Instructions
Before Operation
Place the Blue 1 on an even surface. IMPORTANT: Do not place any objects on top
of the Blue1. The ventilation slots located on top of the device must be unobstructed
at all times.
• Speaker connections
Make sure correct polarity is maintained at each speaker connector or the sound can become
weak. The red coloured speaker terminals are positive (+) and the black speaker terminals are
negative (-).
Note: All connections are made using standard loudspeaker cable. Loosen the terminal screws
one after the other and insert the stripped ends into the holes. Re-tighten the terminal screws.
You can also use prefabricated cables with 4mm banana plugs (If using 4mm plugs, the safety
plugs must be removed from the loudspeaker connection terminals) or forked fittings. Also
observe the operating instructions for the speakers you are using.
Connections
• Connect your audio sources.
• Connect the DAB/FM antenna to the antenna connection point at the rear of the device. For later operation, the position of the
antenna should then be determined according to where the best reception is. The end of antenna should then be secured in the
appropriate position.
Reception can be improved by a suitable indoor or outdoor household antenna if the reception is poor.
• Connect the supplied mains cable to the rear and then insert the other end into a socket.
• Actuate the on/off switch on the rear side, the device is now in the standby mode.
• Switch on the device using the remote control or with the ON/STBY key on the front.
• Select your desired audio source using the input selector switch (press then turn left or right) or with the keys on the remote control.
• Sub out
If an active subwoofer is used, connect via a standard single RCA/phono cable (often referred to
as a 'Sub-Link')
11 E&OE NOV21
Operating Instructions-Menu
The Blue1’s menu
The tone and further parameters may be adjusted via a menu.
• The menu is launched with the MENU key on the remote control
• The menu may be navigated and settings changed with the keys◄◄,►►,▲and▼on the remote control
• The individual menu items may be conrmed with the SELECT key on the remote control
The following settings are possible:
Bass adjustment:
Select BASS in the menu. Bass playback may be ramped either up or down in 7 steps.
Treble adjustment:
Select TREBLE in the menu. The treble setting may be ramped either up or down in 7 steps
Balance adjustment:
Select BALANCE in the menu. The stereo balance may be adjusted either to the right or left in ten steps
Loudness (aurally compensated volume correction):
Select LOUDNESS in the menu. The function may now be activated or deactivated
Auto standby function:
The unit has an auto standby function that automatically switches the device to standby mode around 3 1/2 hours after the last time it was
operated (via the controls on the unit or via the remote control). This function implements an EU energy-saving regulation (1275/2008 EC),
reducing power consumption if the device is accidentally left turned on after use.
Select APO SETTING in the menu. The function can now be activated or deactivated. When leaving the factory, the function is activated
Sleep function:
This function enables you to set a time after which the device will switch off automatically and change to the standby mode. The time can be set
between 5 and 240 minutes by using the ▲and▼ buttons. After exiting the menu, the active Sleep function is permanently indicated by a symbol
at the bottom right of the display.
System information:
Select SYSTEM INFO in the menu. The individual rmware versions of the device can be displayed for servicepurposesbypressingthe◄◄and►
►buttons.
Reset:
The RESET menu item will restore the basic settings (clear all station presets, set all tone controls to 0, disable loudness function and sleep timer,
auto standby on).
12
Bluetooth
Bluetooth
Operating Instructions
Blue1 has a built-in Bluetooth receiver, this allows the Blue 1 to receive wireless Bluetooth audio from most smart phones/tablets and
laptops. Please select Bluetooth input, If a connection has not already been made or connection cannot be re-established, the Blue 1 will
automatically activate the “pairing mode”, BT will ash on the display. Now activate the Bluetooth mode on your source device.
The Blue1 will appear in the list of Bluetooth devices as Blue1. If it is not displayed in the list, set your source device to search for Bluetooth
devices manually and make sure that the Blue1 has been switched to the pairing mode.
Depending on the source device, you may be asked whether the password is to be accepted during the pairing procedure. You can conrm
this by simply pressing accept. If you are still asked for a password, use the default passwords „0000“ or „1234“. When the device has been
paired and connected successfully the „BT“ indicator will illuminate continuously.
Preset memory
The device is equipped with two independent PRESET memories for FM and DAB stations. Each memory can store up to 40 stations.
Storing stations:
Set the desired DAB or FM stations using the TUNING buttons on the unit or via the remote control.
• Select the desired storage location by holding down the corresponding key on the numeric keypad.
• In the case of two-digit storage location numbers (10 – 40), the +10 key rst has to be pressed for a longer time and the desired digits then
entered.
• Successful storage is conrmed on the display with the appearance of STORED PRESET. In the rst line, the storage location number is
played permanently before the station frequency.
Select a station from the list of stations:
Select the desired storage location via the numerical keyboard (by pressing briey).
RDS (RADIO DATA SYSTEM)- function of the tuner(FM only)
RDS is a system which provides information about FM stations that is broadcast together with the station ‘s signal. The Blue1 can present
this information (about the station, broadcast, etc.) in the display.
The RDS information can be retrieved by repeatedly pressing the DISPLAY button (remote control) in the following order:
• PS (Program Service Name): Displays the name of the program.
• RT (Radio Text):Shows station information and messages.
• PTY (Program Type): Displays the type of program.
• Time/Date
If one of these functions is not supported despite reception of an RDS signal, "N/A“ will appear in the display.
13
Bluetooth
DAB FUNCTIONS OF THE TUNERS (DAB ONLY)
The DAB transmission system provides further data and information that can be accessed via the DISPLAY button (remote control) in the
following order:
• Station name
• DLS (Dynamic Label Segment): Shows station information and messages (e.g. title and artist of the current song, news messages, other
information about the current program or station)
• Program type(e.g. news, pop, classical)
• DAB multiplex number and frequency of the current station
• Time / Date
• Bit rate of the current audio signal
• DAB multiplex name

14
Specication
DAB/DAB+
Frequency range: 174.928 – 239.200 MHz
Sensitivity:-95dBm
FM Tuner
Frequency range: 87.5 –108 MHz
Sensitivity:6 dBu(S/N=30dB)
CD Player
Playable formats: MP3,WMA, MPEG 1/2/2.5 Layer 2/3
USB Format
Playable formats: MP3,WMA, MPEG 1/2/2.5 Layer 2/3
Amplier
Power output: Rated power : 50W*2@8R 1%THD 1KHz
Peak power: 60W*2@8R 10%THD 1KHz
Frequency response: CD/AUX/Line :20Hz-20KHz
Signal to noise ratio: CD/AUX/Line :85dB
Input sensitivity/impedance: AUX/Line in :320mV,47K
Electricity consumption: MAX 120W
Digital inputs
S/PDIF co-axial and ToslinkSupported sampling frequencies: 8-192KHz
Supported bit depths: 16-24bit
Bluetooth version 5.0 operating frequency: 2402-2480MHz
Maximum emitted power according to EN 62479: 1.73-2.02dBm
Dimensions (wxhxd):275x120x317 mm
Weight:6.4KG (14.10lb)

15
Troubleshooting
There is no sound
Check that the speakers are connected correctly
Check aerial connections and an available station is selected
Ensure that the volume is set at an audible level
Check that the right source is selected
Check the unit is not in mute
There is no power
Ensure the AC power cord is connected securely
Ensure the plug is fully inserted into the wall socket and is switched on
Check fuse in the mains plug or adaptor
Check the unit is switched on via the back panel
The player will not read the disc
Check the disc is not loaded upside down
Check that the disc is not too scratched or dirty
Check the disc type is suitable
The disc is skipping
Check that the disc is not too scratched or dirty
Ensure the player is on a rm surface and not subject to vibrations
The remote handset will not function
Check the polarity and that the batteries have not expired
Ensure that nothing is blocking the remote sensor
Perform a System Reset (Follow steps on page.11)
The unit does not pick up enough DAB stations
Re-orientate the aerial
Check the aerial has strong signal
Perform a System Reset
Make sure there is DAB signal in the area
There is unwanted background noise and interference
Move the unit away from other electrical equipment that is likely to cause
interference
The player will not read the USB drive
Check the les in the USB drive is supported
Check if the USB drive is readable
The display on the unit is distorted
Perform a System Reset (Follow steps on page.11)

16
Blue Aura Worldwide Guarantee
This entitles you to have the unit repaired free of charge, during the rst year after purchase, at any authorised
Blue Aura distributor provided that it was originally purchased from an authorised Blue Aura dealer or
distributor.
The manufacturer can take no responsibility for defects arising from accident, misuse, abuse, wear
and tear, neglect or through unauthorised adjustment and/or repair; neither can they accept responsibility for
damage or loss occurring during transit to or from the person claiming under the guarantee.
The warranty covers: Parts and labour costs for rst year from the purchase date.
After one years you must pay for both parts and labour costs, the warranty does not cover transportation costs
at any time.
Claims under guarantee:
This equipment should be packed in the original packing and returned to the dealer from whom it was
purchased, or failing this, directly to the Blue Aura distributor in the country of residence. It should be sent
carriage prepaid by a reputable carrier. No responsibility can be accepted for the unit whilst in transit to the
dealer or distributor and customers are therefore advised to insure the unit against loss or damage whilst in
transit.
All Blue Aura products undergo exhaustive tests and inspections both before and during manufacture to
ensure we deliver products of the highest quality. However, for complete peace of mind please register your
product within 30 days to take advantage of our extended 12 month guarantee.
Please register your product on line at https://www.blueaura.co.uk/register
17
Thank you for purchasing our product.
Please visit our website for more information
E&OE NOV21

blue1_man v.01
Table of contents


