Blue Hawk 3275.1 User manual
Questions, problems, missing parts? Before returning to your retailer, call our customer
service department at 1-877-888-8225, 8 a.m. - 6 p.m., EST, Monday - Thursday, 8 a.m. - 5 p.m.,
EST, Friday.
1
ATTACH YOUR RECEIPT HERE
Serial Number ____________ Purchase Date ____________
Lowes.com
ITEM #0067272
12 AMP CIRCULAR SAW
MODEL #3275.1
Español p. 42
Français p. 21

2
Lowes.com
PRODUCT SPECIFICATIONS
COMPONENT SPECIFICATION
Rated Voltage 120 V ~ 60 Hz
Rated Power Input 12 A
No-Load Speed, n05,500 RPM
Saw Blade Size 7-1/4 in.
Cutting Angle 0° – 45°
Depth of Cut at 90° 2-7/16 in.
Depth of Cut at 45° 1-3/4 in.
TABLE OF CONTENTS
Product Specications ...........................................................2
Safety Information ..............................................................3
Package Contents ..............................................................9
Preparation. . . . . . . . . . . . . . . . . . . . . . . . . . . . . . . . . . . . . . . . . . . . . . . . . . . . . . . . . . . . . . . . . . . 10
Glossary of Terms for Woodworking ...............................................11
Assembly Instructions ..........................................................12
Operating Instructions ..........................................................13
Care and Maintenance..........................................................19
Troubleshooting ...............................................................20
Warranty.....................................................................20
3
Lowes.com
SAFETY INFORMATION
Please read and understand this entire manual before attempting to assemble or operate this product.
If you have any questions regarding the product, please call the customer service department at
1-877-888-8225, 8 a.m. - 6 p.m., EST, Monday - Thursday, 8 a.m. - 5 p.m., EST, Friday.
CAUTION: Read and understand all instructions. Failure to follow all instructions listed below
may result in electric shock, re and/or serious personal injury.
SAFETY SYMBOLS
The purpose of safety symbols is to attract your attention to possible dangers. The safety symbols
and the explanations that accompany them deserve your careful attention and understanding. The
safety warnings DO NOT, by themselves, eliminate any danger. They are not substitutes for proper
accident-prevention measures.
DANGER: Someone will be seriously injured or killed if the safety information is not followed.
WARNING: Someone could be seriously injured or killed if the safety information is not
followed.
CAUTION: Someone may be injured if the safety information is not followed.
DAMAGE PREVENTION AND INFORMATION MESSAGES
These inform the user of important information and/or instructions that could lead to equipment or
other property damage if they are not followed. Each message is preceded by the word “NOTE,” as in
the example below:
Note: Equipment and/or property damage may result if these instructions are not followed.
KNOW THE TOOL
To operate this tool, carefully read this manual and all labels afxed to the circular saw before using it.
Keep this manual available for future reference.
Some of the following symbols may be used on this tool. Please study them and their meaning.
Proper interpretation of these symbols will allow you to operate the tool better and more safely.
SYMBOL DEFINITION SYMBOL DEFINITION
V Volts Direct Current
A Amps n0No-load Speed
Hz Hertz Class II Construction
W Watts /min. Revolutions or Strokes per Minute
A danger, warning, or caution.
It means ‘Attention! Your safety is
involved.’
Alternating Current
Important: This tool should only be serviced by a qualied service technician.
4
Lowes.com
SAFETY INFORMATION
WORK AREA SAFETY
• Keep your work area clean and well-lit. Cluttered benches and dark areas invite accidents.
• Do not operate power tools in explosive environments, such as in the presence of ammable
liquids, gases, or dust. Power tools create sparks that may ignite the dust or fumes.
• Keep bystanders, children, and visitors away while operating a power tool. Distractions can cause
you to lose control.
• Make the workshop childproof with padlocks, master switches, or by removing starter keys.
• Use the right tool. Do not force a tool or attachment to do a job for which it was not designed.
ELECTRICAL SAFETY
• Double-insulated tools are equipped with a polarized plug (one blade is wider than the other). This
plug will t in a polarized outlet only one way. If the plug does not t in the outlet, reverse the plug.
If it still does not t, contact a qualied electrician to install a polarized outlet. Do not change the
plug in any way. Double insulation eliminates the need for a three-wire, grounded power cord and
grounded power-supply system.
• Avoid contact with grounded surfaces, such as pipes, radiators, ranges, and refrigerators. There is
an increased risk of electric shock if your body is grounded while using the tool.
• Do not expose power tools to rain or wet conditions. A wet power tool will increase the risk of
electric shock.
• Do not abuse the cord. Never use the cord to carry the tool or to pull the plug from an outlet. Keep
the cord away from heat, oil, sharp edges, or moving parts.
• Replace damaged cords immediately. Damaged cords increase the risk of electric shock.
• When operating a power tool outside, use an outdoor extension cord marked “W-A” or “W”. These
cords are rated for outdoor use and reduce the risk of electric shock. The following table shows
the correct size to use, depending on the cord length and nameplate amperage rating of the tool.
When in doubt, use the next heavier gauge. Always use UL and CSA listed extension cords:
RECOMMENDED SIZES OF EXTENSION CORDS
AMPERE RATING VOLTS TOTAL LENGTH OF CORD IN FEET
120 V~ 25 ft. 50 ft. 100 ft. 150 ft.
A. W. G.
0~6 18 16 16 14
6~10 18 16 14 12
10~12 16 16 14 12
12~16 14 12 not recommended
PERSONAL SAFETY
WARNING: The operation of any power tool can result in foreign objects being thrown into
your eyes, which can result in severe eye damage. Before beginning power-tool operation, always
wear safety goggles or safety glasses with side shields and a full-face shield, when needed. It is
recommended to use a wide vision safety mask over eyeglasses or standard safety glasses with
shields. Always use eye protection, which is marked to comply with ANSI Z87.1.

5
Lowes.com
SAFETY INFORMATION
• Stay alert, watch what you are doing, and use common sense when operating a power tool. Do
not use the tool while tired or under the inuence of drugs, alcohol, or medication. A moment of
inattention while operating power tools may result in serious personal injury.
• Dress properly. Do not wear loose clothing or jewelry. Keep your hair, clothing, and gloves away
from moving parts. Loose clothes, jewelry, or long hair can be caught in moving parts.
• Avoid accidental startups. Ensure that the switch is off before plugging the tool in. Carrying tools
with your nger on the switch or plugging in tools that have the switch on invites accidents.
• Remove adjusting keys or wrenches before turning the tool on. A wrench or a key that is left
attached to a rotating part of the tool may result in personal injury.
• Do not overreach. Keep proper footing and balance at all times. Proper footing and balance
enables better control of the tool in unexpected situations.
• Use safety equipment. A dust mask, non-skid safety shoes, a hard hat, or hearing protection must
be used for appropriate conditions.
• Before connecting the tool to a power source (receptacle, outlet, etc.), ensure that the voltage
supplied is the same as that specied on the nameplate of the tool. A power source with voltage
greater than that specied for the tool can result in serious injury to the user as well as damage to
the tool.
POWER TOOL USE AND CARE
• Use clamps or another practical means to secure and support the workpiece to a stable platform.
Holding the workpiece by hand or against your body is unstable and may lead to loss of control.
• Do not force the tool. Use the correct tool for your application. The correct tool will do the job better
and more safely at the rate for which it is designed.
• Do not use the tool if the switch does not turn it on or off. Any tool that cannot be controlled with the
switch is dangerous and must be repaired.
• Disconnect the plug from the power source before making any adjustments, changing accessories,
or storing the tool. Such preventive safety measures reduce the risk of starting the tool accidentally.
• Store idle tools out of reach of children and other untrained persons. Tools are dangerous in the
hands of untrained users.
• Maintain tools with care. Keep cutting tools sharp and clean. Properly maintained tools with sharp
cutting edges are less likely to bind and are easier to control.
• Check for misalignment or binding of moving parts, breakage of parts, and any other condition that
may affect the tool’s operation. If damaged, have the tool serviced before using. Many accidents
are caused by poorly maintained tools.
• Use only accessories that are recommended by the manufacturer for your model. Accessories that
may be suitable for one tool may become hazardous when used on another tool.
• Do not alter or misuse the tool. This tool is precision built. Any alteration or modication not
specied is misuse and may result in a dangerous condition.
SERVICE
• Tool service must be performed only by qualied repair personnel. Service or maintenance
performed by unqualied personnel could result in a risk of injury and/or property damage.
• When servicing a tool, use only identical replacement parts. Follow instructions in the maintenance
section of this manual. Use of unauthorized parts or failure to follow maintenance instructions may
create a risk of electric shock or injury.

6
Lowes.com
SAFETY INFORMATION
SPECIFIC SAFETY RULES FOR CIRCULAR SAWS
• Do not use the circular saw near fumes or combustible liquids.
• Never slow the blade down with your hands, or by applying pressure to the side of the blade.
• Never apply force! Move the circular saw forward gently and steadily.
• Use of accessories that are not recommended for use with this tool may create hazardous
conditions.
DANGER: Keep hands away from the cutting area and blade. Keep your second hand on the
auxiliary handle or motor housing. If both hands are holding the saw, they cannot be cut by the blade.
• Keep your body positioned to either side of the saw blade, but not in line with the saw blade.
Kickback could cause the saw to jump backward.
• Do not reach underneath the workpiece. The guard cannot protect you from the blade below the
work surface.
• Check the lower guard for proper closing before each use. Do not operate the saw if the lower
guard does not move freely and close instantly. Never clamp or tie the lower guard into the open
position. If the saw is accidentally dropped, the lower guard may be bent. Raise the lower guard
with the retracting handle and make sure it moves freely and does not touch the blade or any other
part, in all angles and depths of cut.
• Check the operation and condition of the lower guard spring. If the guard and the spring are not
operating properly, they must be serviced before use. The lower guard may operate sluggishly due
to damaged parts, gummy deposits, or a buildup of debris.
• The lower guard should be retracted manually only for special cuts, such as “Pocket Cuts” and
“Compound Cuts.” For these specialized cuts, raise the lower guard with the retracting handle. As
soon as the blade enters the material, the lower guard must be released. For all other sawing, the
lower guard should operate automatically.
• Always observe that the lower guard is covering the blade before placing the saw down on the
bench or oor. An unprotected, coasting blade will cause the saw to walk backward, cutting
whatever is in its path. Be aware of the time it takes for the blade to stop after the switch is
released.
• NEVER hold the piece being cut in your hands or across your body. It is important to support the
work properly to minimize body exposure, blade binding, or loss of control.
• Hold the tool by the insulated gripping surfaces when performing an operation where the cutting
tool may contact hidden wiring or its own cord. Contact with a “live” wire will also make exposed
metal parts of the tool “live” and shock the operator.
• When ripping, always use a rip fence or straight edge guide. This improves the accuracy of the cut
and reduces the chance of blade binding.
• Always use blades with the correct size and shape (diamond vs. round) holes. Blades that do not
match the mounting hardware of the saw will cause a loss of control.
• Never use damaged or incorrect blade washers or bolts. The blade washers and bolts were
specially designed for the saw, for optimum performance and safety of operation.
WARNING: Use of this tool can generate dust-containing chemicals known to the state of
California to cause cancer, birth defects, or other reproductive harm. Some examples of these
chemicals are:
• Lead from lead-based paints.

7
Lowes.com
SAFETY INFORMATION
• Crystalline silica from bricks, cement, and other masonry products.
• Arsenic and chromium from chemically treated lumber.
Your risk from these exposures varies, depending upon how often you do this type of work. To reduce
your exposure to these chemicals:
• Work in a well-ventilated area.
• Work with approved safety equipment, such as dust masks that are specially designed to lter out
microscopic particles.
• Avoid prolonged contact with dust from power sanding, sawing, grinding, drilling, and other
construction activities. Wear protective clothing and wash exposed areas with soap and water.
• Allowing dust to get into your mouth or eyes or to lie on the skin may promote the absorption of
harmful chemicals.
KICKBACK
Kickback is a sudden reaction to a pinched, bound, or misaligned saw blade, causing an uncontrolled
saw to lift up and out of the workpiece toward the operator.
When the blade is pinched or bound tightly by the kerf closing down, the blade stalls and the motor
reaction drives the unit rapidly back toward the operator.
If the blade becomes twisted or misaligned in the cut, the teeth at the back edge of the blade can dig
into the top surface of the wood, causing the blade to climb out of the kerf and jump back toward the
operator.
Kickback is the result of tool misuse and/or incorrect operating procedures or conditions and can be
avoided by taking the proper precautions as given below:
DANGER: Release the switch immediately if the blade binds or the saw stalls. Kickback could
cause loss of control of the saw. Loss of control can lead to serious personal injury.
To guard against kickback, avoid dangerous practices such as the following:
• Setting the blade depth incorrectly.
• Sawing into knots or nails in the workpiece.
• Twisting the blade while making a cut.
• Making a cut with a dull, gummed up, or improperly set blade.
• Supporting the workpiece incorrectly.
• Forcing a cut.
• Cutting warped or wet lumber.
• Operating the tool incorrectly or misusing the tool.
To reduce the chance of kickback, follow these safety practices:
• When the blade is binding, or when interrupting a cut for any reason, release the trigger and
hold the saw motionless in the material until the blade comes to a complete stop. Never attempt
to remove the saw from the workpiece or pull the saw backward while the blade is in motion or
kickback may occur. Investigate and take corrective actions to eliminate the cause of blade binding.
• When restarting a saw in the workpiece, center the saw blade in the kerf and check that saw teeth
are not engaged into the material. If the saw blade is binding, it may walk up or kickback from the
workpiece as the saw is restarted.

8
Lowes.com
SAFETY INFORMATION
• Blade depth and angle-locking knob levers must be tight and secure before making a cut. If the
blade adjustment shifts while cutting, it may cause blade binding and kickback.
• Use extra caution when making a “Pocket Cut” into existing walls or other blind areas. The
protruding blade may cut objects that can cause kickback.
• Keep the blade at the correct depth setting. The depth setting should not extend more than 1/4 in.
(6.5 mm) below the material that is being cut.
• Inspect the workpiece for knots or nails before cutting.
• Make straight cuts. Always use a straight edge guide when rip cutting. This helps prevent the blade
from twisting.
• Use clean, sharp, and properly set blades.
• Support the workpiece properly before beginning a cut.
• Use steady, even pressure when making a cut.
• Do not cut warped or wet lumber.
• Hold the saw rmly with both hands and maintain a balanced position in order to resist the force if
kickback should occur.
WARNING: When using the saw, always stay alert and exercise control. Do not remove the
saw from the workpiece while the blade is moving.
SAW BLADES
• The best saw blades will not cut efciently if they are not kept clean, sharp, and properly set. Using
a dull blade will place a heavy load on the saw and increase the danger of kickback. Keep extra
blades on hand so sharp blades are always available.
• Gum and resin on blades will slow the saw down. Remove the saw blade from the saw and use
gum and resin remover, hot water, or kerosene to remove these accumulations. DO NOT USE
GASOLINE.
9
Lowes.com
PACKAGE CONTENTS
R
B
P
Q
M
G
N
O
K
E
J
L
H
S
I
D
F
A
C
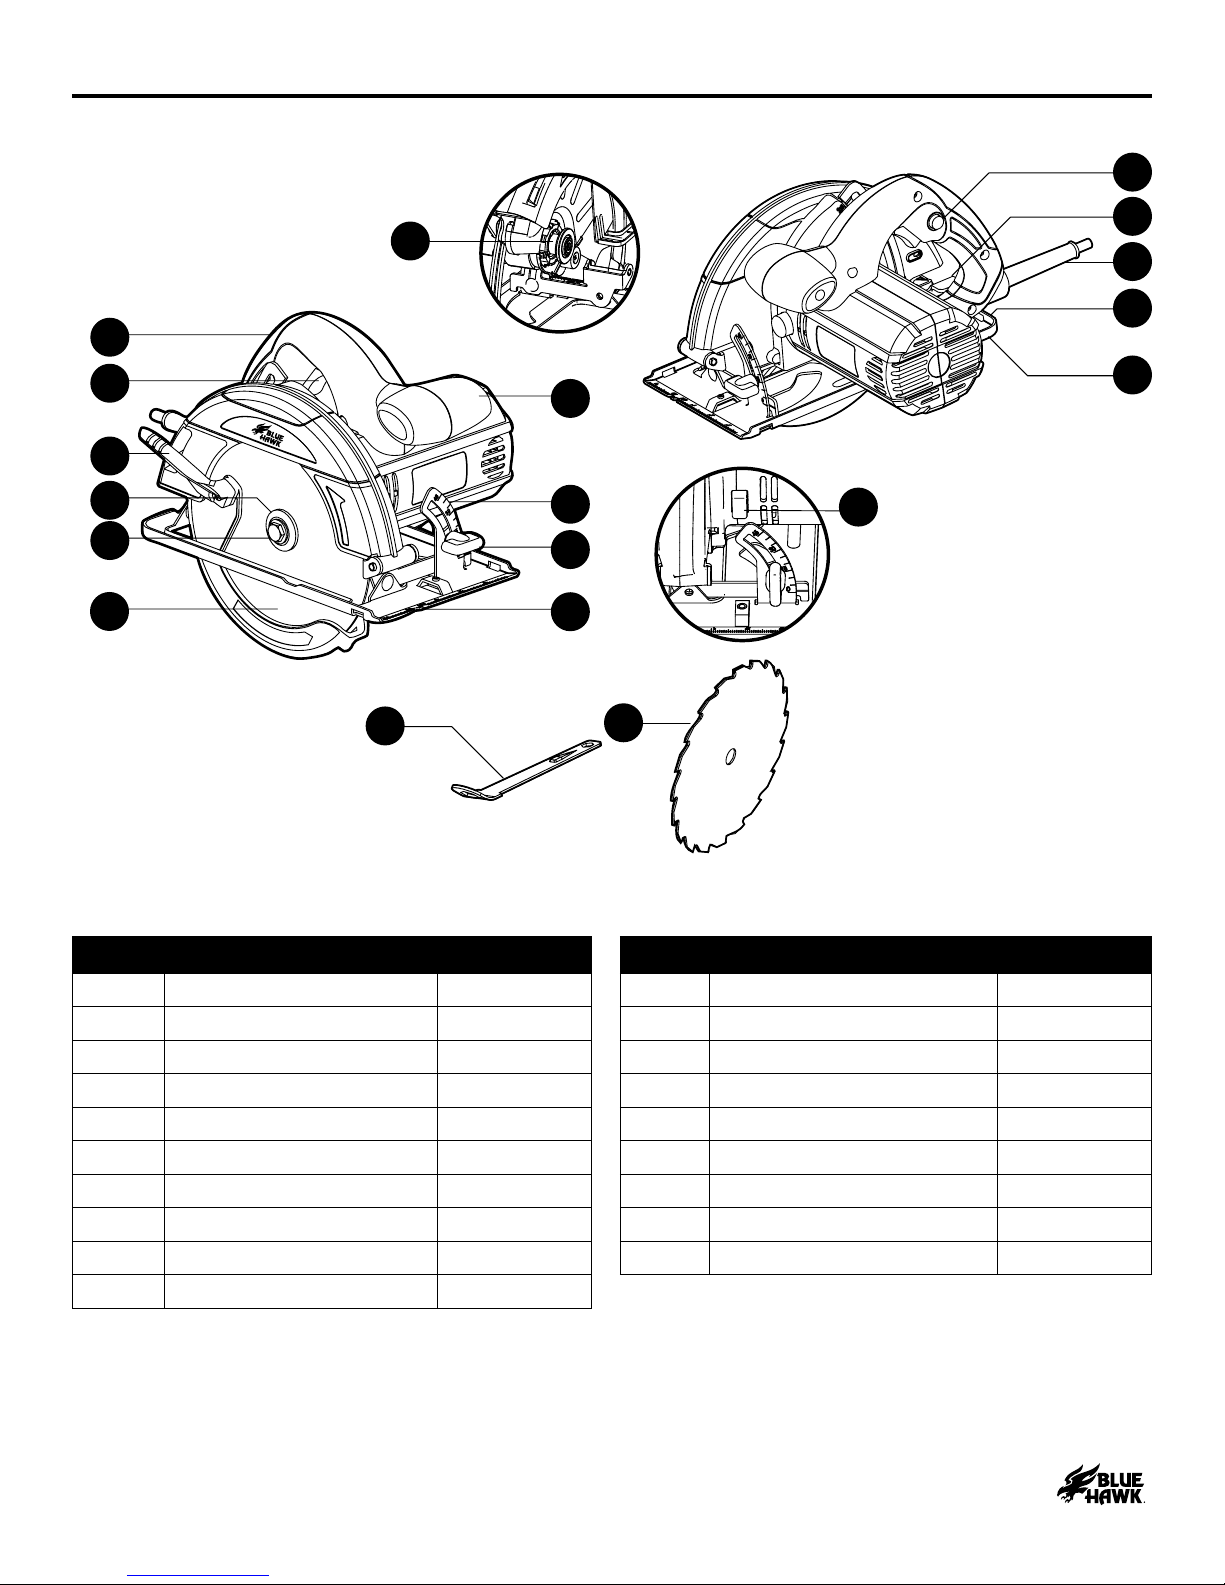
PART DESCRIPTION QUANTITY PART DESCRIPTION QUANTITY
A Trigger Switch 1 K Base Plate 1
B Spindle-lock Button 1 L Outer Flange (D-Washer) 1
C Main Handle 1 M Cord Guard 1
D Front Handle 1 N Lock-off Button 1
E Lower Blade Guard 1 O Blade Wrench Storage 1
F Blade Guard Lever 1 P Blade 1
G Depth-locking Lever 1 Q Wrench 1
H Angle-locking Knob 1 R Spindle 1
I 0° – 45° Bevel Gauge 1 S Kerf Indicator 1
J Hexagon Blade Screw 1

10
Lowes.com
PREPARATION
Before attempting to use any tool, be sure to become familiar with all of the operating features and
safety instructions.
WARNING: DO NOT allow familiarity with the saw to cause carelessness. Remember that one
careless moment is enough to cause severe injury.
APPLICATIONS
This saw can be used for the purpose listed below:
• Cutting all types of wood and wood products.
Note: The use of abrasive cut-off wheels is not recommended with this saw.

11
Lowes.com
GLOSSARY OF TERMS FOR WOODWORKING
TERM DEFINITION
Bevel Cut A cutting operation made with the blade at any angle other than 90° to the
miter table.
Chamfer Cut A cut removing a wedge from a block of wood so that the end (or part of the
end) is angled at other than 90°.
Compound-Miter Cut A cut made using a miter angle and a bevel angle at the same time.
Cross Cut A cutting or shaping operation made against the grain of the workpiece.
Dado Cut A non-through cut that produces a square-sided notch or trough in the
workpiece (requires a special blade).
Freehand Cut Performing a cut without using a fence, miter gauge, xture, work clamp, or
other proper device to keep the workpiece from twisting or moving during the
cut. Freehand cuts are dangerous and should be avoided.
Gum A sticky, sap-based residue from wood products.
Kerf The material removed by the blade in a through cut or the slot produced by
the blade in a non-through or partial cut.
Kickback A hazard that can occur when the blade binds or stalls, throwing the
workpiece back toward the operator.
Leading Edge The end of the workpiece pushed into the tool rst.
Miter Cut A cutting operation made with the blade at any angle other than 90° to the
fence.
Non-Through Cuts Any cutting operation where the blade does not extend completely through
the thickness of the workpiece, like a dado cut.
Resin A sticky, sap-based substance that has hardened.
Revolutions Per
Minute (RPM)
The number of turns completed by a spinning object in one minute.
Ripping or Rip Cut A cutting operation along the length of the workpiece.
Saw-Blade Path The area over, under, behind, or in front of the blade, as it applies to the
workpiece. The area that will be or has been cut by the blade.
Set The distance that the saw blade tooth is bent (or set) outward from the face of
the blade.
Spindle The shaft on which a blade or cutting tool is mounted. Also called the arbor.
Through Sawing Any cutting operation where the blade extends completely through the
thickness of the workpiece.
Workpiece or
Material
The item on which the cutting operation is being done. The surfaces of a
workpiece are commonly referred to as faces, ends, and edges.
12
Lowes.com
ASSEMBLY INSTRUCTIONS
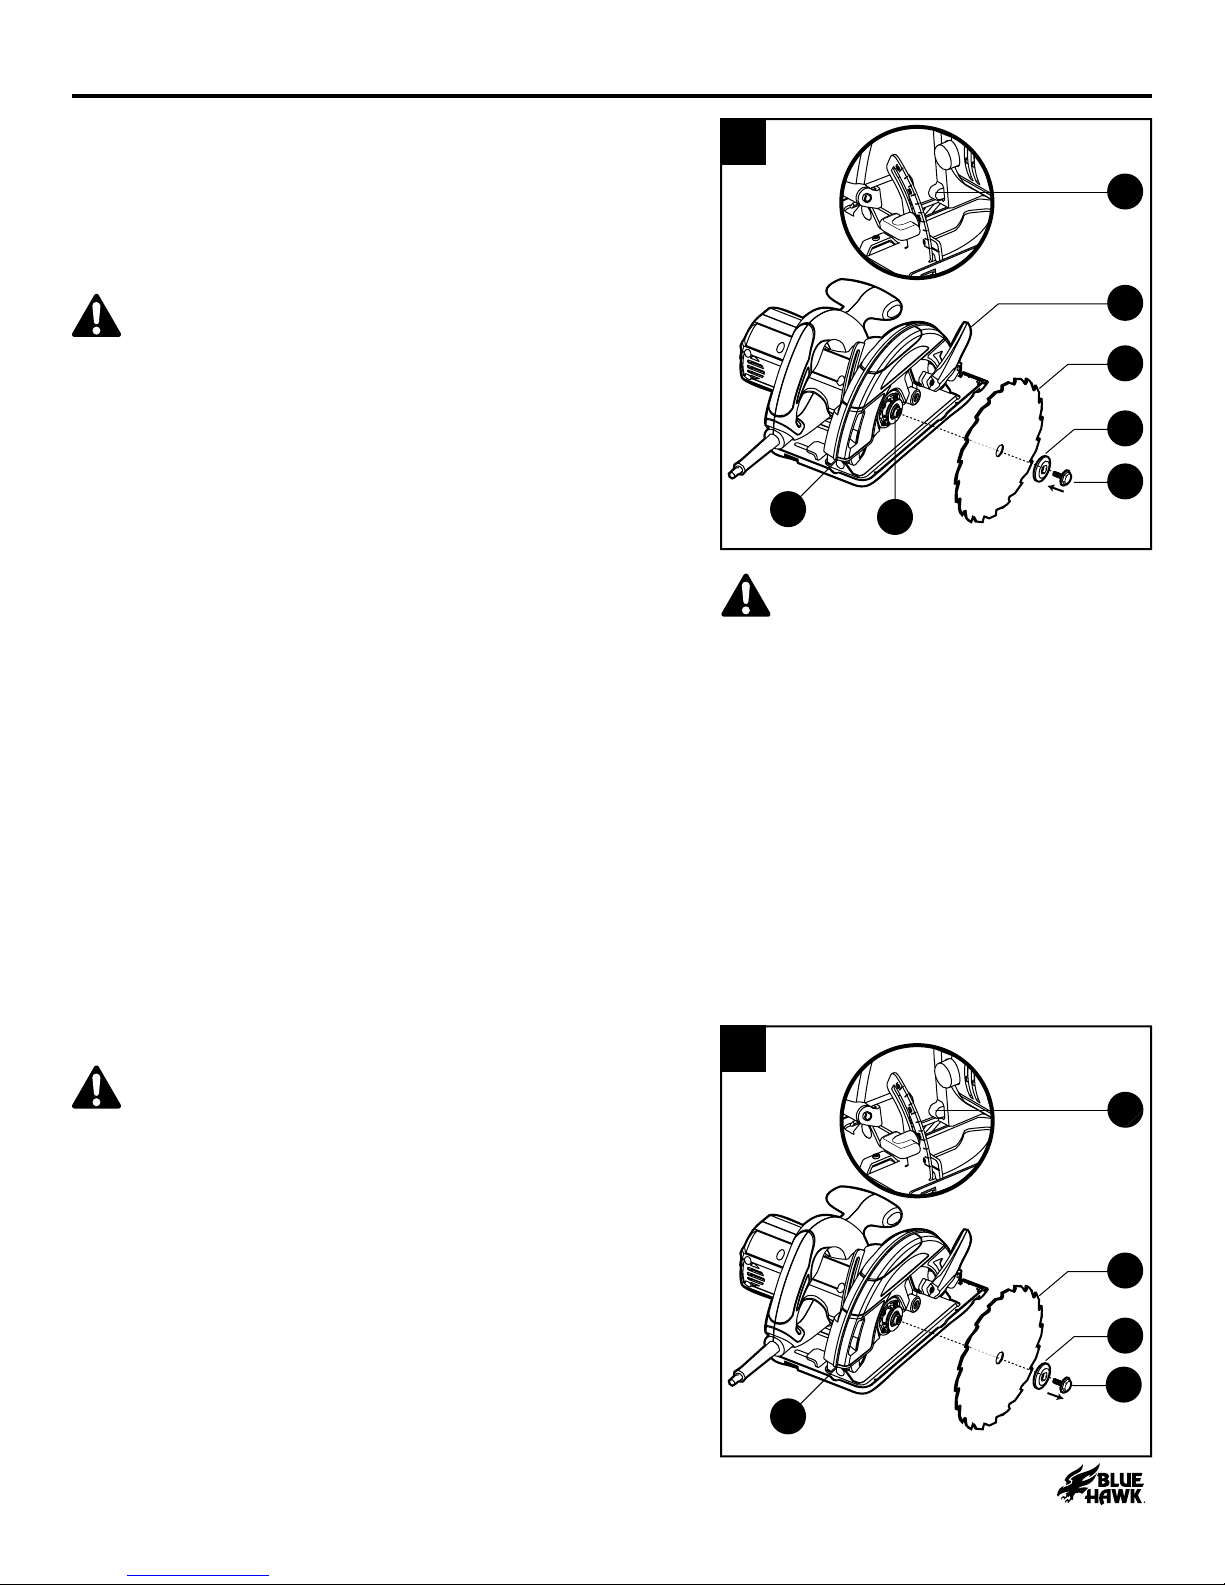
1. Installing a Saw Blade
a. Unplug the saw.
b. Press and hold the spindle-lock button (B)
and remove the blade screw (J) by turning it
counterclockwise with the wrench (Q).
c. Remove the outer ange (D-Washer) (L).
WARNING: If the inner ange bushing has been
removed, replace it before placing the blade on the
spindle. Failure to do so will prevent the blade from
tightening properly, and could result in serious personal
injury.
d. Use the blade guard lever (F) to retract the lower
blade guard (E) into the upper blade guard. Make
sure that the lower guard works properly and
allows the guard to move freely.
e. Verify that the blade teeth and the arrow on the
blade (P) and the arrow on the lower blade guard
(E) are pointing in the same direction.
Note: The blade teeth should point upward at the front of
the saw.
f. Fit the blade (P) inside the lower blade guard (E)
and onto the spindle (R).
g. Replace the outer ange (D-Washer) (L).
h. Press and hold the spindle-lock button (B) and
replace the blade screw (J). Then tighten the
blade screw (J) securely by turning it clockwise
with the wrench (Q).
Note: Never use a blade that is too thick to allow the
outer ange (D-Washer) (L) to engage with the at
section of the spindle.
1
ER
J
L
P
F
B
WARNING: To prevent personal
injury, always disconnect the plug from
the power source before installing or
removing the saw blade.
2. Removing a Saw Blade
WARNING: To prevent personal injury, always
disconnect the plug from the power source before
installing or removing the saw blade.
a. Unplug the saw.
b. Press and hold the spindle-lock button (B)
and remove the blade screw (J) by turning it
counterclockwise with the wrench (Q).
c. Remove the outer ange (D-Washer) (L).
d. Lift the lower blade guard (E) and remove the
blade (P).
2
E
J
L
P
B
13
Lowes.com
OPERATING INSTRUCTIONS
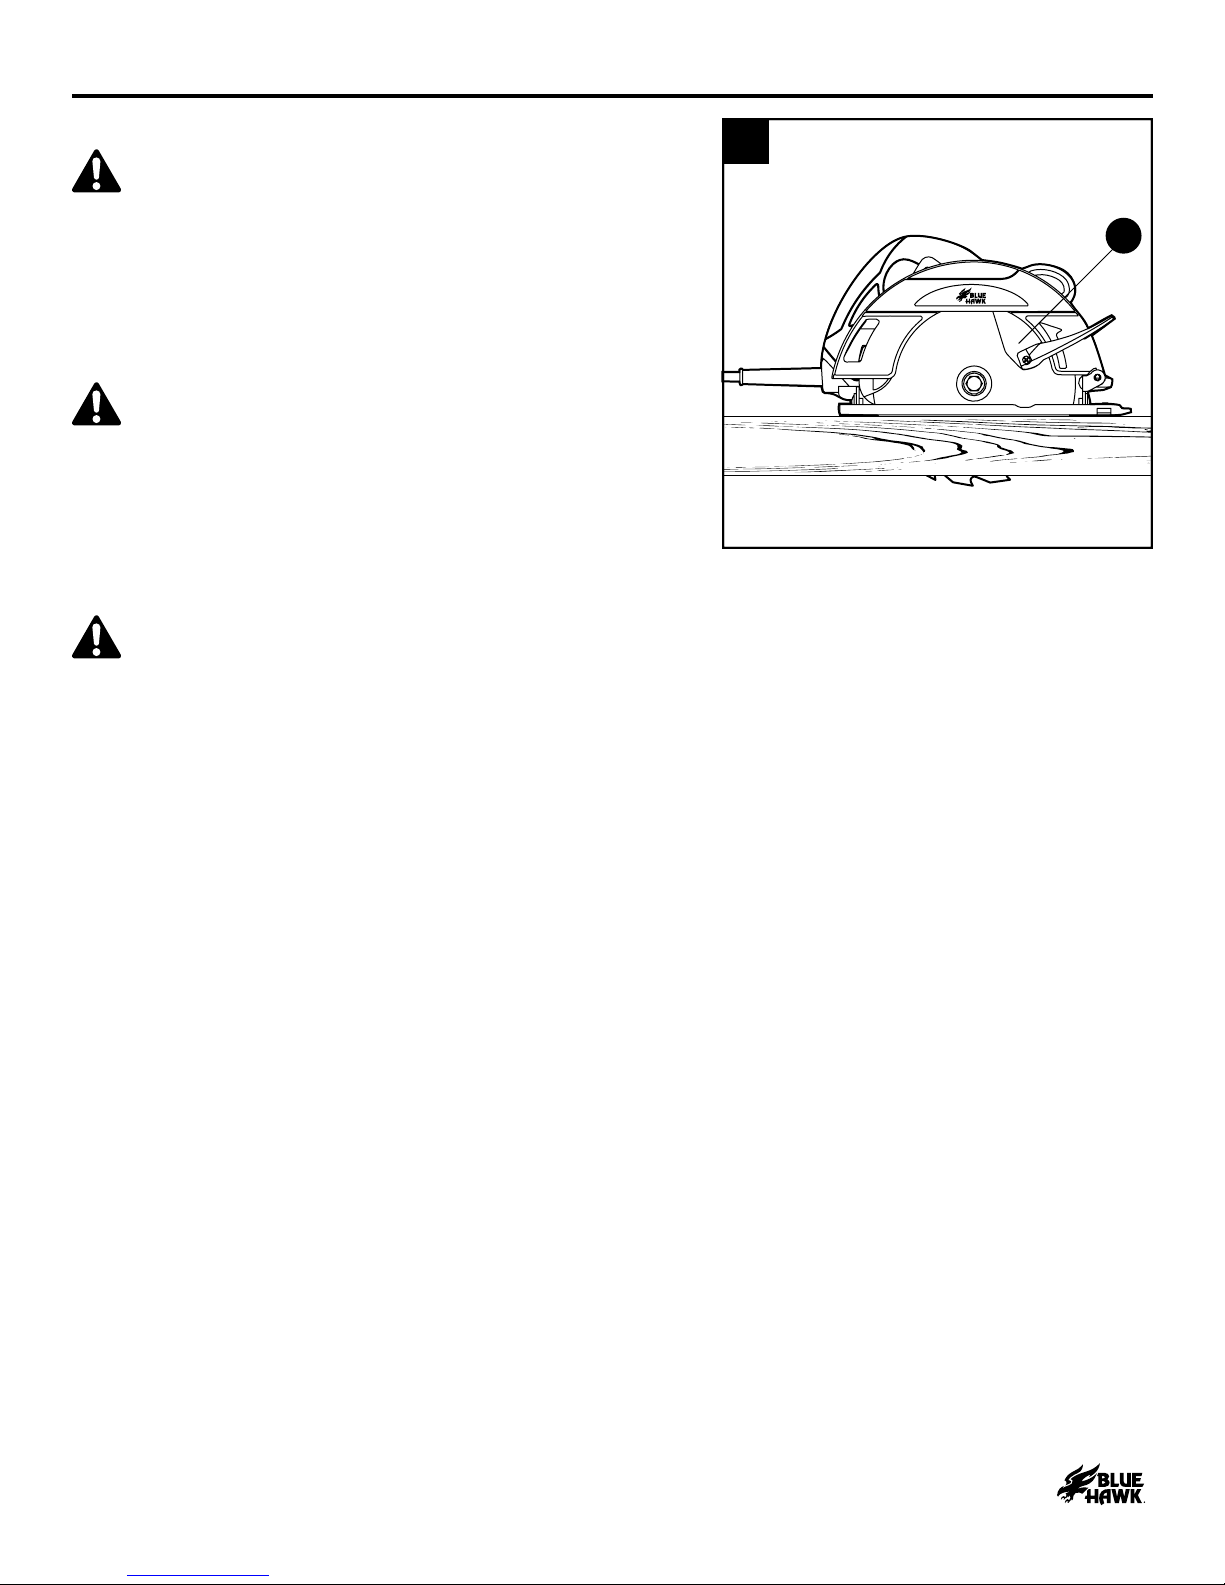
1. Blade Guard System
DANGER: When sawing through a workpiece,
the lower blade guard does not cover the blade on the
underside of the workpiece. Since the blade is exposed
on the underside of the workpiece, ALWAYS keep hands
and ngers away from the cutting area. Serious injury will
result if any part of the body comes into contact with the
moving blade.
WARNING: The lower blade guard on the circular
saw is there for the operator’s protection and safety. Do
not alter it for any reason. If it becomes damaged or if the
blade begins to run slowly or sluggishly, DO NOT operate
the saw until the damaged part has been repaired
or replaced. ALWAYS leave the guard in its correct
operating position when using the saw.
WARNING: To avoid possible serious injury, never
use the saw when the guard is not operating correctly.
Check the guard for correct operation before each use.
The guard is operating correctly when it moves freely
and instantly returns to the closed position. If the saw is
dropped, check the lower blade guard and bumper for
damage at all depth settings before using it.
a. Ensure that the lower blade guard (E) is in the
up position when making a cut. If the lower blade
guard (E) does not snap closed at any time,
unplug the saw from the power supply.
b. Exercise the lower guard (E) by moving it rapidly
back and forth from the full open position to
the closed position several times. This will
usually restore the guard to its normal operating
condition. If this does not correct a slow or
sluggishly closing lower guard (E), do not use the
saw. Take it to an authorized service technician
for repair.
E
1
14
Lowes.com
OPERATING INSTRUCTIONS
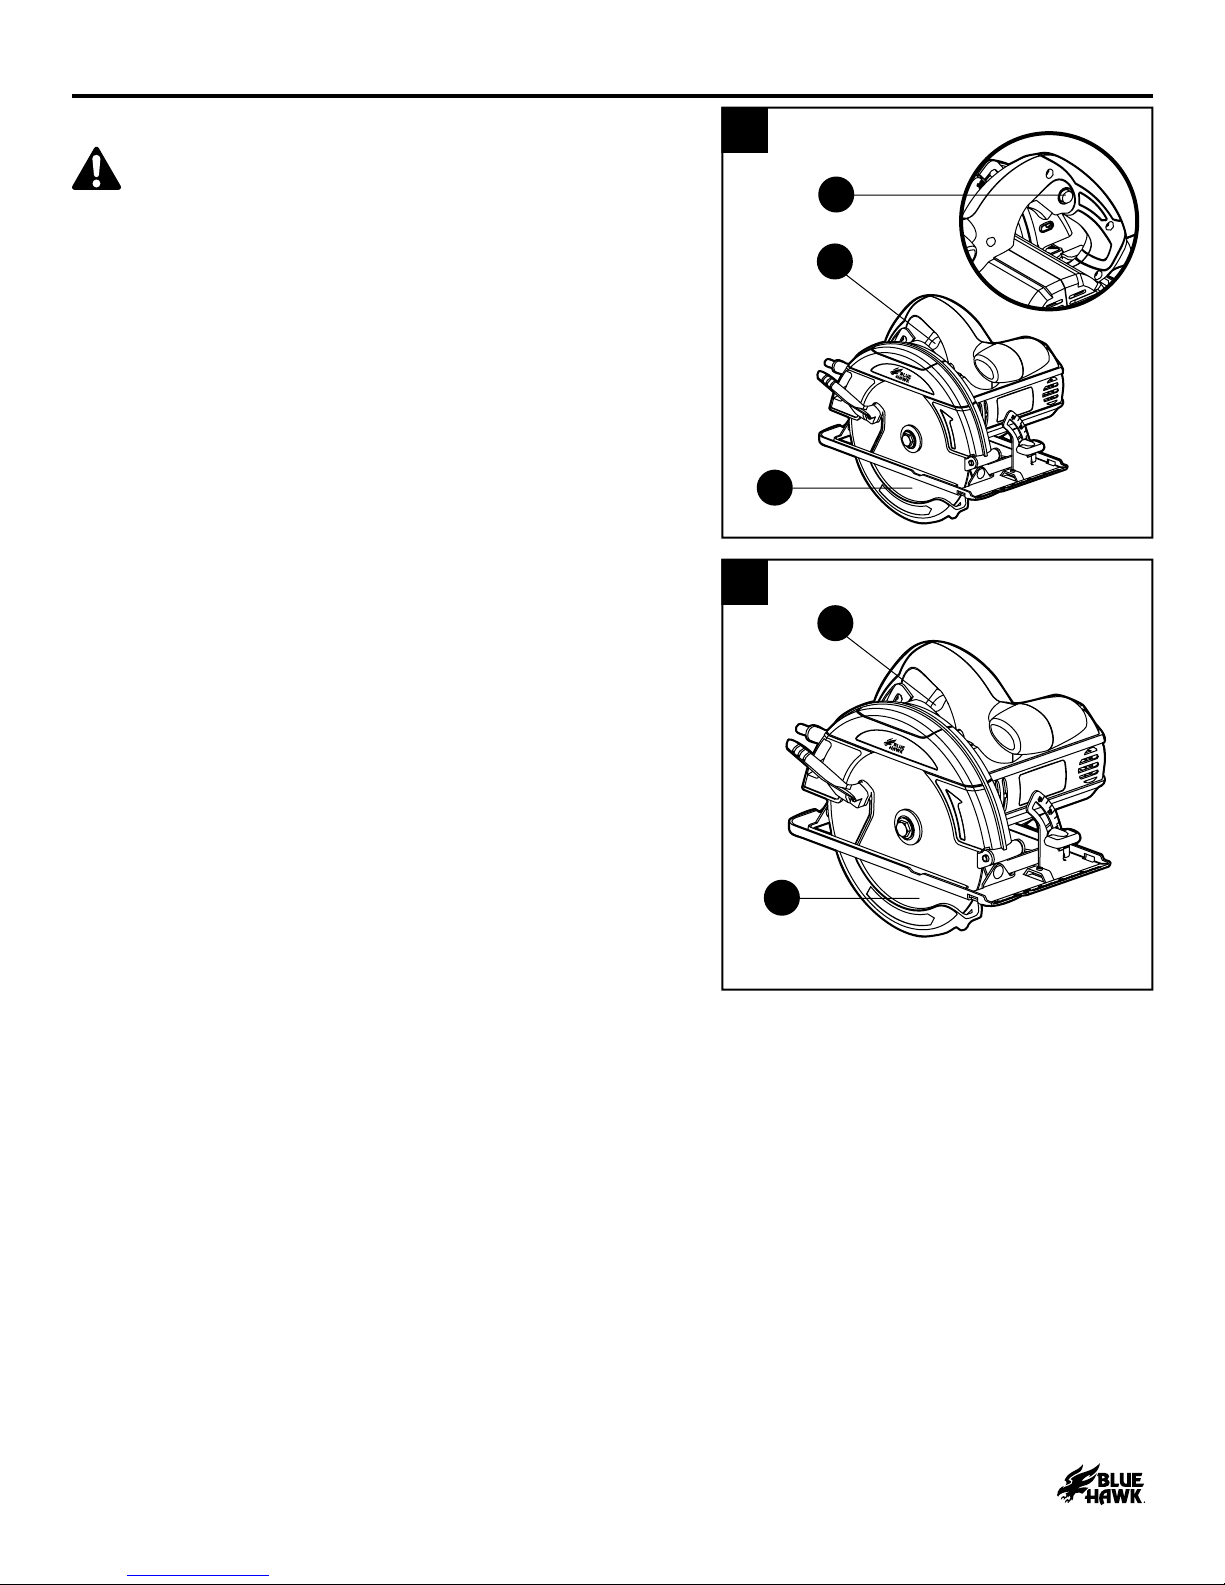
2. Starting the Saw
WARNING: The blade should reach full speed
before it comes into contact with the workpiece.
a. Press lock-off button (N) and then press and hold
the trigger switch (A).
b. Always allow the blade (P) to reach full speed,
then guide the saw into the workpiece.
P
N
A
2
3. Stopping the Saw
Release the trigger switch (A) and allow the blade (P)
to come to a complete stop.
P
A
3
15
Lowes.com
OPERATING INSTRUCTIONS
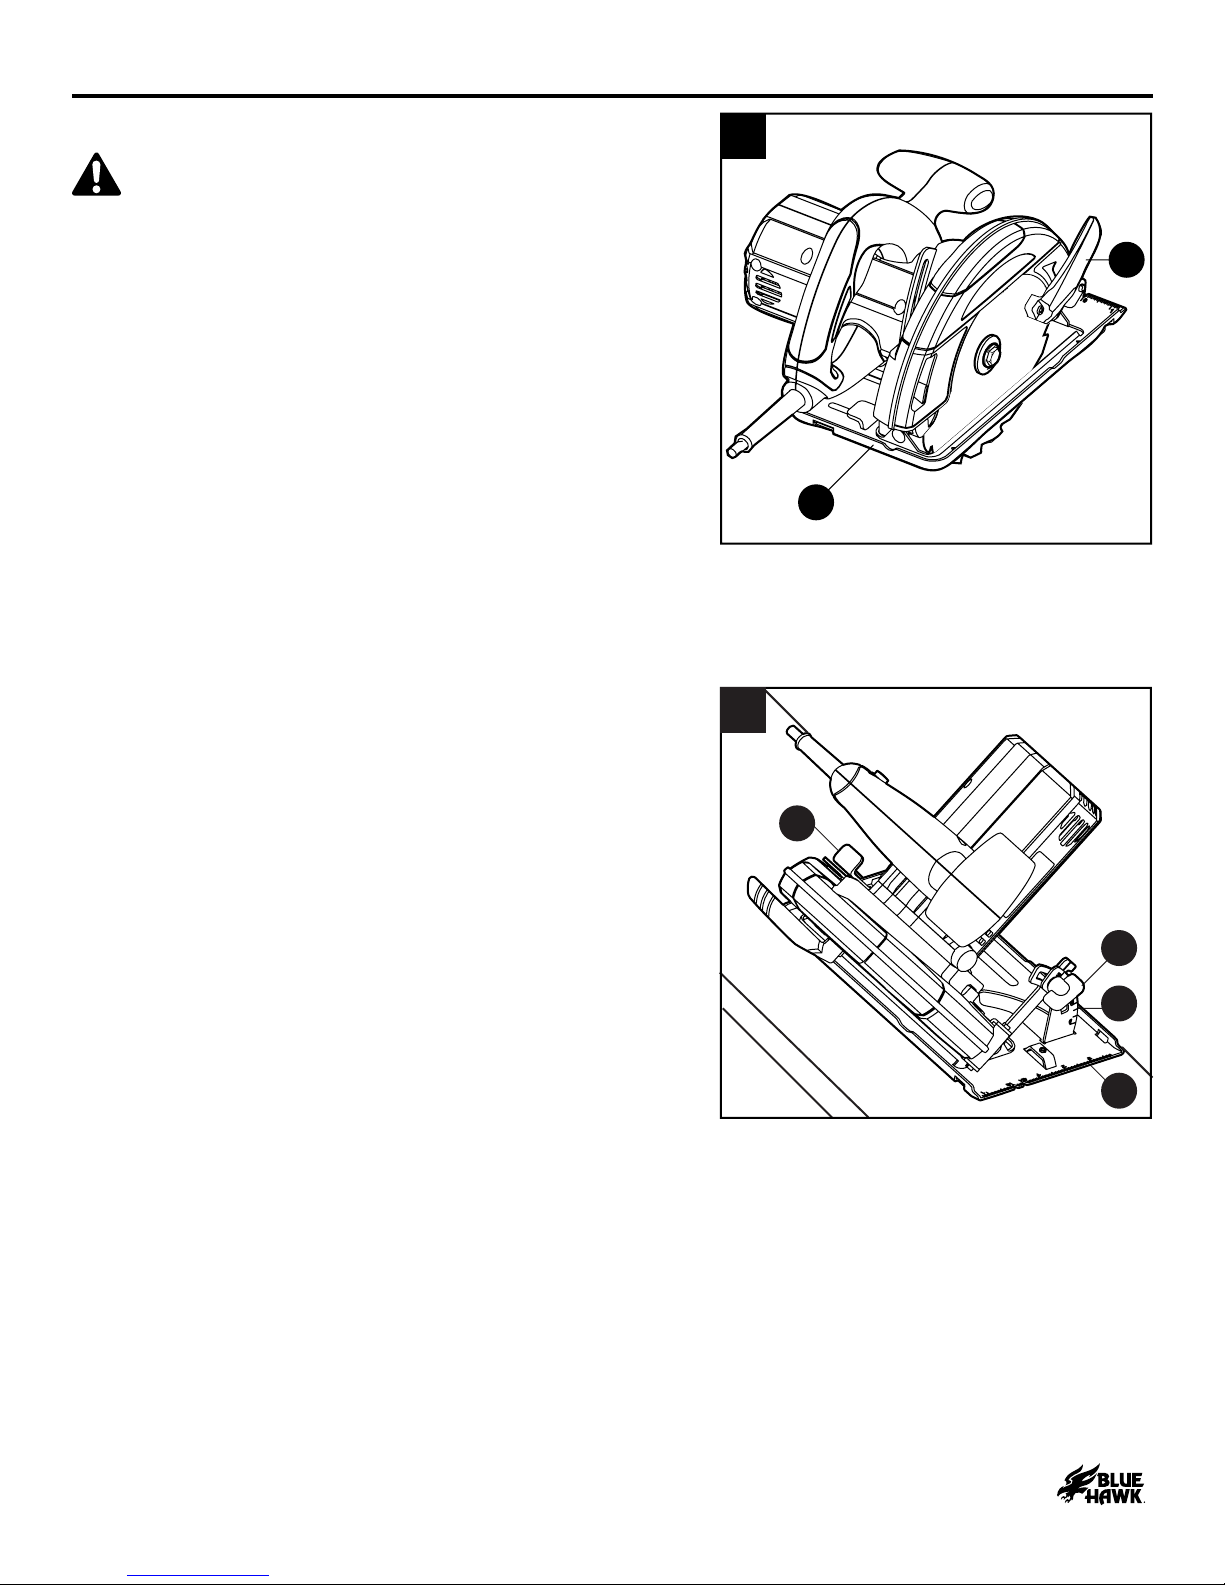
4. Depth-of-Cut Adjustment
WARNING: ALWAYS maintain the correct blade-
depth setting. The correct blade-depth setting for all cuts
should not exceed the thickness of the material being cut
by more than 1/4 in. (6.5 mm). Greater blade depth will
increase the chance of kickback and cause the cut to be
rough.
a. Unplug the saw.
b. Pull the depth-locking lever (G) upward to
release it.
c. Determine the desired depth of cut.
d. Hold the base plate (K) at against the workpiece
and raise or lower the saw until the indicator mark
on the saw aligns with the desired depth on the
scale.
e. Push down on the depth-locking lever (G) to lock
it into position.
G
K
4
5. Adjusting the Cutting Angle
a. Loosen the angle-locking knob (H), located on the
0°~45° bevel gauge (I) on the base plate (K).
b. Tilt the body of the saw until the required angle is
reached. Refer to the scale on the 0°~45° bevel
gauge (I).
c. Tighten the angle-locking knob (H) to secure the
saw and angle.
H
G
K
I
5
16
Lowes.com
OPERATING INSTRUCTIONS
6. General Cutting
DANGER: When lifting the saw from the workpiece,
the blade is exposed on the underside of the saw until
the lower blade guard closes. Ensure that the lower blade
guard is closed before setting the saw down.
WARNING: To make sawing easier and safer,
always maintain proper control of the saw. Loss of control
could cause an accident resulting in possible serious
injury.
To make the safest and best possible cut, follow these
steps:
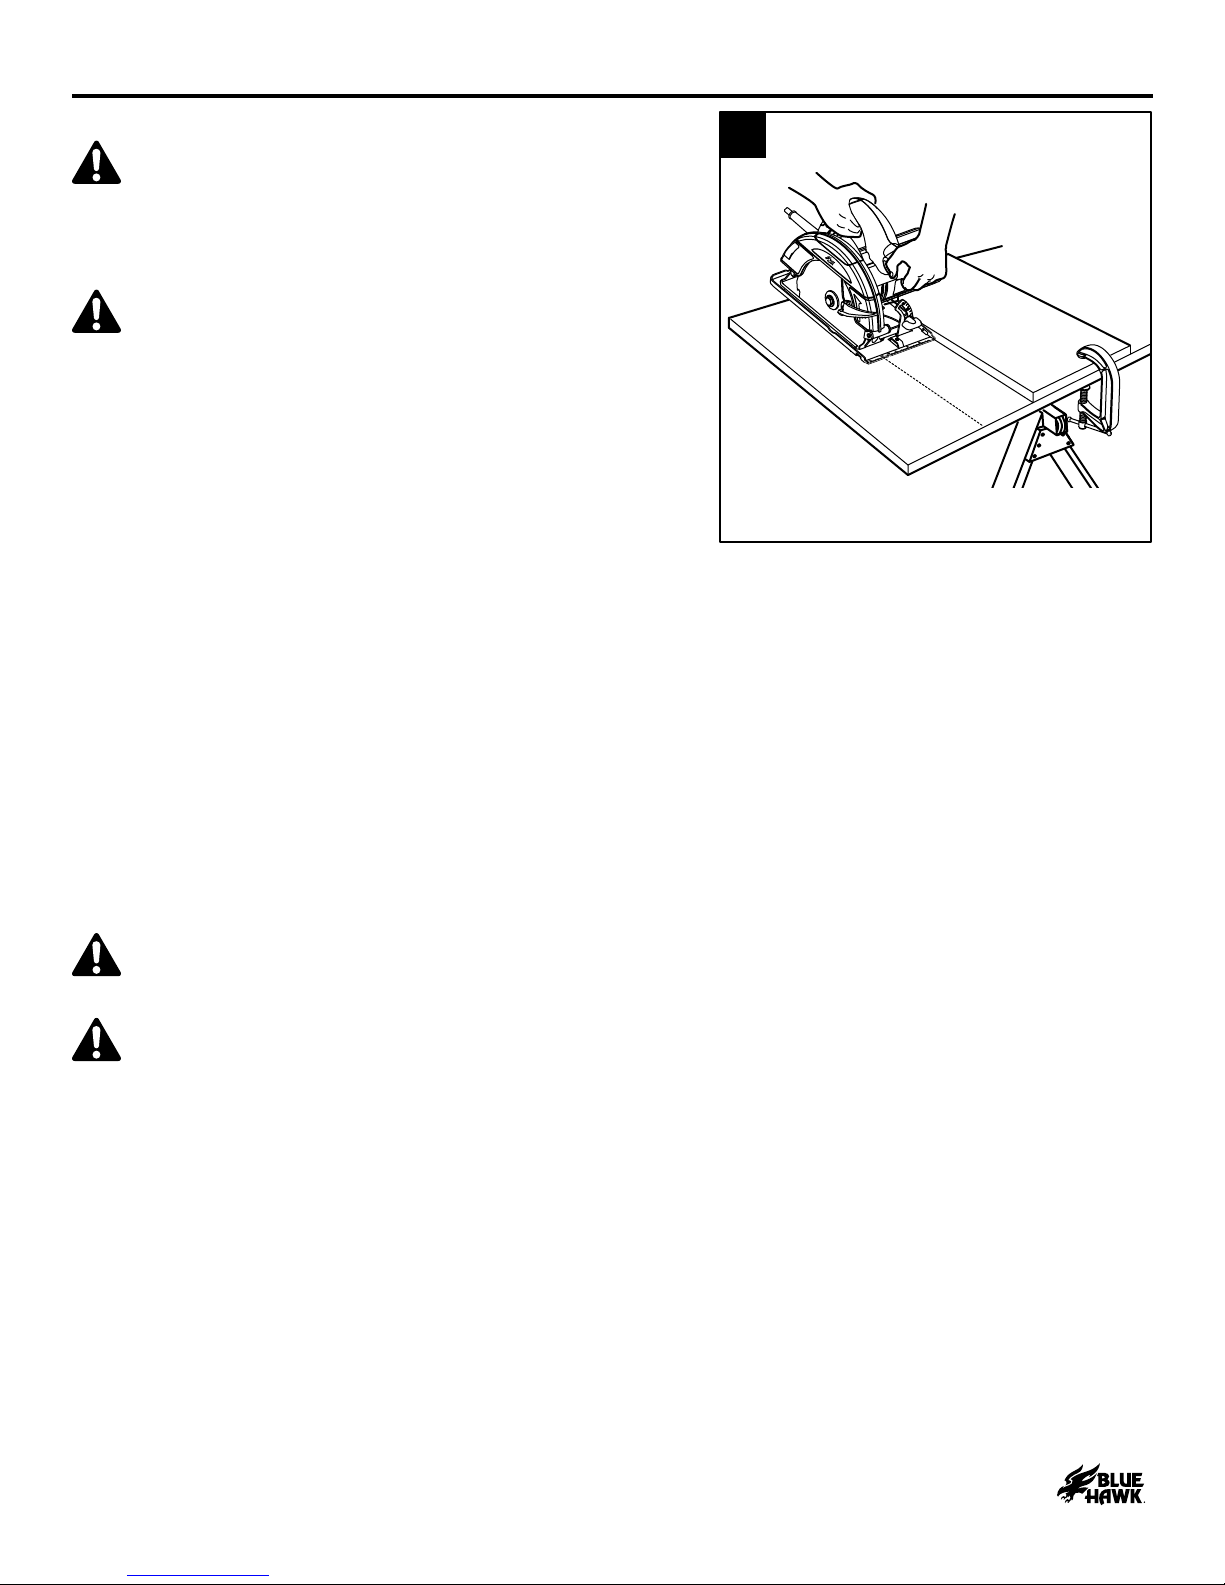
a. Hold the saw rmly with both hands. Avoid placing
your hand on the workpiece while making a cut.
b. Support the workpiece so that the cut is always to
the operator’s side and not directly in line with the
operator’s body; support the workpiece near the
cut.
6
DANGER: If the cord hangs up on the workpiece during a cut, release the trigger switch
immediately. Unplug the saw and reposition the cord in order to prevent it from hanging up again.
DANGER: Using a saw with a damaged cord could result in serious injury or death. If the cord
has been damaged, have it replaced before using the saw again.
c. Place the workpiece with the good side facing down.
d. Clamp the workpiece securely so that the workpiece will not move during the cut.
Note: Always place the saw on the portion of the workpiece that is supported and not on the “cut off”
piece.
e. Draw a guideline along the desired cutting line before beginning the cut.
f. Keep the cord away from the cutting area. Always place the cord so that it is not hanging up
on the workpiece while making a cut.
17
Lowes.com
OPERATING INSTRUCTIONS
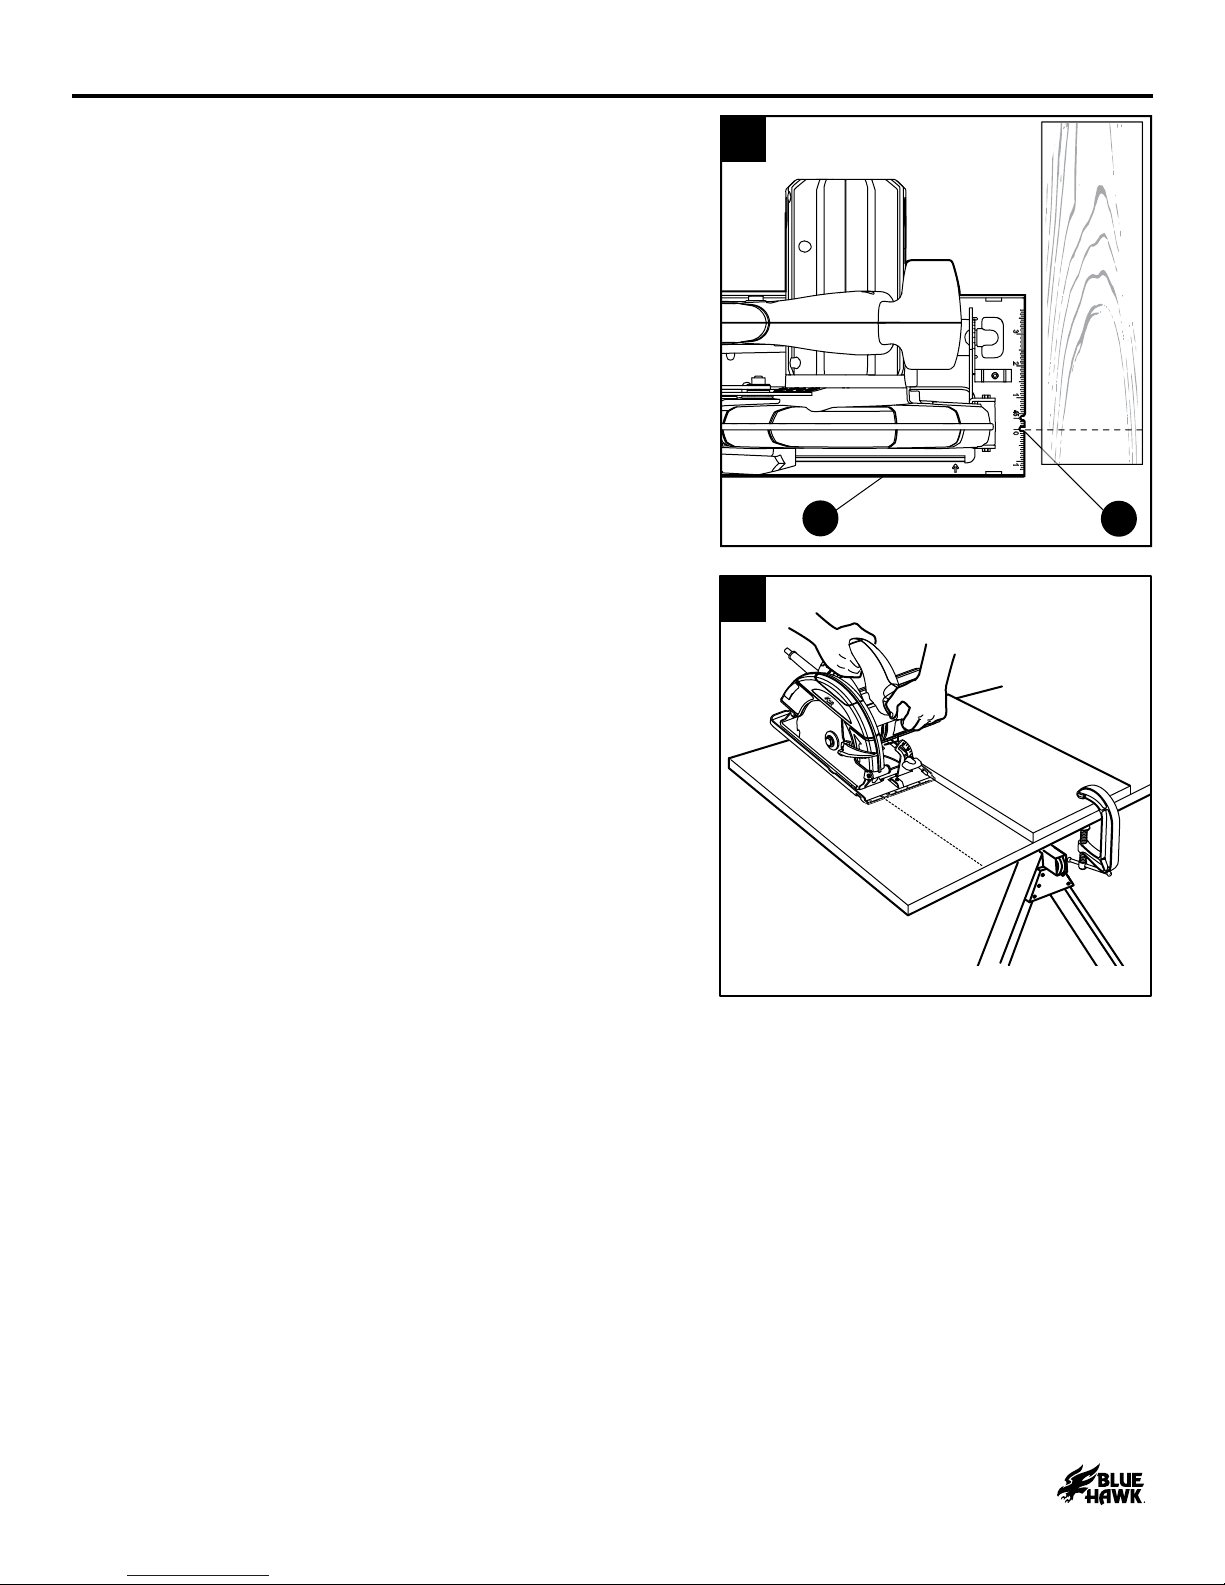
7. Cross Cutting/Rip Cutting
When making a cross-cut or a rip cut, align the
guideline on the workpiece with the full-length kerf
indicator (S) on the base plate (K). The distance from
the saw blade to the saw base is approximately 4-1/4
in. (10.8 cm) on the left side of the saw and 1-1/2 in.
(3.8 cm) on the right side.
Note: Blade thicknesses vary. Always make a trial cut in
scrap material along a guideline to determine how
much the guideline must be offset from the guide
to produce an accurate cut.
Note: The distance from the cutting line to the guideline
is the amount by which the guide should be offset.
Use a guide when making long or wide rip cuts. KS
7
8. Rip Cutting Using a Straight Edge
a. Secure the workpiece.
b. Clamp a straight edge to the workpiece using
C-clamps (not included).
Note: Position the C-clamps so that they will not interfere
with the saw housing during the cut.
c. Saw along the straight edge to achieve a straight
rip cut.
Note: Do not bind the blade in the cut.
8
18
Lowes.com
OPERATING INSTRUCTIONS
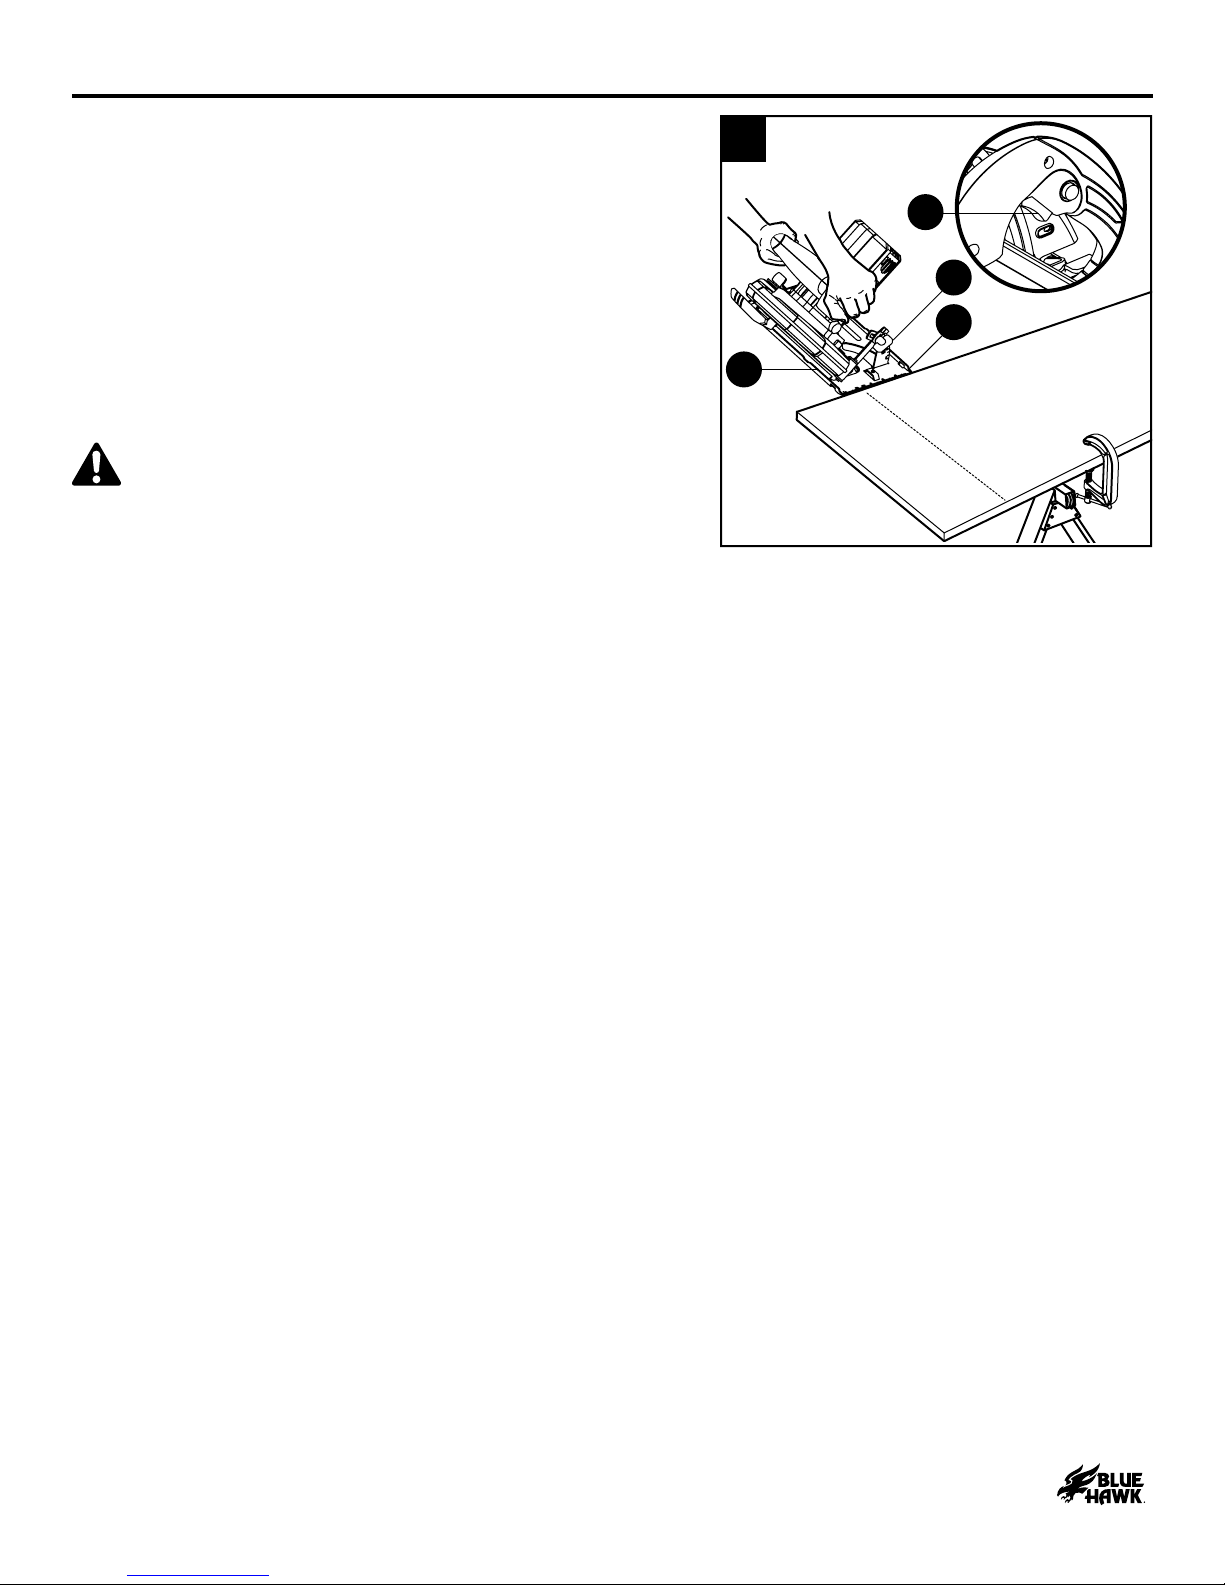
9. Bevel Cutting
To make the best possible cut bevel cut:
a. Align the cutting line with the inner-blade-guide
notch on the base plate (K) when making 45°
bevel cuts.
b. Make a trial cut in scrap material along a
guideline to determine the amount to offset the
guideline on the cutting material.
c. Adjust the angle of the cut to any desired setting
on the bevel gauge (I) between 0° and 45°.
WARNING: Attempting a bevel cut without having
the angle-locking knob securely locked in place can result
in serious injury.
d. Hold the saw rmly with both hands.
e. Rest the front edge of the base plate (K) on the
workpiece without touching the blade (P) to the
workpiece.
f. Start the saw and allow the blade (P) to reach full
speed.
g. Guide the saw into the workpiece and make the
cut.
h. Release the trigger switch (A) and allow the blade
(P) to come to a complete stop.
i. Lift the saw from the workpiece.
9
K
P
A
I
19
Lowes.com
OPERATING INSTRUCTIONS
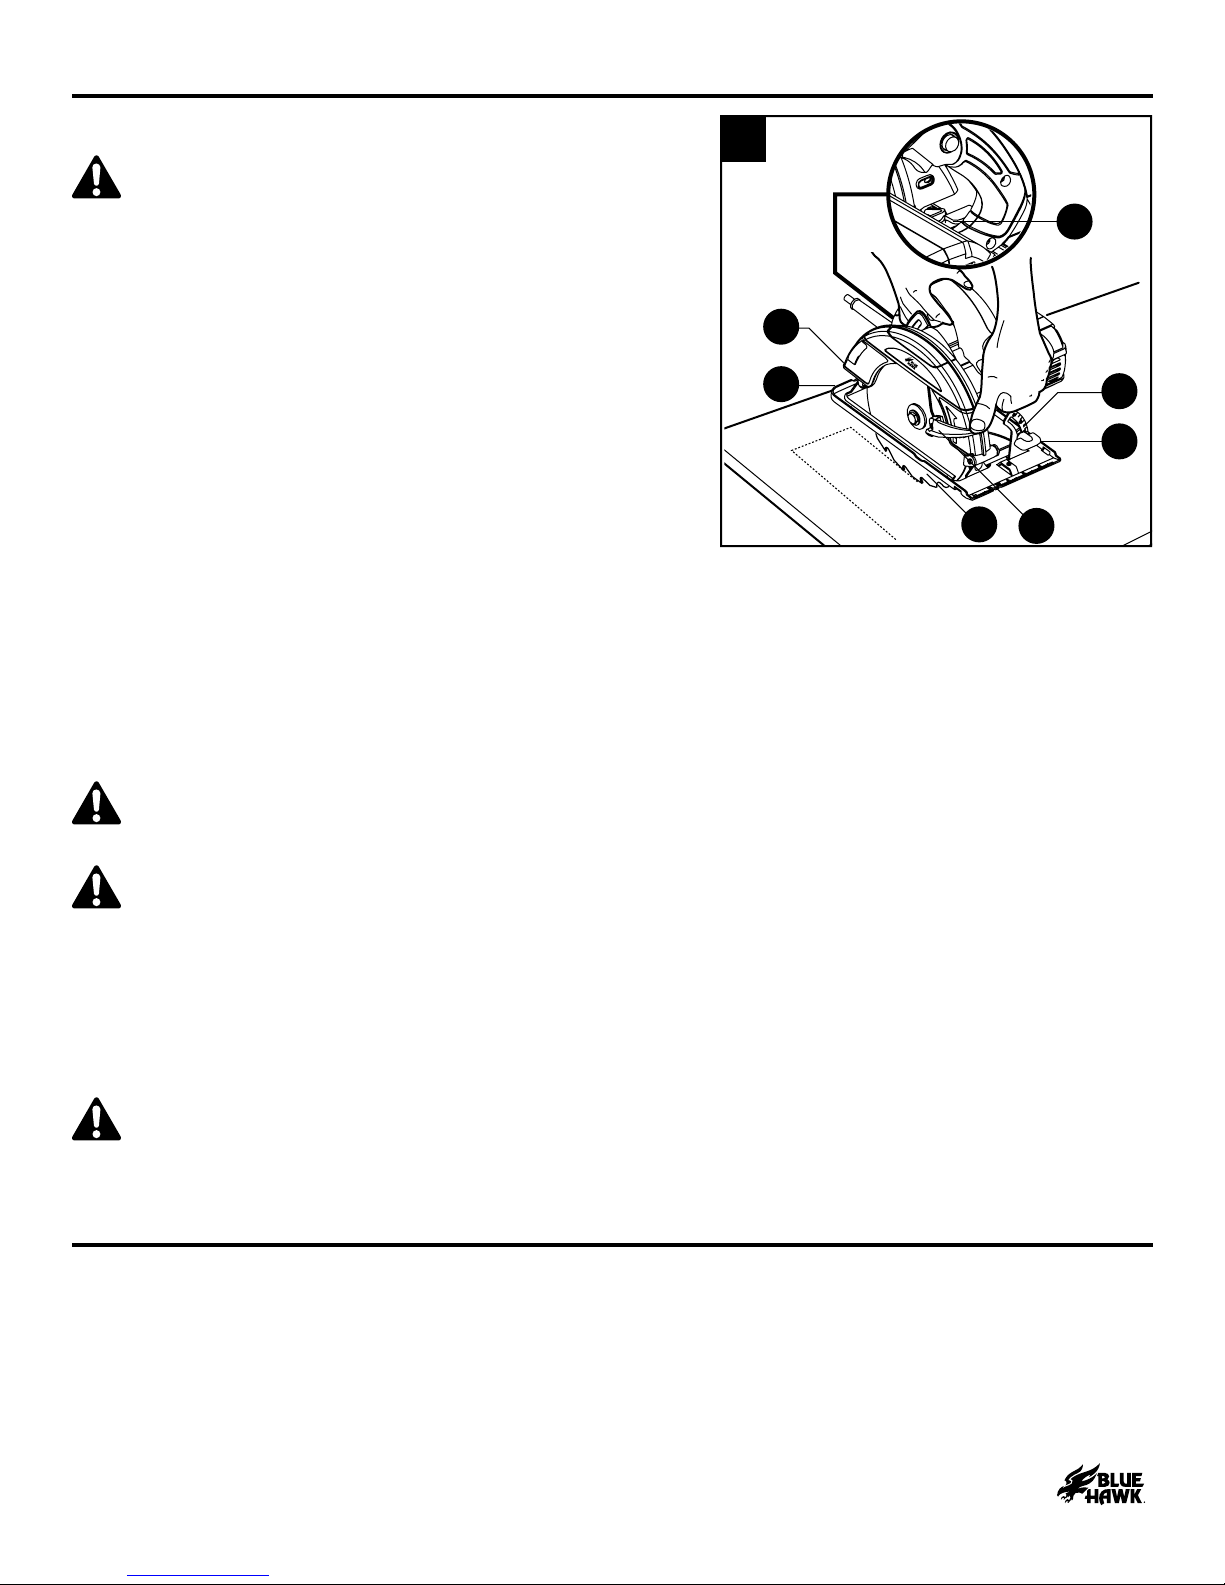
10. Pocket Cutting
WARNING: Always adjust the bevel setting to 0°
before making a pocket cut. Attempting a pocket cut at
any other setting can result in loss of control of the saw
and possible serious injury.
a. Adjust the bevel gauge (I) to 0° and tighten the
angle-locking knob (H).
b. Set the blade (P) to the correct blade-depth
setting and tighten the depth-locking lever (G).
c. Swing the lower blade guard (E) up using the
blade guard lever (F).
d. Hold the lower blade guard (E) in place with the
blade guard lever (F).
e. Rest the front of the base plate (K) at against the
workpiece, with the rear of the handle raised, so
that the blade (P) does not touch the workpiece.
f. Start the saw, allowing the blade (P) to reach full
speed.
g. Guide the saw into the workpiece and make the
cut.
H
I
P
G
E
K
F
10
CARE AND MAINTENANCE
CAUTION: Before performing maintenance or cleaning, pull the plug from the main socket.
• Never use water or chemical liquids to clean the electrical parts of the machine.
• Keep the ventilation slots clean in order to prevent overheating of the motor.
WARNING: Always cut in a forward direction when pocket cutting. Cutting in the reverse
direction could cause the saw to climb up on the workpiece and kick back toward the operator.
WARNING: As the blade starts cutting the material, release the lower guard immediately. When
the foot of the guard rests at on the surface being cut, proceed cutting in a forward direction to the
end of the cut.
a. Release the trigger switch (A) and allow the blade (P) to come to a complete stop.
b. Lift the saw from the workpiece.
c. Clear the corners out with a hand saw or jigsaw.
WARNING: Never tie the lower blade guard in a raised position. Leaving the blade exposed
could lead to serious injury.

20
Lowes.com
TROUBLESHOOTING
PROBLEM POSSIBLE CAUSE CORRECTIVE ACTION
The motor
does not start.
1. There is a blown fuse. 1. Check the time-delayed fuse or
circuit breaker.
The blade
binds, jams,
or burns the
wood.
1. The blade is not operating properly.
2. The blade is dull.
3. The wrong type of blade is being used.
4. The blade is warped.
1. See the Operating Instructions
section of this manual.
2. Replace or sharpen the blade.
3. Replace the blade.
4. Replace the blade.
The saw
vibrates or
shakes.
1. The blade is damaged.
2. The blade is loose.
1. Replace the blade.
2. Tighten the hexagon blade
screw bolt.
WARRANTY
The manufacturer warrants to the original purchaser that each new product is free from defects
in material and workmanship and agrees to replace under this warranty any defective product as
follows from the original date of purchase.
• Three (3) Year Limited Warranty.
• THIS WARRANTY IS NOT TRANSFERABLE AND DOES NOT COVER:
• Products sold damaged or incomplete, sold “as is,” sold reconditioned or used as rental
equipment.
• Products that have ever been used while providing commercial services or have been rented to
another person.
• Delivery, installation or normal adjustments explained in the owner’s manual.
• Damage or liability caused by shipping, improper handling, improper installation, incorrect
voltage or improper wiring, improper maintenance, improper modication, or the use of
accessories and/or attachments not specically recommended.
• Repairs necessary because of operator abuse or negligence, or the failure to install, operate,
maintain and store the product according to the instructions in the owner’s manual.
• Damage caused by cold, heat, rain, excessive humidity, corrosive environments and materials,
or other contaminants.
• Expendable items that become worn during normal use.
• Cosmetic defects that do not interfere with tool functionality.
• Freight costs from customer to vendor.
• ANY INCIDENTAL, INDIRECT OR CONSEQUENTIAL LOSS, DAMAGE, OR EXPENSE THAT
MAY RESULT FROM ANY DEFECT, FAILURE OR MALFUNCTION OF THE PRODUCT.
Some states do not allow the exclusion or limitations on how long an implied warranty lasts, so the
above limitations may not apply to you.
Printed in China
Blue Hawk & Design®is a registered trademark of LF, LLC. All rights reserved.
Table of contents
Popular Saw manuals by other brands


Bosch
Bosch GKS 165 Professional Original instructions

Draper
Draper MS250A instructions

Huvema
Huvema HU 250 CS-4 quick start guide

Harbor Freight Tools
Harbor Freight Tools Admiral Owner's manual & safety instructions

Homelite
Homelite WF10MSP Operator's manual

Parkside
Parkside PTS 20-Li A1 Original instructions


