BOBPERRY AUDIO Ducker 2 User manual

Bob Perry Ducker 2 – Manual – Page 1/12
Ducker 2 Manual
Preface
Thank you for purchasing Bob Perry Ducker 2. To be able to get the best out of this product,
e recommend you carefully read these instructions.
Firstly e ill describe the user interface and ill give a brief introduction to the control
elements. After that e ill provide a quick guide to sho some typical use cases for the
plug-in.
System Requirements
To use Bob Perry Ducker 2, a Digital Audio Workstation (DAW) ith support for AU (Mac),
VST2 (PC, Mac), VST3 (PC, Mac) or AAX 64 bit (PC, MAC) is required. We thoroughly tested
the plug-in ith various versions of the follo ing DAWs:
Steinberg Cubase (Mac, PC)
Steinberg Nuendo (Mac, PC)
PreSonus Studio One (Mac, PC)
Image-Line FL Studio (PC)
Adobe Audition (Mac, PC)
Reaper (Mac, PC)
Logic Pro X (Mac)
Avid Pro Tools (Mac, PC)
Harrison Mixbus (Mac, PC)
Cake alk Sonar (PC)
Installation – macOS
Extract the do nloaded .zip file, if it hasn’t been extracted automatically. Then simply open
the .pkg file and follo the installer’s instructions.
Installation – Windows
Extract the do nloaded .zip file, then open the installer file and follo the instructions.
The first installation path you ill be prompted for ill be the location of the manuals and the
uninstaller.
Then you ill be asked for your VST2 paths. If you ant to install the VST2 plug-ins, select the
VST2 path of your preferred DAW. If you don’t ant to install the VST2 plug-ins, you ill be
able to deselect the VST2 components after clicking ‘Next’.
Bob Perry Ducker 2 Copyright © 2015-2021 Jonas Peters
VST is a soft are and trademark of Steinberg Media Technologies GmbH. 20210113160815

Bob Perry Ducker 2 – Manual – Page 2/12
What does a Ducker do?
Since you already have purchased the Bob Perry Ducker 2, you probably already kno hat
it's good for.
Nevertheless, here is a quick summary:
A Ducker reduces one signal's volume hen a second signal's volume surpasses a set
threshold.
Sounds legit.
ut why should I not use a compressor for this?
Using a compressor ill give you a result that is similar to a Ducker but ill give you less
control. Some people say that „Side Chain Compressing“ is ducking but that is some hat
rong. A compressor ill not only lo er the volume but compress the signal. The hole
character of the sound is likely to change. Additionally you cannot control the level of volume
reduction as it al ays depends on the side chain signal. The resulting sound might become
imbalanced. Bob Perry Ducker 2 solves these problems: it lo ers the volume evenly and
ithout any un anted compression, giving you full control over your production.
What’s new in ob Perry Ducker 2
Bob Perry Ducker 2 comes ith several improvements compared to Ducker 1:
GUI scaling and global saving of preferences
You no have the ability to resize the plug-in indo . This and other preferences can be
saved globally, so that ne instances of the plug-in appear pre-configured to your taste.
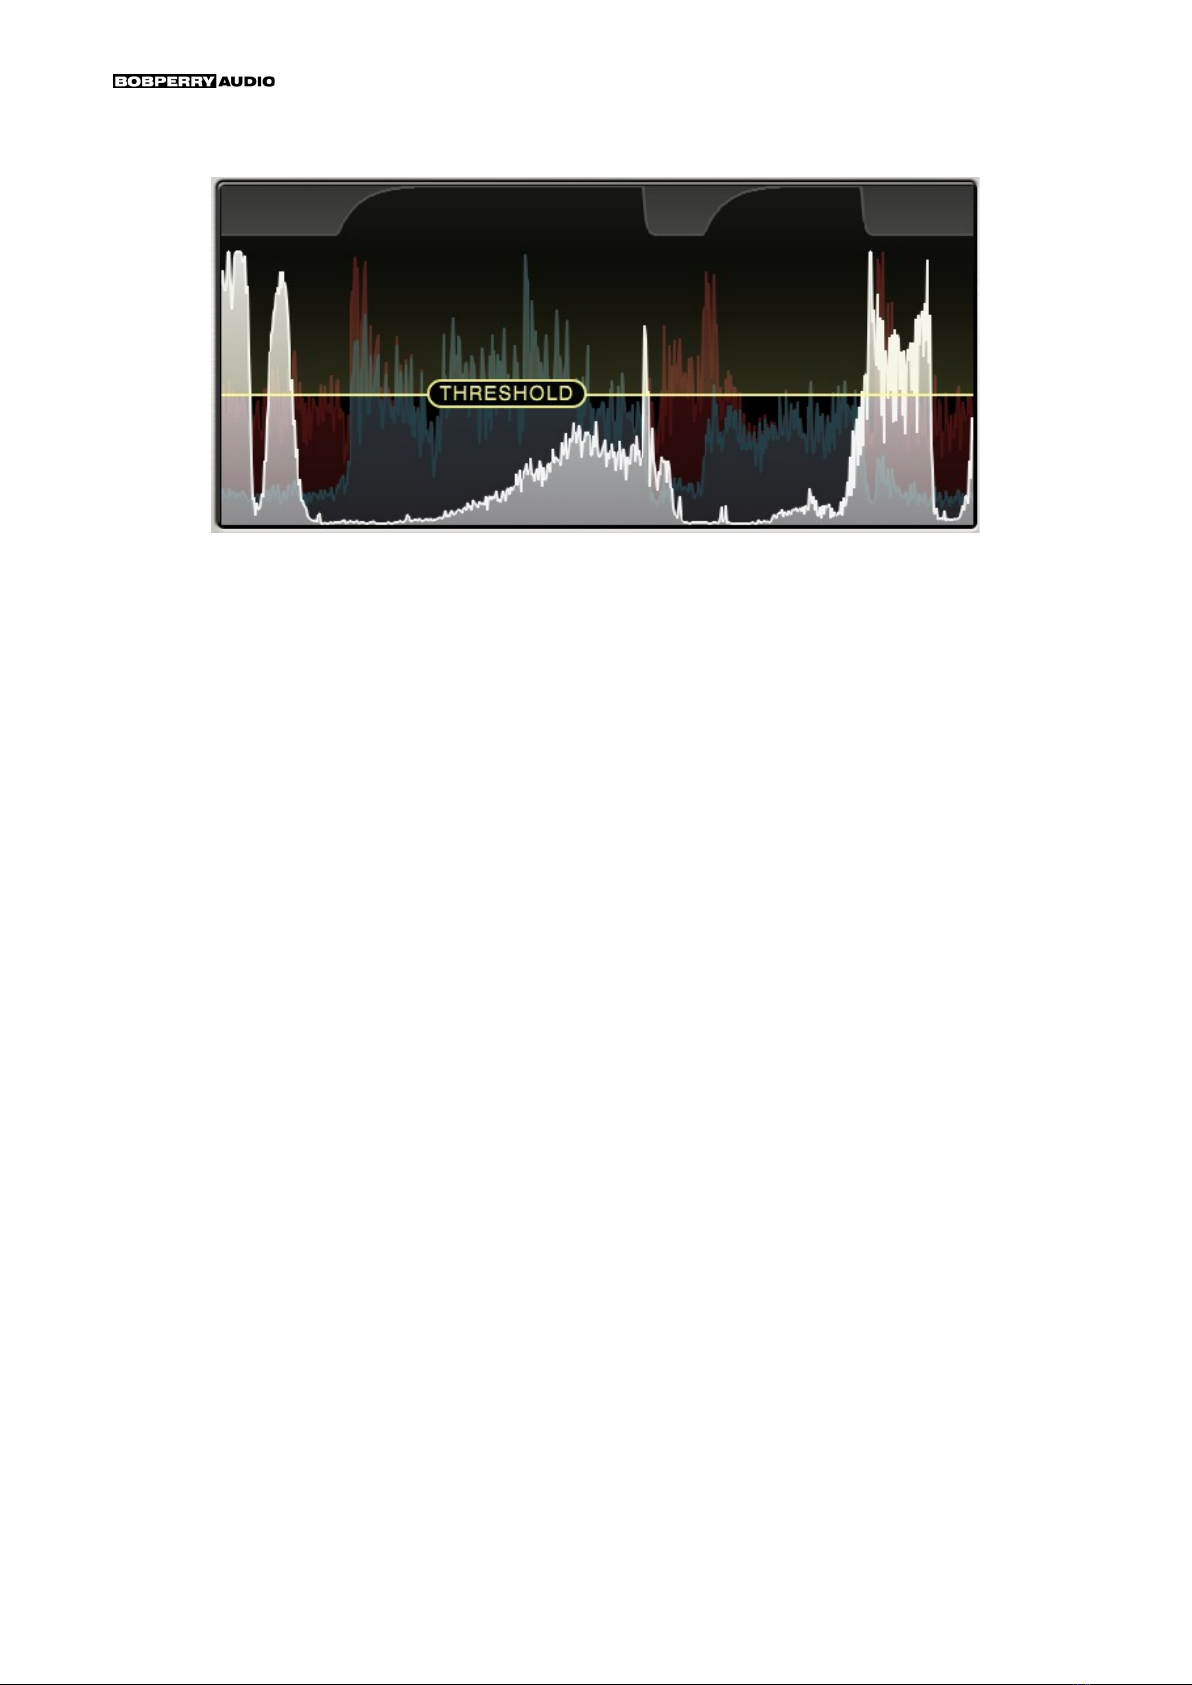
Visual Waveform Display with Threshold Line
The ne four- ay Waveform Display visualises Input, Output and Aux Signals, and also your
Gain Reduction. Additionally, e added a mouse-draggable Threshold line that help ith
visualisation and ease-of-use.
Lookahead functionality
We added the ability to enable up to 100ms of Lookahead for even finer controls.
Additionally, there is a LIVE mode, that enables you to quickly toggle Lookahead ithout
losing your setting.
Undo/Redo, Presets
We added an Undo/Redo feature to quickly get back to a previous setting, and a bunch of
presets to make it easier and quicker for ne users to reach their desired sounds.
Pro Tools AAX support*
Bob Perry Ducker 2 no comes ith AAX support.
*) due to limitations ith the AAX platform,
- only mono aux signals are supported
- the maximum lookahead value may be lo er.
Bob Perry Ducker 2 Copyright © 2015-2021 Jonas Peters
VST is a soft are and trademark of Steinberg Media Technologies GmbH. 20210113160815

Bob Perry Ducker 2 – Manual – Page 3/12
User Interface
The user interface mainly consists of dials and buttons. The numeric values under the dials
can be clicked to enter a numeric value. Some dials feature context menus accessible via
right-click. See below.
THRESHOLD
Serves for the adjustment of the threshold. If the level of the side chain exceeds the
threshold, the ducking process ill be triggered. A threshold belo the side chain signal's
amplitude should be chosen, other ise Ducker 2 on't alter your signal.
ThresPass LED: The hite ring on the Threshold dial lights up henever the gain of the signal
in the Aux chain surpasses the Threshold.
While setting the Threshold, the AUX aveform ( hite) ill be displayed in front of the other
aveforms in the aveform display. Additionally, the Threshold Line ill appear to visualise
the Threshold in relation to your signal.
REDUCTION
Sets the gain reduction in dB. For subtle effects e recommend using a range of up to
±3dB. For pumping club / house music sound go do n to -10dB.
Use boost for special effects – it’s all up to your creativity.
CURVE
The CURVE s itch lets you choose bet een linear (LIN), logarithmic (LOG) and S-CURVE
volume curves for attack and release of the ducking process. The decision hich one to take
ill solely be based on your signal and personal taste.
Bob Perry Ducker 2 Copyright © 2015-2021 Jonas Peters
VST is a soft are and trademark of Steinberg Media Technologies GmbH. 20210113160815

Bob Perry Ducker 2 – Manual – Page 4/12
AUX SRC
Select the source for your Aux Signal ith the AUX SRC s itch.
When orking ithout a side chain, select MAIN.
For normal side chain behaviour, select S/C.
WAVEFORM DISPLAY
The Waveform Display displays the follo ing signals:
•● Red: Main Input
•● Blue: Main Output
•● White: Aux Input
•● Top White: Gain Reduction
The hite Aux Input aveform ill be displayed in front of the other aveforms hile setting
the Threshold.
Bob Perry Ducker 2 Copyright © 2015-2021 Jonas Peters
VST is a soft are and trademark of Steinberg Media Technologies GmbH. 20210113160815
Bob Perry Ducker 2 – Manual – Page 5/12
Threshold Line
Whenever hovering over the Threshold dial, or over the Waveform Display itself, the
Threshold Line is displayed. You can use your mouse or trackpad to set the Threshold
directly on the Display.
ATTACK
Time the Ducker ill take to reach the set gain reduction value after being triggered by the
Aux Signal signal exceeding the threshold. The higher the attack value, the longer it takes the
Ducker to reach the final gain reduction.
HOLD
Time the Ducker ill keep its full gain reduction even hen the threshold is not exceeded
anymore. When the threshold gets exceeded again during hold time, the hold duration ill be
extended accordingly.
RELEASE
Time the Ducker takes to revert back to its original state.
Please note: Very short Attack and elease times might cause distortion when working with
low frequencies. This might happen when the Attack and/or elease are shorter than the
frequencies' oscillating period.
INPUT GAIN
Adjusts the main input signal's level if a plug-in in the signal chain has a high or lo output.
Most of the time you on't need to use it. It ill take a very high level (>1500 dB) to create
distortion ithin Bob Perry Ducker 2.
Bob Perry Ducker 2 Copyright © 2015-2021 Jonas Peters
VST is a soft are and trademark of Steinberg Media Technologies GmbH. 20210113160815

Bob Perry Ducker 2 – Manual – Page 6/12
OUTPUT GAIN
Adjusts the plug-in's output level. Although the plug-in itself on't distort even ith very high
signal levels, e recommend setting a value that on't saturate your DAW channel’s meter.
LIVE
Enabling LIVE mode temporarily disables LOOKAHEAD for minimising latency.
LOOKAHEAD
Turn this dial to the left to increase Lookahead. Ducker 2 ill then react to your Aux signal
sooner.
A typical use of Lookahead is if you ant the Ducker to be already fully ducked hen your
Aux signal kicks in: in a voice-over situation, you can use Lookahead to make sure your
music volume is already reduced hen the speaker begins speaking.
Advice: Lookahead may increase the overall latency of your DAW. Not suitable for live
applications.
Undo and Redo uttons
Click the undo button to quickly revert to the plug-ins state before you last changed a
parameter.
Once you have undone something, the Redo button ill come alive. Click the Redo button to
get back to the plug-in’s state before you clicked undo.
You can undo + redo multiple steps.
Note: If you undo something, and then change a parameter manually, you on’t be able to
redo.
ottom Right Corner (Window Grabber)
Use the bottom right corner of the indo to resize it.
Double-click it to reset the plug-in indo to its default size.
The indo size can be saved for this instance or globally, depending on the settings
SAVE WINDOW SIZE and SAVE PREFS GLOBALLY. (See belo )
Side chain button (window of your DAW)
Activates the side chain. Enabling the side chain is mandatory for using Ducker 2 ith t o
signals. Please refer to your DAW's manual for details.
When enabling the side chain for the first time, Ducker 2 will automatically set AUX S C to
S/C. (Due to the way Audio Units work, this behaviour is disabled for the AU version of Ducker
2)
Bob Perry Ducker 2 Copyright © 2015-2021 Jonas Peters
VST is a soft are and trademark of Steinberg Media Technologies GmbH. 20210113160815
Bob Perry Ducker 2 – Manual – Page 7/12
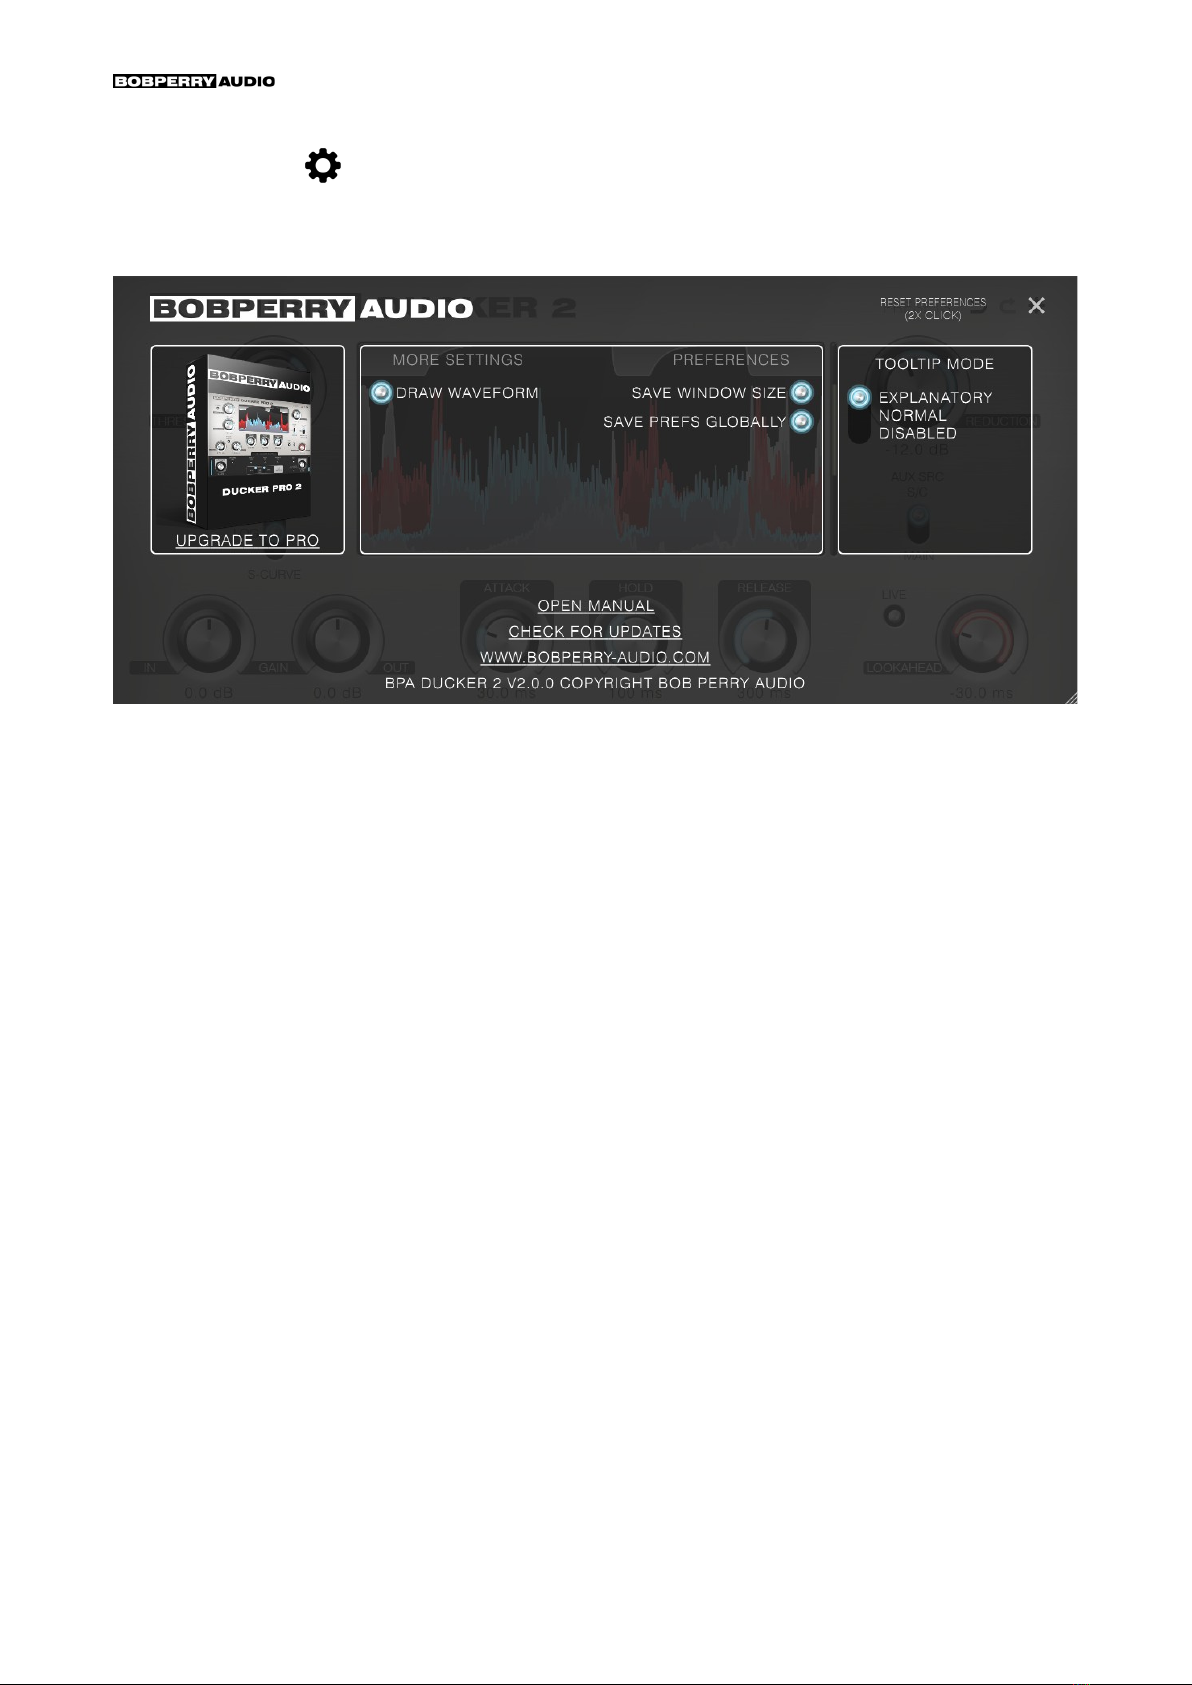
Preferences
Click the gear icon to display the plug-in’s Preferences. You ill be greeted ith the
Preferences indo :
MORE SETTINGS
DRAW WAVEFORM
You can disable Waveform dra ing if you have performance issues.
PREFERENCES
SAVE WINDOW SIZE
Saves the indo size of the plug-in. When SAVE PREFS GLOBALLY is enabled, all
Ducker 2 instances ill open ith the same indo size.
SAVE PREFS GLO ALLY
When enabled, the follo ing settings ill be stored globally:
TOOLTIP MODE, DRAW WAVEFORM, SAVE WINDOW SIZE, your indo size.
Bob Perry Ducker 2 Copyright © 2015-2021 Jonas Peters
VST is a soft are and trademark of Steinberg Media Technologies GmbH. 20210113160815

Bob Perry Ducker 2 – Manual – Page 8/12
TOOLTIP MODE
Every control can sho you a tooltip hen hovering your mouse cursor over it for a couple of
seconds. TOOLTIP MODE lets you choose bet een three tooltip modes:
EXPLANATORY: Sho s you an extended, elaborate tooltip to explain the function of the
current control.
NORMAL: Sho s you a normal, quick tooltip.
DISABLED: Disables all tooltips. Select this if you don’t ant to be bothered by tooltips.
OPEN MANUAL
If you have selected the manual option hen installing the plug-in, you can click
OPEN MANUAL to open this manual.
CHECK FOR UPDATES
This ill open a bro ser indo ith the Bob Perry Audio Update Checker. Click to see if
there is a ne version available to do nload.
WWW. O PERRY-AUDIO.COM
Click to visit our ebsite.
Bob Perry Ducker 2 Copyright © 2015-2021 Jonas Peters
VST is a soft are and trademark of Steinberg Media Technologies GmbH. 20210113160815

Bob Perry Ducker 2 – Manual – Page 9/12
How do I work with ob Perry Ducker 2?
First of all, you need to think about hat signal you ant to duck in dependence of hich
trigger signal (side chain). Then proceed as follo s:
1) Load Ducker 2 into the channel of the signal that you ant to be ducked. (Main Signal)
2) Enable the side chain. (refer to DAW's manual for details)
2a) In the channel that provides the trigger signal (side chain), use an Aux Send to route the
channel's signal onto the Ducker's side chain.
Be are: If you route the output to the side chain directly, you on't hear it any more.
3) Within the plug-in:
a) Adjust the Threshold
b) Adjust the Range
c) Adjust Attack, Hold and Release
4) Listen to the effect and t eak it until it sounds as you please.
Typical Use Cases
We ill no provide some examples for typical use cases of our Ducker.
1) Clean Up the asement
Sometimes you may run into trouble hen you have a bass drum and the bass competing in
the same range of frequencies. In most cases, you certainly don't ant muddy lo
frequencies, but cleanly separated instruments.
To clean things up a bit, the Ducker can lo er the volume of the bass each time the bass
drum kicks in. To do this, e firstly need to find out the average length of the bass drum
signal. We assume the length to be around 60ms. Therefore, the hole ducking (including
attack, hold and release) should not take longer than 60ms. As the bass drum’s volume ill
decline in the end, the hold time may be a little shorter.
For t eaking the ducking effect, start ith a high range value. It ill make you able to easily
hear the results of your adjustments. After ards, the range should not exceed 3dB as
other ise it might begin to sound unnatural. Of course it all depends on your taste.
Pro Tip: Carefully adjust the threshold as other ise the ducking might be prolonged by the
fading bass drum!
Bob Perry Ducker 2 Copyright © 2015-2021 Jonas Peters
VST is a soft are and trademark of Steinberg Media Technologies GmbH. 20210113160815

Bob Perry Ducker 2 – Manual – Page 10/12
2) Pumping eats
You are into electronic music and ant to get this cool contemporary pumping bass? No
problem ith Ducker 2. Try ducking everything in the mix but your bass drum. The ducking
process should be triggered after the length of an eighth note in a four-four time. Thus, the
Ducker needs to do its ork in this short period of time.
With this easy formula you can calculate the length of a quarter note:
60 000 / tempo in bpm = time in ms
As an example ith a tempo of 120 bpm:
60000
120
= 500 ms for a quarter note.
Divide this by 2 to get the value for an eighth note (250ms).
The attack should be short, but be are of distortions. 10 to 30 ms ill mostly do the trick.
Adjust hold and release to place the pumping effect on the right spot. In our example having
120 bpm it should be 250ms. Find your balance bet een hold and release to get the desired
result.
3) Voice over / Voice over Guitar
Sometimes you ant to lo er the volume of the music hile singing or talking. To get this
done do the follo ing:
1) Assign the plug-in to a channel or a channel group.
2) Send your vocal track's signal into the Ducker's side chain.
3) You might ant to choose relatively high values for hold and release to achieve
smooth blending of phases.
Bob Perry Ducker 2 Copyright © 2015-2021 Jonas Peters
VST is a soft are and trademark of Steinberg Media Technologies GmbH. 20210113160815

Bob Perry Ducker 2 – Manual – Page 11/12
Appendix
Common plug-in installation paths
Windows
32-bit VST3 plug-ins in 32-bit environments
C:\Program Files\Common Files\VST3
32-bit VST3 plug-ins in 64-bit environments
C:\Program Files (x86)\Common Files\VST3
64-bit VST3 plug-ins in 64-bit environments
C:\Program Files\Common Files\VST3
VST2 plug-ins are usually installed into a subfolder of your DAW, called “VSTplugins”
or “plug-ins”. Examples are:
C:\Program Files\Steinberg\Cubase\VSTPlugins (64-bit)
C:\Program Files (x86)\Steinberg\Cubase\VSTPlugins (32-bit)
AAX plug-ins in 64-bit environments
C:\Program Files\Common Files\Avid\Audio\Plug Ins
MacOS
VST3 plug-ins
/Library/Audio/Plug Ins/VST3/
VST2 plug-ins
/Library/Audio/Plug Ins/VST2/
Audio Unit plug-in components
/Library/Audio/Plug Ins/Components/
AAX plug-ins
/Library/Application Support/Avid/Audio/Plug Ins
You cannot use the Windo s 64-bit version in a Windo s 32-bit environment / DAW!
The macOS versions are 64-bit only.
Technical Notes
Signal processing floating point
Headroom theoretically over 1500dB, depending on your DAW. But more than
enough.
Bob Perry Ducker 2 Copyright © 2015-2021 Jonas Peters
VST is a soft are and trademark of Steinberg Media Technologies GmbH. 20210113160815

Bob Perry Ducker 2 – Manual – Page 12/12
We hope this manual leaves no questions unans ered.
If you still have questions, feel free to contact us:
support@bobperry-audio.com
Bob Perry Ducker 2 Copyright © 2015-2021 Jonas Peters
VST is a soft are and trademark of Steinberg Media Technologies GmbH. 20210113160815
Table of contents


