BONAIRE Durango 3500M User manual

Page | 1
Owner’s Manual
READ AND SAVE THESE INSTRUCTIONS
BONAIRE
Durango Portable Cooler
Model 3500M, 4200M
Please keep this important manual in a safe place. It is the owner’s responsibility to
ensure that regular maintenance is carried out on this evaporative cooling product.
Failure to do so will void all guarantees beyond statutory and legal requirements.
R
DO NOT
Return to store
For help with installation or warranty issues call
800-939-2983 or www.bonaire-usa.com
For parts Visit our secure website
www.bonairedurango.com
This product may qualify for up to $300 in rebates
Check with your local agency

Page | 2
Quick Setup Guide
BONAIRE PORTABLE COOLER
Quick Setup Guide................................................................................................................... 3
Introduction.............................................................................................................................. 4
General Information............................................................................................................................... 4
Unit External View.................................................................................................................................. 5
Unit Internal View................................................................................................................................... 6
Installation................................................................................................................................ 7
Unpacking The Unit ............................................................................................................................... 7
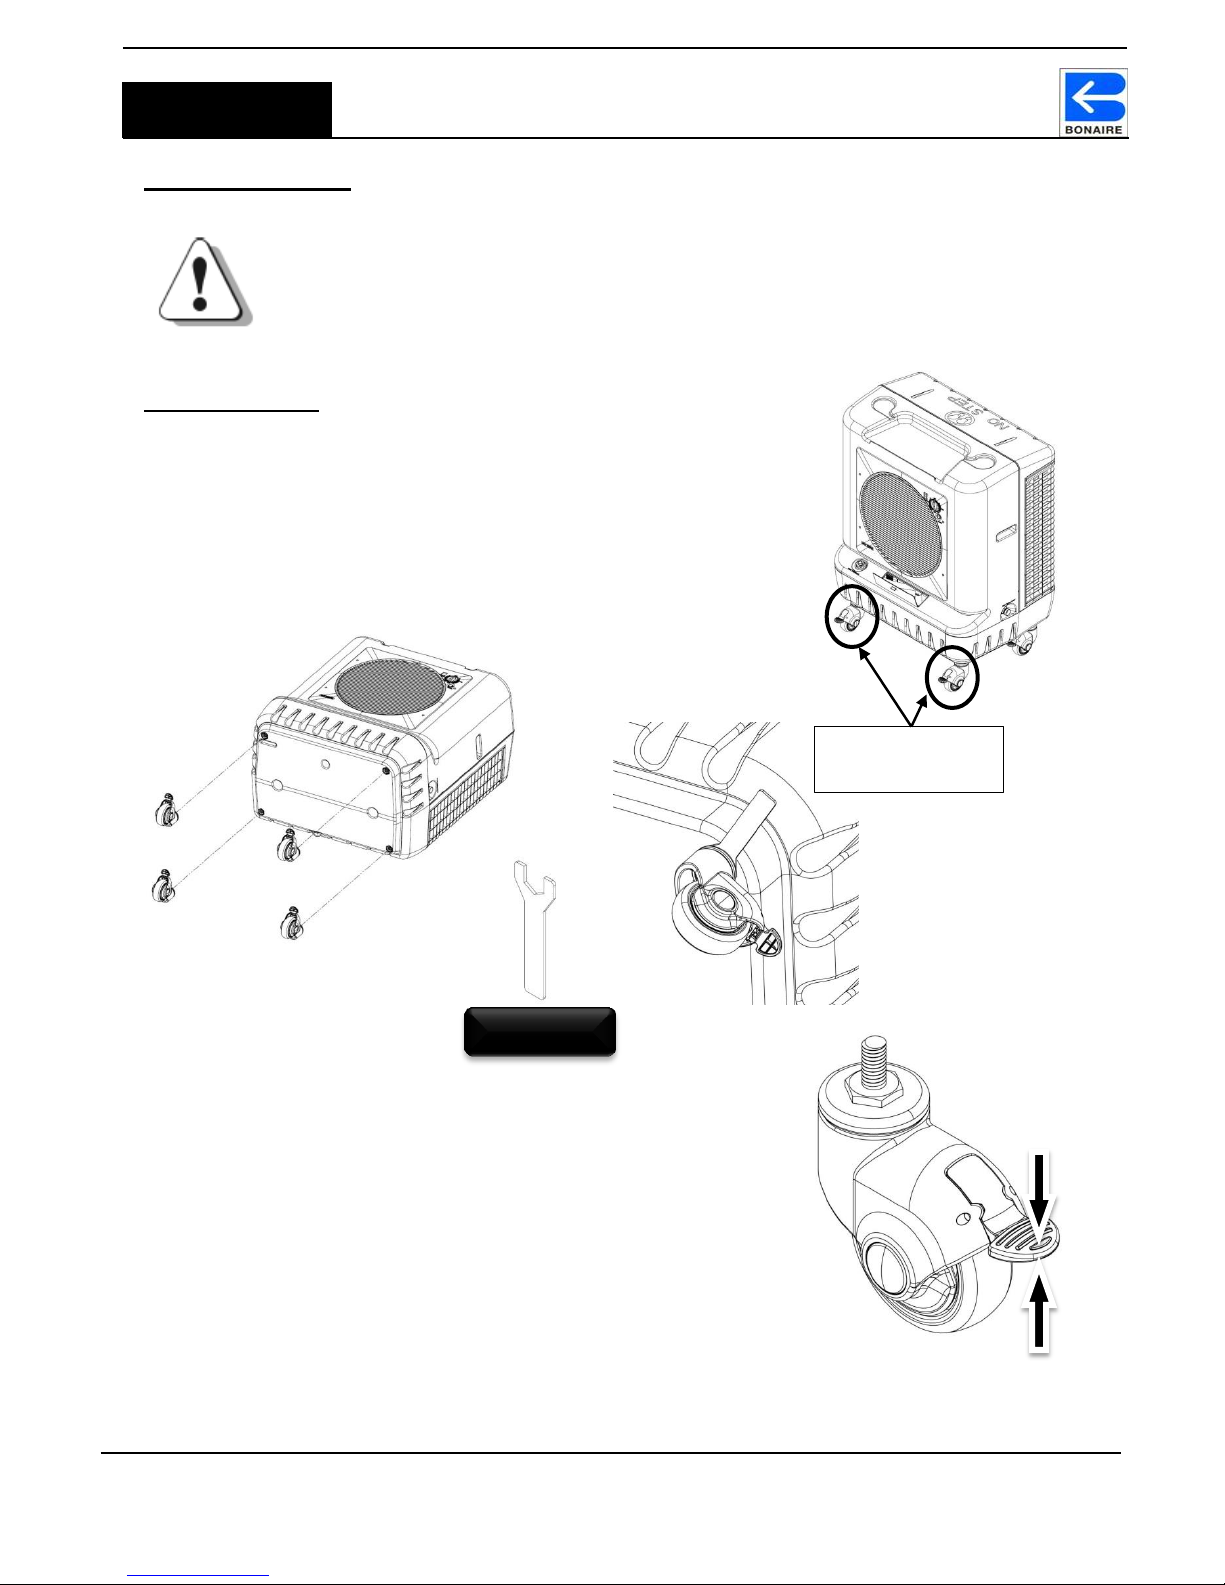
Wheel Assembly..................................................................................................................................... 7
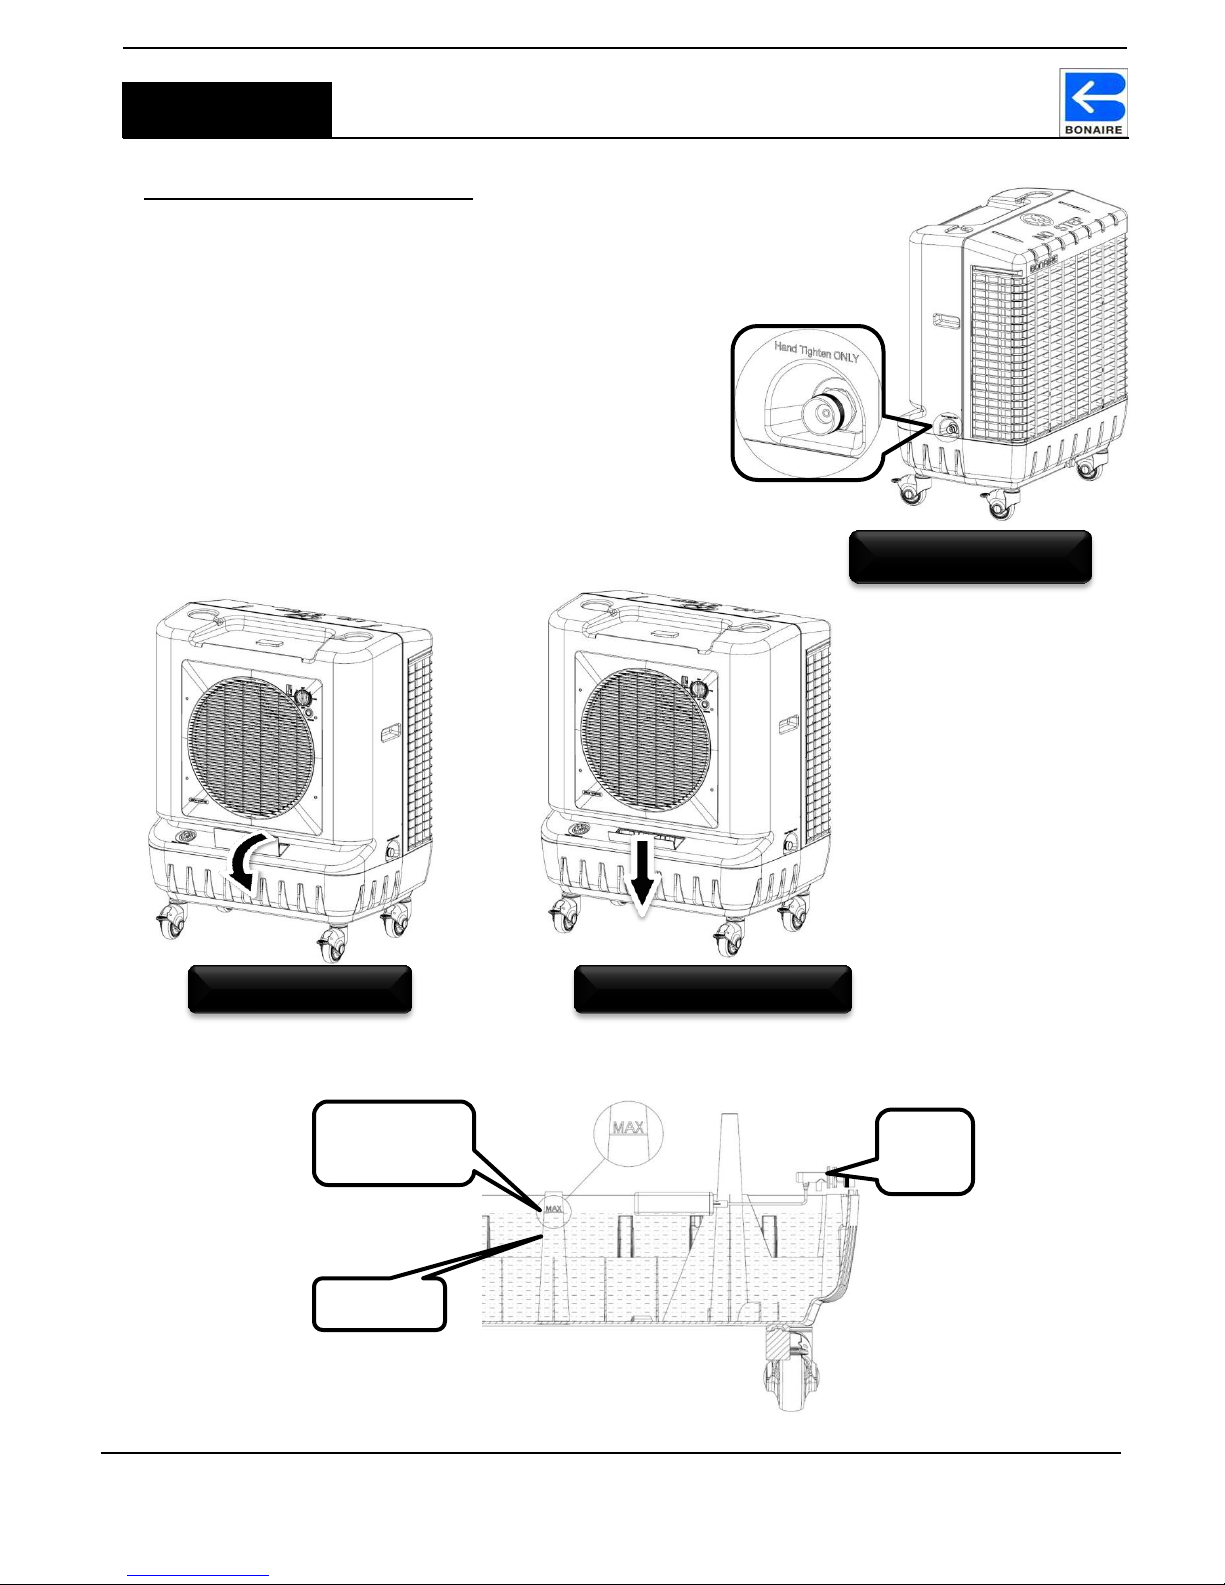
Water Connection / Tank Filling........................................................................................................... 8
Startup Checklist.................................................................................................................................... 9
Operation Instructions............................................................................................................10
Placement.............................................................................................................................................. 10
Cooler Operation.................................................................................................................................. 10
Before Starting.................................................................................................................................. 10
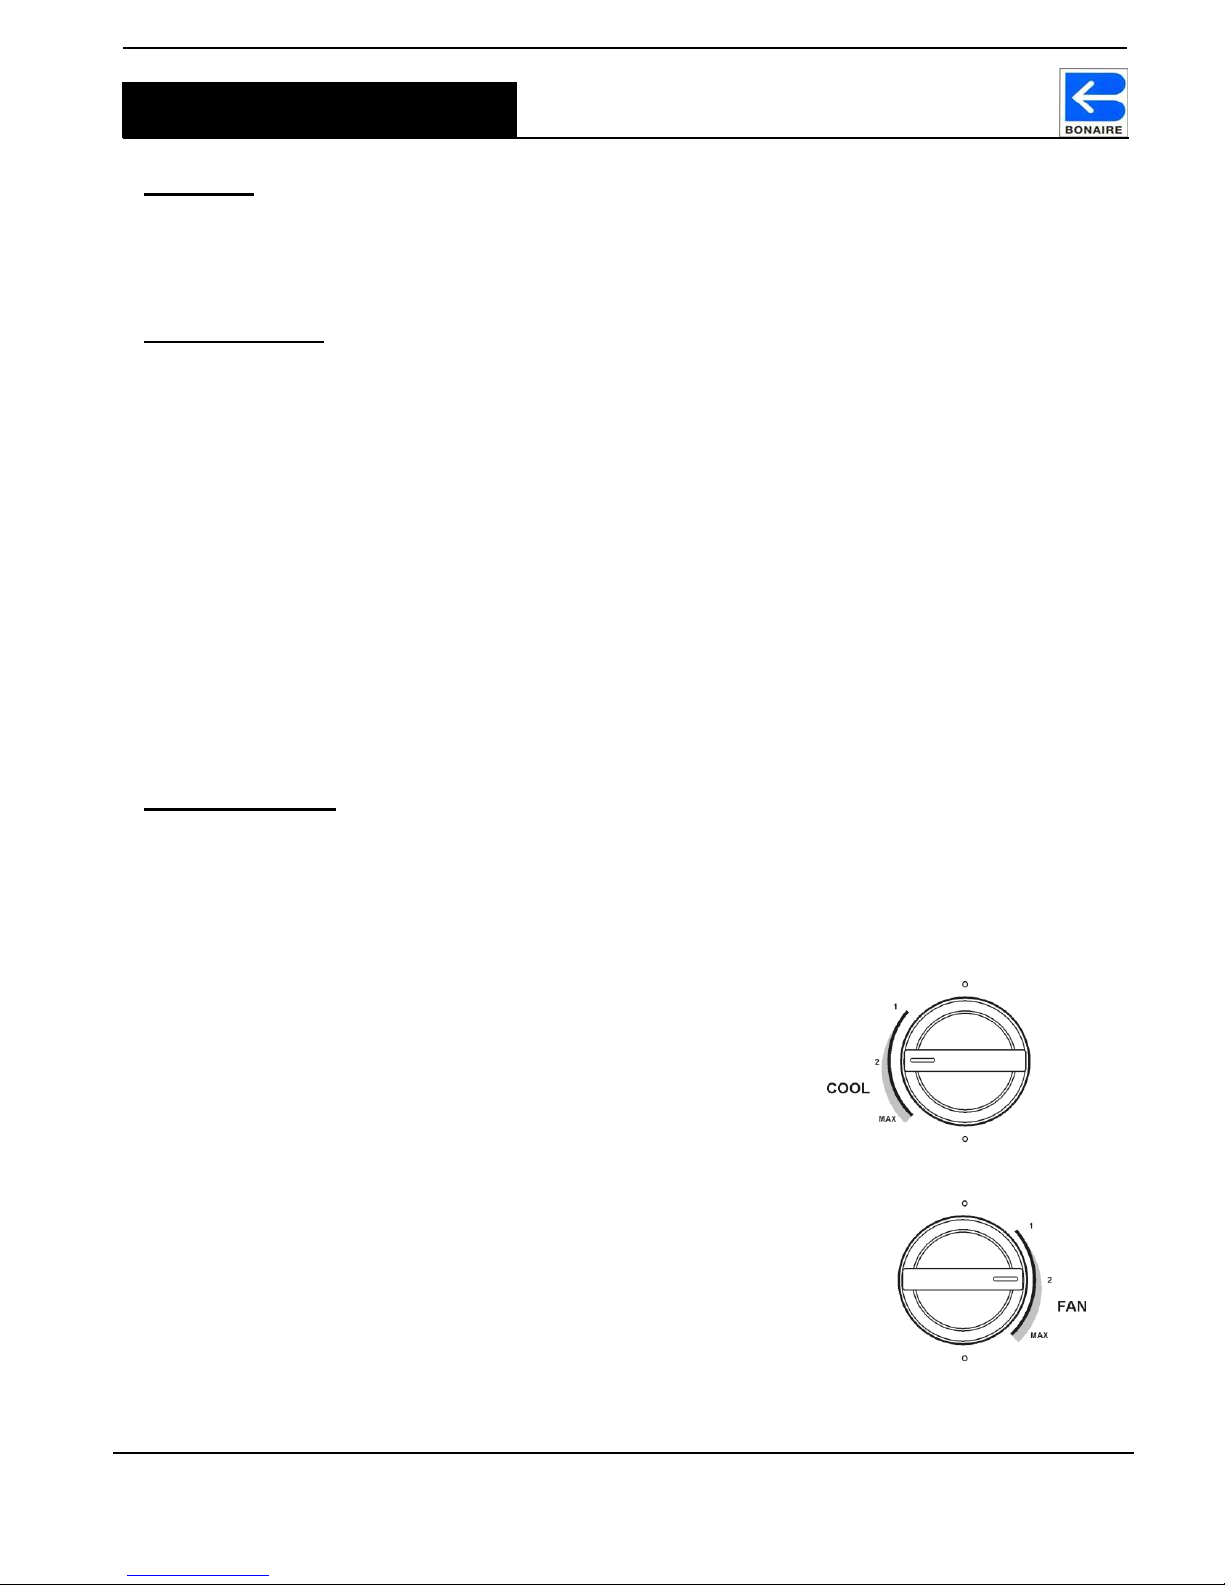
Operating the Unit................................................................................................................................ 10
Manual Mode.................................................................................................................................... 10
Auto (Remote) Mode ....................................................................................................................... 11
Remote control operation…………………………………………………………………………………………………………..12
Bleed off………………….…………………………………………………………………………………………………………..13
Maintenance............................................................................................................................14
General.................................................................................................................................................. 15
Filter Pads .........................................................................................................................................15
Water Tank........................................................................................................................................ 15
Water Distributor............................................................................................................................... 15
Water Level / Float Valve................................................................................................................ 15
Bleed Off............................................................................................................................................ 16
Electrical................................................................................................................................................ 16
5 Year Maintenance Planner..............................................................................................................17
Part List ...................................................................................................................................18
Problem Solving......................................................................................................................19
Warranty..................................................................................................................................20
Notes........................................................................................................................................22

Page | 3
Quick Setup Guide
BONAIRE PORTABLE COOLER
uick Setup Guide
Unpack the unit carefully
Assemble the Wheels &
Position unit on level surface
Fill the tank or attach water
hose. Lock the front wheels
before unit operation.
1
2
3
4
Plug unit into appropriate
outlet. Turn on power &
operate unit manually or by
remote. (Refer Page 10)

Page | 4
Introduction
BONAIRE PORTABLE COOLER
Introducti on
General Information
Thank you for purchasing a quality Bonaire Evaporative Portable Cooler. We care about your safety and
would ask you to spend a few minutes reading these simple instructions before operating this product.
Safety!
Read carefully all of these instructions prior to operating the unit.
Read and Save these Instructions. Do not throw these Instructions away.
Complete the unit assembly before attempting to operate.
Interference with and operation of this cooler in any manner not prescribed by these instructions could
cause a safety issue and WILL void any warranty.
Do not use cooler on uneven or unstable surfaces.
Use only with a 110V 60Hz single phase grounded GFCI protected electrical receptacle.
Do not operate cooler with Rear Filter Panel removed.
Do not use immediately adjacent to heat sources such as stoves or radiators.
Do not use the cooler immediately adjacent to sources of water, such as swimming pools, hot tubs,
bath tubs, sinks.
Do not operate cooler with a damaged cord, plug or other component.
Do not run the power cord under carpet or other floor covering.
Do not use the power cord with an adaptor plug that converts the 3 pin plug into a 2 prong connector.
Do not use the cooler with an improperly grounded outlet.
Do not overfill. Use water only.
Do not alter or modify this cooler.
Do not allow children to operate or service this cooler.
Lock all the wheels before operating cooler.
Do not step on or roll over power cord with heavy or sharp objects.
Remove the plug from the electrical receptacle by pulling on the plug and not the cord.
Never wash the unit cabinet with a garden hose: water may harm the motor and electrical system.
WARNING: To reduce the risk of fire or electric shock, do not use this product with any solid state
speed control device.
Use only qualified electricians for replacement or servicing of switches, or electrical motors and
components in this cooler.
Unplug the cooler and position the rotary control knob to the OFF position when servicing or cleaning.

Page | 5
Introduction
BONAIRE PORTABLE COOLER
Your portable evaporative air conditioner is engineered to meet the rigors of harsh environments. Used
and maintained in accordance with this manual, it will provide you with years of quiet, cool and
environmentally friendly operation. Please take the time to read this manual.
The principal of your unit is to introduce fresh air, which is washed through the filter pads to provide cool
fresh air. The warm stale air within the room is forced out by the cool air through open doors or windows.
Unit External View

Page | 6
Introduction
BONAIRE PORTABLE COOLER
Unit Internal View
YOUR DURANGO PORTABLE COOLER UNIT WILL CONTAIN THE FOLLOWING ITEMS FOR
ASSEMBLY AND OPERATION
Item Description
Quantity
Wheels
4
Spanner
1
Remote
1
Directional Louvre
(Optional accessory)

Page | 7
Installation
BONAIRE PORTABLE COOLER
Installation
Unpacking The Unit
Important
When you receive your unit the wheels, remote
control and accessory bag will be located inside
the box.
Wheel Assembly
Before installing the wheels the unit MUST be laid
down as shown.
As shown in the picture, lie the unit down carefully and place
the wheel screw end in to the recess under the tank as shown.
Then tighten the wheel in by using the spanner. Once all 4
wheels are assembled then carefully stand up the unit without
damaging a rear filter panel.
Note: Wheels must be locked when operating the unit. To lock
and unlock the wheels please refer the picture.
Press to
Lock
Lift to
Unlock
Spanner
Lockable wheels
fitted to front

Page | 8
Installation
BONAIRE PORTABLE COOLER
Water Connection / Tank Filling
This unit is compatible with a standard garden hose connection.
Use standard ¾” connection to connect water to the unit.
The overflow is factory fitted. If unit is inside then bleed hose
should be kept inside the tank and regular draining of the tank
will be required. If unit is outside then bleed hose should place
through the overflow fitting SHOULD bleed water during normal
operation at a rate between 6 –12 Litres per hour (1.5 –3
gallons per hour). This is normal and is designed to preserve
the quality of the Cooler and Cooling efficiency of the Unit.
The float valve is factory set and should require no further
adjustment at time of installation.
As an alternative to hose connection, the tank can be manually
filled through the ice door of the front of the unit. The water level
should be set its maximum limit as shown on overflow.
Note: Water supply line to float valve must be flushed before connecting.
Overflow
Float
Valve
Maximum
Water Level
Indicator
Hose Connection
1.Open the Ice door
2.Slide down the Ice door

Page | 9
Installation
BONAIRE PORTABLE COOLER
Startup Checklist
Position the cooler as required and lock all of the wheels.
Check that another door or window in the room is open to allow air to exhaust to other parts of the
house.
Turn the water supply to the cooler on if hose connected or fill the tank with water.
Plug the cooler into a 110V 60Hz single phase grounded appliance socket and switch the socket
on.
Turn the unit on to FAN mode and check the operation of the three speeds fan.
Rotate the control knob to COOL mode and operate the three speed fan and pump.
Leaving the unit in the COOL mode, check that a constant small stream of bleed off water is
coming from the overflow tube if unit is outside. This bleed off is designed to reduce mineral build
up on the Filtercool filter pads.
You may notice a wet paper smell as the water circulates around the filter pads. This is normal
during the commissioning phase and at the beginning of each season when the unit is operated
after the winter break. It will only last for a short time.

Page | 10
Operation Instructions
BONAIRE PORTABLE COOLER
Operation Instructions
Placement
It is essential for successful operation of the evaporative cooler that there be sufficient free air openings in
the room to be cooled –approximately 0.5m² (5.4² feet). Open doors and windows will usually provide this.
Your cooler must be positioned in front of an open window or door if it is to operate effectively. Always
ensure that there is another open window or door through which the air can exhaust from the room.
Cooler Operation
Before Starting
Always ensure that there is another open window or door through which the air can exhaust to other
parts of the house.
Ensure that the filters are kept clean.
Ensure that the water to the cooler is turned on or that the tank has been manually filled with water.
Ensure the plug is connected to a 110V 60Hz single phase grounded appliance socket on the inside
of the house and turned on.
IMPORTANT. After the first 10 hours of operation in COOL mode, the water must be drained from
the unit water tank to remove any new product residuals. This process must be repeated after a
further 10 hours of COOL mode operation.
IMPORTANT: Wheels MUST BE locked while operation unit.
Operating the Unit
The Durango Portable Cooler can be operated in either Manual or Auto (Remote) mode. This is selectable
by the toggle switch on the front panel. Each mode has COOL and FAN functions available.
Manual Mode:
COOL Mode: - Move control knob to “COOL” side. Select
desired fan speed
1 –Low/Sleep Mode
2 - Normal Operation
Max - Quick Cool down
The unit will now operate with the fan motor and water
pump activated.
FAN Mode: - Move the control knob to the “FAN” side .
Select desired fan speed
1 –Low/Sleep Mode
2 - Normal Operation
Max - Quick Cool down
The unit will now operate with the fan motor only activated.
To turn the unit off, rotate the control knob to the “O”position

Page | 11
Operation Instructions
BONAIRE PORTABLE COOLER
Auto (Remote) Mode: To activate the Auto mode turn on the switch as shown.
COOL Mode: -
1. Press the POWER button and the unit will start.
2. Now press the COOL button and the blue LED will be
illuminated.
3. Press the fan speed button as shown according to
your comfort.
The unit will now operate with the fan motor, water pump.
To turn the unit off, press the power button.
FAN Mode: - Fan mode can be activated by pressing the
PUMP button on and off.
1. Press the POWER button and the unit will start.
2. Press the fan speed button according to your comfort.
(Note: Do not press the Cool or Pump button)
The unit will now operate with the fan motor only activated.
To turn the unit off, press the POWER button.
Step 1
Step 2
Step 2
Step 1
Step 3
To Activate Auto Mode,
Turn ON this switch (Red
mark on the switch
indicates the switch is ON).
LED
Leave in OFF position

Page | 12
Operation Instructions
BONAIRE PORTABLE COOLER
Remote control operation
1. POWER (Start and stop operation)
2. FAN –LOW (starts low fan speed but there will be no pump operation until button 5 is pressed)
3. FAN –MEDIUM (starts medium fan speed but there will be no pump operation until button 5 is
pressed)
4. FAN –HIGH (starts high fan speed but there will be no pump operation until button 5 is pressed)
5. Cool (turns pump and fan continues to operate on previously selected speed)
6. NOT APPLICABLE FOR THIS MODEL
7. NOT APPLICABLE FOR THIS MODEL
8. NOT APPLICABLE FOR THIS MODEL
9. PUMP ONLY (turns pump on at first button press & turns pump off at second button press. NOTE:
there will not be any fan operation with this function, pump only)
NOTE:
For pump only operation the button is selected, the operation will be as follows:
1. The pump only button can only be activated only when the power is on.
2. If the cooler is running pressing will turn off fan and turn on main pump (If the main pump is on
before pressed, it will only turn off fan).
3. Press to turn off the main pump. If the pump only function is required again press and then
to turn on the main pump.
4. If cooling is required when the main pump is running on, press Cool ,and this will start the fan while
the main pump continues to run.
5. When the pump only function is selected by pressing , you cannot start the fan by pressing the
following buttons / / ..

Page | 13
Maintenance
BONAIRE PORTABLE COOLER
Bleed Off The bleed off rate is factory preset and is adjustable. It is critical to the life of the
product that the bleed off function is not restricted in any way as this may void unit
warranty and will cause damage to your filters and cooler.
The function of the bleed off must be inspected by the owner on a regular basis to
ensure the bleed off continuously flows when the unit is operating “COOL” mode.
Setting the BLEED OFF Rate
To set the bleed rate locate the patented DIALFLO externally on front panel. Rotate the BLEED knob
clockwise for more flow and anti-clockwise for less flow.
Note: Hold the water flow knob while setting the bleed rate as the water flow rate may go out of
adjustment. It is recommended that the bleed water is plumbed away to waste in accordance with local
and state plumbing requirements.
Setting the Water Flow Rate
To set the water flow rate to the filter pads, rotate water flow knob anti-clockwise for more water and
clockwise for less water.
Note: Hold the bleed knob while setting the water flow rate as the bleed rate may go out of adjustment.
All evaporative coolers require water bleed-off to prevent build-up of mineral deposits as the result of the
evaporative cooling process. This will maximize the life of the premium Filtercool filter pads and minimize
mineral deposits inside the cooler. The bleed off function only operates in COOL mode (when the water
pump operates).
Please Note: - Any additional pipe work fitted to the bleed off by the owner must slope away from the unit
in a downhill manner.
If water discharge is not an option because of location or cost of water, you may coil the bleed hose
inside the cooler opposite the Float Valve so the water recirculates back into the tank. Please be aware
that this will result in the Filtercool Pads needing to be changed more frequently.
Water Flow
Knob
BLEED OFF
Knob

Page | 14
Maintenance
BONAIRE PORTABLE COOLER
Maintenance
Before commencing any maintenance work on your unit, ensure it is
disconnected from the power supply.
Note: It is essential that your evaporative air conditioner is maintained in accordance with this manual.
Failure to do so will affect the life of the product and reduce the level of efficiency.
THIS MANUAL CONTAINS A 5 YEAR MAINTENANCE PLANNER TO USE IN CONJUNCTION WITH
THESE INSTRUCTIONS. See page 17.
Step 1
Remove Rear Filter Panel fixing
screws (4 off).
Step 2
Lift the rear filter panel vertically
75mm (3”)
Step 3
Remove the hose connected to the
rear filter panel and pull rear filter
panel away from unit. (Note: When
reinstalling the back panel the
pump hose will need to be
reconnected to the rear filter panel)
Step: 1
Step: 2
Step: 3

Page | 15
Maintenance
BONAIRE PORTABLE COOLER
General
Filter Pads
Visually check Filtercool pads for damage or blockage. Gently hose down pads from both sides to remove
any build up of salts, dust and pollen. In dusty areas more regular cleaning is recommended. Check the
water distributor, making sure it is clear and free from blockage. Failure to do so may lead to uneven
water distribution and therefore less efficient operation.
Water Tank
It is important to keep the water tank clean and free from sediment and algae growth. Using a small soft
bristle brush, brush all surfaces in the tank while it is full of water (DO NOT FORGET THE PUMP
STRAINER). Turn off the water inlet to the unit (an isolation valve should be fitted to the water inlet before
the float valve or at the water supply faucet). Drain the tank by undoing the drain CAP as shown (DO
NOT FORGET TO PUT THE DRAIN PLUG BACK ON AFTER DRAINING THE TANK). After refilling, it
may be necessary to repeat this procedure if the tank is very dirty.
Water Distributor
Check the water distribution system for blockage. Check the delivery tube for kinks or holes.
Note: Water supply line to float valve must be flushed before connecting.
Water Level / Float Valve
The water level should be set its maximum limit as shown on overflow. The float valve is a mechanical
type and is factory set. If it requires adjustment keep bends tight. If the valve is leaking, it may require
replacement.
Note: Water supply line to float valve must be flushed before connecting.
Motor and Fan
Check that the fan spins freely and that there is no build up on the blades. Check the motor for corrosion
and spray with an anti-corrosive agent if necessary.
DRAIN CAP

Page | 16
Maintenance
BONAIRE PORTABLE COOLER
Bleed Off
The bleed off should be checked to ensure it runs continuously and that there is no buildup of mineral
deposits in or on your air conditioner. White deposits indicate high mineral content and the bleed off
system should be checked.
In areas of poor water quality (where total dissolved solids are greater than 300 p.p.m.) increase the
bleed rate.
Pump Operation
Check the pump spins freely and that the strainer is
clean. Ensure the water slinger washer is in place on the
stainless steel shaft under the motor above the water
line.
After a long idle period, the pump may stop rotating due
to a mineral build up on the stainless shaft adjacent to
the motor. To free the pump shaft, remove mineral build
up and rotate the shaft using fingers or suitable sized
pliers. See diagram.
Spraying the area with suitable water displacement
lubricate (such as WD-40®) may assist.
In areas of low voltage, the pump may not provide
enough water to wet the filters. To rectify, increase
the water flow rate by turning Dialflo, as shown on
page 13.
Electrical
No general maintenance is
required to the electrical
system.
Electrical connections and maintenance
should only be carried out by a qualified
electrician.

Page | 17
Maintenance
BONAIRE PORTABLE COOLER
5 Year Maintenance Planner
1st
Year
2nd
Year
3rd
Year
4th
Year
5th
Year
PRESEASON
CHECK
1.1
Check quality of filters
1.2
Check fan & pump
1.3
Fill unit with water
1.4
Start unit
1.5
Check bleed-off system
FIRST
MIDSEASON
SERVICE
2.1
Check and clean filters
2.2
Drain, clean and refill water tray
2.3
Check bleed-off system
2.4
Check strainers and filters
2.5.
Check unit operates correctly
SECOND
MIDSEASON
SERVICE
3.1
Check and clean filters
3.2
Drain, clean and refill water tray
3.3
Check bleed-off system
3.4
Check strainers and filters
3.5
Check unit operates correctly
END OF SEASON
SERVICE AND
SHUT DOWN
4.1
Turn off water supply
4.2
Drain and clean unit
4.3
Check motor and pump and
spray with a water
displacement lubricant
To Order Parts
www.bonairedurango.com
For Technical Advice/Warranties
1-800-939-2983
Monday thru Friday 8:00 A.M. –1:00 P.M. Pacific Time

Page | 18
Part List
BONAIRE PORTABLE COOLER
Part List
No
Description
Part Number
1
Control Knob
6280133SP
2
Front Fascia
6280153SP
3
Ice door
6280149SP
4
Front Panel
6280142SP
5
Adaptor Float Valve
6280922SP
6
Float valve
6280919SP
7
Water Flow Control Valve (Dialflo)
6050904SP
8
Fan housing
6280151SP
9
Water Tank
6280143SP
10
Wheels –Swivel (x2)
6280171SP
Wheels –Brake (x2)
6280172SP
11
Drain Cap
6280918SP
12
Filter Pad Set 3500M
6280126SP
13
Rear Panel 3500M
6280141SP
14
Filter Retainer Clips
6280134SP
15
Motor Mounting Brackets
6282010SP
16
Motor
6281601SP
17
Fan Retaining Clip
6280804SP
18
Fan
6280806SP
19
Capacitor 12.0µF / 15.0µF
0160166SP / 0160177SP
20
Pump Filter Basket
6050811SP
21
Pump
6280811SP
22
Directional louvre (OPTIONAL ACCESSORY)
6281925SP

Page | 19
Problem Solving
BONAIRE PORTABLE COOLER
Problem Solving
PROBLEM
PROBABLE CAUSE
REMEDY
Unit fails to start
a. Power Failure
b. Tripped Circuit Breaker
c. Blown Fuse
d. Electrical Fault
a. Wait for power to be turned on.
b. Reset circuit breaker
c. Replace
d. Call Bonaire Care Line
Filter Pads not
wetting.
Filter pads too wet
a. Pump Seized
b. Water Control Valve(Dialflo) Setting
c. Electrical fault with pump
d. High voltage in your area
a. Extension cord dropping voltage
b. Maintenance page. See Pump section.
c. Adjust the Water control valve (Dialflo )
See page 13.
d. Call Bonaire Care Line
Water leaking from
overflow
a. Float Valve Leaking
b. Drain from FiltercoolPads
a. Check adjustment or replace float valve
if necessary
b. Normal Operation –adjust float level
Water Droplets in
air stream
a. Loose Delivery Tube
b. Break in tubing
c. Pump appears to deliver
excessive water to pads
d. Bleed nozzle is blocked
a. Check and tighten
b. Replace as necessary
c. Check the condition of the filter pad.
Wash if pad shows heavy buildup of
minerals
d. Clean bleed nozzle
Excessive humidity
a. Not enough air flow
b. Inadequate Exhaust
a. Increase fan speed
b. Provide more open area to exhaust
stale air by opening windows and doors
in adjacent rooms.
Inadequate
Cooling
a. Dirty Filters
b. Dry Filters
a. Clean
b. Check control set on COOL mode.
Check water delivery system. Adjust if
necessary.
Unpleasant Odor
a. Unit located near odor source
b. Algae in water tank
a. Remove source
b. Clean tank and refill with fresh water.
Rapid formation of
white deposits on
pads
High Mineral Content
Bleed off should be checked to see if
bleed nozzle is blocked, clear if
necessary and clean Filtercool pad.
Increase the bleed rate –see page 13.
More regular maintenance may be
required.
ANY FURTHER PROBLEMS PLEASE CONTACT YOUR
BONAIRE CUSTOMER CARE LINE ON 1-800-939-2983

Page | 20
Warranty
BONAIRE PORTABLE COOLER
Warranty
Statement on Product Warranty (U.S.A.)
1. Warranty
Subject to the Conditions and Exclusions, Climate Technologies Pty Ltd provides the original
purchaser with the following warranty:
Climate Technologies Pty Ltd warrants this appliance for a (2) two year period (parts only)
from the date of purchase. During this period, a defective appliance or defective parts will
be repaired or replaced free of charge at the election of Climate Technologies Pty Ltd.
In addition Lifetime cabinet corrosion parts only warranty on the unit cabinet
2. Conditions and Exclusions
a) The warranty only covers portable coolers manufactured by Climate Technologies Pty Ltd and
purchased in the U.S.A.
b) The warranty does not cover installation components that may be attached to the product
manufactured by Climate Technologies Pty Ltd. These may include and is not limited to items
such as ducting, flues, grills, piping, etc. These items remain solely the responsibility of the
installer / owner.
c) This warranty is only valid if the appliance is installed and operated in accordance with the
manufacturer’s instructions and for its designed and intended purpose at the nominated phase,
voltage and frequency.
d) Product fitness for purpose and overall system design / sizing are solely the responsibility of the
installer / owner. This includes but is not limited to heat load calculations, air flow, system
balancing, humidity, water quality, etc.
e) Industrial or commercial use of this product will void the warranty. The appliance is designed for
domestic use only.
f) The product must be installed by a qualified person in the manner prescribed by local and
statutory regulations and to the manufacturer’s specifications.
g) Warranty will only be given where proof of purchase is provided by the original purchaser and
Climate Technologies Pty Ltd is satisfied that the appliance is within the warranty period.
h) Warranty will not be provided where, in Climate Technologies Pty Ltd opinion:
i. There is nothing wrong with the appliance.
ii. The defective operation of the appliance is due to failure of electricity or water supply.
iii. Defects are caused by neglect, incorrect application, abuse or by accidental damage of the
appliance.
iv. An unauthorized person has attempted to repair the appliance.
v. The appliance has been changed or modified in any way.
vi. A situation arises referenced in the trouble-shooting guide.
i) Damage caused by elements such as wind, rain, lighting, floods, etc. along with power spiking
and brownouts are not considered defective material or workmanship and as such are not
covered by our warranty.
j) If there is no certificate of compliance for plumbing or electrical work, Climate Technologies Pty
Ltd reserves the right to refuse warranty on non-compliant installations.
This manual suits for next models
1
Table of contents
Languages:
Other BONAIRE Freezer manuals