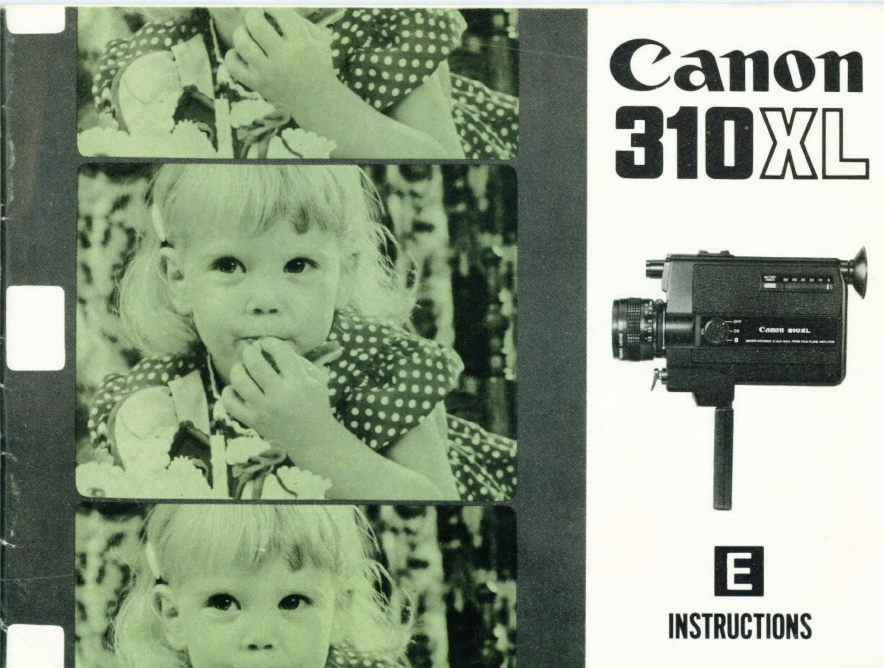
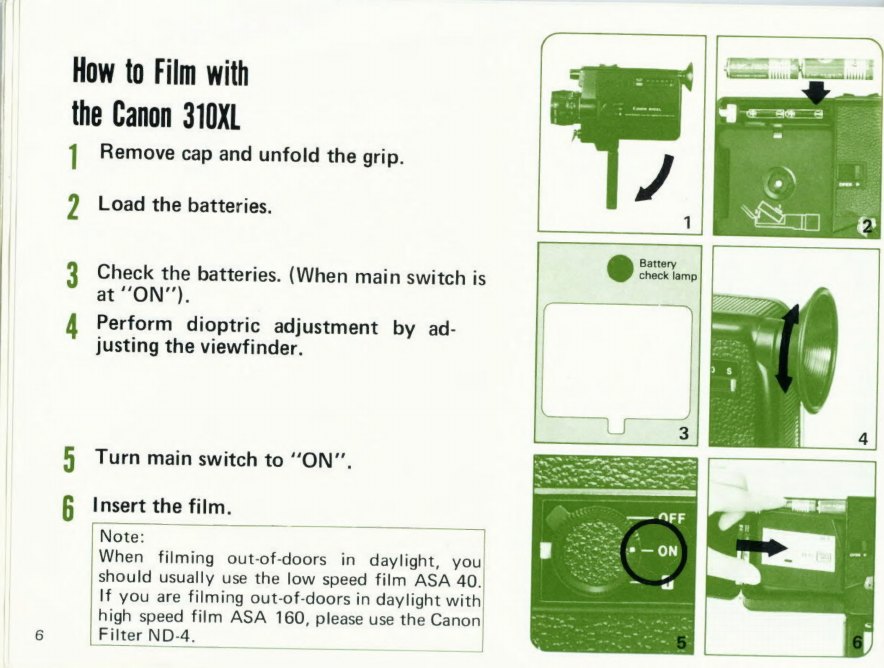
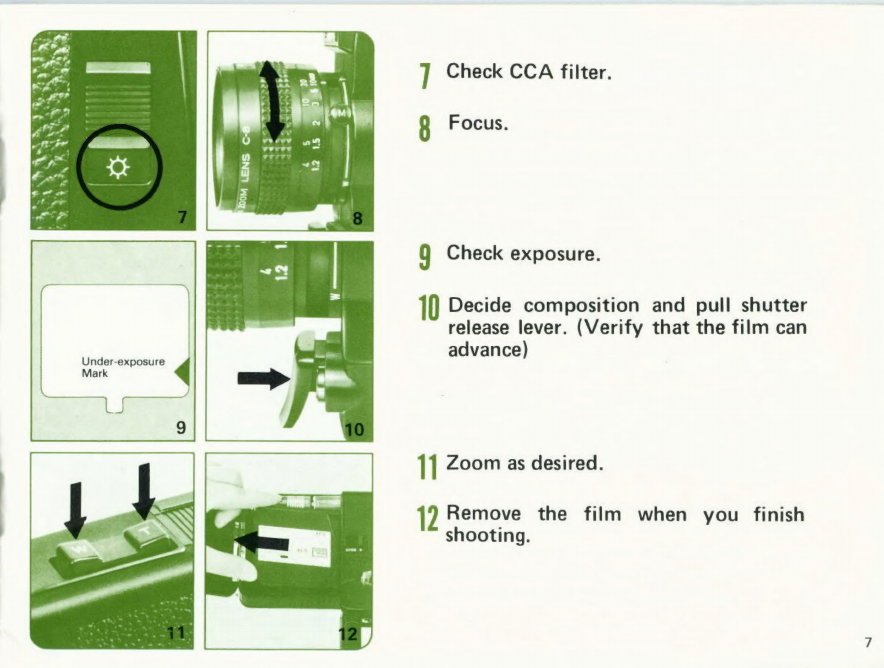
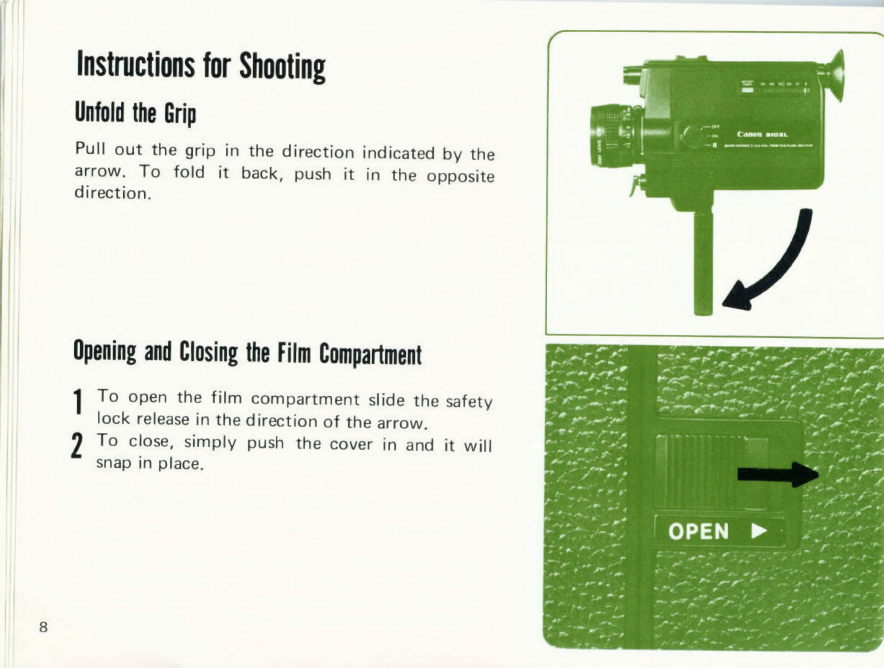
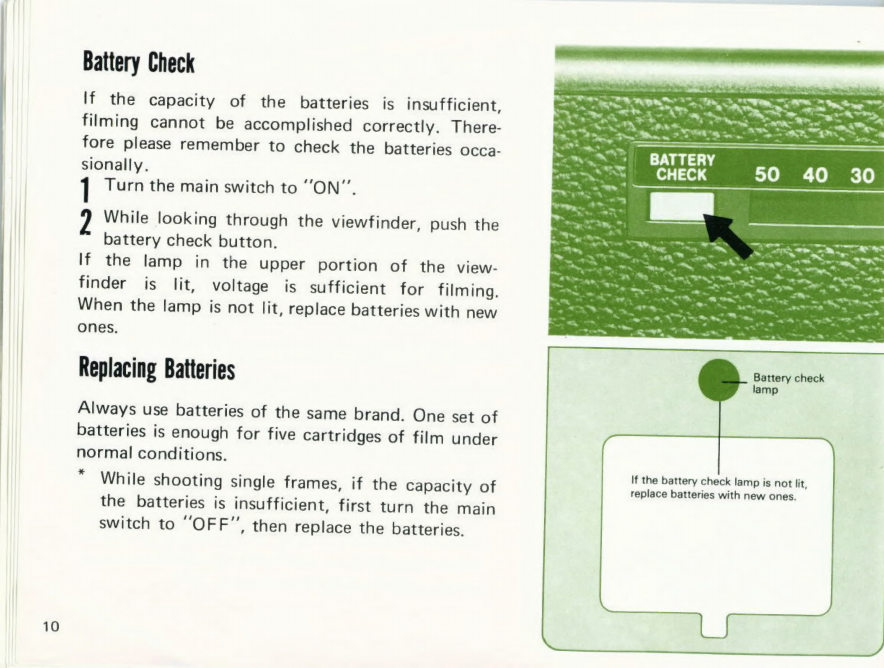
Canon 310 XL User manual

Canon
mwL
INSTRUCTIONS

Power
Zoom
Switch
Distance
Scale
Focusing
Ring
Zoom
Lens
—
Manual
Zooming
Lever/
Macro
Set
Lever
Shutter
Release
Lever
Cable
Release
Socket
CdS
Photocell
Exposure
Control
Plate
2

CCA
Filter
Switch
Film
Compartment
Film
Type
Indicator
Dioptric
Adjustment
Ring
Tripod
Socket
Folding
Grip
Side
Cover
Opening
Switch
3

Canon
310XL
Features
The
Canon
310XL
is
a
photography
system
that
enables
the
shooting
of
dark
subjects
and
indoor
shooting,
without
any
additional
light,
because
of
its
fast
lens
and
wide-angle
shutter,
and
because
of
the
high
speed
film
which
is
used
with
it.
It
is
a
slim
and
compact
camera
with
specifications
that
will
satisfy
not
only
the
beginning
photographer,
but,
as
a
second
camera,
expert
photographers
as
well.
The
Fastest
(f/1.0)
3X
Zoom
Lens
in
the
World
With
the
fastest
lens
of
any
8mm
movie
camera,
the
Canon
310XL
can
clearly
catch
even
very
dimly
lit
subjects.
Despite
the
speed
of
f/1.0,
its
newly
designed
lens
construction
of
13
ele¬
ments
in
11
groups
obtains
sharp
picture
images
without
flare
at
full
aperture
and
excellent
color
balance.
In
addition,
the
Canon
310XL
is
most
suitable
for
home
movies
with
a
consid¬
erable
depth
of
field
and
wide
angle
within
its
focal
length
of
8.5mm-25.5mm.
Easy
Close-up
Photography
using
the
Macro¬
photography
Mechanism
The
macrophotography
mechanism
enables
one
to
shoot
close-up
photography
without
attach¬
ing
any
accessories.
It
can
focus
at
a
point
^
21.5
cm
from
the
film
plane
indicator
by
a
simple
adjustment
of
the
macro
set
lever.
The
field
size
is
then
84.4
x
118mm.
Bright
Viewfinder
with
Filming
Information
The
viewfinder
has
a
large
exit
pupil
to
pre¬
cisely
catch
dark
subjects.
Furthermore,
the
battery
check,
macro-indication,
underexposure
warning
mark
and
film
transport
indicator
are
all
contained
in
the
viewfinder.
Easy-to-Carry,
Slim,
Compact
Design
Even
though
the
Canon
310XL
is
a
camera
with
a
large
aperture
f/1.0
lens,
it
has
an
extremely
compact
design.
The
diameter
of
the
filter
is
only
43mm
and
the
camera
body
is
but
39mm
wide.
High
Performance
Exposure
Meter
with
1C
The
exposure
is
accurately
metered
because
there
is
a
built-in
high
performance
exposure
meter
with
an
1C
within
the
metering
circuit
which
is
designed
also
to
control
the
change
in
voltage.
As
for
the
power
source,
2
penlight
1.5V
batteries
are
used
to
power
the
film
transport,
auto
zoom
and
exposure
metering
functions.
Other
Characteristics
Exposure
control
plate
for
shooting
against
the
light.
A
safety
switch
prevents
accidental
shoot¬
ing.
One
set
of
batteries
conveniently
powers
all
the
electric
functions.
Viewfinder
Information.

Technical
Data
Type:
SLR
type
Super
8
with
XL
mechanism
Frame
Size:
5.8
x
4.2mm
Super
8
size
(Movie
frame),
5.4
X
4mm
(Projection
frame)
Lens:
Focal
Length
8.5
—
25.5mm
(Zoom
Ratio
3)
f/1.0.
Lens
construction:
13
elements
in
11
groups.
Coating:
Spectra
Coating.
Filter
thread
size:
43mm.
Lens
cap
size:
45mm.
Macro
Shooting
Mechanism:
Macro
chooting
mecha¬
nism
is
done
by
switching
macro
set
lever.
With
the
focus
set
at
infinity
(«>);
close-up
shooting
at
21.5cm
from
the
film
plane
indicator
is
possible.
The
field
size
is
then
84.4
x
118mm.
Viewfinder:
Single
reflex
aerial
image
system
(Viewfinder
Information):
Underexposure
warning
mark;
Film
transport
indicator;
Battery
check
lamp;
Macro
indication;
Dioptric
adjustment
from
—4
to
+2
dpt.
with
eyecup.
EE
Mechanism:
Automatic
exposure
mechanism
cou¬
pled
to
film
speed
and
filming
speed.
(Electric
Eye
System):
Light
measurement
by
a
CdS
photocell
through
the
window
above
the
main
lens.
Exposure
Control
Plate.
EE
Metering
Range:
ASA
250
f/1.0
18fps;
ASA
25
f/45
18fps,
single
frame
Film
Speed:
(Artificial
light)
ASA
40
160
250
(Daylight)
ASA
25
100
160
Film
Speed
Setting:
Automatically
set
when
cartridge
Is
loaded.
Color
Temperature
Adjustment
CCA
Filter:
Built-in
CCA
filter
for
correct
color
balance
with
tungsten
film
under
daylight
and
switch
on
camera
body
for
quick
cancellation
of
filter
under
artificial
light.
Filter
is
automatically
cancelled
when
daylight
type
film
car¬
tridge
is
inserted.
Filming
Speeds:
18
fps,
single
frame
Angle
of
Shutter
Opening:
220°
Drive
System:
Film
drive
with
high-performance
elec¬
tric
micromotor
and
power
zooming.
Power
Source:
2
penlight
batteries
(3V).
Film
drive;
power
zooming;
measuring
exposure;
Sufficient
for
5
cartridges
under
normal
temperatures;
One
cartridge
with
new
batteries
when
shooting
single
frames.
Footage
Counter:
Automatically
returns
to
S
and
counts
footage
of
exposed
film.
Coupled
to
the
removal
of
the
cartridge.
Battery
Check:
A
lamp
in
the
viewfinder
activated
by
the
check
button.
Grip:
Collapsible
Socket:
Cable
releaes
socket
Switch:
"ON-OFF"
single
frame
switch
used
also
as
safety
switch.
Safety
Mechanism:
Switch
to
prevent
unnecessary
battery
consumption
or
shooting
inadvertently.
Dimensions
and
Weight:
176
x
112
x
39mm;
(6-15/16"
x
4-7/16"
X
1-1/2");
580g
(1
lb.
4
ozs.
(including
batteries)
Subject
to
change
without
notice.
5

How
to
Film
with
the
Canon
310XL
1
Remove
cap
and
unfold
the
grip.
2
Load
the
batteries.
3
C
h
e
ck
the
batteries.
(When
main
switch
is
at
"ON").
^
Perform
dioptric
adjustment
by
ad¬
justing
the
viewfinder.
5
Turn
main
switch
to
"ON",
g
Insert
the
film.
Note:
When
filming
out-of-doors
in
daylight,
you
should
usually
use
the
low
speed
film
ASA
40.
If
you
are
filming
out-of-doors
in
daylight
with
high
speed
film
ASA
160,
please
use
the
Canon
Filter
ND-4.
6

1
Check
CCA
filter,
g
Focus.
Q
Check
exposure.
'IQ
Decide
composition
and
pull
shutter
release
lever.
(Verify
that
the
film
can
advance)
‘I'l
Zoom
as
desired.
10
Remove
the
film
when
you
finish
shooting.
7

Instructions
for
Shooting
Unfold
the
Grip
Pull
out
the
grip
in
the
direction
indicated
by
the
arrow.
To
fold
It
back,
push
it
in
the
opposite
direction.
Opening
and
Closing
the
Film
Compartment
“I
To
open
the
film
compartment
slide
the
safety
lock
release
in
the
direction
of
the
arrow.
2
To
close,
simply
push
the
cover
In
and
it
will
snap
in
place.
8

Loading
the
Batteries
(The
same
batteries
power
the
exposure
meter,
zooming
system
and
film
drive).
Insert
2
new
A
A
size
batteries
of
the
same
brand
into
the
battery
compartment.
Be
sure
that
the
+
and
—
ends
of
each
battery
are
in
the
proper
direction.
If
the
camera
will
not
be
used
for
a
prolonged
period,
remove
the
batteries
and
store
them
in
a
dry
place.
(Batteries
may
leak
and
damage
the
camera
if
left
inserted
for
a
long
period
of
time.)
Main
Switch
By
turning
the
dial
of
the
Main
Switch
to
'"ON",
all
electric
circuits
are
connected.
Similarly,
at
'"OFF"
all
the
circuits
are
disconnected,
and,
as
a
safety
measure,
neither
the
shutter
nor
the
zooming
switch
can
be
operated.
*
When
the
camera
is
not
in
use
for
a
long
period
of
time
turn
the
dial
to
"'OFF"',
in
order
to
conserve
battery
energy.
A
red
mark
is
visible
when
the
dial
is
in
the
position
to
let
you
see
at
a
glance
that
the
power
Is
"'ON"'.
9

Battery
Check
If
the
capacity
of
the
batteries
is
insufficient,
filming
cannot
be
accomplished
correctly.
There¬
fore
please
remember
to
check
the
batteries
occa-
sionally.
^
Turn
the
main
switch
to
2
While
looking
through
the
viewfinder,
push
the
battery
check
button.
If
the
lamp
in
the
upper
portion
of
the
view¬
finder
is
lit,
voltage
is
sufficient
for
filming.
When
the
lamp
is
not
lit,
replace
batteries
with
new
ones.
Replacing
Batteries
Always
use
batteries
of
the
same
brand.
One
set
of
batteries
is
enough
for
five
cartridges
of
film
under
normal
conditions.
While
shooting
single
frames,
if
the
capacity
of
the
batteries
is
insufficient,
first
turn
the
main
switch
to
"OFF",
then
replace
the
batteries.
10

Dioptric
Adjustment
While
looking
through
the
viewfinder,
turn
the
eyecup
to
adjust
the
eyepiece
to
your
vision.
*1
Turn
the
focusing
distance
ring
to
infinity.
2
Look
through
the
viewfinder.
Turn
the
dioptric
adjustment
ring
until
the
subject
in
far
distance
appears
clearest
and
sharpest.
The
eyepiece
adjustment
range
is
from
—4
to
+2
diopters.
Loading
the
Film
Insert
the
film
cartridge
with
the
identification
label
placed
as
shown
in
the
picture.

CCA
Filter
The
Super
8
camera
is
made
generally
so
as
to
allow
filming
with
tungsten
light
film
(artificial
light)
in
daylight
conditions.
Therefore
there
is
a
CCA
filter
built-in
for
adjust¬
ment
of
color
temperature
within
the
optical
path
of
the
lens.
When
shooting
in
daylight,
the
filter
should
be
applied,
on
the
other
hand,
when
shoot¬
ing
indoors
with
artificial
light,
the
filter
should
be
removed
from
the
optical
path.
However,
when
the
G
type
film
for
daylight
or
artificial
light
and
daylight
type
film
are
loaded
into
this
camera,
the
filter
is
automatically
cancelled
no
matter
what
the
position
of
the
filter
switch
is.
Settings
of
the
CCA
Filter
When
you
are
using
tungsten
type
film,
the
CCA
filter
has
to
be
set
differently
according
to
the
kind
of
light
source.
Under
artificial
light,
slide
down
the
filter
setting
switch
and
when
the
Q
mark
Is
visible,
the
filter
IS
cancelled.
In
daylight,
slide
up
the
switch
until
^
mark
is
Indicated.
It
is
Impossible
to
obtain
12
the
proper
color
balance
unless
this
is
done.

CCA
Filter
Settings
Light
^\Sou
rce
Film
Type
Daylight
Artificial
Light
Tungsten
Type
Q
Daylight
Type
or
G
Type
1
Both
position
Q
J
can
be
used.
1_
J
M
Him
transport
indicator
Checking
the
Film
Transport
The
film
transport
indicator
can
be
seen
in
the
lower
part
of
the
viewfinder.
The
indicator
is
visible
and
moves
up
and
down
when
the
film
is
being
properly
transported.
If
the
indicator
does
not
move,
remove
the
film
cartridge
and
advance
the
film
slightly
with
your
finger;
then
insert
the
cartridge
once
more.
*
When
the
film
reaches
the
end,
the
film
transport
Indicator
stops.
13

Setting
the
Distance
The
Canon
310XL
can
focus
as
close
as
1.2
meters,
but
focusing
is
by
eye.
After
determining
the
distance
between
camera
and
subject,
turn
the
distance
ring
until
the
proper
distance
is
aligned
with
the
index
in
order
to
focus
correctly.
The
distance
ring
may
be
set
at
or
in
between
the
numbers.
The
lower
row
of
white
numbers
represents
distance
in
meters
and
the
upper
row
of
green
numbers
represents
distance
in
feet.
Using
the
Zone
Focusing
When
filming
out-of-doors
under
a
clear
sky,
the
depth
of
the
field
is
increased
and
you
can
simply
use
the
3
or
10
red
zone
gradations
without
focusing
exactly.
(For
generally
close
shooting
of
up
to
about
7
meters
set
the
distance
ring
at
3;
for
shooting
subjects
farther
away
set
the
distance
ring
at
10).
When
perfect
focusing
is
required,
measure
the
distance
between
subject
and
camera
exactly
and
adjust
the
distance
ring
accordingly.
14

I
Battery
check
lamp
Macro
Indication
Under-exposure
Mark
<
Film
transport
Indicator
Confirming
the
Exposure
When
the
subject
is
too
dark,
a
red
mark
in
the
lower
right
part
of
the
viewfinder
warns
of
under¬
exposure.
Under
these
conditions,
use
additional
light.
A
battery
check
lamp,
film
transport
indi¬
cator,
and
macro
indication
are
also
built
into
the
viewfinder.
Backlight
Control
Plate
For
filming
snowcovered
mountains
in
the
daylight,
at
the
beach
or
when
it
is
clear
out,
if
a
high
speed
film
(ASA
160)
is
used,
the
picture
will
be
overexposed.
We
would
highly
recommended
the
use
of
ASA
40
(25)
film
for
daylight
and
outdoor
photography.
When
you
use
the
film
of
ASA
160.
please
use
the
Canon
Filter
ND—4.
When
attaching
the
filter
to
the
lens,
pull
up
the
exposure
control
plate
which
is
located
at
the
base
part
of
the
ex¬
posure
metering
window.
The
range
of
this
exposure
control
plate
is
2
stops.
*
Do
not
use
the
ND
filter
and
the
UV
or
Skylight
filter
together.
*
Do
not
use
filters
except
of
1
or
4
of
exposure
factor.
15

Exposure
Adjustment
When
Shooting
Against
the
Light
The
exposure
control
plate
is
used
in
order
to
attain
the
correct
exposure
when
shooting
against
strong
direct
light
such
as
when
the
sun
is
behind
the
subject.
Exposure
adjustment
value
is
approximate¬
ly
2
f/stops.
When
shooting
a
subject
with
a
window
in
the
background
or
in
ordinary
light
conditions,
exposure
adjustment
is
not
necessary.
Pull
the
shutter
release
lever
and
shoot
Press
the
zooming
switch
when
necessary.
Zooming
can
be
used
for
composition
or
to
make
the
image
change
continuously.
Power
zooming
or
manual
zooming
are
both
possible.
Power
Zooming
-j
While
pulling
the
shutter
release
lever,
press
the
zooming
switch.
2
The
subject
will
become
larger
when
"T"
is
pressed,
and
smaller
when
"W'^
is
pressed.
When
the
image
stops
moving,
the
zooming
lever
will
not
rotate
anymore.
Keep
the
light
metering
window
uncovered
while
you
operate
the
power
zooming.
Power
zooming
cannot
be
performed
without
pulling
the
shutter
release
lever.

Manual
Zooming
Since
power
zooming
produces
the
zooming
effect
at
a
fixed
speed,
use
manual
zooming
for
zooming
at
different
speeds.
1
Slide
the
manual
zooming
lever
(doubles
as
macro
set
lever)
up
or
down
as
desired.
After
Shooting,
Remove
the
Film
Cartridge
1
When
the
film
ends,
the
film
transport
indicator
in
the
viewfinder
stops.
0
After
you
have
shot
50ft.,
open
the
film
^
compartment
and
remove
the
film
cartridge.
In
this
case,
the
film
footage
counter
automatically
indicates
"S'".
*
When
filming
the
television
picture,
the
picture
will
be
overexposed
since
the
light
is
outside
of
the
lens.
When
you
shoot
the
picture,
we
would
recommended
placing
a
table
lamp
on
the
televi¬
sion
to
obtain
correct
exposure.
17

Macro
Filming
The
Canon
310XL
has
a
built-in
macro-filming
system
which
enables
titling
or
close-up
shooting
by
simply
moving
the
zooming
lever.
In
macro-filming,
focus
at
21.5cm
from
the
film
plane
indicator.
“I
Rotate
the
macro
set
lever
and
set
it
at
the
"'W"
position.
2
Slide
this
lever
to
the
''W"
position
and
then
pull
and
slide
it
further
to
the
'"M"'
position
to
set
for
macrophotography.
When
shooting
macrophotog¬
raphy,
a
yellow
mark
appears
In
the
upper
left
of
the
viewfinder.
(Please
see
page
15)
Q
Set
the
distance
scale
on
the
focusing
ring
at
infinty.
^
Measure
21.5cm
from
the
subject
to
the
film
plane
indicator.
The
wrist
strap
is
approximately
the
correct
length.
Measure
it
once,
and
then
use
the
wrist
strap
to
measure
the
distance,
between
the
subject
and
the
film
plane
indicator,
judging
any
remaining
distance
by
eye.
C
To
cancel
the
macrophotography
mechanism,
slide
the
lever
back
to
the
"W"
position.
With
the
distance
ring
at
Infinity,
the
full
field
size
Is
84.4
x
118mm.
Macro
shooting
should
be
performed
In
a
well
lit
18
place.

Single
Frame
Shooting
Single
frame
shooting
is
possible
for
titling
or
animation
with
the
EE
mechanism
and
will
enhance
the
enjoyment
of
making
movies.
^
Turn
the
main
switch
to
*'1
0
Each
time
the
shutter
release
is
pulled,
only
one
^
single
frame
is
exposed.
In
single
frame
shooting,
the
use
of
a
tripod
and
cable
release
will
assure
a
stable
image.
Cable
Release
Socket
It
is
advisable
to
use
the
cable
release
whenever
single
frame
shooting
is
performed
or
when
using
a
tripod.
The
cable
release
socket
is
next
to
the
shutter
release
lever.
Holding
the
Camera
To
avoid
blurred
movies,
it
is
most
important
to
hold
the
camera
correctly.
The
best
method
of
holding
the
camera
is
to
put
your
hand
through
the
strap
and
grasp
the
grip
while
putting
the
other
hand
on
the
top
of
the
camera,
for
focusing
or
zooming.
When
holding
the
camera,
press
your
elbow
firmly
against
your
body
and
keep
your
feet
slightly
apart.
When
performing
photography
with
your
eye
sepa¬
rated
from
the
finder's
eyepiece,
cover
the
eyepiece
with
your
hand
so
as
to
prevent
outside
light
from
entering
the
finder.

Accesories
Copy
Stand
4
Copy
Stand
4
is
convenient
for
macrophotography,
title
shooting
and
copy
work.
Consists
of
stanchion,
carrying
arm,
metal
fasteners
and
case.
Filters
Use
43mm
filters
for
both
color
films
and
black
and
white
films.
Type:
UV,
skylight,
CCA
4,
CCA
8,
CCA
12,
CCB
4,
CCB
8,
CCB
12,
ND-4,ND-8.
C-8
Wide
Attachment
Lens
43
This
is
an
attachment
lens
for
super
wide-angle
shooting.
Set
the
lens
wide-angle
macrophotography
and
shoot
at
a
fixed
focal
length.
This
camera
uses
the
focal
length
of
5.5mm.
When
the
exposure
is
more
than
f/4,
the
focal
length
Is
most
suitable
at
0.8
m
to
oo,
so
you
can
concentrate
on
photograph¬
ing
without
worrying
about
focusing.
20
Other manuals for 310 XL
1
Table of contents
Other Canon Camcorder manuals

Canon
Canon XF100 User manual

Canon
Canon Ultura User manual

Canon
Canon ELURA 80 User manual

Canon
Canon FS30 User manual

Canon
Canon FX 305 User manual

Canon
Canon VIXIA HF M50 User manual

Canon
Canon MV830 User manual

Canon
Canon LEGRIA HF G26 User manual

Canon
Canon Auto Zoom 518 User manual

Canon
Canon ZR 850 User manual

Canon
Canon XL 1 User manual

Canon
Canon DC DC210 User manual

Canon
Canon DM XM2E Operating instructions

Canon
Canon Optura 100 User manual

Canon
Canon VIXIA HF R40 User manual

Canon
Canon ZR200 User manual

Canon
Canon VIXIA HF G30 User manual

Canon
Canon Canosound 514XL-S User manual

Canon
Canon SCOOPIC 16M User manual

Canon
Canon Auto Zoom 1218 User manual