CARBONE TG111136 User manual

Herramientas Eléctricas
1
FICHA TÉCNICA
Marca: Total Tools
Voltaje: 110-120V~50/60Hz
Potencia: 1010W
Velocidad sin carga: 0-2800/min
Velocidad de impacto: 0-44800/min
Mandril: 1/2”
Incluye: manija auxiliar, 1 llave de ajuste para mandril y 1
barra indicadora de profundidad
Peso: 2.9 Kg.
Garantía: 1 año
Procedencia: Importado
Producto: Taladro roto-percutor 1010W Total Tools
CÓDIGO: UTG111136
DESCRIPCIÓN: Taladro roto-percutor 1010W Total Tools de
un voltaje de 110-120V~50/60Hz su potencia es 1010W.
Su velocidad sin carga de 0-2800/min con una velocidad
de impacto de 0-44800/min. Incluye un set de escobillas
de carbón, manija auxiliar, una llave de ajuste para mandril
de 1/2” y una barra indicadora de profundidad. Su peso
es de 2.9 Kg. y su garantía es de 1 año.
Caja a color
F R
1010W 110-120V
~50/60Hz 0-2800
min-1
0-44800
min-1
1.5-13mm

TG111136,UTG111136,TG111136-6,TG111136-8
TG111136S,TG111136E,TG111136-4
IMPACT DRILL
ES
Taladro De Impacto
EN
Impact Drill
1010W

The symbols in instruction manual and the label on the tool
Double insulated for additional protection.
Read the instruction manual before using.
CE conformity.
Wear safety glasses, hearing protection and dust mask.
Waste electrical products should not be disposed of with household waste.
Please recycle where facilities exist. Check with your Local Authority or
retailer for recycling advice.
Safety alert.
Please only use the accessories supported by the manufacture.
2

GENERAL POWER TOOL SAFETY WARNINGS
WARNING Read all safety warnings and all instructions.Failure to
follow the warnings and instructions may result in electric shock, fire and/or
serious injury.
Save all warnings and instructions for future reference.
The term "power tool" in the warnings refers to your mains-operated (corded)
power tool or battery-operated (cordless) power tool.
1) Work area safety
a) Keep work area clean and well lit. Cluttered and dark areas invite
accidents.
b) Do not operate power tools in explosive atmospheres, such as
in the presence of flammable liquids, gases or dust. Power tools
create sparks which may ignite the dust or fumes.
c) Keep children and bystanders away while operating a power
tool. Distractions can cause you to lose control.
2) Electrical safety
a) Power tool plugs must match the outlet. Never modify the plug
in any way. Do not use any adapter plugs with earthed
(grounded) power tools. Unmodified plugs and matching outlets will
reduce risk of electric shock.
b) Avoid body contact with earthed or grounded surfaces such as
pipes, radiators, ranges and refrigerators. There is an increased
risk of electric shock if your body is earthed or grounded.
c) Do not expose power tools to rain or wet conditions. Water
entering a power tool will increase the risk of electric shock.
d) Do not abuse the cord. Never use the cord for carrying, pulling
or unplugging the power tool. Keep cord away from heat, oil,
sharp edges or moving parts. Damaged or entangled cords
increase the risk of electric shock.
e) When operating a power tool outdoors, use an extension cord
suitable for outdoor use. Use of a cord suitable for outdoor use
reduces the risk of electric shock.
f) If operating a power tools in a damp location is unavoidable, use
3

a residual current device (RCD) protected supply. Use of an RCD
reduces the risk of electric shock.
3) Personal safety
a) Stay alert, watch what you are doing and use common sense
when operating a power tool. Do not use a power tool while you
are tired or under the influence of drugs, alcohol or medication.
A moment of inattention while operating power tools may result in
serious personal injury.
b) Use personal protective equipment. Always wear eye protection.
Protective equipment such as dust mask, non-skid safety shoes,
hard hat, or hearing protection used for appropriate conditions will
reduce personal injuries.
c) Prevent unintentional starting. Ensure the switch is in the off-
position before connecting to power source and/or battery pack,
picking up or carrying the tool. Carrying power tools with your
finger on the switch or energizing power tools that have the switch on
invites accidents.
d) Remove any adjusting key or wrench before turning the power
tool on. A wrench or a key left attached to a rotating part of the
power tool may result in personal injury.
e) Do not overreach. Keep proper footing and balance at all times.
This enables better control of the power tool in unexpected
situations.
f) Dress properly. Do not wear loose clothing or jewellery. Keep
your hair, clothing and gloves away from moving parts. Loose
clothes, jewellery or long hair can be caught in moving parts.
g) If devices are provided for the connection of dust extraction and
collection facilities, ensure these are connected and properly
used. Use of dust collection can reduce dust-related hazards.
4) Power tool use and care
a) Do not force the power tool. Use the correct power tool for your
application. The correct power tool will do the job better and safer at
the rate for which it was designed.
b) Do not use the power tool if the switch does not turn it on and off.
Any power tool that cannot be controlled with the switch is dangerous
4

and must be repaired.
c) Disconnect the plug from the power source and/or the battery
pack from the power tool before making any adjustments,
changing accessories, or storing power tools. Such preventive
safety measures reduce the risk of starting the power tool accidentally.
d) Store idle power tools out of the reach of children and do not allow
persons unfamiliar with the power tool or these instructions to
operate the power tool. Power tools are dangerous in the hands of
untrained users.
e) Maintain power tools. Check for misalignment or binding of
moving parts, breakage of parts and any other condition that may
affect the power tools operation. If damaged, have the power tool
repaired before use. Many accidents are caused by poorly maintained
power tools.
f) Keep cutting tools sharp and clean. Properly maintained cutting tools
with sharp cutting edges are less likely to bind and are easier to control.
g) Use the power tool, accessories and tool bits etc. in accordance
with these instructions, taking into account the working
conditions and the work to be performed. Use of the power tool for
operations different from those intended could result in a hazardous
situation.
5) Service
Drill safety warnings
a) Have your power tool serviced by a qualified repair person using
- Wear ear protectors when impact drilling. Exposure to noise can cause hearing loss.
- Use auxiliary handle(s), if supplied with the tool. Loss of control can cause personal
injury.
- Hold power tool by insulated gripping surfaces, when performing an operation where
the cutting accessory may contact hidden wiring or its own cord. Cutting accessory
contacting a "live" wire may make exposed metal parts of the power tool "live" and
could give the operator an electric shock.
only identical.
This will ensure that the safety of the power tool is
maintained.
Additional Safety Warnings
5

used over longer period of time or not adequately managed and properly
maintained.
b) Injuries and damage to property to due to broken accessories that are
suddenly dashed.
Warning! This power tool produces an electromagnetic field during
operation. This field may under some circumstances interfere with active or
passive medical implants. To reduce the risk of serious or fatal injury, we
recommend persons with medical implants to consult their physician and the
medical implant manufacturer before operating this power tool.
Even when the power tool is used as prescribed it is not possible to
eliminate all residual risk factors. The following hazards may arise in
connection with the power tool’s construction and design:
a) Health defects resulting from vibration emission if the power tool is being
Residual risks
6

Components, Specifications and Accessories
1 Depth gauge
2 Chuck
3 Locking screw for depth gauge
4 Drill/Impact action selector switch
5 Switch lock button
Components list
Technical Specifications
6 Cable sleeve
7 On/Off switch
8 Variable speed control
9 Forward/reverse selector switch
10 Auxiliary handle
Accessories:
1 Auxiliary handle 1pcs
2 Depth stop 1pcs
4 Chuck key 1pcs
3 Carbon brushes 1set
Voltage
TG111136
Wattage
No-load speed
Chuck capacity
Max drill capacity
Concrete
Wood
Steel
Double insulation
:220-240V ~ 50/60Hz
:1010W
:
:1.5~13mm
:13mm
:25mm
:10mm
0-2800/min
:
UTG111136
110-120V ~ 50/60Hz
1010W
1/16~1/2˝
0-2800/min
1/2˝
1˝
3/8˝
TG111136-6(ISRAEL plug)
220-240V ~ 50/60Hz
1010W
1.5~13mm
0-2800/min
13mm
25mm
10mm
TG111136-8(BS plug)
220-240V ~ 50/60Hz
1010W
1.5~13mm
0-2800/min
13mm
25mm
10mm
TG111136-4(IRAM plug)
220-240V ~ 50/60Hz
1010W
1.5~13mm
0-2800/min
13mm
25mm
10mm
TG111136E
220-240V ~ 50/60Hz
1010W
1.5~13mm
0-2800/min
13mm
25mm
10mm
Voltage
TG111136S(SAA plug)
Wattage
No-load speed
Chuck capacity
Max drill capacity
Concrete
Wood
Steel
Double insulation
:220-240V ~ 50/60Hz
:1010W
:
:3~16mm
:16mm
:25mm
:10mm
0-2800/min
:
10
1
234
98
7
5
6
7

Dia 1
Dia 2
Dia 3
Dia 5
Dia 4
Operation
Warning: Before using your drill be sure to read the instruction
manual carefully .
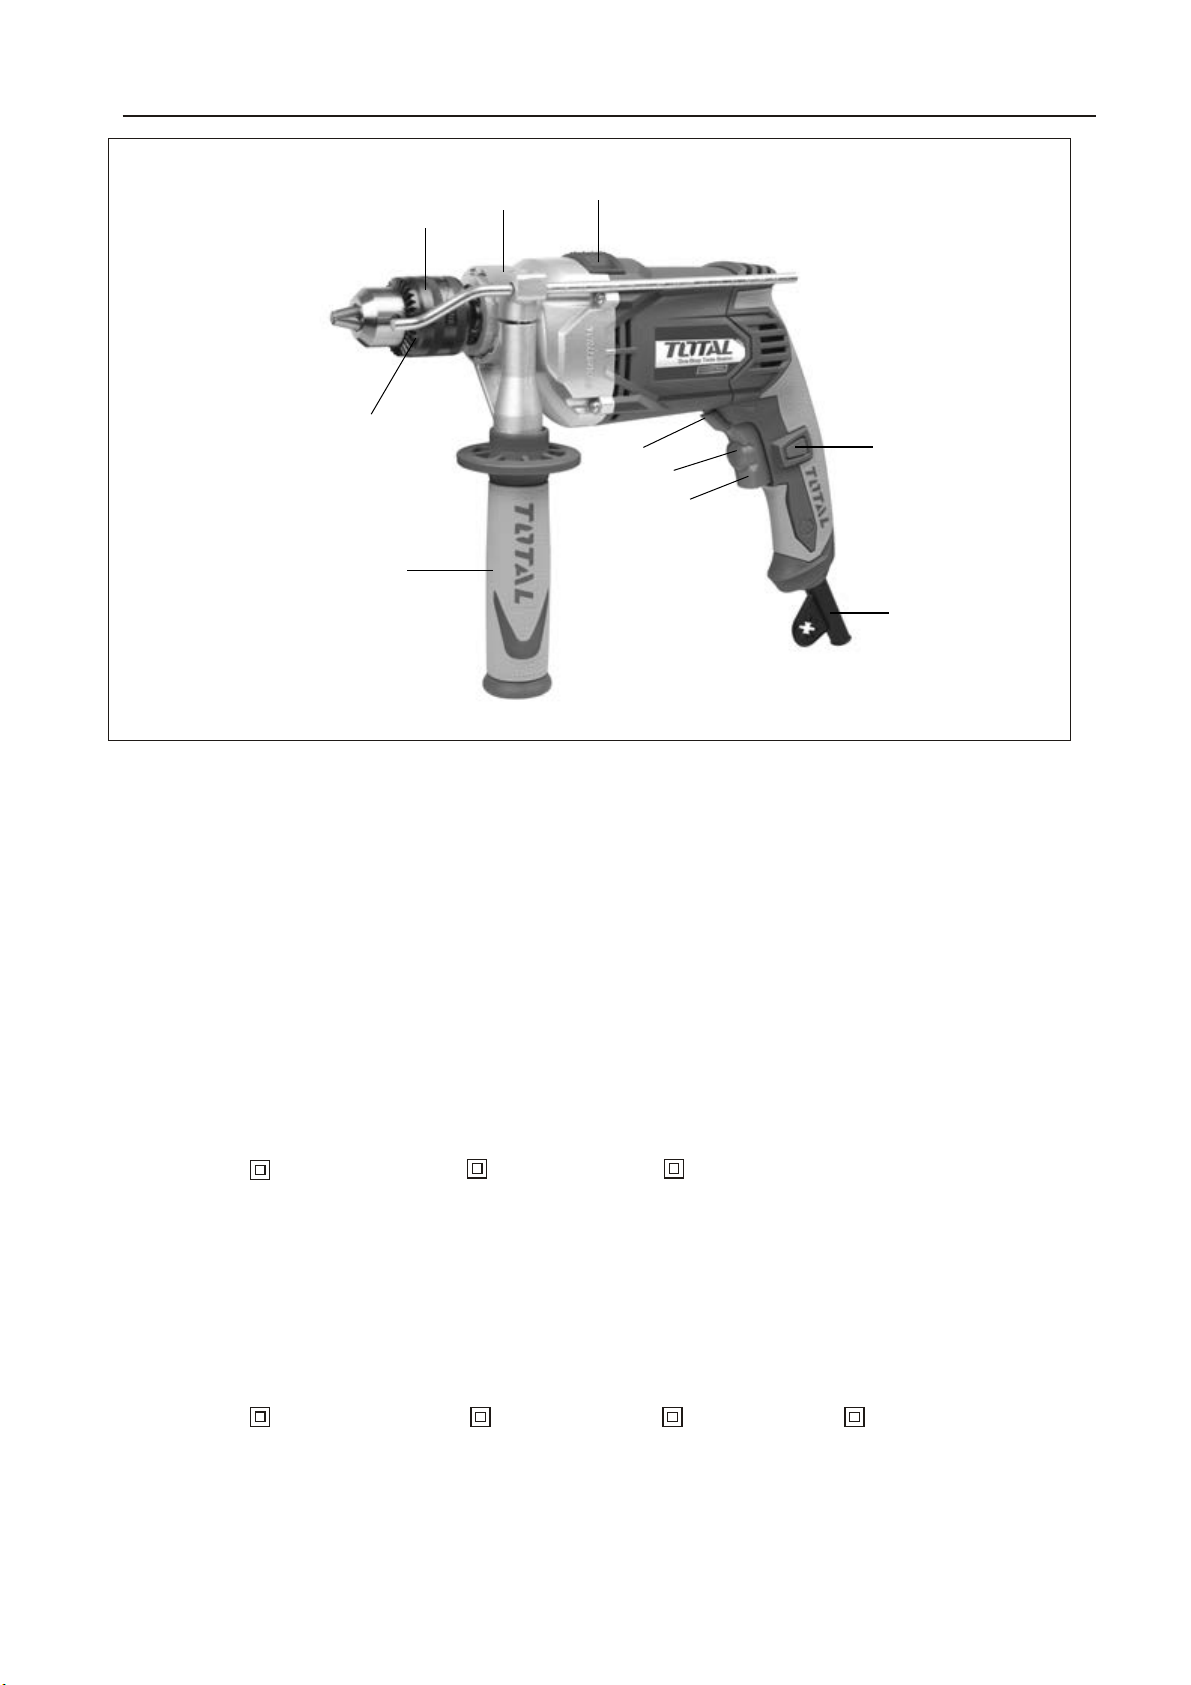
Installing the auxiliary handle (see Dia 1)
For your personal safety we recommend using the
auxiliary handle at all times.
To fit the handle, loosen the locking screw for
handle collar anti-clockwise. Slide clamping loop
over the handle collar. Rotate the handle around
the handle collar until the handle is in the desired
position. Tighten the locking screw clockwise to
secure the handle. If you are right handed fit the
handle as shown in Dia2. If you are left handed fit
the handle the other way round.
Installing the depth gauge (see Dia 2)
The depth gauge can be used to set a constant
depth to drill. To use the depth gauge, loosen the
locking screw for gauge by rotating the auxiliary
handle anti-clockwise. Insert the depth gauge
through hole in handle. Slide the depth
gauge to required depth and tighten the locking
screw by rotating the locking screw clockwise.
Inserting the key into chuck (see Dia 3)
Warning: Before installing tool,
remove mains plug from mains supply .
Remove chuck key from key storage tab at base
of drill handle, place key into chuck, turn key
anti-clockwise to undo/loosen chuck, inset
drill/tool and firmly tighten chuck by turning
key clockwise. Remove key and replace in storage
tab at base of drill handle.
Operating the On/Off switch (see Dia 4)
Press the on/off switch in for operation, release
switch to stop.If you wish to use the drill
continuously the switch lock button can be
pushed in after the on/off switch has been
depressed. To release the lock button simply
depress on/off switch fully, the button will
automatically release.
Variable speed control selector (see Dia5)
The maximum speed can be altered by turning
the variable speed control. Turn clockwise to
increase and anti-clockwise to decrease speed.
The speed of the drill varies with the amount of
pressure applied to the on/off switch, i.e. more
pressure for higher speed.
Locking scre
Auxialiary handle
Turn chuck
key clockwise
to tighten
8

Dia6
Dia 7
Changing rotational direction (see Dia6)
To change the rotational direction, push the
forward/reverse selector switch to the " "
position indicated on your drill. The rotation
will now be forward rotation. Push the
forward/reverse selector switch to " " position
indicated on your drill. The rotation will be
reverse rotation.
Note: Never move the forward/reverse
switch whilst the drill in operation or the
on/off switch is locked as this will damage
the drill.
Drill/Impact action switch (see Dia7)
When drilling masonry and concrete push
the drill/impact action selector switch into the
hammer position " ". When drilling wood,
metal, plastic push the switch into the drill
position " ".
Operation
9

Maintenance and Troubleshooting
Working hints for your drill
1 Drilling masonry and concrete
Select the drill/impact action selector switch to the "hammer symbol" position.
Tungsten carbide drill bits should always be used for drilling masonry,
concrete etc with a high speed.
2 Drilling steel
Select the drill/impact action selector switch to the "drill symbol" position. HSS
drill bits should always be used for drilling steel with a lower speed.
3 Screw driving
Select the drill/impact action selector switch to the "drill symbol" position.
Use a low speed to drive in or remove screws.
4 Pilot holes
When drilling a large hole in tough material (i.e. steel), we recommend drilling
a small pilot hole first before using a large drill bit.
5 Drilling tiles
Select the drill/impact action selector switch to the "drill symbol" position to
drill the tile. When tile has been penetrated, switch over to "hammer symbol"
position.
6 Cool the motor
If your power tool becomes too hot, set the speed to maximum and run no load
for 2-3 minutes to cool the motor.
Maintenance
1 Your power tool requires no additional lubrication or maintenance. There are
no user serviceable parts in your power tool.
2 Never use water or chemical cleaners to clean your power tool. Wipe clean
with a dry cloth.
3 Always store your power tool in a dry place.
4 Keep the motor ventilation slots clean.
5 If you see some sparks flashing in the ventilation slots, this is normal and will
not damage your power tool.
6 If the supply cord is damaged, it must be replaced by a special cord or
assembly available from the manufacturer or its service agent.
Troubleshooting
1 If your drill will not operate, check the power at the mains plug.
2 If the drill is not cutting properly, check the drill bit for sharpness, replace
drill bit if worn. Check that the drill is set to forward rotation for normal use.
3 If a fault can not be rectified return the drill to qualified repair personel for service.
10

TG111136,UTG111136,TG111136-6,TG111136-8,
TG111136S,TG111136E,TG111136-4 Expioding view
INDUSTRIAL
11

NO. Part Description
1
2
3
4
5
6
7
8
9
10
11
12
13
14
15
16
17
18
19
20
21
22
23
24
25
26
27
28
29
30
31
32
33
34
35
36
37
38
39
40
41
42
43
44
45
Qty
Screw M6*25
Chunck key
Chuck
Output spindle
3*10Key
Circlip 32
Ball Bearing6002/C3-2RZ
Movable Lapact block
Whisht Lapact Block
Gear Box
ScrewST4*20
Circlip22
Oil Shield
Gear
Circlip12
Spring
Seal Ring
Oil Shield
Support
Ball Bearing608/C3-2RZ
Rotor
Ball Bearing607/C3-2RZ
Slip Plate Drill/Impact Selector
Spring Cap
Spring
Drill/Impact Selector
Bearing607/C3-2RZ
Stator
Left Housing
O Ring
Inductance
Switch
Cord Clamp
Screw
Cord And Plug
Cord Protector
Screw
Carbon Brush
Brush Holder
Capacitor
Screw
Right Housing
Screw
Depth gauge
Auxiliary Handle
1
1
1
1
1
1
1
1
1
1
4
1
1
1
1
1
1
1
1
1
1
1
1
1
1
1
1
1
1
1
2
1
1
2
1
1
4
2
2
1
1
1
7
1
1
TG111136,UTG111136,TG111136-6,TG111136-8,
TG111136S,TG111136E,TG111136-4 Spare part list
12

Los símbolos del manual de instrucciones y la etiqueta de la herramienta
Doble aislamiento para protección adicional
Lea el manual de instrucciones antes de usar
CE de Conformidad Europea
Utilice gafas de seguridad, protección auditiva y máscara contra
el polvo.
Los productos eléctricos de desecho no deben eliminarse con la
basura doméstica. Por favor, recicle en las instalaciones
correspondientes. Revise con su Autoridad Local o distribuidor
para reciclar estos productos.
Alerta de seguridad
Por favor utilice únicamente los accesorios compatibles con el fabricante.
13

ADVERTENCIAS DE SEGURIDAD PARA HERRAMIENTAS ELECTRICAS EN
GENERAL
ADVERTENCIA Lea todas las advertencias de seguridad y todas las instrucciones. No
seguir todas las advertencias e instrucciones puede provocar una descarga eléctrica,
incendio y / o lesiones graves.
Guarde todas las advertencias e instrucciones para referencia futura.
El término "herramienta eléctrica " en las advertencias se refiere a una herramienta
operada con cable eléctrico y a las herramientas inalámbricas.
1) Seguridad del área de trabajo
A) Mantenga el área de trabajo limpia y bien iluminada. Las áreas desordenadas u
oscuras podrían causar accidentes.
B) No utilice herramientas eléctricas en atmósferas explosivas, o con la presencia
de líquidos inflamables, gases o polvo. Las herramientas eléctricas crean chispas que
pueden encender el polvo o los vapores.
C) Mantenga alejados a los niños y transeúntes mientras maneja una
herramienta eléctrica, las distracciones pueden hacer que pierda el control.
2) Seguridad eléctrica
A) Los enchufes de la herramienta eléctrica deben coincidir con el tomacorriente. Nunca
modifique el enchufe de ninguna manera. No utilice enchufes adaptadores en
herramientas eléctricas puesta a tierra. Enchufes no modificados y las tomas de
corriente coincidente reducirán el riesgo de descarga eléctrica.
B) Evite el contacto con instalaciones o superficies a tierra tales como tuberías,
radiadores y refrigeradores. Hay un incremento de riesgo de descarga eléctrica si su
cuerpo está puesto a tierra.
C) No exponga la herramienta eléctrica a lluvia o condiciones húmedas. El
ingreso de agua a la herramienta eléctrica incrementará el riesgo de descarga eléctrica.
D) No abuse del cable. Nunca utilice el cable para arrastar, halar o desconectar la
herramienta eléctrica. Mantenga el cable lejos del calor, aceite, superficies
afiladas o partes en movimiento. Cables dañados o enredados incrementan el
riesgo de descarga eléctrica.
E) Cuando opera una herramienta eléctrica en exteriores, utilice un cable
extensión adecuado para uso en exteriores. El uso de un cable adecuado para
exteriores reduce el riesgo de descarga eléctrica.
F) Si opera una herramienta eléctrica en un sitio húmedo es inevitable, usar un
dispositivo de corriente residual (DDR). El uso de un DDR reduce el riesgo de
descarga eléctrica.
14

3) Seguridad personal
A) Manténgase alerta, observe lo que está haciendo y utilice el sentido común
cuando opera una herramienta eléctrica. No utilice una herramienta eléctrica
mientras este cansado o bajo la influencia de drogas, alcohol o medicación. Un
momento de distracción mientras opera una herramienta eléctrica puede resulta en
serias lesiones personales.
B) Use equipo de protección personal. Siempre use protección para los ojos. El
uso apropiado de mascarillas contra polvo, zapatos de seguridad antideslizantes,
casco o protección auditiva, reducirán lesiones personales.
C) Evite el arranque involuntario. Asegúrese de que el interruptor esté en la
posición de apagado antes de conectar a la fuente de alimentación y / o la
batería. Transportar la herramienta por el cable o con el dedo en el interruptor
aumenta el riesgo de accidentes.
D) Retire cualquier llave de ajuste o inglesa antes de encender la herramienta
eléctrica. Una llave de ajuste dejada junto a una parte en rotación de una herramienta
eléctrica puede resultar en lesión personal.
E) No utilice la herramienta por periodos de tiempo prolongados. Mantenga la
postura y el equilibrio en todo momento. Esto permite un mejor control de la
herramienta en situaciones inesperadas.
F) Vístase adecuadamente. No use ropa suelta o joyas. Mantenga el cabello y la
ropa alejados de las partes móviles. La ropa suelta, la joyería o el pelo largo pueden
quedar atrapados en las partes móviles.
G) Si dispone de recolectores de polvo, asegúrese de que éstas estén bien
conectadas las tuberías y conectores. El uso de acumuladores de polvo puede
reducir los peligros relacionados con ese material y con su sistema respiratorio.
4) Uso y cuidado de la herramienta eléctrica
A) No fuerce la herramienta eléctrica. Utilice la herramienta eléctrica adecuada
para cada operación específica. La herramienta eléctrica correcta hará el trabajo
mejor y más seguro y a la velocidad para la que fue diseñada.
B) No utilice la herramienta eléctrica si el interruptor no la enciende y apaga.
Cualquier herramienta eléctrica que no pueda ser controlada con el interruptor es
peligrosa y debe ser revisada por personal calificado y autorizado.
C) Desconecte el enchufe de la fuente de alimentación y/o la batería de la
herramienta eléctrica antes de realizar cualquier ajuste, cambio de accesorios o
almacenamiento. Estas medidas preventivas de seguridad reducen el riesgo de
encender la herramienta accidentalmente.
D) Guarde las herramientas eléctricas fuera del alcance de los niños y no
permita que personas que no estén familiarizadas con su operación las utilice.
Las herramientas eléctricas son peligrosas en manos de usuarios inexpertos.
15

E) Cuide y revise las herramientas eléctricas. Revise y compruebe una
herramienta antes de su uso por: atascamiento de las piezas móviles, la rotura
de partes, elementos desajustados y cualquier otra condición que pueda afectar
su funcionamiento óptimo. Si está dañada, haga reparar la herramienta antes de
su uso. Muchos accidentes son causados por mantenimientos pobres en las
herramientas eléctricas.
F) Mantenga las herramientas de corte afiladas y limpias. Mantenimiento
apropiado en las herramientas de corte con un afilado correcto son menos propensas
de doblarse y se pueden controlar mas fácilmente.
G) Utilice la herramienta eléctrica, accesorios, brocas, etc. de acuerdo con estas
instrucciones, teniendo en consideración las condiciones de trabajo y el trabajo a
realizar. El uso de la herramienta eléctrica para operaciones diferentes para las que
fue creada podría resultar en una situación peligrosa.
5) Mantenimiento
A) Permita que un técnico de reparación calificado preste servicio a la
herramienta eléctrica, y solo con piezas de repuesto idénticas. Esto
asegurará que se mantenga la seguridad de la herramienta eléctrica.
Advertencias de seguridad adicional
Advertencia de seguridad de Taladradora con percutor
- Use protecjtores auriculares cuando haga la perforación por impacto. La
exposición al ruido puede causar pérdida de la audición.
- Utilice el (los) mango (s) auxiliar (s) si se suministra con la herramienta.
La pérdida de control puede causar lesiones.
- Sujete la herramienta eléctrica en superficies de agarre aisladas, cuando
realice una operación donde al cortar accesorios puede entrar en
contacto con cables ocultos o con su propio cable. La herramienta de corte
en contacto con un cable energizado puede hacer que el operario reciba una
descarga eléctrica.
Riesgos residuales
Inclusive cuando la herramienta eléctrica sea usada como se indica no es
posible eliminar todo los factores de restos residuales. Los siguientes riesgos
pueden presentarse en conexión con la construcción de la herramienta eléctrica
y diseño:
A) Defectos de salud resultado de la emisión de vibración si la herramienta eléctrica es
usada por largos periodos de tiempos o no es manejada adecuadamente y
mantenimiento apropiado.
B) Lesiones y daños al operario debido a accesorios rotos que de repente e
involuntariamente se eyectan de la herramienta.
Advertencia! Esta herramienta eléctrica produce un campo electromagnético durante
su funcionamiento. Este campo bajo algunas circunstancias interfiere con implantes
activos o pasivos. Para reducir el riesgo de serios o fatales heridas, recomendamos
que personas con implantes médicos consulten a su médico y fabricante del implante
antes de utilizar esta herramienta eléctrica.
16

Lista de
componentes
Especificaciones
técnicas
Accessorios:
1. Tope de profundidad 1pieza 2. empuñadura lateral 1pieza
4. Llave de mandril 1unidad3. Mandril 1pieza
Potencia:
Voltaje:
Velocidad en vacío:
Tipo de impacto
TG111136,TG111136E
750W
220-240V~50/60Hz
0-3000/min
0-48000/min
UTG111136
750W
110-120V~50/60Hz
0-3000/min
0-48000/min
Diámetro de porta broca: 1.5-13mm
TG111136S(SAA plug)
750W
220-240V~50/60Hz
0-3000/min
0-48000/min
1.5-13mm
1/16˝-1/2˝
Potencia:
Voltaje:
Velocidad en vacío:
Tipo de impacto
TG111136-8(BS plug)
750W
220-240V~50/60Hz
0-3000/min
0-48000/min
Diámetro de porta broca: 1.5-13mm
TG111136-6(ISRAEL PLUG)
750W
220-240V~50/60Hz
0-3000/min
0-48000/min
1.5-13mm
TG111136-4(IRAM PLUG)
750W
220-240V~50/60Hz
0-3000/min
0-48000/min
1.5-13mm
Componentes, especificaciones y
accesorios
de tope de
profundidad
acción
1 Tope de
profundidad
2 Porta
broca
3 Tornillo de fijación
4 Interruptor de impacto para seleccionar
5 Botón de
bloqueo
6 Manga del
cable
7 Botón de encendido / apagado
(on/off)
8 Control de velocidad
variable
9 Botón/ selector de avance y
retroceso
10 Mango
auxiliar
El doble
aislamiento:
10
1
234
98
7
5
6
17

Operación
Advertencia!
Instalación del mango auxiliar (ver DIA1)
Instalación del tope de profundidad (ver DIA2)
Antes de utilizar el taladro asegúrese de leer con cuidado el manual de instrucciones.
Antes de instalar la broca/herramienta, retire el
enchufe de alimentación de la red eléctrica.
Para garantizar su propia seguridad, le recomendamos
utilizar siempre el mango auxiliar.
Para colocar el mango, afloje el tornillo de fijación del
cuello de mango hacia la izquierda. Deslice la lazada de
sujeción sobre el cuello del mango. Gire el mango alrede-
dor del cuello del mango hasta que el mango esté en la
posición deseada. Ajuste bien el tornillo de bloqueo hacia
la derecha para sujetar el mango. Si usted es diestro,
coloque el mango como se muestra en DIA2. Si usted es
zurdo ajuste el mango a la inversa.
El tope de profundidad se puede utilizar para establecer
una profundidad constante para perforar. Para utilizar el
tope de profundidad, afloje el tornillo de bloqueo de
profundidad girando el mango auxiliar en sentido contrario
del reloj. Inserte el tope de profundidad a través del
agujero en el mango. Deslice el tope de profundidad a la
profundidad requerida y apriete el tornillo de bloqueo hacia
la derecha (en sentido de reloj.)
Funcionamiento del interruptor ON / OFF (ver Dia4)
Para poner en marcha la herramienta pulse el botón de
encendido/ apagado (on/off) y suelte el interruptor para
apagar. Parauna operación continua,oprima el interruptor
on/off y después empuje el botón de bloqueo. Para soltar
el botón de bloqueo, simplemente presione encendido /
apagado por completo, el botón se soltará automática-
mente.
Control de velocidad variable de selección (ver Dias5)
La velocidad máxima puede ser alterada utilizando el
control de velocidad variable. Para aumentar la velocidad,
gire la palanca a la derecha y para disminuir, hacia la
izquierda. La velocidad del taladro varía con la presión
aplicada al interruptor on / off, es decir, si la presión es
mayor, aumentará la velocidad.
Insertar la llave en la porta broca (ver Dia3)
Advertencia!
Retire la llave del porta brocas que se encuentra en una
ficha de llaves en la base del mango, coloque la llave en
el porta brocas, gire la llave hacia la izquierda para
sacar/aflojar el porta broca, inserte la broca / herramienta
y apriete firmemente el porta broca girando la llave hacia
la derecha. Retire la llave y vuelva a colocarla en la ficha,
en la base del mango.
Dia 1
Dia 2
Dia 3
Dia 5
Dia 4
Locking scre
Auxialiary handle
Turn chuck
key clockwise
to tighten
18

Operación
Cambio de dirección de rotación (ver Dia6)
Para cambiar la dirección de rotación, presione y
mueva el selector de inversión de giro hacia
adelante / atrás a la posición "R" que figura en su
taladro. La rotación será ahora hacia adelante.
Presione y mueva el selector de
inversión de giro hacia adelante / atrás a la
posición "L" que figura en su taladro. La rotación
será ahora inversa.
Nota: Nunca mueva el selector de avance /
retroceso, mientras el taladro este en operación o
el interruptor on / off esté bloqueado, ya que
podría dañar el taladro.
Selector de accionamiento (ver Dia7)
A la hora de perforar mampostería y hormigón
pulse y gire el selector de accionamiento en la
posición de martillo "martillo". Altaladrar madera,
metal, plástico, gire el selector a la posición de
perforación "taladro".
Dia6
Dia 7
19
This manual suits for next models
6
Table of contents
Languages:
Other CARBONE Drill manuals
Popular Drill manuals by other brands

Worx
Worx WX366.1 Original instructions

MasterCraft
MasterCraft 54-2896-8 owner's manual

Hitachi
Hitachi DS 18DBL2 instruction manual

Stanley
Stanley FATMAX SFMCD715M2K manual

Makita
Makita Makstar BDF452 instruction manual

Universal Tool
Universal Tool UT8892 Series General Safety Information & Replacement Parts