Certa CTLWN4AMWRA User manual


Table of Contents
Safety Notes.........................................................................................................................................2
Specifications......................................................................................................................................3
Lawn Mower....................................................................................................................................3
Battery Pack....................................................................................................................................3
Battery Charger.............................................................................................................................3
Product Layout...................................................................................................................................4
Asse bly...............................................................................................................................................5
Fastening the push bars.............................................................................................................5
Securing Cable by using Cable Clips....................................................................................5
Mounting the Grass Collection Bag.......................................................................................5
Adjusting the Cutting Height...................................................................................................6
Operations............................................................................................................................................6
Usage Tips........................................................................................................................................6
Charging and Battery Care.......................................................................................................7
Starting and Stopping......................................................................................................................9
Starting..............................................................................................................................................9
Stopping...........................................................................................................................................9
Grass Collection Bag...................................................................................................................9
Mulching Fit ent.........................................................................................................................10
Mowing Tips..................................................................................................................................10
Interruptions to Mowing...........................................................................................................10
LED Battery Charge Indicator................................................................................................10
Maintenance and Storage..............................................................................................................11
Cleaning Your Mower..................................................................................................................11
Re oving and Attaching the Blade......................................................................................11
Sharpening the Blade.................................................................................................................12
Sharpening the Blade in a Vise..............................................................................................13
Balancing the Blade....................................................................................................................13
Storing your Mower....................................................................................................................13
Troubleshooting................................................................................................................................14
1

Safety Notes
It is i portant that you read, fully understand and obey the following safety
precautions and warnings. Careless or i proper use of the equip ent ay
cause serious or fatal injuries.
•Never allow children or people unfa iliar with these instructions to use the lawn ower.
Local regulations ay restrict the age of the operator.
•Never ow while people, especially children or pets, are nearby.
•The operator or user is responsible for accidents or hazards occurring to other people or
their property.
•Do not operate the lawn ower when barefoot or wearing open sandals, always wear
substantial footwear and long trousers.
•Thoroughly inspect the area where the lawn- ower is to be used and re ove all stones,
sticks, wires, bones and other foreign objects.
•Before using, always visually inspect to see that the blades, blade bolts and cutter
asse bly are not worn or da aged. Replace worn or da aged blades and bolts in sets
to preserve balance.
•Mow only in daylight or in good artificial light.
•Avoid operating the lawn ower in wet grass, where feasible.
•Walk, never run.
•Never operate the appliance with defective guards or shields, or without safety devices,
for exa ple deflectors and/or grass catchers in place.
•Mowing on banks can be dangerous:
◦Do not use the ower on a slope steeper than 15º axi u .
◦Always be sure of your footing on slopes or wet grass.
◦Mow across the face of slopes – never up and down.
◦Exercise extre e caution when changing direction on slopes.
•Use extre e caution when stepping back or pulling the lawn ower towards you.
•Never ow by pulling the ower towards you.
•Stop the blades if the lawn ower has to be tilted for transportation when crossing
surfaces other than grass and when transporting the lawn ower to and fro the area to
be owed.
•Do not tilt the achine when starting or switching on the otor, except if the achine
has to be tilted for starting in long grass. In this case, do not tilt it ore than absolutely
necessary and tilt only the part which is away fro the operator. Always ensure that both
hands are in the operating position before returning the achine to the ground.
•Switch on the lawn ower according to instructions and with feet well away fro the
blades.
•Do not put hands or feet near or under rotating parts. Keep clear of discharge opening at
all ti es.
•Never pick up or carry the lawn ower while the otor is running.
Under the following conditions, the unit must be switched off, the safety key must be removed
from it’s socket, and the unit must be brought to a standstill:
✗leaving the lawn ower unattended
✗unblocking a blade
✗intending to check, clean or work on the lawn ower
✗you have encountered a foreign object, in which case you should check the lawn ower
for da age and carry out any necessary repairs.
✗the lawn ower is vibrating heavily (switch off i ediately and ascertain the cause).
✗you wish to change the settings or carry out cleaning work.
✗you wish to check whether the connection cables have beco e tangled or da aged.
2

•Keep all nuts, bolts and screws tight to be sure that the lawn ower is in safe working
condition.
•Check the grass collection bag frequently for wear or deterioration.
•Replace worn or da aged parts for safety.
•Ensure replace ent cutting eans of the right type are used. Ensure replace ent parts
fitted are fro anufacturer.
•Protect the battery charger fro rain and oisture. The penetration of water in a battery
charger increases the risk of electric shock.
•Recharge only with the charger supplied by the anufacturer. A charger that is suitable
for one type of battery pack ay create a risk of fire when used with another battery
pack.
•Do not charge other batteries. The battery charger is suitable only for charging the
battery pack of this lawn ower within the listed voltage range. Otherwise there is
danger, fire and explosion.
•Keep the battery charger clean. Conta ination ay cause the danger of electric shock.
•Check the battery charger, cable and plug each ti e before using. Do not use the battery
charger when defects are detected. Do not open the battery charger yourself and have it
repaired only by qualified personnel using original spare parts. Da aged battery
chargers, cables and plugs increase the risk of electric shock.
•Do not operate the battery charger on easily infla able surfaces (e. g. paper, textiles,
etc.) or in co bustible environ ents. There is danger of fire due to the heating of the
battery charger during charging.
•Use product only with specifically designated battery packs. Use of any other battery
packs ay create a risk of injury and fire.
•When battery pack is not in use, keep it away fro other etal objects like paper clips,
coins, keys, nails, screws, or other s all etal objects that can ake a connection fro
one ter inal to another. Shorting the battery ter inals together ay cause burns or a
fire.
•Do not open the battery pack yourself. There is danger of a short circuit.
•Do not short-circuit the battery.
•Touching electrically conductive parts of battery pack ight result in an electric shock,
be sure to wear rubber gloves before inspection or aintenance work.
•Protect the battery against oisture and water.
•Store the battery only within a te perature range between –20°C and 40°C. As an
exa ple, do not leave the battery in your car in the su er.
Specifications
awn Mower
Model: CTLWN4AMWRA
Mains Power: 36V, 4Ah
Charging Ti e: 3 – 5 hours
Cutting Width: 370
No Load Speed: 3000rp
Cutting Syste : rotary blade
Cutting Height: 6 settings = 25 ~ 75
Fabric Collection Bag Capacity: 40L
Battery Pack
Battery Type: Li-ion
Battery Voltage: 36V, 4.0Ah
Battery Charger
Input: 100-240V, 50/60Hz
Output Voltage: 42V
Charging Current: 1.0A
3

Product ayout
1. Safety Button 2. Switch Lever
3. Handle Knob 4. Cable Clip
5. Battery Cover 6. Height Adjust ent Lever
7. Upper Push Bar 8. Grass Collection Indicator
9. Grass Collection Bag 10. Quick Fold Lever
11. Battery Pack 12. Safety Key
13. Power Cord for Charger 14. Charger
15. Mulching Insert 16. Battery Te perature Indicator
17. Battery Power Indicator 18. Switch Button for Indicator
4
1
2
3
4
5
7
8
9
10
6
11 12 13 14 15 16 17 18

Assembly
Do not insert the battery or the safety key before the mower has been
completely assembled.
Fastening the push bars
The push bar is already asse bled and only needs to be unfolded to the desired
position. Firstly unfold the quick fold lever, then loosen the handle knob.
Expand the handle, aking sure that the upper and lower handle atch up.
Screw the tightly with the handle knob and swing nuts. The swing nuts should
be hand tightened only. Never use a spanner or other tool to tighten the .
Securing Cable by using Cable Clips
Secure the cable fro the otor to the switch asse bly by using four cable
clips – two is fixed on upper push bar, the others fixed on lower push bar.
Mounting the Grass Collection Bag
Note: Before ounting the bag, the ower MUST
be switched off.
Raise the safety flap as far as possible, then place
the collection bag on the two hooks under the
deck. Always fit the grass collection bag onto the
ower before connecting the power sources.
5
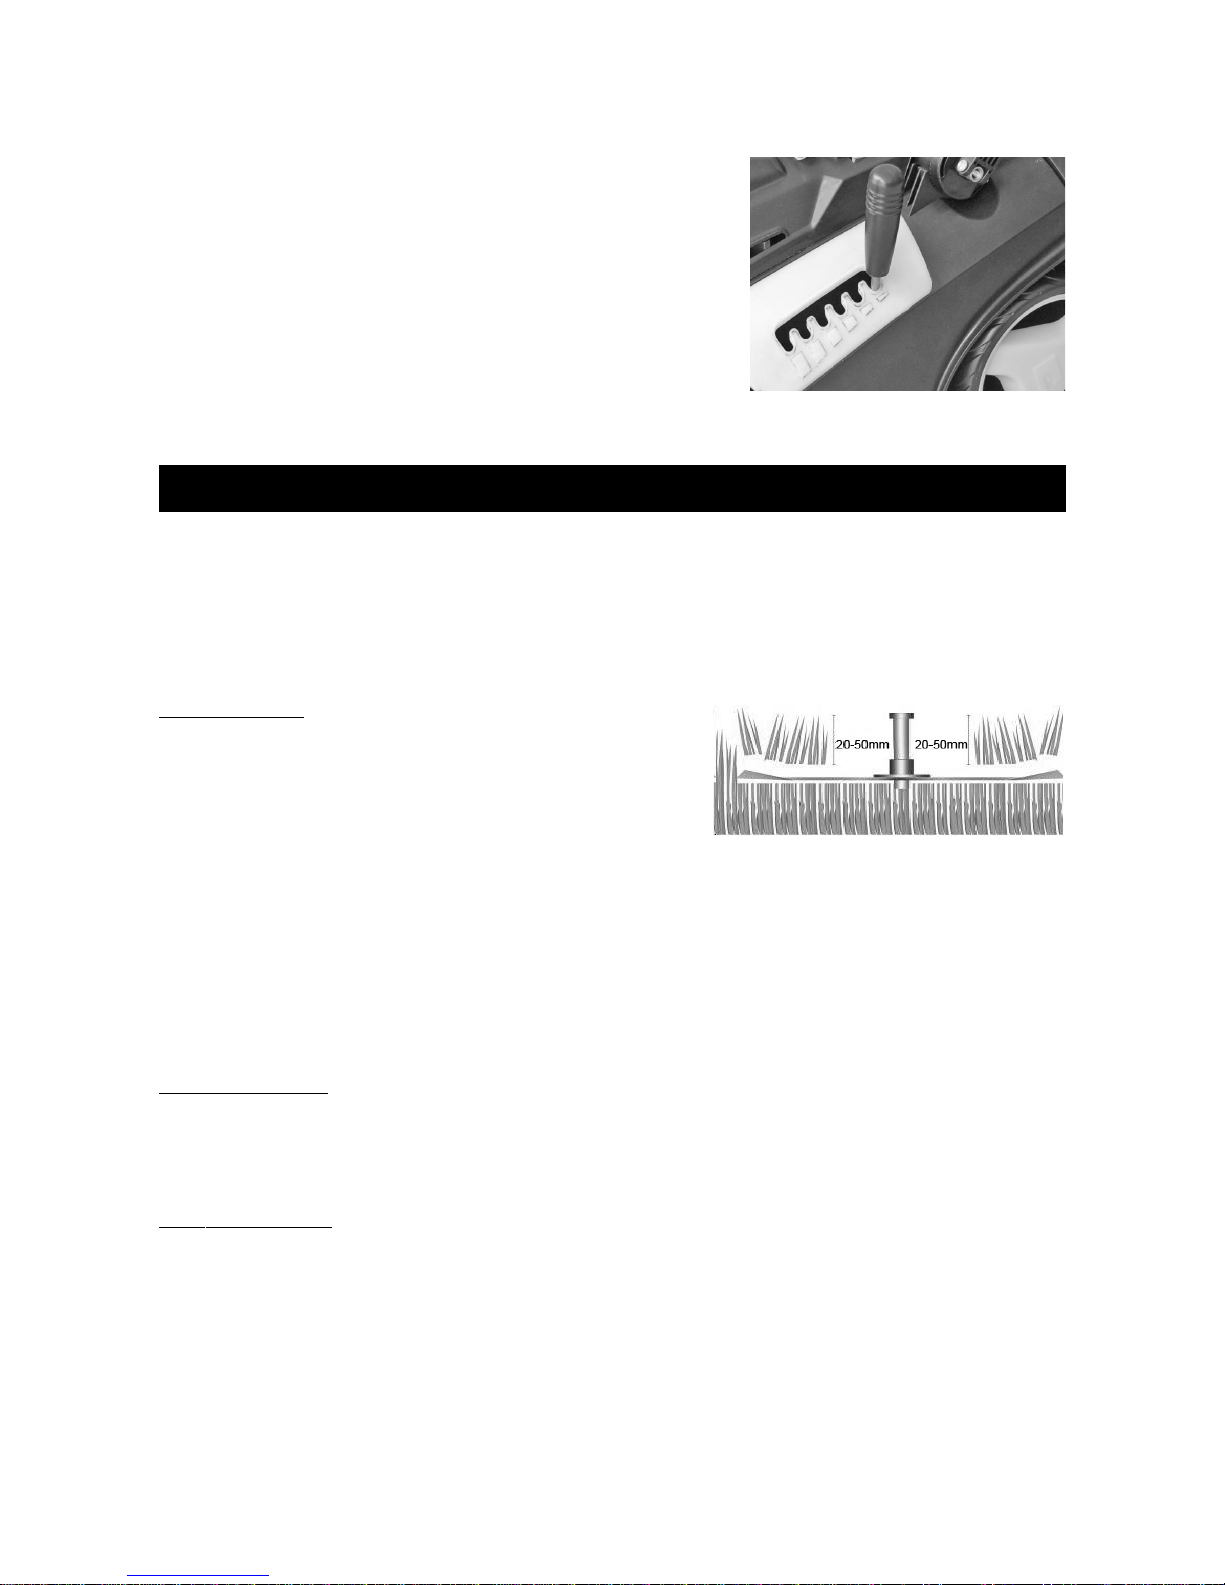
Adjusting the Cutting Height
Note: Stop and release the switch lever, then wait
for the otor to stop before adjusting height. The
blades will continue to spin after the ower has
been switched off, and these blades can still cause
injury.
For the first cutting of the season, a high cutting
adjust ent should be selected. The ower can be
set to 6 different cutting heights between 25
and 75 high. Press the height lever inwards, then
lift or push down the ower until the desired height is selected.
Operations
Usage Tips
Under nor al conditions, the battery should run for approxi ately 30 inutes
on a single charge. This operation ti e and the area that can be own on a
charge is dependent on several factors. These are:
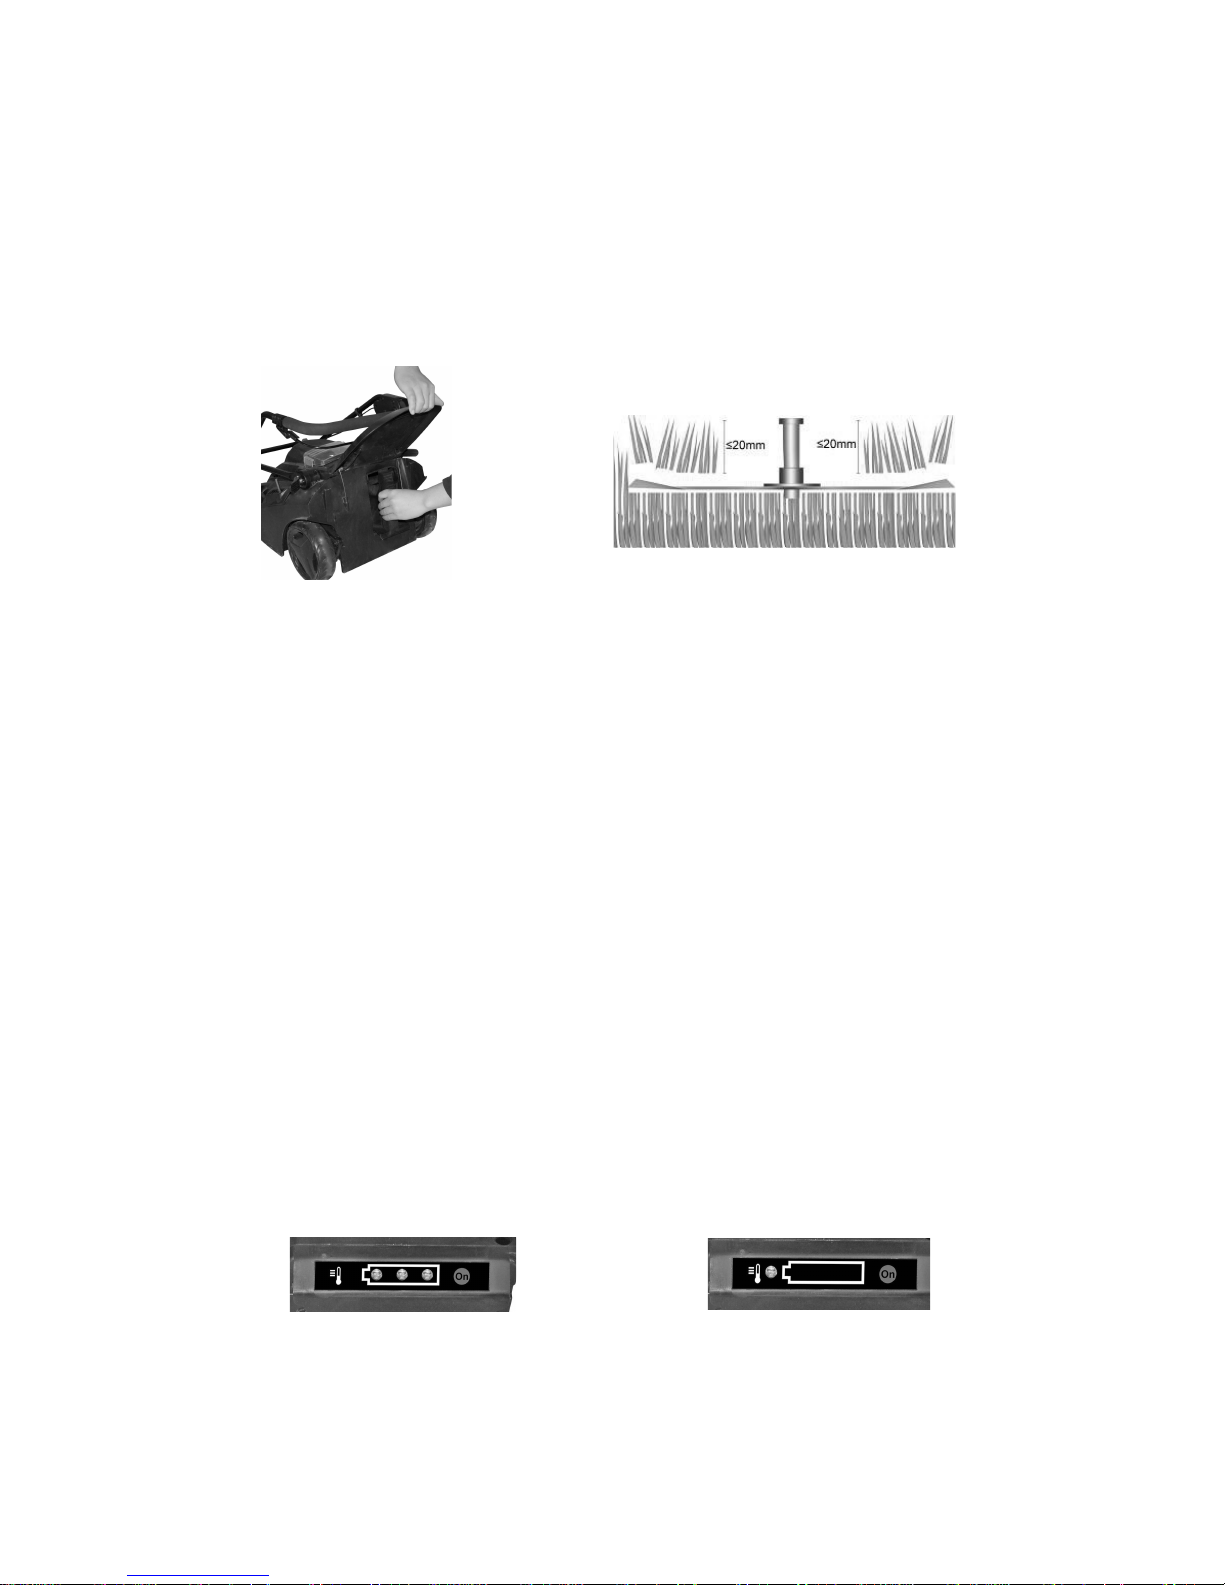
Type of lawn: Battery-powered lawn owers are
suitable for lawns which are own frequently.
For exa ple, battery-powered owers are not
suitable for infrequently- own eadows or
overgrown thickets or si ilar. To produce a
well- aintained lawn, we reco end owing
the lawn as often as you can, once a week if possible. This would ean that you
are only cutting 1 to 2 inches (20 to 50 ) of grass each owing session
(see i age to right). Trying to cut ore than 2 inches (50 ) will drastically
reduce the charge life of the battery and quality of the cut. After relatively long
intervals between owing (holiday lawn), firstly cut in one direction with the
cutting height as high as possible, then cut in the crosswise direction at the
cutting height required.
Lawn structure: The area that can be own decreases in proportion to the
density of the grass. The owing capability is lowest on extre ely dense grass,
(e. g. golf greens, which are not suitable for battery-powered lawn owers to
ow).
Law n condition: Tall, thick, or da p grass ake the Mower work harder, causing
the battery to discharge faster. Under nor al owing conditions the run ti e is
around 30 inutes. To ow longer, consider purchasing a second battery and
keep it fully charged. Before starting the ower, adjust the cutting height so
that you only cut 1 to 2 inches (20 to 50 ) of grass at a ti e. Cut thicker
grass at a higher cutting height, or cut a narrower swath. Do not force the
ower forward in tall, thick or wet grass.
6

Mowing/walking speed: Walking speed influences the duration of owing, and
therefore the area that can be covered. We reco end owing at a steady
pace. To avoid da age and extend battery life, always ow at a speed which
allows the otor to run s oothly. The owing path should not be covered
twice if possible, and the overlap of owing tracks should be kept as ini al as
possible. Frequently switching the ower on and off decreases the battery's
power. Try to work continuously and s oothly when owing.
Blade sharpness: Keep your ower blade sharp! A sharp ower blade cuts the
grass quickly and cleanly, using less of the ower’s power, which conserves
battery life. For best results, inspect the blade often and have an extra sharp
blade ready to install as a replace ent while the dull blade is being sharpened.
Charging and Battery Care
Important: Before charging the battery, read all instructions and warnings in this
anual and on your ower, Do not operate your ower until you have read and
understand all instructions and the battery has been fully charged.
Battery: This ower co es with a sealed Li-ion battery, already asse bled at
the factory. The battery is rated for 36volts and 4 a ps.
The battery is co pletely aintenance-free. Do not atte pt to open or alter the
battery. As with all rechargeable batteries, they will eventually need
replace ent.
Charging ti e: The battery is supplied charged at the factory, but ay lose
charge during transportation, and when it has been stored for so e ti e. You
MUST charge the battery for 3-5 hours before you use the ower for the first
ti e.
Charging Procedure: The red light on the charger only indicates that the charger
is plugged in and the battery charging procedure starts. The light on the charger
will change to green when the battery is fully charged.
Only use the charger in a dry roo and only use the supplied battery charger.
Use nor al household voltage when charging your battery. Plug the charger
directly into the electric outlet. Ensure that the charging plug is correctly seated.
Do not abuse the cord and never carry the charger by the cord. Always
disconnect fro the power supply by pulling on the plug and not the cord.
The battery for this ower can be charged inside or outside the ower. The
perfor ance of your ower is sa e, regardless of which charging ethod you
choose.
Important: Always connect the charger to the battery first, and then plug it into
the wall outlet. When unplugging, reverse the process: unplug the charger fro
the wall outlet first and then disconnect it fro the battery.
7

Re oving the battery: To take the battery out of the ower, open the
transparent cover first, then pull the battery pack out of the ower.
Charging the battery inside and outside the ower: You can either plug the
battery directly into the power socket as shown to the left, or re ove the
battery fro the ower and then connect it to the power socket as shown on
the right.
During the charging process, the charger will be war to be touch. This is
nor al and does not indicate a proble .
Battery storage te perature range: For superior battery perfor ance, always
store the battery in te peratures between –20°C and 40°C. Make sure the
storage te peratures will never be outside these li its. The lower the storage
te perature is within the specified range, the better. The battery will discharge
ore slowly at low te peratures.
Battery Care: You can lengthen the life of your battery by following so e si ple
guidelines.
•Always charge the battery indoors in a garage or other covered area
where it will be dry and protected fro the weather.
•Only charge the battery when the te perature is at least 5°C - above
freezing, but no ore than 35°C. Charging in lower or higher te peratures
can be har ful to the battery.
•Always keep the battery away fro water, heat sources (stoves, radiators,
open fla es, etc.), and hazardous che icals.
•Only use the supplied battery charger to charge your battery; never
atte pt to use any other charger. Use of a different charger ay cause a
fire or explosion.
•Never use the charger with any other product. Never operate the charger
if it is da aged. If a cord or the charger unit has been da aged, replace
the charger.
8

•When storing the battery after re oving it fro the Mower, follow the
storage guidelines in “Maintaining and Storing Your Mower.”
•If the otor will not run after you have fully charged the battery, consult
the techniques in “Troubleshooting Tips.” If you need further assistance,
please contact the Kogan custo er support tea .
Starting and Stopping
Warning: The blade continues to rotate for a few seconds after the achine is
switched off. Allow the otor/blade to stop rotating before switching “on”
again. Do not rapidly switch off and on.
Starting
Before starting, ake sure the battery pack has been inserted into the ower
and put the safety key into it’s socket.
You should switch the otor on with ower placed on level and fir ground,
not in high grass - alternatively tilt the ower back slightly then follow the
below procedures:
1. Press and hold the safety button
2. Squeeze the switch lever towards the handle
3. Release the safety button and squeeze the switch lever fir ly
Stopping
To stop, si ply release the switch lever.
Grass Collection Bag
When owing with the grass collection bag, ensure the ulching insert is NOT
installed. The grass collection bag ust be e ptied as soon as grass is left lying
on the lawn.
Warning: Foreign bodies thrown out of the ower can cause injuries! Only lift
the safety flap with the otor switched off and once the cutting blade has co e
to a standstill.
1. Lift safety flap and re ove the grass collection bag by the handle.
2. E pty the grass box and hang it on the back again using the ounting
hook on the underside.
We reco end always ow the lawn with the grass collection bag.
9
Mulching Fitment
Warning: Risk of injury! Do not put your hand in the discharge opening!
When the safety flap is released, this closes auto atically and covers the
discharge opening. For ulching purposes, install the ulching insert into the
discharge opening and close the flap.
This will secure the ulching adaptor into place, Grass will drop to back to the
lawn - NO grass catcher required.
•The grass should not be too high or too wet!
•Walk slowly while owing.
•Do not cut grass ore than 20 .
Mowing Tips
If grass residue is left in the discharge opening, pull ower backwards about 1-
2 so that the grass residue can drop out downwards.
Before starting the ower, adjust the cutting height so that you only cut 20
to 50 of grass at a ti e. Cut thicker grass at a higher cutting height, or cut a
narrower swath. Do not force the ower forward in tall, thick or wet grass.
Interruptions to Mowing
Never leave the ower unattended at the working area. If you interrupt your
work, store the ower in a safe place and re ove the safety key fro it’s
socket!
If you stop work to ove to another area of the garden, switch off the ower
and re ove the safety key for the socket!
ED Battery Charge Indicator
The battery pack is equipped with a LED battery charge-control Indicator, which
indicates both the battery capacity and it’s te perature.
10

•One green light - low battery capacity
•Two green lights - id battery capacity
•Three green lights - full battery capacity
•Red light - battery te perature is too high. Please wait until the red light
goes out before restarting the charging process.
Maintenance and Storage
A WAYS switch off the ower, re ove safety key fro it’s socket, and re ove
battery before perfor ing any adjust ents, aintenance, blade change, or
repairs to your ower.
Cleaning Your Mower
Periodically clean your ower to ensure peak perfor ance.
Supplies needed:
•Clean cloth or sponge
•Mild soap or detergent (if needed)
•Soft nylon brush (if needed)
1. Re ove the safety key fro it’s socket, and re ove battery.
2. Only use a dry cloth or sponge for cleaning of battery pack.
3. Only use a dry cloth or sponge to clean the battery pack seat.
4. Using a da p cloth or sponge with a ild soap or detergent, clean the
Mower. Never use water, gasoline, solvents, or other petroleu -based or
solvent-based products when cleaning - re e ber, this is an electric
ower.
5. Use a soft nylon brush or non- etallic scrubbing pad to re ove any
clippings that have accu ulated on the underside of the deck and in the
rear discharge plate. Do not use a wire brush; it will scratch and har the
surface of your ower.
6. You ay use water to clean the grass collection bag, but not the ower
itself. For proper grass collection, ake sure the grass collection bag is
clean and the esh holes are not clogged. Allow the grass collection bag
to dry thoroughly before using it again.
Note: A wet grass collection bag will clog quickly and ha per grass collection.
Removing and Attaching the Blade
You ust re ove the blade to sharpen it, or to change to a spare blade. Always
check the blade for sharpness, da age, and tightness before and after each use.
Replace the blade pro ptly if it has been bent or da aged. Only use spare
blades sourced fro Kogan.co .
11

Tools and Supplies needed:
•14 socket wrench (supplied with Mower)
•Gloves or rag to protect your hands
•Wear heavy gloves to protect your hands when holding, re oving and attaching
blades.
1. Re ove the safety key fro it’s socket, and re ove battery. If you are
charging the battery, disconnect the charger fro the electrical outlet.
2. While holding the handle bars, turn the ower over on its right side to
expose the blade.
3. Place the socket wrench over the blade nut.
4. While holding the blade in place, loosen the blade nut by turning counter-
clockwise. Be careful; wear heavy gloves to hold the blade in place so the
blade does not spin and strike your hand (see above, left).
5. Re ove the blade nut, plastic spacer and blade in that order (see above,
right).
6. To install a new or sharpened blade, reverse steps 1 to 5. Be sure to
replace all parts in order exactly as they were re oved. Make sure the
blade is properly seated and securely tightened.
7. Turn your ower upright.
Sharpening the Blade
When the blade is dull, the cut ends of the grass will be ragged and ay turn
brown soon after owing. A dull blade also causes the battery to discharge
ore quickly. When this occurs, sharpen the blade.
You ust re ove the blade fro the ower to sharpen it.
Tools & supplies needed:
•Fine-toothed file or sharpening stone
•Gloves.
•Safety glasses
12

Sharpening the Blade in a Vise
1. Re ove safety key fro it’s socket, and re ove battery.
2. While holding the handlebars, turn the ower over on its right side to
expose the blade.
3. Re ove the blade.
4. Secure the blade in a sturdy vise.
5. While wearing safety glasses, carefully file the cutting edges of the blade
using even strokes. Be sure to file both sides of the blade equally.
6. Check the blade after sharpening to be sure it is still balanced.
Balancing the Blade
Note: When sharpening a used blade, be especially careful to keep it balanced. If
in doubt, replace the blade with a new one.
An out-of-balance blade causes your achine to vibrate excessively. Excessive
vibration ay cause da age to the Mower, especially to its otor. As you are
re oving etal fro the blade, ake sure to re ove an equal a ount fro
each side to keep the blade balanced.
Of course, you can always have a ower service sharpen and balance your
blade.
Storing your Mower
Whether you store the ower for a short or long period of ti e, the battery can
be safely stored either inside the ower or separately, but always follow these
i portant guidelines:
•Re ove safety key fro it’s socket.
•Always store the ower in an environ ent where the te perature is
between –20°C and 40°C. Make sure the storage te peratures will never
be outside these li its. For long-ter storage, store your battery in an
environ ent where the te perature is lower, since the battery self-
discharges slower at low te peratures.
•Store the Mower in a dry environ ent. Do not store it on a floor that ay
be da p or subject to accidental flooding. Water will da age the ower
and battery.
•Do not store the ower near che icals, such as fertilizers. These products
are often highly corrosive and ay cause per anent da age to your
ower.
•Do not store the battery in proxi ity to organic or other solvents.
•Do not store the battery close to a source of heat, sparks or open fla es.
•Do not expose the battery to abnor al shaking or shocks.
•Store the battery away fro children and ani als.
•Do not press, bend, or use force on the ter inals of battery
•Do not apply heat (such as a soldering iron) to the ter inals of battery
•Regularly observe the external appearance of the battery and keep it
clean and dry. Never use a battery that shows cracks, changes shape,
leaks, or otherwise is obviously da aged.
13

Troubleshooting
Most difficulties are easy to fix. Consult the troubleshooting table for co on proble s
and their solutions. If you continue to experience proble s or need repairs beyond these
inor adjust ents, contact your local licensed service center for assistance.
ALWAYS switch off the ower, re ove safety key fro it’s socket, and re ove battery
before perfor ing any adjust ents, aintenance, blade change, or repairs to your ower.
Problem Possible Cause Corrective Action
Motor fails to start Safety key re oved fro battery power socket Put safety key into battery power socket
safety key has been put into the socket,but the
connection is not so tight and secure
Take out safety key and put it into the socket again,
to ensure the tight and secure plugging
Battery discharged Need to recharge the battery before every use, only
use a fully charged battery.
Battery is defective Replace with a fully charged battery
Starting procedure is not correct Make sure you follow the correct starting procedure:
1. Press and hold the safety button (1).
2. Squeeze the switch lever (2) towards the
handle.
3. Release the safety button (1) and hold
switch lever fir ly.
The blade ay be blocked. Re ove safety key for the socket, re ove battery,
turn the ower over, and check the blade.
Mower stops while
owing
(for reasons other than
releasing the switch lever)
The battery has been co pletely depleted. Recharge the battery i ediately or replace it with a
fully charged battery.
Mower is hard to push The grass ay be too high for the cutting height. Raise the cutting height or narrow your cutting swath
and try again.
The blade, ower deck, or rear discharge plate ay
be clogged with debris.
Re ove the safety key fro the socket,, and re ove
battery, turn the ower over on the left side, and
check below the deck. Clear the debris if necessary.
The ower bogs down or stalls in heavy grass Raise the height of Mower. Cut a narrower swath.
Walk ore slowly.
The grass is wet Let the grass dry before owing.
The battery capacity is not enough Charge the battery or replace with a fully charged
battery.
The wheels ay not be rotating freely. Re ove the safety key fro the socket,, and re ove
battery, turn the ower over on the left side, and
check the wheels for da age. Replace with new
wheels if necessary.
Excessive vibration or
noise
The blade ay be loose Re ove the safety key fro the socket,, and re ove
battery, turn the ower over on the right side, and
check that the blade is tightly attached or not, if not,
tighten the blade.
14

The blade ay be unbalanced, bent, or da aged Re ove the safety key fro the socket, and re ove
battery, turn the ower over on the right side, re ove
the blade, and check its condition. Replace with a new
blade if necessary.
Mower runs, but cutting
perfor ance is
unsatisfactory, or there is
a loss of power
The battery is not fully charged Charge the battery 5 hours to get a full charge
The blade ay be dull Re ove safety key fro the socket, and re ove
battery, turn the ower over on the right side, and
check the condition of the blade. Sharpen or replace
the blade, if necessary.
The blade ay be bent, loose, or da aged Re ove the safety key fro the socket, and re ove
battery, turn the ower over on the right side, and
check the condition of the blade. Sharpen or replace
the blade, if necessary
The grass ay be too high or too thick for the
cutting height
Raise the cutting height or narrow your cutting swath
and try again.
The Mower is oving too fast Slow down a little bit
Battery loses its power
quickly
The battery is not fully charged Charge the battery 5 hours to get a full charge ,You
will need to charge the battery at least five ti es to
achieve axi u cutting ti e
The grass ay be too high or too thick Raise the cutting height or narrow your cutting swath
The battery ay be getting old The battery will need to be replaced.
Collection bag is
collecting grass poorly
The collection bag is full E pty the collection bag, and clean it if necessary.
The grass is too long, or the Mower is cutting too
low
Raise the cutting height
The Mower is oving too fast Slow down
The rear discharge ay be clogged Re ove the safety key fro the socket, and re ove
battery, turn the ower over on the left side, and
clean away any debris fro the rear discharge plate
and below the deck
The esh holes on the collection bag are clogged Clean the collection bag
The collection bag is wet. Allow the collection bag to dry thoroughly before
using it again.
Battery disposal: Dispose of used batteries in an environ entally responsible anner.
WARNING: Do not atte pt to dispose of your battery in a fire. The cell ay explode.
The battery contains Li-ion cells. After their lifeti e has expired, they ust not be disposed of as
nor al household rubbish, but ust be disposed of properly.
Please dispose of the flat battery via you local unicipal disposal point. It is essential to return
the battery or to dispose of it via your local unicipal disposal point. Only hand over the battery
in a discharged condition.
If you experience issues or have any questions regarding the mower, please
contact the Kogan customer support team.
15
Other Certa Lawn Mower manuals


