Chef Tested FCO23B CT, FCO25R CT User manual

Instruction Manual
MODEL: FCO23B_CT, FCO25R_CT
120 V, 60Hz, 1200W
Wards.com 1•888•557•3848
Montgomery Ward Customer Service
3650 Milwaukee Street, Madison, WI 53714
8:00 am to Midnight, Monday through Friday
14
delicious
recipes
inside!
by
Wards.com 1•888•557•3848
by
23-liter Toaster Oven with Convection
®
®

Thank you for purchasing your Chef Tested®23-liter Toaster Oven
with Convection by Montgomery Ward®. Put through the paces by the
experts, it will perform to the highest standard, time after time, with all the
convenience, easy clean-up and durability you rely on from Wards.
We guarantee it!
Think of the time and money you’ll save! Instead of turning on your big oven,
now you can use your fast-heating, energy-conscious oven for so many
things, from melting cheese on open-faced sandwiches to baking cookies or
cooking up a savory 5-lb. roast!
3
PLEASE READ THESE INSTRUCTIONS BEFORE USE
Basic safety precautions should always be followed when using your Electrical Oven
with Convection, especially when children are present.
WARNING: TO AVOID THE RISK OF ELECTRICAL SHOCK, ALWAYS MAKE
SURE THE PRODUCT IS UNPLUGGED FROM THE ELECTRICAL OUTLET
BEFORE ASSEMBLING, DISASSEMBLING, RELOCATING, SERVICING OR
CLEANING
1. Read all of these instructions.
2. Do NOT touch hot surfaces. Use handles or knobs.
3. Close supervision is necessary when any appliance is used by or near children.
4. Do NOT let cord hang over edge of table or counter, or touch hot surfaces.
5. Do NOT operate appliance with damaged cord or plug or after the appliance
malfunctions, or has been damaged in any manner. Call our toll-free Customer
Service for information regarding returns and refunds.
6. The use of accessory attachments not recommended by the appliance
manufacturer may create hazards or cause injury.
7. Do NOT place on or near a hot gas or electric burner, or in a heated oven, or in
a microwave.
8. When operating the oven, keep a minimum of 5 inches of space on all sides of
the oven to allow for adequate air circulation.
9. Unplug from the electrical outlet when not in use, or before cleaning. Let it cool
before putting on or taking off parts, or before cleaning.
10. Extreme caution must be used when moving an appliance containing hot oil or
other hot liquids.
11. Do NOT use metal foil on any part of the oven. This may cause overheating of
the oven.
12. Use extreme caution when removing tray or disposing of hot grease or other hot
liquids.
13. Do NOT clean with metal scouring pads. Pieces can break off the pad and touch
electrical parts, creating a risk of electric shock.
14. A fire may occur if the oven is covered or touching flammable material,
including curtains, draperies, walls, etc., when in operation. Do NOT store any
items on the oven during operation.
Important Safeguards........................3-4
Before Using for the First Time............. 4
Polarized Plug....................................... 5
Parts & Features................................... 6
Cleaning & Care ................................... 7
Getting Started: How it Works .............. 8
How to Use......................................9-12
Cooking Tips....................................... 13
Recipes..........................................14-21
Warranty & Return Information......22-23
by
ank you
for your
purchase!
Table of Contents
21•888•557•3848
Wards.com
Important Safeguards
PLEASE SAVE THESE INSTRUCTIONS
THIS APPLIANCE IS FOR HOUSEHOLD USE ONLY
© 2014 Montgomery Ward, Inc. All rights reserved.
®

41•888•557•3848
Wards.com
45
Polarized Plug
This appliance has a polarized plug (one blade is wider than the other). As a safety
feature to reduce the risk of electrical shock, this plug is intended to fit a polarized
outlet only one way. If the plug does not fit fully in the outlet, reverse the plug. If it still
does not fit, contact a qualified electrician. Do not attempt to modify the plug in any
way.
SHORT CORD INSTRUCTIONS
1. A short power supply cord is provided to reduce the risk resulting from
becoming entangled in or tripping over a longer cord.
2. Longer detachable power-supply cords or extension cords are available and may
be used if care is exercised in their use.
3. If a long detachable power cord or extension cord is used:
•Themarkedelectricalratingofthedetachablepowersupplycordorexten-
sion cord should be at least as great as the electrical rating of
the appliance.
•Iftheapplianceisofthegroundedtype,theextensioncordshouldbethe
same type—3 wire.
•Thelongercordshouldbearrangedsothatitwillnotdrapeover
the countertop or table top where it can be pulled on by children or tripped
over.
PLASTICIZER WARNING
CAUTION: To prevent Plasticizers from migrating from the finish of the
countertop or table top or other furniture, place NON-PLASTIC coaster or place-
mats between the appliance and the finish of the counter top or table top. Failure
to do so may cause the finish to darken. Permanent blemishes may occur or
stains can appear.
15. Extreme caution should be exercised when using containers constructed of
anything other than metal or glass.
16. Do NOT place any of the following materials in the oven: cardboard, plastic,
paper or anything similar.
17. Do NOT store any materials, other than the manufacturer’s recommended
accessories, in this oven when not in use.
18. To disconnect, turn all controls to the “off” position, then remove plug from wall
outlet. Always hold the plug, but NEVER pull the cord.
19. Always wear protective, insulated oven mitts when inserting or removing items
from the oven when hot.
20. This appliance has a tempered, safety glass door. The glass is stronger than
ordinary glass and more resistant to breakage. Avoid scratching the door surface
or nicking the edges. If the door has a scratch or nick, contact our Customer
Service number for information on returns or refunds.
21. Do NOT use outdoors.
22. Do NOT use appliance for other than intended use.
23. This appliance is for HOUSEHOLD USE ONLY.
24. The exterior of the oven will get hot when it is operating. Avoid touching hot
surfaces.
Before Using for the First Time
1. Read all instructions included in this manual.
2. Make sure the oven is unplugged and the Timer Knob is in the “off” position.
3. Remove all racks and pans. Wash them in hot, soapy water or in a dishwasher.
4. Thoroughly dry all accessories and re-assemble in the oven. Plug oven into wall
outlet, and it’s ready to use.
After re-assembling your oven, we recommend that you run it at MAX temperature
on “TOAST” for approximately 15 minutes to eliminate any manufacturing oil that
may remain after assembly..
Important Safeguards (cont’d)
76 1•888•557•3848
Wards.com
Cleaning & Care
This appliance requires little maintenance. It contains no user serviceable parts. Do
NOT try to repair it yourself. Contact a qualified appliance repair technician if the
product requires servicing.
Cleaning Instructions:
•Always unplug oven and allow to cool before cleaning
•Yourovenfeaturesaquick-cleancoating.Ifdesired,wipewallswithadampcloth
and mild detergent.
•DONOTUSESTEELWOOLSCOURINGPADSORABRASIVECLEANERS
OR SCRAPE WALLS WITH METAL UTENSILS, AS THIS MAY DAMAGE THE
QUICK-CLEAN INTERIOR.
•Washallaccessoriesinhotsoapywaterorinadishwasher.Wipethedoorclean
with a damp cloth and wipe dry with a paper or cloth towel. Clean exterior with
damp cloth.
•DRYALLPARTSANDSURFACESTHOROUGHLYPRIORTOPLUGGING
OVEN IN AND USING.
Storing Instructions:
Unplug the unit, allow to cool and clean before storing. Store this appliance in its
box in a cool, dry place. NEVER store while it is hot or still plugged in. Do NOT put
any stress on the cord or wrap the cord around the appliance.
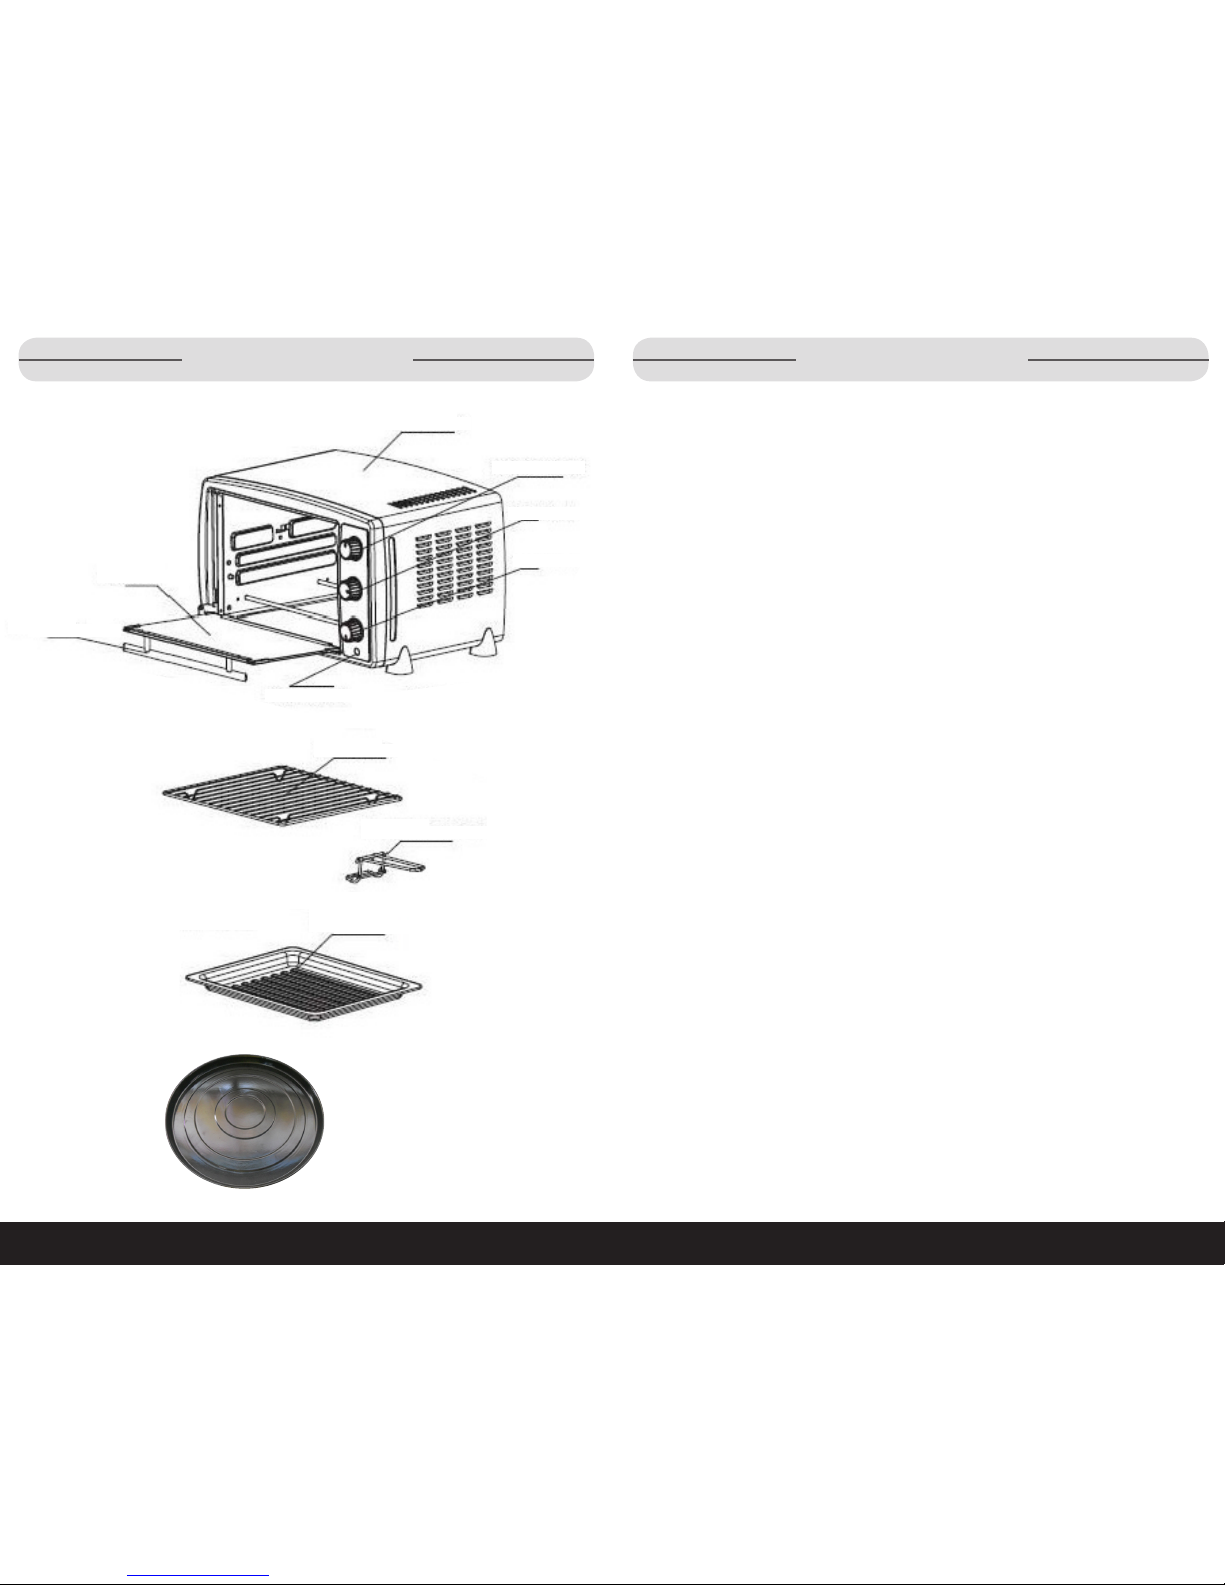
Parts & Features
Temperature Knob
Timer Knob
Function Knob
Door Handle
Power Indicator
Grill Rack
Tray/Rack Removal Tool
Food Tray
Housing
Glass Door
Pizza Tray

89
1•888•557•3848
Wards.com
Getting Started:
Overview of How It Works
In standard ovens, there is radiant heating of the interior, and air move-
ment is relatively slow. A convection oven circulates heated air continuously
through the oven to maintain uniform temperature. As a result, convection
ovens heat more quickly and cook faster. The constant, gentle air flow is
what seals in juices, promotes browning and may shorten cooking time with-
out turning and basting. Note that some convection ranges run the fan more
slowly for baking and faster for roasting.
The best way to become a confident convection cooker is to try out your
favorite recipes using the features. Your Convection Oven can Keep Warm,
Bake, Broil, Rotisserie, Convection Toast and Convection Bake. The Oven
has a special recessed area to accommodate a 12” frozen pizza.
Please familiarize yourself with the following oven functions and accessories
prior to the first use:
•Function Knob: This oven has 4 cooking modes (BROIL, BAKE, TOAST,
CONVECTION)
•Temperature Knob: Choose desired temperature from LOW (150°F) to HIGH
(465°F)
•Timer Knob: Turn control to the left (counter-clockwise) and the oven will STAY
ON until manually shut off. To activate timer, turn to right (clockwise) for other
use. A bell will sound at the end of the programmed time.
•Indicator Light: It is illuminated whenever oven is turned on.
•Grill Rack: For toasting, baking and general cooking in casserole dishes and
standard pans.
•Food Tray: For use in broiling and roasting meat, poultry, fish and various
other foods.
BAKING AND TOASTING
You can use bakeware up to 9 inches in length. We do not recommend the use of
oven roasting bags or glass containers inside the oven that are not heat resistant.
NEVER use plastic, cardboard, paper or anything flammable in the oven.
NOTE: Position the rack in the lowest support guide.
POSITIONING OF THE RACK WHEN BAKING
Cookies and Pies– Use bottom or middle support guides.
Layer Cakes – Use bottom support guide only (bake one at a time).
Nuts, fruits and meats – Use bottom or middle support guides.
Pizza – Use the middle support guides.
This function is ideal for baking cake, in general.
Operation:
•PlacetheGrillRackinthemiddlesupportguide.
•PlacefoodtobecookedinFoodTray.
•TurnFunctionKnobtoBake.
•TurnTimerKnobto“ON”.Timeaccordinglyandcheckprogresswithmeat
thermometer to ensure it is cooked to your taste.
•Tocheckorremovefood,useTray/RackRemovalToolprovidedtohelpslidefood
in and out.
•TurnTimerKnobto“O”whencookingiscomplete.
USING THE CONVECTION FUNCTION
Using the Convection Fan will help distribute the heat within the oven more evenly.
This results in food cooking much faster. This is ideal for browning or roasting of
certain foods.
Operation:
•Preheatovenasdirectedinrecipe.
•SetThermostatKnobtoHigh.
•TurnFUNCTIONKnobtoConvection.
•Checkbakedgoodsfordoneness5–10minutesbeforeexpectedcompletion.
•TurnTimerKnobto“O”whencomplete.
Baking in Your Oven

10 11
1•888•557•3848
Wards.com
Broiling in Your Oven
For best results, we recommend you preheat the oven for
15 minutes on 450°F.
OPERATION:
Operation:
•PlacetheGrillRackinthemiddlesupportguide.
•PlacefoodtobecookedontoFoodTray.
•TurnFunctionKnobtoBroil.
•TurnTimerKnobto“ON”.Timeaccordinglyandcheckprogresswithmeatther-
mometer to ensure it is cooked to your taste.
•Tocheckorremovefood,useTray/RackRemovalToolprovidedtohelpslide
food in and out.
•TurnTimerKnobto“O”whencookingiscomplete.
BROILING GUIDE
Cooking results may vary, adjust these times to your individual requirements.
MEAT OVEN TEMP TIME PER LB.
Rib Eye Steak 400° 25 – 30 min.
T-Bone Steak 400° 25 – 30 min.
Hamburger Patty 400° 25 – 28 min.
Pork Chops 400° 40 – 45 min.
Lamb Chops 400° 30 – 40 min.
Chicken Legs 400° 30 – 35 min.
Fish Filets 350° 20 – 25 min.
Salmon Steaks 350° 20 – 25 min.
NOTE: All broiling times are based on meats at refrigerator temperature.
Frozen meats may take considerably longer. Using a meat thermometer is
highly recommended.
Roasting in Your Oven
ROAST YOUR FAVORITE CUT OF MEAT TO PERFECTION
The oven can cook up to a 5-lb. roast or ham. A guide has been provided to assist
you with roasting times. However, we suggest that you periodically check the cooking
progress with a meat thermometer. For best results, we recommend that you preheat
the oven for 15 minutes on 450°. We do not recommend the use of oven roasting
bags, or glass containers inside the oven unless they are heat resistant glass. Never
use plastic, cardboard, paper or anything flammable inside the oven.
Operation:
•Preheatovenasdirectedinrecipe.
•SetThermostatKnobtoHigh.
•TurnFUNCTIONKnobtoConvection.
•Checkbakedgoodsprogress5–10minutesbeforeexpectedcompletion.
•TurnTimerKnobto“O”whencomplete.
ROASTING GUIDE
Cooking results may vary, adjust these times to your individual requirements.
MEAT OVEN TEMP TIME PER LB.
Beef Roast 325 – 450° 25 – 30 min.
Pork Roast 325 – 450° 40 – 45 min.
Ham 325 – 450° 35 – 40 min.
Chicken 350 – 450° 20 – 25 min.
Turkey 350 – 450° 20 – 25 min.
NOTE: All roasting times are based on meats at refrigerator temperature. Frozen
meats may take considerably longer. Using a meat thermometer
is highly recommended.

12 13
1•888•557•3848
Wards.com
TOASTING CAPACITY
Large capacity oven allows for toasting 4 to 6 slices of bread, 6 muffins,
frozen waffles or frozen pancakes. When toasting only 1 or 2 items, place food
on the Grill Rack in the center of the oven.
Function: Toast
This function is ideal for cooking bread, pizza and fowl in general.
Operation:
•PlacetheGrillRackinthemiddlesupportguide.
•TurnFunctionKnobto“Toast”.
•PlacefoodtobecookedontotheFoodTray.
•PlaceFoodTrayontoGrillRack.
•TurnTimerKnobto“ON”.Timeaccordinglyandcheckprogresswithmeatther-
mometer to ensure it is cooked to your taste.
•Tocheckorremovefood,useTray/RackRemovalToolprovidedtohelpslidefood
in and out.
•TurnTimerKnobto“O”whencookingiscomplete.
NOTE: ALL toasting times are based on meats at refrigerator temperature.
Frozen meats may take considerably longer. Therefore, use of a meat ther-
mometer is highly recommended.
Toasting in Your Oven
Coong ps R
Baked Goods
Butter releases steam almost immediately, making the dough rise higher. That
means your baked goods will all be flakier, lighter, and loftier. For cookies, take
advantage of all available shelf space by baking with several trays at once. Be-
cause the fan disperses heat throughout, you won't have to rotate them as often.
Toasting/Drying Nuts and Grains
Use the convection setting to achieve an even, golden hue with far less tossing
and turning.
Coong ps R
BAKING
•Lowerthetemperatureindicatedinyourrecipesbyabout25°F,
but cook for the indicated time.
•Forcookiesandcakes,useshiny,brightaluminumorsteelpans.
They reflect heat and allow for more delicate browning.
•Forbreadsandpies,usedarkordullaluminumorsteelpans.They
absorb heat and result in darker browning.
ROASTING
•Whenroastingmeats,cookaccordingtotheindicatedtemperaturebut
cut cooking time by about 25 percent.
•Usepanswithlowsidessothecirculatinghotaircanworkitsmagic.
Otherwise, food won’t brown as well.
•Don’tusealid.Itpreventsthecirculatingairfromreachingthefood.
•Whencookinginafulloven,payattentiontohowthefoodbrowns,as
you might still have to rotate the pans in the convection oven to ensure
even cooking.

1514
14 15
1•888•557•3848
Wards.com
Royal Pork Roast
1 boneless pork top loin roast (3 lbs.) 2 cloves garlic, thinly sliced
2 Tbsp. Dijon mustard 1 tsp. red wine vinegar
¾ tsp. ground thyme ½ tsp. ground sage
1 cup reduced-fat beef broth ¾ cup unsweetened apple juice
½ cup apricot jam 1 Tbsp. cornstarch
1 Tbsp. sour cream
•Cut8deepslitsinthetopofroast,insertgarlicintoslits.
•Mixmustard,vinegar,thyme,andsageinabowl.Brushthemixtureontothe
roast entirely.
•Placeroastintotheoven.
•SetTimerfor1hourandbegincooking.
•SetheatselectiontoRoast.
•Warm¾cupofbroth,applejuiceandjaminasmallsaucepanover
medium-high heat or until jam melts. Brush jam mixture onto roast once.
(Save the ¼ cup of broth for later use.)
•Addsourcreamandcornstarchtojammixtureandmixuntilsmooth.
Add the rest of beef broth into mixture in a saucepan and cook
over medium heat until bubbly and thickened.
•Servesauceoverthinslicesoftheporkroast.
Sweet Chile Chutney Roast Beef
2½ lb. boneless rib of beef
Glaze: 3 Tbsp. honey 1 Tbsp. dried chilies
Chutney: 1 large thinly sliced apple 2 tomatoes, chopped
2 Tbsp. brown sugar ½ cup red wine
½ cup water Pinch of cayenne pepper
•PlaceingredientsforChutneyintosaucepan.Bringtoaboilandsimmerfor10
minutes until nice and thick.
•Placeroastbeefintooven.
•SetheatselectiontoRoast.
•Cookfor30–45minutes.
•Brushhoneyontoroast.Letroastforanother10minutesandbrushsomeof
Chutney mixture onto roast.
•ServewithremainingChutneymixture.
RecipesRecipes
Beef and Pork Roasts
Herb Marinated Beef (or Pork) Roast
3-31⁄2lb. Angus Beef roast OR
3-11⁄2lb. rolled Pork roast
Marinade:
3⁄4cup beef broth
¼ cup vegetable oil
3 cloves of garlic, chopped finely
1 Tbsp. parsley
1 Tbsp. thyme
1 Tbsp. rosemary
Salt and pepper (black) to taste
•Blendallmarinadeingredientstogetherandputinlargeplasticbag.Placeroast
in bag with marinade and leave overnight in refrigerator (at least 8 hours) – turn
the roast often.
•Preheatovento350°andplacedrainedmeatonrackinroastingpan.Cook
approximately 2½ hours (more if well-done meat is desired), occasionally
basting with remaining marinade.

16 17
1•888•557•3848
Wards.com
Chicken
Sticky Roasted Chicken
4 tsp. salt 2 tsp. paprika
1 tsp cayenne pepper 1 tsp. onion powder
1 tsp. thyme 1 tsp. white pepper
½ tsp. garlic powder 1 tsp. black pepper
1 large whole chicken (4 lbs.) 1 cup chopped onion
•Combineallthespicesinabowl.Removegibletsfromchicken.Trusschickenor
tie drumsticks in place. Rub spice mixture into chicken, inside and out. Place in
refrigerator overnight.
•Whenreadytoroast,stuffcavityofchickenwithonions.Placechickenintheoven.
•SetheatselectiontoRoast.
•Cookfor1-11⁄2hours.
•Oncetimerisdone,letchickensitfor5-10minutes.Removechickenwhenithas
cooled.
•Carveandserve.
Jamaican Chicken
½ cup water 5-6 thin slices fresh ginger
2 dried chili peppers, crumbled ½ onion, chopped
¼ cup white-wine vinegar 1 Tbsp. pepper sauce
1 tsp. dried thyme ½ tsp. ground allspice
½ tsp. ground black pepper 1 whole chicken (4 lbs.)
•Inblender,combinewater,ginger,chilipeppers,onion,vinegar,peppersauce,
thyme, allspice and black pepper. Purée until fairly smooth.
•Trusschickenortiedrumstickstogether.Spreadmixtureontochickenthoroughly.
Reserve leftover mixture for later use. Cover and refrigerate overnight.
•PlacechickenintoovenandsetheatselectiontoRoast.Roastfor1–1½hour.
•Placereservedmixtureinasaucepan.Bringtoaboilandkeepwarmoverlow
heat.
•Servemixtureasthesaucewiththechicken.
Recipes Recipes
Balsamic Chicken
1⁄3cup olive oil 1⁄3cup balsamic vinegar
1 Tbsp. dried rosemary ½ tsp. red pepper flakes
1 clove garlic, minced 1 whole chicken (4 lbs.)
1 green bell pepper, sliced 1 red bell pepper, sliced
1 small red onion, quartered 3 carrots cut into 1” pieces
1 small eggplant cut into 1” pieces
•Inasmallbowl,combineoliveoil,balsamicvinegar,rosemary,
red pepper flakes and garlic.
•Trusschickenortiedrumstickstogether.Marinatechickenin
mixture for a half hour.
•Reservethemixture.
•Placechickenintooven.
•SetheatselectiontoRoast.
•Roastfor1–1½hour.
•Addthevegetablesintoreservedmixtureandtosstocoatevenly.
Place vegetables in roasting basket and roast in oven when chicken is
done and removed. Cook for 15–20 minutes or until edges brown.
•Servetogetherhotwithchicken.

18 19
1•888•557•3848
Wards.com
Ham
Apple Cider Glazed Ham
1 (3-5 lb.) boneless shank of ham 1 cup apple cider
4 tsp. cornstarch 2 tsp. spicy mustard
1⁄8tsp. ground cloves
•Combine2Tbsp.ofappleciderandcornstarchtogetherinsmallbowl.Inasauce-
pan, bring cornstarch mixture and rest of apple cider, mustard and cloves to a boil.
Stir until thickened.
•Coathaminmixtureandrefrigerateovernight.
•Placehamintooven.
•SetheatselectiontoRoast.
•SetTimerto1–1½hour.Occasionallyglazehamwithremainingapple
cider mixture.
•Servemixtureoverslicesofham.
Sugared Ham
1 (8 lb.) half shank of smoked ham 2 Tbsp. whole cloves
¾ cup Port wine 2 Tbsp. Port wine
1 cup packed brown sugar 3 Tbsp. dijon mustard
•Scorehamindiamondpatternandstudwithcloves.Marinatehamin¾cupofPort
overnight. Make sure to turn occasionally to coat thoroughly.
•Placehamintooven.
•SetheatselectiontoRoast.
•SetTimerfor45–60minutes.
•Insmallbowl,combinesugar,mustardand2Tbsp.ofPortwine.Mixuntilsmooth
and shiny.
•Oncehambeencookingfor30–45minutes,brushsugarglazeontoham
and cook for 15 minutes more.
•Letstandfor15minutesbeforecarving.
Cookies
Apple Sauce Cookies (Makes 36)
½ cup sugar ½ cup butter or margarine
1 cup all-purpose flour ½ tsp. baking powder
¼ tsp. baking soda Pinch of salt
½ tsp. ground cinnamon ½ cup chopped walnuts
1 lb. cooking apples, peeled, cored and diced 3 Tbsp. water
•Cookappleswiththewaterinacoveredsaucepanoverlowheatuntiltheapples
are tender. Set aside and let cool slightly. Then purée in a food processor or
blender, or mash with a fork. Measure out ¾ of a cup and set aside.
•Preheattheovento375°F.Greaseabakingsheet.(Makesurethebakingsheet
is the right size to fit into the oven.)
•Creamtogethersugarandbutterormargarineinamediumsizedbowluntil
thoroughly mixed. Beat in the reserved applesauce. Sift the flour, baking powder,
baking soda, salt and cinnamon into the mixture and stir to blend. Fold in the
walnuts.
•Dropsmallspoonfulsaboutthesizeofajawbreakerontothepreparedbaking
sheet. Place each about 2 inches apart to avoid sticking.
•Bakethecookiesfor8–10minutesoruntiltheyaregoldenbrown.Transfertoa
wire rack and allow to cool before serving.
Granny’s Ginger Cookies (Makes 60)
2½ cups all-purpose flour 1 tsp. baking soda
1½ tsp. ground ginger ¼ tsp. ground cinnamon
¼ tsp. ground cloves ½ cup butter or margarine
1½ cups sugar 1 egg, well beaten
4 Tbsp. black molasses 1 tsp. fresh lemon juice
•Preheattheovento325°F.Greasebakingsheet.(Makesurethebakingsheet
is the right size to fit into the oven.)
•Sifttheour,bakingsodaandallthespicesintoabowl.Setaside.
•Creamtogetherbutterormargarineand2⁄3of the sugar with an electric mixer.
•Stirintheegg,molassesandlemonjuice.Addtheourmixtureandmixin
thoroughly with a wooden spoon to make a soft dough.
•Shapethedoughinto1⁄4" balls. Roll the balls in the leftover sugar and place them
on the baking sheets about 2 inches apart.
•Bakeforabout12minutesoruntilthecookiesarermtothetouch.Transferto
a wire rack and let cool before serving.
Recipes Recipes

20 21
1•888•557•3848
Wards.com
Recipes Recipes
Cookies (continued)
Almond Cinnamon Cookie Balls (Makes 15)
11⁄2cups ground almonds 1⁄3cup granulated sugar
1 Tbsp ground cinnamon 2 egg whites
Oil for greasing Confectioner’s sugar or
powdered sugar for coating
•Preheattheovento350°F.Greaseabakingsheet.(Makesurethebakingsheet
is the right size to fit into the oven.)
•Mixtogetherthegroundalmonds,sugarandcinnamon.Beattheeggwhitesuntil
they begin to stiffen and fold enough into the almond mixture to make a fairly
firm dough.
•Wethandswithcoldwaterandrollsmallspoonfulsofthedoughintoroundballs.
Place onto baking sheet.
•Bakefor15minutesmakingsurethattheyremainsoftontheinside.Toomuch
baking time will result in hard and tough cookies. Remove the cookie balls from
the baking sheet and set aside to cool.
•SifttheConfectioner’ssugarorpowderedsugarontoaplate.Rollthecookie
balls into the sugar, shaking off any excess. (You may need to repeat the baking
process for the remaining dough.)
Baking Biscuits or Bread Sticks
Dill and Potato Biscuit Cakes (Makes 10)
2 cups self-rising flour 3 Tbsp. butter
Pinch of salt 1 Tbsp. finely chopped fresh dill
1 cup freshly made mashed potatoes 2–3 Tbsp. milk
•Preheattheovento450°F.Siftourintoabowlandaddbutter,saltanddill.
Mix in the mashed potatoes and enough milk to make a soft dough.
•Rolloutthedoughuntilfairlythin.Cutintoneatrounds.Placecakesonto
greased baking sheet. (Make sure baking sheet is the right size to fit in the
oven.)
•Bakefor20–25minutesuntilgoldenbrown.Servewarm.(Youmayneedto
repeat the baking process for the remaining dough.)
Baking Biscuits or Bread Sticks (continued)
Bacon Bread Twists (Makes 12)
4 cups all-purpose flour 12⁄3cup hot water
1 envelope active dry yeast 12 bacon strips
Pinch of salt 1 egg, well beaten
•Mixtheour,yeastandsaltinabowlandblendtogether.Addalittlewatertothe
mixture and mix with a knife. Add the remaining water and use hands to pull the
mixture together to form a sticky dough.
•Turnthedoughontoaslightlyouredsurfaceandkneadfor5minutesuntilthe
dough is smooth and elastic.
•Dividethedoughinto12evensectionsandrollintosausageshapes.Lightly
grease a baking sheet. (Make sure the baking sheet is the right size to fit into the
oven.) Wind each bacon strip around each “sausage” dough. Brush the dough
with beaten egg and arrange them onto baking sheet. Set aside for about 30
minutes until the dough has risen to twice its size.
•Preheatovento400°F.Bakefor20–25minutesuntilcookedandgoldenbrown.
(You may need to repeat the baking process for the remaining dough.)
Feta Cheese & Chives Biscuits (Makes 9)
1 cup self-rising flour Pinch of salt
1 cup self-rising whole wheat flour 3 oz. Feta cheese
1 Tbsp. chopped fresh chives 1⁄4tsp. cayenne pepper
2⁄3 cup skim milk, plus extra for glazing
•Preheattheovento400°F.Sifttheoursandsaltintoabowl.CrumbletheFeta
cheese and rub into the dry ingredients. Stir in the chives, then add the milk and
mix to a soft dough.
•Turnthedoughontoaouredsurfaceandlightlykneaduntilsmooth.Rollout
until 1⁄4" thick and stamp out 9 biscuits with floured cookie cutter.
•Transfertoagreasedbakingsheet.(Makesurethebakingsheetistherightsize
to fit into the oven.) Brush with skim milk and sprinkle with cayenne pepper. Bake
for 15 minutes until golden brown. (You may need to repeat the baking process
for the remaining dough.)

Returns
If any item, for any reason, does not meet your expectations, just return it to us.
We’ll gladly either:
•Refundyourmerchandiseamount
•Credityouraccount
•Sendareplacement
You can return any unused item in its original packaging within 60 days of its
receipt for a full refund of the purchase price (excluding shipping and handling
charges).
Please send returns to:
Montgomery Ward, Inc.
Attn: Customer Returns
2000 Harrison Suite 100
Clinton, IA 52732-6676
When returning an item:
•Usetheoriginalpackagingandpackitsecurely.
•Pleaseadequatelyinsureyouritemincaseyouneedtomakeaclaim
with the carrier you choose for returning your item.
•Includeyourordernumberandreasonforreturn.
•Werecommendkeepingthereceiptfor4weeks.
Montgomery Ward, Inc. warrants this Chef Tested product
to be free from defects in material and workmanship
for one year from provable date of purchase.
Within this warranty period, Montgomery Ward will repair or
replace, at its option, defective parts of this Chef Tested
product at no charge, provided the product is returned,
freight prepaid with proof of purchase to Montgomery Ward.
Allow 2-4 weeks for return shipping.
This warranty does not cover improper installation, misuse,
abuse or neglect on part of the owner. Warranty is also
invalid in any case that the product is taken apart or
serviced by an unauthorized service station.
This warranty gives you specific legal rights and they may
vary from state to state.
THE FOREGOING WARRANTIES ARE IN LIEU OF ALL
OTHER WARRANTIES AND CONDITIONS,
EXPRESS OR IMPLIED, INCLUDING
BUT NOT LIMITED TO THOSE OF MERCHANTIBILITY
OR FITNESS FOR A PARTICULAR PURPOSE.
1 Year Limited Warranty
Montgomery Ward Customer Service
8:00 am to Midnight CST, Monday through Friday
Wards.com 1•888•557•3848
22 23
1•888•557•3848
Wards.com
®
This manual suits for next models
3
Table of contents
Popular Oven manuals by other brands

Kalorik
Kalorik BSET 41707 operating instructions

Blanco
Blanco BOSE45X owner's manual

Omega
Omega OO610XA Installation and operating instructions

Hotpoint Ariston
Hotpoint Ariston 7OFK 1049L X RU/HA operating instructions

DeLonghi
DeLonghi 5718102700GB Directions for use

Smeg
Smeg Electric Multifunction Oven F170K instruction manual


