Chicago Electric 92472 User manual

14.4 VOLT IMPACT DRIVER KIT
1/4” HEX DRIVE
Model 92472
OPERATING INSTRUCTIONS
3491 Mission Oaks Blvd., Camarillo, CA 93011
Visit ourWeb site at: http://www.harborfreight.com
Copyright 2004 by Harbor Freight Tools®. All rights reserved. No portion of this
manual or any artwork contained herein may be reproduced in any shape or form
without the express written consent of Harbor Freight Tools.
For technical questions, or replacement parts, please call 1-800-444-3353.
®
©
TO PREVENT SERIOUS INJURY,
READ AND UNDERSTAND ALL WARNINGS
AND INSTRUCTIONS BEFORE USE.

PRODUCT SPECIFICATIONS
SAVETHIS MANUAL
You will need this manual for the safety warnings and precautions, assembly, operating,
inspection, maintenance and cleaning procedures, parts list and assembly diagram. Keep
your invoice with this manual. Write the invoice number on the inside of the front cover.
Keep this manual and invoice in a safe and dry place for future reference.
GENERAL SAFETY RULES
WARNING!
READ AND UNDERSTAND ALL INSTRUCTIONS
Failure to follow all instructions listed below may result in
electric shock, fire, and/or serious injury.
SAVETHESE INSTRUCTIONS
WORK AREA
1. Keep your work area clean and well lit. Cluttered benches and dark areas invite
accidents.
2. Do not operate power tools in explosive atmospheres, such as in the presence of
flammable liquids, gases, or dust. Power tools create sparks which may ignite the
dustor fumes.
SKU 92472 For technical questions, please call 1-800-444-3353 PAGE 2
UNPACKING
When unpacking, check to make sure all the parts shown on the Parts List on page 10
are included. If any parts are missing or broken, please call Harbor Freight Tools at the
number shown on the cover of this manual as soon as possible.
Item Description
Electrical
Requirements Power Output Source: 14.4 VDC Battery
Battery Type: 1.3 Ah Panasonic
Power Input Source: 120 VAC/60 Hz Charger
Charge Time: 1 Hour Quick Charge
Charger Power Plug: 2 Prong, Polarized
Drive Size/Type 1/4” Quick Change Hex Drive
Impact Type Pin Clutch
Trigger Type Variable Speed: 0-2300 RPM/IPM; Reversible w/Trigger Lock
Maximum Torque 850 In./Lbs
Accessories Carrying Case / Charger / Battery
1/4” Socket / 5/16” Socket / 3/8” Socket / 15/32” Socket
Over all Dimensions 7-3/4” L x 3-3/8” W x 9-1/2” H
Weight 4.10 Pounds
®

3. Keep bystanders, children, and visitors away while operating a power tool.
Distractions can cause you to lose control. Protect others in the work area from debris
such as chips and sparks. Provide barriers or shields as needed.
ELECTRICAL SAFETY
1. Avoid body contact with grounded surfaces such as pipes, radiators,ranges, and
refrigerators. There is an increased risk of electric shock if your body is grounded.
2. Do not expose power tools to rain or wet conditions. Waterenteringapowertool will
increase the risk of electric shock.
PERSONAL SAFETY
1. Stay alert. Watch what you are doing, and use common sense when operating a
power tool. Do not use a power tool while tired or under the influence of drugs,
alcohol, or medication. A moment of inattention while operating power tools may
result in serious personal injury.
SKU 92472 For technical questions, please call 1-800-444-3353 PAGE 3
2. Dress properly. Do not wear loose clothing or jewelry. Contain long hair. Keep
your hair, clothing, and gloves away from moving parts. Loose clothes, jewelry, or
long hair can be caught in moving parts.
3. Avoid accidental starting. Be sure theTrigger (34) is released before plugging in.
Carrying power tools with your finger on the Trigger, or plugging in power tools with the
Trigger depressed, invites accidents.
4. Remove adjusting keys or wrenches before turning the power tool on. Awrench or
a key that is left attached to a rotating part of the power tool may result in personal injury.
5. Do not overreach. Keep proper footing and balance at all times. Properfooting and
balance enables better control of the power tool in unexpected situations.
6. Use safety equipment. Always wear ANSI approved safety glasses underneath a full
face safety shield. Dust mask, nonskid safety shoes, hard hat, or hearing protection
must be used for appropriate conditions.
7. Use clamps (not included) or other practical ways to secure and support the
workpiece to a stable platform. Holding the work by hand or against your body is
unstable and may lead to loss of control.

TOOL USE AND CARE
1. Do not force the tool. Use the correct tool for your application. The correct tool will
do the job better and safer at the rate for which it is designed.
2. Do not use the power tool if theTrigger (34) does not turn it on or off. Any tool that
cannot be controlled with the Trigger is dangerous and must be replaced.
3. Disconnect the power tool from its Battery (40) before making any adjustments,
changing accessories, or storing the tool. Such preventive safety measures reduce
the risk of starting the tool accidentally.
4. Store idle tools out of reach of children and other untrained persons. Tools are
dangerous in the hands of untrained users.
5. Maintain tools with care. Keep tools dry and clean. Properly maintained tools are
less likely to bind and are easier to control. Do not use a damaged tool. Tag damaged
tools “Do not use” until repaired.
SKU 92472 For technical questions, please call 1-800-444-3353 PAGE 4
6. Check for misalignment or binding of moving parts, breakage of parts, and any
other condition that may affect the tool’s operation. If damaged, have the tool
serviced before using. Many accidents are caused by poorly maintained tools.
7. Use only accessories that are recommended by the manufacturer for your model.
Accessories that may be suitable for one tool may become hazardous when used on
another tool.
SERVICE
1. Tool service must be performed only by qualified repair personnel. Service or
maintenance performed by unqualified personnel could result in a risk of injury.
2. When servicing a tool, use only identical replacement parts. Follow instructions in
the
“Inspection, Maintenance, And Cleaning”
section of this manual. Use of
unauthorized parts or failure to follow maintenance instructions may create a risk of
electric shock or injury.
SPECIFIC SAFETY RULES
1. Maintain a safe working environment. Keep the work area well lit. Make sure there
is adequate surrounding workspace. Always keep the work area free of

obstructions, grease, oil, trash, and other debris. Do not use the Impact Driver in areas
near flammable chemicals, dusts, and vapors. Do not use this product in a damp or wet
location.
2. Maintain labels and nameplates on this product. These carry important information.
If unreadable or missing, contact Harbor FreightTools for a replacement.
3. When using the Impact Driver, always maintain a firm grip on the tool with both
hands.
4. Hold the tool by its insulated gripping surfaces when performing an operation
where the Impact Driver may contact hidden wiring. Contact with a “live” wire will
make exposed metal parts of the Impact Driver “live” and shock the operator.
5. Do not use the Impact Driver or Charger (46) if it has been dropped, damaged, left
outdoors, or immersed in liquid.
6. To avoid electrical shock, do not handle the Charger (46), its Power Cord Plug, or
the Impact Driver with wet hands.
7. Keep the Handle of the Impact Driver dry, clean, and free from oil and grease.
8. Always turn off the Impact Driver and unplug the Charger (46) from its electrical
outlet before changing accessories or performing any inspection, maintenance,
or cleaning procedures.
9. Avoid unintentional starting. Makesure you areprepared tobegin workbeforeturning
on the Impact Driver.
10.To avoid electrical shock,do not pull or carry the Charger (46) by its Power Cord.
11.Never leave the Charger (46) unattended when itis plugged into an electrical outlet.
Make sure to unplug it from its electrical outlet before leaving.
12.Proper Battery Care: Battery (40) leakage may occur under extreme usage or
temperature conditions. If Battery fluid comes in contact with skin, wash with soap and
water and rinse with lemon juice and vinegar. If the fluid comes into contact with the
eyes, flush with water for several minutes and contact a doctor immediately. Never burn
the Battery, as it can explode in a fire. Do not charge the Impact Driver with a leaking
Battery. Contact local solid waste authorities for instructions on correct disposal or
recycling of the Battery.
SKU 92472 For technical questions, please call 1-800-444-3353 PAGE 5

15. WARNING! People with pacemakers should consult their physician(s) before
using this product. Electromagnetic fields in close proximity to a heart pacemaker could
cause interference or failure of the pacemaker. In addition, people with pacemakers
should adhere to the following: Avoid operating power tools alone. Don’t use a power
tool with the power switch (Trigger) locked on. If powered via a power cord be certain
that the tool is properly grounded. A ground fault interrupt (GFCI) system is also a good
precaution. This inexpensive device is a good safety measure because it prevents a
sustained electrical shock. Properly maintain and inspect all tools before use to avoid
electrical shock.
16. WARNING! The warnings, precautions,andinstructionsdiscussed in thismanual
cannot cover all possible conditions and situations that may occur. The operator must
understand that common sense and caution are factors which cannot be built into this
product, but must be supplied by the operator.
14. WARNING! Some dust created by power sanding, sawing, grinding, drilling, and
otherconstructionactivities, containchemicals known(tothe Stateof California)tocause
cancer, birth defects or other reproductive harm. Some examples of these chemicals
are:lead from lead-basedpaints,crystallinesilicafrombricksandcementorothermasonry
products, arsenic and chromium from chemically treated lumber. Your risk from these
exposures varies, depending on how often you do this type of work. To reduce your
exposure to these chemicals: work in a well ventilated area, and work with approved
safety equipment, such as those dust masks that are specially designed to filter out
microscopic particles.
(California Health & Safety Code 25249.5, et seq.)
13.Always switch to a fresh Battery (40) when tool performance begins to diminish.
Severe heat is most destructive to a Battery. The more heat generated, the faster the
Battery loses power. A Battery that gets too hot can be permanently damaged. Never
over-discharge a Battery by using the tool while tool performance is decreasing. Never
attemptto discharge atool’s Battery bycontinuingto pullthe toolTrigger (34). When tool
performance begins to diminish, stop the tool, recharge the Battery, and use the fresh
Batteryfor optimalperformance.
SKU 92472 For technical questions, please call 1-800-444-3353 PAGE 6
PRODUCT FEATURES
NOTE: For additional information regarding the parts listed in the following pages, refer
to the Assembly Diagram on page 11.
1. WARNING! Always make sure theTrigger (34) of the Impact Driver is in its“OFF”

inits“OFF” position, theBattery(40)is removed fromthe ImpactDriver, and theCharger
(46) is unplugged from its electrical outlet prior to making any adjustments to the tool.
(See Figure A.)
2. Lock Sleeve (9): Accepts the 1/4”
shank
diameter Double End Screwdriver (39), 1/4”
Socket (42), 5/16” Socket (43), 3/8” Socket (44), and 15/32” Socket (45). To install the
Screwdriver or Sockets with the Impact Driver pointed away from your body, pull back on
the Lock Sleeve. Insert the shank of the Screwdriver or Socket all the way into the Lock
Sleeve. Then, release the Lock Sleeve to hold the Screwdriver or Socket in place.
(See Figure A.)
SKU 92472 For technical questions, please call 1-800-444-3353 PAGE 7
3. Trigger (34):TheTrigger is operated
manually
simply bysqueezing theTrigger toturnon
theImpact Driver andreleasing pressure on theTriggertoturnoff the Driver. TheTrigger
features a Trigger Lock for continuous running of the Impact Driver. To set the Impact
Driver in a continuous run mode, squeeze the Trigger and depress the Trigger Lock.
Then, release pressure on theTrigger. The Impact Driver will continue to run. To turn off
the Impact Driver, squeeze and let up on theTrigger. (See Figure A.)
4. Forward/Reverse Lever (37): The Forward/Reverse Lever allows you to change the
rotational direction of the Impact Driver. To change the rotational direction, make sure
theImpactDriver isata completestop. Whileholdingthe tool inyourhand,fora
clockwise
rotation, move the Lever to the
right
. For a
counterclockwise
rotation, move the Lever to
the
left
. (See Figure A.)
LOCK SLEEVE (9)
FORWARD/REVERSE LEVER (37)
TRIGGER (34)
TRIGGER LOCK
BATTERY (40)
CHARGER (46)
FIGURE A
TO CHARGETHE IMPACT DRIVER
1. NOTE: The Battery (40) requires charging. (See Figure A.)
2.When the Battery (40) requires recharging, a 1- 1-1/2 hour charge allows the tool to

operateat fullpower. Donot recharge the Batterylonger than 1-1/2hours,as damageto
the Battery and/or Charger (46) will occur. (See Figure A.)
3.Makesure theTrigger(34) on theImpact Driver is in its“OFF”position. Slidethe Battery
(40)offthe Handleof the ImpactDriver. Next,inserttheBatteryonto theCharging Socket
oftheCharger (46). Then,plug theChargerinto thenearest 120volt,grounded,electrical
outlet. Do not leave unattended while charging. (See Figure A.)
4.Press the SET Button on the Charger (46) to begin charging. (See Figure B.)
5.Verify that the RED Charging Indicator Light comes on. If it does not illuminate, check
the power connection or try a different electrical outlet. (See Figure B.)
6.When the Battery is fully charged, the RED Charging Indicator Light will automatically
turn off and the GREEN Charged Light will illuminate. (See Figure B.)
7. NOTE: While charging, the Battery (40) and Charger (46) may become warm to the
touch. This is normal, and does not indicate a problem. (See Figure B.)
8.Once the Battery (40) is fully charged, disconnect the Charger from the electrical outlet.
Then, remove the Battery from the Charger. (See Figure B.)
SIDEVIEW
SKU 92472 For technical questions, please call 1-800-444-3353 PAGE 8
FRONT VIEW
BATTERY
(40) BATTERY
(40)
RED
CHARGING
INDICATOR
LIGHT GREEN
CHARGED
LIGHT
SET
BUTTON
CHARGER
(46)
CHARGER
(46)
FIGURE B
OPERATING INSTRUCTIONS
1.When installing Screwdriver or Sockets, make sure the Battery (40) is removed from the
ImpactDriver to avoidaccidentalstarting. Then, insert and lockinplace the Screwdriver
or Socket in the Lock Sleeve (9) of the Impact Driver. (See Figure A.)

SKU 92472 For technical questions, please call 1-800-444-3353 PAGE 9
2.If necessary, adjust the Forward/Reverse Lever (37). (See Figure A.)
3.Wheneverpossible, securethe workpiecein place,using avise orclamps (notincluded).
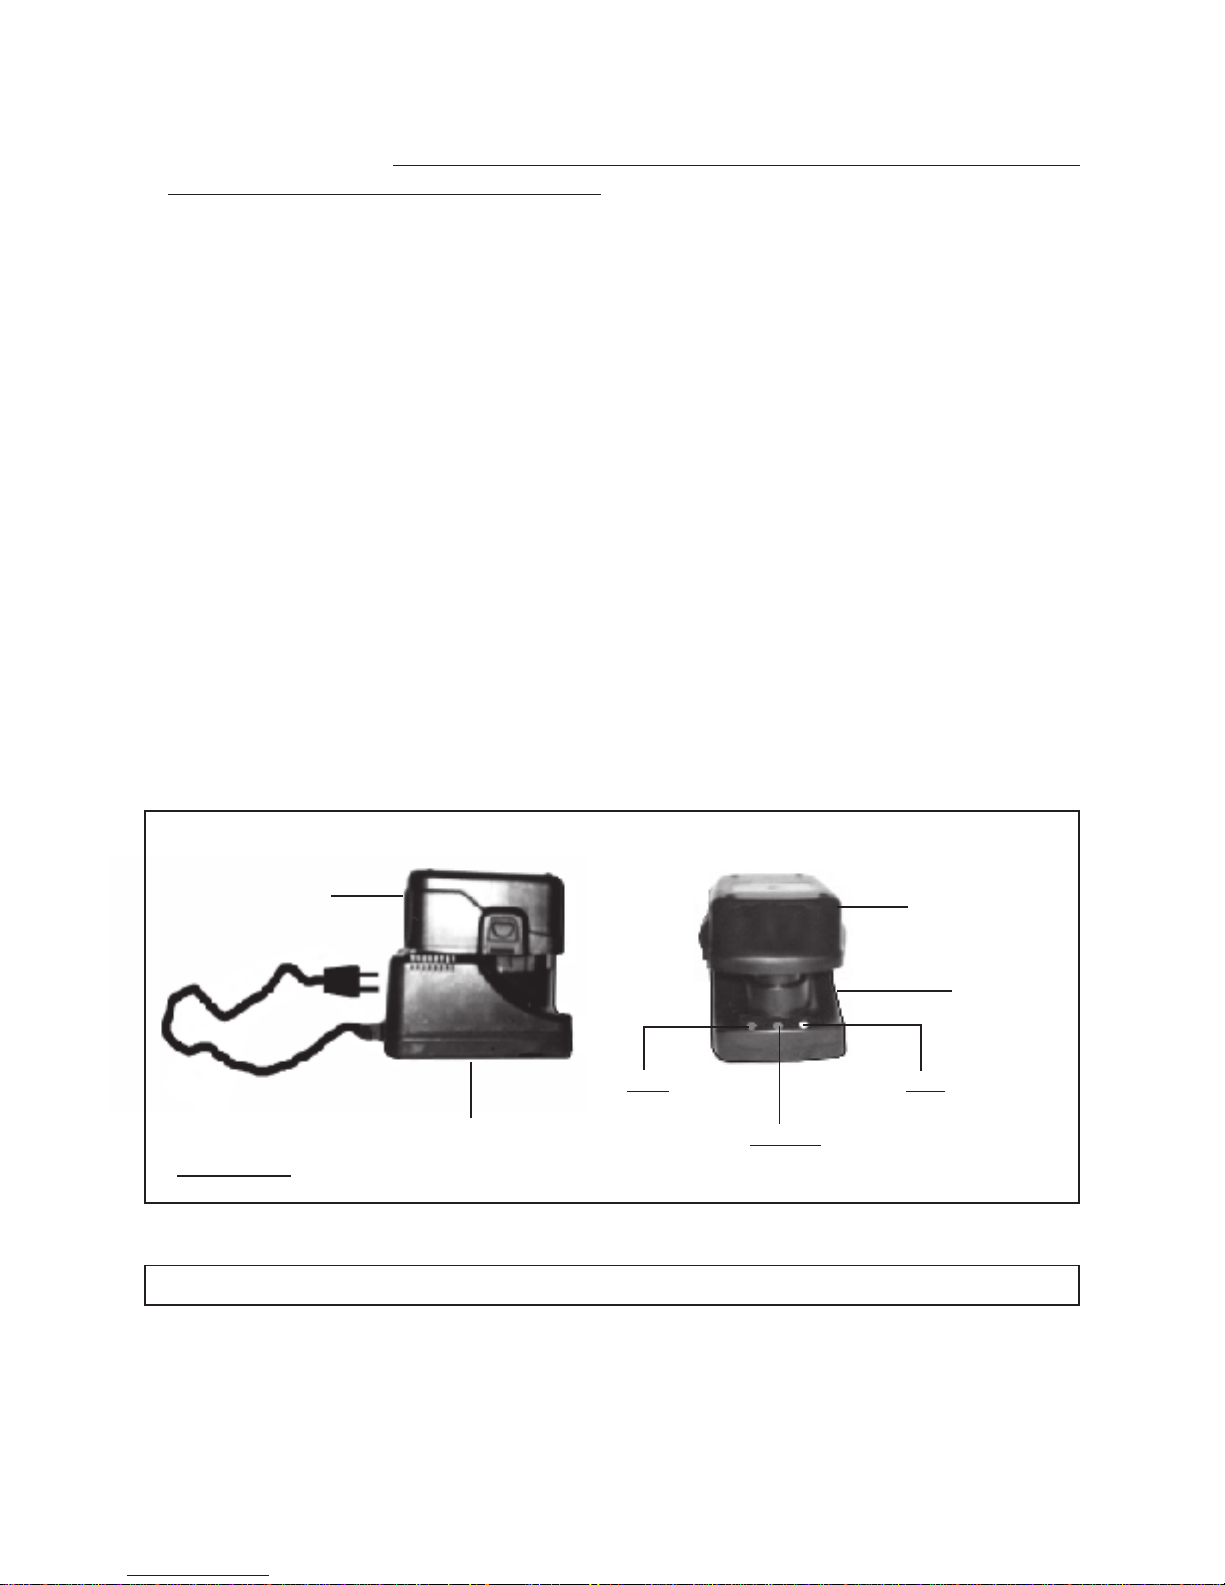
4.Insert the fully charged Battery (40) into the Handle of the Impact Driver.
(See Figure B.)
5. Make sure to hold the Impact Driver firmly with both hands, as torque from the
Motor will cause the tool to twist.
6.Insertthe Screwdriver(39) into the screw,orinsert theSocket(42, 43, 44, 45) onto a bolt.
Then, turn on the Impact Driver, using theTrigger (34). (See Figure A.)
7.When finished using the Impact Driver, release the Trigger (34) to stop the tool. Make
suretotorque the boltwitha torquewrench(not included)accordingto themanufacturer’s
recommendedtorque setting. Then,remove the Battery (40)and Screwdriver, or Socket,
from the Impact Driver. (See Figure A.)
8.Make sure to store the Impact Driver and its accessories in the Carrying Case 47), and
place the Carrying Case in a safe, dry, clean location out of reach of children.
INSPECTION, MAINTENANCE, AND CLEANING
1. WARNING! Always turn the Trigger (34) to its “OFF” position, remove the
Battery(40), and unplug the Charger (46) from its electrical outlet before performing
any inspection, maintenance, or cleaning.
2. Before each use: Inspect the general condition of the Impact Driver. Check for
misalignment or binding of moving parts, cracked or broken parts, leaking Battery,
damaged Charger wiring, chipped or broken Drill Bit/Sockets, and any other condition
thatmayaffect itssafe operation. If abnormalnoise orvibration occurs, havethe problem
corrected before further use.
Do not use damaged equipment.
3. Battery precautions: Neverburn Batteries,as theycan explodein afire. Do notcharge
leaking Batteries. Only a qualified service technician should perform maintenance on
the Battery. Contact local solid waste authorities for instructions on correct disposal or
recycling of the Battery.
4. Daily: Witha softbrushor cloth,remove alldirt anddebrisfromthe Impact Driver. Donot
immerse the Impact Driver in any liquids.

5. When storing: Always removethe Battery(40) fromthe Impact Driver. Keepthe Impact
Driver and its accessories in a clean, dry location and out of children’s reach.
SKU 92472 For technical questions, please call 1-800-444-3353 PAGE 10
6. CAUTION! All maintenance, service, or repairs not listed in this manual are
only to be attempted by a qualified service technician.
PLEASE READTHE FOLLOWING CAREFULLY
THE MANUFACTURER AND/OR DISTRIBUTOR HAS PROVIDED THE PARTS LIST AND ASSEMBLY DIAGRAM IN
THIS MANUAL AS A REFERENCE TOOL ONLY. NEITHERTHE MANUFACTURER OR DISTRIBUTOR MAKES ANY
REPRESENTATION ORWARRANTY OF ANY KINDTOTHE BUYERTHAT HE OR SHE IS QUALIFIEDTO MAKE ANY
REPAIRSTOTHEPRODUCT, ORTHAT HE ORSHE ISQUALIFIEDTOREPLACEANY PARTSOFTHE PRODUCT. IN
FACT, THE MANUFACTURER AND/OR DISTRIBUTOR EXPRESSLY STATES THAT ALL REPAIRS AND PARTS
REPLACEMENTS SHOULD BE UNDERTAKEN BY CERTIFIED AND LICENSED TECHNICIANS, AND NOT BY THE
BUYER. THE BUYER ASSUMES ALL RISK AND LIABILITY ARISING OUT OF HIS OR HER REPAIRS TO THE
ORIGINALPRODUCTOR REPLACEMENTPARTSTHERETO,OR ARISINGOUT OF HISORHER INSTALLATIONOF
REPLACEMENT PARTS THERETO.
PARTS LIST
Part
#
Description Part # Description
1 Right Case 25 Steel Ball
2 Washer (1) 26 Planetary Gear
3 Stun Screw (1) 27 Runner Axle
4 Stun Screw (2) 28 Bearing Plate
5 Washer (2) 29 Bearing
6 Retainer Ring 30 Inner Gear
7 Spring Washer 31 Stun Screw (3)
8 Spring 32 Mount Plate
9 Lock Sleeve 33 Motor
10 Machine Head 34 Trigger
11 Lock Washer 35 Battery Clamp
12 Seal Loop 36 Left Case
13 Oil Bearing 37 Forward/Reverse Lever
14 Oil Seal 38 Screw Clamp
15 Plate 39 Screwdriver
16 Rubber Plate 40 Battery
17 Steel Ball 41 Carrying Strap
18 Impact Driver 42 1/4” Socket
19 Impact Setting Plate 43 5/16” Socket
20 Iron Shot 44 3/8” Socket
21 Steel Ball Plate 45 15/32” Socket
22 Spring 46 Charger
23 Spring Plate 47 Carrying Case
24 Main Shaft

NOTE:
Some parts are listed and shown for illustration purposes only,
and are not available individually as replacement parts.
ASSEMBLY DIAGRAM
SKU 92472 For technical questions, please call 1-800-444-3353 PAGE 11
42: 1/4” Socket not shown.
43: 5/16” Socket not shown.
44: 3/8” Socket not shown.
45: 15/32” Socket not shown.
46: Charger not shown.
47: Carrying Case not shown.
Table of contents
Other Chicago Electric Impact Driver manuals

Chicago Electric
Chicago Electric 98701 Installation manual

Chicago Electric
Chicago Electric 92651 User manual

Chicago Electric
Chicago Electric 92920 User manual

Chicago Electric
Chicago Electric Owner's Manual & Safety Instructions Assembly instructions

Chicago Electric
Chicago Electric 68099 System manual

Chicago Electric
Chicago Electric 91790 User manual

Chicago Electric
Chicago Electric 68568 User manual

Chicago Electric
Chicago Electric 45252 Instruction Manual

Chicago Electric
Chicago Electric ITEM 68853 Instruction Manual

Chicago Electric
Chicago Electric 92349 User manual