ChiQ U50H7S User manual
U50H6
U55H6
EN-1
Table of contents
Help & Package contents..............................................................................................1
Safety instructions.........................................................................................................2
Getting started...............................................................................................................5
Controls and connections..............................................................................................6
Connecting antenna, Internet, and external devices .....................................................9
Powering the TV set on and off...................................................................................12
Channel guide .............................................................................................................12
USB Function (Media Player)......................................................................................22
After use......................................................................................................................22
Troubleshooting...........................................................................................................23
Technical specifications...............................................................................................25
Wall-mounting .............................................................................................................26
Disposal of old electrical appliances............................................................................26
Conformity...................................................................................................................26
Figures and illustrations in this Operation Manual are provided for reference
only and may differ from the actual product appearance. Product design and
specifications may be changed without notice.
Help
The Help feature offers much information about your TV operation. To use the Help feature,
press the Home button. Then, use the Direction and OK buttons to access the Help menu.
Troubleshooting information can be accessed via the list or keyword search.
When the application is updated, the Help feature and information will be updated as
well.
Package contents
Model U50H7S U55H7S
Led TV 1 1
Remote Control 1 1
Stand 2 2
Supports - -
Operation Manual 1 1
Screws 4 4
Mains cable 1 1
Batteries 2 2
Warranty Card 1 1
Installation Guide of Base Stand 1 1
EN-2
Safety instructions
Before you use this device for the first time, please read the following instructions and heed
all warnings, even if you are familiar with handling electronic devices. Keep this manual safe
for future reference. Keep it near the product. If you sell the device or pass it on, it is
essential that you also hand over this manual.
This symbol and the signal word “Danger” indicate a hazardous situation which
leads to death or serious injuries if not avoided.
This symbol and the signal word “Warning” indicates a hazardous situation
which could lead to death or serious injuries if not avoided.
This symbol and the signal word “Caution” indicate a hazardous situation which
could lead to minor or moderate injuries and damage to property if it is not
avoided.
This symbol indicates further information on the topic.
Warning: Children and persons with disabilities
Children and persons with disabilities may not be able to comprehend the potential risks.
Therefore, children and persons with disabilities should never be allowed to use electrical
devices unsupervised. Batteries and small parts represent potential choking hazards.
Therefore, keep the batteries in a safe place. Seek medical attention immediately if a
battery is swallowed. Keep the pa
ckaging away from children and persons with
disabilities. There is a risk of suffocation.
Caution: Risk of hearing damage
•Using headphones at extremely high volume levels can cause permanent hearing
damage.
•Reduce the volume before connecting the earphones. You can then increase it to a
comfortable level.
Caution: Disconnecting from the power supply
•The device still uses electricity in standby mode. To prevent that the device using
any electricity, the power plug must be pulled out from the power socket. Position
the device with free access to the power socket so that the power plug can be
removed quickly in the event of an emergency.
•If you do not plan on using the device for an extended period, for example, when
going on vacation, pull out the power plug from the power socket. This eliminates
any fire risks. The same applies in the event of thunderstorms. Disconnect the
device from the power supply and disconnect the antenna plug.
EN-3
Warning: Batteries
•
Danger of death!
Store batteries out of the reach of children. If a battery is
swallowed, seek medical attention immediately!
•Make sure that batteries are always inserted with the correct polarity.
•Do not attempt to recharge the batteries and do not throw the batteries into a fire.
•Do not mix battery types (old and new or carbon and alkaline, etc.).
•Keep the batteries away from heat and direct sunlight (even when they are in the
remote control). Otherwise, there could be a risk of explosion or fire!
•Do not attempt to open or modify the batteries. Leaking battery acid can cause
injuries. In the case of skin or eye contact, rinse immediately with plenty of water,
and seek immediate medical attention.
•Remove any leaking batteries immediately. Use suitable gloves to prevent injuries.
•If you do not plan on using the device for an extended period, remove the batteries.
Improper use could cause explosions or leaks.
Caution: Cables
Always handle the cables by the plug and do not pull on the cables themselves. Make
sure that you never place heavy objects on the cables and do not place the device itself
on a cable. Never tie a knot in a cable or bend it, especially near the plug and at the
connection jack, and never tie it to other cables. All cables must be routed so that nobody
can trip over them or be obstructed by them. Do not try to open or modify the cable.
Warning: Screen
Do not apply any pressure to the screen and keep sharp objects away from the surface of
the screen. A broken screen represents a risk of injury. Wear gloves to collect broken
parts and consult the customer service department where necessary.
If any liquid escapes from the broken display, wipe it carefully with a dry cloth. Wear
safety gloves while doing so and note the following:
•If liquid is swallowed, first rinse out the mouth and throat with water. Then, drink
plenty of water. Seek medical assistance immediately!
•If liquid gets into the eyes, rinse them out with plenty of clean water. Seek medical
attention immediately.
•In the case of skin contact, wipe the liquid off with a clean cloth and rinse with plenty
of clean water. Seek medical attention where applicable!
Dispose of the broken screen according to local environmental regulations.
EN-4
Warning: Repairs
Never open the housing of the device. Failure to do so could
cause a potentially fatal electric shock.
Repair work is required if the device was dropped or has been damaged in any way, for
example, if the device housing was damaged, liquid or objects penetrated the device
interior, or if it was exposed to rain or moisture. Repairs are also required if the device
does not work properly.
If smoke, unusual noises or odors are detected, immediately switch off and unplug the
device from the power source. If this occurs, do not continue to use the device and have it
checked out by a qualified person. All repair work must be carried out by qualified
personnel.
Warning: Cleaning
Disconnect the device from the power source before cleaning.
There is a risk of electric shock.
Only use a clean, dry cloth for cleaning. Never use any corrosive liquids (alkalis, acids,
thinners, solvents, etc.).
Place of installation and operating environment
The following measures support the proper functioning of the device and extend its service life:
•Only position the device on a stable, flat surface and do not place any objects on the
device. The device is not suitable for use in rooms with high temperature or humidity
(e.g., bathrooms) or with high levels of dust (e.g., workshops).
•The device is very large and heavy. It must only be placed on fitted furniture which is
sufficiently strong to support it. The furniture must be wide enough so that the device
does not protrude beyond the edges of the furniture. Alternatively, it can be wall
mounted. For this purpose, use a suitable mounting frame and follow the
recommendations of the manufacturer.
•Operating temperature and humidity: 5 ºC to 35 ºC, max. 80 % RH.
•Make sure that the air circulates freely (do not place the device on shelves, on a thick
carpet or bed, or anywhere, where the ventilation slots would be obstructed. Leave at
least 10 cm clearance on all sides).
•Do not expose the device to direct heat sources (e.g., heaters).
•Do not expose the device to direct sunlight or bright artificial light.
•Avoid contact with water sprays or drips and aggressive fluids. Never operate the
device near water. In particular, the device must never be immersed. Do not place any
containers containing liquid such as drinks, vases, etc. on or next to the device.
•Never place the device near magnetic fields (e.g., loudspeakers).
•CAUTION! Always keep candles and open flames away from this product to avoid the
risk of fire.
•Do not allow foreign bodies to penetrate the device.
•Do not subject the device to significant temperature fluctuations, as this can cause
condensation and short-circuits.
•Do not subject the device to excessive shocks or vibrations.
•Only connect the TV set to a properly installed, easily accessible power socket whose
voltage corresponds to that on the type plate.
EN-5
Intended use of the product
This is a consumer electronics device. It is used for TV reception via an antenna or cable
TV network and to playback multimedia files from the Internet and USB mass storage
devices. It may only be used for private purposes and not for industrial or commercial
applications. It is not intended for medical, lifesaving or life-preserving applications.
Only use connecting cables and external devices compatible with the product in terms of
safety, electromagnetic compatibility, and shielding.
Only use accessories recommended by the manufacturer. Do not use this device for
purposes other than those indicated and do not modify it in any way. Always comply with
the regulations and laws of the country in which you are operating the device.
Explanation of other symbols
The following symbols can be found on the device itself:
This symbol means there is potentially life-threatening high voltage inside the device. For
this reason, you should never open the housing. There are no user-serviceable parts
inside.
Protection Class II: This symbol means that the TV set has double insulation and is
subject to the electro-technical Protection Class II.
This symbol means that the TV set supports Dolby Vision and Dolby Audio
technology for sound and video output.
This symbol means that the TV set must be connected to an alternating current
supply.
This symbol means that the remote control is supplied with direct current.
Trademarks
Dolby, Dolby Vision, Dolby Audio, and the double-D symbol are trademarks of Dolby
Laboratories.
Manufactured under license from Dolby Laboratories. Confidential unpublished works.
Copyright © 1992-2019 Dolby Laboratories. All rights reserved.
Getting started
Fitting the stand
Before you can install your TV set, you need to fit the stand. Alternatively, you can mount
the TV set to the wall. A Phillips screwdriver is needed for installation.
Setting up the TV set
Place your TV set on a flat, stable surface (e.g., a table or a specially designed TV stand).
Make sure that all cables are routed straight forwardly and safely and do not represent a
tripping hazard. The device must be connected to a power socket using the power cable.
This power socket must be easily accessible so that the power plug can be removed
immediately in the event of an emergency.
EN-6
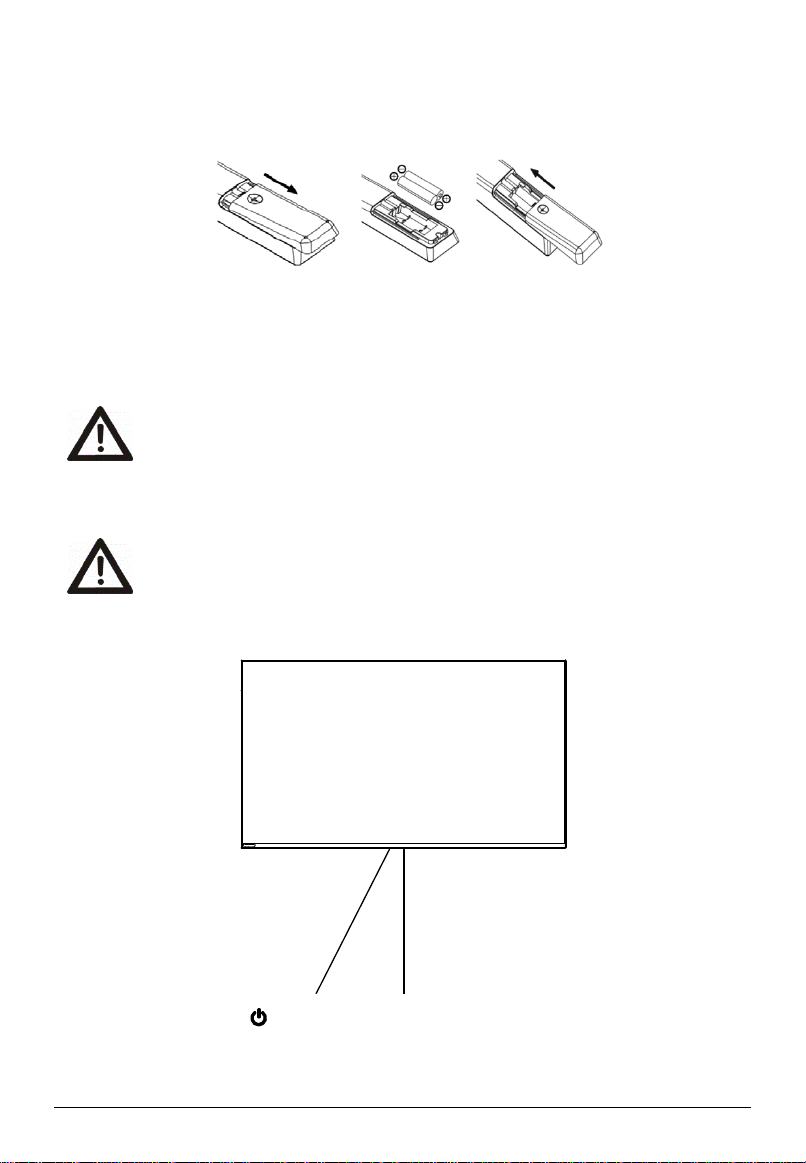
Fitting the batteries into the remote control
1. Turn the remote control over with its bottom side facing up. Insert a finger into the
recess and push the battery compartment cover in the direction of the arrow. Remove
the battery compartment cover.
2. Insert the batteries supplied into the remote control. Make sure that you insert the
batteries with the correct polarity as shown inside the battery compartment.
3. Replace the battery compartment cover and slide it against the direction of the arrow
until it clicks into place.
Caution: Remove the batteries from the remote control if you are not going to
use the device for an extended period. Otherwise, the remote control can be
damaged by leaking battery acid.
Controls and connections
Caution: Before connecting or disconnecting any cables, switch off all related
devices (including the TV). Otherwise, you could damage the devices.
Front
Power
button Power Indicator/
Remote Sensor
EN-7
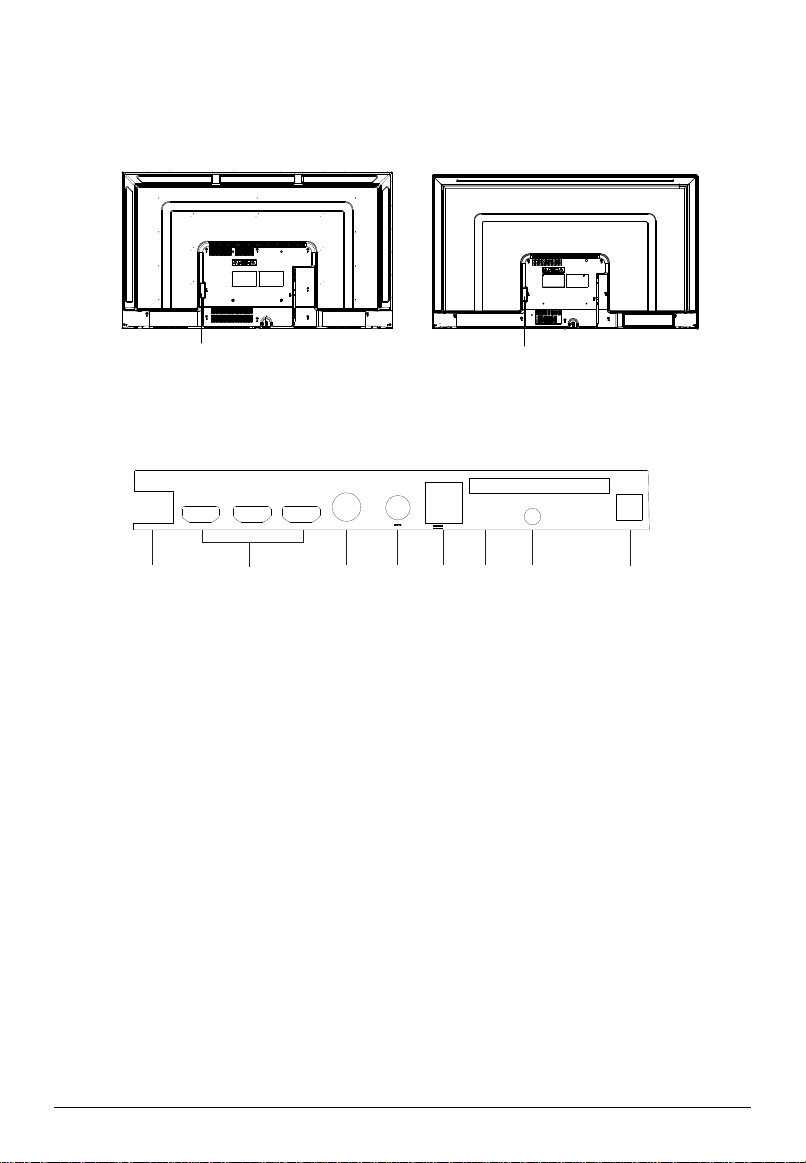
Back
1. DIGITAL AUDIO OUT: Connect to an external digital audio device.
2. AV IN: AV audio/video signal input
3. Common Interface slot
4. USB2.0 X 2: USB port. Connect a USB storage device for multimedia file playback.
5. ANT2: For connecting a satellite antenna (ANT 2) (SATELLITE)
6. ANT1: For connecting the external antenna
7. HDMI1 (ARC) /HDMI2/HDMI3: HDMI (High-Definition Multimedia Interface) input
HDMI1 (ARC) supports HDCP 2.2, CEC, and ARC.
8. LAN: Local area network (LAN) port. Connect a LAN cable to this port for connecting to
the Network.
LAN ANT1
USB2.0
(5V 500mA)
AV
DIGITAL
AUDIO OUT
COMMON
INTERFACE
13/18 V 400mA
ANT2
(SATELLITE)
HDMI3(CEC) HDMI2(CEC) HDMI1
(ARC/CEC)
AC Input
12
3
4
56
7
8
AC Input
50"55"

EN-8
Remote control
Definition of the remote control buttons:
Serial
No. Button Description
1 Power Turns on/off the TV
2 Info Displays program information
3 Settings Displays System Settings menu
4 Menu Displays main menu
5 NETFLIX Opens NETFLIX app
6 prime video Opens prime video app
7 Volume+/-
Adjusts volume
8 Home Opens Android TV homepage
9 USB Switches to the USB source
10 Teletext Shows or hides Teletext
11 Mute Mutes or unmutes sound
12 Number Number buttons
13 EPG Launches Electronic Program
Guide
14 Source Selects signal source
15 Direction/
OK
Direction buttons:[UP] /
[DOWN] / [LEFT] / [RIGHT]
Press the direction buttons to
select menu options or settings.
OK button: Press [OK] to select
or confirm the menu item; In the
TV mode the channel list can be
opened with the [OK] button.
16 Back Returns to the previous menu or
setting
17 YouTube Opens YouTube app
18 Google play Opens Google play app
19 Voice Activates voice command
function
20 Program
∧
/
∨
Selects programs in ascending or
descending order
21 Audio Selects sound track for current
channel
22 Subtitle Selects subtitle
23 Media/
Teletext
Media play control except for the
button / Teletext control
except for the Pause II button

EN-9
24 Color Use as per the operating
interface instructions.
Connecting antenna, Internet, and external devices
CI card slot
If you purchased a subscription for encrypted channels from a Pay TV provider, you can
insert the module with the CI or CI+ card into this slot. For more information, please read
the documentation supplied with your CI card.
Caution! Switch your TV set off before inserting or removing the CI module.
Otherwise, you could damage the module or the TV set.
Inserting the CI card
Insert the module with the CI or CI+ card into the CI card slot. Make sure that the module is
oriented correctly.
Removing the CI card
To remove the CI card, carefully pull it out of the CI card slot.
The CI/CI+ module is initialized after you switch on the TV set. This may take a little while.
You should then be able to view the encrypted channels. If this is not the case, consult your
Pay TV provider to ensure that the signal has been enabled for you.
Connecting a USB device
The TV has USB 2.0 ports for connecting appropriate
mass storage devices.
EN-10
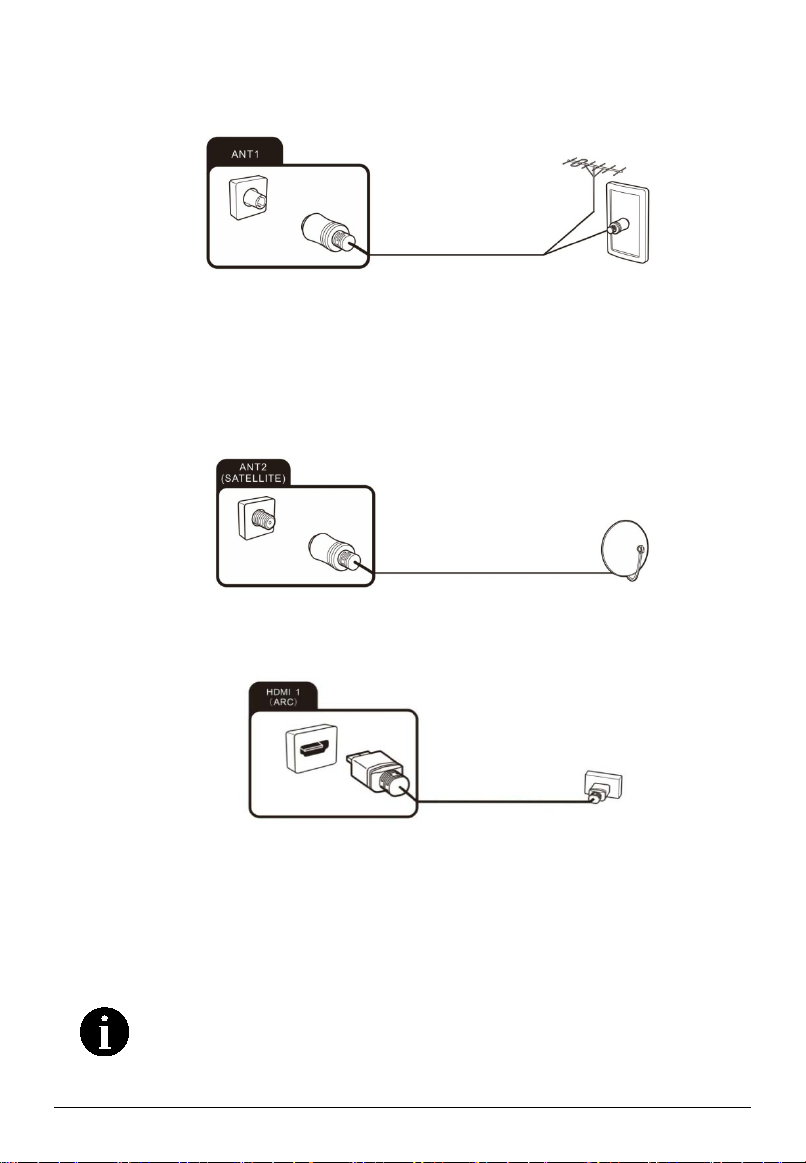
Connecting the TV antenna or cable TV
You can connect the cable of your indoor or outdoor antenna or cable TV to the antenna
socket (ANT1).
To switch to TV reception, press the Source button repeatedly to select the signal source
“TV.”
Connecting the satellite antenna
You can connect the cable of your satellite antenna to the ANT 2 SATELLITE socket.
To switch to satellite reception, select signal source “TV.”
Connecting an external device with HDMI interface
If you wish to connect an ARC-compatible HDMI device (e.g. a home cinema), you need to
use socket HDMI 1.
1. Connect the output from a playback device, e.g. an HDMI-compliant computer or Blu-
ray player, to one of the HDMI inputs on the TV.
2. To play the audio and video signal fed from the external device on the TV, select signal
source “HDMI1”, “HDMI2” or “HDMI3” as appropriate.
Connecting a PC
Your PC must have an HDMI-compliant graphics card to connect to your TV
set. It is not possible to connect a PC with an analog (VGA) output.

EN-11
To play the audio and video signal fed from the PC on the TV, select the signal source as
appropriate.
Connecting an external device with AV output
Connect external devices (e.g.,
camcorder, gaming console) via
the AV Input jack directly to your
TV by using the cinch standard
(red, white, and yellow).
To play the audio and video
signal fed from the external
device on the TV, select signal
source “AV”.
Connecting a digital audio system
You can connect your TV set to a digital audio system (e.g., amplifier, home cinema).
Connect the plug at the end of an optical fiber audio cable (not supplied) to the Digital Audio
Out connection on your TV set.
Connecting the network cable (LAN connection)
Connect one end of the network cable (Cat.
5 or better) to the network port. The network
cable is not supplied. Connect the other end
of the network cable to a hub or router on
your home network.
You can also establish an internet
connection via Wi-Fi.

EN-12
Powering the TV set on and off
Powering on
Check that the TV is in standby mode. This means that the power cable must be connected
to a working power socket. Then press the Power button on the device or the
button on
the remote control to turn on the TV.
Powering off
To power off the TV, either press the Power button on the device or press the
button on
the remote control.
Notes:
If you press and hold the Power button or
standby button on the remote control for short
period of time, the TV will go into fully standby mode. When it is powering on again, the TV
will start from the original power on procedure.
After about 30 times of powering on & off, the TV will go into fully standby mode which
allows the TV to clear some temporary files for better performance.
Channel guide
Selecting the channel
1. Press [P∧] to select the next channel.
2. Press [P∨] to select the previous channel.
3. If you know the channel number, enter it using the numeric keys to switch the channel
what you want.
4. If you do not know the channel number, press [OK] to show the Channel list. Use the
[UP] & [DOWN] to scroll through the Channel list until the channel you want is selected,
then press [OK] to switch to this channel.
LCN (logic channel number)
1. Press [MENU] to open the “TV options” menu.
2. Press [LEFT] and [RIGHT] on the remote control, select the “Settings” option and press
[OK] to display the “Settings” submenu.
3. Press [UP] and [DOWN] on the remote control, select the “Channel” to show “Channel”
subpage.
4. Press [UP] and [DOWN] on the remote control, select the “Channels” option and press
[OK] to get in subpage.
5. Press [UP] and [DOWN] on the remote control, select the “LCN” option and press [OK].
Off: do not use LCN for channel list, all channel ordered by system.
On: Use LCN for channel list, channel number is from stream.
Default: On/Off are defined by middleware which is determined by country and operators.

EN-13
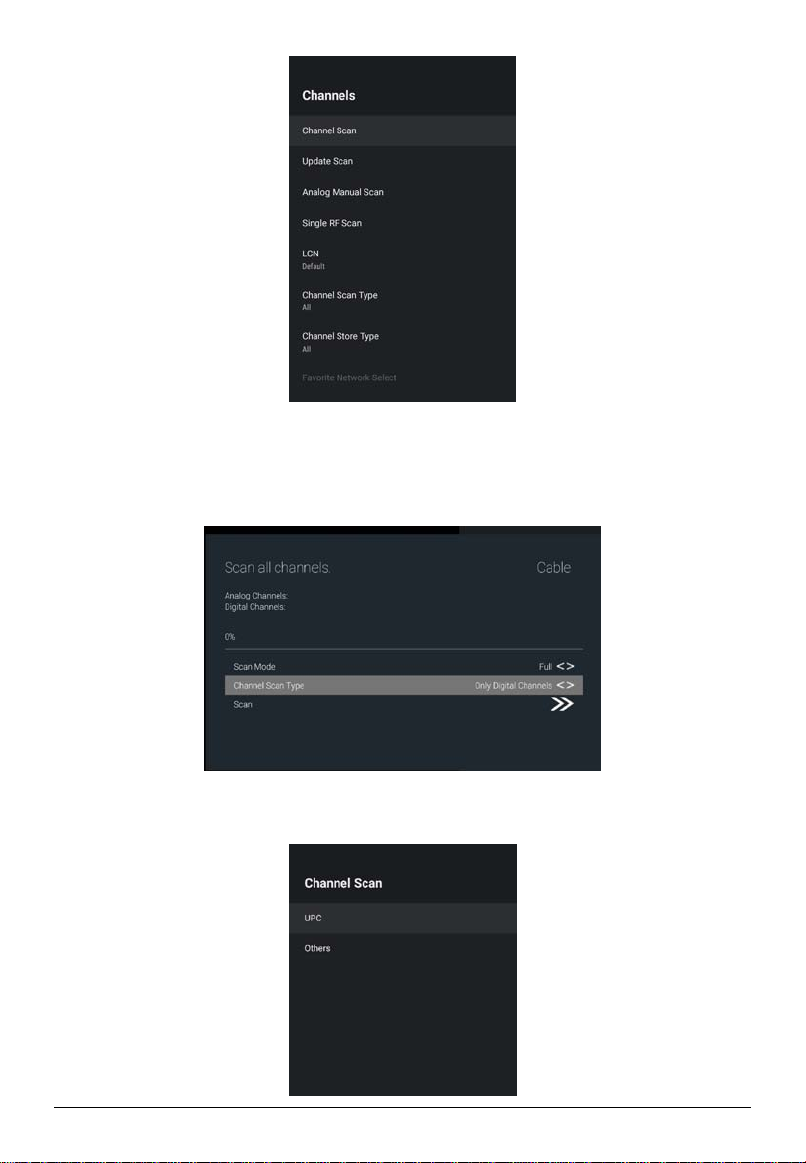
Channel Scan
Channel search in Antenna mode
1. Press [MENU] to open the “TV options” menu.
2. Press [LEFT] and [RIGHT] on the remote control,
select the “Settings” option and press [OK] to display
the “Settings” submenu.
3. Press [DOWN] and [UP] on the remote control, select
the “Channel” option and press [OK] to display the
“Channel” submenu.
4. Press [DOWN] and [UP] on the remote control, select
the “Channel Installation Mode” option.
5. Press “Channel Installation Mode” to set your antenna
type.
6. There will be Two Types which rely on the current country.
Type1:Type2:
Notes:
In the Preferred Satellite mode, there are some operators which depend on the
selected country. The satellites of the operators are fixed, and the operators have their
own way to scan the channels.
In the General Satellite mode, no operator is available, and the satellite is not fixed.
7. Select Antenna type then go back to previous page. Select Channels item, then select
Channel Scan.
EN-14
Press [OK] to start scan channel.
Channel search in Cable mode
In the “Channel Installation Mode” submenu, select Cable type, and then select Channels.
a) If we don’t have operator to choose
Set Scan Mode to Full, change focus on Scan, and then press [OK] or [RIGHT] to
start scan.
b) If we have operator
EN-15
Select operator.
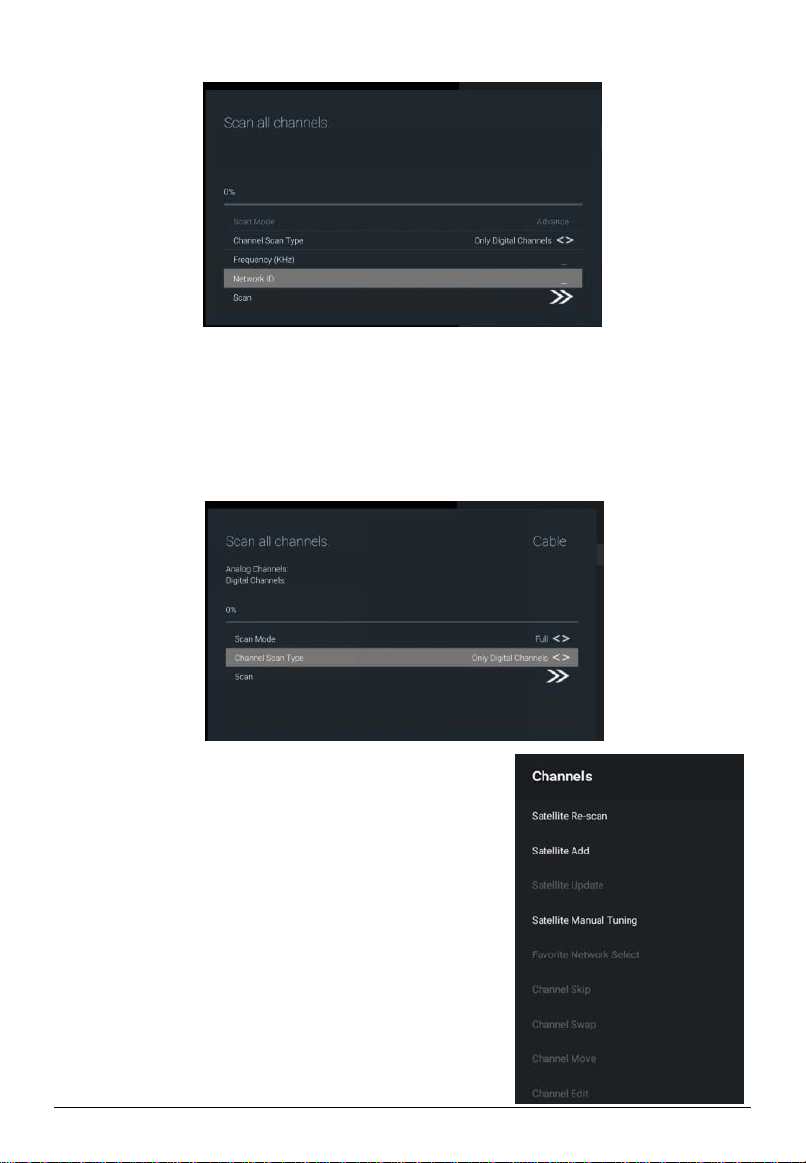
In some situation, we need to input frequency and network ID depending on
selected country and operators.
You can get them from the member of operator.
After finishing setting Frequency and Network ID, focus on Scan Item and press
[OK] or [RIGHT] to start scan.
c) If choose Others operator
Use full scan mode to start scan.
Channel search from satellite
1. In the “Channel Installation Mode” submenu, select
Satellite type, and then select Channels.
EN-16
There will be some operators.
Select one operator.
Some default satellites will be showing.
Press [Right] to start scan. Focus on Scan item and press [Right] to start scan.
Some operator will show dialog to select LNB search.
Choose “Scan” to start scan.
2. If you cannot find your preferred operator, select General Satellite, and then select
Channels.
EN-17
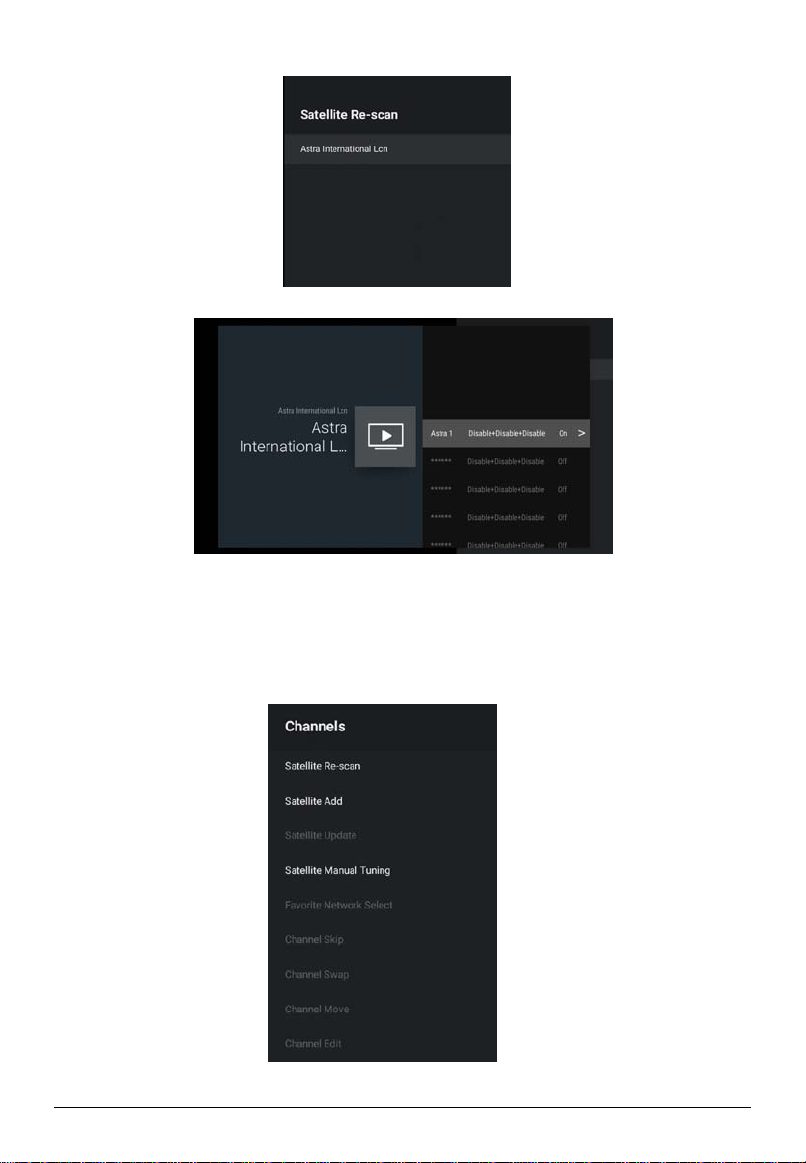
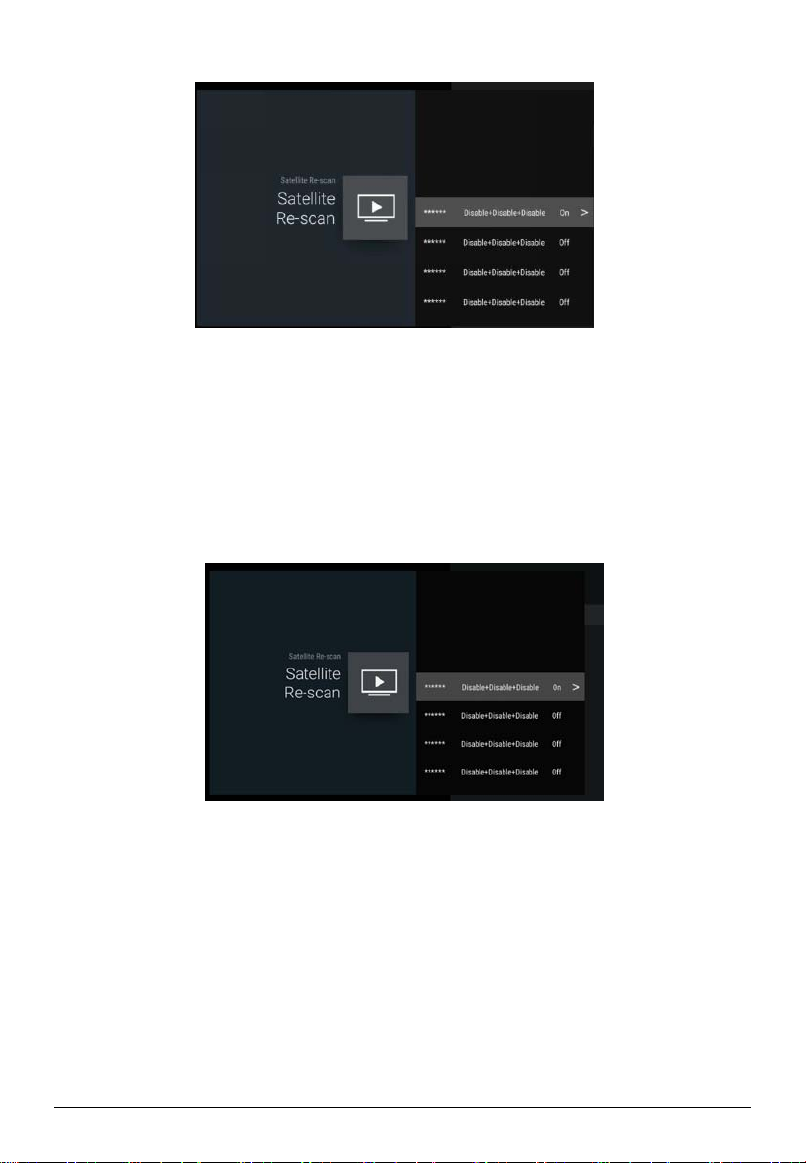
Select Satellite Re-scan.
Press [Right] to start scan.
Focus on Scan item and press [OK] or [RIGHT] to start scan.
Channel search from multiple satellites
1. In the “Channel Installation Mode” submenu, select the “Preferred Satellite”/ “General
Satellite” option underneath. It will turn back to previous menu level.
2. Press [DOWN] and [UP] on the remote control, select the “Channels” option and press
[OK] to display the “Channels” submenu.
3. Press [DOWN] and [UP] on the remote control, select the “Satellite Re-scan” option
and Press [OK].
The simple way to start scan for two satellites is using Tone Burst option.
a) Set one satellite enable and set it’s “ToneBurst”to Tone Burst A
b) Set another satellite enable and set it’s “ToneBurst”to Tone Burst B
c) Return to satellite list page and press Right to scan detail page.
d) Start Scan by pressing [OK] on Scan item
The scanning process will scan two satellites.
Another way to Scan 2 or more satellites is using DiSEqC Set.
Note: Single Cable and Jess Single Cable can be changed in the Setup Wizard and
"New Channels Available" after pressing [MENU] in the Live TV.

EN-18
Satellite Add
Channel Installation Mode sets Preferred Satellite or General Satellite.
1. This operation is similar to Satellite Re-scan after select Satellite Add option.
2. Press [OK] to set detail info for satellite.
Satellite Status: set current satellite enable or disable
Satellite Name: cannot be set by user
LNB Power: enable or disable Low Noise Block down-converter;
LNB Frequency: set frequency for Low Noise Block down-converter
DiSEqC set: set Digital Satellite Equipment Control, the \“disable+disable+disable\” in
satellite list page is meaning DiSEqC 1.0 Port, DiSEqC1.1 Port and DiSEqC Motor status.
Tone Burst: select Tone Burst switch output.
Transponder: set Transponder detail for scanning.
Signal Quality: satellite signal quality
Signal Level: satellite signal level
3. Press [BACK] to return previous page and press [RIGHT] to prepare scanning like
“Satellite Re-scan”.
Satellite Manual Tuning
This operation is similar to Satellite Re-scan after select Satellite Manual Tuning option.

EN-19
1. Press [OK] to change satellite setting.
2. By setting transponder,we can use new satellite settings to start scan manually.
3. Press [BACK] to return satellite list, then Press [RIGHT] to scanning detail page.
4. Same as “Satellite Re-scan” to start scan.
Editing Channels
Defining favorite channels
This is how to add channels to the Favorite list or remove them:
1. Press [MENU] to open the “TV options” menu.
2. Press [UP] on the remote control to select the “Channels” menu.
3. Press [LEFT] and [RIGHT] on the remote control, select the “Add to My Favorites”
option and press [OK] to add current displaying channel to favorite list,or select the
“My Favorites” option and press [OK] to remove current displaying channel from the
favorite list.(Default add to favorite list 1)
4. Press [OK] to show channel list.
5. Press [BLUE] key to change channel list into favorite list.
This manual suits for next models
1
Table of contents
Languages:
Other ChiQ TV manuals


