Christie Spyder Stereoscopic Option 2 User manual

CC2 Gas Barbecue Cooktop
Installation and User Manual
dachristie.com
+61 3 9708 2999
Part numbers 1204,
1205 and 1206
Installation Manual 6837_00
This manual is an integral part of the appliance and
must be kept in its entirety in an easily accessible
location. Read these instructions carefully before
installing and using the appliance.

CC2 Gas Barbecue Cooktop (Part numbers 1204, 1205 and 1206)
2| Table of contents
1 GENERAL INFORMATION 3
1.1 Product diagram | Figure 1, 2 4
1.2 Safety instructions 5
1.3 How to read this manual 6
1.4 Manufacturer liability 7
1.5 Conditions of use 8
1.6 Declaration of conformity 8
1.7 Specifications | Table 1, Figure 3 9
1.8 Description 11
1.9 Disposal 11
1.10 Boxed contents | Figure 5 12
2 INSTALLATION 13
2.1 Design guidelines for installing a CC2 cooktop | Figure 6, 7,8 17
2.2 Preinstallation 16
2.3 Installation | Figure 9, 10, 11,12,13,14 18
3 OPERATION 27
Figure 15 28
4 CLEANING AND MAINTENANCE 29
4.1 Safety considerations 30
4.2 Environmental considerations 30
4.3 Cleaning the cooktop 30
4.4 Cleaning waste containers | Figure 16 31
4.5 General cleaning and maintenance 33
5 FREQUENTLY ASKED QUESTIONS 34
6 TROUBLE SHOOTING 37
6.1 Diagnostic codes | Table 2 38
7 OPTIONS AND ACCESSORIES 40
8 WARRANTY AND CLAIM PROCEDURE 42

Installation Manual 6837_00
3General information |
1.

CC2 Gas Barbecue Cooktop (Part numbers 1204, 1205 and 1206)
4
FIG 1
1.1 Product diagram
| General information
148 mm
to fat drain tube
160 mm projection
below benchtop
208 mm projection
below benchtop
47 mm
M8 x 100 mm long mount bolts
2 places
459 mm bolt hold down point centres
Start/Stop button
with LED indicator
56 mm projection
above benchtop
495 mm minimum benchtop cutout width
435 mm cooking area
536 mm
600 mm
FIG 2
Please note
this cooktop is square

Installation Manual 6837_00
5
1.2 Safety instructions
General information |
Risk of personal injury
• Any variation from the original Product Specification, including the use of different
components, may result in injury and will void the Safety Certification and Product Warranty
• Isolate and remove the appliance from the power and gas supply before conducting
any service or repair work
• The appliance and its accessible parts become very hot while in use. Never touch the
cooking surface or any part of the appliance while it is turned on
• The appliance must be fixed into an enclosed structure to prevent access to
its underside
• Where the underside is not fully enclosed, you must use a Christie Open Bench
Installation Kit to avoid potential injury refer to FIG 8 on page 16
• This appliance can be used by children aged from 8 years and older and persons with
reduced physical, sensory or mental capabilities or lack of experience and knowledge,
if they have been given supervision or instruction concerning use of the appliance in a
safe way and understand the hazards involved
• Children must not play with the appliance. Unsupervised children must not clean or
maintain the product
• Unsupervised children under eight years of age must be kept at a safe distance from
the appliance when turned on
• Never leave the appliance unattended while it is turned on
• Never try to put out an appliance fire with water. Turn off the appliance and smother the
flames with a fire blanket or similar material

CC2 Gas Barbecue Cooktop (Part numbers 1204, 1205 and 1206)
6
1.3 How to read this manual
Risk of damage to the Appliance
• Do not charge the battery while it is connected to the appliance, as this will damage
the circuit board
• Do not use a power supply below 12 VDC, as this may damage the appliance
• Clean the appliance only with non-toxic products with a neutral pH between 6 and 9
• Corrosive (acidic or alkaline) cleaning products may leave a toxic residue on the
cooking surface, damage the electronic circuitry, components, and labels, and void
the Product Warranty
• Do not direct water from pressure washers into openings in the appliance
• Do not use charcoal or similar combustible fuels with this appliance
• Do not use products intended for cleaning mild steel on this appliance. Only use
products designed specifically for cleaning stainless steel
Chapter headings and sub heading are
listed in the Table of Contents along
with the relevant page numbers.
Key words:
• “Must” and “must not” are
mandatory instructions
• “Should’ and “should not” are
advisory instructions
The following icons are used throughout
the manual.
Electrical Hazard icon
warns of possible
electrical shock
Warnings or Caution
icon warns how to
prevent personal injury
Hot Surface icon warns
not to touch hot surfaces
| General information
1.2 Safety instructions

Installation Manual 6837_00
7
1.5 Conditions of use
• This appliance must only be installed
and serviced by a licensed gasfitter
or suitably qualified person. They will
be directly responsible for installing
it according to the manufacturer’s
instructions, as well as AS/NZS5601,
local Gas Fitting Regulations, Municipal
Building Codes and all applicable
Statutory Regulations
• Where no specific instruction is provided,
refer to the following standards:
- AS/NZS 5601 Gas installations
- AS/NZS 1596 Storage and
handling of LPG gas
- AS/NZS 1869 Gas hose and
hose assemblies
- AS/NZS 3000 Wiring rules
• The appliance must be installed,
operated, and maintained according to
the manufacturer’s instructions
• Keep all ventilation strips on the
appliance free from obstructions
• Check the Appliance Data Plate to
ensure the appliance is suitable for the
intended gas type, before connecting
the appliance
General information |
1.4 Manufacturer liability
The manufacturer declines all liability for damage to persons or property caused by:
• Use of non-original spare parts
• Use of the appliance other than as intended
• Tampering with any part of the appliance
• Not observing instructions contained in this Installation and User Manual
• Do not use combustible materials when
constructing enclosures or surrounds
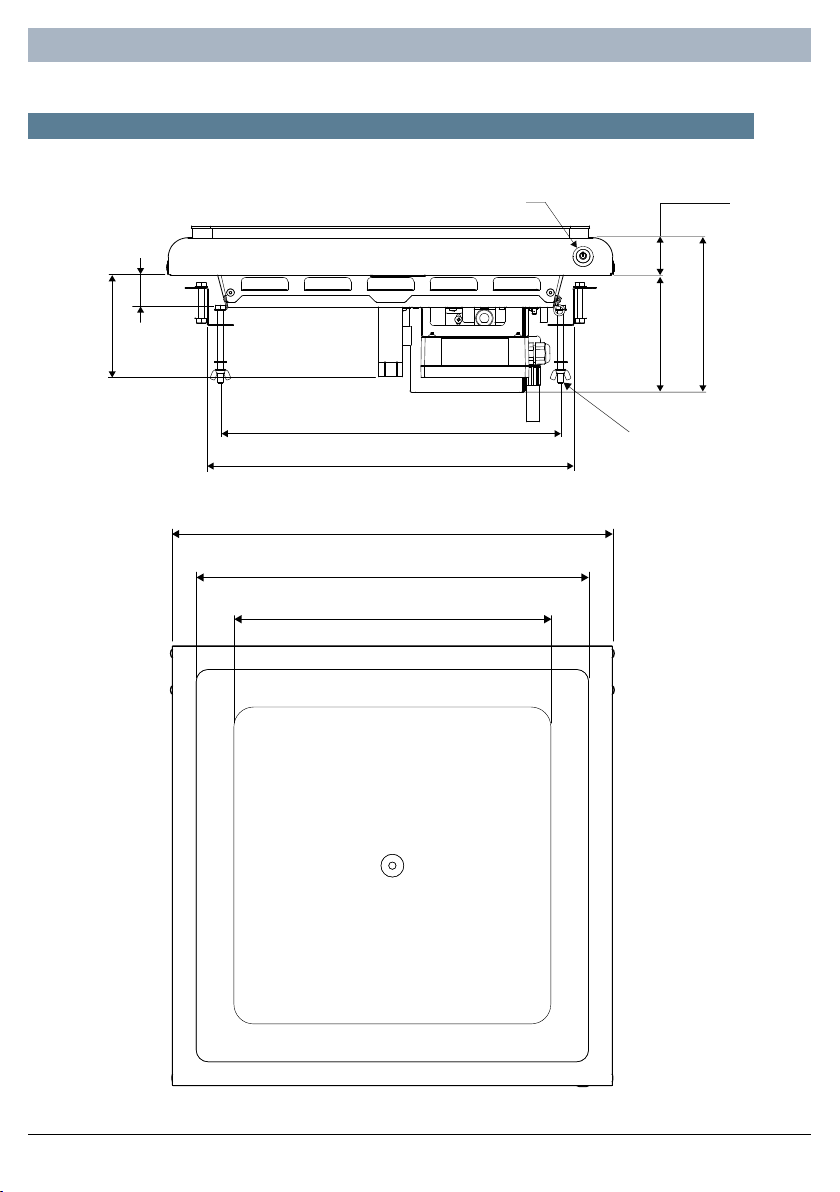
• Ensure there is at least 1200 mm
clearance above the appliance. Do
not locate the barbecue underneath
combustible structures or materials
• Maintain a minimum of 12VDC for correct
appliance operation
• When installed indoors, gas bottles
must be housed in a separate, ventilated
enclosure separately from the appliance,
under the requirements of AS/NZS 5601
and or AS/NZS 1596
• When installed outdoors and gas bottles
are located in the same structure as the
appliance, bottles must be contained in
a ventilated enclosure, separate from
the appliance and any ignition source,
in accordance with LPG regulations.
The minimum gas bottle size is 9 kg
• When installing an underground gas
supply, use AS/NZS 5601 or equivalent
local regulations to determine gas
piping specifications. Terminate with a
Standpipe and Gas Cock

CC2 Gas Barbecue Cooktop (Part numbers 1204, 1205 and 1206)
8| General information
This appliance has been tested and certified to Australian Standards and RCM regulatory
requirements. The declaration of conformity certificate is available on request. The Product
Identification Label contains the following information:
• The appliance type and model
• The gas type, including a colour-coded gas type panel
• Serial number
• Injector, test pressure, and gas consumption data
• Electrical requirements
• Manufacturers name and contact details
DO NOT REMOVE THIS PRODUCT IDENTIFICATION LABEL. CONTACT CHRISTIE
FOR A REPLACEMENT IF IT IS ILLEGIBLE OR DAMAGED.
Product safety features include a 6 second time delay start button located on the cooktop;
and an ignition safety timer with flame failure rectification sensor and maximum ignition
retry lockout.
1.6 Declaration of conformity
1.5 Conditions of use (continued)
• The gas supply from the bottle regulator to the gas inlet connection in the appliance
must be a copper tube or flexible hose compliant with AS/NZS 1869. Where the gas
supply passes through non-combustible material, it must be sealed with an approved
sealing compound
• For LPG and ULPG appliances supplied directly from a gas bottle (not via a reticulated
gas supply system), the gas cylinder must be fitted with an approved two-stage cylinder
regulator. The regulator is available from Christie
• Do not modify any part of the appliance without written authorisation from the manufacturer
• The manufacturer must approve all repairs conducted under warranty. Christie will not take
responsibility for any repairs made without prior authorisation
• This appliance is suitable for indoor and outdoor use
• The safety instructions in chapter 1.2 form part of the conditions of use for this appliance

Installation Manual 6837_00
9General information |
1.7 Specifications
Gas Type LPG Natural ULPG
Nominal consumption 16.0MJ/h 15.8MJ/h 12.8MJ/h
Injector size 1.1 mm 1.8 mm 0.95 mm
Min supply pressure 2.75kpa 1.13kpa 2.75kpa
Max supply pressure 3.5kpa 3.5kpa 3.5kpa
Operating pressure 2.60kpa 0.84kpa 2.60kpa
Gas inlet connection 3/8” SAE Male Flare
Gas Hose 10 mm diameter Gas Hose, 3/8” SAE Female Flare x
1/2” Male Bayonet - 1000 mm long
Min power supply 12V DC
Power consumption 800mA ignition, 350mA cooking, 10mA standby
Nominal cooking time 20 minutes
Nominal net weight 20 kg
Nominal packed weight 25 kg
Nominal target temp 240 degrees Celsius
IP Rating IPX4
Plan
View
Above
Bench
Below
Bench
Hotplate/
Grillplate
Cooking
Surface
Dimension = mm 600 x 600 66 160 536 x 536 433 x 433
TABLE 1

CC2 Gas Barbecue Cooktop (Part numbers 1204, 1205 and 1206)
10| General information
FIG 3
Wiring diagram
1.7 Specifications

Installation Manual 6837_00
11General information |
• The Christie CC2 Gas Barbecue Cooktop is a self-contained hotplate-style cooking
appliance with fully automatic functions, designed for public use
• The CC2 gas appliance is capable of using three fuel gas options:
- Liquefied Petroleum Gas (LPG - Propane). Part number 1204
- Natural Gas. Part number 1205
- Universal Liquefied Petroleum Gas (ULPG - Propane/Butane). Part number 1206
• The appliance is factory-fitted with an SAE 45° flare loose nut on a 10 mm stainless
steel, Class B gas hose (Part number 7102) with a bayonet fitting (AGA approval 6421)
that has a standard 1/2” male BSPT thread for connection to the gas supply
• The appliance requires a 12 VDC supply rated at a continuous 2 ampere. The appliance
is supplied with a 2.5A, 240 VAC to 12 VDC plug-in transformer (Part Number 7057) as
standard. It can also be supplied with the following options:
- 12V 26 AH SLA deep-cycle gel cell Battery Kit (Part Number 1767), with a 240VAC
charger, or
- 12V 26 AH SLA deep-cycle gel cell Battery and Solar Kit (Part Number 1766) with a
regulated 20-watt solar panel maintain the battery
1.8 Description
1.9 Disposal
• The appliance must be disposed of separately from other waste, under Directives 2002/95/
EC, 2002/ 96/EC, 2003/108/EC
• According to European RoHS Directive, the appliance does not contain substances
in quantities sufficient to be considered hazardous to health and the environment
• Deliver the appliance to an appropriate electrical and electronic recycling facility
• Christie appliances are packaged in non-polluting and recyclable materials. Please recycle
according to local regulations

CC2 Gas Barbecue Cooktop (Part numbers 1204, 1205 and 1206)
12| General information
Christie CC2 Gas Barbecue Cooktops are supplied with the following boxed contents:
1. CC2 Gas appliance with the following variation by gas type:
- Liquefied Petroleum Gas - LPG/Propane. (Part number 1204)
- Natural Gas. (Part number 1205)
- Universal Liquefied Petroleum Gas (ULPG – Propane/Butane). Part number 1206
2. 10mm Gas Hose, 3/8” SAE Female Flare x Male Bayonet, 1000 mm long & Bayonet,
Floor Socket, 1/2” Male BSP
3. Transformer, Plug In, 240VAC to 12VDC
4. Cable, Power Supply - 1000 mm Preassembled (Not Shown)
5. Cable, Battery Lead - 500 mm
6. 2 x Anti-rotation brackets attached to the hold-down brackets. Note: Remove brackets
before installation
7. 2 x 8 mm bolts with washers and nuts (Not Shown)
8. 2 x 8 mm wing nuts and washers (Not Shown)
9. Installation and User Manual
1.10 Boxed contents
CC2 Cooktop Anti-rotation brackets
Installation & User Manual
CC2 Cooktop Anti-rotation brackets
Installation & User Manual
FIG 5
1.
6.
3.
9.
2.
5.

Installation Manual 6837_00
13
2.
Installation |

CC2 Gas Barbecue Cooktop (Part numbers 1204, 1205 and 1206)
14 | Installation
Christie cooktops must be installed into structures that meet minimum specifications for
their safe operation. As a cooking appliance, it reaches temperatures above 200°C, and
adhering to the guidelines below will reduce the possibility of injury.
2.1 Design guidelines for installing a CC2 Cooktop
• Separate barbecues and eating facilities from playgrounds and other active recreation
areas wherever possible
• Install barbecues where they can be easily monitored for safe and appropriate use
• Ensure that there are no climbing aids that may allow children access to the cooktop
• Round off any protruding benchtop and corners that may cause injury
• Build gas barbecue structures from sturdy, non-combustible materials such as brick,
stone, or metal. Do not use combustible materials of any type
• Create a 495 mm x 495 mm cut-out in the benchtop to fit the cooktop. Refer to FIG. 1
• Allow a minimum space of 130 mm on all four sides of the cut-out hole and 1200 mm
clearance above the cooktop Refer to FIG 6 & 7
• Christie provides pre-manufactured barbecue cabinets to suit most projects and
environments. We also offer options for built-in structures
Note: For installing the cooktop into a prefabricated Christie barbecue cabinet, please refer
to instructions for installing a CC2 cooktop on page TBC.

Installation Manual 6837_00
15Installation |
FIG. 7
2.1 Design guidelines for installing a CC2 Cooktop
Both CC2 electric
and CC2 gas cooktops
extend 160 mm downwards
1200 mm Minimum clearance
above cooking surface.
850 mm high
access opening
600 mm wide
access opening
Minimum
900 mm bench
height
Allow at least 130mm of clear bench space around the cut-out.
495 mm x 495 mm
cut-out
130 mm
130 mm
FIG. 6

CC2 Gas Barbecue Cooktop (Part numbers 1204, 1205 and 1206)
16 | Installation
Christie Open Bench Installation Kit
2.1 Design guidelines for installing a CC2 Cooktop
FIG. 8
The cooktop must be fixed into an enclosed cabinet or structure to prevent access to its
underside. Where the underside is not fully enclosed, you must use a Christie Open Bench
Installation Kit or similar enclosure to avoid possible injury.
130 mm minimum clear
bench space on all sides
484 mm
484 mm
342 mm
Removable
waste container

Installation Manual 6837_00
17Installation |
2.2 Preinstallation
Gas Supply
• Check the Appliance Data Plate to ensure it is suitable for the intended gas supply
• Ensure adequate pipe size and sufficient gas supply pressure is available for the MJ/h
rating of the appliance
• The CC2 Gas Cooktop is supplied with a bayonet hose connection and a bayonet floor
socket with a 15mm BSP connection. Make provision for these connections
• The reticulated gas supply must conform to AS/NZS5601. Do not locate the underground
gas supply pipe directly beneath the cooking surface area. Do not route or lead the Gas
Supply Pipe underneath the drain tube
• When installing the cooktop into a prefabricated Christie cabinet, refer to the installation
instructions for that particular product to determine where underground services should
be terminated
• Where it is not possible to install reticulated gas, provision should be made for bottled gas
and must conform to AS/NZS 5601 Gas installations
- AS/NZS 1596 Storage and handling of LPG gas
- AS/NZS 1869 Gas hose and hose assemblies
Ventilation
• Louvres in the Christie access door and perforations in the gas cooktop provide ventilation.
The space under the hotplate lip provides exhaust ventilation. This ventilation gives
essential airflow for the gas to burn correctly, and to limit heat build-up inside the unit
• Custom built-in structures must allow for ventilation, as per section 6.4.4 air requirements
for gas appliances in the Gas Code
• The structure must prevent wind from blowing laterally across the underside of the
appliance and disturbing the burner flame
This appliance must only be installed and serviced by a licensed gasfitter or suitably
qualified person. They will be directly responsible for installing it according to the
manufacturers’ installation instructions, as well as AS/NZS5601, with specific attention to
the requirements of Clause 6.4.4.1, 6.10.1.7, 6.10.2 and 6.10.2.3, any Local Gas Fitting
Regulations, Municipal Building Codes, Electrical Wiring Regulations, and any other
applicable statutory regulations.

CC2 Gas Barbecue Cooktop (Part numbers 1204, 1205 and 1206)
18 | Installation
2.2 Preinstallation
2.3 Installation
Caution:
1. The appliance must be installed by a licensed gasfitter or suitably
qualified person
2. The appliance must be fixed into a fully enclosed structure to prevent
accidental contact with the hot underside of the appliance. Where the
underside is not fully enclosed, you must use a Christie Open Bench
Installation Kit or similar enclosure to prevent possible injury
3. Any variation from the original Product Specification, including the use
of different components, may result in injury and will void the Safety
Certification and Product Warranty
Power supply
240 VAC to 12 VDC plug-in transformer (Standard)
• All Christie CC2 Gas Cooktops require power for ignition and to operate correctly. Provide a
10 A 3-pin weatherproof power outlet in a convenient location inside the barbecue cabinet
for each appliance. The appliance connects to the power outlet through the 240 VAC to 12
VDC plug-in transformer, supplied with each appliance
Battery Kit and Battery and Solar Kit options
• Where mains power is not available, the appliance can be powered by an optional Battery
Kit with a 240VAC charger, or a Battery and Solar Kit, which allows for in-situ charging,
available from Christie
• Charge the battery with the supplied battery charger before first use
• When using the Battery and Solar Kit, refer to the relevant installation instructions for siting
details, connecting, and mounting the panels
• When using the Battery Kit, do not remove its plastic enclosure at any time
• When using a Battery Kit in a built-in structure, make provision for housing the battery
• For power consumption, see specification table in Chapter 1.7 of this document
Important: Battery voltage must be more than 12 VDC for the appliance to operate as intended.
Do not use the 240 VAC charger while the battery is connected to the appliance, as this will
damage the circuit board. Only use the charger provided with the battery.

Installation Manual 6837_00
19Installation |
2.3 Installation
STEP 1
Review section 1.10 Boxed contents, and check that all listed parts are present.
Contact
Christie immediately if there any discrepancies.
Open the box and remove cardboard packers to reveal the underside of the appliance.
FIG. 9

CC2 Gas Barbecue Cooktop (Part numbers 1204, 1205 and 1206)
20 | Installation
FIG. 10
STEP 2
Remove the wing nuts and washers on the 8mm hold down brackets then remove the anti-
rotation brackets. Using a Phillips head screwdriver, remove the 2 x M5 screws and remove
the gas valve cover.
Note: The information on the Appliance Data Plate will be required to commission
the appliance.
2.3 Installation
Other manuals for Spyder Stereoscopic Option 2
1
This manual suits for next models
3
Table of contents
Other Christie Cooktop manuals
Popular Cooktop manuals by other brands

LG
LG LCE3081ST - 30in Smoothtop Electric Cooktop 5 Steady Heat... Guia de usario e instrucciones de instalacion

Garland
Garland E24-12H Information sheet

Viking
Viking DGCU105-4B Use & care manual

Viking Range
Viking Range CMVIC630 Use & care manual

ARC
ARC ACG4 user manual

Samsung
Samsung NZ30K6330 Series installation manual