Cinemateq picture optimizer plus II User manual

Quick Installation Guide
picture optimizer plus II (SDI)
Deutsch – Version: 3.00
Bitte beachten
:
Dieser Quick-Installation Guide ist nur für versierte Anwender
gedacht und erläutert lediglich die erste Inbetriebnahme des Gerätes. Bitte lesen Sie
in jedem Fall das beiliegende Benutzerhandbuch!
Schritt 1: Vorbereitung
Bevor Sie den picture optimizer plus II (SDI) anschließen, sollten Sie zuerst Ihre Videoquelle(n)
und Ihr Wiedergabegerät überprüfen und für den Anschluss vorbereiten:
Videoquelle (z.B. DVD-Player, SAT-Receiver)
Falls Sie Ihre Videoquelle über SCART anschließen, beachten Sie dabei bitte, dass der
SCART Ausgang der Videoquelle auf „RGB-Signal“ eingestellt sein sollte. Falls Ihre
Videoquelle kein RGB-Signal über SCART ausgeben kann, stellen Sie bitte fest, welche
Signale (z.B. S-Video, YUV) ausgegeben werden können.
Für die bestmögliche Optimierungsleistung benötigt der picture optimizer plus II (SDI) ein
ungefiltertes und unverändertes Videosignal. Schalten Sie deshalb alle bildverändernden
Filter (z.B. Rauschfilter) über das Setup der Videoquelle aus und stellen Sie das
Ausgabeformat bei DVD-Playern unbedingt auf 16:9 (nicht 4:3 oder „letterbox“).
Bitte beachten Sie: der picture optimizer plus II (SDI) kann nur „interlaced“ Signale
verarbeiten. Verwenden Sie auf keinen Fall einen „Progressive Ausgang“ bzw. schalten Sie
die „Progressive-Funktion“ im Setup aus.
Wiedergabegerät (z.B. Projektor, Plasma)
Ihr Wiedergabegerät kann über YUV, RGB oder digitales DVI (empfohlen!) angeschlossen
werden. Sollte Ihr Gerät über keine digitale DVI Schnittstelle verfügen, stellen Sie bitte
fest, über welche Eingänge Ihr Gerät „YUV“ oder „RGB“ (RGB HV, RGBs, RGsB) Signale
akzeptiert.
Auch bei Ihrem Wiedergabegerät sollten alle bildverändernden Filter und
Optimierungsfunktionen ausgeschaltet werden. Ebenso empfehlen wir alle Bildparameter
(Helligkeit, Kontrast, usw.) auf neutral zu stellen und die Bildformatumschaltung auf das
Format des Gerätes zu stellen (bei 16:9 auf 16:9 bzw. „normal“, bei 4:3 auf 4:3 oder
„Vollbild“). Ebenso sollten Einstellungen wie „Trapezkorrektur“ oder „Overscan“
abgeschaltet bzw. auf neutral gestellt werden.
Unser TIPP
Sollten Sie Probleme mit dem richtigen Ausgabesignal-Format bzw. -Auflösung für Ihr
Wiedergabegerät haben, empfehlen wir zusätzlich zu Ihrem Wiedergabegerät einen
analogen PC Monitor (CRT) anzuschließen (z.B. über VGA oder 5x BNC).
Darüber können Sie das Ausgangssignal des picture optimizer plus II (SDI) kontrollieren
und mit Ihrem Wiedergabegerät vergleichen, da ein analoger Monitor Signale
„unbearbeitet“ wiedergibt.
Schritt 2: Anschließen
Bitte beachten Sie unbedingt die Anschluss- & Aufstellhinweise im Handbuch.
Der picture optimizer plus II (SDI) verfügt über folgende Eingänge (werkseitig ist der
SCART 1 (RGB) Eingang als aktiv eingestellt):
Eingang Signaltyp Anwahl über FB-Taste
SCART 1 RGB / (Composite) * 1
SCART 2 Composite / (RGB)* 2
Video 1** 3
Video 2** Composite 4
S-Video 1 5
S-Video 2 S-Video 6
YUV 1 7
YUV 2 YUV 8
* beide SCART Eingänge können wahlweise auf RGB oder Composite Signal eingestellt werden
** bei der SDI Version sind die beiden Eingänge Video 1 & 2 durch die SDI Eingänge ersetzt
Schließen Sie nun Ihre Videoquelle am picture optimizer plus II (SDI) an. Für die erste
Inbetriebnahme empfehlen wir den Anschluss nur einer Quelle am SCART 1 Eingang.
Verbinden Sie nun Ihr Wiedergabegerät mit dem picture optimizer plus II (SDI). Werkseitig
gibt der picture optimizer plus II (SDI) ein RGB HV Signal aus (über VGA oder 5x BNC).
Nachdem Sie Videoquelle und Wiedergabegerät mit dem picture optimizer plus II (SDI)
verbunden haben, schließen Sie die Stromversorgung an und schalten das Gerät über den
Netzschalter auf der Geräterückseite an – er ist nun betriebsbereit und befindet sich im
„Standby-Modus“.
Schritt 3: Erste Inbetriebnahme
Schalten Sie das Wiedergabegerät und die Videoquelle an und achten Sie darauf, dass Ihre
Videoquelle ein Signal ausgibt. Anschließend aktivieren Sie den picture optimizer plus II
(SDI) über die Power-Taste auf der Fernbedienung. Die LED beginnt zu blinken, nach ca. 5
Sekunden schaltet sich das Display an und zeigt die Basis Statusinfo mit folgenden
Informationen:
oIn: SCART 1 RGB (=> Aktiver Eingang)
oOut: RGB HV (=>Aktives Ausgabesignal)
oRes.: doubling 50 Hz (=> Aktive Ausgabeauflösung und Bildwiederholrate)
Wenn Ihre aktive Videoquelle nicht am Eingang SCART 1 angeschlossen ist, müssen Sie
den entsprechenden Eingang auswählen. Bitte drücken Sie dazu die entsprechende
Zifferntaste auf der Fernbedienung (siehe Tabelle / 2. Schritt). Nachdem Sie den Eingang
gewählt haben, wird dieser im Display angezeigt, z.B. IN: YUV 1.
Jetzt sollte Ihr Wiedergabegerät das Bild der Videoquelle zeigen, falls Sie es über RGB
angeschlossen haben (z.B. VGA oder 5x BNC) und das RGB HV Signal versteht. Andernfalls
müssen Sie das Ausgabesignal auf Ihr Wiedergabegerät einstellen!
Drücken Sie dazu einmal die Taste [menu], wählen Sie auf dem Display mit den [S] / [T]
Tasten den Menüpunkt „Output-Setup“ aus und bestätigen Sie diesen mit der [OK]-Taste.
Wählen Sie nun den Punkt „Output-Format“ aus und bestätigen mit der [OK]-Taste. Mit
den [W] / [X] Tasten können Sie zwischen den verschiedenen Ausgabesignalen (z.B. YUV)
wechseln und mit [OK] auswählen. Mit der [exit] Taste können Sie das Menü anschließend
wieder verlassen.
Bei Signaltypen mit mehreren Varianten wie z.B. RGB (RGB HV, RGBS, RGsB) empfiehlt es
sich, die verschiedenen Einstellungen auszuprobieren. Die Umschaltung erfolgt parallel zur
Auswahl im Menü, d.h. die angewählte Signalart wird auch ausgegeben.
Ihr Wiedergabegerät sollte nun das Signal der Videoquelle darstellen. Um einen Überblick
über die aktuellen Einstellungen zu erhalten, rufen Sie bitte die On-Screen „Status-Info“
durch Drücken der [OK]-Taste auf.
Sollte weder die On-Screen „Status-Info“ noch das Videobild dargestellt werden, erkennt Ihr
Wiedergabegerät die werkseitig eingestellte Ausgabeauflösung „doubling“ mit 50/60Hz nicht.
Wechseln Sie bitte auf die HDTV Auflösung 720p, indem Sie auf der Fernbedienung die Taste
[option] und anschließend die Taste [4] drücken. Überprüfen Sie anschließend nochmals, ob Sie
das korrekte Ausgabesignal gewählt haben (siehe oben).
4. Schritt: Wahl der „richtigen“ Auflösung
Entscheidend für die Bildqualität des Wiedergabegerätes ist die Ansteuerung mit der
„richtigen“ Auflösung. Darunter versteht man die Auflösung, bei der das Wiedergabegerät das
Videobild ohne weitere Umrechnungsfehler darstellen kann. Im besten Fall ist dies die so
genannte „native“ Auflösung, d.h. exakt die Pixelauflösung, die auch das „Panel“ des
Wiedergabegerätes physikalisch hat. Leider funktioniert die native Auflösung nicht bei allen
Geräten, da die Steuerungselektronik diese nicht verarbeiten kann. Hier gilt es den
bestmöglichen Kompromiss zu finden.
Folgende Standardauflösungen sind hinterlegt und können mit der Tastenkombination [option]
+[Zifferntaste 1-9] oder das Menü (Output-Setup / Res. Custom 2) ausgewählt werden:
Auflösung H x V Max. Bildwiederholrate *
PAL / NTSC FB-Taste
Doubling 1440 x 576p 100 Hz / 120 Hz [option] + 1
Tripling 864 / 720p x 1440p 75 Hz / 90 Hz [option] + 2
Quadrupling 1152 / 960p x 1440p 50 Hz / 72 Hz [option] + 3
HDTV 720p 1280 x 720p 100 Hz / 120 Hz [option] + 4
XGA 1024 x 768p 100 Hz / 120 Hz [option] + 5
SXGA (5:4) 1280 x 1024p 75 Hz / 72 Hz [option] + 6
HDTV 1080i 1920 x 1080i 100 Hz / 120 Hz [option] + 7
custom 1: 480p 1440 x 480p 100 Hz / 120 Hz [option] + 8
custom 2: Wide-XGA 1280 x 768p 100 Hz / 90 Hz [option] + 9
Wide-VGA 852 x 480p 100 Hz / 120 Hz
540p 960 x 540p 100 Hz / 120 Hz
576p 720 x 576p 100 Hz / 120 Hz
576i 1440 x 576i 100 Hz / 120 Hz
SVGA 800 x 600p 100 Hz / 120 Hz
Wide-XGA 2 1365 x 768p 100 Hz / 90 Hz
Wide-XGA 3 1366 x 768p 100 Hz / 90 Hz
SXGA (4:3) 1280 x 1024 100 Hz / 120 Hz
PDP 1 852 x 1024p 100 Hz / 120 Hz
PDP 2 1024 x 1024p 100 Hz / 120 Hz
DILA 1366 x 1024p 75 Hz / 72 Hz
UXGA (4:3)** 1600 x 1200p 50 Hz / 50 Hz
HDTV 1080p** 1920 x 1080p 50 Hz / 60 Hz
über Menü
* über DVI max. 50 Hz / 60 Hz; ** Ausgabe nur über analoge Ausgänge möglich
Bitte lesen Sie im Handbuch nach, wie nun Auflösung, Bildwiederholrate, Funktionen und
Bildparameter optimiert werden können. Weitere Informationen finden Sie auch unter
www.cinemateq.de im Supportbereich.
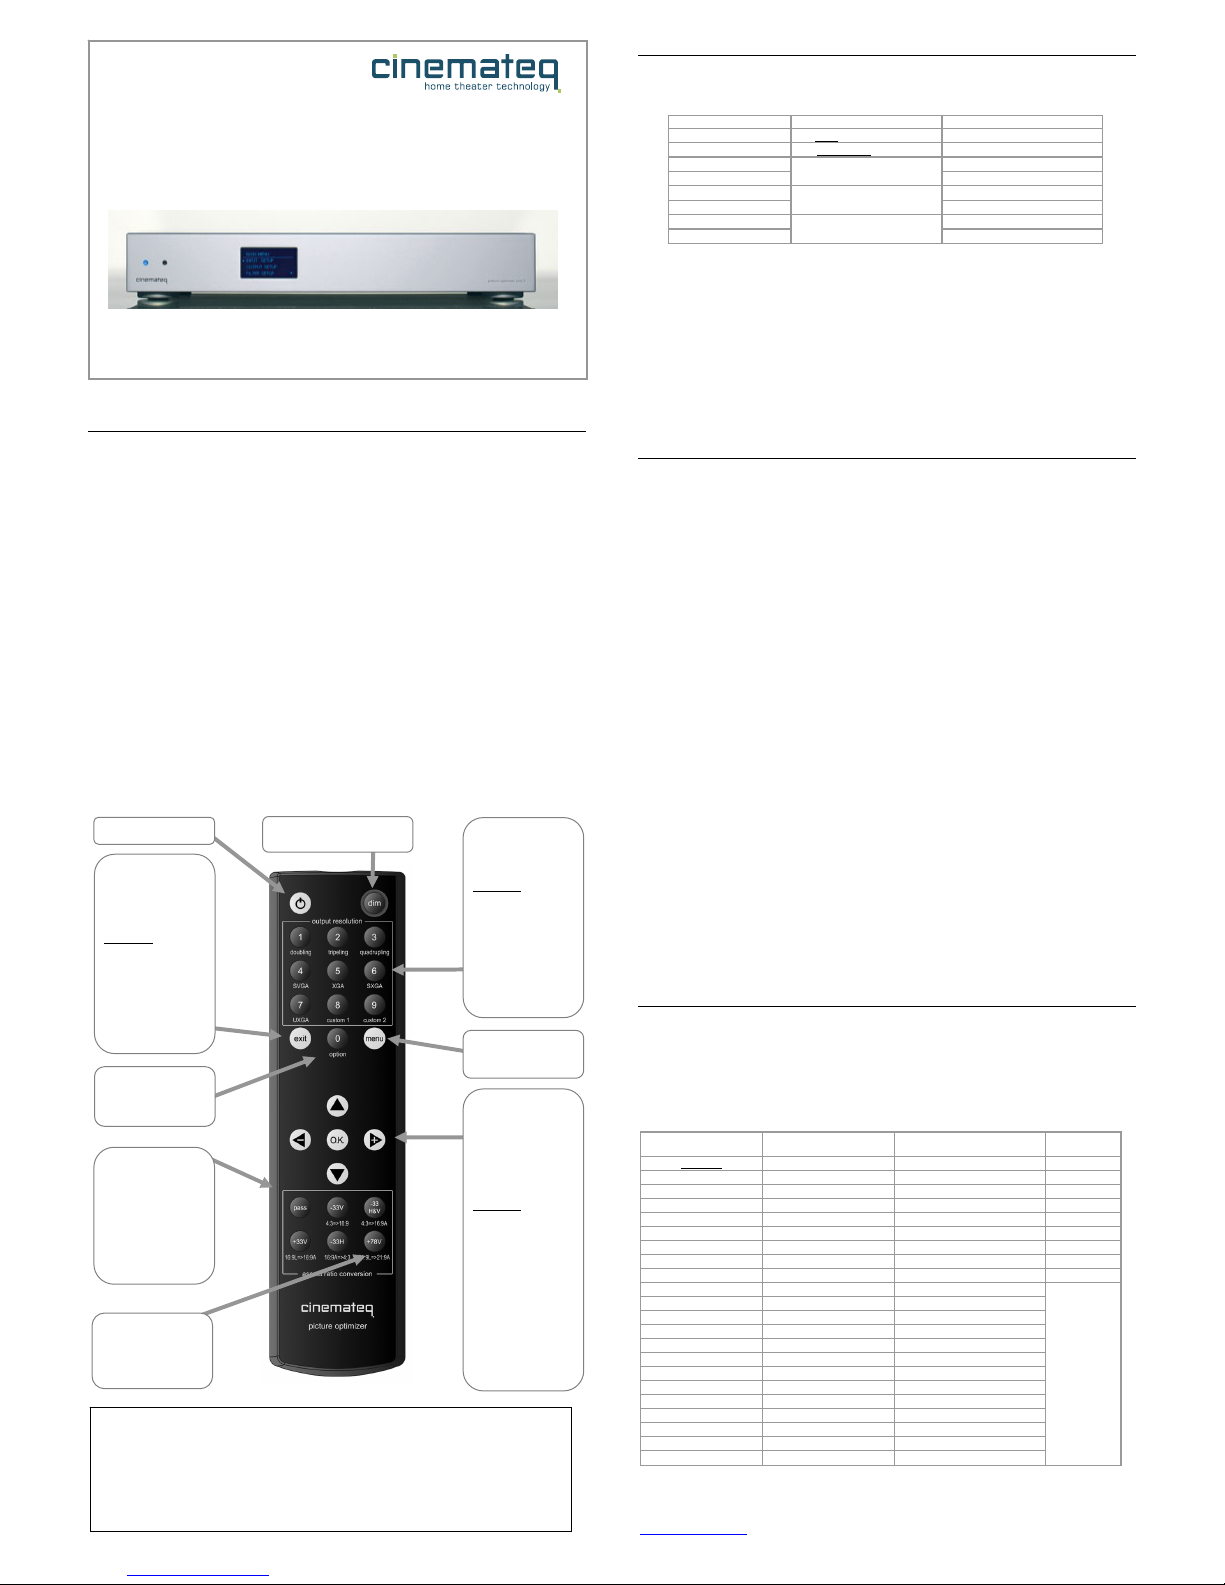
on / s
t
andb
y
dim
regelt die Helligkeit des Displays Ziffernblock
zur direkten Eingabe
von Werten in
Dialogboxen
außerdem:
input selection
Direktanwahl der
8 Inputs über die
jeweilige Zifferntaste
output resolution
über [option] + [entspr.
Taste] Auswahl der
Ausgabeauflösung
menu
1 x: Hauptmenü
2 x: Expert-Menü
Navigationskreuz
Navigation und
Einstellen von Werten in
Menüs und Dialogboxen
[O.K.] blendet zudem
die On-Screen Status-
Info ein
außerdem:
[option] + [+]/[-]
schaltet den VGA-
Bypass ([-]) bzw. den
RGB-Bypass ([+]) an
und aus
electronic lensshift
[option] + [▲]/[▼]
aktiviert die „electronic
lensshift“ Funktion nach
oben oder unten.
aspect ratio
conversion
Direktanwahl der
Formatkonver-
tierungen.
Bitte beachten:
Die Taste [+78V] ist nun
mit der Funktion
„overscan“ belegt.
exit
schließt Dialoge, ohne
Änderungen zu
übernehmen bzw.
blendet das Menü oder
die Statusanzeige aus
außerdem:
tv-mode ON / OFF
über [option] + [exit]
wird der TV-Mode
aktiviert, über [exit]
wieder deaktiviert.
option
[option] aktiviert die „2.te
Funktion“ verschiedener
Tasten.
Overscan ON / OFF
über die Taste [+78V]
wird die Overscan
Funktion ein- und
ausgeschaltet.
Quick Installation Guide
picture optimizer plus II (SDI)
English – Version 3.00
Please note
:
This quick installation guide is only for experienced usersand only
explainshow to put the device into operation the first time. Please in any case read
the enclosed detailed user manual!
Step 1: Preparation
Before connecting the picture optimizer plus II (SDI), you should first of all check your video
source and your display device and carefully prepare those for connection:
Video source (e.g. DVD player, SAT receiver)
In case you connect your video source using SCART, please consider, that the SCART
output of the video source should be set to “RGB signal“ output. In case your video
source can’t process a RGB signal via SCART, please determine, which signals (e.g. S-
Video, YUV) can be distributed.
For the best possible optimization result the picture optimizer plus II (SDI) needs a
unfiltered and unchanged video signal. Thus please switch off any picture influencing filters
(e.g. noise filter) in the setup utility of the video source and mandatorily set the output
format of DVD players to 16:9 (not 4:3 or “letterbox“).
Please note that the picture optimizer plus II (SDI) can only accept and process
“interlaced“ signals. In neither case use a “progressive output“ but switch off the
“progressive function“ in the setup menu.
Display device (e.g. projector, plasma screen)
Your display can be connected via YUV, RGB or digital DVI (recommended!). Should your
device not have an integrated digital DVI interface, please determine, which of the
available inouts of your device accept “YUV“ or “RGB“ (RGB HV, RGBs, RGsB) signals.
You should also switch off all picture influencing filters and optimizing functions on your
display. In addition to that we recommend to set all picture parameters (brightness,
contrast etc.) to neutral and any aspect ratio conversion to the format of the device
(when watching 16:9 material to 16:9 or “normal“, when watching 4:3 to 4:3 or “full
picture“). Setting such as “keystone correction“ or “overscan“ shoud be switched off or
also set to neutral.
TIP
Should you experience problems with the right output signal format and/or resolution for
your display device, we recommend to connect a analog PC monitor (CRT) in addition to
your display device (e.g. via VGA or 5x BNC).
So you can double check the output signal of the picture optimizer plus II (SDI) and
compare with your display device, as a analog monitor displays all signals „unaffected“.
Step 2: Connection
Please absolutely consider the hints for connection & set up in the user manual.
The picture optimizer plus II (SDI) has the following inputs integrated (SCART 1 (RGB)
input is active in factory base settings):
input type of signal remote control key
SCART 1 RGB / (Composite) * 1
SCART 2 Composite / (RGB)* 2
Video 1** 3
Video 2** Composite 4
S-Video 1 5
S-Video 2 S-Video 6
YUV 1 7
YUV 2 YUV 8
* both SCART inputs can be either set to RGB or composite signals
** within the SDI version the two inputs Video 1 & 2 are replaced by SDI inputs
Now connect your video source to the picture optimizer plus II (SDI). For the first time
operating the device we recommend to connect only one source to the SCART 1 input.
Now connect your displaying device to the picture optimizer plus II (SDI). In factory base
configuration the picture optimizer plus II (SDI) distributes a RGB HV signal via VGA or 5x
BNC.
After having connected the video source and display to the picture optimizer plus II (SDI),
now connect the power supply and switch on the device using the power button on the
back panel of the device – it is now ready for use and switches to „standby modus“.
Step 3: Putting the appliance into operation the first time
Switch on the display and the video source. Take care, that your video source distributes
a signal. Next activate the picture optimizer plus II (SDI) via the power key in the upper
left corner of the remote control. The LED of the picture optimizer plus (SDI) begins to
flash, after approx. 5 seconds the integrated display switches on and shows the basic
status info with the following information:
oIn: SCART 1 RGB (=> active input)
oOut: RGB HV (=>active output signal)
oRes.: doubling 50 Hz (=> active output resolution and framerate)
If your active video source is not connected to the SCART 1 input, you ought to choose
the according input. Therefore please press the according numeric key on the remote
control (see table / Step 2). After having cjosen the input, this will be shown in the
display, e.g. IN: YUV 1.
Now your displaying device should show the picture delivered by the video source, in case you
connected it via RGB (e.g. VGA or 5x BNC) and it understands the RGB HV Signal. Otherwise
you need to reset the output signal in order to enable proper communication with your
displaying device!
Therefore press the [menu] key once, select the menu point “output setup“ in the display
by using the [S] / [T] keys and confirm this with the [OK] key.
Now select the point “output format“ and again confirm with the [OK] key. With the [W] /
[X] keys you can change on the fly between the different output signals (e.g. YUV) and
select one with [OK]. By pressing the [exit] key you can afterwards leave the menu again.
If using signal types with more than one variants such as RGB (RGB HV, RGBS, RGsB) it
is recomended to test out the different settings. The conversion happens in parallel to
the selection in the menu, i.e. the selected signal type will be displayed on the fly.
Your displaying device should now show the signal of the vieo source. In order to get an
overview about the actual settings, please recall the on screen “status info“ by pressing
the [OK] key.
Should neither the on screen “status info“ nor the video picture be displayed correctly, your
displaying device doesn’t recognize the output resolution “doubling“ with 50/60Hz hard coded
in factory base setup. Please try and change to the HDTV resolution 720p, by pressing the
[option] and afterwards the numeric key [4]. Afterwards please check again, if you have
selected the correct output signal (see above).
Step 4: Choosing the “right“ resolution
The “right“ resolution is crucial for the picture quality of the displaying device. The “right”
resolution is the resolution enabling the displaying device to render the video picture without
further conversion errors. Best case this is the so called “native“ resolution, i.e. exactly the
pixel resolution that is also physically integrated into the “panel“ of the displaying device.
Unfortunately the native resolution does not necessarily work with all devices, as the control
electronics cannot cope with it. Here you should try and find the best compromise.
The following standard resolutions are hard coded and can be selected with the key
combination [option] +[numeric key 1-9] or via the menu (output setup / Res. Custom 2):
resolution H x V max. refresh (frame) rate *
PAL / NTSC
remote
control key(s)
doubling 1440 x 576p 100 Hz / 120 Hz [option] + 1
tripling 864 / 720p x 1440p 75 Hz / 90 Hz [option] + 2
quadrupling 1152 / 960p x 1440p 50 Hz / 72 Hz [option] + 3
HDTV 720p 1280 x 720p 100 Hz / 120 Hz [option] + 4
XGA 1024 x 768p 100 Hz / 120 Hz [option] + 5
SXGA (5:4) 1280 x 1024p 75 Hz / 72 Hz [option] + 6
HDTV 1080i 1920 x 1080i 100 Hz / 120 Hz [option] + 7
custom 1: 480p 1440 x 480p 100 Hz / 120 Hz [option] + 8
custom 2: wide XGA 1280 x 768p 100 Hz / 90 Hz [option] + 9
wide VGA 852 x 480p 100 Hz / 120 Hz
540p 960 x 540p 100 Hz / 120 Hz
576p 720 x 576p 100 Hz / 120 Hz
576i 1440 x 576i 100 Hz / 120 Hz
SVGA 800 x 600p 100 Hz / 120 Hz
wide XGA 2 1365 x 768p 100 Hz / 90 Hz
wide XGA 3 1366 x 768p 100 Hz / 90 Hz
SXGA (4:3) 1280 x 1024 100 Hz / 120 Hz
PDP 1 852 x 1024p 100 Hz / 120 Hz
PDP 2 1024 x 1024p 100 Hz / 120 Hz
DILA 1366 x 1024p 75 Hz / 72 Hz
UXGA (4:3)** 1600 x 1200p 50 Hz / 50 Hz
HDTV 1080p** 1920 x 1080p 50 Hz / 60 Hz
via menu
*if distributed via DVI max. 50 Hz / 60 Hz, ** Distribution via analog outputs only
Please refer to the user manual to find out how resolution, frame rate, functions and picture
parameters can be optimized. Further information can also be found under
www.cinemateq.com in the Support section.
on / s
t
andb
y
dim
controls the display brightness numeric keys
for direct input of
specific values in
dialog boxes
additional:
input selection
direct access to the
8 Inputs via the
corresponding
numeric key
output resolution
via [option] + [key]
selection of output
resolution
menu
1 x: main menu
2 x: expert Menu
navigation arrows
navigation and
adjustment of values
in menus and dialog
boxes
[O.K.] also shows the
on-screen status-info
additional:
[option] + [+]/[-]
switches the VGA-
Bypass ([-]) and/or
RGB-Bypass ([+]) on
and off
electronic lensshift
[option] + [▲]/[▼]
activates the
„electronic lensshift“
function up- and
downwards
aspect ratio
conversion
direct access to aspect
ratio conversion.
attention:
The key [+78V] ist now
hard coded to the
„overscan“ function.
exit
closes dialogs, saves
changes and/or
removes menu or
status overview
additional:
tv-mode ON / OFF
via [option] + [exit]
the TV-Mode is
activated, via [exit]
deactivated again.
option
[option] activates the
„2nd function“ for
several keys.
overscan ON / OFF
via the key [+78V] the
overscan function is
switched on and off.
Other manuals for picture optimizer plus II
1
Table of contents
Languages:
Other Cinemateq TV VCR Combo manuals


