CINIOS HURRICANE BACKYARD TV User manual

HURRICANE BACKYARD TV
OWNER’S MANUAL
CINIOS Inc.
Rev. 1.4

1
Thank you for purchasing a CINIOS™Backyard TV™–a television
designed specifically for TV viewing enjoyment in the outdoors of
your home backyard, spa, patio, or cabana. It’s well-protected from
the sun, most weather and temperatures, and from the errant
baseballs and pool splashing that comes with backyard fun.
IMPORTANT - FCC STATEMENT
Note: This equipment has been tested and found to comply with the limits for a Class B
digital device, pursuant to part 15 of the FCC Rules. These limits are designed to provide
reasonable protection against harmful interference in a residential installation. This
equipment generates, uses, and can radiate radio frequency energy and, if not installed and
used in accordance with the instructions, may cause harmful interference to radio
communications. However, there is no guarantee that interference will not occur in a
particular installation. If this equipment does cause harmful interference to radio or
television reception, which can be determined by turning the equipment off and on, the
user is encouraged to try to correct the interference by one or more of the following
measures:
Reorient or relocate the receiving antenna.
Increase the separation between the equipment and receiver.
Connect the equipment into an outlet on a circuit different from that to which the
receiver is connected.
Consult the dealer or an experienced radio/TV technician for help.
TABLE OF CONTENTS
Safety Instructions............................................................ 2
Unpacking......................................................................... 4
TV Setup ........................................................................... 5
Operating the TV ..............................................................10
TV Controls ..........................................................10
On-Screen Display Menu Controls.......................14
Care and Maintenance .....................................................24
Troubleshooting ...............................................................25
Limited Warranty .............................................................28
Copyright © 2011 CINIOS Incorporated. All Rights Reserved.
All other trademarks are the property of their respective owners.

2
SAFETY INSTRUCTIONS
This product has been designed, engineered, and manufactured with a priority on
user and product safety. However, improper use and care can result in permanent
damage to the TV, or harm to you. To ensure your safety and avoid potential
dangerous situations, please read and follow these precautions prior to use, while
installing, and during use of this product.
Read this entire manual to become familiar with all instructions and proper
operations.
Heed all warnings.
Do NOT use this TV near a heating source of any kind.
Do NOT modify or alter the polarized or 3-way grounding plug in any way,
shape, or form. Do NOT bypass the 3-way grounding plug. Use only in a 3-
way grounded outlet.
Protect the power cord from being walked on, cut, pinched or pulled under
strain, especially at the plug and at TV entry.
Unplug the unit during lightning storms. Do not touch the TV during lightning
storms. It is recommended to use a surge protector.
Only use attachments and accessories specified and/or provided by CINIOS.
This TV should be operated only from the type of power source indicated on
the manual/rear marking label.
Although your TV has strong protection from water, it is not 100%
waterproof. Always avoid spilling liquid on this product.
Never push objects of any kind into this product through any openings.
Do NOT attempt to remove the rear cover or to open this TV, as this can
expose you to high voltage and risk of electric shock. There are no user
serviceable parts inside. Refer servicing and repair to qualified personnel.
Do NOT attempt to modify or repair this product in any way as this will
invalidate your warranty.
TV installation should be performed by a licensed installer for best results.
Use proper lifting technique during installation and removal as a TV can be a
heavy, bulky item.
When moving or lifting, do not press or place stress on the front screen.
For use with outdoor antennas, follow proper grounding and installation
requirements provided by the antenna.
Do not block any ventilation openings during use as this can damage the TV
permanently. Ensure the installation location has plenty of space around the
TV, particularly near the ventilation openings.
3
Do not touch the ventilation openings during TV operation as they can
become hot –this is normal operation.
Although the front panel is tempered glass and scratch resistant, avoid any
sharp objects contacting the surface as permanent scratches can occur.
Although the TV is protected from high temperatures, direct sunlight can
cause temperatures to exceed the product specifications and create dark
splotches on the screen. Over time this can permanently damage the LCD
panel inside. To remedy, ensure the installation does not allow direct
sunlight on the front panel during the day. Block or remove the TV from the
direct sunlight. Direct sunlight reduces the picture quality because it
increases light on the screen, washing out the bright picture from the TV.

4
UNPACKING
A television is a heavy, bulky, and fragile item. Always use caution when lifting it
from the packaging and mounting in place.
Save the original packaging in the event warranty service is required to ensure safe
shipment to an authorized service provider.
CONTENTS of PRODUCT PACKAGING:
CINIOS Backyard TV with integrated AC power cord
Waterproof Remote Control, with battery (1) and battery cover key (1)
This User Manual
Quick Start Guide
Velcro strips (2) for remote control
Magnet strips (2) for remote control
* Note: No stand or mount is included. Contact a CINIOS Dealer or local retailer if
you need a mounting solution.
Remote control replacement battery is one 3V CR2025 coin-style, found in most
drugstores or home improvement stores.
IMPORTANT: Keep all original product packaging materials and the original
purchase receipt or invoice in the event the product requires any service in the
future. Keep a record of your date of purchase, store or dealer purchased from,
the model number, the product serial number, and the price paid for your own
records, besides the original receipt for proof of purchase.

5
TV SETUP
Follow these four quick steps to setup and enjoy your Backyard TV.
Some A/V device sources may not support every connection shown. Check your
device manual for its recommended connection cable and input connection type.
You will need to provide the cables for each connection chosen (most sources like
a cable set top box or DVD player include them in the box).
CHOOSE A MOUNTING LOCATION
The location must be strong and sturdy enough to hold the TV in place during
normal use and in high winds. We recommend following the instructions in the
mounting product you have chosen for the installation, or using a professional
installer. [Note: 42” TV weighs about 95lbs, 32” TV weighs about 60lbs.]
Although the TV has features and protection from the effects of sunlight, for best
picture quality you should mount the TV so that direct sunlight is not facing the
front panel. This will also provide a longer life for the TV.
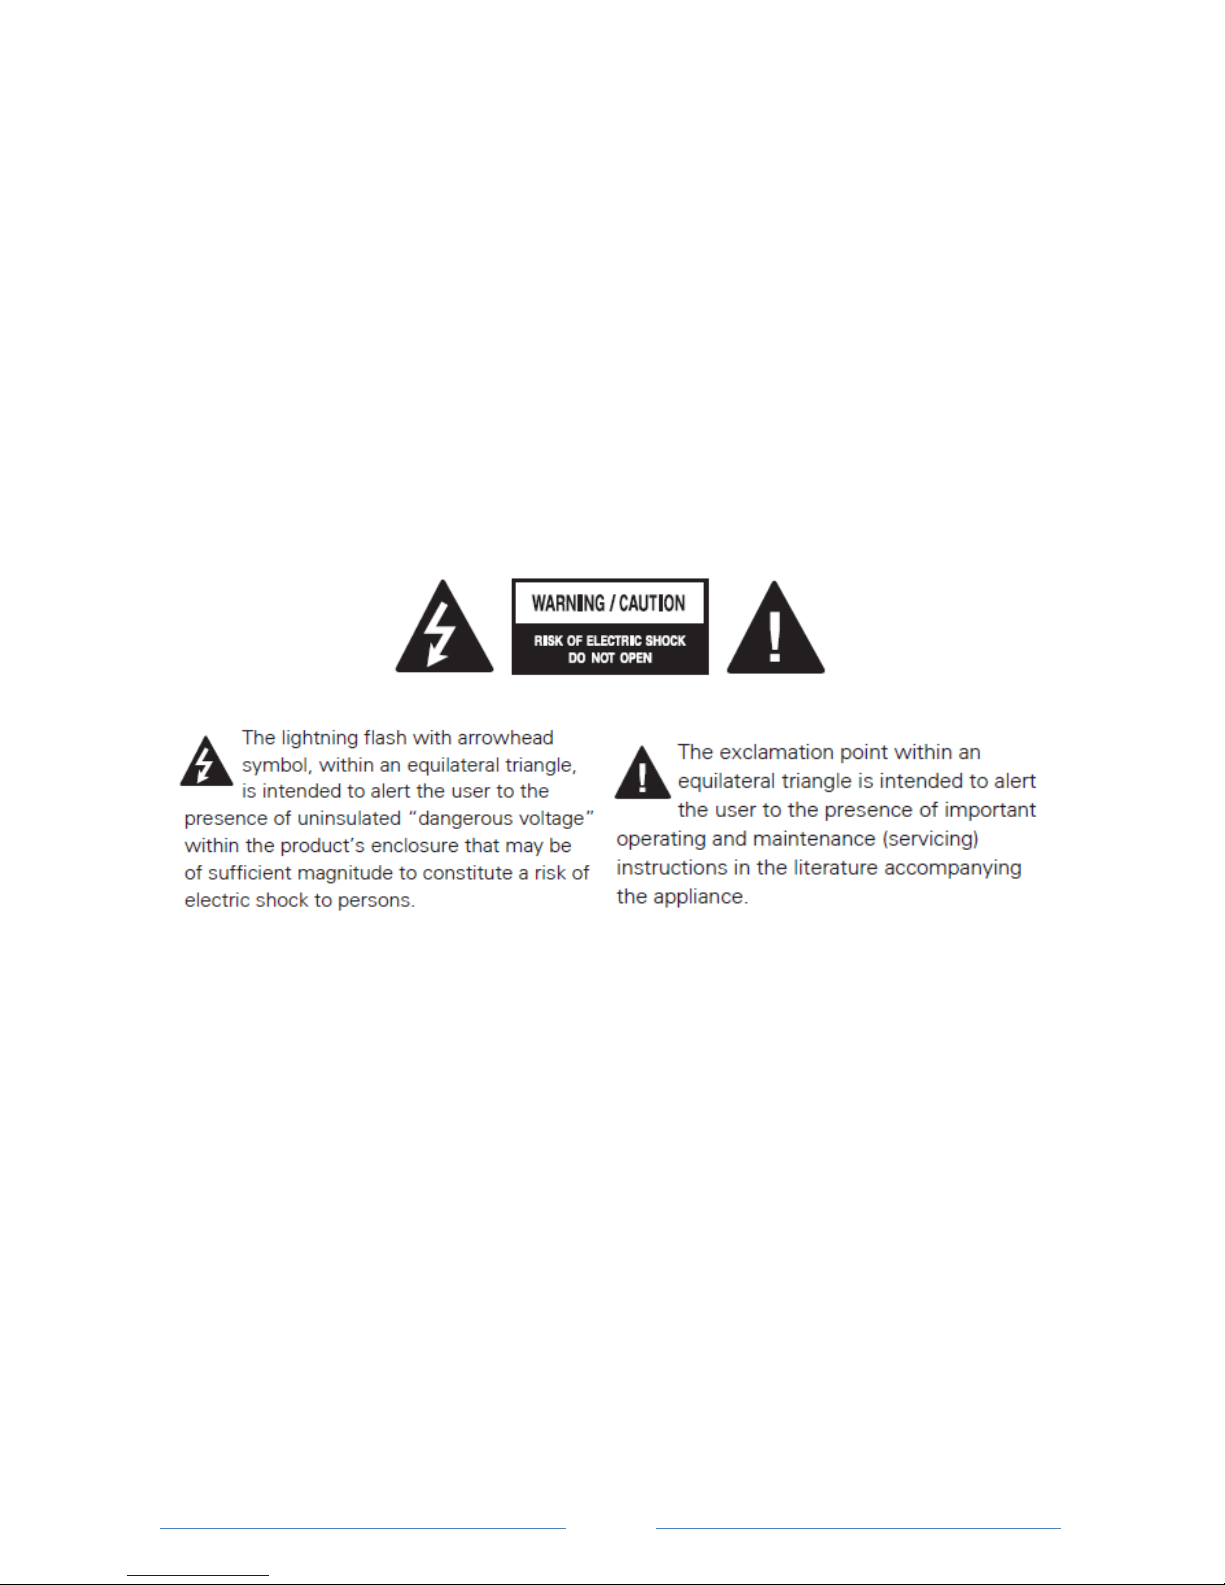
CONNECT YOUR INPUT SOURCE DEVICES
Connect your device to the TV using the device cables that provide the best
connection. Not all devices have all of the connections shown below and available
on the TV. Remove the rear cable area cover by loosening the (4) screws.
Reattach cover after cables are connected to protect the cable area.
Standard input device connections available:
6
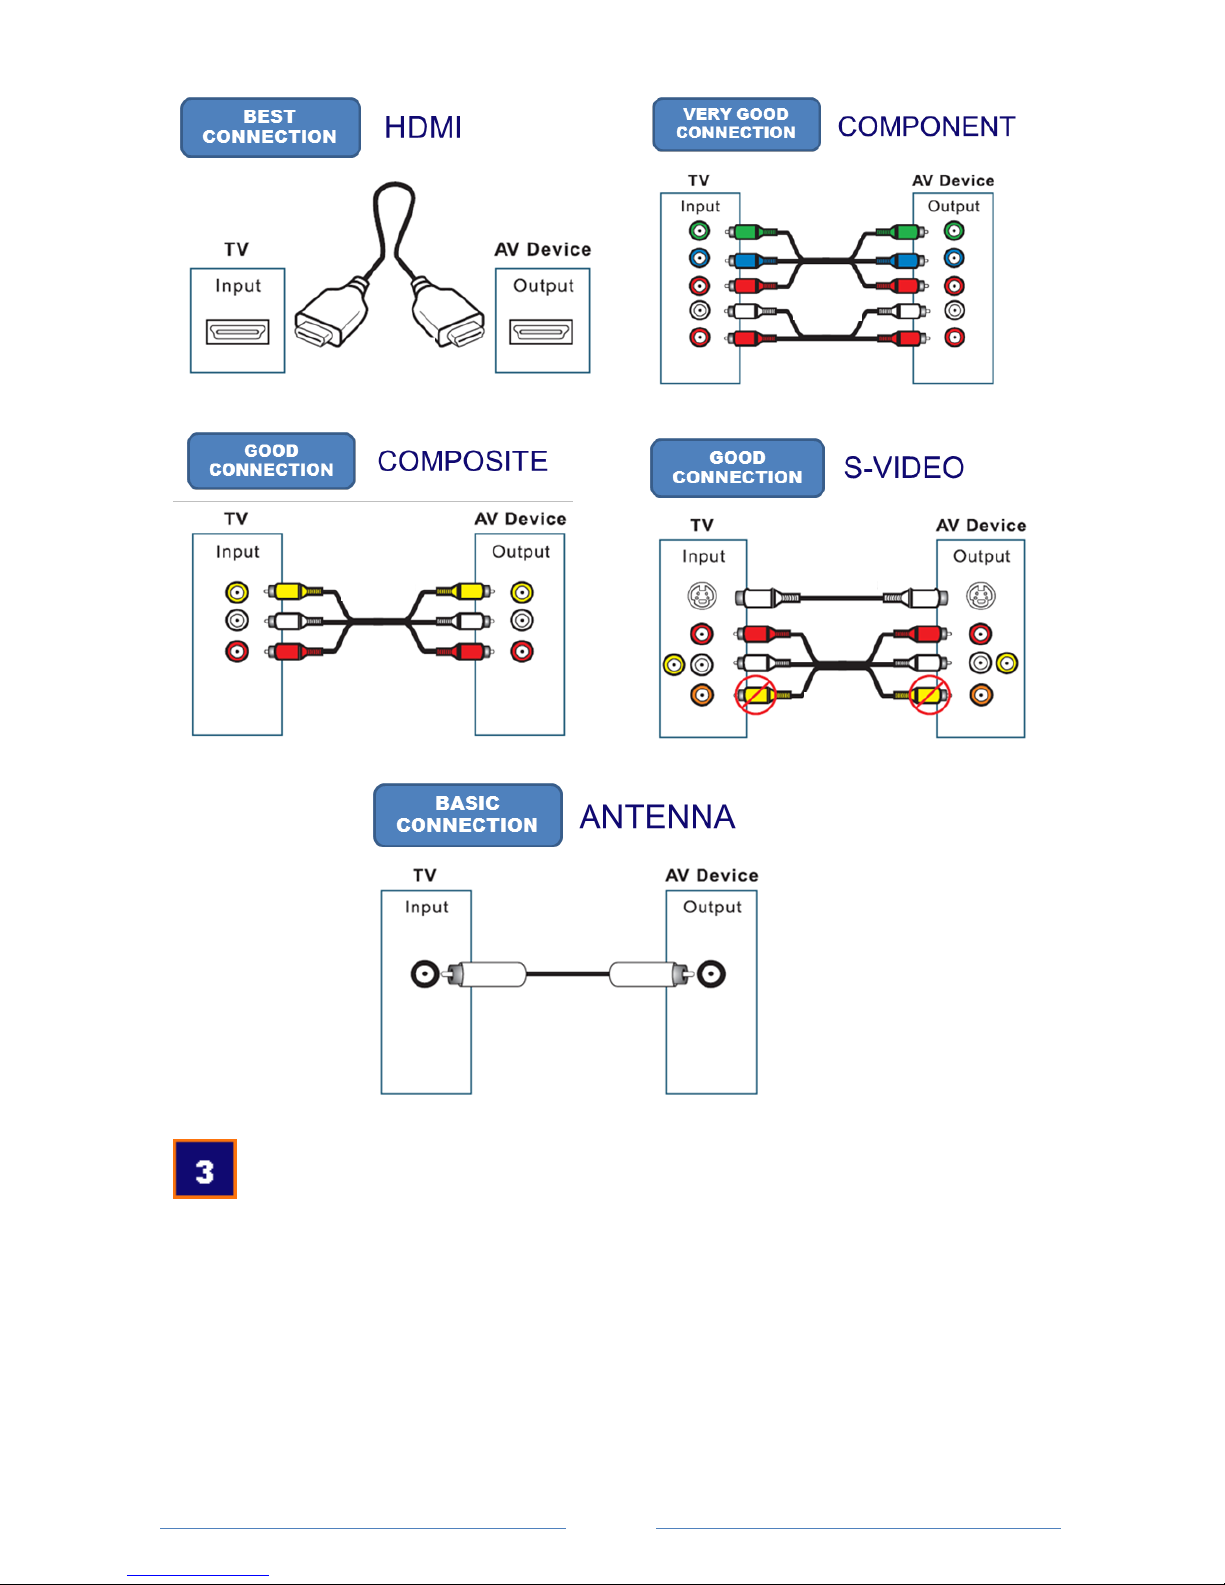
CONNECT POWER TO THE TV + INSERT BATTERY TO REMOTE
CONTROL
Connect the power cord from the TV into a properly grounded AC plug outlet. It is
highly recommended to use a ground fault protected outlet using a cover shield.
Remove the rear cover from the back of the remote control by twisting it to ‘OPEN’
with the included plastic key or a small coin. Insert the disk battery with the ‘+’
side facing up. Replace the cover and turn it to ‘CLOSE’ to lock it.
7
CHOOSE THE INPUT SOURCE TO WATCH
Press the ‘POWER’ button on the remote or the TV side panel.
Press ‘TV/AV’ button on the remote or ‘INPUT’ on the TV side panel.
Select the input source you wish to view that was connected from step 2.
Press ‘TV/AV’ again to exit the onscreen display.
For help, please refer to the Troubleshooting section in this manual or visit
www.cinios.com ‘CUSTOMER SUPPORT’ page.
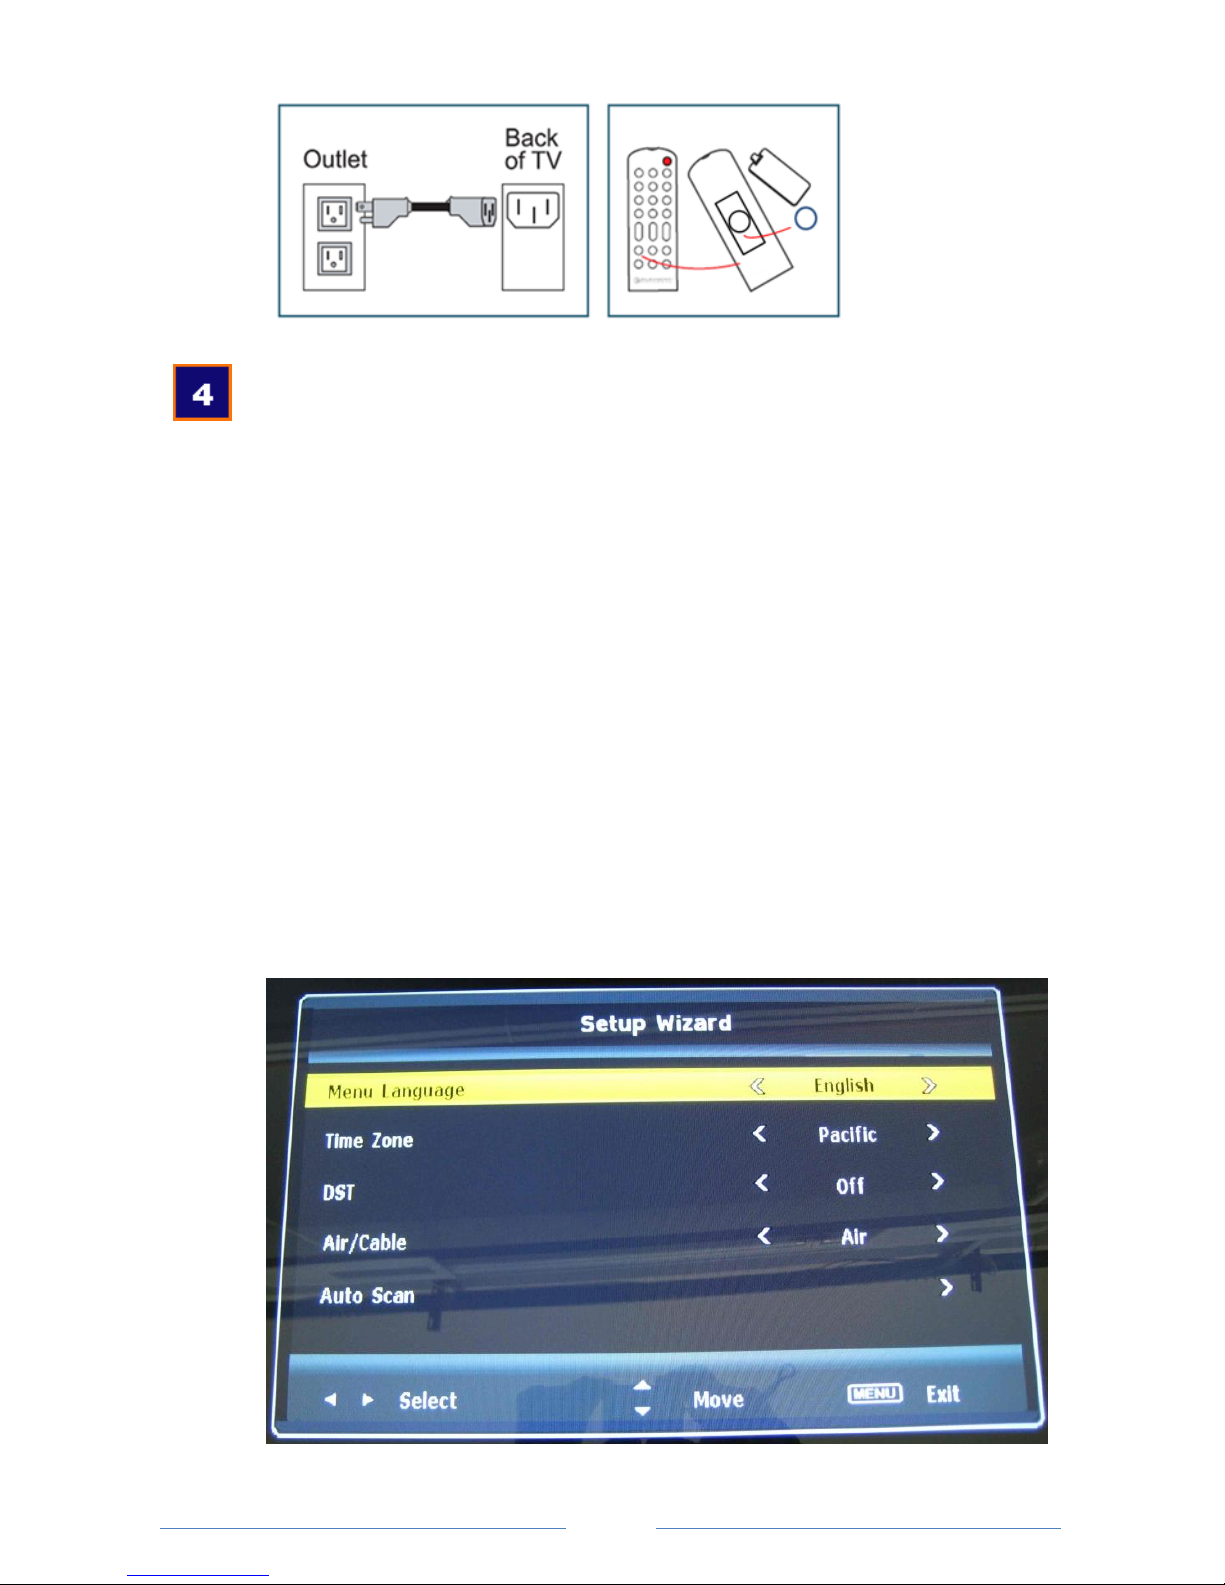
Additional Setup:
The first time the TV is powered on, the Setup Wizard will display, or can be
reached by pressing the MENU button on the remote.
Choose your settings for Language, Time Zone, TV signal from over-the-air or cable.
Selecting auto-scan will start the TV automatically scanning for available channels
to lock in.

8
STORABLE REMOTE CONTROL SETUP:
1. Choose Velcro or magnet method to attach remote control.
2. Peel the backing from one Velcro piece (2 halves), or from one magnet strip.
3. Press the Velcro strip on the bottom of the remote control housing, and on
the side of the TV bezel. Or press the magnet strip on the bottom of the
remote control only. Press and hold firmly for several seconds.
4. Place the remote against the bezel anywhere for the magnet, or on the
Velcro strip to store it anytime and never lose it!
5. Save the extra Velcro and magnet strip for a second remote, more holding
strength, or a second Velcro another location.
Now that the TV is setup and ready to enjoy, you may want to adjust the picture
settings to improve the picture quality based on how you prefer to view your
programming on the screen.
Press the ‘MENU’ button on the remote control or the side of the TV to enter the
on-screen display. There you will find settings such as brightness and contrast that
you can adjust for the optimum picture. See page 13 for more details.
DAY-NIGHT DIMMING ADJUSTMENT
In the on-screen display menu, on the Picture menu page, you will find the setting
to change the TV brightness from daytime to nighttime viewing. This is a single
step dimming between day and night to optimize the picture brightness to the
different light conditions. You should adjust the TV for normal daylight viewing,
then choosing ‘night’ will dim the settings. It is a manual setting and not automatic.
9
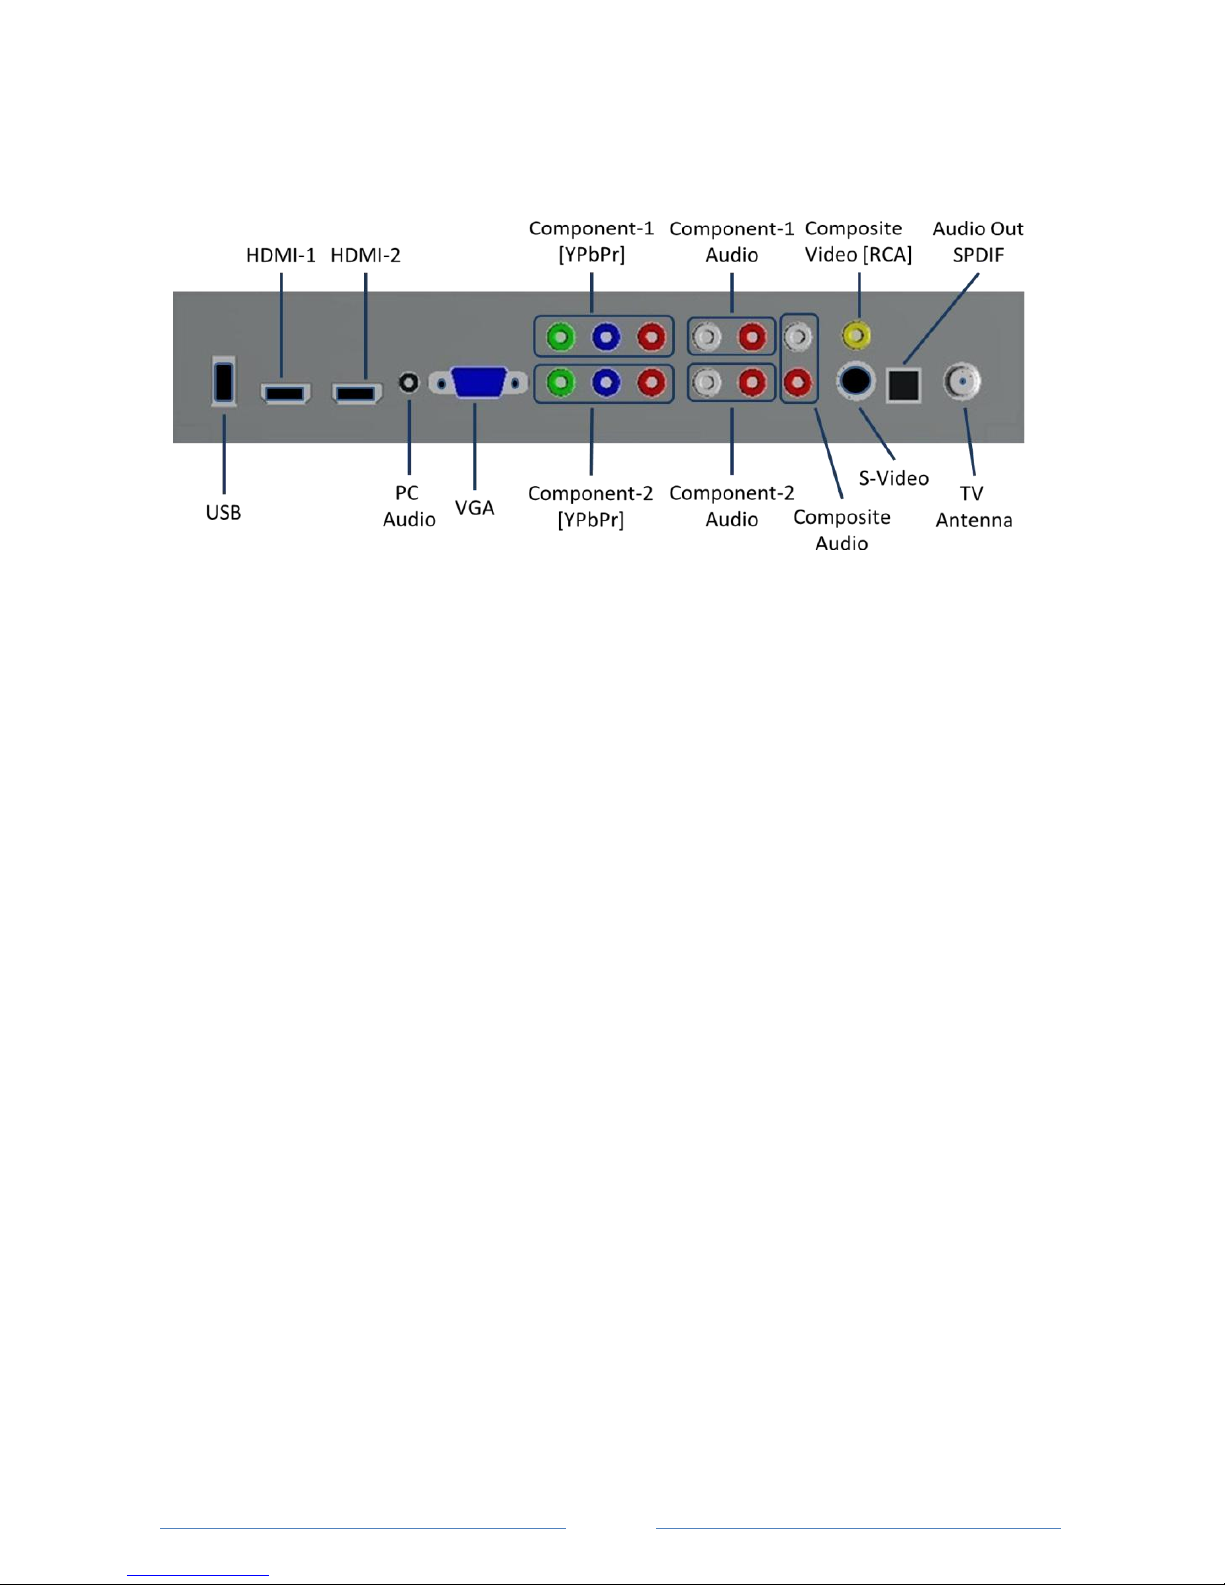
INPUT-OUTPUT CONNECTORS:
Connect your input device source to one of these connectors.
10
OPERATING THE TV: TV and Remote Controls
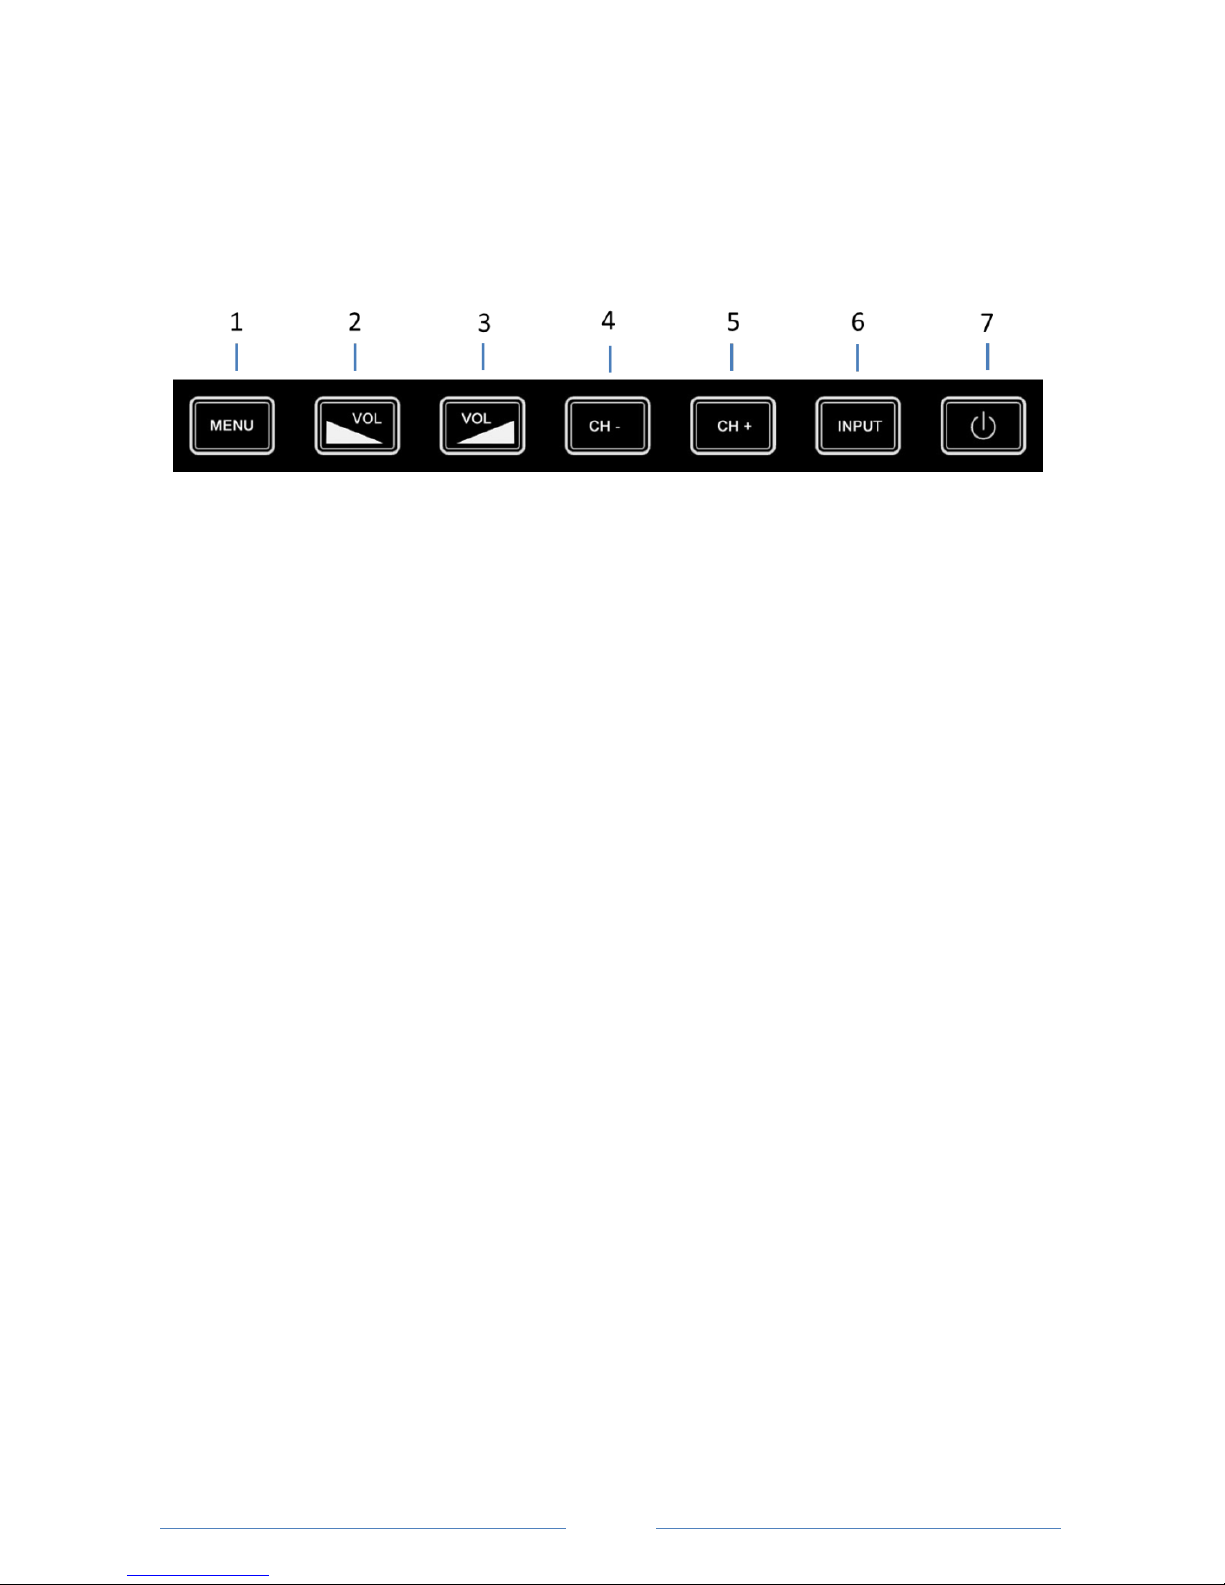
EXTERNAL TOUCH CONTROL BUTTONS:
The touch buttons are located on the side of the TV for operation without using
the remote control.
1. DISPLAY ON-SCREEN MENU
2. VOLUME DOWN
3. VOLUME UP
4. CHANNEL DOWN -
5. CHANNEL UP +
6. SELECT INPUT SOURCE
7. POWER ON/OFF
REMOTE CONTROL OPERATION:
The remote control is waterproof, but is not made for a prolonged period
submerged in water or at depths below several inches.
Should the remote be submerged for a period of time, it is recommended to allow
it to dry for 24 hours or longer before use. Open the battery cover, and remove
and dry the battery. Place it in a cool, dry area with the battery compartment
open and face up to allow air to circulate inside.
The remote control operates on one 3V CR2025 coin-style battery. Replacement
battery can typically be found in most drugstores or home improvement stores.
REPLACE BATTERY
On the remote control bottom, simply turn the battery cover to ‘OPEN’ using a
coin or the included plastic key. Place the battery inside with the ‘+’ side facing up.
Replace cover and turn it to ‘CLOSE’.
11
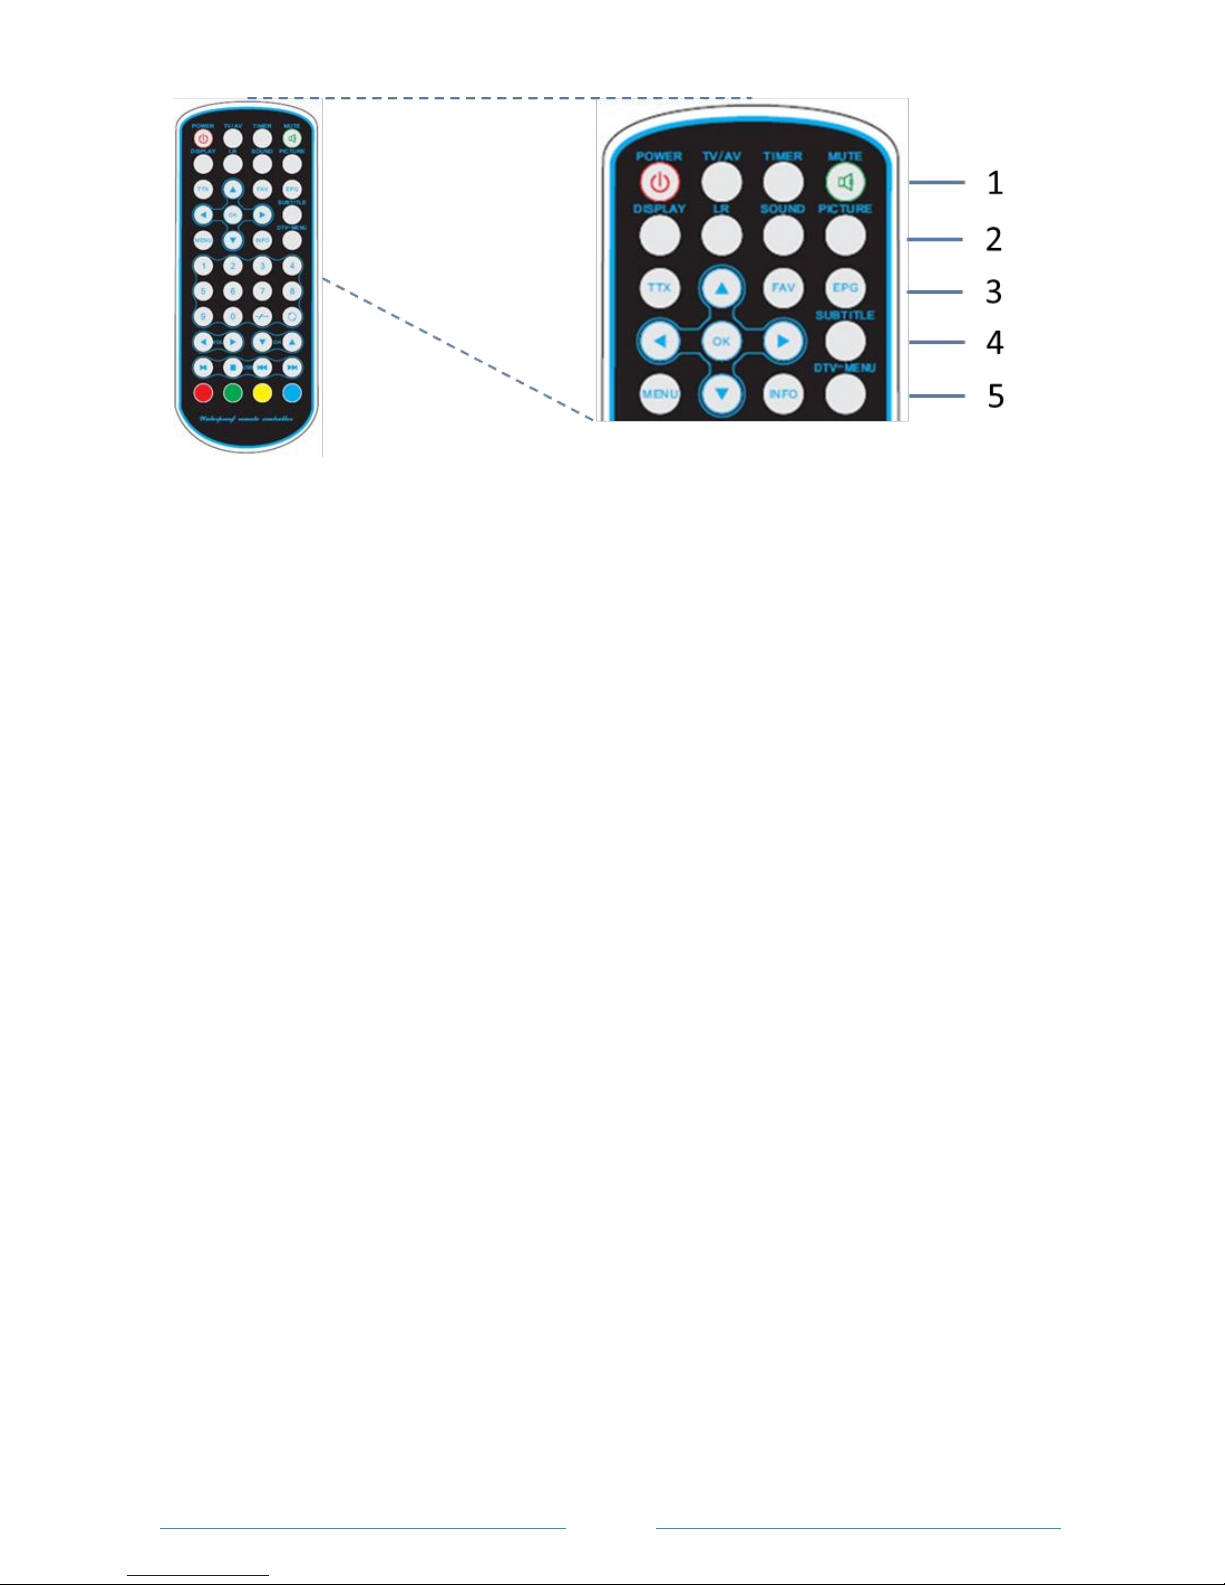
ROW 1 buttons:
POWER Press to power the TV on and off.
TV/AV Press to enter the input menu to choose source connection.
TIMER Press to set sleep timer on/off/or a specific time.
MUTE Press to mute/unmute the speaker volume.
ROW 2 buttons:
DISPLAY Press to change the zoom mode –Cinema/Zoom/Wide/Normal.
LR Press to change MTS mode (MONO/STEREO/DUAL), used only in TV
mode.
SOUND Press to change the SOUND mode between Standard/News/Music/
Movie/Sports/or Custom.
PICTURE Press to change the picture mode between Standard/Sports/Theater/
Custom/or Vivid.
ROW 3 buttons:
TTX Press to turn on/off teletext, used only in TV mode.
FAV Press to show all channels in favorite programs on the screen, used only
in TV mode.
EPG Press to open Electronic Program Guide, used only in TV mode.
ROW 4 buttons:
▲▼Menu button for up and down control in most menu pages.
OK Press to confirm choices in menus.
Menu button for left and right in most menu pages.
SUBTITLE Function not supported.

12
ROW 5 buttons:
MENU Press to display the OSD menu or to EXIT to the previous menu.
INFO Press to show TV information (e.g. channel number or TV system) on
the top of the screen.
DTV-MENU Function not supported in North America TV tuners.
ROWS 6, 7, and 8 buttons:
0 - 9 Press to select channel number or enter data.
- / -- Press to enter the second/third digit of channel numbers larger than
one digit. Not needed on all models.
Press to return to previous TV channel.
ROW 9 buttons:
VOL Press to adjust volume up or down.
CH In TV mode, changes the channel up or down. In On-Screen Display
(OSD) mode, this selects the next or previous menu.
ROW 10 buttons:
Only operate in USB input mode to command the photo player and music player.
Press to start photo slideshow or to play music file highlighted.
Press to stop photo slideshow, stop playing current music file, or to exit
USB mode.
Press to play the previous photo or music file.
Press to play the next photo or music file.

13
ROW 11 buttons:
RED Used in the USB mode. Press to select on-screen items in RED color.
GREEN Used in the USB mode. Press to select on-screen items in GREEN color.
YELLOW Used in the USB mode. Press to select on-screen items in YELLOW.
BLUE Used in the USB mode. Press to select on-screen items in BLUE color.
14
OPERATING THE TV: On-Screen Display Menu Controls
The on-screen display (OSD) menu can be displayed by pressing the ‘MENU’ button
on the remote control, or the external control button ‘MENU’ on the side of the
TV. While in the OSD like the pictures below, you can press MENU to exit that
menu page.
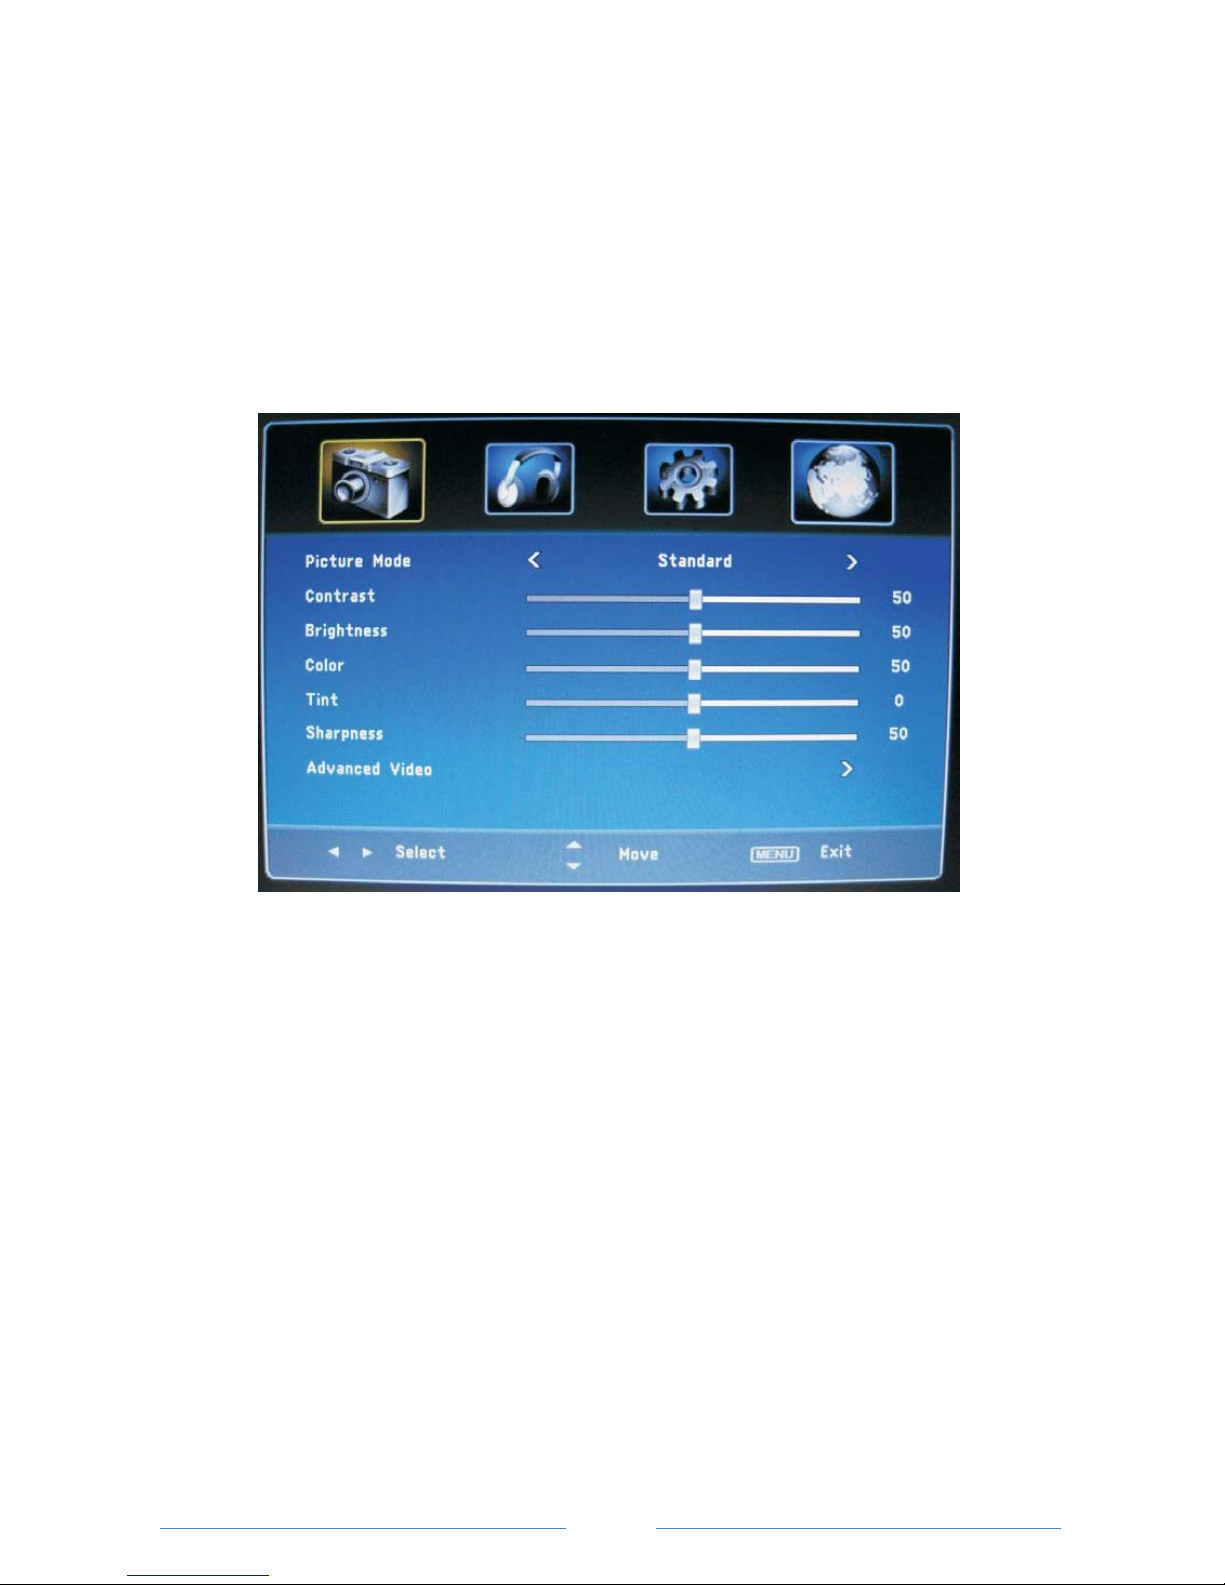
1. PICTURE MENU
The picture menu is the first page of the main menu shown by the camera icon.
You can make basic adjustments to the picture quality here such as picture mode,
contrast, color, sharpness.
1. Press buttons to highlight the item to be selected.
2. Press buttons to make the desired adjustments.
3. When you are satisfied with your adjustments, press MENU to exit.
Picture Mode
Highlight the PICTURE MODE line to select the type of picture that corresponds to
your viewing requirements.
Press the buttons select the picture mode such as Standard, Sports, Theater,
Custom, or Vivid mode. You may also press the PICTURE button on the remote
control when not using the OSD menu.
Contrast
Highlight the CONTRAST line and adjust using buttons.

15
Brightness
Highlight the BRIGHTNESS line and adjust using buttons.
Color
Highlight the COLOR line and adjust the color saturation using buttons.
Tint
Highlight the TINT line and adjust using buttons. Only used in TV mode with
NTSC (Analog) input sources.
Sharpness
Highlight the SHARPNESS line and adjust using buttons.
Advanced Video
Highlight the ADVANCED VIDEO line and press the button to open the Advanced
Video menu page. Using buttons highlight the selected item to adjust.
ADVANCED VIDEO Page:
Color Temperature
Highlight the COLOR TEMP line and adjust using buttons to select
personal/normal/cool/warm.
Zoom Mode
Highlight the ZOOM MODE line and adjust using buttons to select
wide/zoom/cinema/normal mode. You may also press the DISPLAY button on the
remote control when not using OSD menu.

16
Noise Reduction
Highlight the NOISE REDUCTION line and adjust using buttons to select off/
weak/ middle/ strong/ auto.
Adaptive Contrast
Highlight the ADAPTIVE CONTRAST line and adjust using buttons to select
on/off.
2. AUDIO MENU
The audio menu is the second page of the main menu -- the headphones icon.
1. Press buttons to highlight the item to be selected.
2. Press button to adjust the item.
3. When you are satisfied with your adjustments, press MENU to exit.
Sound Mode
Highlight the SOUND MODE line and adjust using the buttons to select the
sound type that best matches your listening preference - Standard/News/Music/
Movie/Sports/Custom. Bass and Treble will automatically be set except in Custom.
You may also press the SOUND button on the remote when not using OSD menu.
Bass
Highlight the SOUND MODE line and select Custom. Then highlight the BASS line
and adjust using the buttons.
17
Treble
Highlight the SOUND MODE line and select Custom. Then highlight the TREBLE line
and adjust using the buttons.
Balance
Highlight the BALANCE line and adjust using buttons.
Surround
Highlight the SURROUND line and adjust using buttons to turn Surround
on/off.
AVC
Highlight the AVC line and adjust using buttons on or off.
DIGITAL OUTPUT
Highlight the DIGITAL OUTPUT line and adjust using buttons.
Audio Language
Highlight the AUDIO LANGUAGE line and adjust using buttons to select one
audio language such as English/French/ Spanish. If there is no selection
This function has not been programmed for use on this TV model.
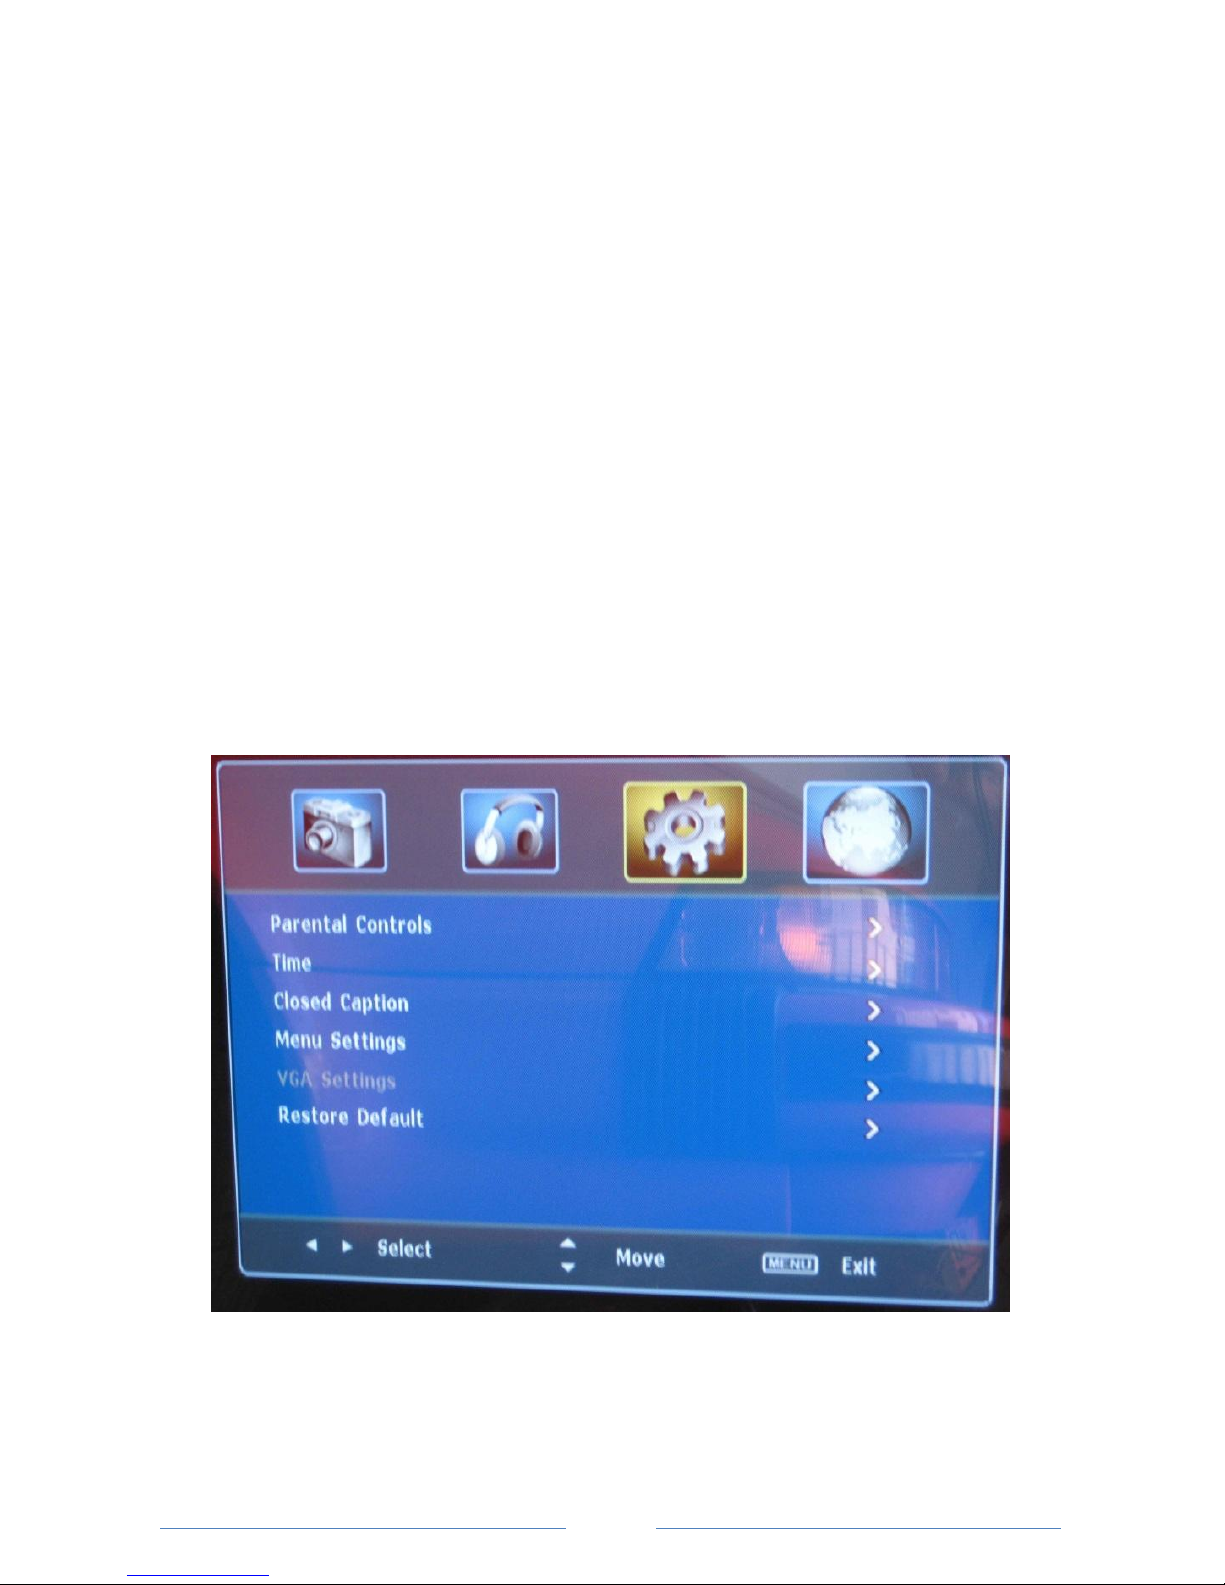
3.SETTING MENU
The settings menu is the third page of the main menu shown by the gear icon.
1. Press buttons to highlight the item to be selected.
2. Press button to enter the submenu of each item.
3. When you are satisfied with your adjustments, press MENU to exit the page.

18
PARENTAL CONTROL Page:
Highlight the PARENTAL CONTROL line and adjust using buttons to select a
password and turn controls on/off. The default password is: 0000.
TIME Page:
Highlight the TIME line and adjust using buttons to show Sleep Timer/Time
Zone/DST Mode/Clock.

19
Sleep Timer
Highlight the SLEEP TIMER line and adjust using buttons to select off/30Min/
45 Min/60 Min/90 Min/120 Min/180 Min/240 Min. You may also press the TIMER
button on the remote control when not using the OSD menu.
Time Zone
Highlight the TIME ZONE line and adjust using buttons to select the correct
time zone, the options are Pacific / Alaska / Hawaii / Eastern / Central / Mountain.
DST: Daylight Saving Time
Highlight the DST line and adjust using buttons to select Daylight Saving
Time on/off. When DST is ON, the clock is set 1 hour ahead of local standard time.
CLOSED CAPTION Page:
Highlight the CLOSED CAPTION line and adjust using buttons to show closed
caption adjustments.
CC Mode
Highlight the CC MODE line and adjust using buttons to turn CC on/off.
Basic Selection
Highlight the BASIC SELECTION line and adjust using buttons to choose the
closed caption type to display.
Advanced Selection
Highlight the ADVANCED SELECTION line and adjust using buttons to choose
the closed caption special type to display.
Table of contents
Other CINIOS TV manuals


