Circuit Blox 11S User manual

WARNING: Always check your wiring before turning on a circuit. Never leave a circuit
unattended while the batteries are installed. Never connect additional batteries or any
other power sources to your circuits. Discard any cracked or broken parts.
Adult Supervision:
Because children’s abilities vary so much, even with age groups, adults should exercise
discretion as to which experiments are suitable and safe (the instructions should enable
supervising adults to establish the experiment’s suitability for the child). Make sure your
child reads and follows all of the relevant instructions and safety procedures, and keeps
them at hand for reference.
This product is intended for use by adults and children who have attained sufcient
maturity to read and follow directions and warnings.
Never modify your parts, as doing so may disable important safety features in them, and
could put your child at risk of injury.
FCC Notice: Please note that changes or modications not expressly approved by the
party responsible for compliance could void the user’s authority to operate the equipment.
NOTE: This equipment has been tested and found to comply with the limits for a Class B
digital device, pursuant to Part 15 of the FCC Rules. These limits are designed to provide
reasonable protection against harmful interference in a residential installation. This
equipment generates, uses and can radiate radio frequency energy and, if not installed
and used in accordance with the instructions, may cause harmful interference to radio
communications. However, there is no guarantee that interference will not occur in
a particular installation. If this equipment does cause harmful interference to radio or
television reception, which can be determined by turning the equipment off and on, the user
is encouraged to try to correct the interference by one or more of the following measures:
• Reorient or relocate the receiving antenna. • Increase the separation between the equipment
and receiver. • Connect the equipment into an outlet on a circuit different from that to which
the receiver is connected. • Consult the dealer or an experienced radio/TV technician for help.
-1-
Never connect E-Blox®Circuit
Blox™ to the electrical outlets in
your home in any way!
Only use the battery holder with
the cover securely in place.
Small parts. Not for children
under 3 years.
Do not touch the fan while it is
spinning.
WARNING:
SHOCK HAZARD
WARNING:
CHOKING HAZARD
WARNING:
MOVING PARTS
WARNING:
!
!
!
Batteries:
lUse only 1.5V “AA” type, alkaline batteries (not
included).
lInsert batteries with correct polarity.
lNon-rechargeable batteries should not be
recharged.
lRechargeable batteries should only be charged
under adult supervision, and should not be
recharged while in the product.
lDo not mix old and new batteries.
lDo not mix alkaline, standard (carbon-zinc), or
rechargeable (nickel-cadmium) batteries.
lRemove batteries when they are used up.
lDo not short circuit the battery terminals.
lNever throw batteries in a re or attempt to
open its outer casing.
lBatteries are harmful if swallowed, so keep away
from small children.
!
1. Most circuit problems are due to incorrect assembly, always double-check that your circuit exactly matches
the drawing for it.
2. Be sure that parts with positive/negative markings are positioned as per the drawing.
3. Be sure that all connections are securely made.
4. Try replacing the batteries. Note: Rechargeable batteries do not work as well as alkaline batteries.
E-Blox
®
is not responsible for parts damaged due to incorrect wiring.
Basic Troubleshooting
Note: If you suspect you have damaged parts, you can follow the Advanced
Troubleshooting procedure on page 15 to help determine which ones need replacing.
-2-
About Electricity (Science)
1. What is Science?
Q: What do we mean when we say “Science”?
A: Science is dened as the intellectual and practical
activity encompassing the systematic study of the structure
and behavior of the physical and natural world through
observation and experiment.
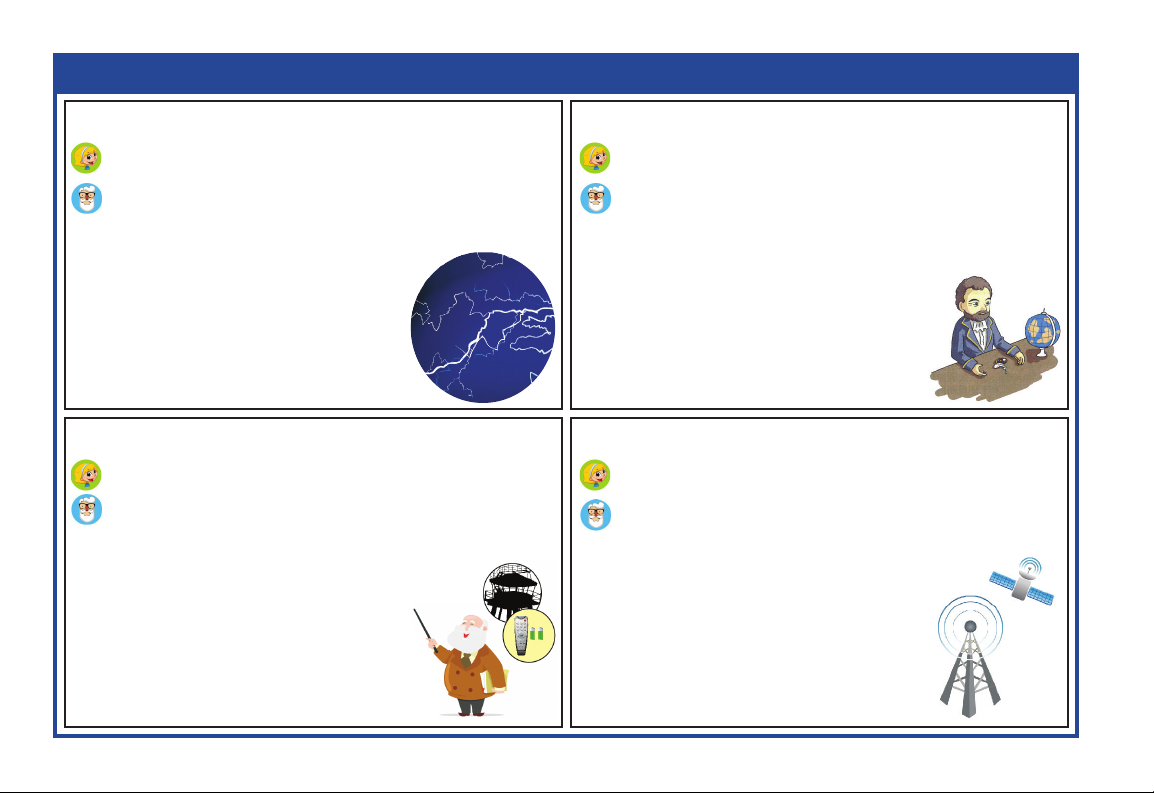
Early scientists were curious people
that wondered what made lightning.
They decided to experiment to see if
they could understand lightning and
even make their own somehow.
2. Who Discovered Electricity?
Q: Who was the rst scientist to study electricity?
A: In ancient Greece, it was found that rubbing fur on amber
produced an attraction between the two. This discovery is
credited to the philosopher Thales of Miletus. One day, when
he was polishing his amber at home, he found that a piece
of fur was attracted by the amber after he put it on the desk.
Then he split them, but it happened again. So he
made a record about the phenomenon. It took
many centuries before anyone was able to
connect this phenomenon with electricity and
a century before electrical current was put to
practical use.
3. What Other Ways Does Science Help Us?
Q: What do we mean when we say “Science”?
A: A few other major Sciences are Biology, Chemistry,
Astronomy, and Physics.
Biology is the study of living things like plants & animals.
Chemistry is the study of substances & how they
react when you combine them. Things like the
plastic in your remote and the batteries that make
it work.
Astronomy is the study of the universe.
Physics is the study of matter, energy, and
forces that are on structures like a tall tower.
The science of Electronics is considered a
branch of Physics.
4. Can Science Help Predict the Weather?
Q: What Sciences were used to help weather prediction?
A: Putting a satellite into orbit that could monitor the
weather required the use of almost all the Sciences.
Astronomy and Physics were needed to understand the
forces of gravity and how objects stay in orbit.
Chemistry was needed to make materials that
could withstand the heat and cold and to make
fuels to get the satellite into orbit. Electronics
was used to study the weather and transmit
it back to earth. Biology was needed to study
how repair people could work in orbit.
-3-
About Electricity (Technology)
5. What is Technology?
Q: What is technology and who used technology in the past?
A: Technology is the application of scientic knowledge for
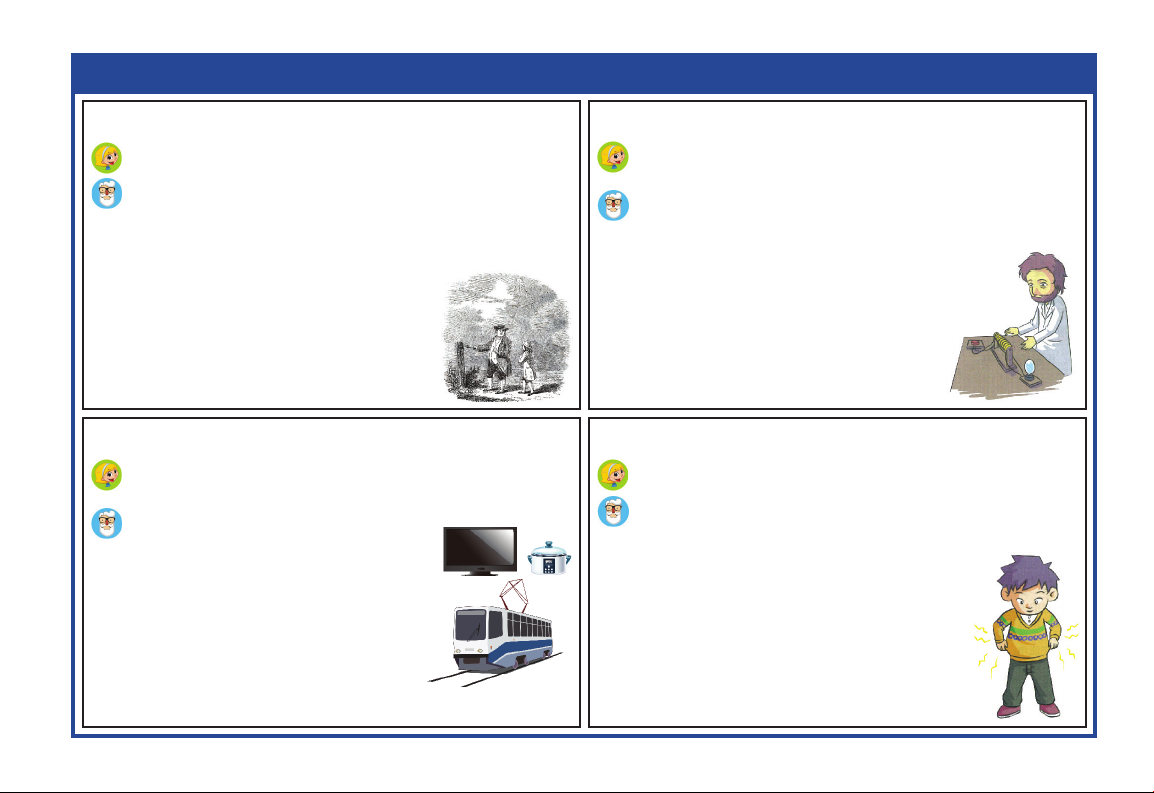
practical purposes. Dating back to the 18th century, Benjamin
Franklin (a famous American) proved that lightning was caused
by electricity by performing an experiment in which an electrical
conductor would be used to extract power from a thundercloud. In the
experiment, he ew a kite with a metal key
attached to it into a suitable cloud. The precise
historical details are unclear, but he may have
then retrieved the key and discharged electricity
from it. He later, in 1799, invented the lightning
rod, a device that served a practical purpose.
6. Technical Terms
Q: What terms do electrical technicians need to know?
A: When technicians work on circuits and appliances there
are some terms they need to know. Current is the movement
of electrons and is measured in Amperes (Amps), which is named
in honor of André-Marie Ampère. Resistance
is measured in Ohms, which is named after
George Ohm. Electro-Motive Force EMF that
pushes the electrons through the resistance is
measured in Volts, named after Alessandro
Volta. Electrical Power is measured in Watts,
named after the famous technical inventor
James Watt.
7. Technology in Everyday Life
Q: Where do we see Technology?
A: Since Technology is the
application of scientic knowledge,
we see it every day when
we watch television, cook in an
electric pot, ride on a train that is
powered by electricity, and more.
Repairmen that x our furnaces or our
air-conditioning units are technicians
because knowledge of how the science
was used to make things hot and cold
helps us repair a broken device.
8. Is There an Age Requirement to be a Technician?
Q: How old do you have to be to become a Technician?
A: Let me tell you a story about a girl named Becky. She
was only 10 years old when she was attempting to do her
homework in her mom’s car. As it got darker outside, she had
the idea that there should be a way to make
her paper easier to see in the dark. She began
playing around with phosphorescent materials,
which exhibited light without heat. She then used
phosphorescent paint to cover an acrylic board
and The Glo-Sheet was created. At the ripe old
age of 12, Becky became the youngest woman
to be approved for a U.S. patent for her Glo-
Sheet invention.
-4-
About Electricity (Engineering)
9. What is Engineering?
Q: What is Engineering? What do engineers do?
A: Engineering is the application of Science, Technology,
and Mathematics to make products that are useful to
people. Engineers are skillful in using their knowledge to make
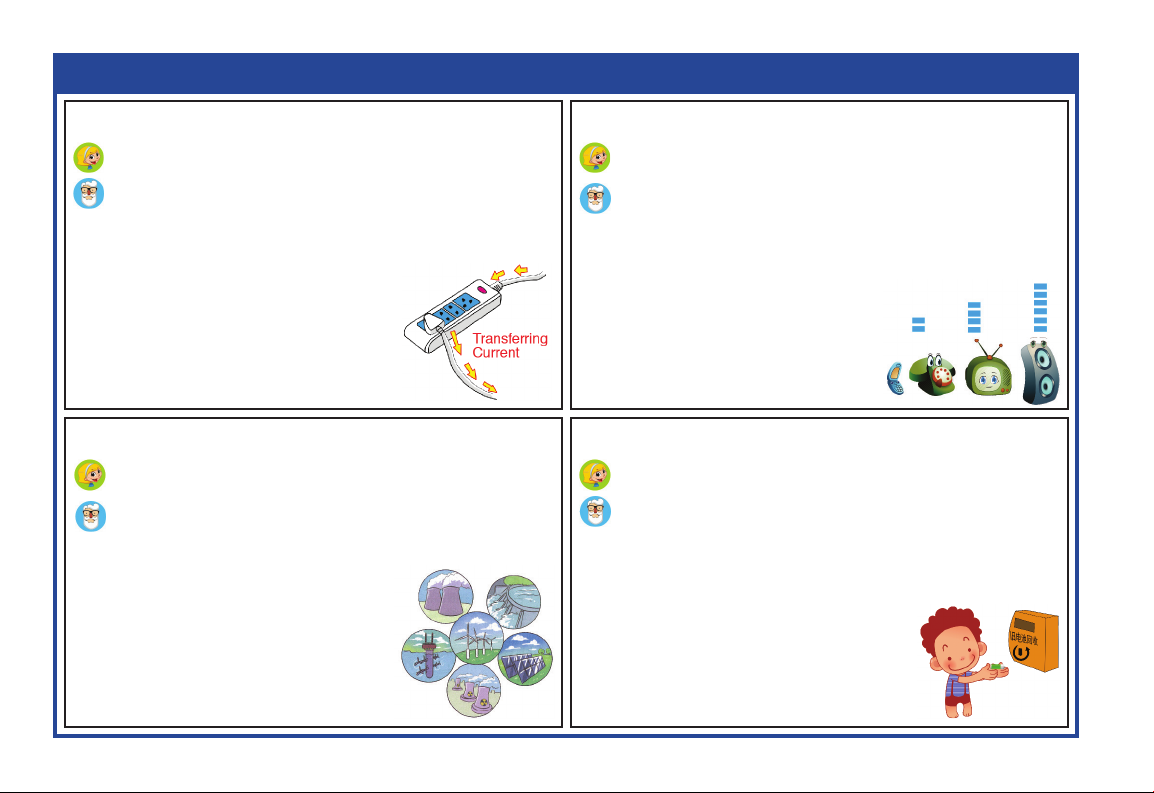
products. For example, surge protectors transfer current from
the electrical wall outlet to the electrical
appliances plugged into it while protecting
the appliances from large spikes of
electricity which could damage them.
Some surge protectors have many sockets
to plug computers and TVs into them,
while others only have two. The design is
an engineer’s job.
10. Is Engineering only about Electronics?
Q: Besides Electronics what else do Engineers do?
A: Engineers must design the products to be the most
appealing at the best price. Product appearance helps
marketing sell the product. Product performance is also
important and engineers are given specications by marketing
to meet their requirements. Safety is always very important. An
audio device should only be loud enough
to serve the specications. Production
Engineers use electronic and magnetic
sensors to automate production. Civil
engineers design roads and bridges
that are safe for everyone to use.
11. Engineering and Electricity Generation
Q: Do engineers help make electricity for daily use?
A: Yes! So far they have designed systems that use the
seven fundamental methods of directly transforming
other forms of energy into electrical energy: Fossil-fuel,
biomass, hydro/tidal, wind, nuclear,
mechanical power generation, and
solar thermal energy. Certainly there
will be more methods for electricity
generation to be found, since the
engineers, like artists, are always
creating.
12. Environmental Engineering - Battery Recycling
Q: How do Engineers help protect our environment?
A: Batteries contain a number of toxic chemicals and
their improper disposal may cause soil contamination and
water pollution. Engineers know that most typical kinds of
batteries can be recycled, especially lead-acid automotive
batteries which are nearly 90% recycled today. Nickel-
cadmium (Ni-Cd), nickel metal hydride
(Ni-MH), lithium-ion (Li-ion) and nickel
zinc (Ni-Zn) can also be recycled.
Engineers are always looking for ways
to make products safe like integrating
fuses into their designs to prevent
overheating and res.
-5-
About Electricity (Mathematics)
13. Ohm’s Law
Ohms Law states that Voltage equals Current multiplied by
Resistance. If V = Voltage, I = Current, and R = Resistance,
then mathematically Ohms Law is V = I x R where “x” stands
for “multiplied by”. Since the law starts with Voltage, we need
a voltage source or a Power Supply. There are both DC (direct
current) and AC (alternating current) power supplies. Batteries
are also a source of DC
voltage. Using Algebra, any
one unknown can be calculated
if the other two variables are
known. For example, if V=9
Volts and R=1000 Ohms, then
I=0.009 Amp or 9 milliamps.
14. Switches and Power
A switch is a device that may control other components in
the circuit. It is used for power connection and disconnection.
A switch is a device that is either ON or OFF and used often
in digital electronics. Power is the product of the current in a
device multiplied by the voltage across it. Electronic Power is
expressed in Watts. Mathematically this
is expressed as W = V x I. If you have a
60 Watt light that is on a voltage of 120
Volts, then the current can be calculated
to be 60 Watts divided by 120 Volts,
which equals 1/2 Amp. Some switches
are controlled by magnets and others by
temperature.
15. Using Mathematics to Calculate Fuses
Many different appliances can be connected to draw current from
the outlets in your homes. If these outlets are all connected to
one fuse, then the fuse must
be able to handle the sum of
all the currents being drawn.
Fuses are used in the battery
holder that comes with this
product. Each current drawn
from any outlet in your home
will add up as the appliances
are turned ON because they
are all connected in parallel.
16. Calculating Resistance
Conductive paths are used to connect circuits and transfer
electricity. If the voltage on one end of the conductor is lower than
on the other end when current is owing, then the conductor
has resistance. The voltage drop on the conductor divided by
the current in the conductor is the Resistance of the conductor
or wire. In Mathematical
terms and from Ohms law,
this would be stated as
R = V ÷ I. If the voltage drop
is 2 Volts when 4 Amps is
owing, then the resistance
of the conductor is 1/2
Ohm.
-6-
About Electricity (STEM)
17. Circuit Blox™
For Circuit Blox™, the denition of an electrical circuit is: The
complete path for an electric current ow, usually including the
source of electric energy. The path shown in the circuit below
is from the battery, through the blue 2-wire, through the motor
under the fan, through the blue 4-wire, through the switch,
through the blue 2-wire, and then back to the battery. If the
switch in this circuit is closed, then current will ow from the
battery through all the components
and back to the battery. If enough
current ows, the motor will spin and
launch the fan. If the switch is open,
nothing will happen since it is an open
circuit with no current.
18. Short Circuits in Circuit Blox™
The battery holder that comes with your Circuit Blox™ Kit is fully
protected. A short circuit indicator LED lights and a beeper sounds
if any of the outputs are shorted or under a high current draw. It
is important that you always use this battery holder in the circuits
you build to protect the batteries and prevent damage to parts.
Even shorts from one voltage output to another is protected by a
patented circuit and will indicate an excessive
current. This circuit uses resettable Positive
Temperature Fuses (PTCs). Circuit Blox™ kits
are always approved by independent safety
laboratories to insure all users will be able to
experiment without worry of harm to parts or
themselves.
19. Sound and Light
There are many modules in Circuit Blox™ that will produce
different sounds and different light effects.
The Three-in-One module, for example, has two
control inputs (T1, T2), a speaker connection (SP1,
SP2), and music & space sound selects (I/O1, I/O2).
By proper connection of parts with the
Three-in-one module many special effects
can be generated and triggered in different
ways. This module will be used to simulate
many of the different interesting problems
in the elds of Sound Technicians, Medical
Engineering, Communication Engineers,
Home Security, and much more.
20. Semiconductors
Semiconductors have properties that can control current owing
through a conductor similar to a faucet controlling the ow of
water in a pipe. A diode acts like a check valve in a water pipe by
only letting current ow in one direction. A Light Emitting Diode
(LED) produces light when very little current ows. Different
colored LEDs are made and some LEDs can
even produce Laser light similar to hand-
held pointers or gun scopes. Transistors
have three leads and one is used to control
the current between the other two.
-7-

Parts List (colors and styles may vary) Symbols and Numbers
Important: If any parts are missing or damaged, DO NOT RETURN TO RETAILER. Call toll-free (855) MY EBLOX (693-
2569) or e-mail us at: suppor[email protected]. Customer Service: 880 Asbury Dr., Buffalo Grove, IL 60089 U.S.A.
21-wire
Block
6EB2X01
62-wire
Block
6EB2X02
23-wire
Block
6EB2X03
34-wire
Block
6EB2X04
15-wire
Block
6EB2X05
1Press
Switch
6EB2X61
1 Switch
6EB2X62
1 Lamp
6EB2X76
Qty. Name Symbol Part #
1Touch
Plate
6EB2X80
1Reed
Switch
6EB2X83
1Spring
Wire
6EB2X09
3Motor
Shaft Cap
6EB2X60A
3Motor
Top
6EB2X64
2Level
1-Block
6EB2X100
2Level
2-Block
6EB2X200
1 LED
6EB2X69
Qty. Name Symbol Part #
-8-

Qty. Name Symbol Part # Qty. Name Symbol Part #
1 Speaker
6EB2X93
1 Magnet
6EB2X07
3Fan
Blade
6EB2X60
1 Motor
6EB2X95
1Base
Grid
6EB2X39
1Three-in-
One
6EB2X11
1
1
Battery
Holder
Battery
Cover
6EB2X91
6EB2X91C
-9-

-10-
How to Use Your E-Blox®Circuit Blox™ Set
E-Blox®Circuit Blox™ parts contain a PC board with
connectors so you can build the different electrical and
electronic circuits in the projects. Each block has a
function: there are switch blocks, a light block, battery
block, wire blocks, etc. These blocks are different colors
and have numbers on them so that you can easily identify
them.
For Example:
This is the press switch, it is green and has the marking
61 on it. The part symbols in this booklet may not exactly
match the appearance of the actual parts, but will clearly
identify them.
This is a wire block which comes in 5 different lengths.
The part has the number 1, 2, 3, 4, or 5 on it depending
on the length of the wire connection required.
There are also 1-post and 2-post blocks that are used as
a spacer or for interconnection between different layers.
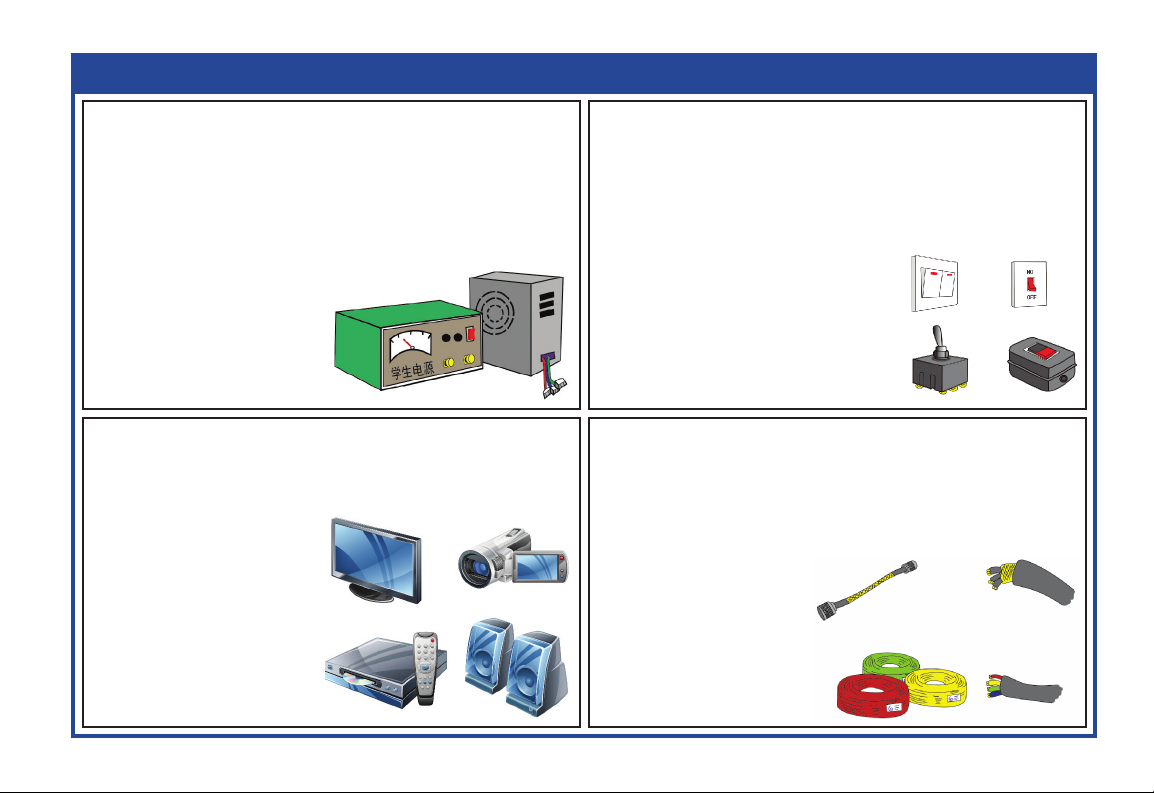
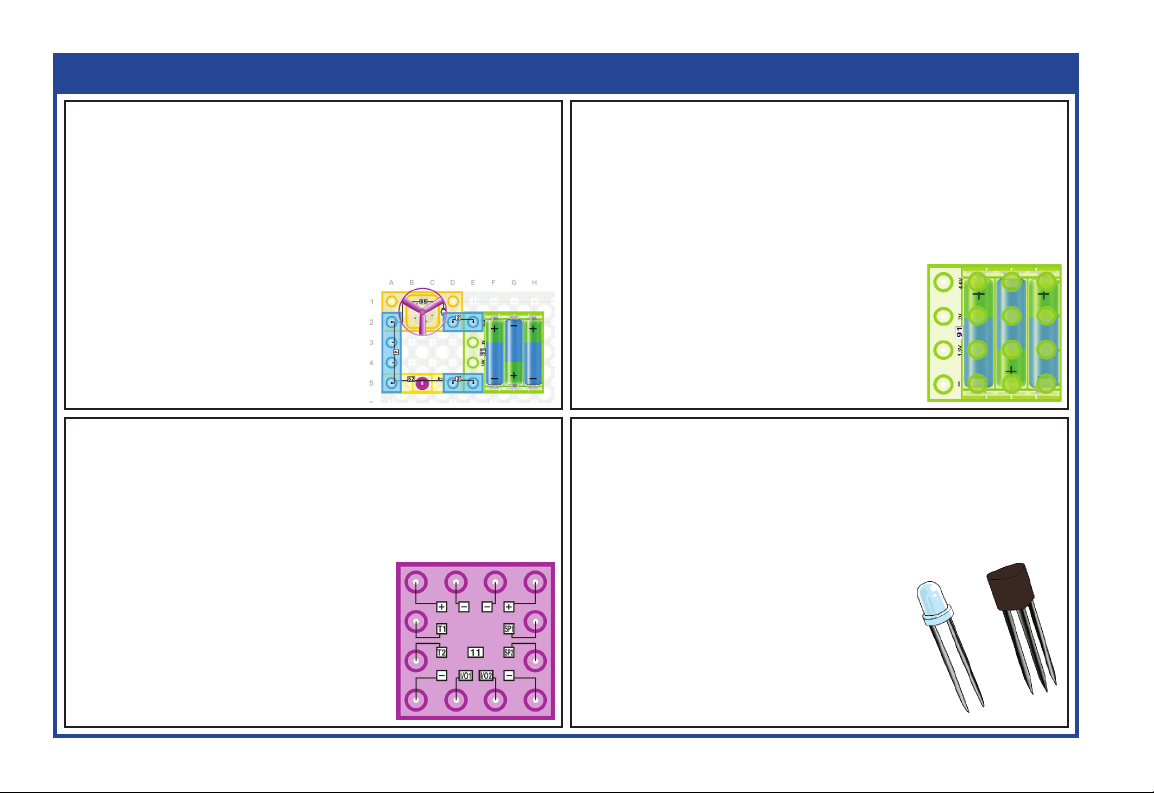
You need a power source to build each
circuit. The part is marked 91 and
requires three (3) 1.5V “AA” batteries
(not included). The four connections are
marked −, 1.5V, 3V, and 4.5V.
A short circuit indicator LED lights and
beeper sounds if any of the outputs are
shorted or under a high current draw.
Only use the battery holder when the cover is securely
in place.
A large clear plastic base grid is included with this kit to
help keep the circuit blocks properly spaced. You will see
evenly spaced posts that the different blocks plug into.
Next to the assemble drawing may be a part with an
arrow and red circle as shown below. This indicates that
the part is installed below other parts and which level it
is on.
2nd level

About Your E-Blox®Circuit Blox™ Parts
(Part designs are subject to change without notice).
The base grid functions like the printed circuit boards
found in most electronic products. It is a platform for
mounting parts and wire blocks (though the wires are
usually “printed” on the board).
The blue wire blocks are just wires used to connect other
components, they are used to transport electricity and
do not affect circuit performance. They come in different
lengths to allow orderly arrangement of connections on
the base grid.
The spring wire (9) is two single blocks connected by a
wire used to make unusual connections.
The batteries (91) produce an electrical voltage using
a chemical reaction. This “voltage” can be thought of as
electrical pressure, pushing electrical “current” through
a circuit. This voltage is much lower and much safer than
that used in your house wiring. Using more batteries
increases the “pressure” and so more electricity ows.
The switch (62) connects (ON) or disconnects (OFF) the
wires in a circuit.
The press switch (61) connects (pressed) or
disconnects (not pressed) the wires in a circuit, just like
the switch does.
A reed switch (83) is an electrical switch operated by
an applied magnetic eld. When exposed to a magnetic
eld, the switch closes (ON). When the magnetic eld is
removed the switch opens (OFF).
The blue level blocks (100 & 200) are non-conductive
and just used as building blocks.
The touch plate (80) is a type of switch when both
electrodes are touched together using your nger, shorts
the two electrodes and a small amount of current ows,
activating the circuit.
The LED (69) is a light emitting diode inside the heart,
and may be thought of as a special one-way light bulb.
In the “forward” direction (indicated by the “arrow” in the
symbol) electricity ows if the voltage exceeds a turn-on
threshold (between 1.8V to 3.3V typically); brightness then
increases. LEDs block electricity in the “reverse” direction.
The 4.5V lamp (76) contains a special wire (lament)
that glows bright when a large electric current passes
through it. Voltages above the bulb’s rating can burn out
the wire.
The speaker (93) converts electricity into sound. It does
this by using the energy of a changing electrical signal to
create mechanical vibrations (using a coil and magnet
similar to that in the motor). These vibrations create
variations in air pressure which travel across the room.
You “hear” sound when your ears feel these air pressure
variations.
The motor (95) converts electricity into mechanical
motion. Electricity is closely related to magnetism, and
an electric current owing in a wire has a magnetic eld
similar to that of a very, very tiny magnet. Inside the
-11-

-12-
About Your E-Blox®Circuit Blox™ Parts
motor are three coils of wire with many loops. If a large
electric current ows through the loops, the magnetic
effects become concentrated enough to move the coils.
The motor has a magnet inside, so as the electricity
moves the coils to align them with the permanent
magnet, the shaft spins.
Some types of electronic components can be super-
miniaturized, allowing many thousands of parts to t into
an area smaller that your ngernail. These “integrated
circuits” (ICs) are used in everything from simple
electronic toys to the most advanced computers.
The three-in-one (11) modules contain specialized
sound-generation ICs and other supporting components
(resistors, capacitors, and transistors) that are always
needed with them. This was done to simplify the
connections you need to make to use them. The pin
descriptions are given here for those interested, see the
projects for connection examples:
Three-in-One
T1, T2 - control inputs
SP1 - speaker – connection
SP2 - speaker + connection
I/O1 - music select
I/O2 - space sound select
(+) - power from batteries
(–) - power return to batteries
DOs and DON’Ts of Building Circuits
-13-
After building the circuits given in this booklet, you may wish to experiment on your own. Use the projects in this booklet
as a guide, as many important design concepts are introduced throughout them. Every circuit will include a power
source (the batteries), a resistance (which might be an LED, lamp, motor, integrated circuit, etc.), and wiring paths
between them and back. You must be careful not to create “short circuits” (very low-resistance paths across
the batteries, see examples below) as this will damage components and/or quickly drain your batteries. Only
connect the parts using congurations given in the projects, incorrectly doing so may damage them. E-Blox®is not
responsible for parts damaged due to incorrect wiring.
Here are some important guidelines:
DO
USE EYE PROTECTION WHEN EXPERIMENTING ON YOUR OWN.
DO
include at least one component that will limit the current through a circuit, such as the speaker, lamp, LED,
integrated circuit (IC, which must be connected properly), or motor.
DO
disconnect your batteries immediately and check your wiring if something appears to be getting hot.
DO
check your wiring before turning on a circuit.
DO
connect the IC using congurations given in the projects or as per the connection descriptions for the part.
DON’T
connect to an electrical outlet in your home in any way.
DON’T
leave a circuit unattended when it is turned on.
DON’T
touch the motor when it is spinning at high speed.
-14-
Examples of SHORT CIRCUITS – NEVER DO THIS!
Placing a wire block directly across the battery holder is a SHORT
CIRCUIT, indicated by a ashing LED in the battery holder.
When the switch (S1) is turned on, this large
circuit has a SHORT CIRCUIT path (as shown
by the arrows). The short circuit prevents any
other portions of the circuit from ever working.
WARNING: SHOCK HAZARD! Never connect E-Blox®Circuit Blox™ to the electrical
outlets in your home in any way!
!
NEVER DO
THIS!
!
NEVER DO
THIS!
!
NEVER DO
THIS!
-15-
Advanced Troubleshooting (adult supervision recommended)
E-Blox®is not responsible for parts damaged due to
incorrect wiring.
If you suspect you have damaged parts, you can
follow this procedure to systematically determine
which ones need replacing:
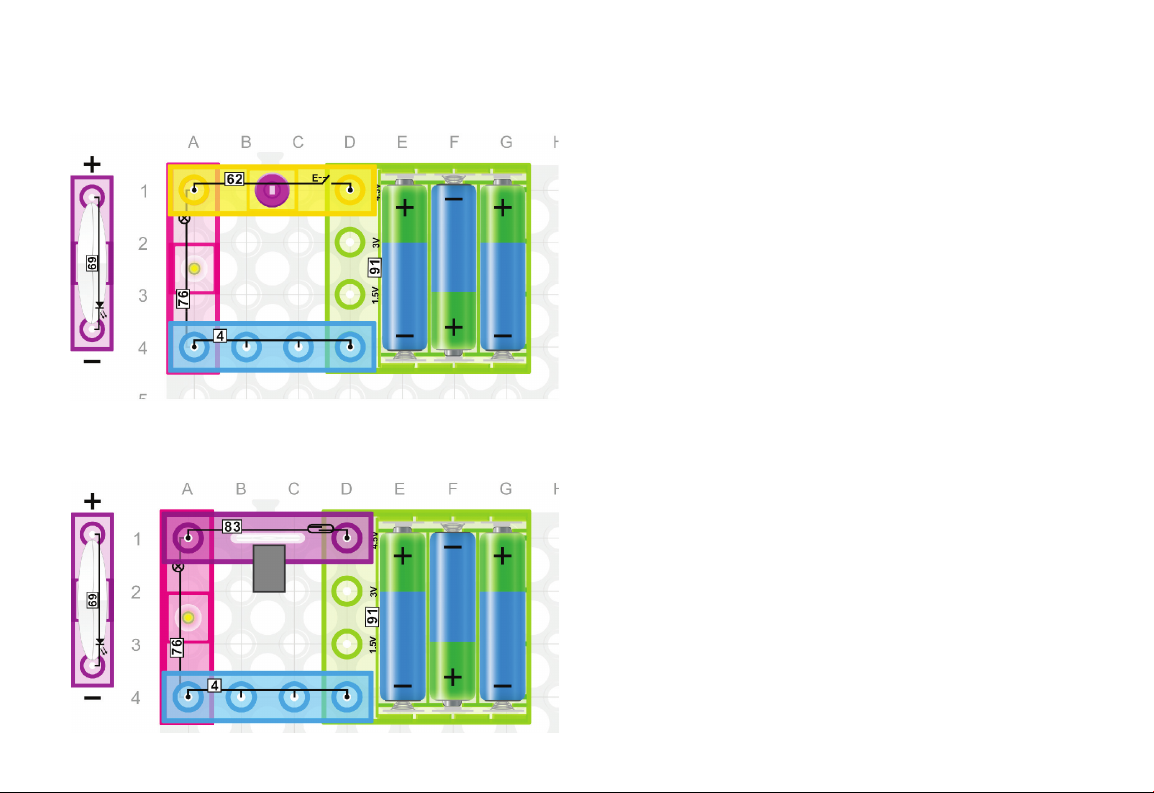
1. Lamp (76), LED (69), Battery Holder (91): Place
part directly across the battery holder as shown, it should
light. If none work, then replace
your batteries and repeat, if still
bad then the battery holder is
damaged. Make sure the LED is
installed in the correct direction.
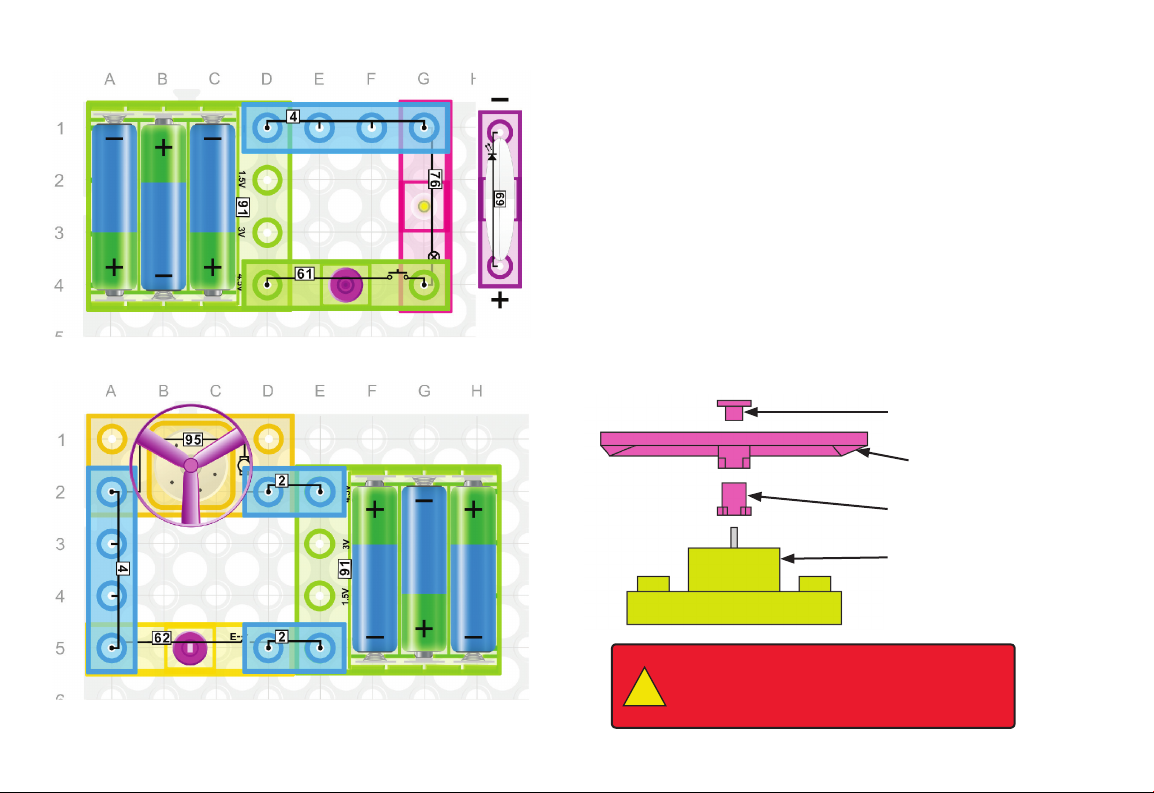
2. Wire Blocks (1-5), Spring Wire (9), and Speaker
(95): Use this mini-circuit to test each of the Wire Blocks
and Speaker (95), one at a time. The lamp (76) should light
if the part is functioning properly. Follow the steps below:
Spring Wire test - Build the circuit shown
below. The lamp (76) should light.
Wire Block tests - Insert the Wire
Blocks between the spring wire to
lamp connection shown in the gure.
The lamp should light.
Speaker test - Insert the speaker (95) between the spring
wire to lamp connection shown in the gure. The speaker will
not sound, but the lamp will light.
3. Motor (95): Place the motor across
the battery holder (95 at top) as shown; it
should spin clockwise.
4. Switch (62), Press switch (61), Reed Switch
(83), Touch Plate (80): Use this circuit to test each
switch and the touch plate (80). The lamp (76) should light.
If the lamp doesn’t light, then the switch is bad.
Switch - Up position the lamp off, Down position lamp on.
Press - Light when switch is
pressed.
Reed - When you place the
magnet on the switch the
lamp should light.
Touch Plate - Wet your nger;
when you touch the contacts, the lamp should light.
5. Three-In-One (11): Siren & Machine Gun - Build project
#49, you should hear a siren sound from the speaker.
Space Battle - Build project #52, you should hear a space
battle sound from the speaker.
Music - Build project #47, you should hear a music from the
speaker.
E-Blox®
880 Asbury Dr., Buffalo Grove, IL 60089 U.S.A.
Phone / Fax: (855) MY EBLOX (693-2569)
You may order additional / replacement parts at:
www.pickabrick.com

-16-
Project Listings
1. Closed Circuit 18
2. LED, the Check Valve Light 18
3. Magnetic Switch 18
4. Alarm Switches 18
5. The ‘Momentary’ Switch 19
6. Electrical to Mechanical Energy 19
7. Proximity Sensor 20
8. Newton’s First Law of Motion 20
9. Newton’s Second Law of Motion 21
10. Launching versus Latching Forces 21
11. Magnet-controlled Flying Saucer 21
12. Parts Connected in Series 22
13. Inertia 22
14. Parts Connected in Parallel 22
15. Electrical Current Indicators 23
16. Power ‘ON’ Indicator 23
17. Electronic Efciency 24
18. House Wiring 24
19. Ohm’s Law 25
20. Kirchhoff’s First Law 25
21. Kirchhoff’s Second Law 26
22. The Resettable Fuse 26
23. Motor Speed 27
24. Simulation of a PTC-fused Lamp 28
25. Fused Motors 28
26. Ohm’s Law Revisited 28
27. Magnet Does Two Jobs 28
28. Magnet 2-speed Fan 29
29. Speed-controlled Fan 29
30. Testing Conductors 29
31. Ship-to-Ship Morse Code 30
32. Reversing a DC Motor 30
33. Electronic ‘AND’ Gate 31
34. Electronic ‘OR’ Gate 31
35. Triple Input ‘AND’ Gates 32
36. Triple Input ‘OR’ Gate 32
37. Series-Parallel Circuit Paths 33
38. Series-Parallel Connection 2 34
39. Individually Switch-controlled Electrical Appliances 35
40.
Main Switch with Motor Press Switch-controlled Electrical Appliances
36
41. OR Gate Controlling Parallel Electrical Appliances 37
42. AND Gate Controlling Parallel Electrical Devices 38
43. Three-Person Rocket Launch 39
44. Siren 40
45. Machine Gun Sounds 41
46. Space Battle Sounds 42
47. Music (I) 43
48. Emergency Fire Siren 44
49. Touch-controlled Sound Effects 45
50. Siren Sound Effects 45
51. Magnet-controlled Alarm Siren 45
52. Space Battle Sounds 46
53. Touch-controlled Sound of Space Battle 46
54. Magnet-controlled Sounds of Space Battle 46
55. Music (II) 47
56. Reset Switch 47
57. Touch Reset 47
58. Proximity Music Or Warning 47
# Description Page # Description Page

Project Listings
59. Siren & Red Light Warning 48
60. Gun with Flash on Shot 48
61. Fire Siren & Red Light Warning 48
62. Magnet-controlled Fire Siren with Red Light Warning 48
63. Five Space Battle Sound Effects 49
64. Cycling Through Space Battle Sounds 49
65. Proximity Warning of an Alien Craft 49
66. Music with a Red Beat 50
67. Repeat Button 50
68. One Finger Disc Jockey 50
69. Proximity Music Interrupt 50
70. Distant Siren with Indicator 51
71. Battle Far, Far Away 51
72. Many Sirens in the Distance 51
73. No Touch Special Effects 51
74. In a Galaxy Far, Far Away 52
75. Control Drone in Battle 52
76. Mixing and Repeating Sound Effects 52
77. Automated Sound Effect 52
78. Soft Playing Heartbeat Music 53
79. Quiet Musical Chairs Game 53
80. Stop the Music Game 53
81. One Finger Restart 53
82. Nearby Siren 54
83. Bank Robbery Starts 54
84. More Sound Engineering Tricks 54
85. Magnet Helps Sound Effect Engineer 54
86. Engineering a Space Battle 55
87. Sound Technicians 55
88. Perfect Timing Counts 55
89. Changing Power ON Effect 55
90. Music Loudness Reduction 56
91. Parallel LED Resistance 56
92. Mr. Magnet’s Birthday 56
93. Birthday Party Disc Jockey 56
94. Flickering Candle 57
95. Silent Morse Code 57
96. Automated Code 57
97. Magnet Lights the Candle 57
98. Two-channel Monitor 58
99. Silent Search for Signals 58
100. Geiger Counter 58
101. Four Beats per Second 59
102. Taking a Rest 59
103. Touch-controlled Slow Flashing Lamp 59
104. Magnet-controlled Slow Flashing Lamp 59
105. Erratic Heartbeat 60
106. Heart Failure and Shock 60
107. Simulating CPR 60
108. The Pacemaker 61
109. Different Heartbeats 61
110. Attention Please 61
111. Proximity-controlled Sign 61
112. Normal Heartbeat 62
113. Morse Code Heartbeat 62
114. Flashing Quick Sale Sign 62
115. Flashing Alarm Light 62
# Description Page # Description Page
-17-
-18-
1. Closed Circuit
E-Blox®Circuit Blox™ uses electronic blocks that plug into a
clear plastic grid to build different circuits. These blocks have
different colors and numbers on them so that you can easily
identify them.
Build the circuit shown on the left by placing all the parts
that plug into the rst layer base. Then, assemble the parts
that connect to the secondary layer. Install three (3) “AA”
batteries (not included) into the battery holder (91). Secure
the battery cover before using it.
Pressing the switch (62) creates a closed circuit; the lamp
(76) will turn on. Press it again to open the circuit and the
lamp (76) will turn off.
2. LED, the Check Valve Light
Replace the lamp (76) with the LED (69), making sure it’s in the
correct direction. Press the switch (62) to turn it ON and OFF.
Reverse the LED (69) and repeat. Notice that the LED does not
light when in the circuit in the reverse direction, demonstrating
how LEDs only allow current to ow in one direction.
3. Magnetic Switch
Build the circuit on the left. Put the magnet (7) near the reed
switch (83) and the lamp (76) will turn on. Move the magnet (7)
away and the lamp (76) will turn off. This is a “no touch” switch!
4. Alarm Switches
Replace the lamp (76) with the LED (69), making sure it’s in
the correct direction. Put the magnet (7) near the reed switch
(83) and the LED (69) will turn on. Move the magnet (7) away
and the LED (69) will turn off. House alarms sometimes use
reed switches to detect when a door or window is open.
-19-
5. The ‘Momentary’ Switch
Build the circuit to the left. Press and hold the press switch
(61) and the lamp (76) will turn on. Release the press switch
(61) and the lamp (76) will turn off. Replace the lamp (76) with
the LED (69) making sure the LED is in the correct direction,
and repeat above directions. This type of switch is called a
‘momentary’ switch since it is only on when pressed.
6. Electrical to Mechanical Energy
Assemble the fan by following the assembly diagram below.
Build the circuit to the left. Press the switch (62) and the fan
will spin as long as the switch is pressed. Electrical energy
from the batteries (91) has been changed to mechanical
energy by the motor (95).
Fan Assembly
Motor shaft cap
Fan
Motor top
Motor
WARNING: Moving parts. Do not touch
the fan or motor during operation. Do
not lean over the motor.
!
Table of contents
Popular Game manuals by other brands

Franklin
Franklin 13008D PLAYING INSTRUCTIONS AND RULES

Beleduc
Beleduc FIND MONTY! Instruction

Hasbro
Hasbro B Daman Helio Breaker 98057/98047 instructions

Hasbro
Hasbro Pop Flyers 09015 instruction manual

HARVARD
HARVARD G03993 Assembly instructions and rules

Tiger Electronics
Tiger Electronics Star Wars Episode I Podrace Challenge Game... Instruction


Rally and Roar
Rally and Roar DB300Y19012 Assembly instructions

Carmelli
Carmelli BRISTOL NG4023 Assembly instructions

Hathaway
Hathaway Mirage BG5033 Assembly instructions

Carmelli
Carmelli NG1216 Assembly instructions

AmazonBasics
AmazonBasics B07TWSGLTX quick start guide

Kettler
Kettler Carbon 7099-000 manual