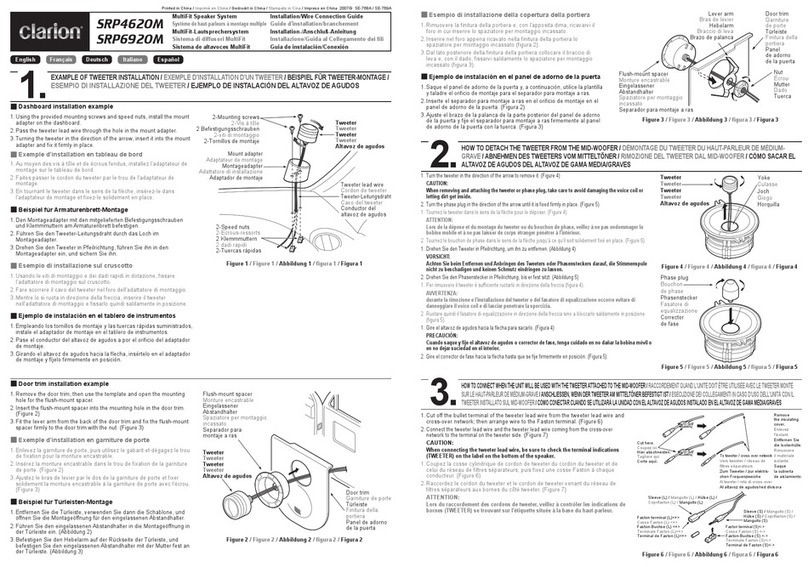
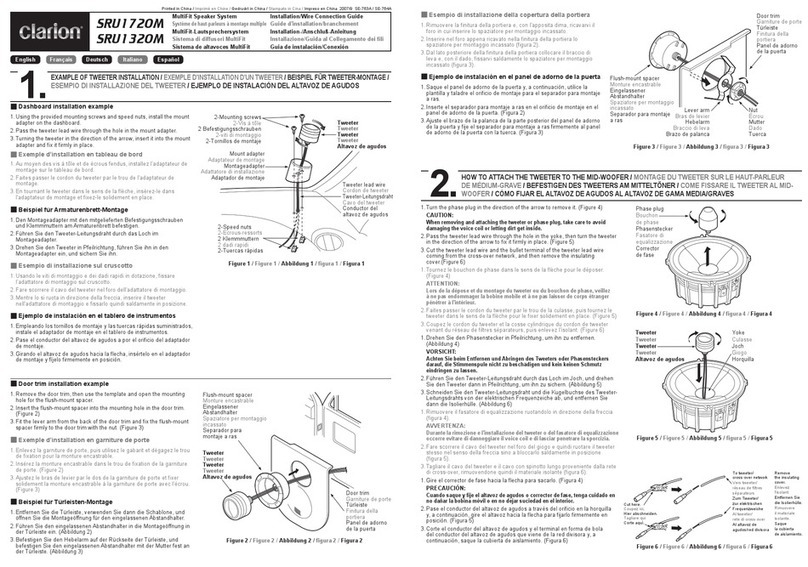
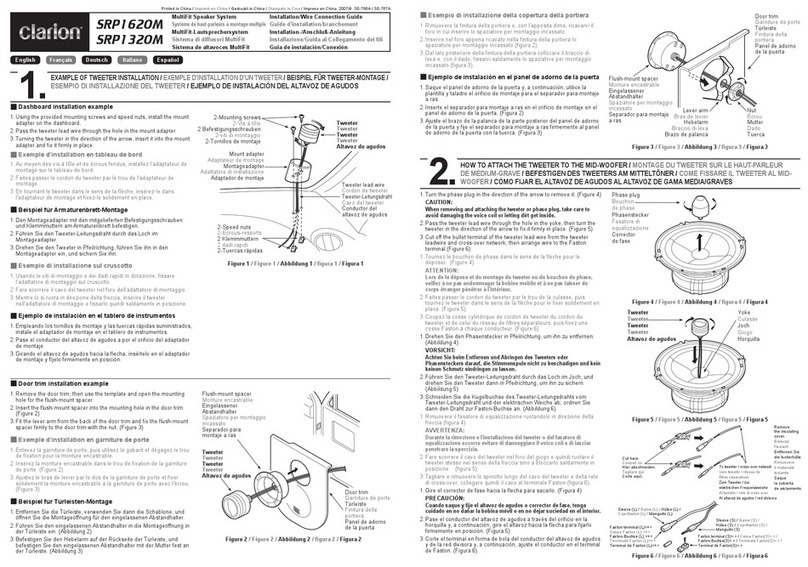
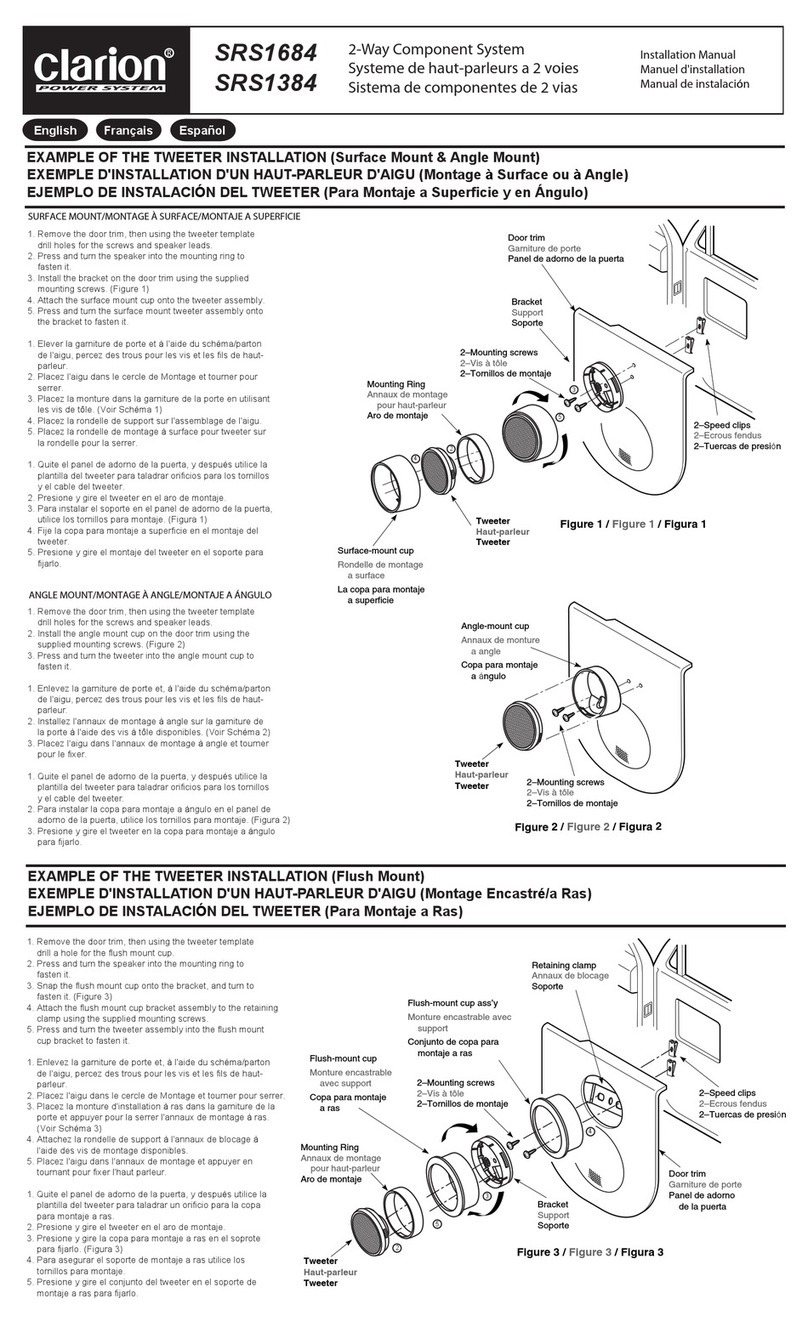
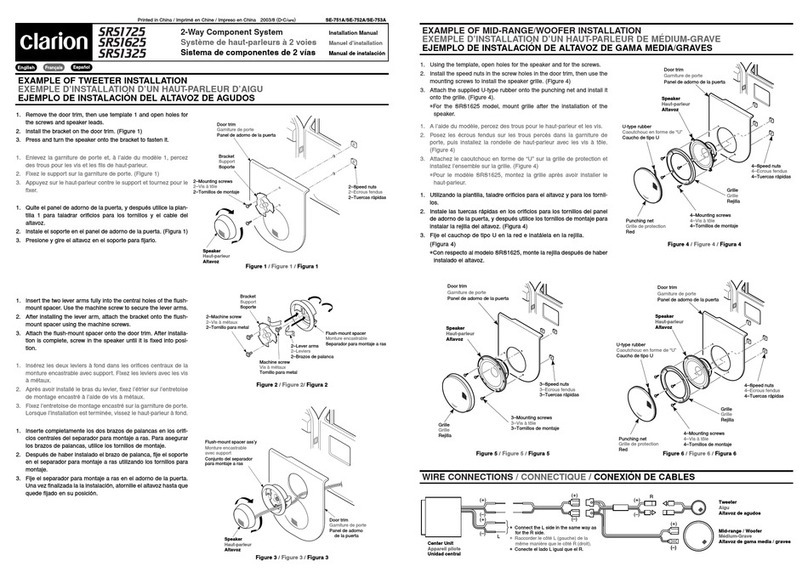
EXAMPLE OFTWEETER INSTALLATION
EXEMPLE D’INSTALLATION D’UN HAUT-PARLEUR D’AIGU
EJEMPLO DE INSTALACIÓN DEL ALTAVOZ DE AGUDOS
CONNECTION DIAGRAM/ SCHÉMA DE RACCORDEMENT/ DIAGRAMA DE CONEXIÓN
HOWTO USETHE UNITWITHTHETWEETER REMOVED
COMMENT UTILISER L’APPAREIL AVEC LE HAUT-PARLEUR D’AIGUS RETIRÉ
FORMA DE UTILIZAR LA UNIDAD CON EL ALTAVOZ DE AGUDOS EXTRAÍDO
Speaker
Haut-parleur
Altavoz
Source unit
Appareil pilote
Unidad fuente
* Connect the L side in the same way as for the R side.
* Raccorder le côtéL (gauche) de la même manière que le côtéR (droit).
* Conecte el lado L igual que el R.
Tweeter interconnecting cord
Cordon de raccordement du tweeter
Cable interconector del altavoz de agudos
Tweeter
Tweeter
Altavoz de agudos
(–)
(+)
(–)
(+)
(–)
(+)L
Door trim
Garniture de porte
Panel de adorno de la puerta
Grille
Grille
Rejilla
2–mounting screws
2–vis àtôle
2–tornillos de montaje
Speaker
Haut-parleur
Altavoz
2-speed nuts
2-ecrous fendus
2-tuercas rápidas
1.Remove the door trim, then use template 1 and open holes for the screws
and speaker leads.
2. Install the grille on the door trim.
3. Press and turn the speaker onto the grille to fasten it.
1. Enlevez la gamiture de parte et,àl’aide du modèle 1, percez des trous
pour les vis et les fils de haut-parleur.
2. Fixez la monture sur la garniturre de porte.
3. Appuyez le haut-parleur contre la monture et tournez pour le fixer.
1. Quite el panel de adorno de la puerta, y después utilice la plantilla 1 para
taladrar orificios para los tornillos y el cable del altavoz.
2. Instale la rejilla en el panel de adorno dde la puerta.
3. Presione y gire el altavoz en la rejilla para fijarlo.
2.As shown in the figure, press the tweeter in the
direction of the aroow to remove it.
2.Comme le montre l’illustration,poussez le haut-
parleur d’aigus dans la direction de la flèche
pour le retirer.
2.Como se muestra en la figura, presione el
altavoz de agudos en el sentido de la flecha
para extraerlo.
1.Extract the tweeter cord from woofer terminal
plate.
2.Retirez le cordon du haut-parleur d’aigus de la
plaque de connexion du haut-parleur de graves.
3.Desconecte el cable del altavoz de agudos de
la placa de terminales del mismo.
3.Connect the tweeter interconnecting cord as
shown in the figure below.
3.Raccorder lecordon de raccordement du tweeter
comme indiquéci-dessous.
3.Conecte el cable interconector del altavoz de
agudos como se muestra en la ilustración
siguiente.
4.As shown in the figure, install the protector by
pressing it in the direction of the arrow while
turning it.
4.Comme le montre l’illustration, installez le
protecteur en le poussant dans la direction de
la flèche tout en le tournant.
4.Como se muestra en la figura, instale el protector
presionándolo en el sentido de la flecha mientras
lo gira.
1.Insert the two lever arms fully into the central holes of the flush-mount spacer.
Use the machine screw to secure the lever arms.
2.Install the grille on the flash-mount spacer using the mouting screw.
3.When the grille has been installed, install the tweeter by pressing it in the
direction of the arrow while turning it.
1.Insérez complètement les deux bras de levier dans les trous centraux de
l’entretoise de montage encastré.Utilisez la vis de machine pour fixer les bras
de levier.
2.Installez la grille sur l’entretoise de montage encastréen utilisant la vis de
montage.
3.Quand la grille est installée, montez le haut-parleur d’aigus en le poussant
dans la direction de la flèche tout en le tournant.
1.Inserte los dos brazos de palanca completamente en los orificios centrales
del separador para montaje a ras. Utilice el tornillo para metal para asegurar
los brazos de palanca.
2.Instale la rejilla en el separador para montaje a ras utilizando el tornillo de
montaje.
3.Después de haber instalado la rejilla, instale el altavoz de agudos presionándolo
en el sentido de la flecha mientras lo gira.
Tweeter
Haut-parleur d'aigus
Altavoz de agudos
Spring
Ressort
Resorte
From amplifier
De l'amplificateur
Desde el amplificador
To tweeter
Au haut-parleur d'aigus
Al altavoz de agudos
Tweeter interconnecting cord
Cordon d'interconnexion du haut-parleur d'aigus
Cable de interconexión del altavoz de agudos
