Clarus TOP-131KTV User manual

1
User Manual
13.3“ Kitchen TV

2
CONTENTS
1. Safety instructions ............................................................................... 3
2. Accessories ......................................................................................... 5
3. Controls and connections .................................................................... 5
3.1 Front view/side view ..................................................................... 5
3.2 Rear View .................................................................................... 6
3.3 Remote Control ............................................................................ 7
4. Operating Your Television...................... .......................................... 12
5. Troubleshooting............................................................................... . 20

3
1. Safety instructions
Welcome
Congratulations! You now own one of the most state of the art and technologically advanced
high definition Television products available. In order to make set-up as easy as possible, we
would like to familiarize you with the features and functions of this special product. Please
read this user‟s manual carefully and thoroughly and keep in a safe place for future reference.
We thank you for your business and hope you enjoy this product.
Caution
This symbol is intended to alert the
user to the presence of uninsurable
“dangerous Voltage” within the
Product‟s enclosure that may be of
sufficient magnitude to constitute a risk of electric
shock to persons.
This symbol is intended to alert the
user to the presence of important
operating and maintenance
(servicing) instructions in the
literature accompanying the appliance.
CAUTION: TO REDUCE THE RISK OF ELECTRIC
SHOCK, DO NOT REMOVE COVER (OR
BACK), NO USER-SERVICEABLE PARTS
INSIDE.REFER SERVICING TO
QUALIFIED SERVICE PERSONNEL
CAUTION
-TO PREVENT DAIMAGE WHICH MAY
RESULT IN FIRE OR SHOCK HAZARD
-DO NOT EXPOSE THIS APPLIANCE TO RAIN
OR MOISTURE.
-SHOCK HAZARD DO NOT OPEN
CAUTION
These servicing instructions are use by qualified
service personnel only. To reduce the risk of
electric shock, do not perform any servicing
other than that contained in the operating
instruction unless you are qualified to do so.
CAUTION
The stand intended for use only with this TV.
Use with other apparatus is capable of resulting
in instability causing possible injury.
WARNING
-Apparatus shall not be exposed to dripping or splashing and no objects filled with liquids, such as vases,
shall be placed on the apparatus.
-This is Class B product. In a domestic environment this product may cause radio interference in which
case the user may be required to take adequate measures.
To reduce the risk of fire and electric shock, do not expose this product to rain moisture.
RISK OF ELECTRIC SHOCK
DO NOT OPEN

4
Always be careful when using your television. To reduce the risk of fire, electrical
shocks, and other injuries, keep these safety precautions in mind when installing,
using, and maintaining your Television.
Read these instructions and keep them in a safe place.
Heed all warnings.
Follow all instructions.
Install it in accordance with the manufacturer‟s instructions.
Protect the power cord from being walked on or pinched particularly at plugs,
convenience receptacles, and the point where they exit from the Television.
Only use the attachments/accessories specified by the manufacturer.
Unplug this Television during lightning storms or when unused for long periods of
time.
Refer all servicing to qualified service personnel. Servicing is required when the
Television has been damaged in any way, such as power supply cord or plug is
damaged, does not operate normally, or has been dropped.
Clean only with a lint free cloth.
Important Safety Precautions

5
2. Accessories
User Manual Remote Control Power adapter
3. Controls and connections
3.1 Front view/side view

6
3.2 Rear View
1. HDMI Input Jack
HDMI Cable input.
2. Power adapter DC12V
3. RC-LINK
Connect to the Home automation.
4. IR IN
5. AV Input Jacks
Connection for AV signal input in
composite mode.
6. CI Card Slot
Use to insert the CI card.
7. IR OUT
Connecting for headphone.
8. Antenna Input Jack
Connect to external antenna to receive
the ATV/DTV program in ATV/DTV
mode.
9. Headphone Jack
Input connection for headphones.
10. USB Host
Input connection for USB Device.

7
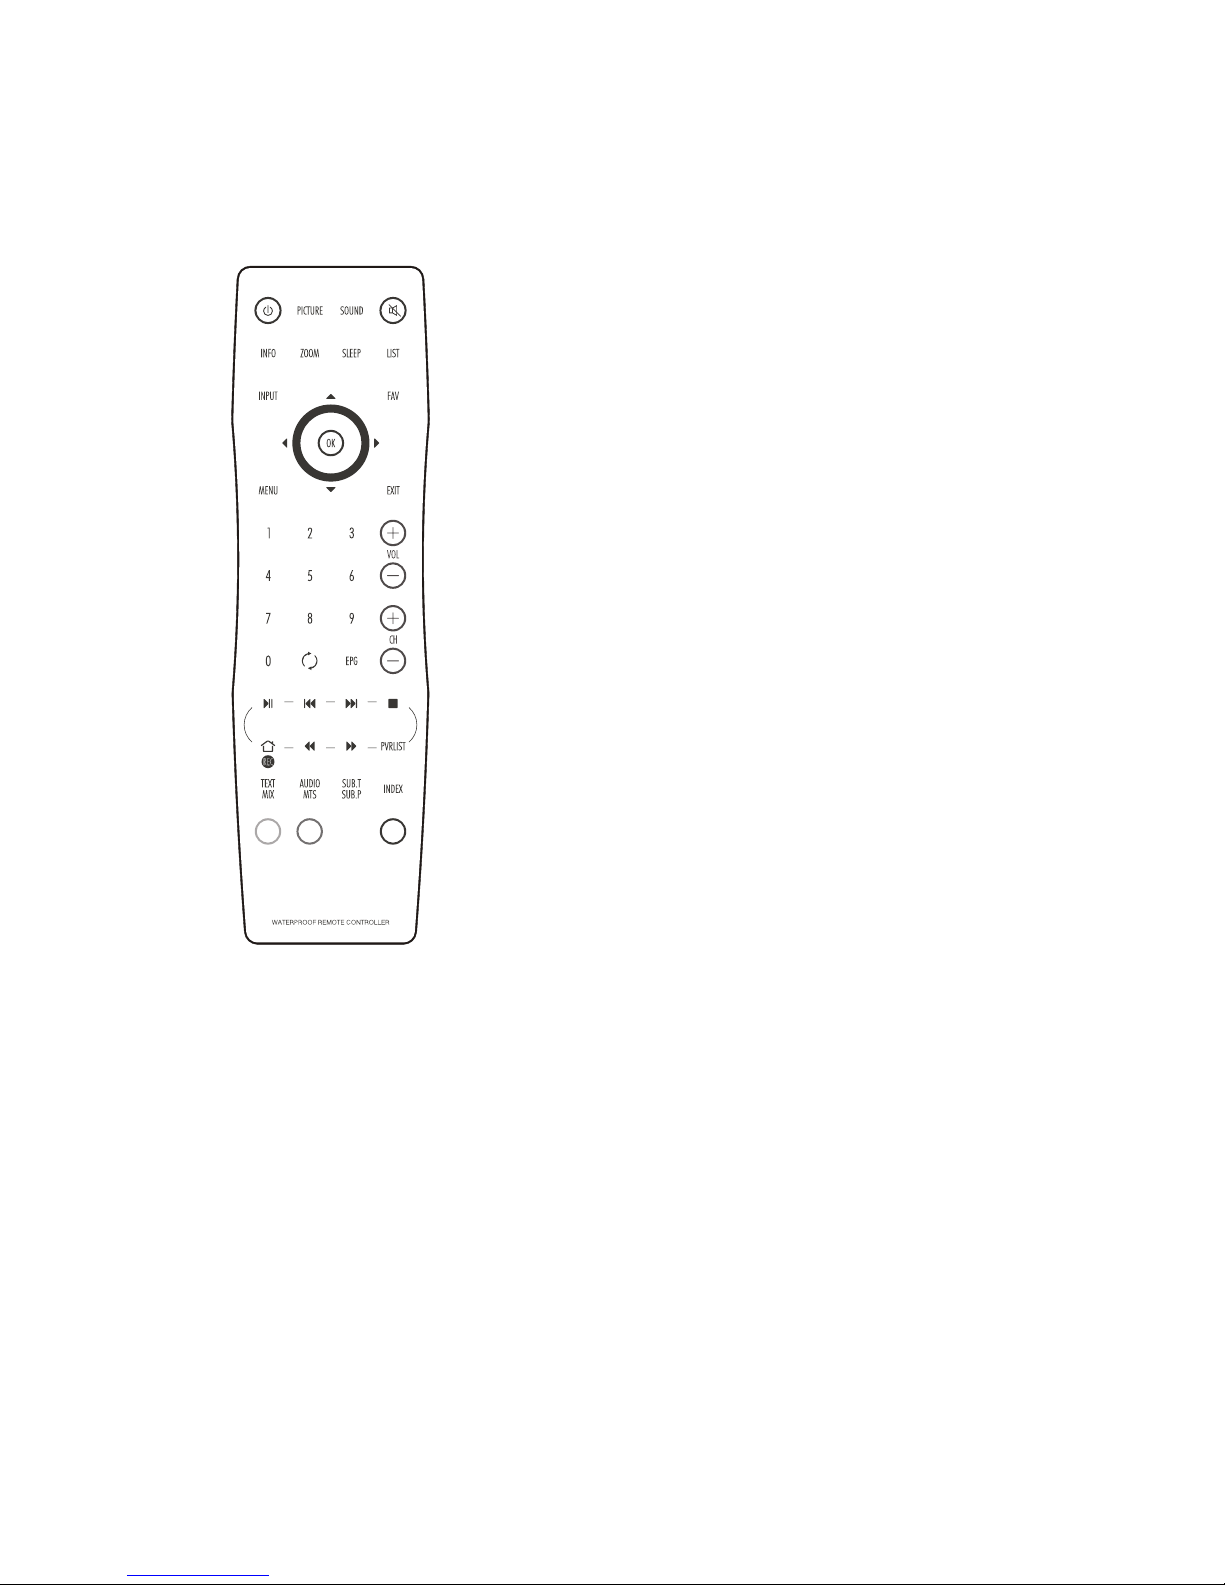
3.3 Remote Control
POWER button – Turns the TV on and off.
INPUT button – Displays the Input Source menu
and allows source selection: DTV, ATV, HDMI, etc.
SLEEP button – Displays/sets the sleep timer.
MUTE button – Turns the sound on and off.
ZOOM button – Switches between picture formats:
Auto, 16:9, 4:3, Zoom1, Zoom2
INFO button – Displays information of the current channel.
SOUND button – Switches between different sound modes:
Standard, Movie, Music, Speech, User
PICTURE button – Switches between different picture
modes: Standard, Optimal, Vivid, Soft, User
MENU button – Displays or closes the menus
EXIT button – Closes all on-screen menus and lists
LIST button – Displays or closes the channel list.
FAV button – Displays or closes the favourite
programme list.
Up button – Menu and EPG navigation
Down button – Menu and EPG navigation
Left button – Menu and EPG navigation
8
Right button – Menu and EPG navigation
OK button – Accepts menu selections or displays the
programme list.
EPG button – Displays the Electronic Programme
Guide
NUMBER buttons –
Input programme numbers
Back button –
switches between last and current
programmes
USB PLAY buttons – Control the medias in the USB
programme list.
VOL (Volume up/down) buttons –
Adjust the volume
CH (Programme up/down) buttons –
Selects next or
previous programme

9
Preparation of remote control
Before the waterproof remote control can be used the insulating plastic film must be
removed from beneath the battery.
Place the remote control face down on a horizontal flat surface and use the opener to
release the battery compartment cover by rotating it in an anti-clockwise direction. Set the
battery cover and opener to one side.
Rest one finger lightly on the battery and pull the printed tag to ease the insulating film from
underneath the battery. Try to avoid touching the black O-ring as it is coated in light grease.
Replace the battery cover and lock it back in place using the opener.

12
Operating Your Television
Basic Operations
Turning Your TV On and Off
TURN ON TV
1. Connect to power with the main power cable. The TV will enter STANDBY mode and the
LED indicator light will be red.
2. From the STANDBY mode, use the POWER button either on the main unit or on the
remote, to turn the television on.
TURN OFF TV
From ON mode, use the POWER button either on the main unit or on the remote control to
turn the television to STANDBY mode.
Picture Mode Setup Wizard
If using your TV for the first time, select the desired picture mode as shown below.
Home Mode (Energy Saving): The energy saving mode will show a darker picture as it
requires less energy power consumption, as required by the ENERGY STAR®qualification.
Standard Mode: Shows the picture more brightly as it requires more energy to operate
volume, sound mode, picture mode and change source.
The power consumption may exceed the requirements of the ENERGY STAR®qualification.
ENERGY STAR® is a set of power saving guidelines issued by the U.S. Environmental
Protection Agency (EPA).
ENERGY STAR® is a joint program of the U.S. Environmental Protection Agency and the U.S.
Department of Energy helping us all save money and protect the environment through
energy efficient products and practices.
The ON-MODE power under Home Mode should be less than 27W.
The SLEEP-MODE Power should be less than 0.5W.

13
Operating Your Television
Press “Yes” to confirm.
Note: If you wish to change between Home Mode (energy saving) and Standard Mode later,
this can be changed under the Display mode in the Setup menu.
Natural Resources Canada’s (NRCan’s) Office of Energy Efficiency (OEE) promotes the
international ENERGY STAR® symbol in Canada and monitors its use.
ENERGY STAR® is the international symbol of premium energy efficiency. Products
that display the ENERGY STAR® symbol have been tested according to prescribed
procedures and have been found to meet or exceed higher energy efficiency levels without
compromising performance.
Select Your Onscreen Language Preference
Note: If using your TV for the first time, select the onscreen language which will be used to
display menus and information boxes.
•Press the / button to select Menu Language.
•Press the / button to select the desired language.
•When satisfied with the selection, press MENU to exit.
Volume Adjustment
1. Press VOL +/- to adjust the volume
2. To turn the sound off, press MUTE . Press again to resume sound.

14
Operating Your Television
Navigating the Onscreen Display
• Press the MENU button to display the main menu.
• Use the
/ buttons to navigate and select the available menus.
Choosing a TV Channel
1. Use the CH-/CH+ buttons on the side panel or CH+/CH- on the remote control.
• Press CH+ to increase the channel.
• Press CH- to decrease the channel.
2. Using 0-9 remote buttons
Enter the channel number with the 0-9 remote button, then press “OK” to select the channel.
For example:
1. Press 4, then press “OK” to select channel 4.
2. Press 4, press 5, then press “OK” to select channel 45.
3. Press 1, then 2, press 1, and then press “OK” to select channel 121.
15
Operating Your Television
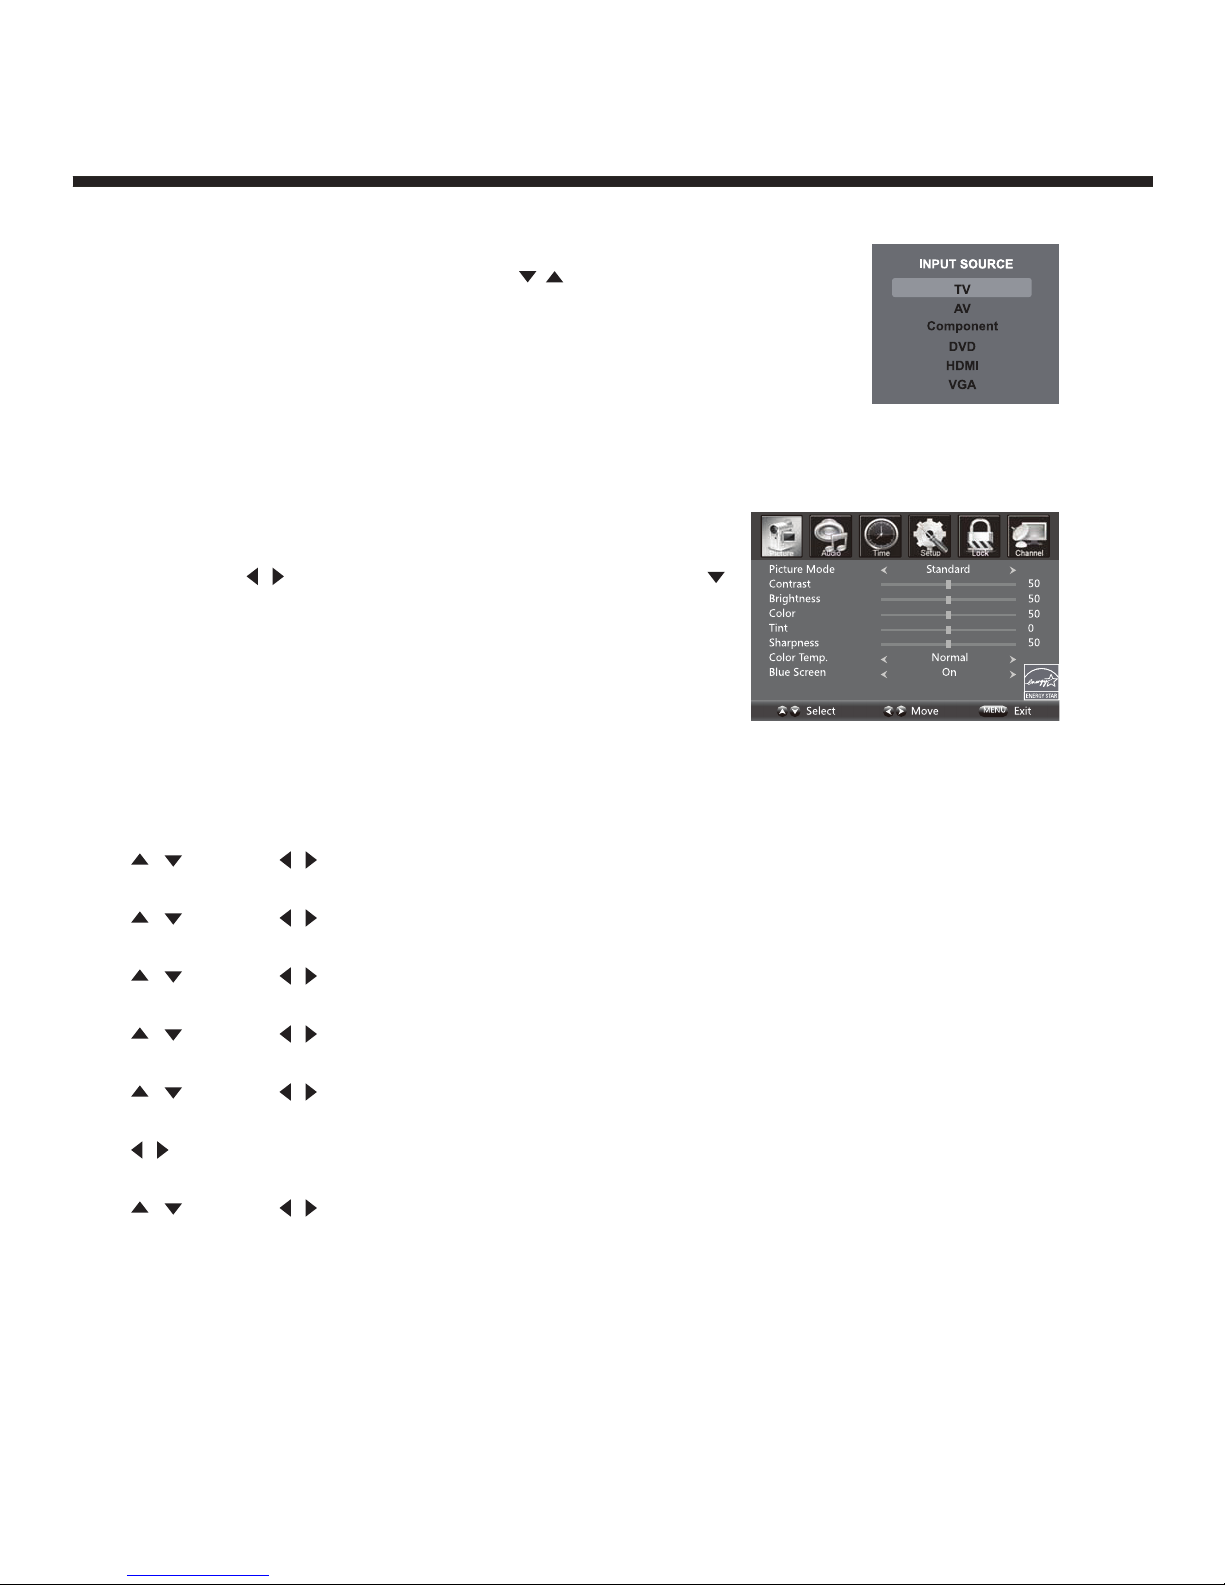
Selecting Input Source
Picture Menu Options
Press MENU on the side panel or MENU on the remote
control, then use
/ to move within the PICTURE menu. Press
or OK to enter (see picture).
Picture Mode
Select the type of picture which best corresponds to your viewing preferences by selecting Picture Mode in
the PICTURE menu, or enter picture mode directly by pressing the P.MODE button on the remote control.
Contrast
Press / then use
/ to adjust the contrast of the picture.
Brightness
Press / then use
/ to adjust the brightness of the picture.
Colour
Press / then use
/ to adjust the colour of the picture.
Tint
Press / then use
/ to adjust the tint of the picture.
Sharpness
Press / then use
/ to adjust the sharpness of the picture.
Colour Temperature
Press
/ to select mode: Cool, Warm, Normal.
Blue Screen
Press / then use
/ to select On or Off.
/
Display the input screen menu by pressing SOURCE on the remote control
or SOURCE on the side of the TV. Press the button to select your choice,
then press OK to enter using remote, or press SOURCE or VOL+ directly on
the side of the TV.

16
Operating Your Television
Audio Menu Options
Press MENU on the side panel or on the
remote control then use
/ to select the AUDIO
menu. Press or OK to enter (see picture).
Sound mode
Press / then use
/ to select User, Standard, Music
and Movie.
Bass
Press / then use
/ increase or decrease the level of the lower-pitched sounds.
Treble
Press / then use
/ to increase or decrease the level of higher-pitched sounds.
Balance
Press / then use
/ to adjust the audio output between left and right speakers.
Surround
Press
/ to switch Surround On or Off.
AVC (Auto Volume Control)
Press
/ to switch auto volume control On or Off. This function allows volume to be controlled
automatically.
SPDIF Type
Press
/ to select between PCM or RAW.
Audio Language
Press
/ to select the audio language from: English, French and Spanish.
Time Menu Options
Press MENU on the side panel or on the remote control
then use
/ to select the TIME menu. Press or OK to enter
(see picture).
Sleep Timer
Press / then use
/ to set the sleep timer from the following
selections:
Off, 5 min, 10 min, 15 min, 30 min, 45 min, 60 min, 90 min, 120 min, 180 min or 240 min.
Time Zone
Press / then use
/ to set up the time zone:
Pacific, Alaska, Hawaii, Eastern, Atlantic, Newfoundland, Central or Mountain.
Daylight Saving Time
Press / then use
/ to set up the daylight saving time On or Off.

17
Operating Your Television
Setup Menu Options
Press MENU on the side panel or MENU on the remote control and then use
/ to select the SETUP
menu. Press or OK to enter (see picture).
Menu Language
Press / then use
/ to select menu language for either
English,
Français
or Español.
Transparency
Press / then use
/ to turn On or Off the transparency function.
Zoom Mode
Press / then use
/ to select the zoom to either Wide, Zoom,
Just Scan, Cinema or Normal.
Noise Reduction
Press / then use
/ to adjust the noise reduction mode to either
Weak, Middle, Strong or Off.
Advanced
Press / then use
/ to select the advanced options between
H-POS, V-POS, Clock, Phase, Auto (only used in VGA source mode).
H-POS
Press / then use
/ to adjust the H-POS of the picture.
V-POS
Press / then use
/ to adjust the V-POS of the picture.
Clock
Press / then use
/ to adjust the Clock of the picture.
Phase
Press / then use
/ to adjust the Phase of the picture.
Auto
Press / then use to adjust the Auto of the picture.
Closed Caption
Press / to navigate and highlight the closed caption item, then press
the button to enter into the following menu.
CC Mode
Select the CC mode options from: On, Off, or CC on Mute.
Basic Selection
Select the basic selection from: CC1, CC2 CC3, CC4, Text1 Text2,
Text3, Text4.
Advanced Selection
Press / then use
/ to select the advanced selection from:
Service1, Service2, Service3, Service4, Service5, or Service6.
Option
Press / then use to enter into the following menu.
Press / then
/ to select.
DLC
Press / then use
/ to turn dynamic luminance control On or Off.
Display Mode
Press / then use
/ to select Home Mode or Standard Mode.
Restore Default
Select “Restore Default”, press OK and it will display “Are you sure?”
Select “Yes” to select the factory default settings.

18
Operating Your Television
Lock Menu Options
Press Menu on the side panel or MENU on the remote control, then use
/ to select the LOCK menu.
Press d button or OK to enter.
Use the button to go to the “Enter Password” selection and use the numeric buttons to input a 4-digit
password. The screen will display the sub-menu. After setting, press the Menu button to exit.
NOTE: The factory password is 0000.
Change Password
Press the button to select the “Enter New Password” selection and then
press the button to enter into the following menu. Input the 4-digit
password once and again to confirm.
System Lock
Allows you to turn On or Off the system lock. If you turn off the system
lock, then the following options (US, Canada, RRT Setting and Reset
RRT) are unavailable for use.
US
Use the button to highlight the “US” selection, then press the button to enter into the menu.
Canada
Use the button to highlight the “Canada” selection, then press the
button to enter into the following menu.
Canada English
Use
/ buttons to select among: E, C, C8+, G, PG, 14+ and 18+.
Canada French
Use
/ buttons to select among: E, G, 8ans+, 13ans+, 16ans+
et 18ans+.
RRT Setting
Rating Region Table setting. (Note: This option is valid in DTV.)
Reset RRT
Allows you to reset the RRT setting.
4-digit password
19
Operating Your Television
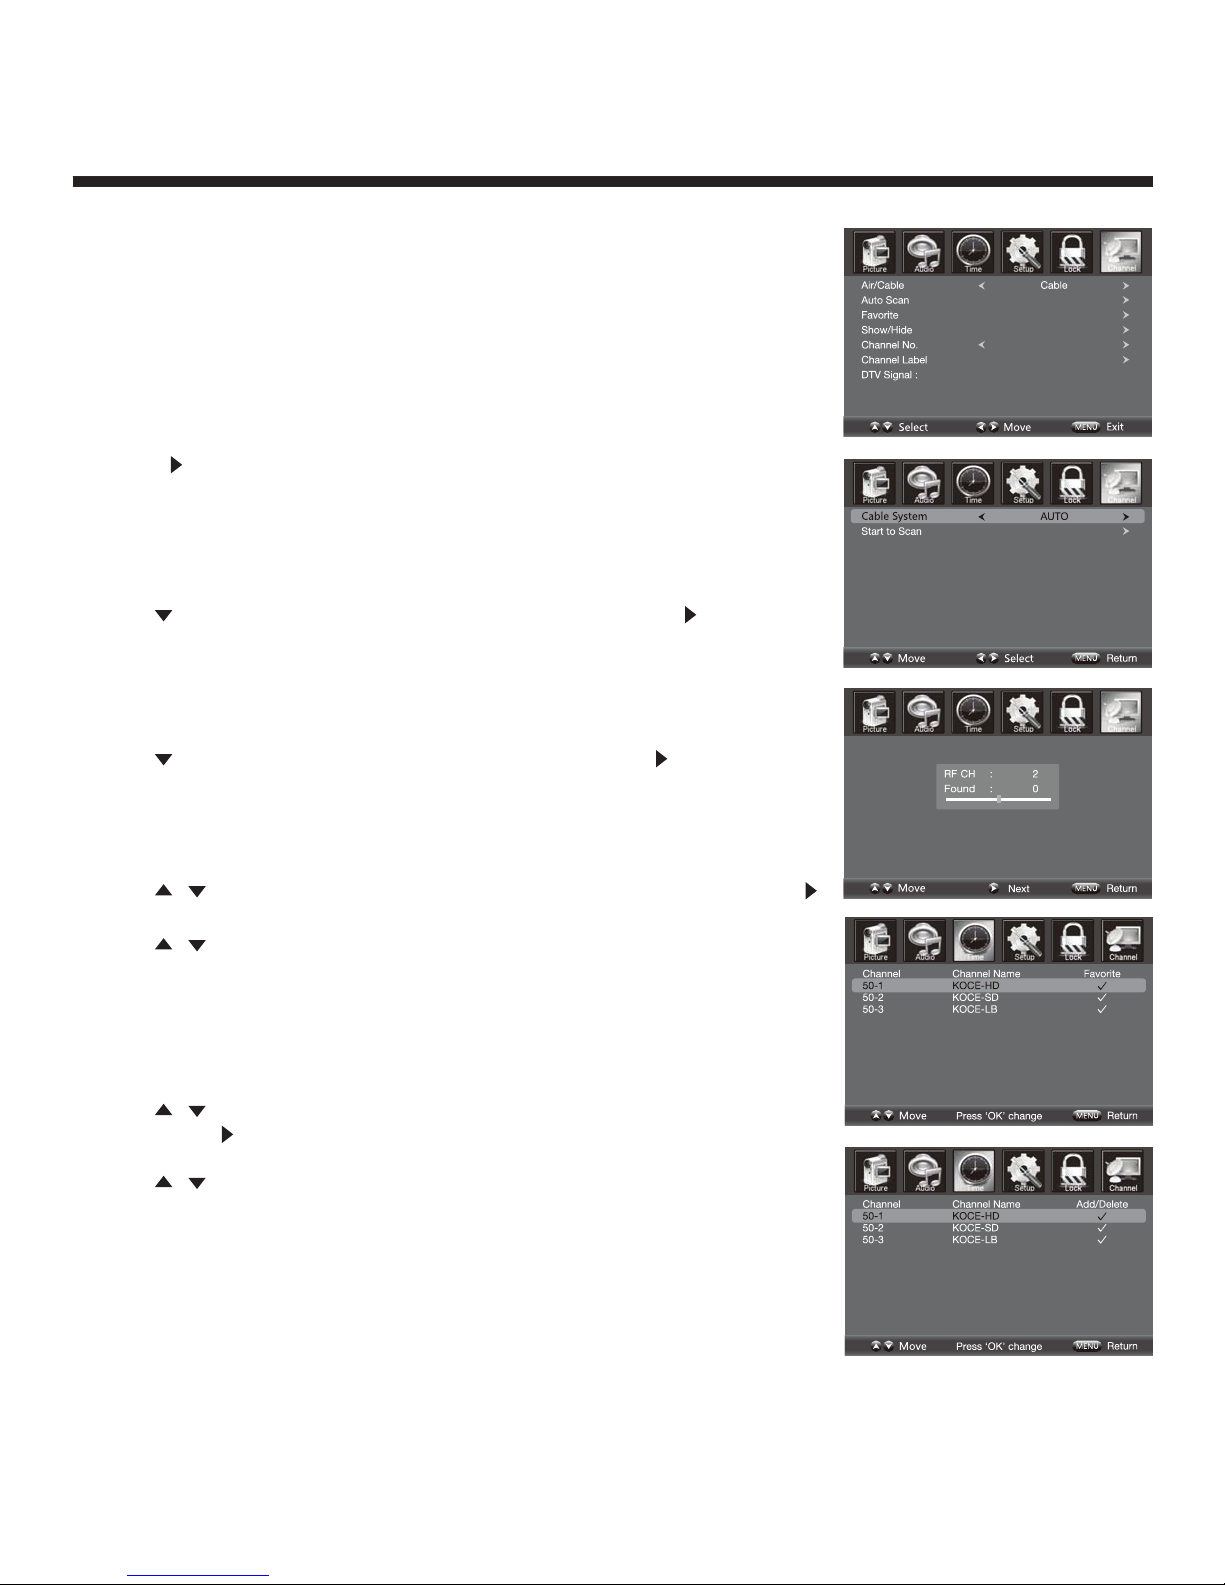
Channel Menu Options
Air/Cable
Allows you to select the input signal between Air and Cable.
If you select “Air” as the input signal in the “Antenna” option
press the button to search the channels automatically.
The receiver channels will be stored automatically.
When searching channels, press MENU to stop.
If you select “Cable” as the input signal in the “Antenna” option, this
allows you to select the Cable System between: AUTO, STD, IRC and HRC.
Use the button to highlight “Start to Scan”, then press the button
to search the channels automatically. The receivable channels will be
stored automatically.
When searching channels, press MENU to stop.
Auto Scan
Use the button to highlight “Auto Scan”, then press the button to enter
into the menu.
Favourite
Allows you to add any channels that you flag to your favourite channel list.
Use the / button to highlight the “Favourite” channel, then press the
button to enter the menu.
Use the / button to highlight the desired channel, then press the OK
button to add or remove the highlighted channel as a favourite.
Show/Hide
Allows you to show or hide the channels.
Use the / button to highlight the “Show/Hide” item,
then press the button to enter the menu.
Use the / button to highlight the desired item, then
press the OK button to show or hide the highlighted channel.
Channel No.
Displays the number of the current channel.
Channel Label
Displays the label of the current channel.
DTV Signal
Displays the quality of the current DTV signal.

5. Troubleshooting
Carry out the problem-solving measures described in the following section before contacting
customer support. Turn off the device immediately as soon as you suspect a malfunction and
unplug the power plug. Do not attempt to repair the device yourself.
SYMPTOM
CHECK ITEM
LCD screen stays
Dark.
Make sure the unit is turned on and the connections are correct.
Make sure the power adapter is correctly connected.
There is no sound
Make sure the system connection is correct.
Mack sure the power of speaker is turned on.
There is no picture or
picture move up and
down unsteady.
Check if the connections with the external AV signal source are
correct.
Correctly set the items in the picture menu.
Check if the video type input signal is not corresponding to the
unit.
Make sure the unit is turned on and in correct video type.
The remote control does
not work.
Make sure there are no obstructions between the remote control
and the unit.
Make sure the remote control is pointing at the unit.
Make sure the batteries are inserted or the polarity is correct.
Make sure the batteries are not weak.
Replace the weak battery.
Other Notes:
Static or other external interfere may cause the player to behave abnormally. In this occurs,
unplug the power-supply cord from the outlet and plug it in again to reset the player. If the
problems persist, then please disconnect the power and consult a qualified technician.
20
Table of contents


