Connectland X-Rev Storage Center User manual

3
3.
.5
5”
”
U
US
SB
B/
/S
SA
AT
TA
A
C
CO
OM
MB
BO
O
E
EN
NC
CL
LO
OS
SU
UR
RE
E
(
(F
FO
OR
R
S
SA
AT
TA
A
H
HA
AR
RD
D
D
DR
RI
IV
VE
E)
)
U
US
SE
ER
R
M
MA
AN
NU
UA
AL
L

INDEX
Trademarks ----------------------------------------------------------------------- 3
Introductions --------------------------------------------------------------------- 3
System requirements ------------------------------------------------------------ 3
Package contents ----------------------------------------------------------------- 3
Your X-Rev Storage Center Outline ----------------------------------------- 4
Getting Started ------------------------------------------------------------------- 4
a. Install 3.5 inch SATA hard drive -------------------------------------------------- 3
b. Plugging in the X-Rev Storage Center -------------------------------------------- 7
Button Manager Utility Installation ----------------------------------------- 8
Button Manager Utility Description ----------------------------------------- 12
a. User Interface Description -------------------------------------------------------- 12
b. Adding A New Task -------------------------------------------------------------------------- 13
c. Use Button Backup Function -------------------------------------------------------------- 16
Indicator description ------------------------------------------------------------ 16
Notice for user application ----------------------------------------------------- 16
Product specification ------------------------------------------------------------ 17

Trademarks
All names and products mentioned below are registered trademarks of their respective companies.
Introductions
Thank you for purchasing our 3.5” X-Rev Storage Center enclosure. This guide contains information
regarding the product features and procedures of installation of this unit. Please read this guide
thoroughly before you being its installation and operation and retain it for future references.
The 3.5” X-Rev Storage Center enclosure allows you to install a high-speed SATA hard drive and
connect to a computer via USB2.0 or the new eSATA interfaces. The X-Rev Storage Center offers not
only for a standalone backup storage disk, but is also integrated with a USB 2.0 hub and a multimedia
card reader. This provides an easy way to access your present USB peripherals and media cards all in a
storage center.
Product features:
•Supports one 3.5” SATA interface hard disk drive installation.
•Supports one SATA hard drive application up to 500GB.
•Supports one multi card reader with 4 slots.
•Support 2 external USB 2.0 downstream ports.
•Allows you to connect to a computer via either eSATA or USB 2.0 host port.
•Supports one button file copy function.
•Supports SATA I 1.5G and SATA II with NQC hard drive.
•Plug & Play and hot swappable.
System requirements
zIBM®PC or Macintosh®computer with one free USB2.0 port or eSATA port.
zSupports Windows®98SE、Windows®ME、Windows®2000、Windows®XP、Windows®Vista.
Mac™OS 9.x and 10.0.X or later.
z3.5” SATA hard drive.
Package contents
Please check that the following items are included in the package. If any items are missing or damaged,
please return the whole package to your local dealer.
zX-Rev Storage Center (without hard drive)
zUSB cable
zSoftware Driver and manual disc
zPower adapter
zAccessories pack

Your X-Rev Storage Center Outline
Getting Started
Before using the X-Rev Storage Center Enclosure…
)Electrostatic discharge can damage electronic components. Be sure you are properly grounded before the
beginning of any procedure.You can touch the metal parts of a computer’s chassis or power supply unit
to discharge any static charge that may have accumulated inside your body.
)To avoid damage to your hard drive, please handle with much care. Do not shake or drop your hard drive.
)All electronic components have a limited lifetime. Electronic components may be damage by a sudden
electrostatic shock or personal misuse or negligence. Please always double backup your data in other
media formats such as CD-R or DVD-R to ensure your own data protection.
a. Install 3.5 inch SATAhard drive
1. Remove the top four screws in X-Rev to remove the aluminum cover.

2. Remove the four screws that fix the drive carrier in place and then take the drive carrier out.
3. Attach a SATA hard drive to the drive carrier with the four screws supplied in the package.
4. Place the carrier with the hard drive into the housing (Step 1) and connect the hard drive via the
SATA connector with the fitting of the carrier to the housing (Step 2).
Step 1 Place down the carrier with the hard drive locked in. It should be placed in the position
that is further away from the SATA connector. See the diagram below that the sliding hole
on the carrier should fit accurately into the leading boss on the housing.
Step 2 Slide and then gently push the carrier along the leading tracks with the hard drive towards
the SATA connector for it to connect. Do not use excessive force. Check for the accuracy
of placement of carrier on to housing and mounting of hard drive on to the carrier if the
SATA connection is not smooth and accurate.

5. Install that previously removed screws to secure the drive carrier.
6. Reinstall the X-Rev aluminum cover and tighten by previously removed screws.
7. Stand the X-Rev Storage Center in an upright position. Upon cable connection it is ready for
use.

b. Plugging in the X-Rev Storage Center
1. Plug in the dual voltage power adapter:
Make sure the X-Rev Storage Center is turned OFF. Connect the DC plug end of power
adapter to 12V/5V DC-IN DIN jack on the back of the Storage Center,connect the other end
into an power outlet or power strip.
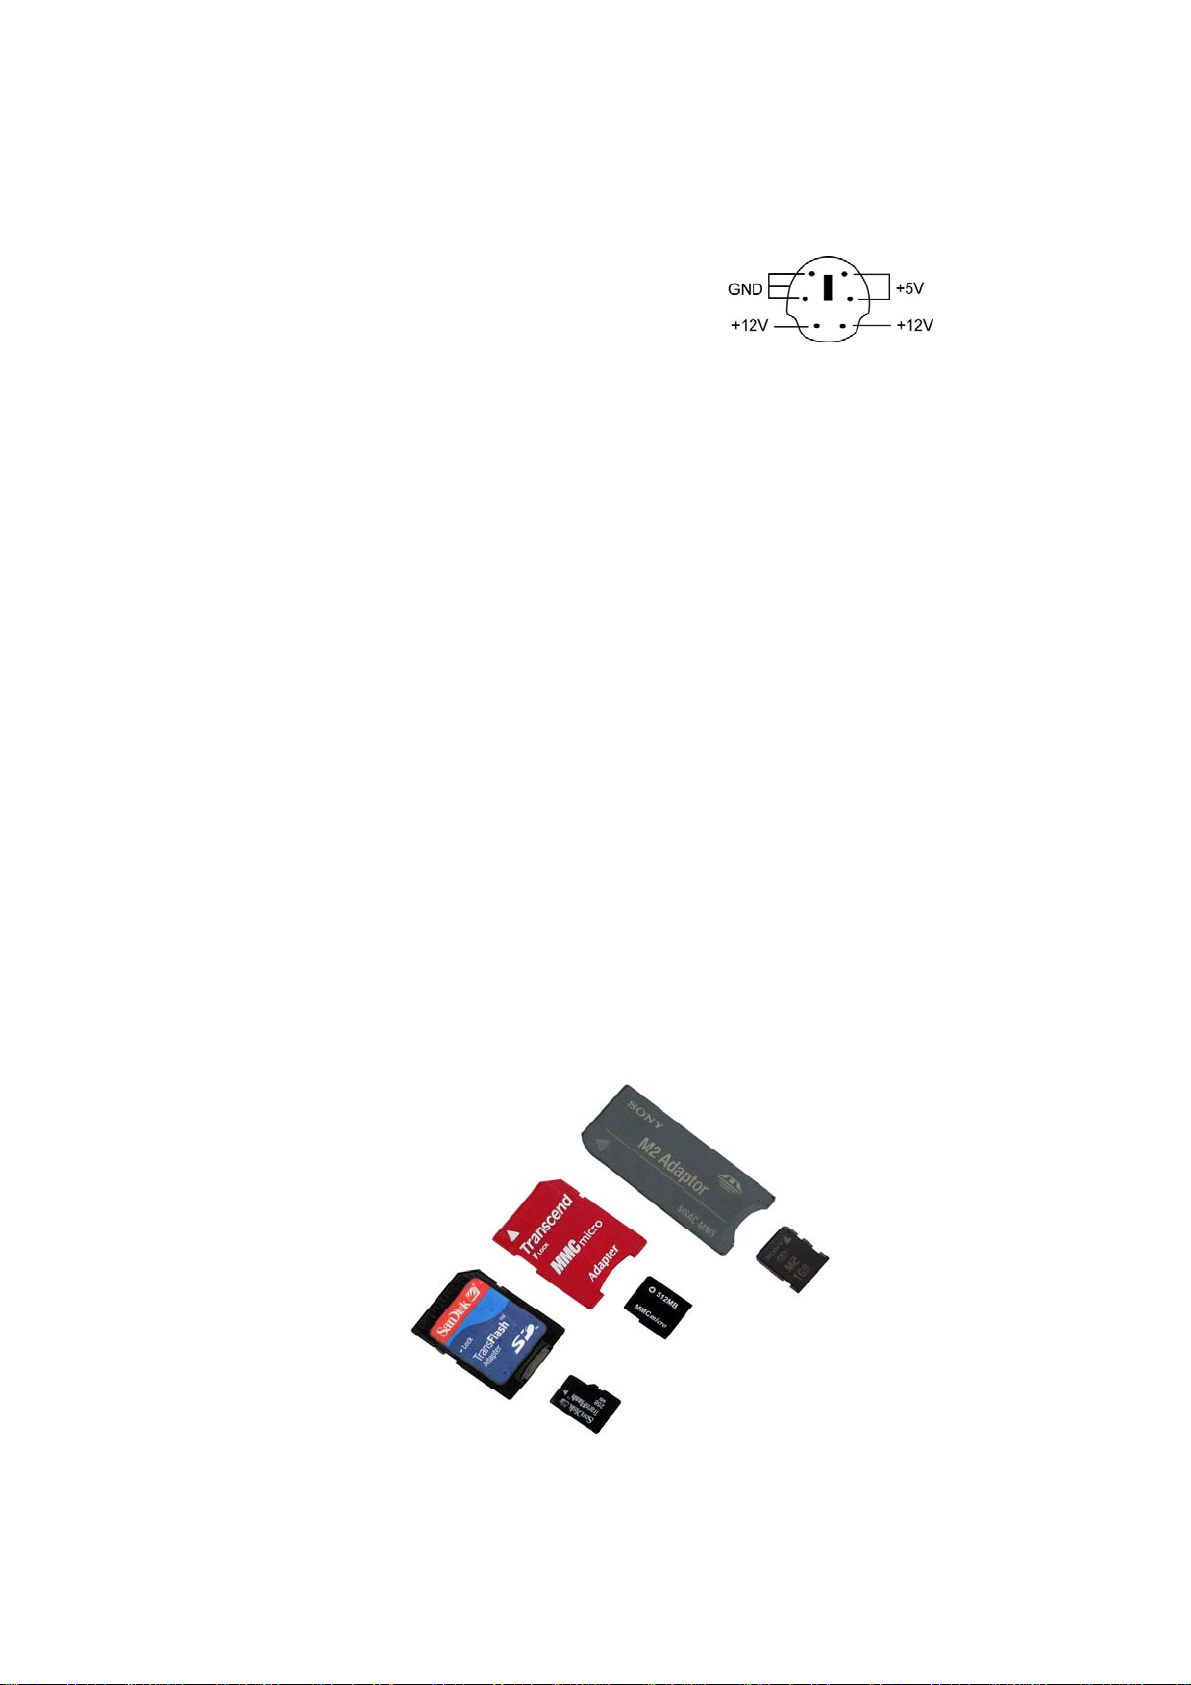
Externalpoweradapterpinoutspecification:
2. Plug in the USB cable:
The X-Rev Storage Center includes an USB hub to enable the use for a hard drive, a media
card reader and two external USB ports. The USB hub and card reader will only operate
through the USB connection and will be disabled if only the eSATA connection is present.
3. Plug in high speed ESATA port:
The X-Rev Storage Center supports USB2.0 and high-speed eSATA interfaces for host
connectivity. When both are connected, the eSATA interface will have priority in accessing the
hard drive to enhance the speed of the hard drive access.
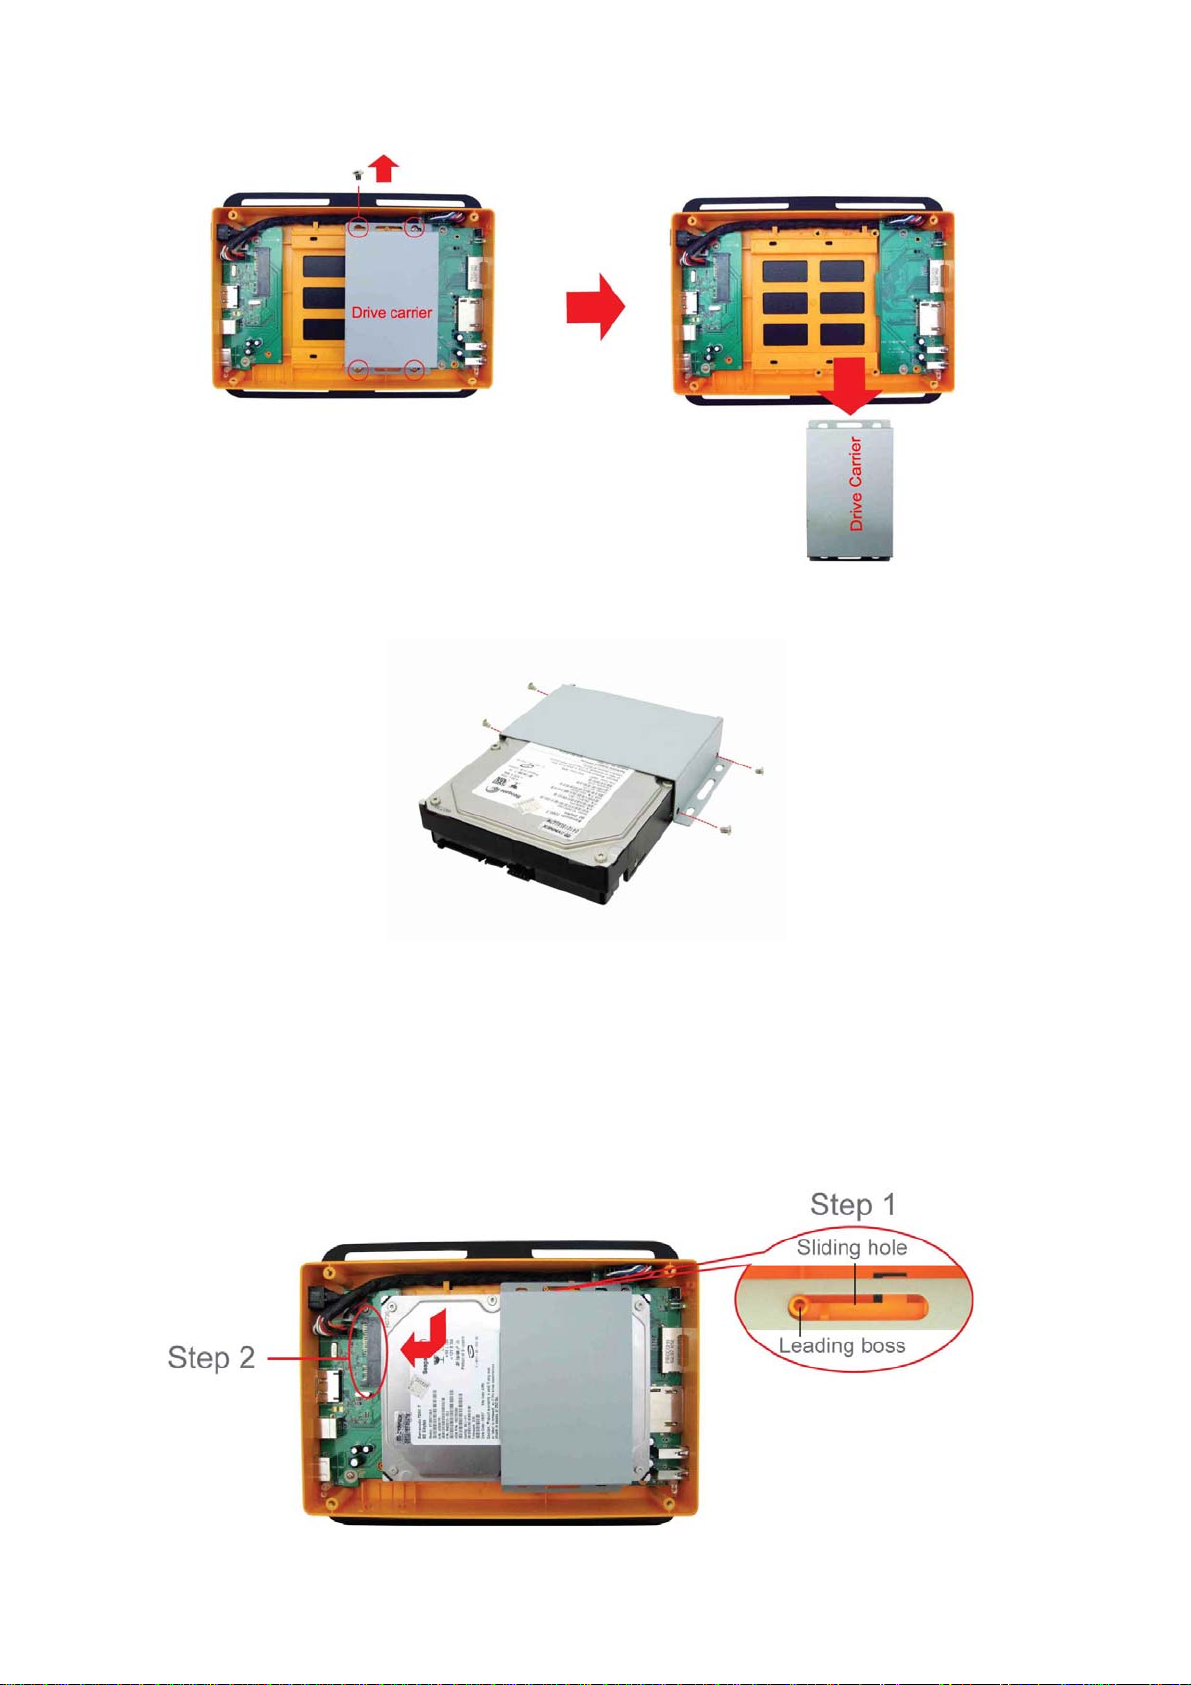
4. Media Card Application:
The X-Rev Storage Center provides four media slots in front side for different types of media
memory cards application. You must load each media card in the correct slot as indicated on
the printing of the front panel. Do not attempt to insert the cards in reverse directions or by
excessive force. This may damage your media memory cards or card slot.
Some mini types of media cards need to use an adaptor before inserting:
The following list of mini card formats is not supported for direct access. Users will need to
use an adaptor as indicated in the photo for X-Rev to accept them. This adaptor may be
included as a package with the mini memory card purchased. Please contact your local
memory card dealer to purchase a mini card adapter if one is not available.
SD slot: To access micro SD (T-flash) or MMC Micro media cards need an adaptor.
MS slot: To access MS micro (M2) media card need an adaptor.

Button Manager Utility Installation
The X-Rev Storage Center provides a special backup button for the file copy function. A Button
Manager Utility will need to be first installed and users need to preset a copy path location. Users can
then regularly synchronize the data from the hard disk in the X-Rev to a specified location in the hard
drive in the PC by pressing the one touch button. Please follow below steps to complete the Button
Manager Utility installation:
Please note:
1. This function is only available via the USB interface connectivity.
2. The utility program is only supported on Windows 2000 and Windows XPplatforms.
1. Place software disc into CD ROM drive. Double click the “Button manager” setup icon in disc.
2. Click “Next” button.

3. Choose the “Button ManagerApplication” and click “Next” to continue
4. Click “Install” button to begin the installation.

5. Click “ Finish” button to exit the software installation.
6. Choose “Yes, I want to restart my computer now” and click “OK” button to restart your computer.

7. After restarting your computer, the user will find an icon on the status bar of the windows on the
bottom right.
8. Click on the icon and choose “Automatic Backup".

9. After clicking on the “Automatic Backup”, a backup task window will pop out for user to configure
the preset path for file copy.
Button Manager Utility Description
a. User Interface Description:
1
2 3 5 6 9
4 7 8 10
11

1. TASK LIST: The task window shows all arranged tasks, each task comprises source directory,
destination directory and attribute.
2. OPEN: Open a previous preset backup task file.
3. SAVE: Save current task list to a backup task file (as *.iniBackup file).
4. Disk Properties: Display: Display your host system current disk drives information.
5. ADD: To add a new task in list.
6. NEW: Create a new backup task file.
7. DELETE: Deletes the chosen task.
8. MODIFY: Modifies the chosen task.
9. EXECUTE: Execute current task list.
10. EXIT: close the task window.
11. Display path of executing task. If checked, the preset task will auto loaded by backup button; otherwise
the button function will be disabled.
b. Adding a New Task
1. Click “Automatic Backup” from status bar’s icon.
2. When the task window pops out, click “Add” button to add a new task.

2. Define the daily backup tasks in the “Source Directory” and “Destination Directory” columns by
clicking the browse button and check the necessary “Attributes” and “Task Direction”.
Source Directory: assign Source Directory location.
Destination Directory: assign backup Destination Directory location.
3. After presetting a task path, click the “OK” button to continue.

3. The task window will show a new task, you can add more task in the time or click ”Save” button to save
as a *.iniBackup backup file, then press “Exit” to finish task setting.
1
2
4. If you quit the Button Manager utility from the windows, and would like to modify or add a new task,
you can bring the utility back via Start button\Startup\Button manager.

c. Use Button Backup Function
When you press the “Backup Button” in front of the X-Rev, the Button Manager utility will
do the backup as a preset task.
Indicator Descriptions
HDD :Hard Disk Drive data access indicator
This indicator will turn flash while data is reading or writing between PC and X-Rev
Storage Center.
Note: Some new SATA hard drive do not support data access display.
Notes for user application
-------------------------------------------------------------------------------------------------------------------------------
USB and eSATA port Priority
TheX-Rev Storage Center provides dual interface of USB and eSATA for host connectivity, but the
high-speed eSATA port will have priority over the USB port when both are connected at the same time.
------------------------------------------------------------------------------------------------------------------------------
How to identify SATA and eSATA connectors
It is possible to have two types of SATA connector in your computer. One is a SATA type-A connector for
internal ports. This usually connects to internal SATA hard drives by a standard SATA cable. All internal
connections are Type A and have a “L” key to ensure the correct orientation.
The other is an eSATA connector that does not have
the “L” shaped key. It is usually used for external
SATA device connection. An eSATA cable is needed
to connect these external SATA devices. The X-Rev
Storage Center connects via this eSATA connection.
The eSATA cable supports both the high-speed SATA
II at 3 Gb/sec and the SATA I at 1.5 Gb/sec. The
picture on the right will help you recognize the
different plugs between standard SATA and eSATA.
------------------------------------------------------------------------------------------------------------------------------
X-Rev Storage Center housing temperature
Usually the aluminum housing temperature will remain at around 30°C after working for a couple of
hours. This is due to the heat sink design and is not a malfunction.
-------------------------------------------------------------------------------------------------------------------------------

Product Specification:
Chipset Bridge: Initio_INIC1610
Hub: Genesys-GL850G
Reader: ALCOR AU-6375
Host Interface USB 2.0 B-type (USB1.1 compatible)
High-speed eSATA port
USB 2.0 Hub Two high-speed USB 2.0 downstream ports.
Support 500ma high-powered device.
Media slot: Four media slots: CF/SD/xD/MS
Memory Card Supported CF TypeI, CF TypeII, CF UlrraII, Microdrive, Magicstor, xD, M-series xD,
SD, SD Ultra II, mini SD, MMC-I, MMC-II, MMC 4.0,MMC Dual Voltage,
RS-MMC, RS-MMC Dual Voltage, RS-MMC 4.0, TransFlash, Micro SD,
MS, MS Select, MS ROM, MS Magic Gate, MS-PRO Magic Gate, MS-DUO
Magic Gate, MS-PRO-DUO, M2 etc.
*M2, Micro SD (T-Flash), MMC Micro need use an adaptor
Hard Drive Interface SATA
Hard Drive Capacity 3.5” 80/120/160/200/250/500GB.etc.
Hard Drive From Factor 3.5”, 1 inch high
Data transfer rate 1.SATAI up to 1.5G (150MB/s)
2.SATA II up to 3G (300MB/s)
3.USB 2.0 up to 480Mbps (60MB/s)
4. USB 1.1 up to 12Mbps (1.5MB/s)
Indicator HDD active indicator
One button backup Yes
* This function is available only for USB interface connectivity.
Heat cooling By aluminum housing.
Housing Aluminum cover and plastic body
Power Supply AC input: 100-240VAC, auto-ranging.
DC output: 12V/5V 2.0A.
Cable type A to B type USB cable
eSATA cable
Support OS Windows®: Windows®2000/ XP/Vista.
Macintosh®: Mac®8.6, 9.X, 10.X or higher
Unit Dimensions 60*178*221 mm (W*H*D)
Unit Weight 0.5kg (Without hard drive)
Storage Temperature -20°C~60°C
Operating Temperature 5°Cto 40°C
Certificated: FCC、CE.
All Materials: RoHS compliant
Table of contents