Costar 9RV User manual

CARBON
MONOXIDE
ALARM
OWNER’S MANUAL
Model 9RV
ATTENTION: PLEASE READ,
FOLLOW AND SAVE!

Dear New C0STAR®9RV Owner,
Congratulations as you have taken steps to
help insure the health and life safety of you and
your family. We are proud to offer you our
unique, patented CO Sensor technology that
detects CO in a manner similar to the human
body’s response. The COSTAR® 9RV provides
low cost protection from both the acute and
chronic effects of CO poisoning.
Please read this owner’s manual carefully
so you will have a better understanding of the
effects of CO poisoning and the COSTAR® 9RV
Alarm, as we work together pursuing a safer,
healthier indoor air quality for us all. To your
good health and safety,
Mark Goldstein, Ph.D.
President
Quantum Group Inc.
WARNING: Failure to replace
this product by the “REPLACE
BY DATE” printed on the alarm
cover may result in death by Carbon
Monoxide poisoning. Replace By
Date is six (6) years from date of
manufacture.
1.0 GENERAL DESCRIPTION
This CO alarm is intended for protection
from carbon monoxide in ordinary indoor
residential areas, in recreational vehicles
(RV) and in unconditioned spaces such as
cabins, basements and attics. It is not
intended for use in Marine or industrial and
commercial applications.
2.0 PRODUCT
PrimarySensitivity Setting: Unit will alarm at
150 ppm CO within 50 minutes.
2

Power: 9volt alkaline Gold Peak GP 1604AU,
Duracell MN 1604
Current Draw: Standby 20 micro-Amp.
Alarm 60 milli-Amp, Trouble 30 milli -Amp.
Operating Temperature: -40° C to +66° C (-
40° F to +150° F)
Operating Humidity: 10 to 95% RH
Horn (Sounder) Loudness: 85 db @ 10 ft (3.3
meters)
3.0 APPROVALS
Listed by Underwriters Laboratories Inc. to
UL standard 2034 and CSA6.19-01
CSA6.19-01
4.0 WHAT YOU SHOULD KNOW ABOUT
CO
Carbon monoxide (CO) is an insidious
poison. It is a colorless, odorless and
tasteless gas. It is a cumulative poison.
Even low levels of CO have been shown to
cause brain and other vital organ damage in
unborn infants with no effect on the mother.
The following symptoms are related to
CARBON MONOXIDE POISONING and
should be discussed with ALL members of
the household:
MILD EXPOSURE
Slight headache, nausea, vomiting, fatigue
(often described as "flu–like" symptoms)
MEDIUM EXPOSURE
Severe throbbing headache, drowsiness,
confusion, fast heart rate
EXTREME EXPOSURE
Unconsciousness, convulsions, cardio
respiratory failure, death
3

Many cases of reported CARBON
MONOXIDE POISONING indicate that
while victims are aware they are not well,
they become so disoriented they are unable
to save themselves by either exiting the
building or calling for assistance. Also,
young children and household pets may be
the first affected.
Your CO alarm is designed to detect the
toxic CO fumes that result from incomplete
combustion, such as those emitted from
appliances, furnaces, fireplaces and auto
exhaust. A CO Alarm is NOT A
SUBSTITUTE for other combustible gas,
fire or smoke alarms. This carbon
monoxide alarm is designed to detect
carbon monoxide gas from ANY source of
combustion.
CAUTION:
This alarm will only indicate the presence
of carbon monoxide gas at the sensor.
Carbon monoxide gas may be present in
other areas.
CAUTION:
This product is intended for use in ordinary
indoor locations of family living units. It is
not designed to comply with Occupational
Safety and Health Administration (OSHA)
commercial or industrial standards.
Individuals with medical problems may
consider using warning devices that provide
audible and visual signals for carbon
monoxide concentrations under 30 ppm.
5.0 WHAT YOU SHOULD DO IF THE
ALARM SOUNDS
WARNING: Activation of
this device indicates the presence of
carbon monoxide (CO) which can KILL
YOU. If alarm sounds:
4

For Users in the United States, follow the
protocol in steps 1 through 4 below
1Operate reset/silence button;
2 Call your emergency services
(____ - ______) [fire department
or 911];
3Immediately move to fresh air –
outdoors or by an open
door/window. Do a head count to
check that all persons are
accounted for.Do not reenter the
premises nor move away from the
open door/window until the
emergency services responders
have arrived, the premises have
been aired out, and your alarm
remains in its normal condition.
4After following steps 1-3, if your
alarm reactivates within a 24 hour
period, repeat steps 1-3 and call a
qualified technician (____ -
______) to investigate for sources
of CO from fuel burning
equipment and appliances, motor
vehicles or other sources and
inspect for proper operation of
this equipment. If problems are
identified during this inspection,
have the equipment serviced
immediately.Note any
combustion equipment not
inspected by the technician and
consult the manufacturers’
instructions or contact the
5

manufacturers directly for more
information about CO safety and
this equipment. Make sure that
motor vehicles are not and have
not been operating in an attached
garage or adjacent to the
residence.
For Users in the Canada, follow the protocol in
steps 1 through 2 below
1 Immediately move to fresh air –
outdoors or by an open door or
window. Check that all persons
are accounted for.Do not re-enter
the premises or move away from
the open door/window until the
emergency services responders
have arrived; the premises have
been aired out, and your alarm
remains in its normal condition.
2 Call your emergency services (
___ - _______) [fire department
or 911]; If “service” signal
sounds (RED LED flashes and
horn beeps every 30 seconds);
contact the manufacturer for
troubleshoot-ing and/or
instructions to return the unit:
Quantum Group Inc, Customer
Service: 1-800-432-5599
5.1 Never disconnect the battery to silence an
alarm. The alarm will automatically sense
when the level of CO in the air falls below
the danger level. You should stay outside
the residence, RVor unconditioned area in
fresh air until the alarm is silenced. When
6

the alarm sounds, do not stand too close to
the alarm. The sound produced by the
alarm is loud because it is designed to
awaken a person in an emergency.
Prolonged exposure to the alarm at a close
distance may be harmful to your hearing.
6.0 DEVELOPING YOUR OWN CO
SAFETY PLAN
This CO alarm can quickly alert you to the
presence of CO — it cannot prevent toxic
CO emissions. Please note that there are
hazards against which CO detection may
not be effective, such as gas leaks or
explosions. The ultimate responsibility for
protection against toxic CO fumes rests
solely on you.
Installing CO detectors is just the first step
in protecting your family from toxic CO
poisoning. We also suggest that you create
an effective, comprehensive safety program
as outlined below.
6.1 Install CO detectors properly following the
instructions in this manual.
6.2 Develop a family escape plan and practice it
with your entire family, especially small
children.
–Draw a floor plan of your home and find
two ways to exit from each room. There
should be one way to get out of each
bedroom without opening the door.
–Teach children what the CO alarm
signal means and how they must exit the
residence by themselves if necessary.
–Decide on a meeting place a safe
distance from your house and make sure
all children understand where they
should go and wait if there is a
dangerous CO condition.
–Conduct CO safety drills at least every 6
months to make sure that everyone,
even small children, know what to do in
order to escape safely.
–Know where to go to call the Fire
Department from outside your
7

residence, recreational vehicle or
unconditioned area. .
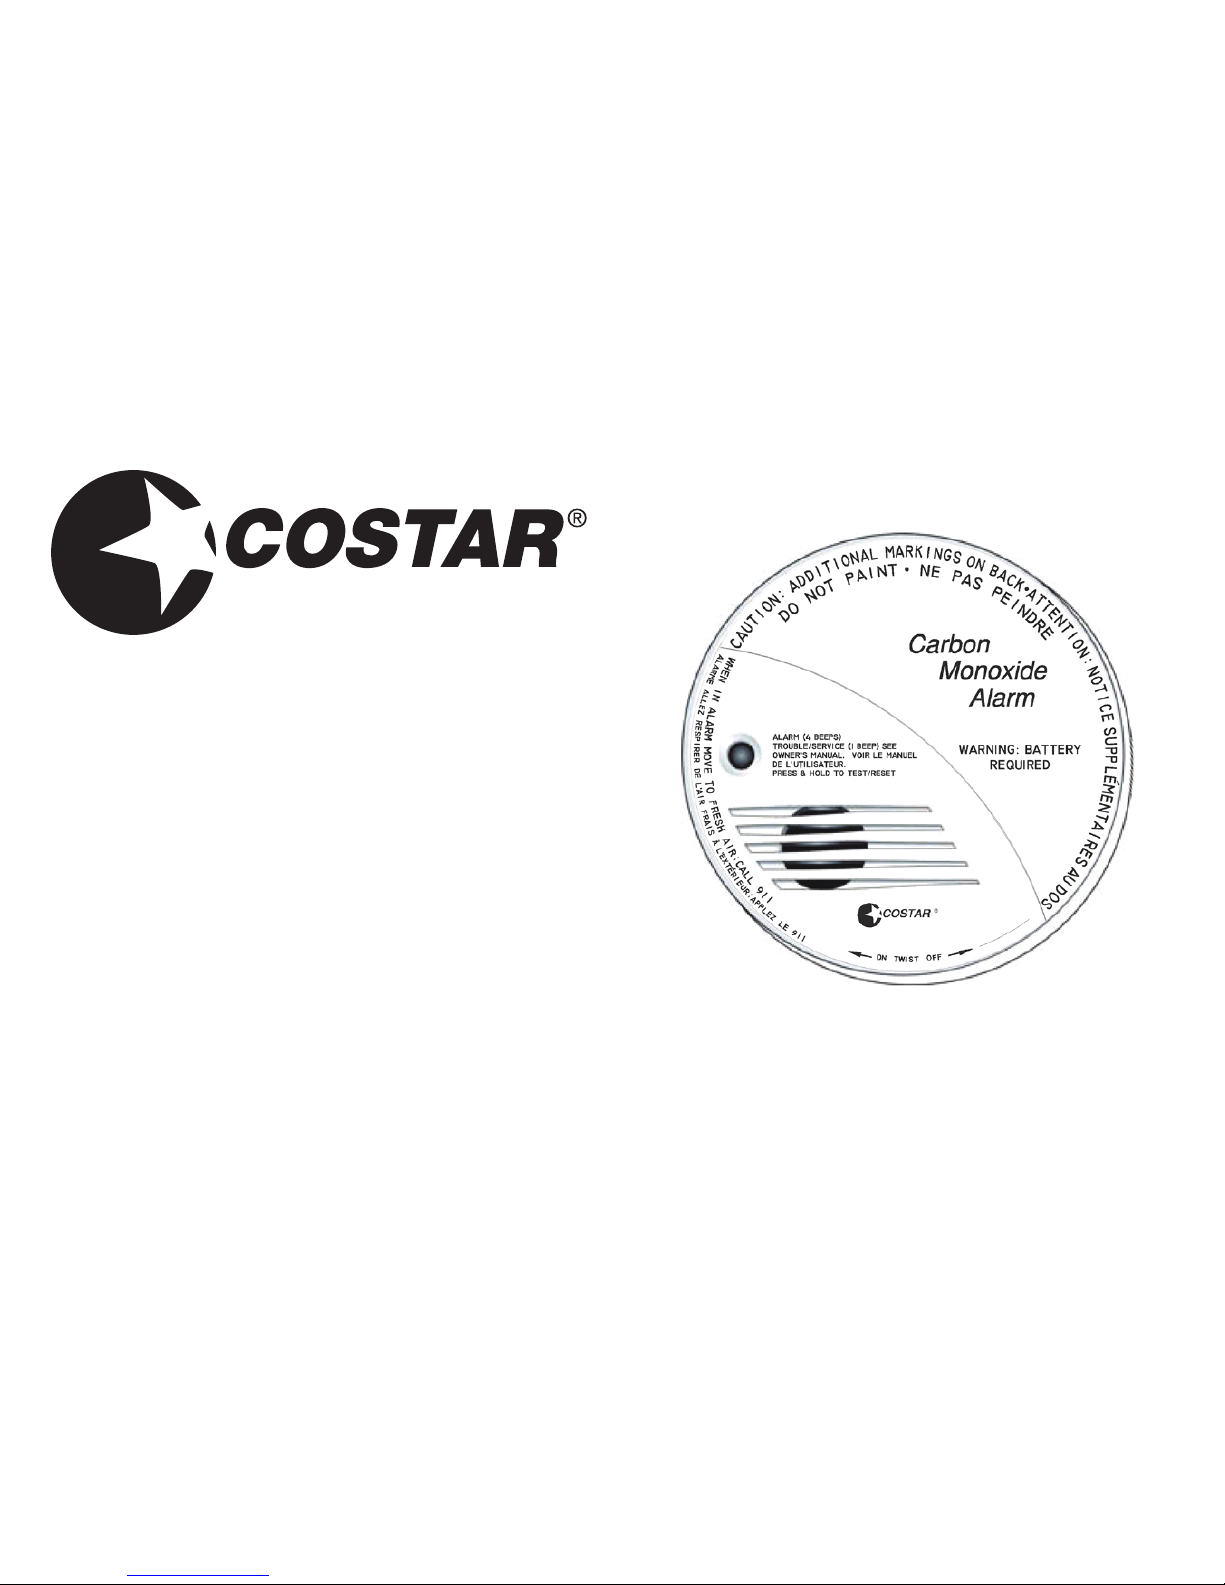
7.0 IMPORTANT: WHAT YOUR CO
ALARM CAN AND CANNOT DO
This CO alarm is designed for use within a
single residential living unit, recreational
vehicle or unconditioned areas. It is
designed to detect carbon monoxide (CO)
entering its sensing chamber. It does not
sense combustible gas (such as natural gas,
propane or (butane), heat, smoke or flames.
When properly located, installed, and
maintained, this CO alarm is designed to
provide early warning of developing
poisonous CO conditions at a reasonable
cost. This alarm monitors the air, and when
it senses CO, it activates its built-in alarm. It
can provide precious time for you and your
family to escape from your residence before
CO can seriously injure or kill. However,
such an early warning is possible only if the
alarm is located, installed, and maintained
as specified in the Owner’s Manual
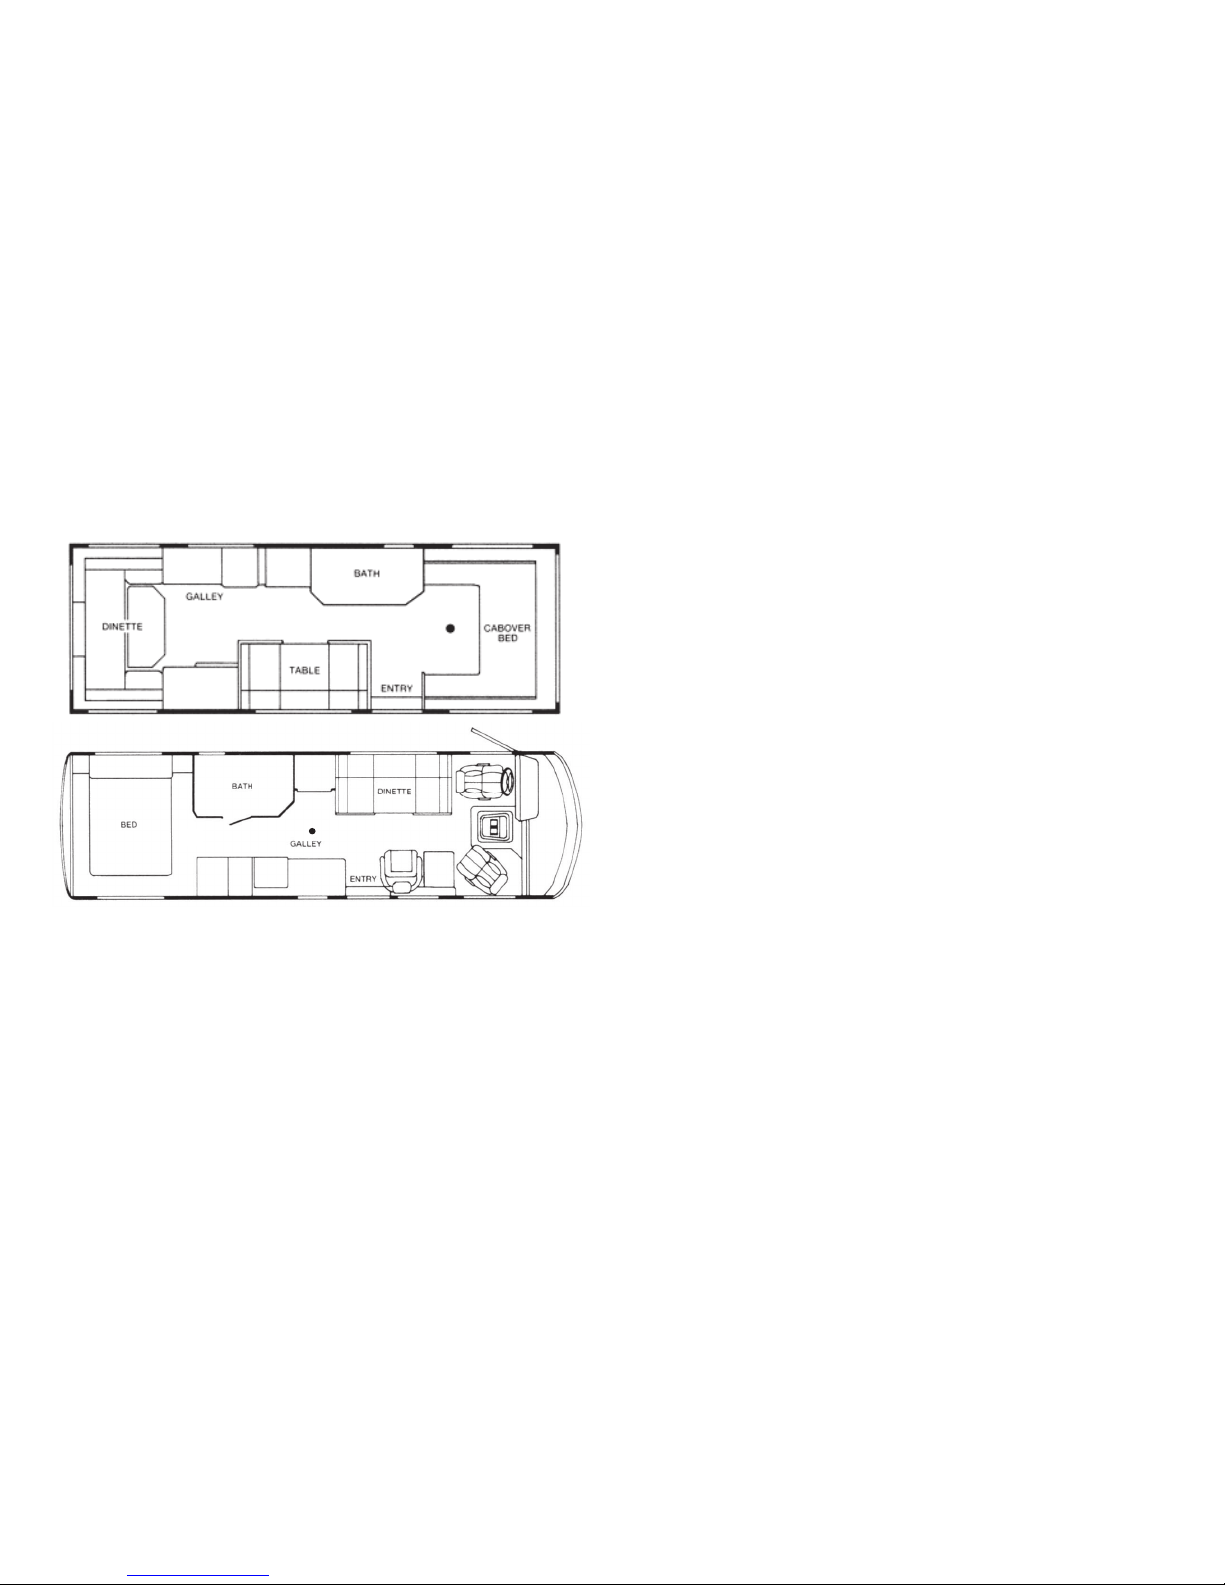
8.0 INSTALLING THE COSTAR®9RV
One of the most important considerations in
any CO alarm system is the location of the
alarms. Statistics of the National Fire
Protection Association (NFPA) show that
most of the fatal CO occurrences happen at
night while people are sleeping and/or
while they are in the garage. Early warning
of CO is best achieved by the correct
installation of CO alarms.
8.1 RESIDENTIAL INSTALLATION
RECOMMENDATIONS
If bedroom doors are usually closed at
night, alarms should be placed in each
bedroom as well as in the common hallway
between them. CO alarms may not sense
CO on a different level of a residence or
building. For example, a second floor alarm
may not sense a CO leak on the first floor or
8

in the basement. Therefore, alarms should
be placed on every level of a residence or
building. If the alarm is located outside of
abedroom, it may not wake up a sound
sleeper, especially if the bedroom door is
closed or only partly open. If the alarm is
located on a different level of the residence
than the bedrooms, it is even less likely to
wake up people sleeping in the bedroom.
Installing CO alarms may qualify you for
lower homeowner’s insurance rates, but CO
alarms are not a substitute for insurance.
Homeowners and renters should continue to
insure their lives and property.
Figure 1: Recommended CO alarm protection for multi-
level residence and Recreational Vehicle.
Please note that COSTAR® 9RV is the only retail
alarm approved for “Unconditioned Space” such
as the garage, RV, Basement and attic.
Figure 2: Recommended CO alarm protection for Single-
floor residence
Figure 3: Recommended CO alarm wall mounting location
is 5 to 6 feet from floor
9

8.2 RECREATIONAL VEHICLE
INSTALLATION
RECOMMENDATIONS
Figure 4: Suggested Mounting Locations for RVs
9.0 ALARM MOUNTING LOCATIONS
This CO alarm may be mounted on the wall
or ceiling.
WALL LOCATION: Locate the top of the
alarm at least 5-6’ feet from the floor.
CEILING LOCATION: Alarm should be
mounted as close as possible to the center of
ahallway or room. If this is not possible, the
edge of the alarm should be at least 4 inches
from any wall
9.1 LOCATIONS TO AVOID:
Nuisance alarms are caused by placing units
where they will not operate properly. To avoid
nuisance alarms, do not place units:
– Within 5 feet (1.5m) of any cooking
appliance or furnace.
–Near an open window or door, because the
fresh air entering the opening may delay
CO from reaching the alarm.
–In damp or very humid areas or next to
bathrooms with showers. Install detectors
at least 10 feet (3 meters) away from
bathrooms.
10

– Good ventilation is recommended when
household cleaning supplies or similar
contaminants are used.
9.2 CONDITIONS WHICH CAN RESULT
IN TEMPORARY CO SITUATIONS:
9.2.1 Excessive spillage or reverse venting
of fuel burning appliances caused by
outdoor ambient conditions, such as:
1 Wind direction and/or velocity,
including high gusts of wind. Heavy air
in the vent pipes (cold/humid air with
extended periods between cycles).
2 Negative pressure differential resulting
from the use of exhaust fans.
3 Simultaneous operation of several fuel
burning appliances competing for
limited internal air.
4 Vent pipe connections vibrating loose
from clothes dryers, furnaces, or water
heaters.
5 Obstructions in or unconventional vent
pipe designs which can amplify the
above situations.
9.2.2 Extended operation of unvented fuel
burning devices (range, oven,
fireplace, etc.)
9.2.3 Temperature inversions which can
trap exhaust gasses near the ground.
9.2.4 Car idling in an open or closed area
garage, or near a home.
10.0 INSTALLATION INSTRUCTIONS:
READ CAREFULLY BEFORE
INSTALLING ALARM
CAUTION: THIS UNIT IS SEALED. THE
COVER IS NOT REMOVABLE!
10.1 Select proper location (See section 8.0)
10.2 A mounting plate is provided on the
back of the alarm. Remove the
mounting plate from the back of the
alarm by holding the mounting plate
11
–
DO NOT use cleaning products on the alarm

and twisting the alarm in the direction
indicated by the “OFF” arrow on the
alarm cover.
10.3 To insure aesthetic alignment of the
alarm with the hallway or wall, the UP h
on the mounting plate must be:
A.) Parallel with the
hallway walls when
ceiling mounting
B.) Vertical when
wall mounting
10.4 As described in
Section 8, attach the
mounting plate on
the wall or ceiling.
Use the screws and
anchors provided to
secure the mounting
plate.
10.5 The battery is installed inside the battery
housing. To activate the alarm, Pull the
red tab away from the battery housing.
The alarm will beep once indicating it
has been activated. See Figure 5.
12
ON TWIST OFF

Figure 5. Pull and Remove Tab to Activate Alarm
WARNING: BATTERY IS REQUIRED
FOR ALARM OPERATION AND
DETECTION OF CARBON
MONOXIDE. IF NO BATTERY IS
INSTALLED, THE BATTERY DOOR
WILL NOT CLOSE EASILY AND
THE UNIT WILL NOT ATTACH TO
THE MOUNTING BRACKET.
The CO alarm product will not alarm
without a working battery, please check
weekly by pressing the test button and
holding it down for 6 seconds.
10.6 Attach alarm to the mounting plate and
twist in the “ON” direction shown on
the cover. (See Figure at Section 10.2).
10.7 To make your carbon monoxide alarm
tamper resistant, a locking pin has been
provided in the bag with the screws and
anchors. Using this pin will deter
children and others from removing the
alarm from the mounting plate. To use
the pin insert it into the hole in the side
of the alarm after the alarm has been
installed on the mounting plate (See
Figure 6). Note the tamper resist pin
will have to be removed in order to
change the battery; this can be done
easily with a long nose pliers. Using the
long nose pliers pull the pin out of the
hole, it is now possible to remove the
alarm from the mounting plate.
13

Figure 6 Tamper Resistant Locking Pin
10.8 This box contains two self-adhesive
labels. You should write the telephone
numbers of the emergency service
provider and a qualified technician in
the space provided on the labels. Place
one label next to the alarm, and the other
label near a source of fresh air where
you plan to gather after the alarm
indicates the presence of carbon
monoxide.
11.0 ALARM SIGNALS
11.1. NORMAL OPERATION: RED
L.E.D. flashes once every 30 seconds,
indicating that the alarm is powered
11.2. ALARM CONDITION:RED LED
turns "on" for 2 seconds with 4 short
beeps and then 5 seconds of silence
11.3. TROUBLE CONDITION: RED LED
flashes twice and beeps once every
30
seconds. Device is not working properly
and should be replaced immediately.
11.5. LOW BATTERY: One chirp every 30
seconds, and one led flash. Replace
battery when this signal occurs.
12.0 MAINTENANCE CLEANING
YOUR ALARM:
12.1. Keep your CO alarms clean - use a
damp (water only) cloth or vacuum.
12.2. To clean your alarm remove it from the
mounting bracket as outlined in Section
10.2: IF TAMPER RESISTANT PIN
HAS BEEN USED, REFER TO STEP
10.7 UNDER INSTALLATION
INSTRUCTIONS FOR REMOVAL
INSTRUCTIONS. (See Figure 6)
14
11.4. END OF LIFE: RED LED flashes
twice horn beeps twice every 30 seconds
REPLACE ALARM

12.3 You can clean the interior of your alarm
by using your vacuum cleaner hose and
vacuuming through the openings
around the perimeter of the alarm.
12.4 The outside can be wiped with a cloth.
12.5 After cleaning, reinstall your alarm as
outlined in Section 10.6 and test your
alarm by using the TEST button.
12.6 Test your detectors weekly and repair or
replace them when they no longer
function. As with any electronic
product, alarms have a limited life and
alarms that do not work cannot protect
you. (See section 14.0)
WARNING:
Do not use any household cleaning
agents, paints, varnishes or any other
chemical on your 9RV alarm.
NOTE: REGULAR TESTING IS
RECOMMENDED.
13.0 BATTERY REPLACEMENT:
IF TAMPER RESISTANT PIN HAS
BEEN USED, REFER TO STEP 10.7
UNDER INSTALLATION
INSTRUCTIONS FOR REMOVAL
INSTRUCTIONS. (See Figure 6)
Figure 7 Battery Replacement
13.1 To replace the battery remove the alarm
from the mounting plate by rotating the
alarm in the direction of the "OFF"
15

arrow on the cover (See Section 10.2).
Remove and reinstall the battery in the
correct orientation as noted on the
inside of the battery door. After re-
installing the battery, place the alarm on
the mounting plate. Twist the alarm in
the direction indicated by the "ON"
arrow on the alarm cover (see Section
10.2) until it locks in place. The alarm
will beep once indicating proper battery
installation.
13.2 Test alarm immediately following
installation and weekly for proper
operation by pushing the test button
until a short beep is heard (three
seconds). Release the button. The
alarm will then test itself for proper
operation and the RED L.E.D. will flash
5times. At completion of the self test,
the alarm will sound 2 alarm patterns (4
Beeps, pause, 4 Beeps). The alarm then
resumes normal operation
13.3 The COSTAR®9RV CO Alarm uses one
(1) 9 volt alkaline battery. A fresh
battery should last for one year under
normal operating conditions.
13.4 USE ONLY THE FOLLOWING 9
VOLT BATTERY FOR CO ALARM
REPLACEMENT. Alkaline type as
listed at 2.0 of this Manual. These
batteries are available at most local
retail stores.
WARNING USE ONLY THE BATTERY
SPECIFIED. USE OF DIFFERENT
BATTERIES MAY HAVE A
DETRIMENTAL EFFECT ON THE
CO ALARM. THE CONSTANT
EXPOSURES TOHIGH OR LOW
TEMPERATURES OR HIGH
HUMIDITY MAY REDUCE
BATTERY LIFE.
16

CHECK THE BATTERY
MANUFACTURERS
SPECIFICATIONS FOR PROPER
OPERATING CONDITIONS.
NOTE:Most batteries are not rated
below -20°C or above +52°C
14.0 PERIODIC ALARM TESTING:
Test the alarm for proper operation by
pushing the test button until a short beep
is heard (approximately three seconds).
Release the button. The alarm will then
test itself for proper operation and the
RED L.E.D. light will flash 4 - 6 times.
At completion of the self test, the alarm
will sound 2 patterns. The alarm then
resumes normal operation.
WARNING: RESIDENTIAL AND UN-
CONDITIONED SPACE USE:
TEST ALARM OPERATION AT
LEAST ONCE PER WEEK DURING
USE.
WARNING: RECREATIONAL
VEHICLE USE:
TEST ALARM OPERATION AFTER
RECREATIONAL VEHICLE HAS
BEEN IN STORAGE, BEFORE
EACH TRIP, AND AT LEAST ONCE
PER WEEK DURING USE.
15.0 SERVICE AND WARRANTY
If after reviewing this manual you feel
that your CO Alarm is defective in any
way, do not tamper with the unit. Call
Quantum Group’scustomer service line
at 1-800-432-5599 to receive a return
merchandise authorization (RMA)
17

number prior to returning product. Once
an RMA number has been issued, return
product along with a note describing the
problem with postage prepaid to:
6827 Nancy Ridge Dr.
San Diego, CA 92121-2233
Or call us toll free 1-800-432-5599
E-mail address: cs@QGinc.com
LIMITED WARRANTY
COSTAR® Model 9RV
Quantum Group Inc. oers you this limited
warranty on your new carbon monoxide alarm,
including all of its component parts except the
battery. This limited warranty extends solely to
the original end-user purchaser of this product,
provided your purchase was made from an
authorized vendor. Transfer or resale of this
product will automatically terminate warranty
coverage.
Quantum Group Inc. warrants the enclosed
carbon monoxide alarm to be free from defects
in materials and workmanship under authorized
use and service, as specied in the owner’s
manual, for a period of six (6) years from the
date of manufacture. During the initial two (2)
year period commencing with the date of
manufacture, any repair or replacement shall be
made without charge. During the latter four (4)
years of the warranty period, any repair or
18
The 6 year limited warranty has a 2 year
replacement window at no cost with a
new alarm if it fails. After 2 years the
price will be prorated like tires on your
car, which means you can buy a new
alarm for 50% o of the retail price if
your product fails between 2 and 3 years.

replacement shall be made at a charge to the
purchaser not to exceed 60% of the current
retail price or manufactures cost of repair.
All replaced
items become the property of
Quantum Group Inc.
QUANTUM GROUP INC. MAKES NO
OTHER WARRANTIES, EXPRESS OR
IMPLIED, EXCEPT AS REQUIRED BY LAW,
AND IN NO CASE FOR A DURATION
LONGER THAN THAT OF THIS WRITTEN
WARRANTY, EXCEPT AS REQUIRED BY
LAW, INCLUDING, BUT NOT LIMITED TO,
ANY WARRANTY OF MERCHANTABILITY
OR FITNESS FOR A PARTICULAR
PURPOSE OR AGAINST INFRINGEMENT,
OR ANY EXPRESS OR IMPLIED
WARRANTY ARISING OUT OF TRADE
USAGE OR OUT OF A COURSE OF
DEALING OR COURSE OF
PERFORMANCE. Quantum Group Inc. has not
authorized any other party to extend any other
warranties in connection with the sale of the
product, and will not accept responsibility for
any statements, representations, or warranties
made by any other person.
This limited warranty does not cover: (1) 9 volt
alkaline battery; (2) products which have been
improperly installed, repaired, maintained,
modified, or which have been subjected to
misuse, abuse, accident, neglect, exposure to
fire, water, or excessive changes in climate or
temperature, or combined with non-Quantum
Group Inc. - approved accessories; (3) physical
damage caused from use other than normal and
proper operation or handling, as specified in the
owner’s manual; (4) cosmetic damage; (5)
products on which warranty stickers or product
serial numbers have been removed, altered, or
rendered illegible; (6) the cost of installation,
removal or reinstallation.
QUANTUM GROUP INC. SPECIFICALLY
DISCLAIMS LIABILITY FOR ANY AND
ALL DIRECT, INDIRECT, SPECIAL,
GENERAL, INCIDENTAL, OR
19

CONSEQUENTIAL DAMAGES,
INCLUDING, BUT NOT LIMITED TO, LOSS
OF PROFITS OR ANTICIPATED PROFITS
ARISING OUT OF USE OF OR INABILITY
TO USE THE PRODUCT.
P/N 099-0150-01 2010NOV 29
20
QUANTUM GROUP INC.
6827 Nancy Ridge Dr.
San Diego, CA 92121-2425
Or call us toll free 1-800-432-5599
E-mail address: cs@QGinc.com
Other manuals for 9RV
1
Table of contents
Languages:
Other Costar Carbon Monoxide Alarm manuals