Crayon Audio CFA-1.2 User manual

Crayon Audio GmbH
www.crayon-audio.com
CFA-1.2
OperatingInstructions
V5.03-90
English

2
CAUTION:
Caution! The output stages are implemented as bridge circuits.
Therefore, all loudspeaker sockets carry a DC voltage of approx.
18V. The loudspeakers should NOT be connected to ground.
This would destroy your loudspeakers. Hence, the loudspeakers
should be connected only to banana sockets pairs.
The same colour markings
(red = + and black = -) are generally indicated on loudspeaker boxes.
The CFA1 must be first switched to the Standby mode and then
disconnected from the Mains voltage, before connecting to or
disconnecting from the connectors at the back. Otherwise,
voltage surges may result which could damage the CFA1 or
other components of the audio system or AV-systems
connected.
This device must be earthed. It is essential that the earthed power
cable with integrally cast plug provided be used. Never use an
unearthed plug or adaptor.

3
Copyright- and Trademark Notice
Copyright © Crayon Audio. First issued July 2006.
Crayon Audio GmbH, Hauptstrasse 169, 8141 Unterpremstaetten, Austria.
All rights reserved. Contents of this document may not be reproduced either wholly or partly, nor
entered into a database or transmitted in any form (by electronic or mechanical media, by photocopy,
recording or in other way) without prior written approval of the publisher.
Printed in Austria.
CFA1,
CrayonAudio and the Crayon logo are Trademarks of Crayon Audio GmbH
.
The contents of this manual have merely character of information. They can be changed without
previous announcement and may not be laid out as an obligation on the part of Crayon Audio GmbH.
Crayon Audio GmbH takes over no responsibility and assumes no liability for errors or inaccuracies,
which are possibly included in these operating instructions.

4
Table of Contents
CE Declaration of Conformity 5
Introduction 6
Unpacking
7
Voltage Selection
7
Cleaning
7
Connections 8-9
Basic Information 10-11
Remote Control 12
Personal Settings 13-15
Factory Settings 16
Operation 17-18
Adaptor 19-20
Technical Data 21
Warranty and Customer Service 22-25
Important Safety Information 26
General Safety Information 27
Troubleshooting 28-29
Accessoires 30

5
Declaration of Conformity - CE Communauté Européenne
Declaration of Conformity CE-Communauté Européenne
Crayon Audio GmbH affirms that this product fulfils the requirements of the low-voltage guidelines 73 / 23 /
European Economic Community and the guidelines on electromagnetic compatibility 89 / 336 / European
Economic Community which was changed by the guidelines 92 / 31 / European Economic Community and 93 /
68 / European Economic Community. The conformity of the said product with the regulations of the guidelines 73
/ 23 / EEC (low-voltage guideline) is proved by total compliance to the following standards:
Standard / Date of Publication / Test
EN 60065 1998 General requirements Marking
Injurious radiation
Warming under normal conditions
Danger to touch under normal operation conditions
Isolation requirements Maloperation Mechanical rigidity
Parts with mains connection
Components
Terminal equipment
Electrical connections and mechanical mounting
Protection against electrical shock
Stability and mechanical risks
Fire resistance
The conformity of the said product with the regulations of the guideline 89 / 336 / European Economic
Community
(electromagnetic compatibility) is proved by total compliance to the following standards:
Standard / Date of Publication / Test
EN 60065 Audio, video and similar electronic apparatus – Safety requirements
EN 55013 Sound and television broadcast receivers and associated equipment Radio disturbance characteristics
Limits and methods of measurement
EN 55020 Sound and television broadcast receivers and associated equipment - Immunity characteristics - Limits
and methods of measurement
FCC-Notice:
Notice:
This device was tested according to part 15 of the FCC regulations and found to comply with the limits for Class
B digital devices. These limit values should guarantee an adequate protection against harmful disturbances if the
device is operated in residential areas. This device generates radio frequency energy and may cause interference to
radio and television reception. The device can disturb the radio traffic if it is not installed in accordance to
instructions and is used. However, there is no guarantee that interference will not occur in a particular installation.
If this equipment does cause interference to radio or television reception, which can be determined by turning the
equipment off and on, the user is encouraged to try to correct the interference by one or more of the following
measures:
• Reorient the receiving antenna
• Increase distance between the device and the receiver
• Connect the device to a different mains outlet so that receiver is on different branch circuit
• If necessary, the user should consult a specialized dealer or an experienced radio/television technician for
additional suggestions.

6
Introdduction
Dear Music Lover,
The CFA-1.2 is an integrated amplifier developed after many many years of study and research. Our
précis was simple; Create an integrated amplifier that within it’s power rating, establishes itself by
having a unique relationship to music and sound reproduction among today’s components...And while
maintaining said sonic excellence that we might through diligent effort, engineering expertise, and
perhaps a small measure of technical finesse, make operation simple and lifelong enjoyment plausible.
As such, we have implemented a case that is precision machined from solid aircraft grade aluminium.
Careful laser cutting and assembly lead to a beautifully finished component that’s beauty is more than
skin deep. Each design cue of the CFA-1.2 has not only form but function, and contributes to the purity
of sound, and life-like quality one can obtain from Crayon. The case, rugged yet elegant, serves to
stabilize the internal electronics while acting as a very effective heat sink to keep unwanted
temperatures away from any signal carrying circuit.
All internal tracing and signal runs are kept as minute as possible as to not corrupt the music in any
fashion. Using the newest technologies, in this case, a PCB design called Broadband Dirks’
Decoupling (named for Professor Dirks) decouples the power supply up to t GHz to provide extreme
electrical stability, and the lowest possibility of any electromagnetic interference.
Further care is taken by using cross regulators to stabilize the power supply of the preamplifier in the
often disturbed region of 1Hz to 10MHz, thereby applying balanced current regardless of operating
conditions.
The Crayon CFA-1.2’s output stage contains current feedback, (not signal feedback), which is a new
method used in output stages that we feel makes the CFA-1.2 all the more celebratory.
Despite common parlance, A Swiss made Switching Power Supply, and German designed controls
round out what is currently our finest effort in the vast world of integrated amplifiers. We have
developed this product without compromise, and feel certain that our efforts will lead you to experience
your music with a viscerally present and lifelike portrayal that will be new in your experience. Your CFA-
1.2 should be with you for years. Please, should you have a minute, let us know how you like it.
Sincerely,
Roland Krammer
Principle/Chief Engineer

7
Unpacking
The following Accessories belong to the scope of supply of the CFA1;
IEC Power Cable
Remote Control (including 2 pcs. Type AAA Batteries)
Instruction Manual
It is advisable to keep the original packaging in case that you have to transport the device at a later time
Voltage Selection
The power amplifier CFA1 is equipped with a switching power supply. This power supply works at
mains voltage from 115 to 230 V (50/60Hz). The mains voltage cannot be set manually on the device.
The mains input voltage range covers until to 230 V mains voltage.
.
Cleaning
Before every cleaning, make sure that the CFA1 is disconnected from the mains supply. Remove dust
and fingerprints with a soft, dry cloth. Do not use household detergents to clean of the device.
This device must be earthed. It is essential that the earthed
power cable with integrally cast plug provided be used. Never
use an unearthed plug or adaptor.
8
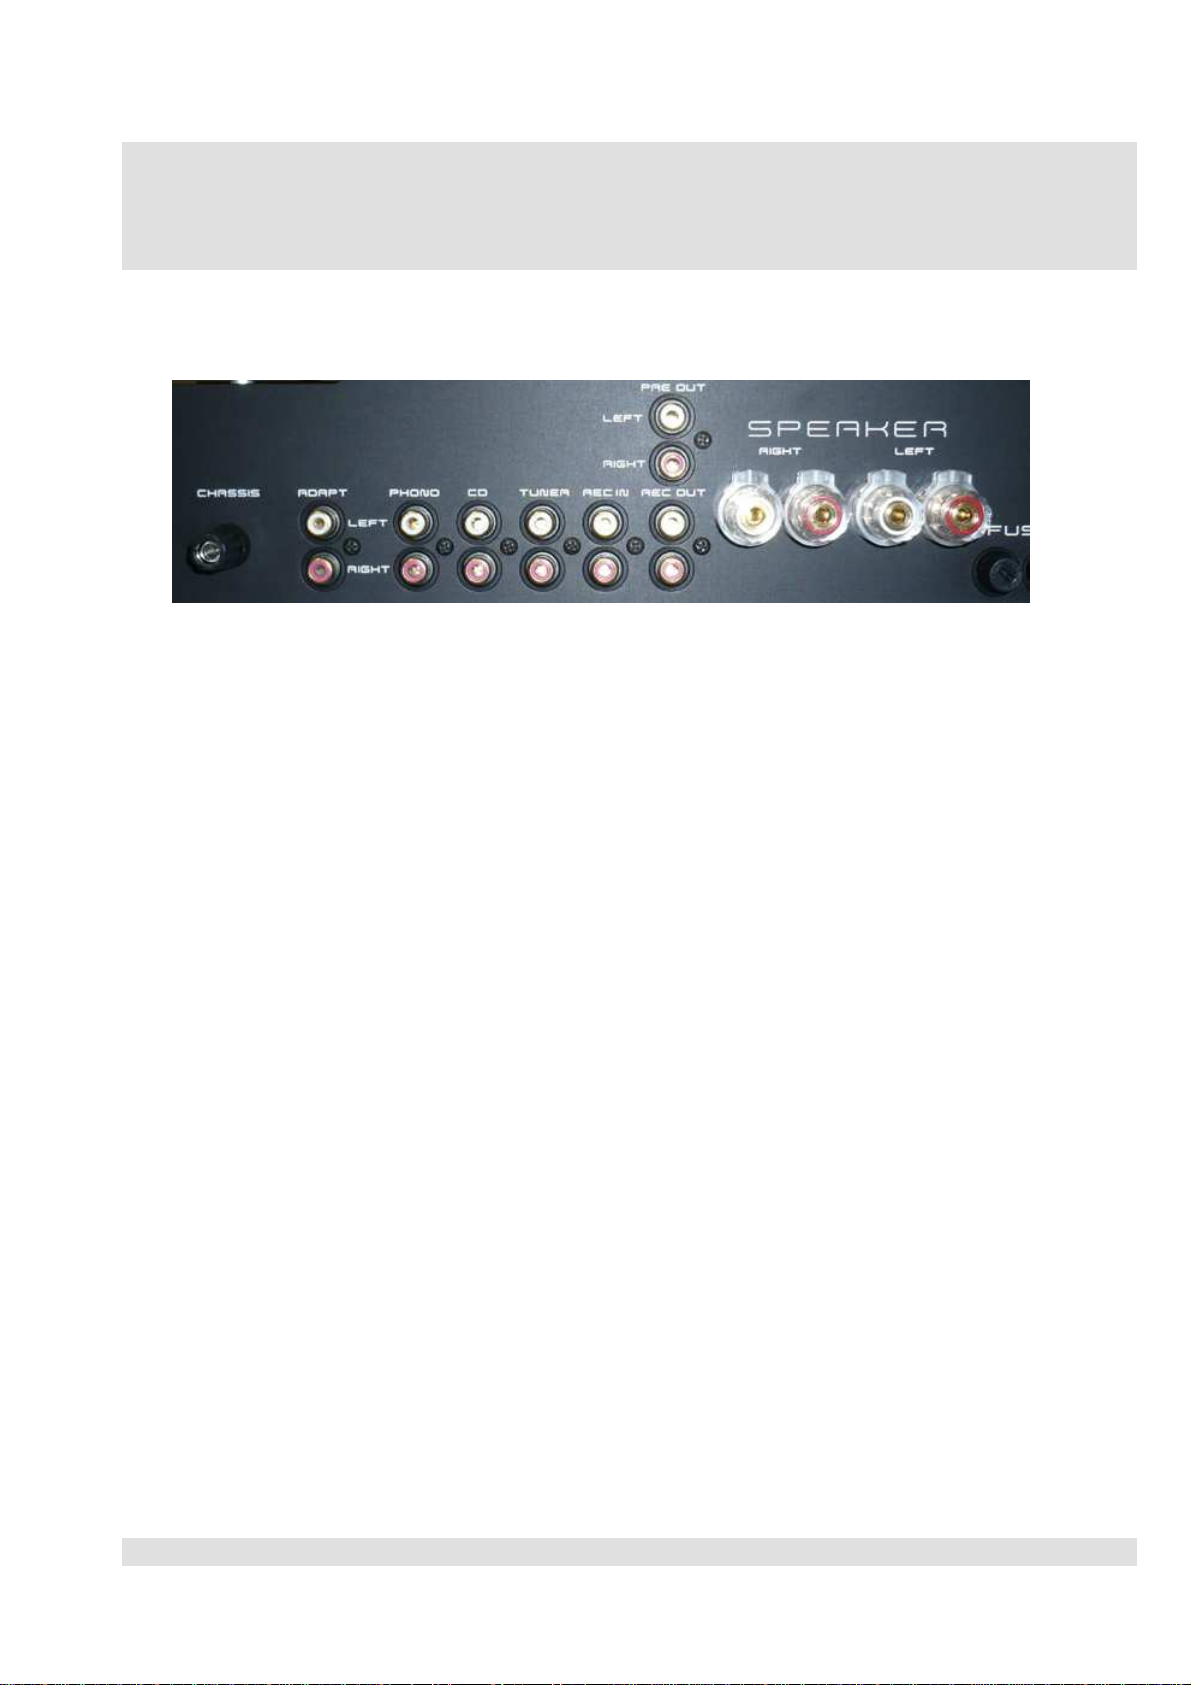
AUDIO INPUTS, OUTPUTS AND SPEAKER TERMINALS
⇑⇑⇑⇑
⇑
⇑⇑
⇑⇑
GND Adapter Phono CD Tuner RecIn Rec/PreOut Right Left
Chassis
Banana socket Phono-Ground
Adapte
r
RCA
socket Phono
-
Pickup matching
(Description
on page 18)
Phono unsymmetrical Input Phono (Moving Magnet / Moving Coil)
C
D
unsymmetrica
l
Input
Compac
t
Disc Player
T
une
r
unsymmetrica
l
Input
T
uner
RecI
n
unsymmetrica
l
Input
Recorder
(
T
ape Deck, D
A
T
or Minidisk)
RecOu
t
unsymmetrica
l
Output
Recorder (
T
ape Deck, D
A
T
or Minidisk)
PreAmpOut
unsymmetrica
l
Preamplifier
Output,
regulated Output
Right
symmetrical
Output Speaker Right Channel
(black
socket = negative output,
red
socket = positive output)
Left
symmetrical
Output Speaker Left Channel
(black
socket = negat
ive output,
red
socket = positive output)

9
Connectors
MainsConnection and Fuse
⇑⇑⇑⇑
Fuse Main Switch Mains Plug
Fuse
2 Fuse holders for 5x20mm Fine Fuses 10A / delay type
Mains Switch The switch separates the Mains voltage from the internal circuit of the device
Mains Plug
Mains Plug 115 - 230 VAC
10
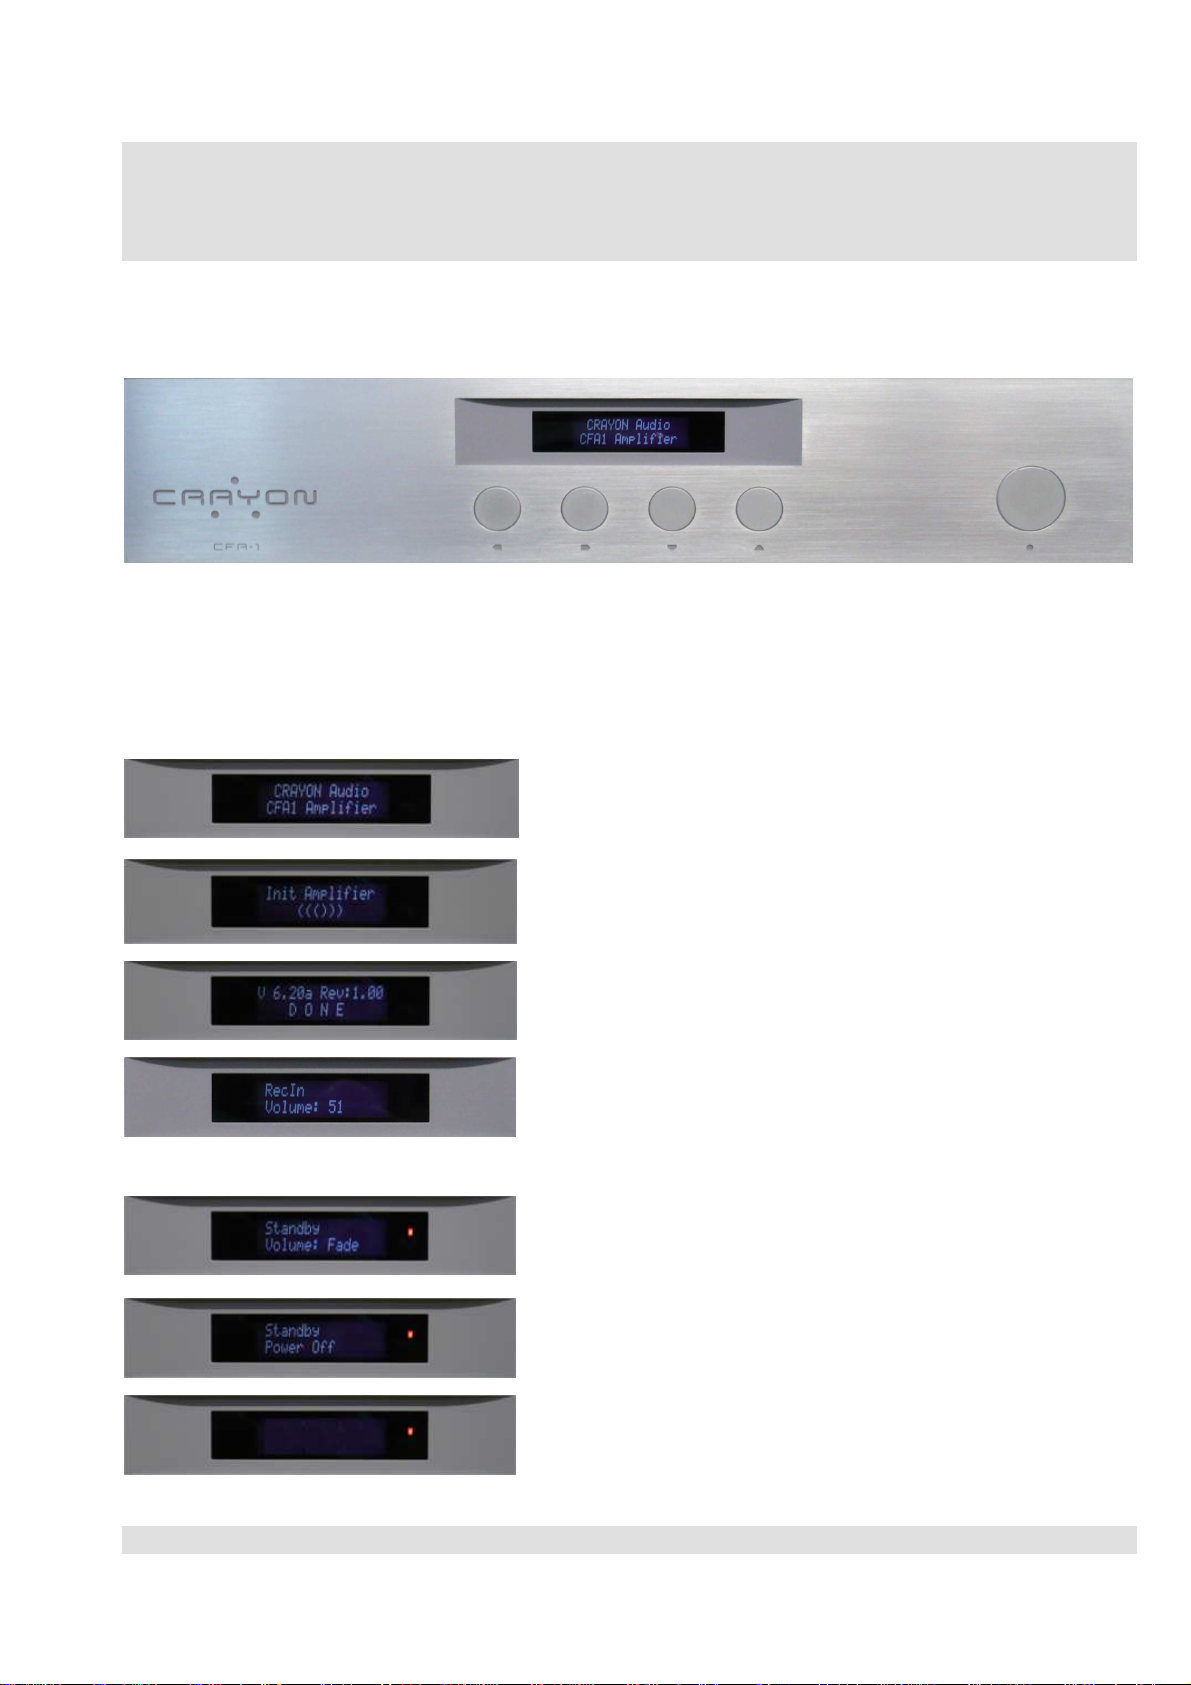
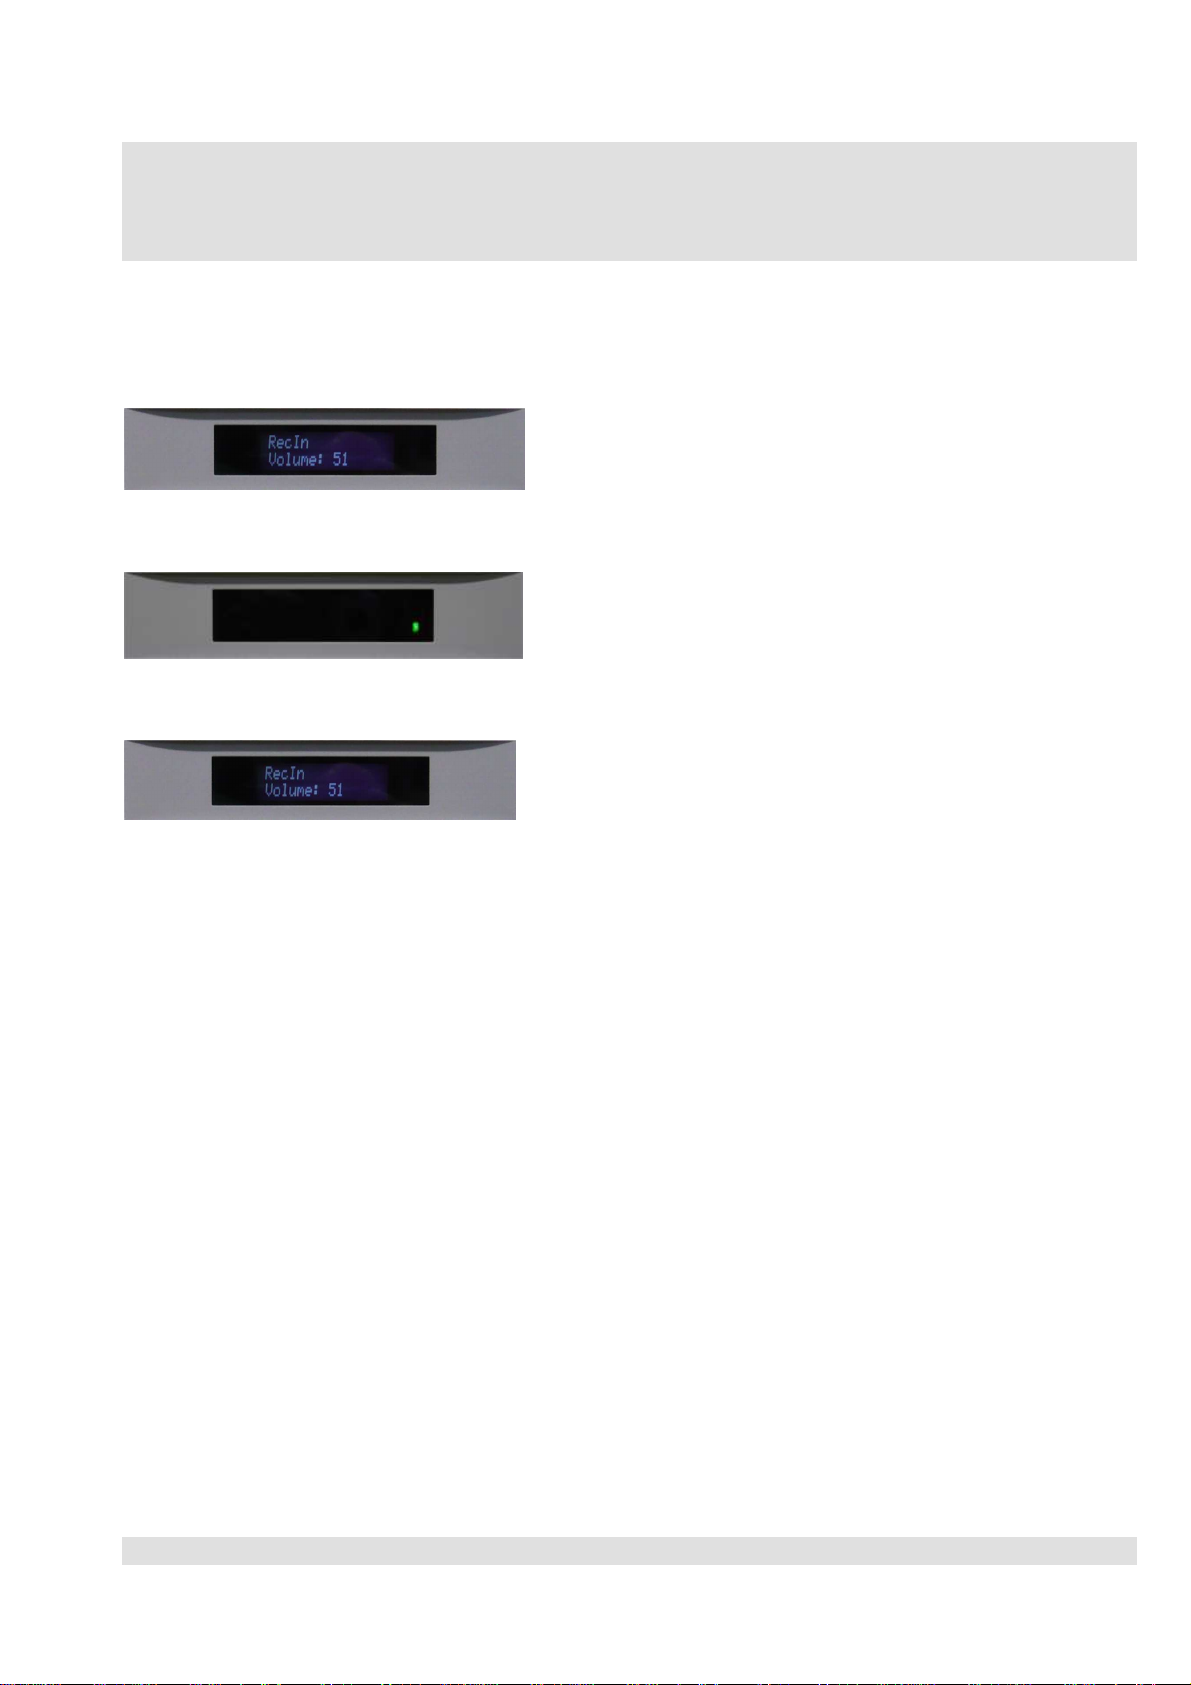
Basic Information
Front Panel Display
Infrarot Sensor Standby LED
⇓
⇓
- + - +
Channel Selection Volume Standby
Standby
Press Standby and activate or deactivate the Standby mode.
Press Standby
Ready for use
Press Standby
Power off ...... Standby
11
Basic Information
Active Modue und Time out
The display and the controller is switched to idle-mode after 15 sec.
The green LED indicate at the new CFA-1.2 the active Mode.
Activation of any key on the device or IR Remote Control activates the display and the controller.
12
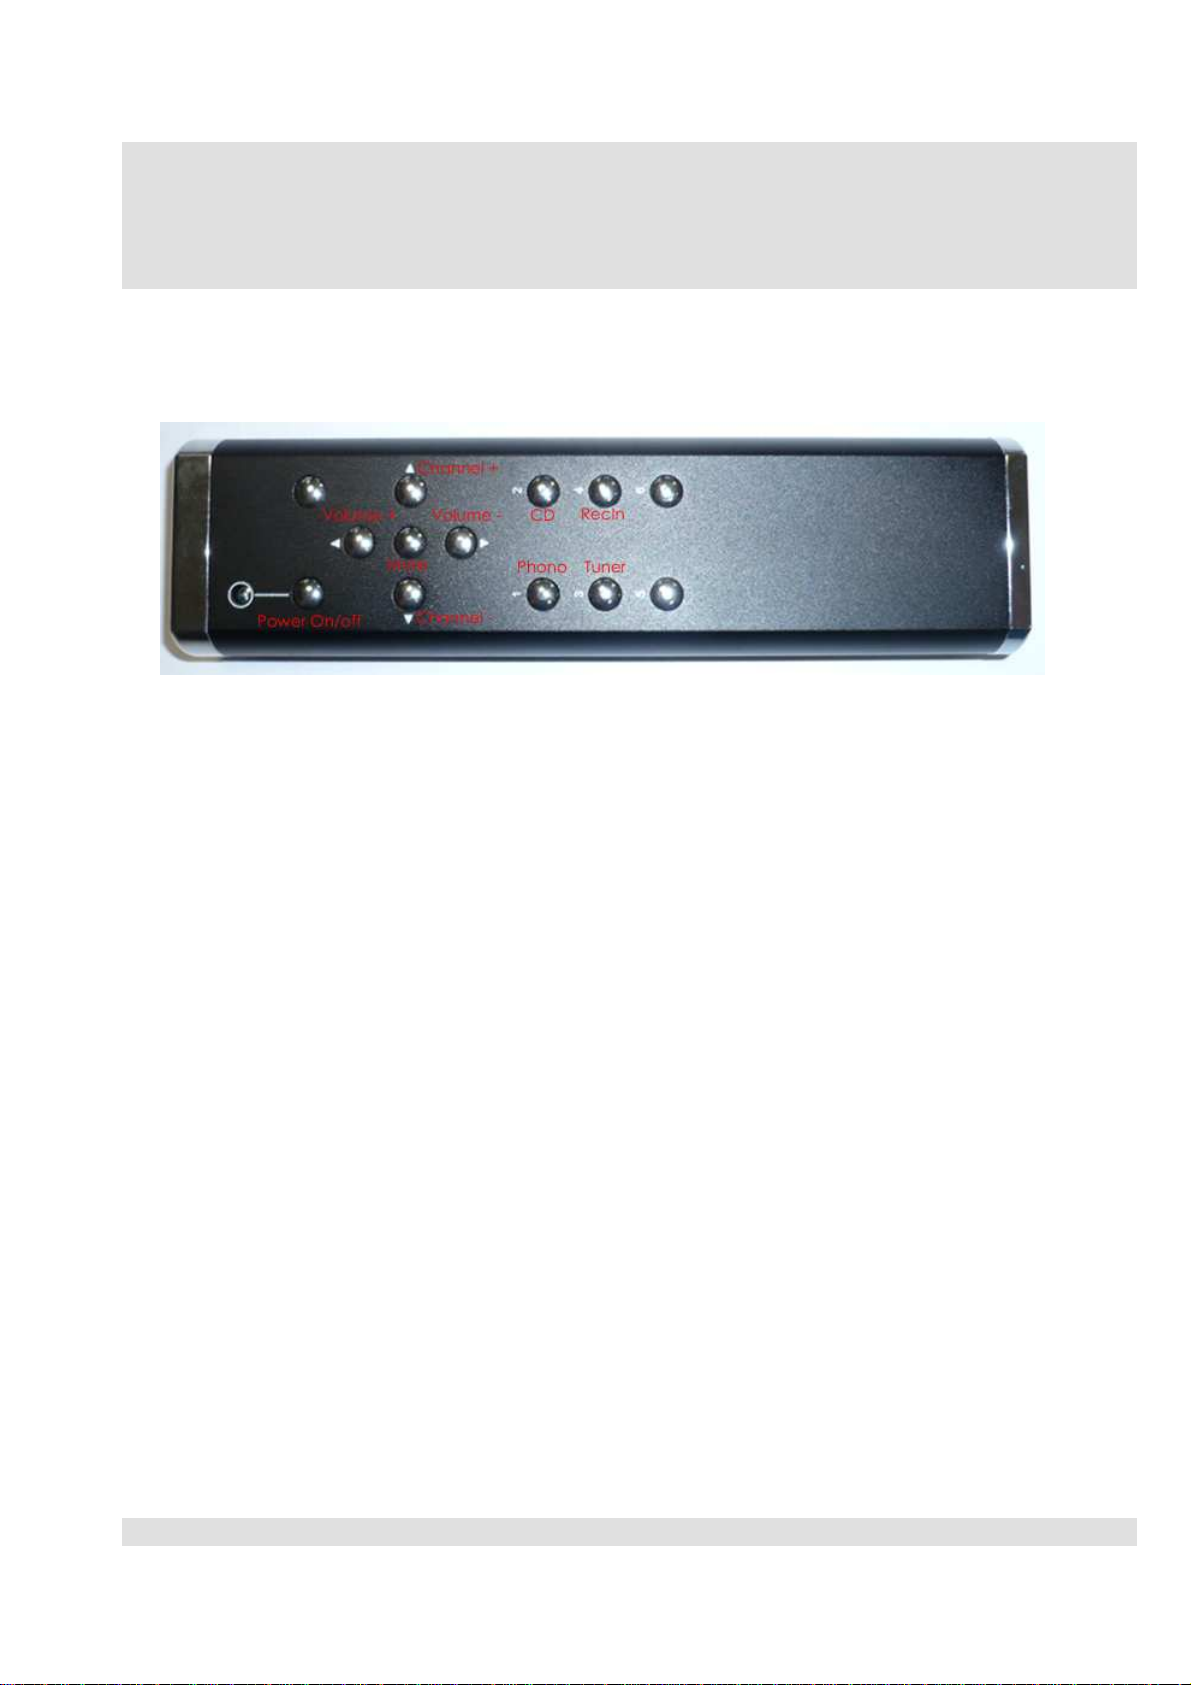
Remote Control
Insertion and change of batteries
At the back of your remote control there is the battery compartment fitted with a screw. Remove this screw with a
suitable screwdriver (PH1). Thereafter you can pull out the battery compartment of the remote control.
Please Note:
Insert the batteries according to the marks on the inside of the battery compartment. Remove immediately possibly running
out batteries. Dispose the old batteries according to the instructions of the respective manufacturer.
After insertion of the batteries push the battery compartment again into the remote control and screw this together.
The remote control is powered by two 1.5 volt alkaline batteries (IEC LR 03,AAA). We recommend you to use only new
batteries. In any case you should never use old and new batteries together because the efficiencyof your remote control
can be strongly affected and in addition, shorten the life span of the batteries substantially.After you have inserted the
batteries please press a key and examine whether the red light-emitting diode lights up; this is the confirmationthat the
batteries were properly inserted.

13
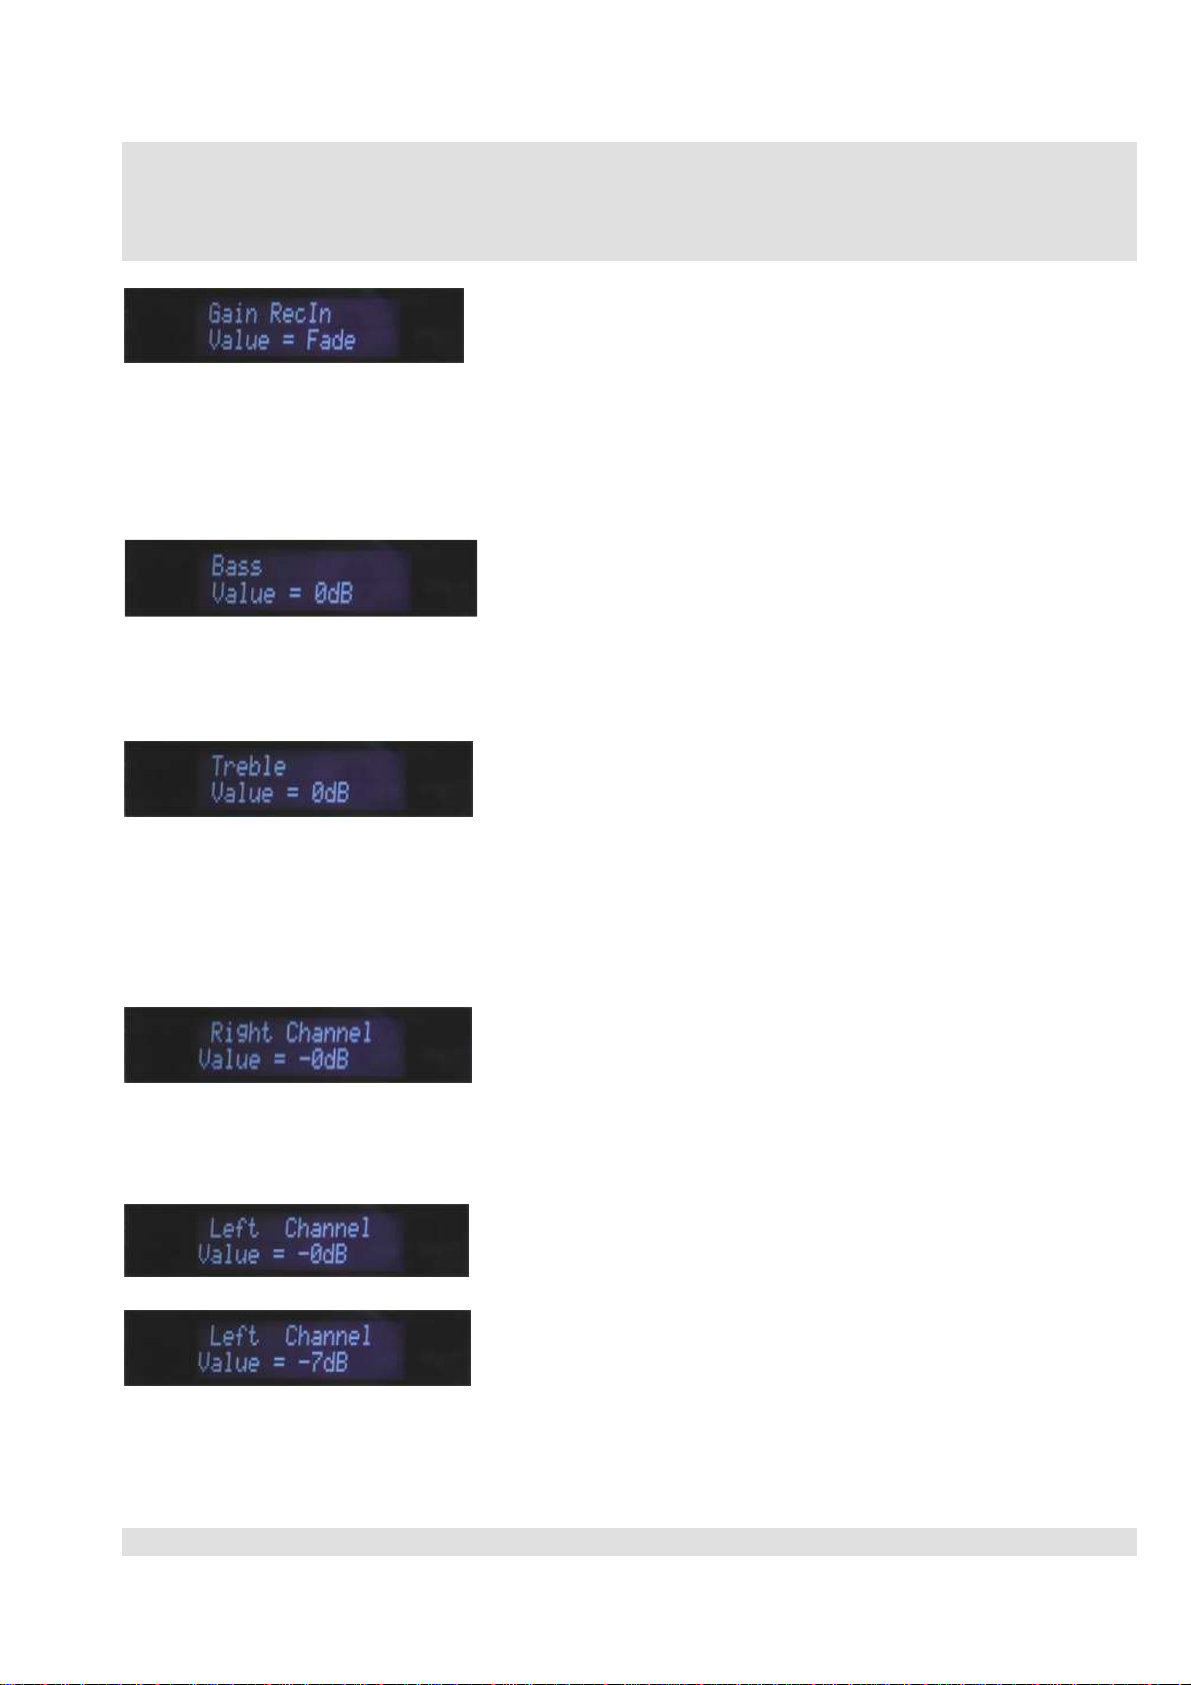
Personal Settings
Press both channel select keys at the same time and activate the set-up mode.
⇑⇑
The single menu points can be selected with the channel selection keys.
Start of the set-up mode. The last selected channel remains stored for the setting of the tone and the
balance control. Using this you can carry out these settings after hearing.
GainControl (input sensitivity)
The Phono (second) channel is ready for gain control. Now this channel is selected. If you have a
turntable connected and a signal available, you can carry out the gain setting also by hearing. By
pressing the volume keys the gain can be changed in 2dB steps.
The CD (Compact Disk) channel is since the software version „CFA1_90-V1.00_REV1.10“ also
adjustable from -6dB to +18dB.
The tuner channel is ready for the gain control. If you have a tuner connected and a signal available, you
can carry out the gain setting also by hearing. By pressing the volume keys the can be changed.
14
Personal Settings
The RecIn channel is ready for the gain control. If you have a device (e.g., cassette deck) connected and
a signal available, you can carry out the gain setting also after hearing.
Tone Controller
The tone controller for low frequency (100 Hz) is ready for the gain setting. Now the channel, which
was selected before you changed the mode in the set-up, becomes audible again. By pressing the
volume keys the gain can be changed. (Max +14dB, min-14dB, in 2dB steps).
The tone controller for high frequencies (high-pass filter 12 kHz) is ready for the gain setting. By
pressing the volume keys, the gain can be changed. (Max +14dB, min-14dB, in 2dB steps).
Note:
Setting of 0dB for all 3 frequency bands, the tone controller remains inactive. The signal is connected without
influence.
Balance
Here you can change the balance setting by reducing the gain of the right signal source. By pressing
the volume keys the gain can be changed in steps of 1dB. The volume [+] key increases the attenuation
which means that the negative number is incremented by 1 (-0db,-1dB,-2dB etc.).
(example)
Here you can change the balance setting by reducing the gain of the left signal source. By pressing
the volume keys the amplification can be changed in steps of 1dB.

15
Personal Settings
Phono Mode (Moving Magnet oder Moving Coil)
In this menu point you choose in which mode (MM or MC) the phono preamplifiers should be
operated. By pressing the volume keys the setting can be changed.
Note: Matching of the pickup impedance see page 18 (Adapter)
Speaker Efficiency
At this point, you can customize the application points of the loudness depending of the efficiency of
your speakers. The input value is "dB per watt per meter" in 1 dB steps. The range extends from
84dB/W/m to 105dB/W/m.
As an example, in 88dB/W/m and volume <= 45 the bass and the treble will be increased by 2dB. For
volume> 45, there is no interference. When volume <36, the bass will be increased by 4dB.
A value of 102dB/W/m the bass and treble for the volume <= 31 will be increased by 2 dB. The second
starting point in this case is <= 21. Also from Volume > 31, there is no influence of the audio signal!
(Pure software feature)!
Contrast
The contrast of the LC-Display's can be changed in this menu point. Liquid Crystal Display
changes its contrast over the years. Here you have the possibility to adjust this value if required.
Default is 24.

16
Individuelle Einstellungen
Volume Display
At this point you can set the kind of display volume. Number and bar graphs can be set.
BAR graph display in normal Mode.
Remote selection
At this point you can select the type of remote control. You can select the Crayon Audio remote or the
Bent Audio Remote handset.
Loudness
The Loudness function can be selected (1) or deselected (0) by the Volume keys.
Note: The Loudness function is switched depending on the Volume and Speaker Efficiency setting by software.
After you have set-up all the parameters according to your choice, press both channel select keys at
the same time once more. All settings are stored. The normal operation mode is automatically chosen.
The Values are also stored and changed to the normla mode by Time Out after 60 seconds.

17
Factory Settings
By pressing the channel select [-] key and the volume [+] key simultaneously the memory is cleared
and overwritten with default values.
⇑⇑
Default Setting (Werkseinstellungen):
Gain Phono PreAmp. 0dB (Gain = Verstärkung oder Eingangsempfindlichkeit)
Gain CD 0dB
Gain Tuner 0dB
Gain RecIN 0dB
BASS 0dB
TREBLE 0dB
Right Channel -0dB ( right channel)
Left Channel -0dB ( left channel)
Phono MM/MC MM (Pickup type)
Spk efficiency 88dB/W/m (Speaker efficiency)
Contrast 24 (Contrast of display)
Value or Bar Value (Volume display by number value)
Remote Bent (Bent Audio Remote)
Loudness 1 (on) Merke:
Note:
The Loudness function is switched depending on the Volume setting
and Speaker efficiency by software. As examble Spk_efficiency =
88dB/W/m, for Volume > 46 no signal i
nfl
uencing exists.
For
Spk_efficiency = 102dB/W/m as examble, for Volume > 31 no
signal i
nfl
uencing exists
Afterwards it is automatically changed to the normal operation mode after 1 minute or press both
buttons of channel select again.

18
Operation
Channel Selection
The CFA1 has one Phono input (RIAA) and 3 high level inputs. Press a channel select [+/-] key of
the remote control or in the front screen. The signals will be selected in the order; Phono, CD, Tuner
or RecIn ([+]). In reverse direction if you press ([-]) key. For fast switching press the select key
immediately again. After 1.8 second the Switching Process will be done.
For recording with the CFA1, connect the input of the recording
device (cassette deck, DAT or Minidisk) to the socket RecOut
With every change of channel the volume is reduced first to a minimum (Fade out, Mute) after which the
channel change-over occurs. After switching the selected channel the volume is set back to the last value
in steps (Fade in). This process needs approx. 1.8 second.

19
Operation
Mute
The volume is reduced gradually to -90 dB (Fade Out) by pressing the Mute key of the remote control
or by pressing both Volume keys on the front panel. A renewed actuation of Mute key or both volume
keys at the same time, will result in volume be set back to the original value (Fade In).
⇑⇑
Volume = 0
If you set volume with the volume [-] key up to level to zero (Push volume [-] key so long, until level
<1 is reached), the words " Volume: Mute" will be displayed instead of “Volume: 0”. This is due to
the volume regulators being switched off (Mute) due to higher Crosstalk damping.
20
Adaptor
ImpedanceMatching for Pickup: (Moving Magnet)
The pickup, which you want to connect to the Phono input, must be matched for its impedance. The
input resistance of the RIAA Phono preamp equalizer amounts to 53,33KOhm Most Moving magnet
pickup systems and some Moving Coil pickup systems need a loading impedance of 47KOhm and a
loading capacity between 150pF and 400pF. The required loading capacity depends on the pickups
used. By connecting the adaptor plug, a resistor of 392KOhm and a capacity of 47pF will be
connected parallel. This results in an input impedance of 47KOhm and an input capacitance of approx.
200pF together with the cable of the turntable drive, because the cables show a capacitance ranging
from 70pF to 150pF per meter (mostly 150pF). A pair (for left and right channel) of the RCA (Cinch)
standard adaptors is provided with the CFA1. If you need special RCA (Cinch) adaptors, these can be
ordered from Crayon Audio GmbH or from one of our authorized dealers in your area. With the order
of the adaptor, please provide us the brand and type of the pickup, or the information of required
loading impedance and loading capacity. You can get these data from the specifications of your
pickup.
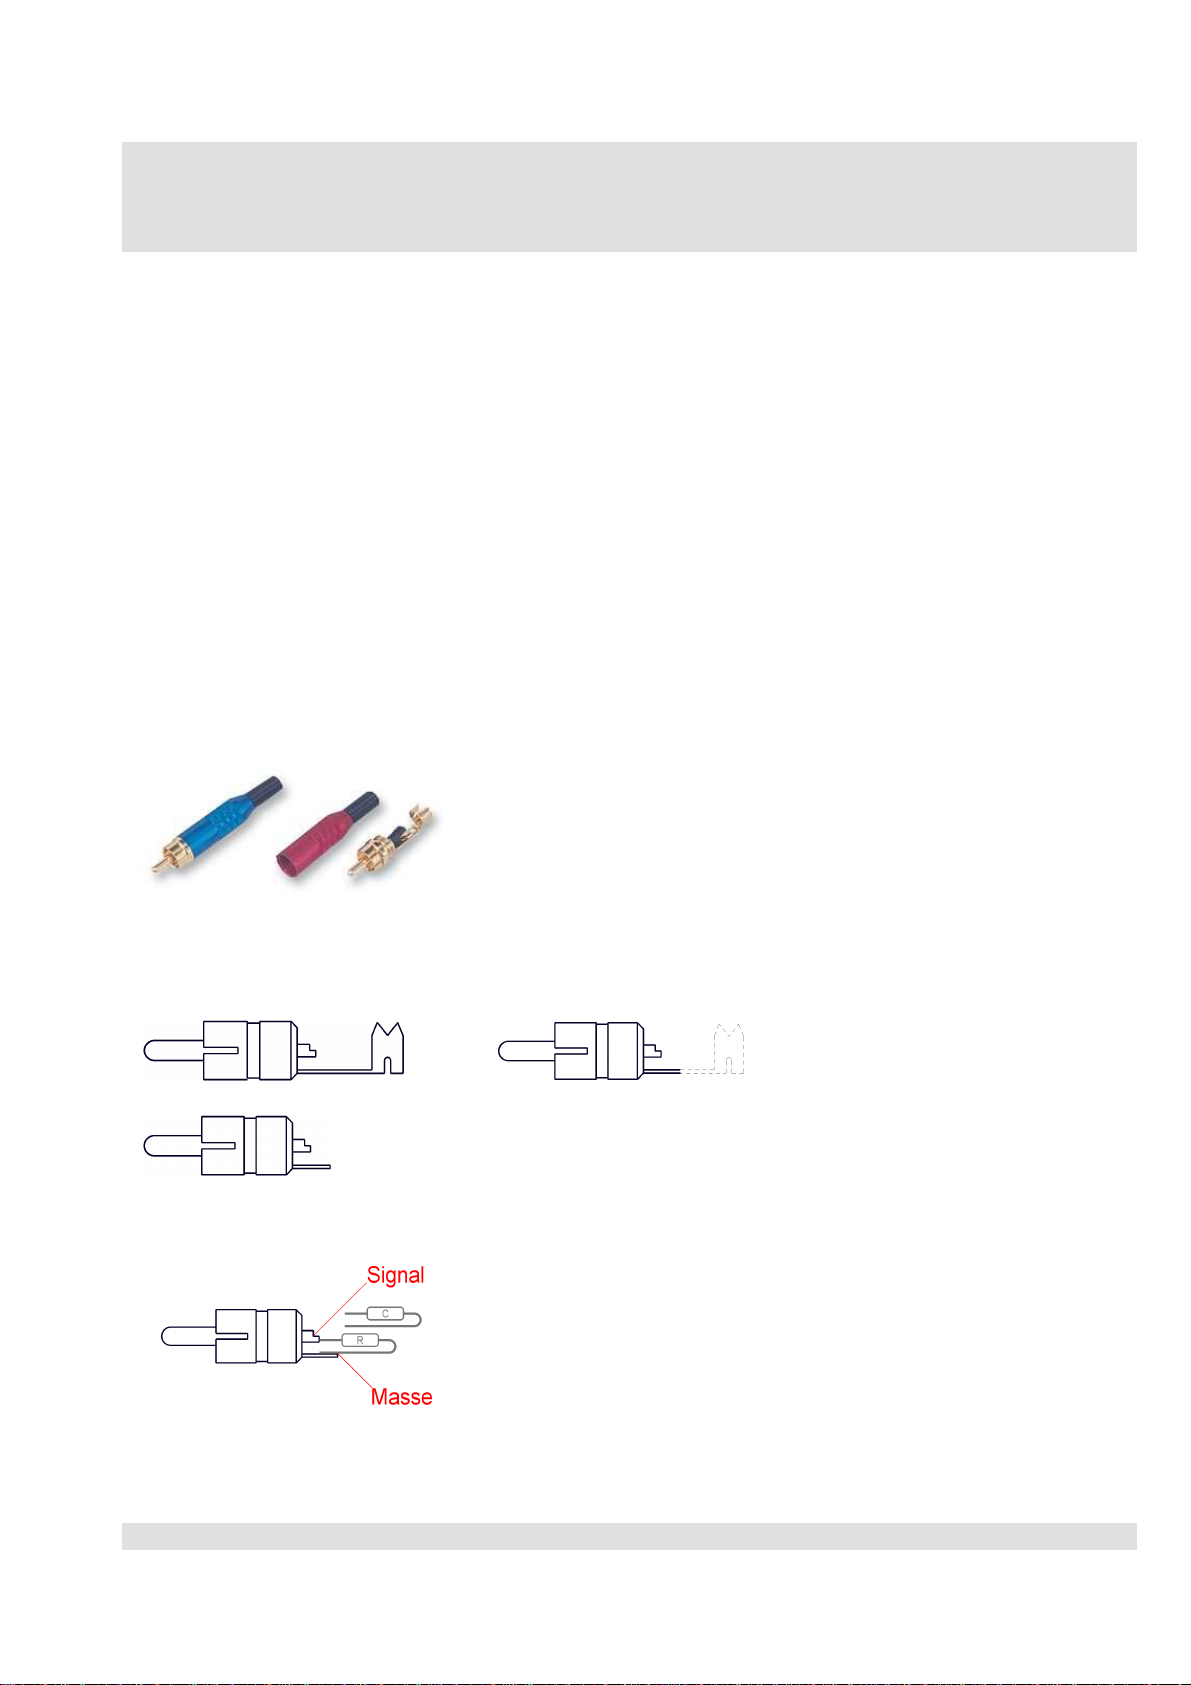
Technically experienced can make these adaptors themselves. Obtain two RCA plugs
⇑
Unscrew the external cover. Shorten the cord grip and ground fin (see drawing) with a suitable
side- cutter.
1 2
3
Solder the resistor (392KOhm) and the capacitor (47pF) at the points "Signal" and "Masse"
You can get these components from an electronics store in your
area. Any 125mW, 0.1% carbon or metal film resistor of small form factor is suitable. For the capacitor
any Styroflex or similar types of small size can be used. Consult your electronics shop.
Table of contents
Other Crayon Audio Amplifier manuals


Popular Amplifier manuals by other brands


Edge
Edge Street Series ED7600-E2 user guide

Pro-Ject Audio Systems
Pro-Ject Audio Systems A/D Phono Box S Instructions for use

Comprehensive
Comprehensive CDA-CAT14018G user manual

JBL
JBL GTO-1001EZ owner's manual

Gem Audio Labs
Gem Audio Labs Sculptor user manual

Hafler
Hafler DH-120 Operation and assembly instructions


