Create RETRO FRIDGE Series User manual

FRIDGE NEVERA
USER MANUAL
FRIDGE RETRO

2
INDEX
ENGLISH
Security instructions 4
Daily use 5
Flammable-refrigerant gas warning 5
Parts list 6
Let’s get started 7
Unpacking 7
Door handle installation 7
Fridge installation 7
Adjusting the thermostat 8
Defrosting 9
Replacing the led lightbulb 9
Food storage 9
Energy-saving tips 10
Going away? 10
Moving the fridge 10
Cleaning and maintenance 10
Internal cleaning 10
External cleaning 11
Warning 11
Disposal of Old Appliances and Packaging 11
Troubleshooting 12
ESPAÑOL
Instrucciones de seguridad 14
Uso diario 15
Advertencia: Gas refrigerante inamable 15
Lista de partes 16
Empecemos 17
Desembalaje 17
Instalación del tirador de la puerta 17
Instalación de la nevera 17
Ajustes del termostato 18
Descongelar el frigoríco 19
Cambiar la bombilla 19
Almacenamiento de la comida 19
Consejos para el ahorro de energía 20
¿Se va de vacaciones? 20
Mover la nevera 20
Limpieza y mantenimiento 20
Limpieza interna 20
Limpieza externa 21
Advertencia 21
Eliminación del embalaje y
desguace de los aparatos usados 21
Resolución de problemas 22
PORTUGUÊS
Instruções de segurança 24
Utilização diária 25
Advertência: gás refrigerante inamável 25
Lista de peças 26
Comecemos 27
Desembalar 27
Instalação do puxador da porta 27
Instalação do frigoríco 27
Ajustes do termostato 28
Descongelar o frigoríco 29
Trocar a lâmpada 29
Armazenamento da comida 29
Conselhos para a poupança de energia 30
Vai de férias? 30
Mover o frigoríco 30
Limpeza e manutenção 30
Limpeza interna 30
Limpeza externa 31
Advertência 31
Eliminação da embalagem e
desmantelamento dos aparelhos utilizados 31
Resolução de problemas 32
FRANÇAIS
Instructions de sécurité 34
Usage quotidien 35
Avertissement : gaz réfrigérant inammable 35
Liste des pièces 36
Commençons 37
Déballage du réfrigérateur 37
Installation de la poignée de porte 37
Installation du réfrigérateur 37
Réglage du thermostat 38
Dégivrer le réfrigérateur 39
Changer l’ampoule 39
Stockage des aliments 39
Conseils d’économie d’énergie 40
Vous partez en vacances ? 40
Déplacer le réfrigérateur 40
Nettoyage et entretien 40
Nettoyage intérieur 40
Nettoyage extérieur 41
Attention 41
Recyclage des emballages et des appareils usés 41
Résolution de problèmes 42
FRIDGE RETRO

3
ITALIANO
Istruzioni di sicurezza 44
Uso quotidiano 45
Avvertenza: gas refrigerante inammabile 45
Elenco delle parti 46
Iniziamo 47
Apertura confezione 47
Installazione della maniglia della porta 47
Installazione del frigorifero 47
Valori del termostato 48
Scongelamento del frigorifero 49
Sostituzione della lampadina 49
Conservazione degli alimenti 49
Consigli per il risparmio di energia 50
Si parte per le vacanze? 50
Spostamento del frigorifero 50
Pulizia e manutenzione 50
Pulizia interna 50
Pulizia esterna 51
Avvertenza 51
Rimozione dell’imballaggio e
smaltimento degli apparecchi usati 51
Risoluzione dei problemi 52
DEUTSCH
Sicherheitsanweisungen 54
Täglicher gebrauch 55
Achtung: brennbares kältemittelgas 56
Teileliste 56
Los geht‘s 57
Auspacken 57
Anbringen des türgriffs 57
Installation des kühlschranks 57
Einstellungen am thermostat 58
Kühlschrank abtauen 59
Lampe auswechseln 59
Lagerung von lebensmitteln 59
Empfehlungen zum energiesparen 60
Sie wollen verreisen? 60
Kühlschrank bewegen 60
Reinigung und pege 60
Innenreinigung 60
Außenreinigung 61
Achtung 61
Entsorgen der verpackung und
verschrotten von altgeräten 61
Problemlösung 62
NEDERLANDS
Beveiligingsinstructies 64
Dagelijks gebruik 65
Waarschuwing: Brandbaar koelgas 65
Lijst met onderdelen 66
Laten we beginnen 67
Uitpakken 67
Deurklink installatie 67
Koelkast installatie 67
Thermostaat instellingen 68
Ontdooi de koelkast 69
Vervang de lamp 69
Voedselopslag 69
Tips om energie te besparen 70
Ga je op vakantie? 70
Verplaats de koelkast 70
Reiniging en onderhoud 70
Interne reiniging 70
Externe reiniging 71
Waarschuwing 71
Verwijdering van de verpakking en
het weggooien van gebruikte apparaten 71
Probleem oplossing 72
POLSKI
Instrukcje bezpieczeństwa 74
Codzienny użytek 75
Ostrzeżenie: łatwopalny gaz chłodniczy 75
Lista części 76
Zacznijmy 77
Rozpakowanie 77
Montaż klamki 77
Instalacja lodówki 77
Ustawienia termostatu 78
Rozmrozić lodówkę 79
Wymień żarówkę 79
Magazyn żywności 79
Wskazówki dotyczące oszczędzania energii 80
Jedziesz na wakacje? 80
Przenieś lodówkę 80
Czyszczenie i konserwacja 80
Czyszczenie wewnętrzne 80
Czyszczenie zewnętrzne 81
Ostrzeżenie 81
Utylizacja opakowania i zużytych urządzeń 81
Rozwiązanie problemu 82
INDEX
FRIDGE RETRO

ENGLISH4
Thank you for choosing our fridge. Before using the appliance, and to ensure the best use, carefully
read these instructions.
The safety precautions enclosed herein reduce the risk of death, injury and electrical shock when
correctly adhered to. Keep the manual in a safe place for future reference, along with the com-
pleted warranty card, purchase receipt and package. If applicable, pass these instructions on to
the next owner of the appliance. Always follow basic safety precautions and accident prevention
measures when using an electrical appliance. We assume no liability for customer failing to com-
ply with these requirements.
SECURITY INSTRUCTIONS
When using any electrical appliance, basic safety precautions should always be
observed.
•
Make sure your outlet voltage and circuit frequency correspond to the voltage stated
on the appliance’s rating label. If this is not the case, please contact the aftersales
service and do not use the refrigerator.
•
Use a dedicated circuit to avoid the main circuit getting overloaded as it may blow
the fuse or circuit breaker.
•
To protect against re and electrical shock, do not immerse the cord, plug, power
base or the body of the Retro Fridge itself in water or other liquids. Do not expose the
electrical connections to water.
•
The cord should be placed in such a way that there is no risk of anyone accidentally
pulling it or tripping over it.
•
Do not kink, bend, squash, strain or damage the power cord and protect it from sharp
edges and heat sources.
•
Do not pull out the mains plug by tugging the cable.
•
Do not let the cord hang over the edge of a table or bench top. Do not let it come in
contact with hot surfaces.
•
Do not pick up or operate the appliance if the power supply cord or the plug are
damaged, or if the refrigerator is malfunctioning or has been dropped or damaged
in any way.
•
In case of damage, contact the aftersales service.
•
A damaged cord or plug must be exclusively replaced by the manufacturer or a qual-
ied person in order to avoid injuries.
•
Make sure all of the electrical connections are clean and dry before switching any-
thing on.
•
Do not connect this appliance to an extension cord.
•
Unplug the appliance from the power outlet when it’s not in use and before cleaning,
servicing, moving or maintenance of the refrigerator.
•
Supervision or instruction concerning use of the appliance in a safe way and under-
stand the hazards involved.
•
To avoid the risk of children becoming trapped and suffocating, do not allow them to
play or hide inside the appliance
•
Do not use chemicals, steel wool or abrasive cleaners to clean the outside of the unit,
as these will scratch the surface.
•
Ensure that all the parts are correctly assembled before operation.
•
If the product is defective or if it has been damaged in any way, please contact the
aftersales service.
ENGLISH

ENGLISH 5
DAILY USE
•
If there is smoke coming out of the appliance or it has an unusual smell, unplug it
immediately and contact the aftersales service.
•
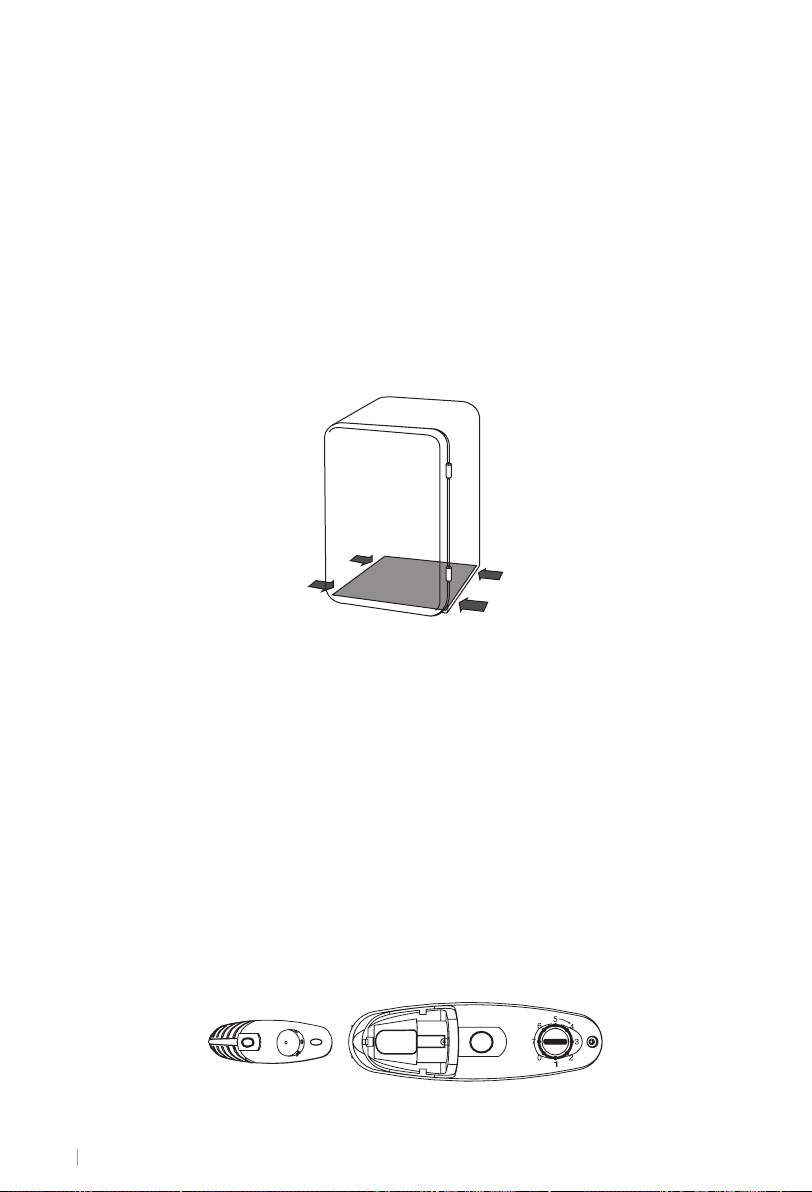
Place the product on a level and stable surface, away from direct sunlight or exces-
sive heat.
•
Do not place the product near heat sources such as radiators, heat registers, stoves
or other appliances that produce heat.
•
Do not place the product near other items that may damage it, such as naked ame
sources (lit candles) or objects containing water (such as a vase or a glass).
•
Care should be taken so that objects do not fall and liquids are not spilled into any
openings.
•
The Manufacturer declines any liability for injury or damage to property if the above
advice and precautions are not respected.
•
Prevent overheating: Place the product in a well-ventilated room. Ensure that air can
circulate freely around the back of the refrigerator.
•
To ensure the best performance, leave a distance of approximately 100 mm on all
sides of the fridge.
•
This appliance features a short power cord to reduce the risk of the cable getting
tangled and people tripping. Do not use single/multi adapters or extension cords.
•
There are no user-serviceable parts inside. Do not attempt to repair this product.
Please contact our aftersales service.
•
Before its rst use, it is advisable to wait at least eight hours before connecting the
appliance to enable the oil ejected from the compressor to return to the crankcase.
•
Make sure there is proper air circulation around the appliance to prevent overheat-
ing. To ensure there is enough space follow the installation instructions.
•
The appliance must not be located near radiators or cookers.
•
Make sure that the mains plug is accessible after installing the appliance.
• Always allow hot foods and drinks to cool to room temperature before putting them in the com-
partment.
• Store pre-packaged food according to the instructions on the label.
WARNING! Do not use mechanical, electric or chemical means other than those recommended by
the Manufacturer to speed up the defrosting process.
• Never use a sharp or metal instrument to remove frost or clean the appliance. Use a plastic scrap-
er, if necessary.
• Strictly follow the refrigerator’s storage guidelines. Refer to relevant instructions.
• If the refrigerator is unplugged, turned off or has lost power, you must wait 3 to 5 minutes before
restarting the unit. If you attempt to restart it before this time delay, the refrigerator will not start.
FLAMMABLE - REFRIGERANT GAS WARNING
• Danger! Risk of re or explosion. Flammable refrigerant used. Maintenance and repair work may
only be carried out by authorised and appropriately trained personnel. Do not damage the appli-
ance’s refrigerant circuit pipes.
• Caution! Risk of re or explosion. Dispose of the refrigerator in accordance with federal and local
regulations. Refrigerants must be evacuated in accordance with established procedures.
Appliances with Isobutane (R600a): isobutane is a natural gas without environmental impact, but it is
ammable. Therefore, make sure the refrigerant circuit pipes are not damaged. Keep special attention
in case of damaged pipes emptying the refrigerant circuit.
WARNING: Do not damage the refrigerant circuit! Never use an appliance with a damaged refriger-
ant circuit! If the refrigerant circuit is damaged, avoid proximity to open res and all types of heat
and sources of ignition. Thoroughly ventilate the room in which the appliance is located.
• It is hazardous for anyone other than an authorised service person to service this appliance.
• The room in which the appliance is located must be at least 1m³ per 8g of refrigerant. The amount
and type of refrigerant in the appliance can be found in the Technical Specications.

ENGLISH6
PARTS LIST
1. Freezer
2. Internal light
3. Adjustable shelves
4. Wine shelf
1
2
3
4
5
6
7
8
9
10
• Do not use or place electrical devices inside the appliance compartments if they are not of the
type expressly authorised by the Manufacturer.
• Do not store explosive substances such as aerosol cans with a ammable propellant in this ap-
pliance.
• During transportation and installation of the appliance, ensure that none of the components of the
refrigerant circuit becomes damaged.
• Avoid open ames and sources of ignition.
• Thoroughly ventilate the room in which the appliance is located.
• It is dangerous to alter the specications or modify this product in any way.
• A damaged cord can cause a short circuit, re and/or electrical shock.
• Excessive weight hazard. Take extra care when moving the fridge to avoid any injuries. This may
require two people or mechanical aid when installing the fridge. Failure to do so can result in back
injuries, amongst others.
• Avoid prolonged exposure of the appliance to direct sunlight.
• This appliance is intended to be used indoors only.
• All electrical components (plug, power cord, compressor, etc.) must be exclusively replaced by a
certied service agent or qualied service personnel.
• DO NOT USE AN EXTENSION CORD. Plug the appliance into a grounded socket: the appliance
must be correctly connected to an approved earthing system. Do not use single/multi adapters or
extension cords.
• Make sure that the power plug is not squashed or damaged. This could lead to overheating and
cause a re.
5. Hinge
6. Crisper drawer
7. Leveling foot
8. Adjustable thermostat
9. Door shelves
10. Anti-tip bottle racks

ENGLISH 7
UNPACKING
LET’S GET STARTED
• This product has been packaged to protect it against transportation damage. Remove all packag-
ing materials from around and inside the appliance, but do not remove any foam insulation sur-
rounding the pipes at the back. Keep the original packaging and materials in a safe place; this will
help prevent any damage if the product needs to be transported in the future, and you can use it
to store the appliance when it is not in use. In the event that the packaging is to be disposed of,
please recycle all packaging materials where possible.
• Plastic wrapping can constitute a suffocation hazard for pets, babies and young children. Ensure
all packaging materials are out of their reach and disposed of safely.
• Parts: Check to ensure you have all the parts shown at the beginning of this manual.
• Unwind the power cord completely and inspect it for damage. Do not use the appliance if the
refrigerator or its cord have been damaged or if they are not working properly. In case of damage,
contact our aftersales service.
• Make sure the refrigerator is disconnected from the power supply before cleaning the interior sur-
faces and all internal accessories with lukewarm water, a soft cloth and neutral cleaning agents.
This will remove any dust from transit and storage and will help remove the typical smell of a
brand new product. Dry thoroughly. Important: do not use harsh or abrasivedetergents or powders,
as these will damage the nish.
DOOR HANDLE INSTALLATION
The door handle comes detached due to packaging restrictions. It can be easily attached following
the instructions.
• Fix the two screws (1) to the door.
• Insert the two xed screws into the two holes on the metal handle (2).
• Fasten the two screws (3) to the bottom of the handle.
1
12
33
FRIDGE INSTALLATION
Before installing your new fridge, read all of the safety guidelines in this manual and then follow the
instructions below:
1. Place the fridge on a sturdy, level oor for quieter operation. Ensure that the oor is strong enough
to support the fridge when it is fully loaded.
2. If the refrigerator is to be placed on a carpet, put a wooden board in between the fridge and the
carpet. Be aware that, by placing the refrigerator on top of a carpet, the heat from the compressor
may cause the carpet to fade.
3. This appliance is designed to be freestanding and it should not be recessed or built-in.
4. Do not tilt the fridge more than 45° from its upright position when moving it.

ENGLISH8
ADJUSTING THE THERMOSTAT
• To start the refrigerator, turn the thermostat knob to the position corresponding to the desired
temperature. The temperature of the refrigerator is controlled by adjusting/setting the thermo-
stat knob, located at the top of the cabinet.
• The settings 0(OFF)-7(MAX) regulate the internal temperature of the refrigerator.
Setting 0 (OFF): not operating (Please press the knob and turn to get the “0” position).
Setting 1 (Min.): lowest setting (warmest internal temperature).
Setting 7 (Max.): highest setting (coldest internal temperature).
NOTE: The refrigerator temperature will vary depending on the quantity of cans/bottles stored and
on the frequency with which the door is opened. The internal temperature varies in different parts
of the refrigerator. The back of the refrigerator is coldest. Please keep the cans/bottles away from
the rear wall to avoid them freezing and to allow cold air circulation.
NOTE: The thermostat 0 (OFF) position indicates that the refrigerator is turned off even though
power is still being supplied to the appliance. By turning the thermostat knob to the left, the refrig-
erator will turn on automatically. When the refrigerator is not going to be used for a long period of
time, disconnect the plug and leave the door partially open.
Light Thermostat
5. Avoid areas where the appliance would be exposed to direct sunlight, sources of heat (stove, heat-
er, radiator, etc.), extremely cold ambient temperatures or excessive moisture and high humidity.
Installing it in the coolest area of the room will save energy consumption and running costs.
Handle with care! Do not apply force to any area such as the condenser or the door. The metal rails on
the bottom of the refrigerator may have sharp edges, so always unpack and handle with care. Do not
drag the unit: place it carefully into position to avoid scratching the oor.
SPACE REQUIREMENTS
• Place the unit so there is enough space for the door to open.
• Leave a minimum clearance of 100mm at the back of the fridge to ensure air can circulate freely
so the compressor and condenser can cool down. Also leave at least 50mm of space at the top of
the fridge and 50mm on each side.
LEVELLING
• The appliance must be level in order to work properly. If the unit is not level, the doors and magnetic
seal alignments will not be covered properly.
• Your refrigerator has two adjustable front feet, one on the right and one on the left. In most cases, the
refrigerator should be steady when both feet are touching the oor. If your refrigerator seems un-
steady or if you want the doors to close more easily, adjust the refrigerator’s tilt by levelling the feet.

ENGLISH 9
DEFROSTING
REPLACING THE LED LIGHTBULB
The surface of the evaporator ices up when the refrigerator is working. This is an entirely normal
part of the operation. If the frost layer is more than 3mm (1/8”) thick, the refrigerator must be de-
frosted and cleaned to avoid unnecessary energy consumption and inefcient operation.
• Remove all of the items from inside and unplug the refrigerator.
• After defrosting, clean the refrigerator and allow it to dry.
• Reconnect to the mains supply and turn the fridge on.
WARNING: Food should not be stored in the freezer in contact with its wall. When the surface of
the evaporator freezes it creates a thin layer of ice that would end up turning anything in contact
with this part of the freezer into a block of ice, which would also hinder the correct functioning of
the product.
Your fridge uses a long-life, energy-saving LED lightbulb. Should you need to replacethis light, please
contact your nearest retailer or service agent for a suitable replacement part.
To replace the lightbulb:
1. Disconnect the appliance from the power supply.
2. To remove the light shield, gently squeeze the light shield and slightly turn it deasil, then remove
the screws on both sides.
3. Gently pull out the connectors and take out the light box, but keep the controller and the ther-
mostat knob.
4. Insert the connectors into the new light box, place the controller and thermostat knob back, and
fasten them.
5. Put the light cover back and adjust it by turning it widdershins.
FOOD STORAGE
1. The refrigerator compartment is suitable for short-term storage of fresh food. The internal tem-
perature of the appliance may be affected by the ambient temperature, frequency of door open-
ing, as well as the location of the appliance. When setting the temperature , these factors should
be taken into consideration.
2. In order to maintain good cooling efciency and save energy, we recommend you do not open the
door for too long or too often. Do not overload the fridge, and leave enough space around items to
allow cold air to ow. Do not block ventilation openings.
3. The shelves can be positioned to suit individual storage requirements.
4. In order to keep vegetables fresh and crisp, make sure they are properly packaged and the cover
sits rmly on top of the crisper drawer (applicable model).
5. You can conveniently store two wine bottles in the hanging wine rack. If you don’t need this wine
rack, or you wish to remove it for cleaning, pull the shelf that holds the rack completely out of the
fridge, then slide the wine rack off the side of the shelf (applicable model).

ENGLISH10
• Install the refrigerator in a cool, well ventilated place, protect it from direct sunlight and keep well
away from heat sources.
• Do not put hot food in the fridge or freezer. Wait for foods and drinks to cool to room temperature
before placing them in the fridge.
• Do not overload the fridge, as it forces the compressor to run for longer.
• Wrap foods properly and wipe containers dry before placing them in the fridge. This cuts down on
frost build-up inside the fridge.
• Do not line any fridge container with aluminium foil, wax paper or paper towels. Liners interfere
with cold air circulation, reducing cooling efciency.
• Position food so that air can circulate freely around it (food should not touch each other and try to
leave space between food and the rear wall).
• Do not leave the fridge door open for longer than required to prevent the unit from overheating.
• Make sure the food doesn’t touch the back of the compartment.
• Don’t set the thermostat to extremely cold temperatures.
ENERGY-SAVING TIPS
• Short vacation: Leave the fridge running during vacations shorter than a month long. Use up any
perishables and freeze other items.
• Long vacation: Disconnect the appliance from the power supply, empty it, defrost it (if necessary)
and clean it.To prevent odour and mould growth, keep the doors slightly ajar to let aircirculate inside
the compartments, blocking it open, if necessary. (While the fridge remains open, restrict children’s
access to the room to avoid child entrapment).
1. Unplug the fridge and remove all food from the inside. Clean, wipe and dry thoroughly.
2. Securely tape the doors closed and tape the power cord to the back of the refrigerator. Take out
all removable parts, wrap them well, and tape them together so they don’t shift and rattle during
the move.
3. Depending on the model, raise the front of the refrigerator so it rolls more easily OR screw in the
levelling feet so they don’t scratch the oor.
CAUTION! Never pick the refrigerator up by the door.
4. Protect the outside of the unit with a soft, clean surface, such as a towel, blanket or piece of
cardboard and make sure the fridge stays secure in an upright position during its transportation.
Disconnect the appliance from the power supply before cleaning.
GOING AWAY?
MOVING THE FRIDGE
CLEANING AND MAINTENANCE
INTERNAL CLEANING
• Do not pour water over the appliance.
• The cavity should be cleaned periodically using a solution of baking soda and lukewarm water
(5ml to 0.5 litre of water)
• Hand wash, rinse, and dry removable parts and interior surfaces thoroughly. Use a clean sponge or
soft cloth and a mild detergent in warm water. Do not put them in the dishwasher.
• Do not use abrasive products, detergents or soaps.
• After washing, rinse with clean water and dry carefully.
• Once you have nished cleaning, plug in the refrigerator or reconnect power with dry hands.

ENGLISH 11
EXTERNAL CLEANING
• Wash stainless steel and painted metal parts with a clean sponge or soft cloth and a mild deter-
gent in warm water.
• Take caution when cleaning as there are sharp edges on the bottom of the unit.
• Once or twice a year, dust the back of the appliance with a brush or vacuum cleaner, as an accu-
mulation of dust will affect the performance of the appliance and cause an increase of energy
consumption.
WARNING
• Do not use abrasive or harsh cleaners such as window sprays, scouring cleansers, ammable u-
ids, cleaning waxes, concentrated detergents, bleaches or cleansers containing petroleum prod-
ucts on plastic parts, interior and door liners or gaskets. Do not use paper towels, scouring pads,
or other harsh cleaning tools. Never use ammable uids or sprays for cleaning as the fumes from
these substances can create a re hazard or explosion.
• Never clean the appliance with a steam cleaner. Moisture could accumulate in the electrical com-
ponents. Failure to follow this recommendation could result in electrical shock. Hot steam can
lead to the damage of plastic parts.
• The appliance must be completely dry before it is turned back on.
• Essential oils and organic solvents (e.g. lemon juice or the juice from an orange peel) and cleansers
that contain acetic acid can damage the plastic parts. Do not clean the appliance with substances
such as these.
Be sure to make any locks unusable, remove any doors and discard separately.
Warning-chemical hazard: do not allow children to play with the old appliance.
Contact your local authority for disposal procedures.
• Before disposing of an old appliance, please make sure it is switched off and safe. Unplug the
appliance and break any locks in order to avoid children becoming trapped.
• Please note: the refrigeration system contains gases and refrigerants which require specialist
waste disposal. The valuable materials contained in a refrigerator can be recycled.
• You can contribute to environmental awareness by insisting on an appropriate non-polluting
method of disposal.
• Do not allow pets or children to play with the packaging, and dispose of plastic bags safely.
• The cardboard can be broken or cut into smaller pieces and recycled. The wrapping covers are
made of polyethylene. The polyethylene pads and padding don’t contain uorochloric hydrocar-
bons, and therefore they are recyclable.
WARNING!
Risk of child entrapment. Before you throw away your old appliance:
• Take off the doors.
• Leave the shelves in place so that children may not easily climb inside.
• Cut the power cord as close to the appliance as you can.
• If this appliance, featuring a magnetic door seal, is to replace anolder appliance having a spring lock
(latch) on the door or lid, please make the spring lock unusable before you discard the old appliance.
This will reduce the risk of trapping children or animals inside.
DISPOSAL OF OLD APPLIANCES AND PACKAGING

ENGLISH12
TROUBLESHOOTING
PROBLEM CAUSE/SOLUTION
Refrigerator will not
operate.
The appliance is not plugged in. Plug it in to an earthed socket.
No power to the electrical outlet. Check that the plug is not faulty.
Household fuse has blown/circuit breaker has tripped. Replace the fuse or reset
the circuit breaker.
Check that the voltage is correct for the appliance.
The temperature inside
the appliance is not cold
enough.
Large amount of warm food recently added. Allow several hours for the refrigerator to
return to its normal temperature.
Controls are not set correctly for the surrounding conditions.
Check that the appliance is not placed in direct sunlight, or too near to a heating
source.
Check that the ambient temperature is within the operation limits of the appliance.
Are the doors of the appliance opened frequently? Once the door is opened, the
humidity found in the air in the room enters the appliance, especially if the humidi-
ty levels in the room are very high. The more frequently the door is opened in humid
conditions the more chance of moisture building up.
The door is not completely closed.
The door gasket is not properly sealed.
Air vents are blocked. Remove any items that are immediately in front of the vents.
The temperature within
the appliance is too cold.
Increase the ambient temperature within the fridge by adjusting the thermostat to a
lower setting. The highest setting should only be used as a rapid cool setting and should
only be set 2 hours before storing a large load of food. If this is not done, the temperature
in the fridge compartment could fall below 0°C, as the compressor will run continuously.
Moisture builds up on the
inside or outside walls of
the fridge.
A hot and humid environment will contribute to moisture being built-up. This is
normal.
Smell/odour
Check that all the food and the drinks in the fridge are within their ‘best before’
date and is packaged correctly. If this weren’t the case, repackage or throw the
expired food away immediately.
Check for spillage on each shelf, rack and drawer. You may need to remove the
drawers to check that no food or liquids have settled underneath them. Wipe up
any spills immediately to avoid smells and unwanted odours.
The doors do not close
properly.
Ensure there are no objects obstructing the door.
Make sure all bins and shelves are in their correct position.
Check the door seal is not warped or torn.
Confirm the appliance is level.

ENGLISH 13
PROBLEM CAUSE/SOLUTION
Unusual noises.
Check that the appliance is on a flat, level surface and is stable.
Check the spacing around the appliance and ensure it is not touching other items.
Bubbling and gurgling sound: This noise is the coolant fluid flowing through the
pipes within the system. It’s normal.
Water flowing sound: This is the normal sound of water flowing into the drain
during the defrosting process.
If the appliance is operating noisily (compressor noise): This is normal. This noise
indicates that the compressor is operating normally. As the compressor is being ener-
gized, it might run a bit more noisily for a short period of time.
Popping and cracking noises are heard when the inside walls contract/expand,
especially during initial cooldown.
The fridge door will not
open.
If the door has just been opened, leave it for a few minutes to allow the air pressure to
equalise before trying again.
The compressor runs
continuously.
The temperature is set too cold: select a lower (warmer) setting.
The door is open or something is obstructing proper door closure.
The door gaskets are worn, dirty or damaged.
A large load of food has been added.
The room temperature is higher than normal.
The external fridge
surface is warm.
The exterior walls can be warmer than room temp. It’s normal while the compressor
is transfering heat from the inside of the fridge.
In compliance with Directives: 2012/19/EU and 2015/863/EU on the restriction of the use of dangerous substanc-
es in electric and electronic equipment as well as their waste disposal. The symbol with the crossed dustbin
shown on the package indicates that the product at the end of its service life shall be collected as separate
waste. Therefore, any products that have reached the end of their useful life must be given to waste disposal
centres specialising in separate collection of waste electrical and electronic equipment, or given back to the re-
tailer at the time of purchasing new similar equipment, on a one for one basis. The adequate separate collection
for the subsequent start-up of the equipment sent to be recycled, treated and disposed of in an environmentally
compatible way contributes to preventing possible negative effects on the environment and health and optimis-
es the recycling and reuse of components making up the apparatus. Abusive disposal of the product by the user
involves application of the administrative sanctions according to the laws.

ESPAÑOL14
ESPAÑOL
Gracias por elegir nuestra nevera. Antes de utilizar este electrodoméstico y para asegurar su mejor
uso, por favor, lea detenidamente las instrucciones.
Las medidas de seguridad aquí indicadas reducen el riesgo de incendio, descarga eléctrica y le-
siones cuando se siguen correctamente. Guarde el manual en un lugar seguro para futuras referen-
cias, así como la garantía, el recibo de compra y la caja. Si procede, entregue estas instrucciones al
futuro propietario del electrodoméstico. Siempre siga las instrucciones básicas de seguridad y las
medidas de prevención de riesgos cuando utilice un electrodoméstico eléctrico. El fabricante no
se responsabilizará de ningún daño derivado del incumplimiento de estas instrucciones por parte
del usuario.
INSTRUCCIONES DE SEGURIDAD
Al utilizar cualquier aparato eléctrico, deben observarse siempre las precauciones bási-
cas de seguridad.
•
Asegúrese de que el voltaje y la frecuencia del circuito corresponden a los indicados en
la etiqueta de clasicación del aparato. Si este no fuese el caso, contacte con el servicio
de postventa y no utilice la nevera.
•
No conecte otros electrodomésticos simultáneamente en el mismo circuito eléctrico,
puesto que puede sobrecargar el circuito y quemar los fusibles o causar un cortocircuito.
•
Para evitar incendios y descargas eléctricas, no sumerja el cable, el enchufe, la base
eléctrica oel cuerpo de la nevera. Noexponga lasconexiones eléctricas a ningún líquido.
•
El cable de alimentación debería estar posicionado de tal manera que no haya riego de
que alguien lo estire por accidente o se tropiece.
•
No retuerza, doble, aplaste, presione o dañe el cable de alimentación y protéjalo de bor-
des alados y del calor.
•
Sujete el enchufe cuando desconecte la nevera, no tire del cable.
•
No deje que el cable cuelgue del borde de una mesa o encimera. No permita que entre en
contacto con ninguna fuente de calor ni supercies calientes.
•
No levante u opere el aparato si el cable o el enchufe están dañados, si la nevera falla o
si se le ha caído o lo ha dañado de algún modo.
•
En caso de avería, contacte con el servicio de postventa.
•
Un cable o enchufe dañados debe reemplazarlos exclusivamente personal autorizado
para evitar riesgos.
•
Asegúrese de que todas las conexiones eléctricas están limpias y secas antes de conec-
tar la nevera.
•
No conecte este electrodoméstico a un prolongador.
•
Desconecte el aparato de la corriente eléctrica cuando no esté en uso, antes de limpiarlo
o moverlo.
•
Este aparato no está concebido para utilizarse mediante un temporizador externo o un
sistema de control remoto separado.
•
Este aparato está diseñado para uso exclusivamente doméstico.
•
Este electrodoméstico no está concebido para uso comercial. No utilizar en el exterior.
•
Use este frigoríco solo como se indica en el manual. Una instalación indebida así como
el uso de accesorios no recomendados por el fabricante o cualquier otro uso no indicado
podría causar fuego, descargas eléctricas o lesiones.
•
El fabricante no se responsabiliza de ningún daño ocasionado por un uso indebido.
•
La nevera no está destinada para uso por las personas con capacidad física, sensorial o
mental reducida, falta de experiencias y conocimientos, a menos que se les haya dado la
supervisión o instrucción en la relación con el uso del aparato por la persona responsa-
ble de su seguridad.
•
Los niños deben ser supervisados para asegurar que no jueguen con el aparato. Super-
víselos detenidamente cuando se vaya a utilizar cualquier aparato cerca de ellos.

ESPAÑOL 15
USO DIARIO
• No guarde comida caliente en la nevera.
• Cuando guarde comida precocinada siga las instrucciones del envase.
¡ADVERTENCIA! No utilice dispositivos mecánicos u otros medios para acelerar el proceso de de-
scongelación.
• No utilice nunca un instrumento de metal para eliminar escarcha o limpiar la nevera. Si fuese
necesario, utilice una espátula de plástico.
• Siga estrictamente las recomendaciones de almacenamiento. Consulte las instrucciones corre-
spondientes.
• Si se desconecta o apaga la nevera o si se va la luz, debe esperar de 3 a 5 minutos antes de volverla
a encender. Si intenta reiniciarla antes de este plazo, no arrancará.
•
No utilice productos químicos, estropajos de acero o limpiadores abrasivos para limpiar
el exterior de su frigoríco para no dañar la supercie.
•
Asegúrese de que todas las partes estén bien montadas antes de usarlo.
•
Mantenga el aparato según se indica para asegurar que funciona correctamente.
•
Si hay alguna avería, o si está el producto dañado, contacte con el servicio de postventa.
•
Si observa que la nevera echa humo o huele raro, desconéctela de inmediato y llame al
servicio técnico.
•
Sitúela en una supercie lisa, rígida y estable, apartada de fuentes de luz solar directa
o calor excesivo.
•
No ponga la nevera cerca de fuentes de calor tales como radiadores, calefactores,
fogones u otros electrodomésticos que generen calor.
•
No ponga el aparato cerca de otros objetos que puedan dañarlos, tales como llamas (ve-
las encendidas) u objetos que contengan agua (un orero o un vaso).
•
Tenga cuidado para que no caigan objetos encima de la nevera ni entren líquidos por
cualquier abertura.
•
El fabricante no se responsabiliza de lesiones o daños a la propiedad si no se respetan
los consejos y precauciones anteriores.
•
Evite el sobrecalentamiento: Ponga el electrodoméstico en un lugar bien ventilado.
Asegúrese de que el aire circula bien por la parte trasera de la nevera.
•
Para asegurar un mejor funcionamiento, deje una distancia de unos 100mm a cada lado
de la nevera y por detrás.
•
Este aparato cuenta con un cable de alimentación corto para reducir el riesgo de que se
enrede y de que la gente se tropiece. No se recomienda el uso de un prolongador.
•
No contiene partes que puedan ser reparadas o reemplazadas por el usuario. No intente
reemplazarlo usted mismo, contacte con el servicio de postventa.
•
Antes del primer uso, es aconsejable esperar por lo menos 8 horas antes de conectar el
aparato para permitir que el aceite vuelva a llegar al compresor.
•
El aire debería de poder uir alrededor de la nevera para evitar que se sobrecaliente.
Para conseguir que ventile bien siga las instrucciones concernientes a la instalación.
•
El aparato no debería estar cerca de radiadores o fogones.
•
Asegúrese de que el enchufe queda accesible después de la instalación de la nevera.
ADVERTENCIA: GAS REFRIGERANTE INFLAMABLE
• ¡Peligro! Riesgo de fuego y explosión. El gas refrigerante es inamable y únicamente puede ma-
nipulado por personal autorizado. No perfore el tubo refrigerante.
• ¡Precaución! Riesgo de fuego y explosión. Por favor, contacte con la autoridad municipal corre-
spondiente para informarse sobre el desecho de los RAEE para su reutilización, reciclaje y su
recuperación. Su distribuidor o administración local le informará gustosamente sobre las vías y
posibilidades más ecaces y actuales para la eliminación respetuosa con el medioambiente de
estos materiales.
El circuito refrigerante contiene el gas refrigerante isobutano (R600a), sin embargo, a pesar de
tener una gran compatibilidad, medioambiental es inamable. Asegúrese de que durante el trans-
porte e instalación del electrodoméstico, no se daña ninguna parte del circuito.
ADVERTENCIA: ¡No dañe el circuito refrigerante! ¡Nunca utilice un aparato que tenga el circuito re-
frigerante dañado! Si el circuito se estropea, no lo acerque a ninguna fuente de calor ni de ignición
ni a fuego. Ventile a fondo la habitación en que se encuentra.

ESPAÑOL16
LISTA DE PARTES
• Es peligroso que personal no autorizado intente reparar el aparato.
• La habitación en la que se vaya a tener la nevera debería ser de al menos 1m³ por cada 8g de
refrigerante. La cantidad y el tipo de refrigerante vienen indicados en las Especificaciones
Técnicas.
• No utilice otros aparatos eléctricos (como heladeras) dentro del frigoríco, salvo que lo haya
aprobado para este uso el fabricante.
• No guarde substancias explosivas tales como latas de aerosol con propulsor inamable en este
aparato.
• Asegúrese de que durante el transporte e instalación del electrodoméstico, no se daña ninguna
parte del circuito refrigerante.
• Evite llamas abiertas y fuentes de ignición.
• Ventile a fondo la habitación en que se encuentra.
• Es peligroso alterar las especicaciones o modicar este producto de cualquier manera.
• Cualquier daño al cable de alimentación puede causar un cortocircuito, fuego o descargas
eléctricas.
• Este electrodoméstico es pesado. Vaya con cuidado cuando lo mueva. Para evitar dolores de es-
palda o cualquier otro tipo de lesión, pida ayuda a otra persona o considere ayuda mecánica a la
hora de instalarlo.
• Evite la exposición prolongada de la nevera a la luz solar.
• Este electrodoméstico es de uso exclusivamente doméstico.
• Cualquier componente eléctrico (enchufe, cable de alimentación, compresor, etc.) debe reempla-
zarlo personal autorizado.
• NO UTILICE UN PROLONGADOR. Use exclusivamente la toma de la pared. No conecte el frigoríf-
ico a una toma en la que hayan conectados otros aparatos.
• Asegúrese de que el cable no está aplastado ni dañado por la parte trasera del electrodoméstico
ya que podría sobrecalentarse y provocar un incendio.
1. Cajón congelador
2. Lámpara interior
3. Estantes ajustables
en altura
1
2
3
4
5
6
7
8
9
10
4. Estante para el vino
5. Bisagra
6. Cajón para la ensalada
7. Pies ajustables
8. Termostato ajustable
9. Estantes de la puerta
10. Soporte metálico para
botellas

ESPAÑOL 17
DESEMBALAJE
EMPECEMOS
• Este producto se ha embalado para protegerlo de daños durante el transporte. Retire todo el ma-
terial de embalaje de alrededor y de dentro del electrodoméstico, pero no retire la espuma de
aislamiento de alrededor de las tuberías en la parte trasera. Guarde la caja de cartón original y los
materiales en un lugar seguro. Ayudará a prevenir daños si hubiese que transportar el material en
el futuro y puede utilizarlo para almacenar el frigoríco cuando no lo esté gastando. Dado el caso
en que tuviese que desechar el cartón, por favor, recicle todo lo que le sea posible.
• Los envoltorios de plástico pueden suponer un riesgo de asxia para mascotas, bebés y niños, así
que, por motivos de seguridad, tírelos a la basura de reciclaje.
• Compruebe que le han llegado todas las partes indicadas en las páginas anteriores.
• Desenrolle por completo el cable e inspecciónelo para detectar cualquier posible daño. No utilice
el electrodoméstico si la nevera o el cable de alimentación tuviesen algún daño o no funcionasen
correctamente. En caso de daño, consulte con nuestro servicio de postventa para que le reparen
o sustituyan el producto.
• Asegúrese de que el frigoríco está desconectado de la corriente antes de limpiar su interior y
todos sus accesorios internos con agua templada, un trapo suave y jabón neutro. Esto eliminará el
polvo y ayudará a deshacerse del típico olor a producto nuevo. Después séquelo bien. Importante:
no emplee detergentes o polvos abrasivos que dañarán el acabado.
INSTALACIÓN DEL TIRADOR DE LA PUERTA
La manivela viene desmontada debido a restricciones del empaquetado. Se puede instalar fácil-
mente siguiendo estas instrucciones.
• Fije los dos tornillos (1) a la puerta.
• Ponga la manivela de metal (2) en los dos tornillos que acaba de instalar y haga que coincidan con
los dos agujeros en la manivela.
• Apriete los dos tornillos (3) en la parte inferior de la manivela.
1
12
33
INSTALACIÓN DE LA NEVERA
Antes de instalar su nevera nueva, lea detenidamente el manual y siga estas instrucciones:
1. Ponga la nevera en un suelo estable y nivelado para que haga menos ruido. Asegúrese de que el
suelo es lo sucientemente resistente para soportar su peso cuando esté completamente llena.
2. Si fuese a poner la nevera sobre una alfombra, colóquela coloque un tablero de madera entre la
alfombra y la nevera. Tenga en cuenta que poner la nevera sobre una alfombra puede causar que
el calor que emite el compresor descolore la alfombra.
3. Este electrodoméstico está diseñado para sujetarse por sí mismo y no para ir empotrado o sobre
un soporte.
4. No incline la nevera más de 45º cuando vaya a moverla.

ESPAÑOL18
AJUSTES DEL TERMOSTATO
• Para arrancar la nevera, gire la rueda del termostato hasta la temperatura deseada. Puede ajustar
la temperatura girando la perilla de control del termostato que se encuentra en la parte superior
del interior de la nevera.
• Los ajustes 0(OFF) - 7(MAX) regulan la temperatura interior del frigoríco.
Ajuste 0 (OFF): No operativo. (Por favor, presione la perilla y gírela hasta el 0 para apagarlo.)
Ajuste 1 (Min.): Valor más bajo (Temperatura interna más cálida).
Ajuste 7 (Max.): Valor más alto (Temperatura interna más fría).
NOTA: La temperatura del frigoríco variará dependiendo de la cantidad de latas/botellas guar-
dadas en el interior y de la frecuencia con que se abra la puerta. La temperatura interna varia en
diferentes partes del interior de la nevera. La parte trasera es la más fría. Por favor, mantenga las
latas y las botellas alejadas de la parte trasera de la nevera para evitar que se congelen y facilitar la
circulación del aire frío.
NOTA: La posición 0 (Apagado) del termostato indica que el frigoríco está apagado a pesar de que
todavía se le suministra energía. Al girar la perilla del termostato hacia la izquierda, la nevera se
enchufará automáticamente. Cuando la nevera no se vaya a utilizar durante un periodo de tiempo
prolongado, desconecte el enchufe y deje la puerta entreabierta.
Luz Termostato
5. Evite las zonas donde el electrodoméstico estaría expuesto a la luz solar, a fuentes de calor
(fogones, estufa, radiador, etc.) temperaturas ambientes extremadamente bajas o con mucha hu-
medad. Instalarlo en la zona más fresca de la habitación ahorrará energía.
¡Manéjelo con cuidado! No aplique fuerza sobre ninguna parte como el condensador o la puerta.
Los rieles metálicos debajo del frigoríco pueden tener bordes alados, así que siempre desem-
paquételo con cuidado. No arrastre la nevera, póngalo cuidadosamente en su sitio para que no le
raye el suelo.
REQUISITOS DE ESPACIO
• Instale la nevera de tal modo que cuente con suciente espacio para abrir la puerta.
• Deje una separación mínima de 100 mm en la parte trasera de la nevera para asegurar que el aire
pueda circular libremente y así el compresor y el condensador se puedan enfriar. También deje por
lo menos 50 mm de espacio en la parte superior de la nevera y 50 mm a cada lado.
NIVELACIÓN
• El electrodoméstico debe estar nivelado para que funcione correctamente. Si no está nivelada
correctamente, las puertas y la alineación de sellado magnético no estarán cubiertos correcta-
mente.
• Para nivelar la nevera, ajuste uno o los dos pies niveladores de su base.

ESPAÑOL 19
DESCONGELAR EL FRIGORÍFICO
CAMBIAR LA BOMBILLA
La supercie del evaporador se congela cuando la nevera está en marcha. Es un proceso complet-
amente normal del funcionamiento. Si la capa de hielo es mayor a 3mm (1/8”) de grosor, debe des-
congelar la nevera y limpiarla para evitar un consumo de energía innecesario y un funcionamiento
ineciente.
• Retire todos los productos del interior y desconecte el frigoríco.
• Tras descongelarlo, límpielo y deje que se seque.
• Vuelva a conectarlo a la corriente y enchúfelo.
ADVERTENCIA: Los alimentos no deben almacenarse en el congelador en contacto con la pared.
Cuando la supercie del evaporador se congela crea una na capa de hielo que acabaría convir-
tiendo en un bloque de hielo cualquier cosa en contacto con esta parte del congelador, lo que entor-
pecería también el correcto funcionamiento del producto.
Su nevera utiliza bombillas LED de larga vida útil y que contribuyen al ahorro de energía. Si necesitara
cambiar la bombilla, póngase en contacto con su distribuidor más cercano para que puedan ofrecerle
una pieza de recambio adecuada.
Para cambiar la bombilla:
1. Desconecte el enchufe y asegúrese de que la luz está apagada.
2. El modelo incluye una cubierta para la bombilla. Para retirarla, presiónela y gírela ligeramente en el
sentido de las agujas del reloj, después retire los tornillos de ambos lados.
3. Retire los conectores, saque la caja de luz por completo, pero quédese con el controlador y la perilla
del termostato.
4. Introduzca los conectores a la nueva caja de luz, vuelva a colocar el controlador y la perilla del ter-
mostato y asegúrelos.
5. Vuelva a colocar la tapa girándola en sentido contrario a las agujas del reloj.
ALMACENAMIENTO DE LA COMIDA
1. El compartimento del frigoríco es adecuado para la conservación de comida fresca a corto
plazo. La temperatura interna varía dependiendo de la cantidad de comida almacenada, de la
temperatura ambiente y de la frecuencia con que se abra la puerta. Ajuste el termostato según
corresponda.
2. Para una buena eciencia de enfriamiento y ahorrar energía, no deje la nevera abierta mucho
tiempo ni demasiado a menudo. No sobrecargue la nevera y deje bastante espacio entre los ali-
mentos para que pueda uir el aire frio. No bloquee los conductos de ventilación.
3. Las estanterías se pueden ajustar a diferentes alturas dependiendo de sus necesidades.
4. Para que las frutas y verduras se mantengan frescas en el cajón de las verduras, asegúrese de
que están debidamente envasadas y de que la tapa está correctamente situada sobre el cajón de
las verduras (según modelo).
5. Puede guardar dos botellas de vino en el botellero colgante. Si no necesita el botellero o quiere
limpiarlo, puede extraerlo. Extraiga por completo el estante sobre el que se sujeta y deslícelo
hacia el lado (según modelo).

ESPAÑOL20
• Coloque la nevera en la parte más fresca de la habitación, alejada de electrodomésticos que pro-
duzcan calor y alejada de la luz solar directa.
• Espere a que la comida y las bebidas calientes se enfríen antes de introducirlas en la nevera.
• No sobrecargue la nevera ya que esto provoca que el compresor tenga que funcionar más tiempo.
• Envuelva bien la comida y limpie y seque los envases antes de meterlos en la nevera para evitar la
formación de escarcha.
• No forre ningún compartimento de la nevera con papel de aluminio, papel vegetal, o servilletas de
papel. Cualquier forro interere con la circulación, lo que reduce la eciencia.
• Guarde la comida de tal manera que el aire pueda uir a su alrededor.
• No deje la puerta de la nevera abierta durante más tiempo del necesario.
• Asegúrese de que la comida no toca la parte trasera de los compartimentos.
• No congure el termostato a una temperatura extremadamente baja.
CONSEJOS PARA EL AHORRO DE ENERGÍA
• Vacaciones cortas: Deje la nevera en funcionamiento durante vacaciones inferiores a un mes.
• Vacaciones largas: Si no va a utilizar la nevera por periodos de tiempo prolongados, retire toda la
comida y desconecte el enchufe. Limpie y seque a fondo el interior. Para evitar olores y la aparición
de moho, deje la puerta ligeramente abierta (bloquéela para que no se cierre si fuese necesario).
Restrinja el acceso de niños a la habitación mientras la nevera permanezca abierta para evitar que
se queden atrapados.
1. Desconecte la nevera y retire toda la comida de su interior.
2. Cierre y pegue las puertas y el cable de alimentación con cinta adhesiva a la parte posterior de la
nevera. Saque todas las partes desmontables, envuélvalas bien y péguelas con cinta adhesiva para
que no se muevan durante la mudanza.
3. Según el modelo, levante la parte delantera de la nevera para que ruede más fácilmente o atornille
hacia arriba las patas niveladoras para que no rayen el suelo.
¡CUIDADO! Nunca levante la nevera por la puerta.
4. Proteja el exterior del producto con una manta o un elemento suave y acolchado y asegúrese de
que la nevera permanece segura y en posición vertical mientras la transporta.
Desconecte el electrodoméstico de la corriente antes de limpiarlo.
¿SE VA DE VACACIONES?
MOVER LA NEVERA
LIMPIEZA Y MANTENIMIENTO
LIMPIEZA INTERNA
• No vierta agua sobre el electrodoméstico.
• Limpie la cavidad regularmente utilizando una solución a base de bicarbonato y agua tibia
(5ml/0.5l de agua).
• Limpie los accesorios por separado con agua y jabón. No los ponga en el lavavajillas.
• No utilice productos, detergentes o jabones abrasivos.
• Después de limpiarlo, aclárelo con agua limpia y séquelo con cuidado.
• Cuando haya acabado de limpiar toda la nevera, vuelva a conectar el enchufe con las manos secas.
This manual suits for next models
1
Table of contents
Languages: