CREOLE FEAST TFK-TG-3001 User manual
CONJUNTO PARA FREIR PAVO Y PESCADO
KIT DE FRITEUSE POUR DINDE ET POISSON
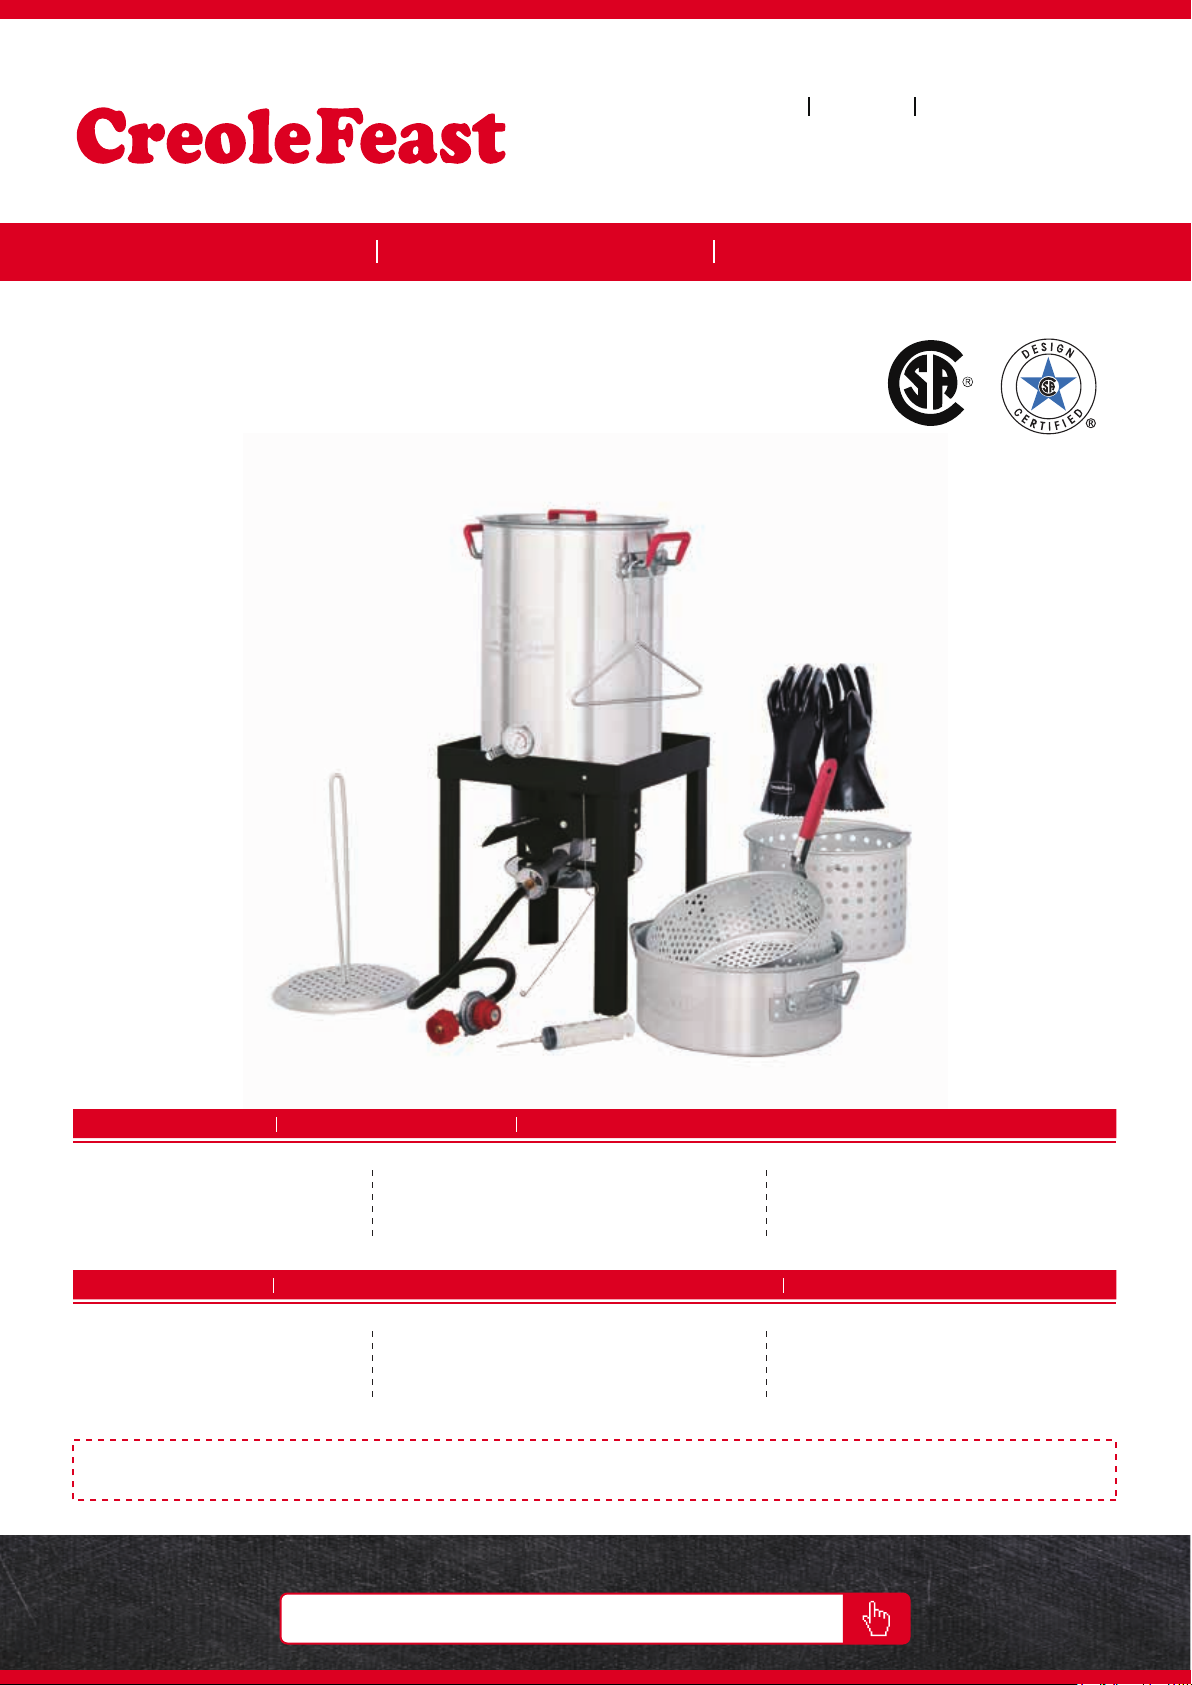
TURKEY AND FISH FRYER BOILER KIT
FOR YOUR SAFETY!POUR VOTRE SÉCURITÉ!
¡PARA SU SEGURIDAD!
CONTACT US FIRST! CONTACTEZ-NOUS D'ABORD!
¡PÓNGASE EN CONTACTO CON NOSOTROS PRIMERO!
Use outdoors only!
Read the instructions before
assembling and using the appliance.
If you have any questions that are
not addressed, please contact us first.
Si tiene alguna pregunta que no se
aborde en este Manual del Usuario,
póngase en ontacto con nosotros primero.
Si vous avez des questions qui ne
sont pas traitées dans ce manuel de
l'utilisateur, contactes-nous d‘abord.
¡Solo usa al aire libre!
Lea las instrucciones antes
de montar y utilizar el aparato.
Utilisez uniquement à l'extérieur!
Lisez les instructions avant
d'assembler et d'utiliser l'appareil.
OWNER’S MANUAL MANUEL DE L'UTILISATEURMANUAL DEL USUARIO
TFK-TG-3001
ModèleModeloModel
www.creolefeast.com
Learn more at / Obtener más información en / Pour en savoir plus:
Customer Service / Servicio al Aliente / Service de Clientèle:
1-800-618-6798
US
Serial No.: 1018
1
For Your Safety
Operating Instructions
Parts List
Hardware List
Assembly
Cleaning and Maintenance
Troubleshooting Guide
Warranty and Customer Service
2-3
4-7
34
35
36-38
9
10
11
..............................................................................................................
...................................................................................................................
....................................................................................................................
....................................................................................
..................................................................................................
...............................................................................................
..................................................................................................
Lighting Instructions
8
........................................................................................................
.........................................................................................................................
CONTENTS
DANGER !!
If you smell gas:
1. Shut off gas supply to the appliance.
2. Extinguish any open flame.
3. If odor remains, keep away from the appliance and immediately call your fire department.
NOTE: Read all instructions prior to assembly and use. Failure to follow the instructions in
this manual could result in bodily injury and/or property damage.
1. The installation must conform with local codes or, in the absence of local codes, with either
the National Fuel Gas Code, ANSI Z223.1/NFPA 54.
2. Do not store or use gasoline or other flammable liquids or vapors in the vicinity of this or
any other appliance.
3. An LP cylinder not connected for use shall not be stored in the vicinity of this or any other
appliance.
WARNING
! !
THIS APPLIANCE IS FOR OUTDOOR USE ONLY.
WARNING
! !

For Your Safety
2
For more information, go to: www.P65Warnings.ca.gov
1. Fuels used in gas burning appliances and the combustion byproducts of such fuels, can expose you to
chemicals including carbon monoxide, which is known to the State of California to cause birth defects or
other reproductive harm.
2. This product contains Nickel (Metallic) known to the State of California to cause cancer.
3. This product contains Lead and Lead Compounds known to the State of California to cause cancer and birth
defects or other reproductive harm.
In case of any issue, call us first! DO NOT return the appliance to the retailer. This appliance has been made to
high quality standards. If you have any questions not addressed in this user’s manual, or you need parts, please
call our customer service hotline.
1. Please keep this Owner’s Manual for future reference.
2. This appliance is NOT intended for commercial use and should never be used as a heater.
3. The gas appliance is meant for use with propane gas only (propane gas cylinder not included).
4. DO NOT use gasoline, kerosene, or alcohol for lighting. This appliance is not intended to be used in or on
recreational vehicles or boats.
5. Children should never use your appliance. Keep children and pets away when in use.
6. DO NOT attempt to move the appliance while it is lit or hot. DO NOT alter the appliance in any manner.
7. DO NOT use the appliance unless it is completely assembled, and all parts are securely fastened and tightened.
8. DO NOT use the appliance or any gas products near unprotected combustible buildings and materials.
9. DO NOT use in the presence of gases or vapors. Keep the cooking area clear and free from combustible
materials, gasoline, and other flammable vapors and liquids.
10. DO NOT fill the pot with oil below minimum fill line or beyond maximum fill line.
11. DO NOT obstruct the air flow for combustion and ventilation.
12. Clean and inspect the hose before each use. If there is evidence of abrasion, wear, cuts, or leaks, the hose
must be replaced before operating the appliance. The replacement hose assembly must be as per the
manufacturer specifications specified by the manufacturer.
13. Keep the appliance's valve compartment, burners, and circulating air passages clean. Inspect the appliance
before each use.
14. Keep the ventilation openings of the cylinder enclosure free and clear from debris.
15. The appliance shall not be used on or under any apartment or condominium balcony or deck.
16. Heat shield must always be in place during use.
17. Never allow oil or grease to get hotter than 400 °F (204 °C). If the temperature exceeds 400 °F (204 °C) or if
oil begins to smoke, immediately turn the burner or gas supply OFF.
18. This appliance will be HOT during and after use. Heated liquid remains at scalding hot temperature long after
the cooking process. NEVER touch the cooking appliance until the liquid has cooled to 115 °F (46 °C) or less.
Use insulated oven mitts or gloves for protection from hot surfaces or splatter from cooking liquids.
19. Always have an approved extinguisher on hand when using this product. A Class "B" dry chemical or "CO2"
extinguisher or preferably a Class "K" extinguisher. Special care must be taken to understand the manufacturer’s
instructions and be prepared to operate the appropriate extinguisher prior to using this appliance.
20. If a fire should occur, keep away from the appliance and immediately call your fire department. Do not attempt
to extinguish an oil or a grease fire with water.
CAUTION
! !
CALIFORNIA PROPOSITION 65 WARNINGS
!

3
Liquid propane gas is flammable and hazardous if handled improperly. Understand the characteristics before using
any propane product.
1. Propane characteristics: Flammable, explosive under pressure, heavier than air, settles in pools and low areas.
2. In its natural state, propane has no odor. For your safety, an odorant has been added.
3. Contact with propane can cause freeze burns to the skin.
4. This appliance is shipped from the factory for use with propane gas only.
5. Never use a propane cylinder with a damaged body, valve, collar, or footing.
6. Dented or rusted propane cylinders may be hazardous and should be checked by your propane gas supplier.
WARNING
! !
DANGER: LP CYLINDER RISK
! !
1. Maintain at least 10 feet (3.05 m) clearance to combustible objects that can catch fire.
2. Keep at least 24-inch (61 cm) distance between the appliance and cylinder.
3. Do not place or use the appliance where there are combustible surfaces overhead.
WARNING: LP hose may pose a tripping hazard.
! !
FOR YOUR SAFETY
1. This appliance is for Outdoor Use Only and should not be used inside a building, garage, or any other enclosed
space.
2. The consumption of alcohol, prescription, or non-prescription drugs may impair the operators’ ability to properly
assemble or safely operate the appliance.
3. Always place your appliance on a hard and level surface far away from combustibles.
4. Do not leave a lit appliance unattended. ALWAYS keep children and pets away from the appliance.
5. Do not place the appliance on any type of tabletop surface.
6. Do not use the appliance in high winds.
CLEAR OVERHEAD
24 INCHES
THE MINIMUM
DISTANCE TO
PROPANE CYLINDER
THIS APPLIANCE IS FOR
FRYING TURKEY ONLY
24”

4
Operating Instructions
Your new gas appliance operates on LP (Liquified Petroleum) Gas. It is odorless, colorless, and non-toxic when
produced. You can smell LP gas as it has been given an odor similar to rotten eggs for your safety.
Follow the instructions carefully to avoid seriously damaging your appliance and causing injury to yourself and to property.
1. Assemble the appliance as per the assembly instructions carefully.
2. Connect the LP cylinder to the appliance (LP cylinder not included).
3. Turn off the regulator valve before turning on the gas supply to the appliance.
4. Operate the regulator in accordance with the instructions supplied with the regulator.
5. It is recommended to use the cooking pot less than 30 qt. capacity & 12-inch diameter. POT LARGER THAN THE
COOKING CAPACITY MAY RESULT IN TIPPING.
6. Fill the appliance with oil according to fill lines.
DETERMINE MAXIMUM FILL LEVEL WHEN USING A POT WITHOUT A
MAXIMUM FILL LINE:
1. Place the food in the basket or on the turkey stand.
2. Place the food with basket/stand into the empty pot.
3. Fill the pot with water just until the food is completely submerged. There must be a minimum of 3 inches (7.62 cm)
between the water level and top of the pot.
4. Remove the food with basket/stand from the pot and either mark the water level on the side of the pot or measure
the amount of water in the pot.
5. Drain the water and completely dry the pot and the food.
6. This is the volume of cooking oil that the pot is to be filled with to fry the turkey.
LP GAS AND CYLINDER INFORMATION
INSTRUCTIONS FOR USE
The LP cylinder used with your appliance must have two features:
1. An OPD (Overfill Protection Device) that prevents accidental gas leaks caused by overfilling
of the cylinder. Each cylinder contains a float that closes the input value when the cylinder
is 80%full. This allows room or the propane gas to expand in hot temperatures. A triangular
hand wheel distinguishes this type of cylinder.
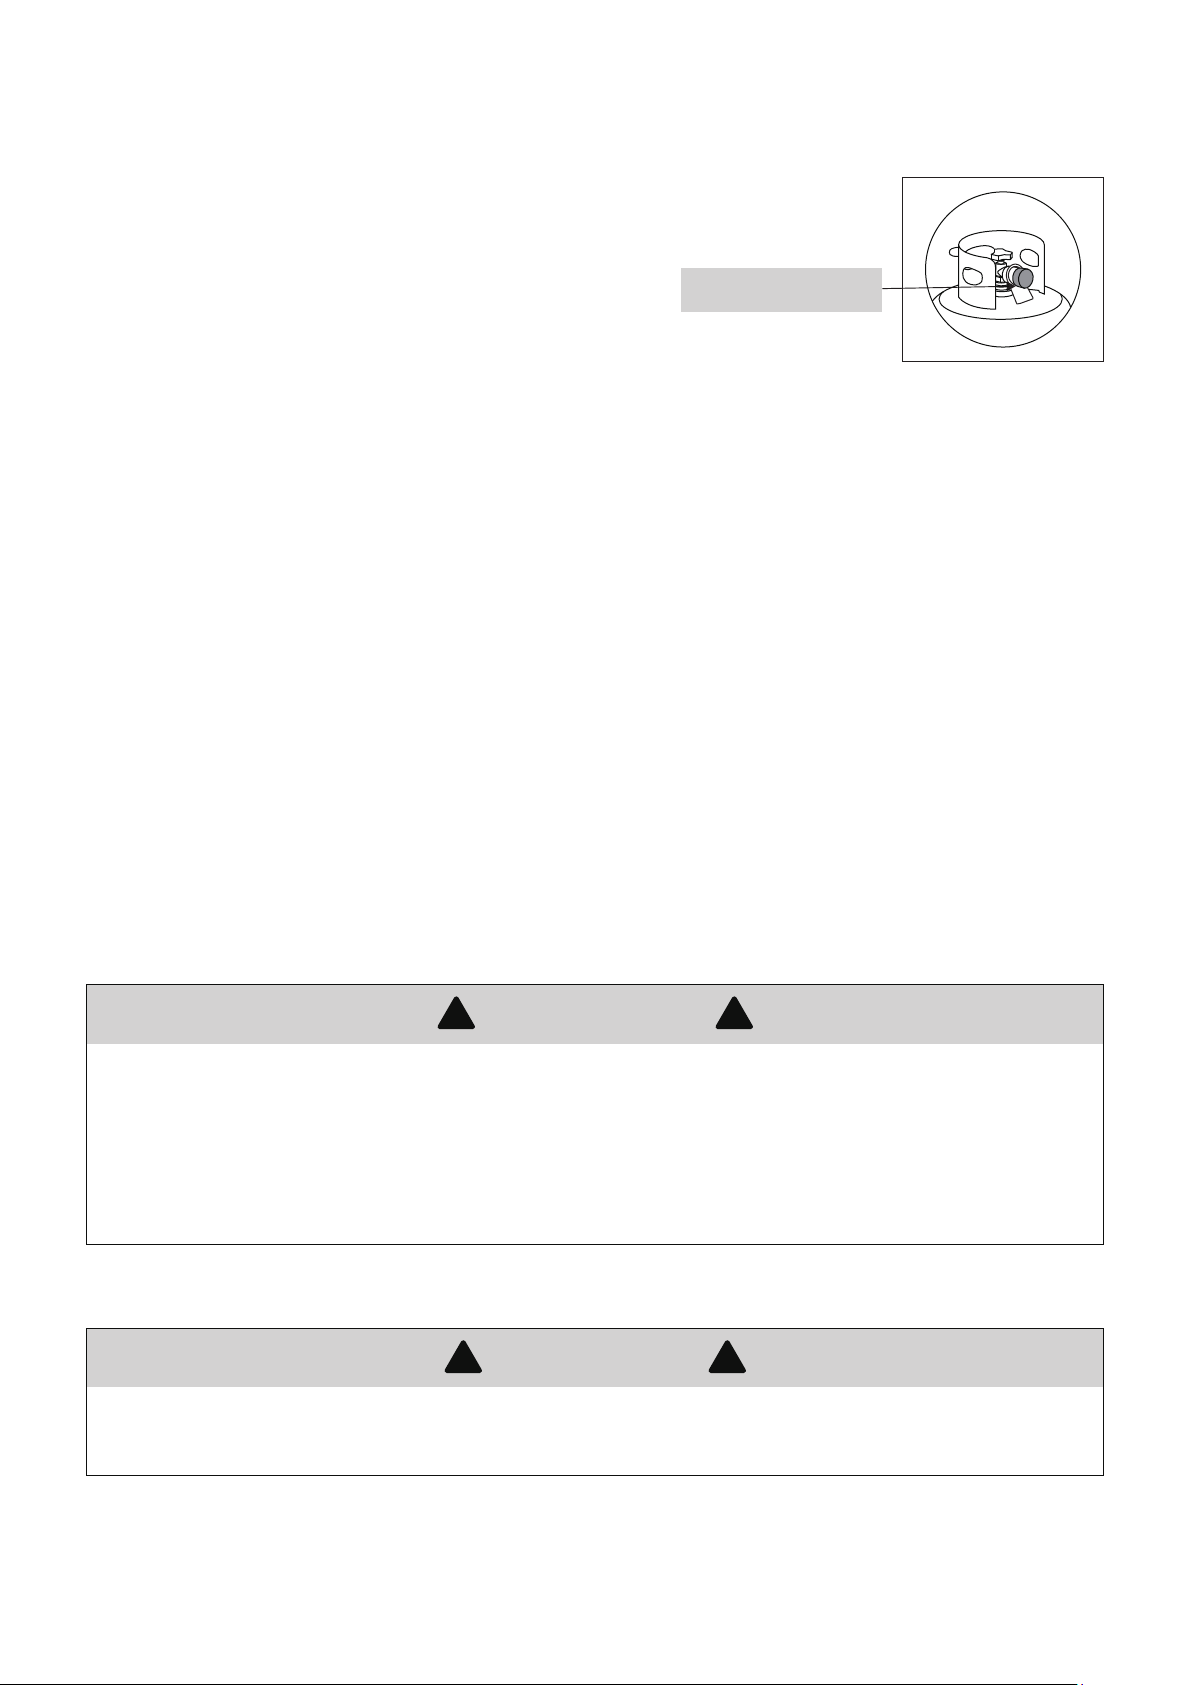
2. An QCC1 Type1 Quick Connect Valve that provides fast cylinder hook-ups and requires only
to be tightened by hand.
1. Introduction of water or ice from any source into the oil/grease may cause overflow and severe burns from hot oil
and water splatter. When frying with oil/grease, all food MUST be completely THAWED, and towel DRIED before
being immersed in the fryer.
2. Avoid bumping into or impacting the appliance to prevent spillage or splashing of hot cooking liquid.
3. Never drop food or accessories into hot cooking liquid. Lower food and accessories slowly into the cooking liquid
in order to prevent splashing or overflow. When removing food from the appliance, pay more attention to avoid
being scalded from hot cooking liquids.
WARNING !!
Triangular Hand Wheel
5
TRANSPORTATION AND STORAGE
1. The LP cylinder must include a collar to protect the gas supply valve.
2. Do not store a spare LP cylinder under or near the appliance.
3. Never fill the LP cylinder beyond 80% capacity.
4. If the warnings 2 and 3 above are not heeded exactly, a fire causing
death or serious injury may occur.
5. Always transport in an upright position.
6. Do not smoke when transporting your LP cylinder.
7. Place a dust cap on the cylinder gas valve outlet whenever the cylinder is not in use.
Use only the type of dust cap
that is provided with the cylinder valve when purchased.
Other types of cap or plugs may result in leakage of propane.
1. Cylinder purchased or exchanged for your gas appliance must be manufactured and marked in accordance with
the specifications for LP Gas cylinder of the U.S. Department of Transportation (DOT) or the National Standard of
Canada, CAN/CSA-B339, Cylinders, Spheres and Tubes for Transportation of Dangerous Goods and Commission,
be equipped with a listed over-filling prevention device (OPD), and be equipped with a cylinder connection device
compatible with connection for outdoor cooking appliances.
2. The LP gas cylinder used for this appliance must not have a capacity exceeding 20 lb. (9.1 kg). Approximately
18” (45.7 cm) high and 12” (30.5 cm) diameter.
3. This appliance is designed to fit Worthington, Manchester, or SMPC brand 20 lb. (9.1 kg) cylinders. Other brands
may fit this appliance if the top collar and bottom support ring have similar dimensions.
1. A shut-off valve terminating in a Type 1 gas cylinder valve outlet
2. A Type 1 valve that prevents gas flow until a positive seal is made
3. A collar to protect the cylinder shut-off valve
4. A safety relief device that is directly linked with the vapor space of the cylinder
THE CYLINDER MUST ALSO BE EQUIPPED WITH:
CYLINDER SPECIFICATIONS
A frosty cylinder valve indicates possible gas overfill. Close the LP valve and call your LP dealer immediately.
1. DO NOT connect this appliance to an existing #510 POL cylinder valve with left-hand threads. The Type 1
valve can be identified by the large external threads on the valve outlet.
2. DO NOT connect to a propane cylinder exceeding this capacity.
3. DO NOT connect to a cylinder that uses any other type of valve connection device.
WARNING
! !
Only use the gas pressure regulator provided with this outdoor cooking appliance. This regulator is set for
an outlet pressure of 11 inches of water column.
CONNECTING REGULATOR TO LP CYLINDER
CAUTION
! !
Dust Cap

6
Your regulator is equipped with a QCC Type 1 quick connect system. It does not allow gas to flow until a positive
seal has been made. It has a thermal element that will shut off the gas flow if the temperature reaches
115 °C (240 °F). It also has a flow-limiting device that restricts the flow of gas to 0.28 cubic metrics per hour
(10 cubic feet per hour).
1. Make sure the LP cylinder is OFF by turning the hand wheel clockwise until it stops.
2. Keep at least 24-inch (61 cm) distance between the appliance and cylinder.
3. Be sure the regulator valve is turned to the OFF position.
4. Remove the safety cap from the cylinder valve.
5. Center the regulator nipple into the cylinder valve.
6. Turn the coupling nut clockwise until it stops. Hand tighten Only. Do not use a wrench.
1. Do not connect this appliance to any unregulated sources of propane.
2. Before each use, check the gas hose for excessive abrasion, wear, or cuts. Replace a damaged hose
assembly with the one specified in the parts list before using the appliance.
3. Always perform the Leak Test listed below before using your appliance for the first time, if the cylinder has
been changed, if any gas supply components have been changed, if the regulator flow--limiting device has
been activated, or after a long period of non-use.
4. Do not attempt to connect this appliance to the LP system of a motor home or trailer.
WARNING
! !
LP CYLINDER LEAK TEST
1. Leak test must be repeated each time the LP cylinder is exchanged or refilled.
2. DO NOT smoke or have anything nearby that can easily ignite, such as lighters or matches.
3. DO NOT use an open flame to check for gas leaks.
4. The appliance must be leak checked outdoors in a well-ventilated area away from open flames or sparks.
5. REMOVE any pots or other cookware from the burner before beginning the test.
Always keep the gas cylinder in
the upright position at all times.
WARNING
!
QCC 1 Type 1 Connector
Center the regulator nipple
into the cylinder valve.
The regulator must enter the
cylinder valve in a straight line.

7
THERMOMETER TEST
STEPS FOR LEAK TEST:
WARNING
! !
Failure to comply with these instructions may result in serious bodily injury.
1. DO NOT USE THE APPLIANCE if there are leaks. Be sure the LP cylinder valve is closed. If the LP cylinder
is still leaking, contact your LP dealer or call 911.
2. Do not use any matches, open flames, or smoke during leak testing.
3. Do not light any burner during leak testing.
4. Replacement parts, including a replacement hose assembly, must be as per the specifications in the parts list.
WARNING
! !
Always use a thermometer when frying any food. A thermometer is a sensitive measuring device which may
not work properly if dropped, bent, or twisted. Always check to be sure your thermometer is working properly
before frying. DO NOT use a meat thermometer for frying.
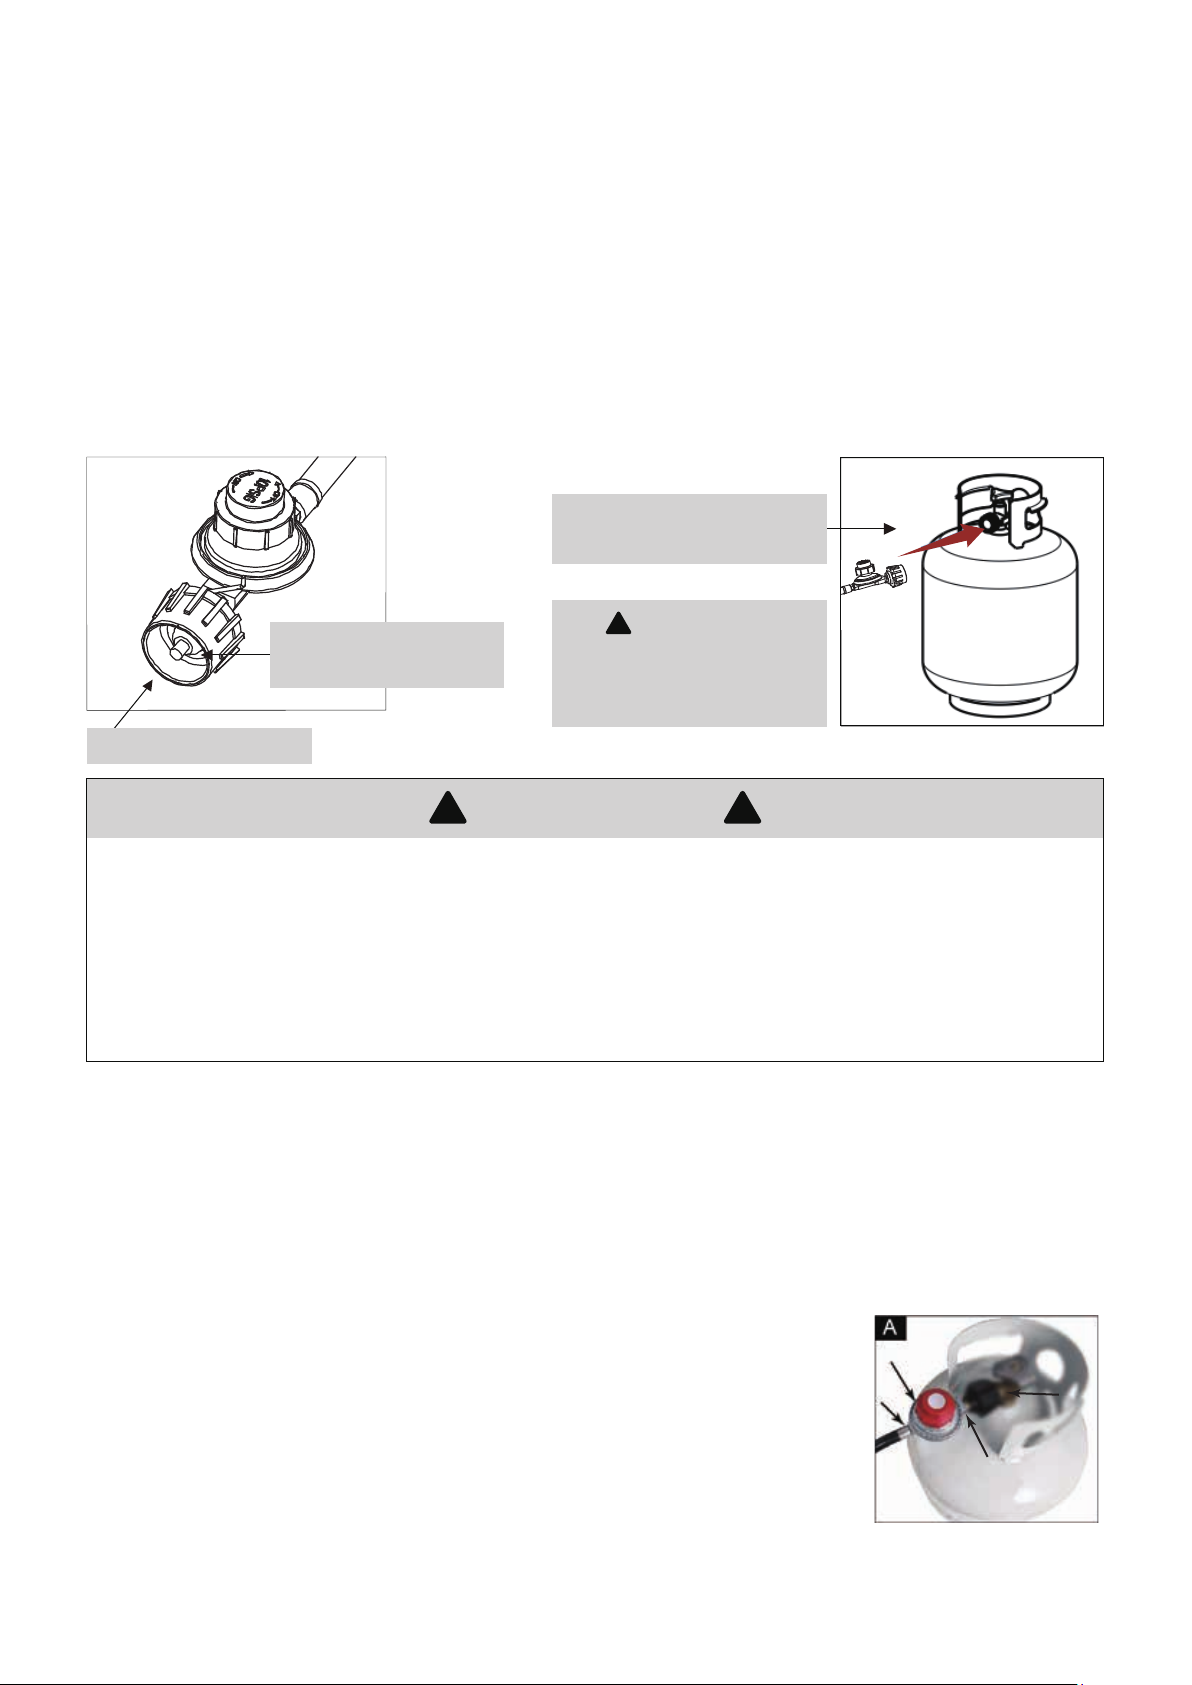
Use a clean paint brush and 50/50 soap and water solution.
NOTE: Use a mild soap and water. DO NOT use household cleaning agents, which
could damage the gas component.
1. Turn regulator and cylinder valves OFF.
2. Be sure regulator is tightly connected to LP cylinder.
3. Completely open LP cylinder valve by turning hand wheel counterclockwise. If
you hear a rushing sound, turn gas off immediately. There is a major leak at the
connection. Correct before proceeding.
4. Brush the soapy solution onto all metal seams and the entire valve area as shown in figure A.
5. Slowly turn the LP cylinder valve counterclockwise to the open position.
6. A leak is identified by a flow of bubbles from the area of the leak. Close LP cylinder valve immediately and
retighten connections.
7. If leaks cannot be stopped, do not try to repair, contact your appliance dealer for assistance. Do not attempt
to operate appliance if a leak is present.
8. Always examine the hose for any damage. If damage is observed, do not attempt to patch the hose.
Replacing the hose is the only safe option.
9. For assistance with any malfunction related to the LP cylinder, regulator or hose, contact customer service.
10. Always close LP cylinder valve after performing leak test by turning hand wheel clockwise.
UNDER NO CIRCUMSTANCE SHOULD THE VALVE REMAIN IN THE ON POSITION FOR MORE THAN
12 SECONDS.
TEMPERATURE ACCURACY TEST
TEMPERATURE RANGE TEST
While wearing protective gloves, hold the thermometer by the dial and insert
the stem into boiling water. The needle should quickly move around the dial
and register approximately 212 °F (100 °C) (plus or minus 5 °F). This indicates
whether or not the temperature reading is accurate.
NOTE: Due to water evaporation, the maximum reading possible on a
thermometer in hot water is 212 °F (100 °C).
Hold the thermometer by the dial and place the end of the stem above a lit match or lighter. The needle should
quickly move around the dial and register a temperature reading far above 350 °F (177 °C). If the needle stops
at a low temperature reading such as 225 °F (107 °C), then the thermometer is damaged and cannot be used.
NOTE: DO NOT attempt frying if the thermometer is not working! If the thermometer supplied with this fryer or boiler
has been lost or damaged, a replacement thermometer must be one specified by the appliance manufacturer.
8
Each appliance burner is tested and calibrated at the factory prior to shipment; however, variations in the local gas
supply
may make it necessary to adjust the burner. Please visually check the flames of the burner. Always visually
inspect your appliance before lighting. Replace any hose that is frayed or cracked. Look for anything that could
block ventilation and remove such a blockage or move the appliance. After lighting, check the flame pattern to
ensure you have even heat distribution for the burner. If burner don’t light up, or if the flame pattern is uneven, see
the Troubleshooting section.
1. Read the instructions before lighting.
2. If the burner does not ignite in 5 seconds, turn regulator valve off, wait 5 minutes and repeat lighting procedure.
3. Inspect the gas supply hose prior to turning the gas “ON”. If there is evidence of cuts, wear, or abrasion,
it must be replaced prior to use. Do not use the appliance if the odor of gas is present. Only use the pressure
regulator and hose assembly supplied with the unit.
4. Never use regulators and hose assemblies other than those supplied with the appliance. If a replacement is
necessary, contact the manufacturer to get the proper replacement. The replacement must be as per the
specifications in the Owner’s Manual. DO NOT LEAVE THE APPLIANCE UNATTENDED WHILE COOKING.
5. DO NOT USE SPIRIT OR PETROL FOR LIGHTING OR RE-LIGHTING!
WARNING: BEFORE LIGHTING
! !
LIGHTING THE BURNER
1. Read all instructions before lighting.
2. Turn regulator control valve and cylinder valve to OFF position.
3. Fully open LP cylinder valve by turning counterclockwise.
4. Slowly turn on regulator valve one turn clockwise. DO NOT stand with your
head or arms over the burner.
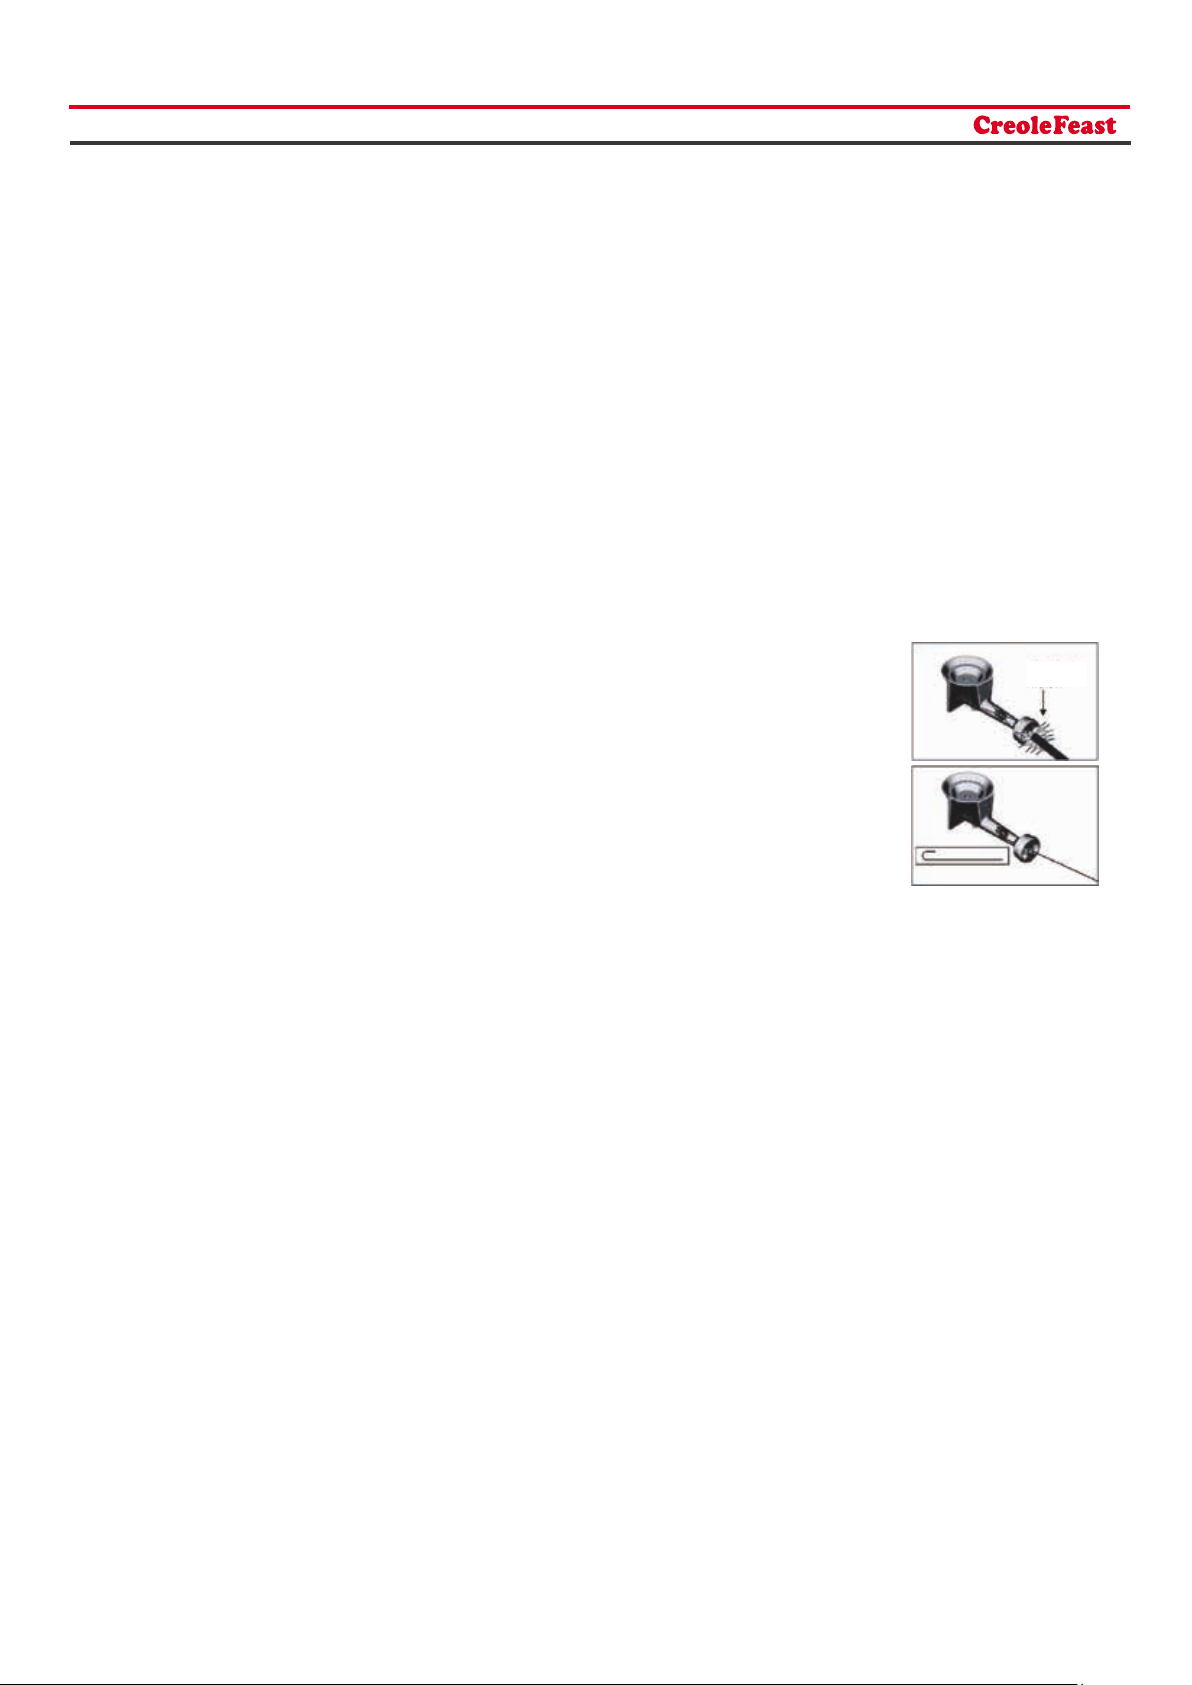
5. A: Light a long wooden match or a gas lighter and place it over the burner.
B: Place a match in the match holder. Match holder is attached to burner
stand. Use the holder to slide the lit match close to the burner.
The burner should light immediately.
6. When the burner is lit, turn the regulator control valve to the desired heat output position.
7. If the burner does not ignite in 5 seconds, turn the regulator and the LP cylinder valves to OFF position.
Wait 5 minutes for the gas to be cleared and repeat above procedure.
* Should the burner still fail to ignite, check the gas supply.
TURNING OFF YOUR APPLIANCE
1. Turn off the gas supply at the LP cylinder by turning the valve clockwise to a full stop.
2. Turn off the regulator by turning the valve counterclockwise to a full stop.
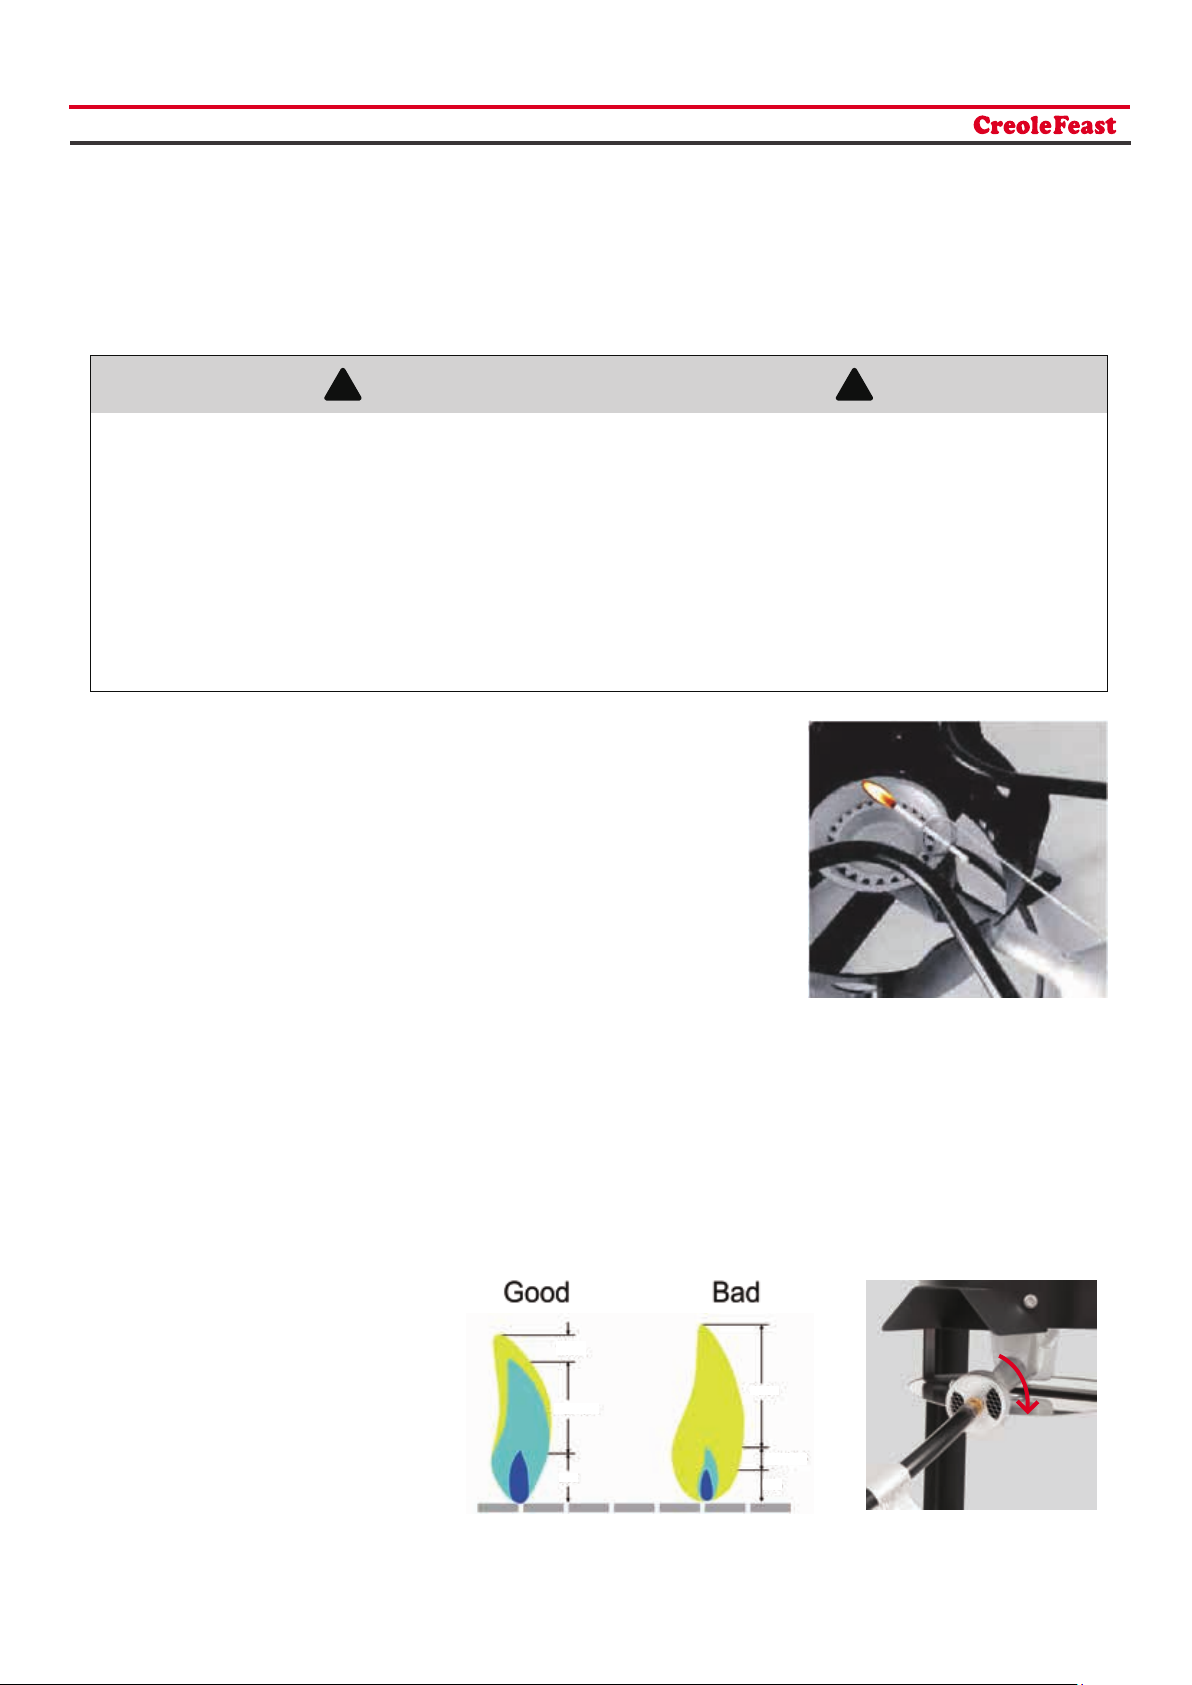
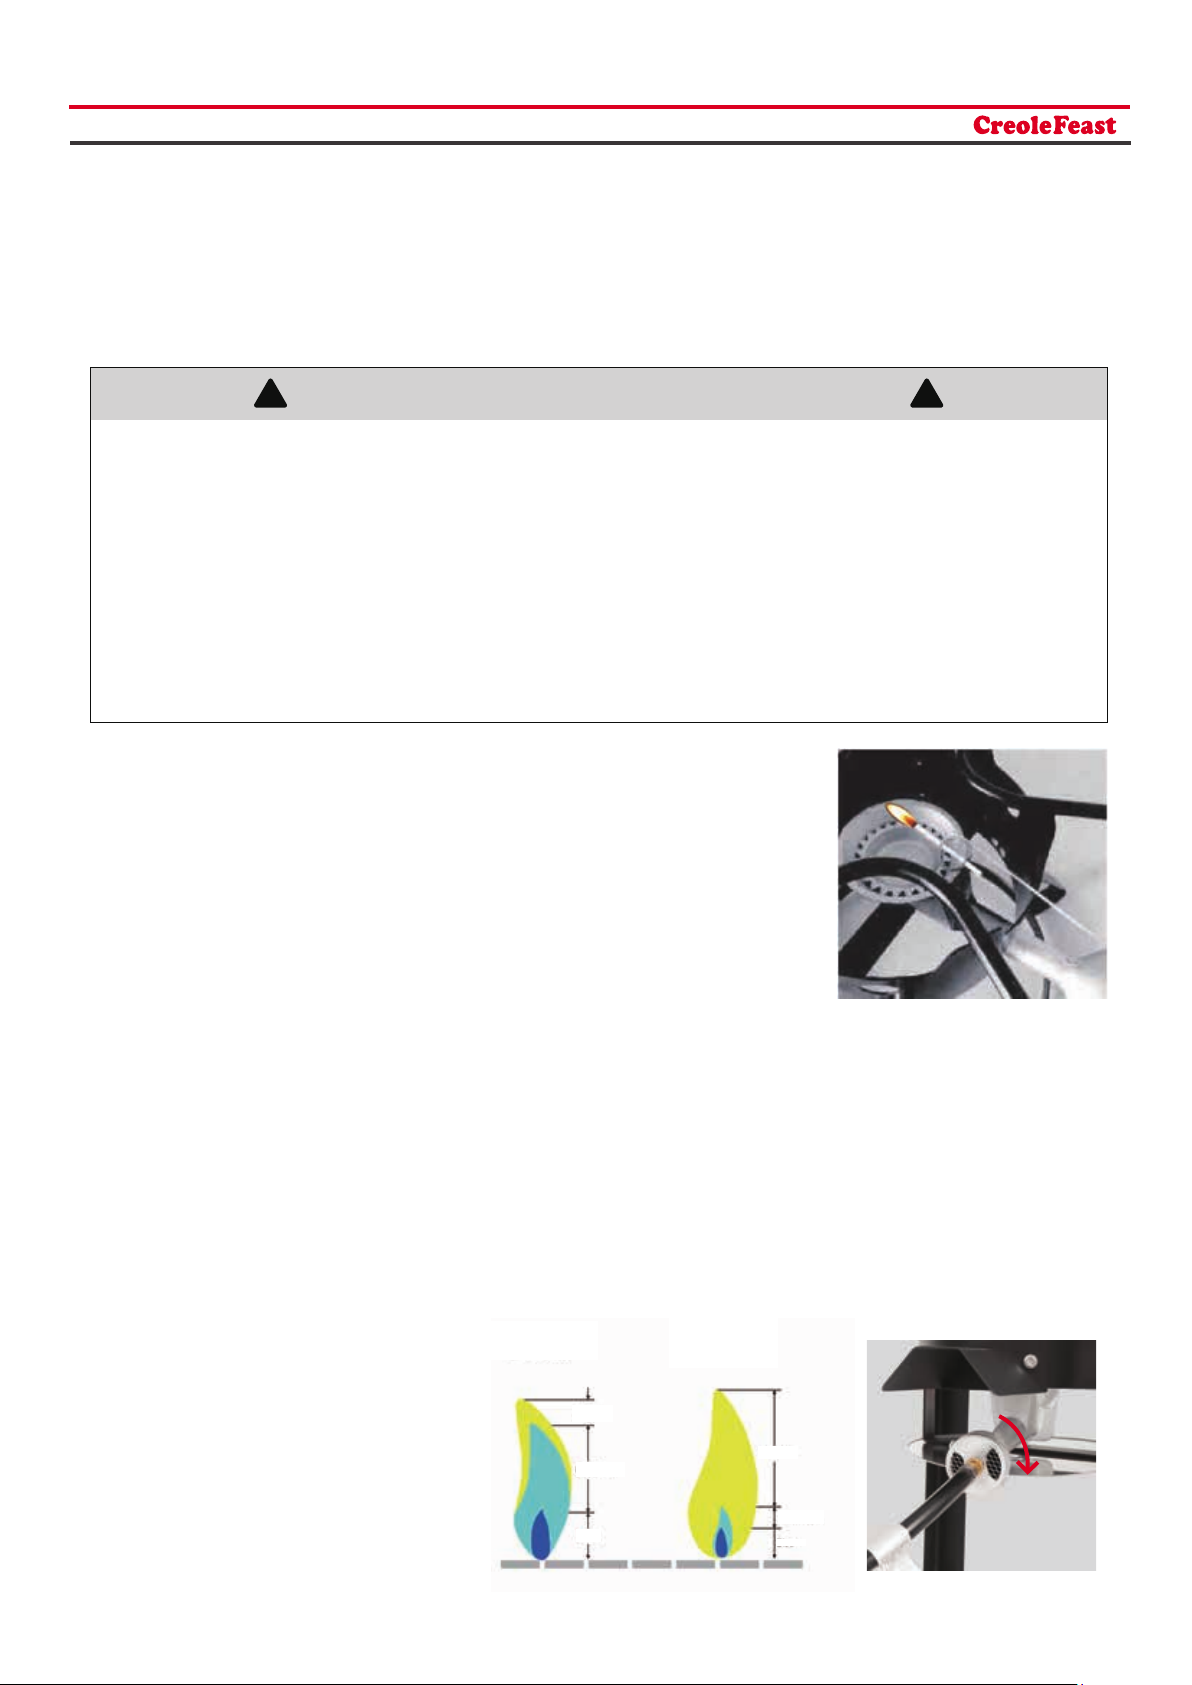
BURNER FLAMES
Light the burner and adjust the flame
with the regulator control valve and
air damper until the desired flame is
achieved. Always check the flame
prior to each use. A blue flame with
little or no yellow flame provides
the best heat.
Yellow
Light Blue
Blue
Yellow
Light Blue
Blue
Lighting Instructions
Air damper
9
Cleaning and Maintenance
Your new appliance has been designed and manufactured to high quality standards. It will provide you with many
years of fun cooking time, however, it requires a minimal amount of maintenance.
NOTE: 1. Clean the entire appliance regularly and tighten all hardware on a regular basis (1-2 times a year or more
depending on usage). Cleaning should be done using detergents that won't harm patio, lawn, or environment.
2. Do not clean any part of your appliance in a self-cleaning oven.
3. Do not use oven cleaners, abrasive kitchen cleaners that contain citrus products, or mineral spirits.
4. Always allow the appliance to cool down prior to cleaning.
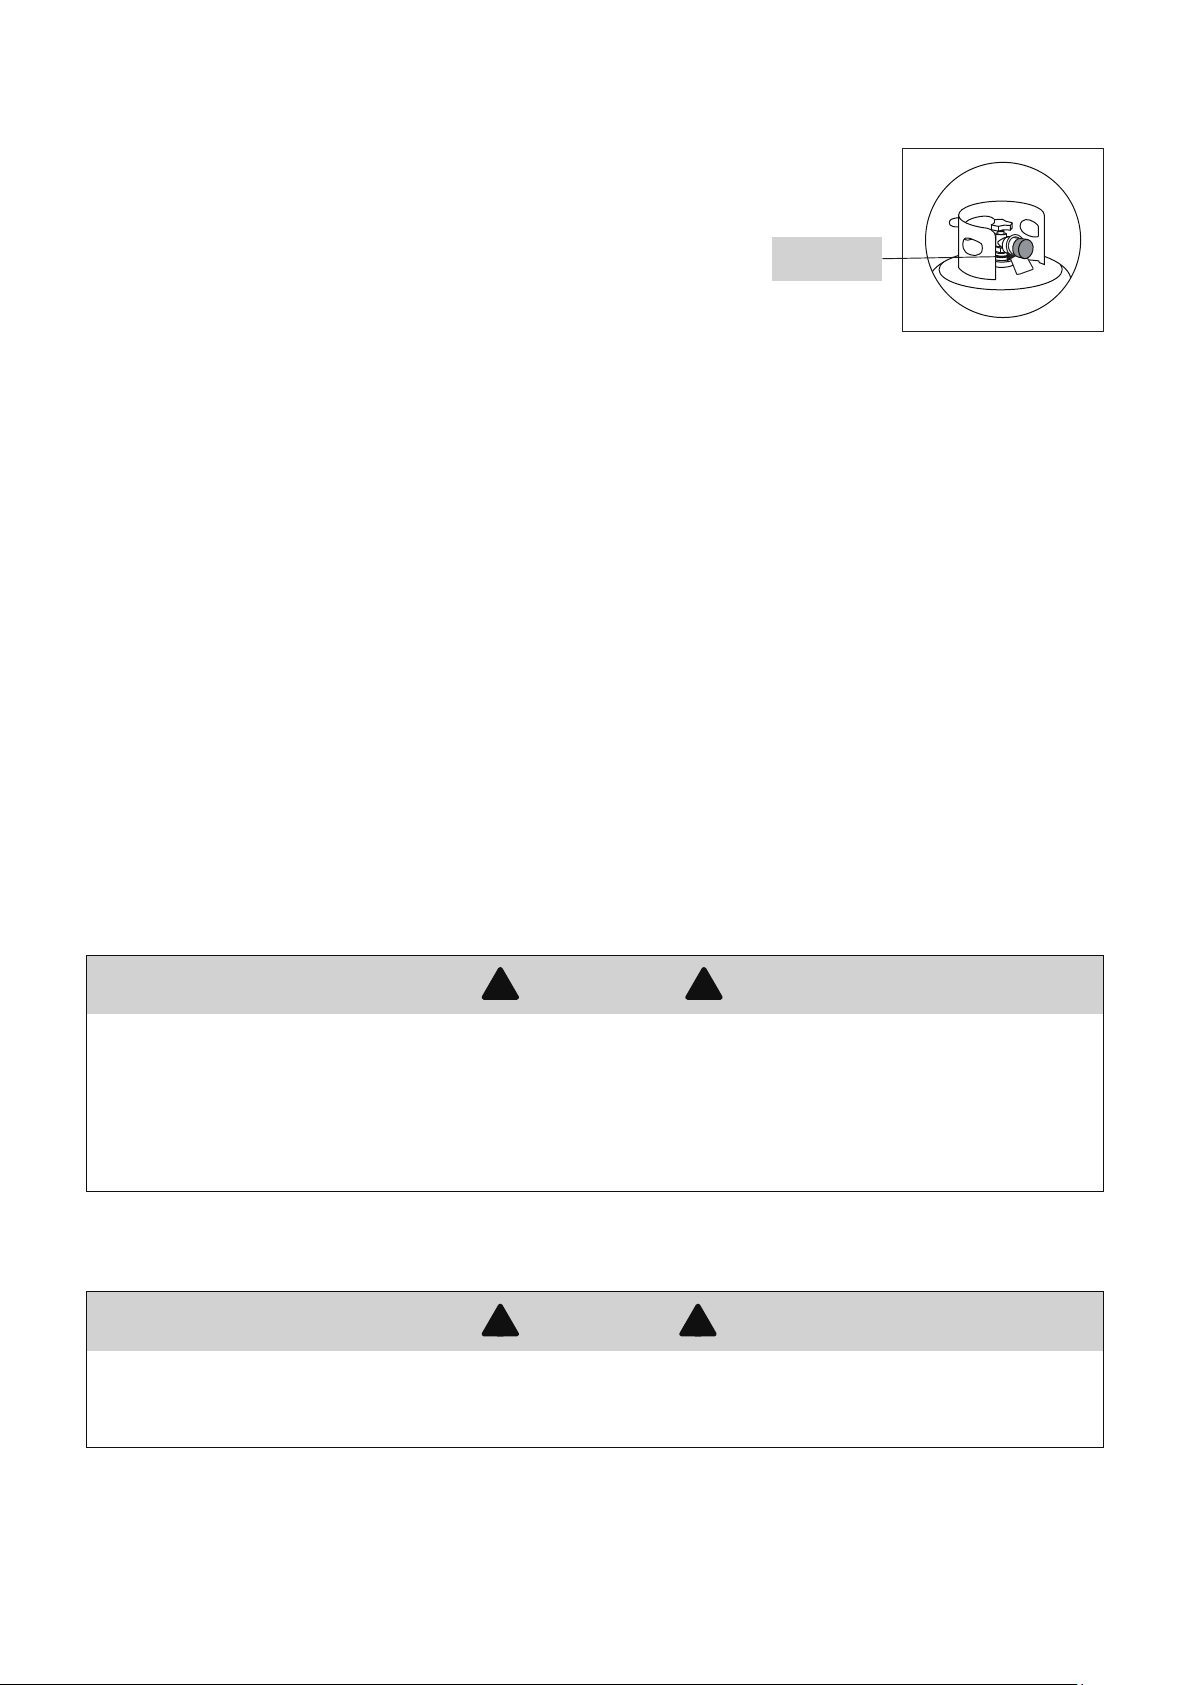
STEPS FOR CLEANING THE BURNER
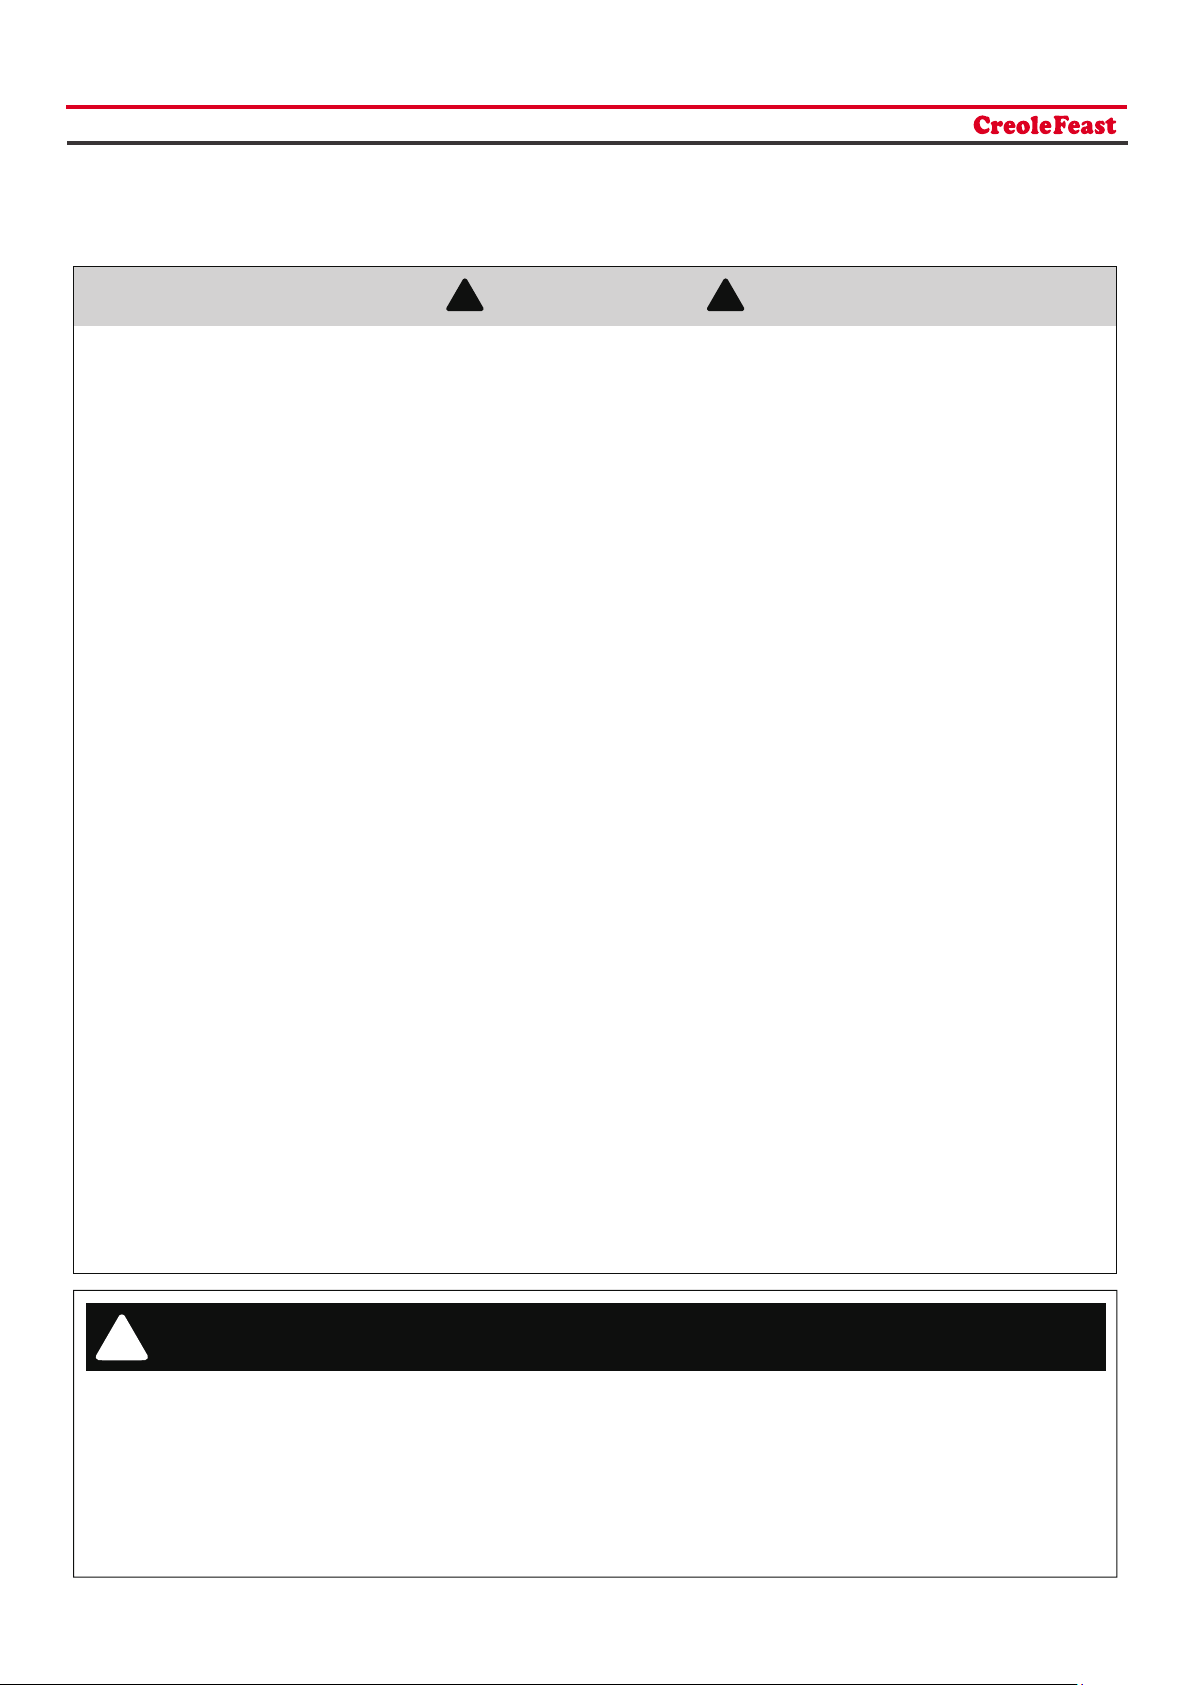
NOTE: Proper placement of the burner and valve is vital to ensure safety.
1. Remove the brass connector/hose from the burner.
2. Look inside the burner tube for insect nests, webs, or mud.
3. To remove the above obstructions, use a FLEXIBLE venturi brush or bend a small
hook on one end of a long flexible wire such as the one shown in the inset picture.
4. Inspect and clean the burner if needed.
5. Reattach the brass connector/hose to the burner.
Natural Hazards - Insects and Spiders
A clogged tube or burner can lead to a fire beneath the appliance. During shipment or storage, it is possible that
small insects and spiders may be able to find their way into the venturi tubes and make nests or webs. This could
block the flow of gas through the venturi tube causing a smoky, yellowish flame, or prevent a burner from lighting
up. It could even cause the gas to burn outside the venturi tube, which could seriously damage the appliance.
Cleaning of the venturi tube should be conducted periodically, especially at the start of the season.
NOTE: Damage caused by a blocked venturi tube is not covered under warranty.
BURNER CLEANING
TIPS FOR MAINTENANCE OF ALUMINUM POTS
1. Wash out the interior of the pot, it will be ready to use.
2. After cooking, let pots and lid cool down gradually. Do not pour cold water into a hot pot. This will cause the
bottom of the pot to warp. Always wash the pots thoroughly in warm, soapy detergent after each use to remove
all traces of food, salt, or grease particles that may burn and cause stains when the pan is reheated.
3. Scouring pads and aluminum cleaners can be used to clean the interior of the pots but will scratch the exterior.
4. Polished aluminum pots will tarnish and discolor with normal use.
5. Boiling with large quantities of salt is very corrosive and can cause pits in the pot and basket. To reduce the
chance of this occurring, do not allow salt water to remain in the pot for a long period of time after the pot has
cooled. The basket and pot should be thoroughly cleaned after each use.
NOTE:
1.
DO NOT store cooking oil inside the pots.
2. Do not use any strong or grinding solvents or abrasive pads, as they can damage surfaces and leave
behind scratch marks.
1. Clean your appliance before storage. Store in a cool dry place.
2. Storage of your appliance indoors is permissible only if the LP cylinder is disconnected and removed from the appliance.
3. A cover is highly recommended to protect your appliance. Choose from a variety of appliance covers offered by
the manufacturers.
4. Perform a Leak Test before using the appliance after it has been kept in storage for some time.
STORAGE
Flashback
here!!!

10
Troubleshooting Guide
Troubleshooting: Problem Possible cause Prevention/Solution
Burner will not light
1. Burner not fully engaged with
control valve
2. Obstruction in burner
3. No gas flow
4. Coupling nut and LP cylinder
valve not fully connected
1. Make sure valve are positioned inside the burner.
2. Ensure burner is not obstructed with spider webs or
other material; see cleaning section in Cleaning and
Maintenance.
3. Make sure LP cylinder is not empty. If LP cylinder is
not empty, check sudden drop in gas flow.
4. Turn the coupling nut approximately one-half to
three-quarters.
A. 1. Turn regulator valve OFF (counterclockwise).
Close the cylinder valve completely by turning it
clockwise until it stops.
2. Check that the Type1 Connection (red knob) is
completely tightened to the cylinder valve.
3. Wait 5 seconds for the pressure to equalize and for
the flow limiting device to reset.
4. Turn cylinder valve ON (counterclockwise).
5. Turn regulator valve ON (clockwise).
6. Relight burner following all lighting instructions
contained in this Owner’s Manual. Check for proper
flame.
OR
B. 1. Turn regulator valve OFF (counterclockwise).
Close the cylinder valve completely by turning
clockwise until it stops.
2. Remove Type 1 Connection (red knob) from the
cylinder valve. The flow limiting device will now reset.
3. Re-attach Type 1 Connection (red knob) to the
cylinder valve. Tighten completely.
4. Turn the cylinder valve ON (counterclockwise).
5. Turn regulator valve ON (clockwise).
6. Relight burner following all lighting instructions
contained in this Owner’s Manual. Check for proper
flame.
Regulator limits gas flow for safety
precaution
Low flame
1. Low gas level in the LP cylinder,
or the cylinder is empty.
2. Too much wind
3. Blocked burner
4. Water in burner
1. Check the gas level in the LP cylinder.
2. Check wind direction and set the cooker away from
windy areas.
3. Clean and check burner for spiders, insect nests,
and debris.
4. Check the burner for moisture, make sure the
burner is dry
Flame has gone out
If your problem is not resolved using the troubleshooting information above, please contact your local
gas dealer.

11
Warranty and Customer Service
Thanks for purchasing this Creole Feast®Turkey and Fish Fryer Boiler Kit.
Creole Feast®warrants its products to be free from defects in materials and workmanship under proper assembly, normal residential
use and recommended care for 1-Year Full Warranty from the date of original retail purchase. The warranty does not cover paint
finish as it may burn off during normal use. RUST is not considered a manufacturing or materials defect.
Within the stated warranty period, Creole Feast®, at its discretion, shall replace defective components free of charge, with the owner
being responsible for shipping. Creole Feast
®
reserves the right to require that defective parts be returned, postage and/or
freight
pre-paid by the consumer for review and examination. In the event of parts availability issues, Creole Feast®reserves the
right to
substitute like or similar parts that are equally functional. Upon the expiration of such warranty, all such liability shall terminate.
Note: A dated sales receipt along with Model Number and Serial Number will be required for the warranty service.
The limited warranty will not reimburse you for the cost of any inconvenience, food, personal injury or property damage. All warranty
coverage is void if this appliance is ever used for commercial or rental purposes. And this limited warranty applies to the functionality
of the
product ONLY and does not cover cosmetic issues such as scratches, dents, corrosions or discoloring by heat, abrasive and
chemical cleaners or any tools used in the assembly or installation of the appliance, surface rust, or the discoloration of stainless steel
surfaces.
ITEMS NOT COVERED IN THE WARRANTY SERVICE
Any failures or operating difficulties due to accident, abuse, misuse, alteration, misapplication, vandalism, improper installation or
improper maintenance or service, or failure to perform normal and routine maintenance, including but not limited to damage
caused by insects within the burner tubes, as set out in the owner’s manual.
Deterioration or damage due to severe weather conditions such as hail, hurricanes, earthquakes or tornadoes, discoloration due
to exposure to chemicals either directly or in the atmosphere.
Cost of service calls to your home.
Costs of removal or re-installation.
Pickup and delivery of your product.
Shipping or transportation costs.
Labor costs for installation and repair.
Liability for indirect, or consequential damages.
This limited warranty is the sole warranty given by Creole Feast
®
and is in lieu of all other warranties, expressed or implied including
implied warranty, merchantability, or fitness for a particular purpose. Neither Creole Feast
®
nor the retail establishment selling this
product has authority to make any warranties or to promise any remedies in addition to or inconsistent with those stated above.
The maximum liability of Creole Feast®, in any event, shall not exceed the purchase price of the product paid by the original
consumer purchaser. Some states do not allow the exclusion or limitation of incidental or consequential damages. In such a case,
the above limitations or exclusions may not be applicable.
Do not return parts without prior to obtaining return authorization from our customer service department.
Please do not hesitate to contact our customer service when you have any questions regrading assembly, warranty, or accessories.
We will be happy to offer any replacement parts you need during the warranty period.
Mon-Fri, 8:30 AM-5:00 PM, EST
1-800-618-6798

12
ESTE APARATO ES EXCLUSIVAMENTE PARA USO EN EXTERIORES.
Para su seguridad
Instrucciones de funcionamiento
Lista de piezas
Lista de hardware
Montaje
Limpieza y mantenimiento
Guía de solución de problemas
Garantía y servicio al cliente
13-14
15-18
34
35
36-38
20
21
22
......................................................................................................
............................................................................................................
.......................................................................................................................
.........................................................................................
.....................................................................................
.............................................................................................
............................................................................
Instrucciones de iluminación
19
........................................................................................
.................................................................................................................
ÍNDICE
PELIGRO !!
Si huele gas:
1. Apague el suministro de gas al aparato.
2. Extinga cualquier llama abierta.
3. Si el olor permanece, manténgase alejado del aparato y llame inmediatamente a su
departamento de bomberos.
NOTA: El incumplimiento de estas instrucciones podría provocar un incendio, una explosión
o quemaduras, que podrían causar daños a la propiedad, lesiones personales o la muerte.
1. La instalación debe cumplir con los códigos locales o, en ausencia de códigos locales,
con el Código Nacional de Gas Combustible, ANSI Z223.1/NFPA 54.
2. No almacene ni utilice gasolina u otros líquidos o vapores inflamables cerca de este o
cualquier otro aparato.
3. No se debe almacenar un bombona de gas licuado que no esté conectado para su uso
en las proximidades de este o cualquier otro aparato.
ADVERTENCIA
! !
ADVERTENCIA
! !
Para su seguridad
13
PRECAUCIÓN
! !
Para más información, visite: www.P65Warnings.ca.gov
1. Los combustibles utilizados en los aparatos que queman gas y los subproductos de la combustión de dichos
combustibles pueden exponerlo a sustancias químicas, incluido el monóxido de carbono, que según el Estado
de California causa defectos de nacimiento u otros daños reproductivos.
2. Este producto contiene Níquel (Metálico) conocido en el Estado de California como causante de cáncer.
3. Este producto contiene Plomo y Compuestos de Plomo que el Estado de California reconoce como causantes
de cáncer y defectos de nacimiento u otros daños reproductivos.
ADVERTENCIAS DE LA PROPOSICIÓN 65 DE CALIFORNIA
En caso de cualquier problema, ¡llámenos primero! NO devuelva el aparato al minorista. Este aparato ha sido
hecha con altos estándares de calidad. Si tiene alguna pregunta que no figure en este manual del usuario, o
necesita piezas, llame a nuestra línea directa de atención al cliente.
1. Por favor, guarde este Manual del Usuario para futuras referencias.
2. Este aparato NO está destinado a un uso comercial y nunca debe utilizarse como calefactor.
3. Este aparato está diseñada para su uso con gas propano solamente (excluidos los bombona de propano).
4. NO use gasolina, queroseno o alcohol para la iluminación. Este aparato no está diseñada para usarse en
vehículos o botes recreativos.
5. Los niños no deben utilizar su aparato.
6. NO intente mover el aparato mientras está encendida o caliente. NO altere el aparato de ninguna manera.
7. NO utilice el aparato a menos que esté completamente montada, y todas las piezas estén bien sujetas y apretadas.
8. NO utilice el aparato ni ningún producto de gas cerca de edificios y materiales combustibles sin protección.
9. NO la utilice en presencia de gases o vapores. Mantenga el área de cocción despejada y libre de materiales
combustibles, gasolina y otros vapores y líquidos inflamables.
10. NO llene la olla con aceite por debajo de la línea de llenado mínimo ni por encima de la línea de llenado máximo.
11. NO obstruya el flujo de aire para la combustión y la ventilación.
12. Limpie e inspeccione la manguera antes de cada uso. Si hay evidencia de abrasión, desgaste, cortes o fugas,
la manguera debe reemplazarse antes de operarel el aparato. El conjunto de manguera de repuesto debe ser
según las especificaciones del fabricante especificadas por el fabricante.
13. Mantenga el compartimento de válvulas el aparato, los quemadores y los conductos de aire circulante limpios.
Compruebe el aparato antes de cada uso.
14. Mantenga las aberturas de ventilación de la carcasa del bombona libres de escombros.
15. El aparato no debe usarse sobre o debajo de ningún balcón o terraza de un apartamento o condominio.
16.
El escudo térmico debe estar siempre en su lugar durante el uso.
17. Nunca permita que el aceite o la grasa se calienten a más de 400 °F (204 °C). Si la temperatura excede de los
400 °F (204 °C) o si el aceite comienza a humear, apague inmediatamente el quemador o el suministro de gas.
18. Este aparato estará CALIENTE durante y después de su uso. Los líquidos calentados permanecen a
temperaturas susceptibles de producir quemaduras durante un largo periodo después del proceso de hervido.
Nunca toque el aparato de hervido hasta que los líquidos se hayan enfriado hasta 115 °F (46 °C) o por debajo.
Utilice guantes aislantes de horno para protegerse de superficies calientes o salpicaduras de líquidos de cocinado.
19. Tenga siempre a mano un extintor homologado cuando utilice este producto. Un extintor de polvo químico seco
de Clase "B" o "CO2", o preferiblemente un extintor de Clase "K". Se debe tener especial cuidado para
comprender las instrucciones del fabricante y estar preparado para manejar el extintor apropiado antes de usar
este aparato. Si continúa oliendo a gas, comuníquese inmediatamente con el Departamento de Extinción de
Incendios (bomberos) (por ejemplo, en el 911) y no se acerque al aparato.
20. Si se produjera un incendio, manténgase alejado del aparato y llame inmediatamente al Servicio de Extinción
de Incendios (bomberos). Si el aceite o la grasa prenden, no intente apagar el fuego con agua.
!

14
El gas propano líquido es inflamable y peligroso si se manipula incorrectamente. Comprender las características
antes de utilizar cualquier producto de propano.
1. Características de propano: inflamable, explosivo bajo presión, más pesado que el aire, se asienta en piscinas
y áreas bajas.
2. En su estado natural, el propano no tiene olor. Para su seguridad, se ha añadido un olor.
3. El contacto con el propano puede provocar quemaduras de congelación en la piel.
4. Este aparato se envía desde la fábrica para su uso con gas propano solamente.
5. Nunca utilice un bombona de gas con un cuerpo, válvula, anillo o base dañados.
6. Los cilindros de propano abollados u oxidados pueden ser peligrosos y deben ser revisados por su proveedor
de gas propano.
ADVERTENCIA
! !
PELIGRO: RIESGO DE BOMBONA DE GAS
! !
1. Asegúrese de que haya una distancia mínima de 10 pies (3,05 metros) entre materiales combustibles y los lados
y la parte posterior del aparato.
2. Mantenga una distancia de al menos 24 pulgadas (61 cm) entre el aparato y la bombona.
3. No coloque el aparato donde haya superficies combustibles por encima.
ADVERTENCIA: La manguera de gas es un peligro de tropiezo.
1. Este aparato es sólo para uso al aire libre y no debe utilizarse dentro de un edificio, garaje, o cualquier otro
espacio cerrado.
2. El consumo de alcohol, medicamentos recetados o de venta libre puede afectar la capacidad de los operadores
para ensamblar correctamente o operar el aparato de manera segura.
3. Coloque siempre el aparato en una superficie dura y nivelada lejos de los combustibles.
4. No dejar un aparato iluminada desatendida. SIEMPRE mantenga a los niños y mascotas lejos del aparato.
5. No coloque el aparato sobre ningún tipo de superficie de mesa.
6. No utilice el aparato con vientos fuertes.
PARA SU SEGURIDAD
! !
ESPACIO SOBRE EL
APARATO DESPEJADO
NIVEL DEL SUELO
10 PIES AL
COMBUSTIBLE MÁS CERCANO
(TODAS LAS DIRECCIONES)
DIRECCIÓN DEL VIENTO
El modelo puede variar
con respecto a la imagen
24 PULGADAS
LA DISTANCIA MÍNIMA
ENTRE EL APARATO Y EL
BOMBONA
THIS APPLIANCE IS FOR
FRYING TURKEY ONLY
24”

15
Instrucciones de funcionamiento
DETERMINE ASÍ EL NIVEL DE LLENADO MÁXIMO CUANDO USE UNA OLLA
SIN UNA LÍNEA DE LLENADO MÁXIMO
ADVERTENCIA
! !
1. La introducción de agua o hielo de cualquier origen en el aceite/grasa puede causar desbordamiento y
quemaduras graves debido al aceite caliente y las salpicaduras del agua. Al freír con aceite/grasa, todos los
alimentos DEBEN estar completamente DESCONGELADOS y SECADOS con una toalla antes de ser
sumergidos en la freidora.
2. Evite hacer chocar o golpear el aparato para no dar lugar a derrames o salpicaduras de líquido de cocinado
caliente.
3. Nunca deje caer alimentos o accesorios en el líquido de cocinado caliente. Introduzca los alimentos y los
accesorios lentamente en el líquido de cocinado para evitar salpicaduras o desbordes. Cuando retire los
alimentos del aparato, preste mucha atención para evitar quemarse con los líquidos de cocinado calientes .
Su nueva aparato funciona con gas GLP (petróleo licuado). Es inodoro, incoloro y no tóxico cuando se produce.
Puede oler gas GLP, ya que se le ha dado un olor similar al de huevos podridos por su seguridad.
INSTRUCCIONES DE USO
Siga estas instrucciones cuidadosamente para evitar dañar seriamente su aparato y causar lesiones personales y
a la propiedad.
1. Ensamble el aparato siguiendo cuidadosamente las siguientes instrucciones de montaje.
2. Conecte el bombona de gas al aparato (bombona de gas no incluido).
3. Cerrar la válvula reguladora antes de abrir el paso de gas al artefacto.
4. Maneje el regulador de acuerdo a las instrucciones provistas con el mismo.
5. Se recomienda utilizar una olla de menos de 30 qt. (28 L) de capacidad y 12 pulgadas (30,5 cm) de diámetro.
UTILIZAR UNA OLLA QUE SUPERE LA CAPACIDAD DE COCINADO DEL APARATO PUEDE RESULTAR EN EL
VOLCADO DE LA MISMA.
6. Llene la olla con aceite según las líneas de llenado.
1. Coloque la comida en la cesta o en el soporte del pavo.
2. Coloque la comida con la cesta/soporte en la olla vacía.
3. Llene la olla con agua hasta que los alimentos estén completamente sumergidos. Debe haber un mínimo de
3 pulgadas (7,62 cm) entre el nivel del agua y la parte superior de la olla.
4. Sacar la comida con la cesta/soporte de la olla y marque el nivel del agua en el lateral de la olla o mida la
cantidad de agua en la olla.
5. Escurra el agua y seque completamente la olla y la comida.
6. Ese es el volumen de aceite de cocina con el que se debe llenar la olla para freír el pavo.
INFORMACIÓN DE BOMBONA Y GAS GLP
El aparato utiliza el bombona de gas GLP más nuevo y
seguro (tanque) que incluye dos características:
1. Un OPD (dispositivo de protección contra sobrellenado)-evita fugas accidentales de gas
causadas por el sobrellenado del bombona. Cada bombona contiene un flotador que cierra
la válvula de entrada cuando el bombona está 80% lleno. Esto deja espacio para que el
gas propano se expanda en temperaturas altas. Una rueda de mano triangular distingue
este tipo de bombona.
2. Una válvula de conexión rápida QCC1 Tipo 1 que proporciona conexiones rápidas al bombona y solo requiere ser
apretada a mano.
Rueda triangular de mano
16
TRANSPORTE Y ALMACENAMIENTO
1. El bombona de gas debe incluir un collar para proteger la válvula de suministro de gas.
2. No almacene un bombona de gas de repuesto cerca del aparato.
3. Nunca llene el bombona de gas más allá del 80% de su capacidad.
4. Si la advertencia en 2 y 3 anteriores no se hace caso exactamente, puede ocurrir un
incendio que cause la muerte o lesiones graves.
5. Transporte siempre en posición vertical.
6. No fume al transportar su bombona de gas.
7. Coloque una tapa contra el polvo en la salida de la válvula de gas del bombona siempre
que el bombona no esté en uso. Use solo el tipo de tapa guardapolvo que se proporciona
con la válvula del
bombona cuando se compra. Otros tipos de tapones o tapones pueden provocar fugas de propano.
1. El bombona comprado o intercambiado por su aparato debe ser fabricado y marcado de acuerdo con las
especificaciones para bombonas de gas GLP del Departamento de Transporte (DDT) de EE. UU. o el Estándar
Nacional de Canadá, CAN/CSA-B339, Cilindros, Esferas y Tubos para Transporte de mercancías peligrosas
y comisión, Estar equipado con un dispositivo de prevención de sobrellenado (OPD) listado y estar equipado
con un dispositivo de conexión de cilindro compatible con la conexión para aparatos de cocina al aire libre.
2. El bombona de gas GLP que se utiliza con este artefacto no debe sobrepasar las 20 libras (9,1 kg) de capacidad.
Aproximadamente 18 pulgadas (45,7 cm) de alto y 12 pulgadas (30,5 cm) de diámetro.
3. Este aparato está diseñada para adaptarse a los cilindros de 20 libras (9,1 kg) de las marcas Worthington,
Manchester o SMPC. Otras marcas pueden ajustarse a este aparato si el cuello superior y el anillo de soporte
inferior tienen dimensiones similares.
EL BOMBONA TAMBIÉN DEBE ESTAR EQUIPADO CON:
1. Una válvula de cierre que termina en una salida de la válvula del bombona de gas tipo 1
2. Una válvula tipo 1 que evita el flujo de gas hasta que se hace un sello positivo
3. Un collar para proteger la válvula de cierre del bombona
4. Un dispositivo de alivio de seguridad que está directamente relacionado con el espacio de vapor del bombona
ESPECIFICACIONES DEL BOMBONA
ADVERTENCIA
! !
Si se congela la válvula del bombona bombona de gas, puede haber una sobredosis de gas. Cierre la
válvula de baja presión y llame inmediatamente al distribuidor de GLP.
1. NO conecte este aparato a una válvula de bombona POL #510 existente con roscas a la izquierda.
La válvula Tipo 1 se puede identificar mediante las grandes roscas externas de la salida de la válvula.
2. NO conecte a un bombona de gas que exceda esta capacidad.
3. NO conecte a un bombona que utilice ningún otro tipo de dispositivo de conexión de válvula.
PRECAUCIÓN
! !
CONECTANDO EL REGULADOR A LA BOMBONA DE GAS
Utilice únicamente el regulador de presión de gas suministrado con este aparato de cocción al aire libre.
Este regulador está configurado para una presión de salida de 11 pulgadas columna de agua.
Tapa contra el polvo
17
Use una brocha de pintura limpia y una solución de 50/50 de agua y jabón suave.
No use productos de limpieza del hogar. Esto puede dañar los componentes del de gas.
1. Asegúrese todos, el regulador y las válvulas de las bombonas estén cerradas.
2. Cerciórese de que el regulador esté bien conectado al bombona de gas.
3. Abra por completo la válvula del bombona de gas, girando la manilla en sentido
contrario a las agujas del reloj. Si escucha un sonido de ráfaga, cierre de inmediato
el paso de gas. La conexión tiene una fuga considerable. Corrija esta situación
antes de continuar.
PASOS DE LA PRUEBA DE ESTANQUEIDAD:
Su regulador está equipado con un sistema de conexión rápida QCC Tipo 1. No permite que el gas fluya hasta
que se haya hecho un sello positivo. Tiene un elemento térmico que apaga el flujo de gas si la temperatura
alcanza los 115 °C (240 °F). También tiene un dispositivo de limitación de flujo que restringe el flujo de gas a
0,28 métricas cúbicas por hora (10 pies cúbicos por hora).
1. Asegúrese de que el bombona de gas esté apagado girando la rueda de mano en el sentido de las agujas del
reloj hasta que se detenga.
2. Mantenga una distancia de al menos 24 pulgadas (61 cm) entre el aparato y la bombona.
3. Asegúrese de que la válvula reguladora esté en la posición OFF.
4. Retire la tapa de seguridad de la válvula del bombona.
5. Centre la boquilla del regulador en la válvula del bombona.
6. Gire la tuerca negra en el sentido de las agujas del reloj hasta que se detenga. Apriete a mano solamente.
No utilice una llave inglesa.
ADVERTENCIA !!
1. No conecte este aparato a ninguna fuente no regulada de propano.
2. Antes de cada uso, compruebe si la manguera de gas es excesiva abrasión, desgaste o cortes. Reemplace
un conjunto de manguera dañado por el especificado en la lista de piezas antes de usar el aparato.
3. Si el bombona ha sido sustituido, se han sustituido las partes de gas, se ha activado la unidad de caudal
limitado del regulador o se ha dejado de usar durante un período prolongado, deberán realizarse las
siguientes pruebas de fuga antes de que se utilice por primera vez el aparato.
4. No intente conectar este aparato al sistema de GLP de una autocaravana o remolque.
Conector QCC 1 Tipo 1
Mantenga siempre el bombona
de gas en posición vertical en
todo momento.
ADVERTENCIA
!
PRUEBA DE ESTANQUEIDAD DE LA BOMBONA DE GAS
1. La prueba de estanqueidad debe repetirse cada vez que se cambia o se vuelve a llenar la bombona de gas.
2. NO fume ni tenga nada cerca que pueda prender fácilmente, como encendedores o fósforos.
3. NO use una llama viva para verificar si hay fugas de gas.
4. Debe comprobarse si hay fugas en el aparato al aire libre, en un área bien ventilada y lejos de llamas vivas o chispas.
5. RETIRE las ollas u otros utensilios de cocina del quemador antes de comenzar la prueba.
Centre la boquilla del
regulador en la válvula del.
El regulador debe entrar en la
válvula del cilindro en línea.

18
4. Cepille la solución jabonosa en todas las uniones del metal y en toda el área de la válvula, como se muestra en
las figuras.
5. Gire lentamente la válvula de la bombona de gas en sentido contrario a las agujas del reloj hasta la posición de abierta.
6. Las fugas pueden identificarse mediante la formación. Cierre de inmediato la válvula del bombona de gas y
vuelva a apretar las conexiones.
7. Si no puede eliminar las fugas, no intente repararlas, contacte a su proveedor del aparato para obtener ayuda.
No intente utilizar la aparato si hay una fuga.
8. Examine siempre la manguera en busca de daños. Si observa algún daño, no intente reparar la manguera.
Reemplazar la manguera es la única opción segura.
9. Para obtener ayuda con cualquier funcionamiento defectuoso relacionado con la bombona de gas, el regulador
o la manguera, contacte con el servicio de atención al cliente.
10. Después de hacer una prueba para detectar fugas, cierre siempre la válvula del bombona de gas, girando la
manilla en el sentido de las agujas del reloj.
BAJO NINGUNA CIRCUNSTANCIA, LA VÁLVULA DEBE PERMANECER EN LA POSICIÓN DE ENCENDIDO
MÁS DE 12 SEGUNDOS.
ADVERTENCIA !!
1. NO UTILICE EL APARATO si hay fugas. Asegúrese de que la válvula del bombona de gas esté cerrada.
Si el bombona de gas sigue teniendo fugas, póngase en contacto con su distribuidor de GLP o llame al 911.
2. No utilice fósforos, llamas abiertas ni humo durante las pruebas de fugas.
3. No encienda ningún quemador durante las pruebas de fugas.
4. Las piezas de repuesto, incluido un conjunto de manguera de repuesto debe ajustarse a lasespecificaciones
de la lista de piezas de repuesto.
ADVERTENCIA !!
Utilice siempre un termómetro para freír cualquier alimento. Un termómetro es un dispositivo de medición sensible
que puede no funcionar correctamente si se cae, se dobla o se retuerce. Comprebe siempre que su termómetro
funciona correctamente antes de freír. NO use para freír un termómetro para carne.
El incumplimiento de esas instrucciones puede dar lugar a graves lesiones personales.
TESTADO DEL TERMÓMETRO
PRECISIÓN DE LA MEDICIÓN DE LA TEMPERATURA
RANGO DE TEMPERATURA
Con guantes protectores puestos, sostenga el termómetro por el lado de la
escala e inserte la varilla del mismo en agua hirviendo. La aguja debe moverse
rápidamente en torno al cuadrante e indicar aproximadamente 212 °F (100 °C)
(+/- 5 °F). Esto indica si la lectura de temperatura es precisa o no.
NOTA: Debido a la evaporación del agua, la lectura máxima posible
en un termómetro en agua caliente es 212 °F (100 °C).
Sostenga el termómetro por el lado de la escala y coloque el extremo de la varilla sobre un fósforo o un encendedor
encendidos. La aguja debe moverse rápidamente en torno al cuadrante e indicar una temperatura muy por encima
de 350 °F (177 °C). Si la aguja se detiene en una temperatura baja, como 225 °F (107 °C), significa que el
termómetro está dañado y no se puede usar.
NOTA: ¡NO intente freír si el termómetro no funciona! Si el termómetro suministrado con esta freidora/olla se ha
perdido o dañado, el termómetro de repuesto debe ser uno especificado por el fabricante del aparato.
Cada quemador de aparato se prueba y calibra en la fábrica antes del envío; sin embargo, los cambios en el
suministro local de gas natural pueden requerir un ajuste del quemador. Por favor, compruebe visualmente
las llamas de los quemadores. Compruebe siempre visualmente el aparato antes de encenderlo. Reemplace
cualquier manguera que esté deshilachada o agrietada. Busque cualquier cosa que pueda bloquear la ventilación
y eliminar tal obstrucción o mover el aparato. Después de la iluminación comprueba el modo de fuego para
asegurarse de que el calor de cada quemador se distribuye uniformemente. Si los quemadores no se encienden
o si el patrón de llama es desigual, consulte la sección Solución de problemas.
ADVERTENCIA: ANTES DE LA ILUMINACIÓN !!
1. Lea las instrucciones antes de la iluminación.
2. Si el encendido no se produce en 5 segundos, apague la válvula reguladora, espere 5 minutos y repita el
procedimiento de iluminación.
3. Inspeccione la manguera de suministro de gas antes de encender el gas. Si hay evidencia de cortes, desgaste
o abrasión, debe reemplazarse antes de su uso. No utilice el aparato si hay olor a gas. Utilice únicamente el
regulador de presión y el conjunto de manguera suministrados con la unidad.
4. Nunca utilice reguladores y conjuntos de mangueras que no sean los suministrados con el aparato. Si es necesario
un reemplazo, comuníquese con el fabricante para obtener el reemplazo adecuado. El reemplazo debe realizarse
según las especificaciones del Manual del Usuario. NO DEJE EL APARAT DESATENDIDA MIENTRAS COCINA.
5. ¡NO UTILICE ALCOHOL O GASOLINA PARA ENCENDER O VOLVER A ENCENDER!
ILUMINACIÓN EL QUEMADOR
1. Lea todas las instrucciones antes del encendido.
2. Gire la válvula de control del regulador y la válvula de la bombona hasta la
posición de APAGADO.
3. Abra completamente la válvula de la bombona de gas girándola en sentido
contrario a las agujas del reloj.
4. Gire lentamente la válvula reguladora una vuelta en el sentido de las agujas
del reloj. NO se coloque con la cabeza o los brazos sobre el quemador.
5. A: Encienda una cerilla larga de madera o un encendedor de gas y colóquelo
sobre el quemador.
B: Coloque un fósforo en el soporte para fósforos. Utiliza el soporte para deslizar la cerilla encendida por el
quemador del fondo del carro que quieras encender.
6. Cuando el quemador esté encendido, gire la válvula de control del regulador a la posición de salida de calor
deseada.
7. Si el quemador no se enciende en 5 segundos, gire el regulador y la válvula de la bombona de gas a la posición
de APAGADO. Espere 5 minutos para que se evacúe el gas y repita el proceso descrito arriba.
* Si los quemadores siguen sin encenderse, compruebe el suministro de gas.
Amarillo
Amarillo
Luz azul
Luz azul
Azul
Azul
Bueno Malo
APAGAR EL APARATO
1. Apague el suministro de gas en el bombona de gas girando la válvula en el sentido horario.
2. Gire la válvula reguladora a la posición OFF.
LLAMAS DE QUEMADOR
Encienda el quemador y regule la llama
con la válvula de control del regulador y
la compuerta de aire hasta lograr la llama
deseada. Compruebe siempre la llama
antes de cada uso. Una llama azul con
poca o ninguna llama amarilla
proporciona el mejor calor.
Instrucciones de iluminación
Compuerta de aire
19
This manual suits for next models
1
Table of contents
Languages:
Popular Fryer manuals by other brands


Frymaster
Frymaster 8196339 Installation & operation manual

Frymaster
Frymaster 35 Series Installation and operation manual

Eagle
Eagle CLGF30-NG Installation, operating, & maintenance instructions

PowerXL
PowerXL AIR FRYER GRILL PLUS owner's manual

Wells
Wells F-856 Specifications

Henny Penny
Henny Penny OE-30X Service manual

Rankam
Rankam Kamp Kitchen TF2005101-KK-00 Assembly, use and care manual

Amitek
Amitek FE4 Installation, operating and service instructions

Masterbuilt
Masterbuilt Butterball 20010109 Operation manual & safety instructions

Philips
Philips HD4282/10 user manual

Vulcan-Hart
Vulcan-Hart ML-136407 Installation & operation manual

Instant
Instant VORTEX PLUS user manual