Criterion CUF154WD1W User manual

Use & Care Guide
CRITERION
Upright Freezer
/
Refrigerator
M
o
d
e
l
s
/
M
o
d
e
l
o
s
:
CUF154WD1W
–
W
h
i
t
e
–
1
5
c
u
.
f
t
.
CUF179WD1W – White – 18 cu. ft.
CUF208WD1W – White – 21 cu. ft.

2
CAUTION
CAUTION indicates a potentially
hazardous situation which, if not
avoided, may result in minor or
moderate injury.
Record Model/
Serial Numbers
Please read and save
these instructions
This Use & Care Guide provides specific
operating instructions for your model. Use
your unit only as instructed in this guide.
These instructions are not meant to cover
every possible condition and situation that
may occur. Common sense and caution mustbe
practiced when installing, operating, and
maintaining any appliance.
Please record your model and serial
numbers below for future reference. This
information is found on the lower left wall
inside the appliance.
Model
Number: KRFU
or
Serial
Number:
Purchase
Date:
Table of Contents
R
e
cor
d
M
od
e
l
/
S
e
ria
l
N
u
m
b
e
r
s
.....................
2
Important Safety Instructions....................... 2
Appliance Setup..............................................5
Description of Appliance............................. 6
Control Panel ....................................................7
Handle Installation ........................................ 8
Reversing Door/Handle. .................................. 9
Care & Cleaning............................................. 11
Power or Appliance Failure...........................12
Before You Call...............................................13
Warranty ..........................................................15
Service ..............................................
Back Cover
Important Safety
Instructions
Safety Precautions
Do not attempt to install or operate
your unit until you have read the safety
precaution sin this Use & Care Guide.
Safety items throughout this manual are
labeled with a Danger, Warning, or
Caution based on the risk type.
Definitions
This is the safety alert symbol. It is
used to alert you to potential personal
injury hazards. Obey all safety messages
that follow this symbol to avoid possible
injury or death.
DANGER
DANGER indicates an imminently
hazardous situation which, if not
avoided, will result in death or serious
injury.
WARNING
WARNING indicates a potentially
hazardous situation which, if not
avoided, could result in death or serious
injury.
IMPORTANT
Use only soap and water to clean
serial plate.
IMPORTANT
Indicates installation, operation, or
maintenance information which is
important but not hazard-related.

Important Safety Instructions
3
CAUTION
CAUTION Risk of fire or explosion.
Flammable refrigerant used. Consult
repair manual/owner’s guide before
attempting to service this product. All
safety precautions must be followed.
CAUTION Risk of fire or explosion.
Dispose of properly in accordance with
federal or local regulations. Flammable
refrigerant used.
CAUTION Risk of fire or explosion
due to puncture of refrigerant tubing.
Follow handling instructions carefully.
Flammable refrigerant used.
DANGER
DANGER Risk of fire or explosion.
Flammable refrigerant used. Do not use
mechanical devices to defrost refrigerator.
Do not puncture refrigerant tubing.
DANGER Risk of fire or explosion.
Flammable refrigerant used.To be repaired
only by trained service personnel. Do not
puncture refrigerant tubing.
For Your Safety
•
Do not store or use gasoline or other
flammable liquids in the vicinity of this or
any other appliance. Read product labels
for warnings regarding flammability and
other hazards.
•
Do not operate the unit in the presence
of explosive fumes.
•
Remove and discard any spacers used to
secure the basket during shipping. Small
objects are a choke hazard to children.
•
Remove all staples from the carton.
Staples can cause severe cuts and also
destroy finishes if they come in contact
with other appliances or furniture.
Child Safety
Destroy or recycle the carton, plastic bags,
and any exterior wrapping material
immediately after the unit is unpacked.
Children should never use these items to play.
Cartons covered with rugs, bedspreads,plastic
sheets or stretch wrap may become airtight
chambers and can quickly cause suffocation.
Proper disposal of your appliance
DANGER: Risk of child entrapment!
Child entrapment and suffocation are not
problems of the past. Junked or abandoned
appliances are still dangerous – even if they
will sit for “just a few days.” If you are
getting rid of your appliance, please follow
the instructions below to help prevent
accidents.
Before you throw away your old unit:
•
Remove door.
•
Leave shelves in place within appliance so
children may not easily climb inside.
•
Have refrigerant removed by a qualified
service technician.
WARNING
Read all safety instructions before using
your new appliance.

Important Safety Instructions
4
Electrical Information
•
The unit must be plugged into its own
dedicated 10 amp minimum, 115 Volt, 60
Hz, AC only electric outlet. The power cord
of the appliance is equipped with a three-
prong grounding plug to protect against
shock hazards. It must be pluggeddirectly
into a properly grounded three- prong
receptacle. The receptacle must be installed
in accordance with local codes and
ordinances. Consult a qualified electrician.
Do not use an extension cord or adapter
plug.
•
Immediately repair or replace any power
cord that becomes frayed or damaged.
•
Never unplug the appliance by pulling on
the power cord. Always grip the plug
firmly, and pull straight out from the
receptacle to prevent damaging the
power cord.
•
Unplug the appliance before cleaning
and before defrosting to avoid
electrical shock.
•
Performance may be affected if the
voltage varies by 10% or more.
Operating the unit with insufficient
power can damage the motor. Such
damage is not covered under the
warranty.
•
Do not plug the unit into an outlet
controlled by a wall switch or pull cord
to prevent the appliance from being
turned off accidentally.
•
Avoid connecting unit to a Ground
Fault Circuit Interrupter (GFCI).
WARNING
These guidelines must be followed to
ensure that safety mechanisms in this
unit will operate properly.
IMPORTANT
Your old unit may have a cooling system
that used CFCs or HCFCs (chlorofluoro-
carbons or hydrochlorofluorocarbons).
CFCs and HCFCs are believed to harm
stratospheric ozone if released to the
atmosphere. Other refrigerants may cause
harm to the environment if released to the
atmosphere. If you are throwing away
your old unit, make sure the refrigerant is
removed for proper disposal by a
qualified technician. If you intentionally
release refrigerant, you may be subject to
fines and imprisonment under the
provisions of environmental legislation.
5
Appliance Setup
This Use & Care Guide provides specific
operating instructions for your model. Use the
unit only as instructed
in this
Use
&
Care
Guide. Before starting the appliance, follow
these important setup steps.
Installation
•
Choose a place that is near a grounded
electrical outlet. Do Not use an extension
cord or an adapter plug.
•
For the most efficient operation, the
appliance should be located where
surrounding temperatures will not exceed
110°F (43°C). Temperatures of 32°F (0°C)
and below will NOT affect appliance
operation. Additional compressor heaters
are not recommended.
•
Allow space around the unit for good air
circulation. Leave a 1-inch (25.4 mm)
space at the back and on top and a
3
/
8
-
i
n
c
h
(
9
.
5
mm)
s
pa
c
e
o
n
t
he
s
i
d
e
s
o
f
the appliance for adequate circulation.
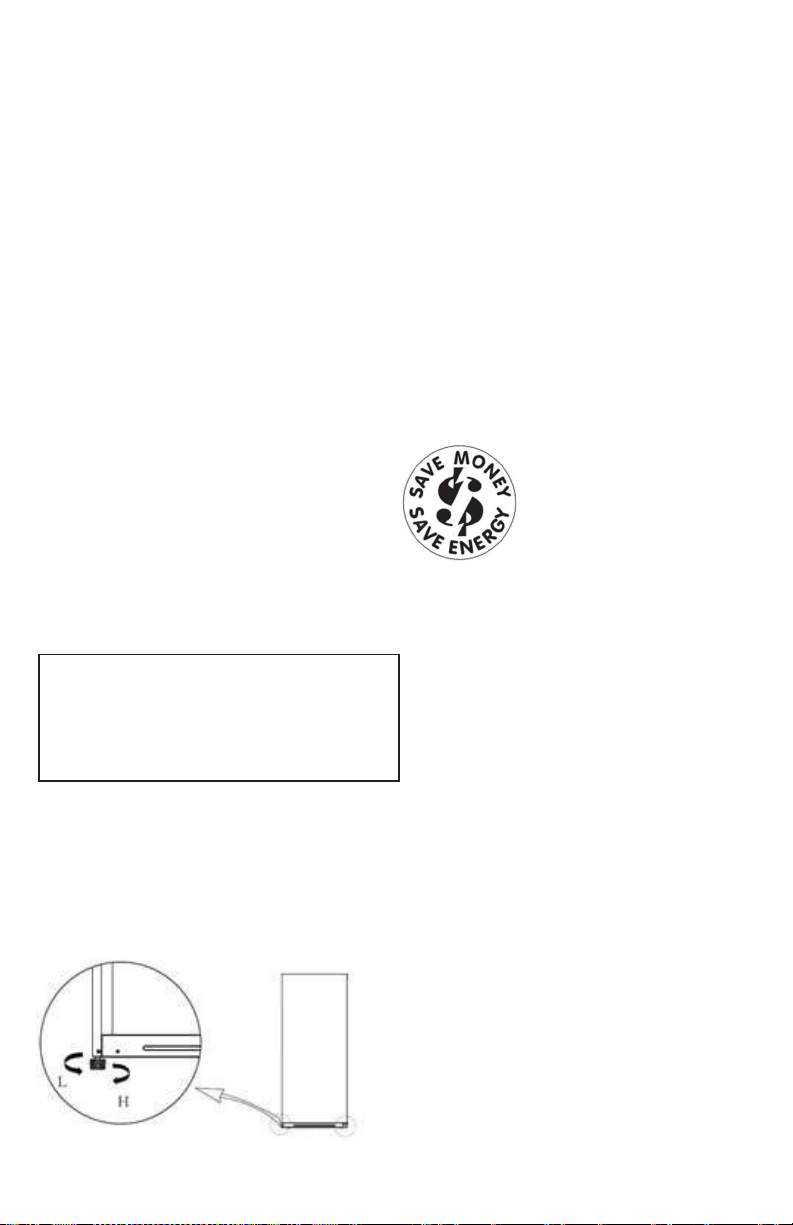
Leveling
The appliance must have all bottom corners
resting firmly on a solid floor that is strong
enough to support a fully loaded appliance.
The appliance is equipped with adjustable
front leveling feet. Turn the foot clockwise
to heighten (H) the side of the unit. Turn
counterclockwise to lower (L) the side. Adjust
each side as needed until front of unit is level.
A
l
s
o
ad
j
u
s
t
s
o
t
h
a
t
f
r
o
n
t
o
f
un
i
t
i
s
1
/
4
˝
higher
than back, so that door stays closed.
Cleaning
•
Wash any removable parts, the
appliance interior, and exterior with mild
detergent and warm water. Wipe dry.
Do not use harsh cleaners on these
surfaces.
•
Do not use razor blades or other sharp
instruments, which can scratch the
appliance surface when removing
adhesivelabels. Any glue left from the
tape can be removed with a mixture of
warm water and mild detergent, or
touch the residue with the sticky side of
tape already removed. Do not remove
the serial plate.
Energy Saving Ideas
for Freezer Mode
The freezer should be
located in the coolest area of
the room, away from heat
producing appliances or
heating ducts, and out of
direct sunlight.
•
Let hot foods cool to room temperature
before placing in freezer. Overloading the
freezer forces the compressor to run
longer. Foods that freeze too slowly may
lose quality or spoil.
•
Be sure to wrap foods properly, and
wipe containers dry before placing
them in the freezer. This cuts down on
frost build-up inside the freezer.
•
Do not line freezer shelves and bins
with aluminum foil, wax paper, or paper
toweling. Liners interfere with cold air
circulation, reducing freezer efficiency.
•
Organize and label food to reduce lid
openings and avoid extended searches.
•
Remove as many items as needed at one
time, and close door as soon as possible.
It is Very Important for the appliance to be
level in order to function properly. If not
level, the door may be misaligned and not
close or seal properly, causing cooling,
frost, or moisture problems.
•
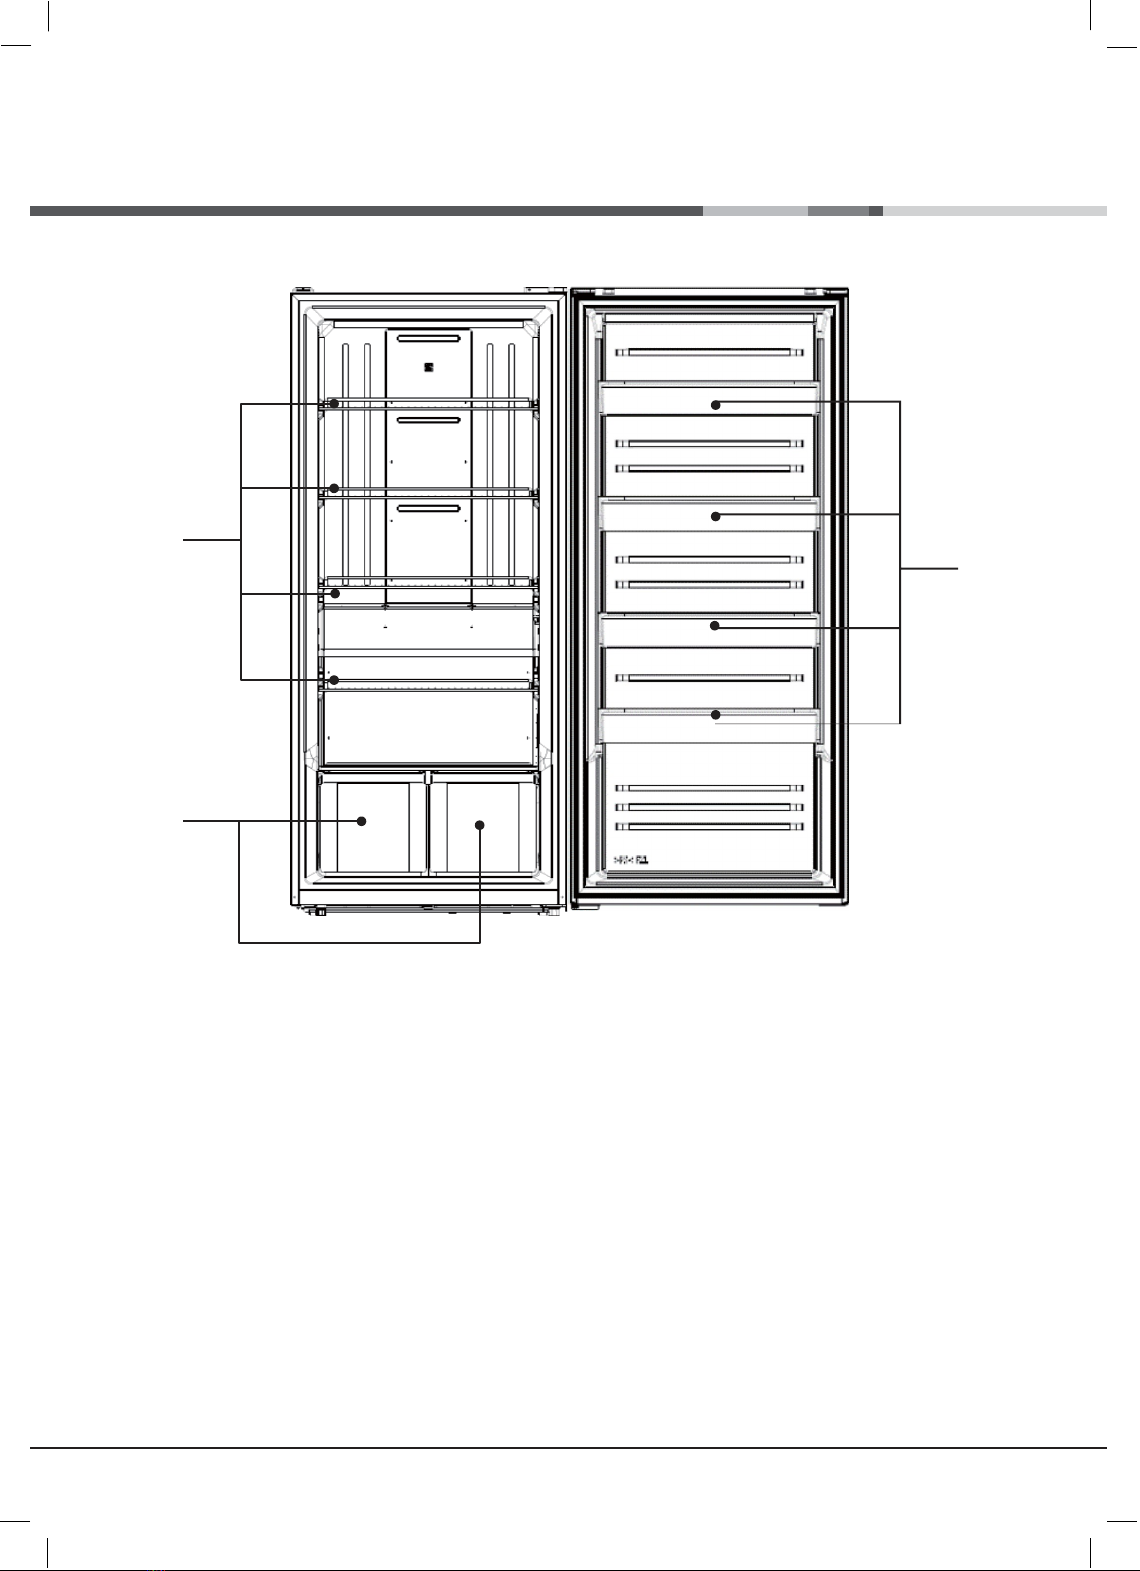
Description of Appliance
6
RZE43@@(EN)_냉동고.indd 11
2021-02-26 오후 5:33:35
Ⓒ
Ⓒ
Ⓒ
Ⓒ
Freezer Compartment Shelves
-
For storage of frozen food, meat, fish, ice cream
Ⓒ
Freezer Compartment Pockets
-
For storage of frozen food.
Ⓒ
Freezer Compartment Cases
-
For storage of frozen food.
Control Panel
7
RZE43@@(EN)_냉동고.indd 14
2021-02-26 오후 5:33:36
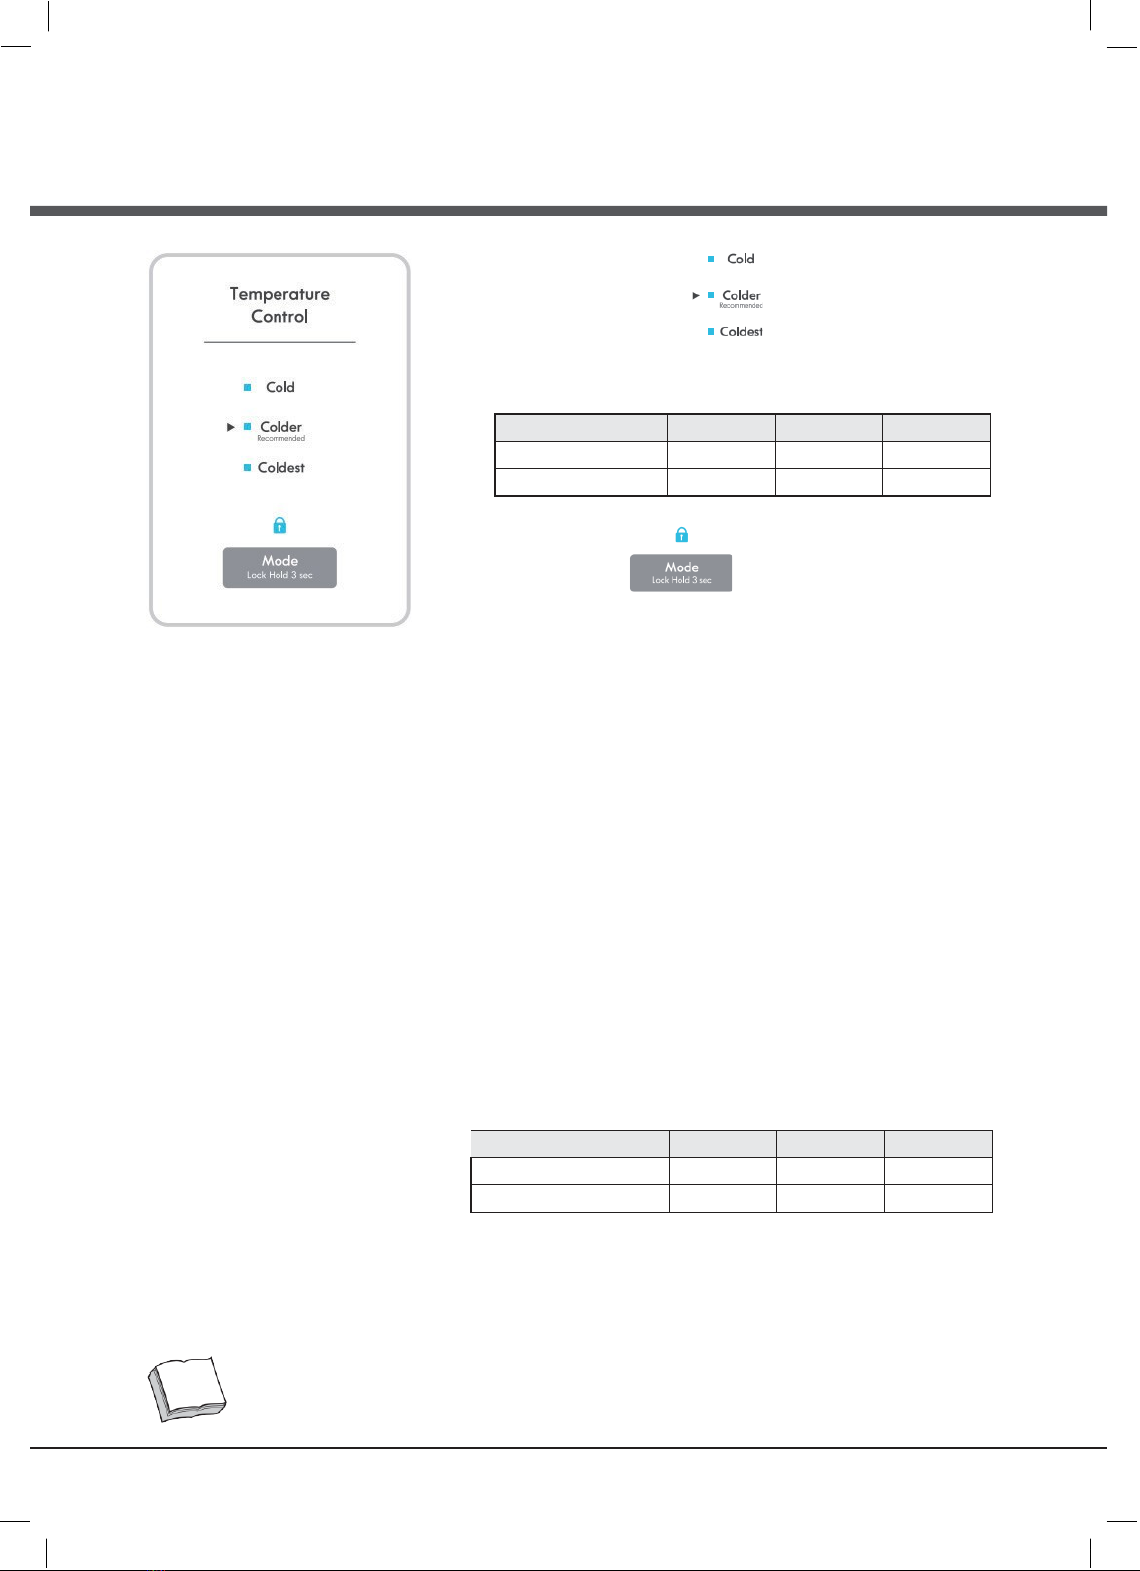
Ⓒ
Freezer Temperature
Press the "Mode" button and the temperature setting changes inthe
sequence as shown below:
Colder→Coldest→Cold
Setting Cold Colder Coldest
Temperature (°C) -15 -18 -21
Temperature (°F) 60-6
Ⓒ
Lock
Function
1)
Lock function: When "Lock" button is pressed for 3 seconds, the
"Lock" button will blink 3 times and activate the lock function Or
it locks itself after 20 seconds without pressing any button.
2)
Unlock function: When it is locked, press "Lock" button for
3 seconds. "Lock "LED light will blink 3 times and it will be unlocked
Temperature Control
Note: After making an adjustment, allow at least 24 hours for the
internal temperature to stabilize at the new setting. The controls are
set correctly when food is as cold as you would like and whenice
cream is firm. If the temperature in either compartment is too cold
or too warm, change the setting one increment at a time.
•
The freezer control is preset to 0 deg F (-18 deg C).
•
Freezer
Under unlock state, Press the "Mode" button and the temperature
setting changes in the sequence as shown below:
Colder→Coldest→Cold
>>> Sequential Temperature Change <<<
Setting Cold Colder Coldest
Temperature (°C) -15 -18 -21
Temperature (°F) 60-6
The interior temperature can depend on number of door opening, room temperature, and other user conditions
Note
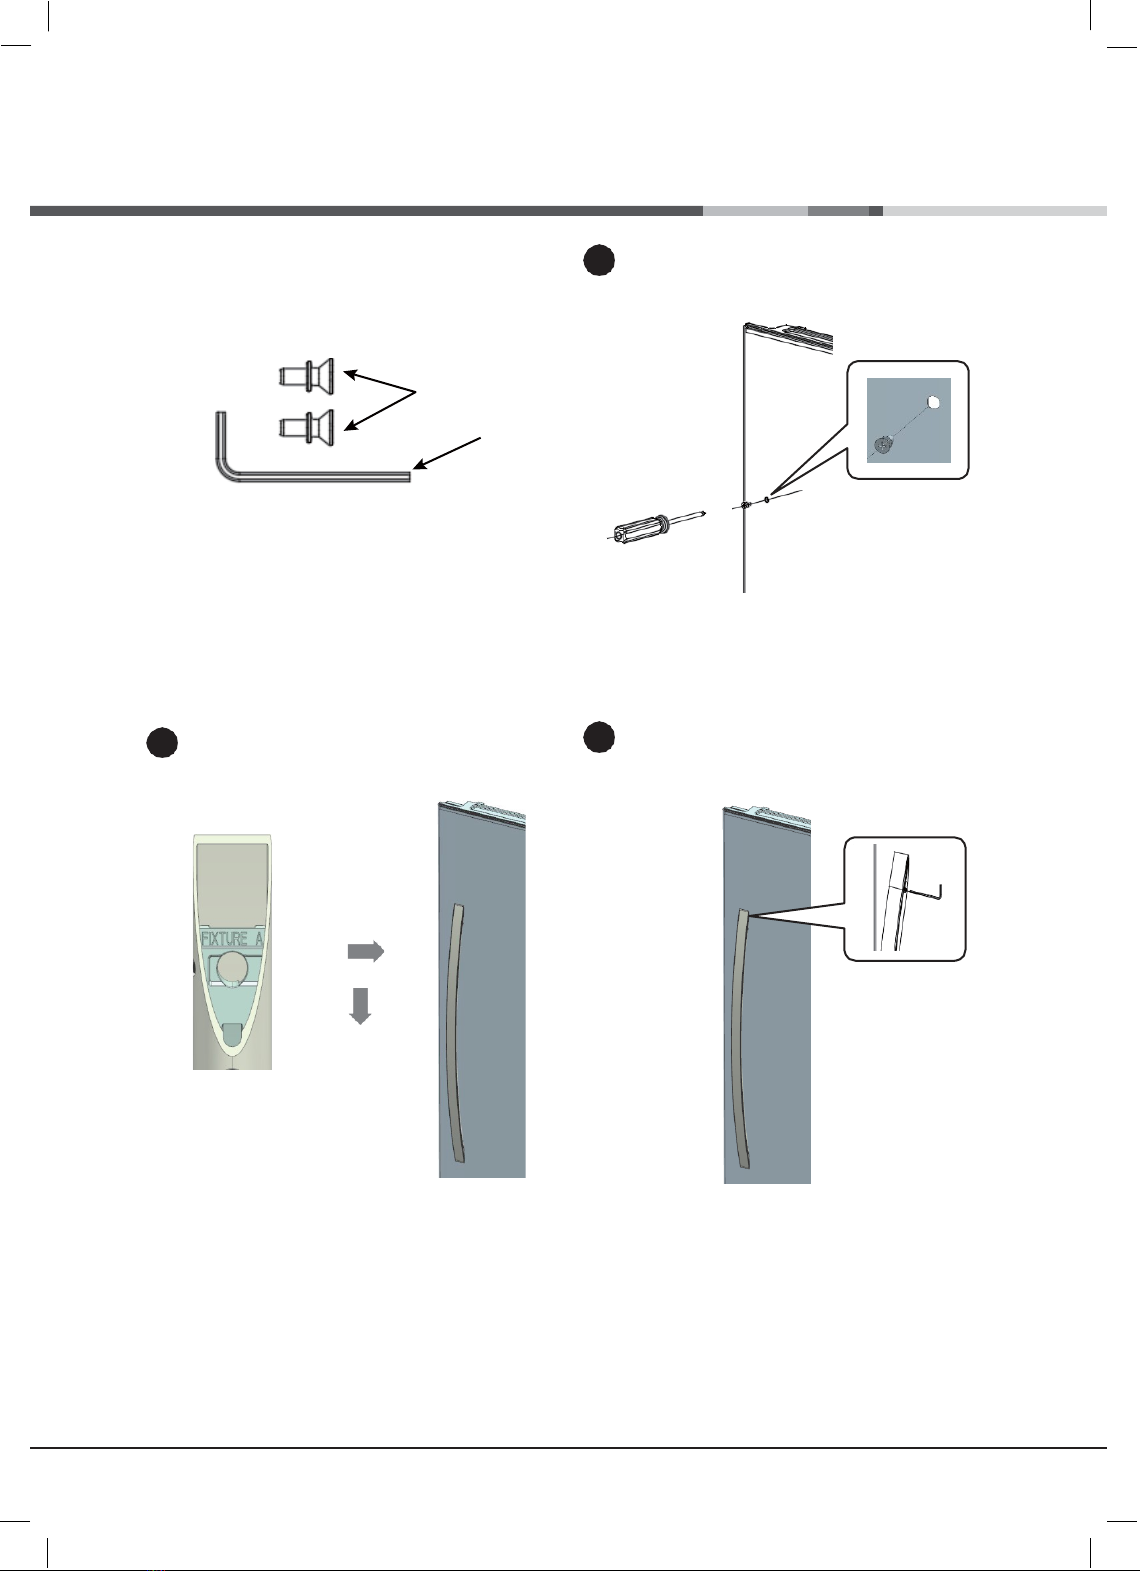
Handle
Installation(Option)
8
RZE43@@(EN)_냉동고.indd 15
2021-02-26 오후 5:33:36
Included Parts :
Two Standoff Screws(A) , Hex Wrench(B),
Install the standoff screw(B)
B
Put the Fig1 side up and assemble in the order
indicated by the arrow
Ⓒ
Ⓒ
Fig1
Tighten with a wrench
1
2
3
A
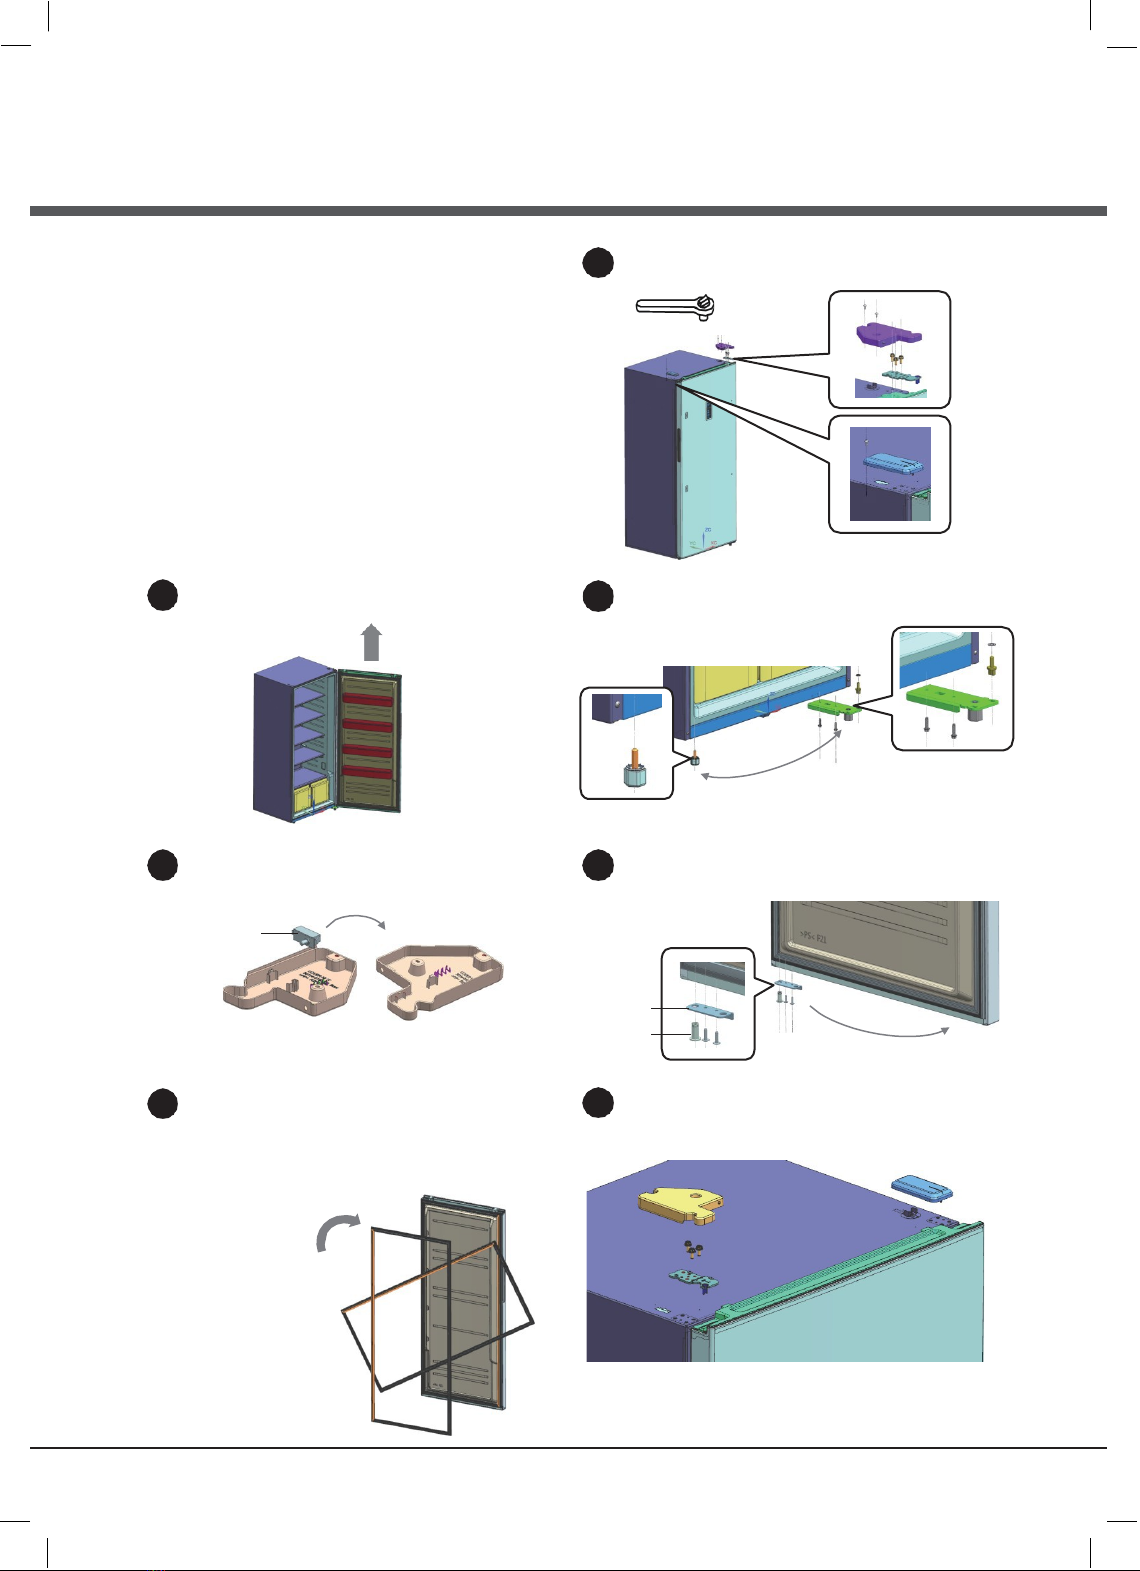
Reversing Door (Option)
9
RZE43@@(EN)_냉동고.indd 9
2021-02-26 오후 5:33:36
Tools Required :
•
5/16”end wrench, Screwdriver
Note
•
Before reverse door, do not forget to unplug the freezer
Disassemble using a wrench and screwdriver.
Open door and lift.
Place door on a non-scratching surface.
Remove the bottom hinge plate and assemble it
on the opposite side.
Note the location of washer
Washer
Remove the door switch and assemble it to the
enclosed COVER HINGE L.
Separate the bushing and door stopper andassemble
on the opposite side.
Door stopper
Bushing
Remove the sealing gasket from freezer door,
noting orientation during removal.
Rotate 180 degrees and reinstall by alighing to
groove and firmly pressing around the perimeter,
from bottom to top.
Make sure gasket is fully
setaed into door
groove.
Assemble using a wrench and screwdriver.
Door
switch
5/16”
1
2
3
4
5
6
7
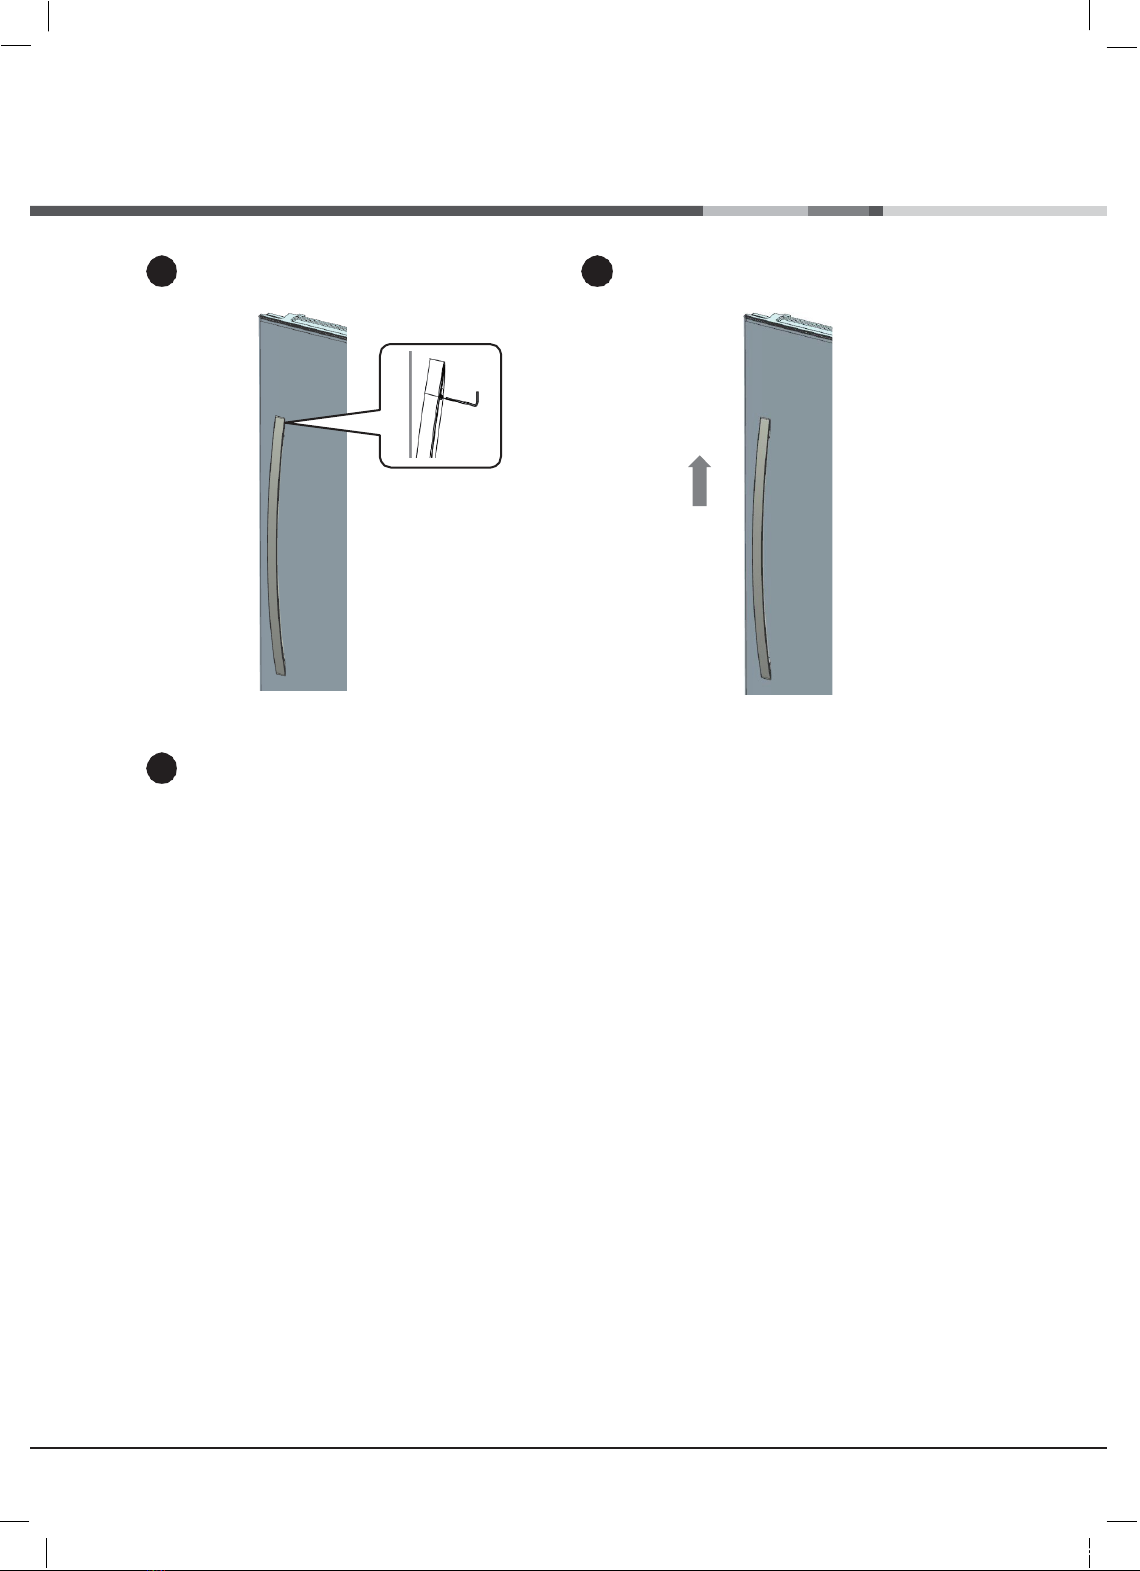
Reversing Handle
(Option)
10
RZE43@@(EN)_냉동고.indd 10
2021-02-26 오후 5:33:36
2
Loosen it with a wrench. Remove by lifting the handle in the direction of the arrow.
Assembling removed handle on the opposite sideis
same as the handle installation above.
1
3
11
Automatic Defrost
The appliance is equipped with
automatic defrost capability so
that
you
do not have to manually defrost. The
cooling element of the unit is regularly
heated to melt the frost that forms on it.
The resulting water drains through a duct
at the back of the unit and into a
concealed pan at the base of the unit
where it evaporates. Should any frost form
on the unit interior walls, remove food and
store it elsewhere. Then unplug the unit,
wait long enough for the frost to melt, and
wipe up the moisture with a drytowel.
Rear Wheels
The appliance is equipped with
rear wheels
to help you roll it into or out of a location.
CAUTION: Obtain the aid of an assistant if
the appliance feels too heavy for you to
safely move it.
Interior LED Lighting
The appliance features interior LED lighting,
which is more effective and longer lasting
than incandescent bulbs. However, in the
unlikely event that the LED fails to light, call
1-844-553-6667 to schedule repair service
to replace it.
Care & Cleaning
abrasive cleaners, or alkaline solutions onany
interior surface. Do not wash removable
parts in a dishwasher.
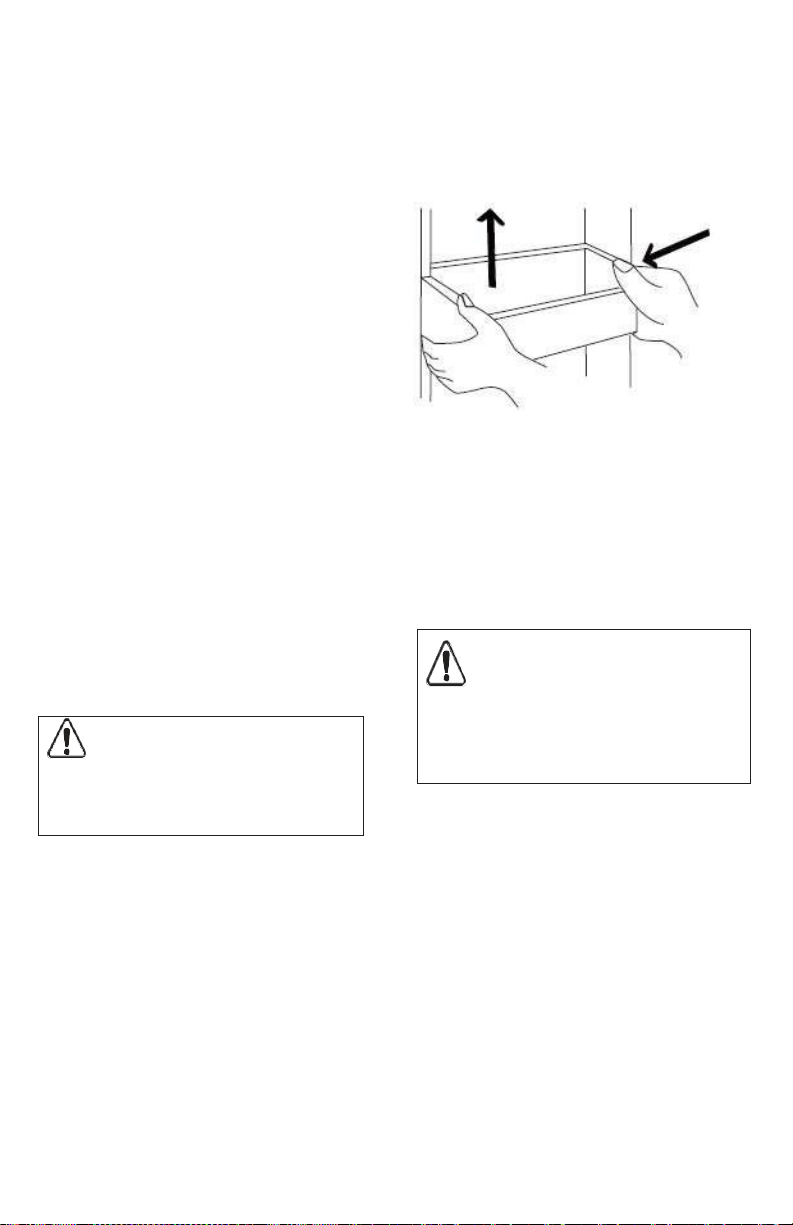
Cleaning Door Bins
To remove the door bins for cleaning, use
both hands to squeeze the tray in from
both ends and push upward.
Cleaning the Outside
Wash the cabinet with warm water and
mild liquid detergent. Rinse well and wipe
dry with a clean soft cloth. Never use
metallic scouring pads, brushes, abrasive
cleaners, or alkaline solutions on any
exterior surface.
Vacation and Moving Tips
Cleaning the Inside
Wash inside surfaces of the appliance with
a solution of two tablespoons of baking
soda in one quart (1.1 liters) warm water.
Rinse and dry. Wring excess waterout of
the sponge or cloth when cleaning in the
area of the controls, or any electrical
parts.
Wash the removable parts and baskets
with the baking soda solution mentioned
above, or mild detergent and warm
water.
Never use metallic scouring pads, brushes,
Short Vacations: Leave the appliance
operating during vacations of less than
three weeks.
Long Vacations: If the appliance will not
be used for several months:
•
Remove all food and unplug the
power cord.
•
Clean and dry the interior thoroughly.
•
Leave the appliance door open slightly,
blocking it open if necessary, to prevent
odor and mold growth.
Moving: When moving the appliance,
follow these guidelines to prevent
damage:
•
Disconnect the power cord plug from
the wall outlet.
CAUTION
Damp objects stick to cold metal
surfaces. Do not touch inferior metal
surfaces with wet or damp hands.
WARNING
If leaving the appliance door open while
on vacation, make certain that children
cannot get into the appliance and become
entrapped.

12
NOTE
If unit is turned off or unplugged for
several hours, do not open appliance
door unnecessarily. This will maintain the
coldest temperature inside and reduce
the recovery time to desired temperature
once the unit is turned back on.
•
Remove foods and clean the appliance
interior.
•
Secure all loose items such as bins
and shelves by taping them securely in
place to prevent damage.
•
In a moving vehicle, secure appliance inan
upright position to prevent movement.
Also protect outside of appliance with a
blanket, or similar item.
Power or Appliance Failure
If a power failure occurs, frozen foods will
stay frozen for at least 24 hours if the
appliance door is kept closed. If the power
failure continues, pack seven or eight
pounds of dry ice into the appliance every
24 hours. Look in the Yellow Pages under Dry
Ice, Dairies, or
Ice
Cream
manufacturers
for local dry ice suppliers. Always wear
gloves and use caution when handling dry
ice.
If the appliance has stopped operating, see
Appliance does not run in the
Troubleshooting Guide. If you cannot solvethe
problem, call an authorized servicer
immediately. If the appliance remains off
for several hours, follow the directions
above for the use of dry ice during a
power failure. If necessary, take the food to
a local locker plant until the appliance is
ready to operate. Look in the Yellow Pages
under Frozen Food Locker Plants.

Before You Call
13
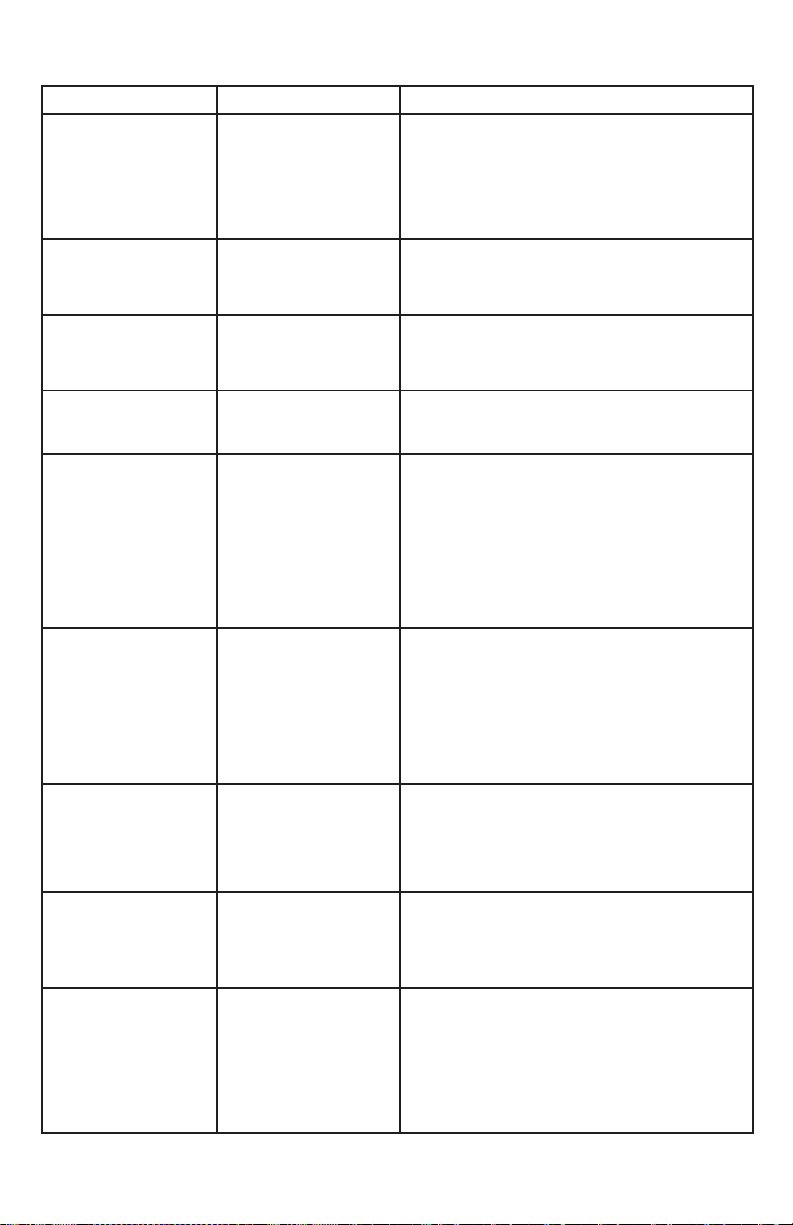
TROUBLESHOOTING
GUIDE
Before calling for service, review this list. It may save you time and expense.
This list includes common occurrences that are not the result ofdefective
workmanship or materials in this appliance.
CONCERN
POTENTIAL CAUSE
COMMON SOLUTION
Appliance does not
run.
1.
Unit is plugged into a
circuit that has a
ground fault
interrupt.
2.
Temperature control
is in the OFF position.
3.
Unit may not be
plugged in or plug
may be loose.
4.
House fuse blown or
tripped circuit
breaker.
5.
Power outage.
1.
Use another circuit. If you are unsure about
the outlet, have it checked by a certified
electrician.
2.
See Temperature Control Section.
3.
Ensure plug is tightly pushed into outlet.
4.
Check house fuse or circuit breaker.
5.
Check house lights. Call local Electric
Company.
Appliance runs too
much or too long.
1.
Room or outside
weather is hot.
2.
Unit has recently
been disconnected
for a period of time.
3.
Large amounts of
warm or hot food
have been stored
recently.
4.
Door is opened too
frequently or long.
5.
Door may be slightly
open.
6.
Temperature Control
is set too low.
7.
Door gasket is dirty,
worn, cracked, or
poorly fitted.
1.
It is normal for the appliance to work harder
under these conditions.
2.
It takes 4 hours for the unit interior to cool
down completely.
3.
Warm food will cause unit to run more until
the desired temperature is reached.
4.
Warm air entering the interior causes it to
run more. Open door less often.
5.
See Door Will Not Close in this Before You
Call Section.
6.
Set control to a warmer setting. Allow
several hours for the temperature to
stabilize.
7.
Clean or change gasket. Leaks in the lid seal
will cause unit to run longer in order to
maintain desired temperature.
Interior
temperature is
too cold.
Temperature Control is
set too cold.
Adjust the control to a warmer setting. Allow
several hours for the temperature to stabilize.
Interior
temperature is
too warm.
1.
Temperature Control
is set too warm.
2.
Door is kept open too
long or is opened too
frequently.
3.
Door may not be
seating properly.
4.
Large amounts of
warm or hot food
may have been
stored recently.
5.
Appliance has
recently been
disconnected for a
period of time.
1.
Adjust control to a colder setting. Allow
several hours for the temperature to
stabilize.
2.
Warm air enters the appliance every time
the door is opened. Open the lid less often.
3.
See Door Will Not Close in this Before You
Call section.
4.
Wait until the appliance has had a chanceto
reach its selected temperature.
5.
Freezer mode requires 4 hours to cool down
completely after appliance is first plugged
in.
Appliance
exterior surface
temperature is
warm.
1.
Appliance exterior
walls can be as much
as 30°F warmer than
room temperature.
2.
Appliance too close
to adjacent surfaces.
1.
This is normal while compressor works to
transfer heat from inside appliance cabinet.
2.
See clearance requirements in the
Installation section of this Use & Care Guide.
Before You Call
14
CONCERN
POTENTIAL CAUSE
COMMON SOLUTION
Louder sound
levels whenever
appliance is on.
Modern cooling
appliances have
increased storage
capacity and more
stable temperatures.
They require a high
efficiency compressor.
This is normal. When the surrounding noise
level is low, you might hear the compressor
running while it cools the interior.
Longer sound
periods when
compressor comes
on.
Appliance operates
at higher pressures
during the start of
the ON cycle.
This is normal. Sound will level off or disappear
as appliance continues to run.
Popping or cracking
sound when
compressor comes
on.
Metal parts undergo
expansion and
contraction, as in hot
water pipes.
This is normal. Sound will level off or disappear
as appliance continues to run.
Bubbling or
gurgling sound, like
water boiling.
Refrigerant (used for
cooling) is circulating
throughout the system.
This is normal.
Vibrating or
rattling noise.
1.
Appliance is not
level. It rocks on the
floor when it is
moved slightly.
2.
Floor is uneven or
weak. Appliance
rocks on floor when
it is moved slightly.
3.
Appliance is touching
the wall.
1.
Level the unit. Refer to Leveling in Appliance
Setup section of this Use & Care Guide.
2.
Ensure floor can adequately support
appliance.
3.
Move appliance slightly. Refer to Leveling in
the Appliance Setup section after moving if
necessary.
Moisture forms on
inside appliance
walls.
1.
Weather is hot and
humid.
2.
Door may not be
seating properly.
3.
Door is kept open
too long, or is
opened too
frequently.
1.
This is normal.
2.
See Door Will Not Close in this Before You
Call section.
3.
Open the door less often.
Moisture forms on
outside of
appliance.
Door may not be seat-
ing properly, causing
the cold air from inside
the appliance to meet
warm moist air from
outside.
See Door Will Not Close in this Before You Call
section.
Odors in
appliance.
1.
Interior needs to be
cleaned.
2.
Foods with strong
odors are in the
appliance.
1.
Clean interior with sponge, warm water, and
baking soda.
2.
Cover the food tightly.
Door will not close.
1.
Unit is not level or
floor is uneven or
weak. Unit rocks on
the floor when it is
moved slightly.
2.
Food package is
pressing
against
inner door panel.
1.
Unlevel unit can misalign door and door seal.
Floor must be solid and strong enough to
support a fully loaded appliance. Refer to
Leveling in Appliance Setup section of this
Use & Care Guide.
2.
Reposition or remove excess package.

Other manuals for CUF154WD1W
1
This manual suits for next models
2
Table of contents
Other Criterion Refrigerator manuals


