Crutchfield 000SRADIG User manual

Tools Needed: (depending upon vehicle)
000SRADIG
Revision 3/13/05
▲
*000SRADIG*
®
Copyright 2005 Crutchfield Corporation
Satellite Radio Installation Guide
Flat Blade
Screwdriver
Phillips
Screwdriver Panel Tool
Pliers Drill & Bit Set Utility Knife
Wire Stripper/
Crimp Tool Torx Driver Set
Socket &
Ratchet Set
Note: Both plug-and-play and dedicated in-car
satellite radio tuners require the installation of a
satellite radio antenna. The satellite radio antenna
installation process is virtually the same for both
types of tuners, and will be covered in the last
section of this guide.
IMPORTANT
Before starting, compare items on your invoice with items received. Carefully check through packaging material. If
any item is missing, please call: Crutchfield Customer Service at 1-800-955-9091
Although reasonable attempts are made to verify the accuracy of the information
contained in this guide, it is presented without warranties or guarantees of any
type due to the constantly changing nature of this type of information and running
changes in vehicle production. Any person or entity using this information does so
at his or its own risk. If you find our instructions do not apply to your vehicle, or
if you have questions, do not continue with your installation. Contact our toll-free
technical support for assistance (Tech support phone number is on your invoice).
As with any car audio/video installation, your first
step is to disconnect the negative terminal of your
car battery to prevent short circuits. Check your Crutchfield
MasterSheet™ (available for most vehicles) or vehicle owner’s
manual for specific directions. In some vehicles, disconnecting
the battery may require you to re-enter a security code or have
the dealer reset the internal computer.
!

000SRADIG
2
®
Copyright 2005 Crutchfield Corporation
Installing a Plug-and-Play Tuner
The most popular way to get satellite radio in the car is with a plug-and-play
tuner. This is a removable tuner that can be played through both car and
home stereos with the appropriate accessory kits.
Plug-and-play tuners must be mounted in the cradle, also called the docking
station, found in the car accessory kit. Power and signal connections are
usually made at the cradle.
There are two ways to mount the cradle in your car:
1. Using the included mounting hardware
2. Using an optional vehicle-specific mount
Accessory kit mounting hardware
The cradle’s mounting hardware typically features an arm with an industrial-
strength, self-adhesive pad on a backing plate. To install the cradle using
the included hardware, first find a convenient spot on your dash to mount
the cradle. You’ll want to make sure that you can reach it easily and that the
tuner isn’t blocking any of your dash controls. It helps to have someone hold
the tuner in place while you sit in the driver’s seat to check the placement.
Once you’re sure where you want to mount the cradle, swab the area with a
cleansing pad (included in most kits), peel the backing off the self-adhesive
pad, and stick the mount in place. Apply moderate pressure for a minute or
so to ensure that the pad adheres correctly. Some vehicle kits also include
screws for a more permanent installation, though you’ll want to think
carefully before drilling into your dash.
Once the mount is in place, slide the tuner into the cradle, make the
appropriate signal and power connections (see page 4), and you’re ready to
go.
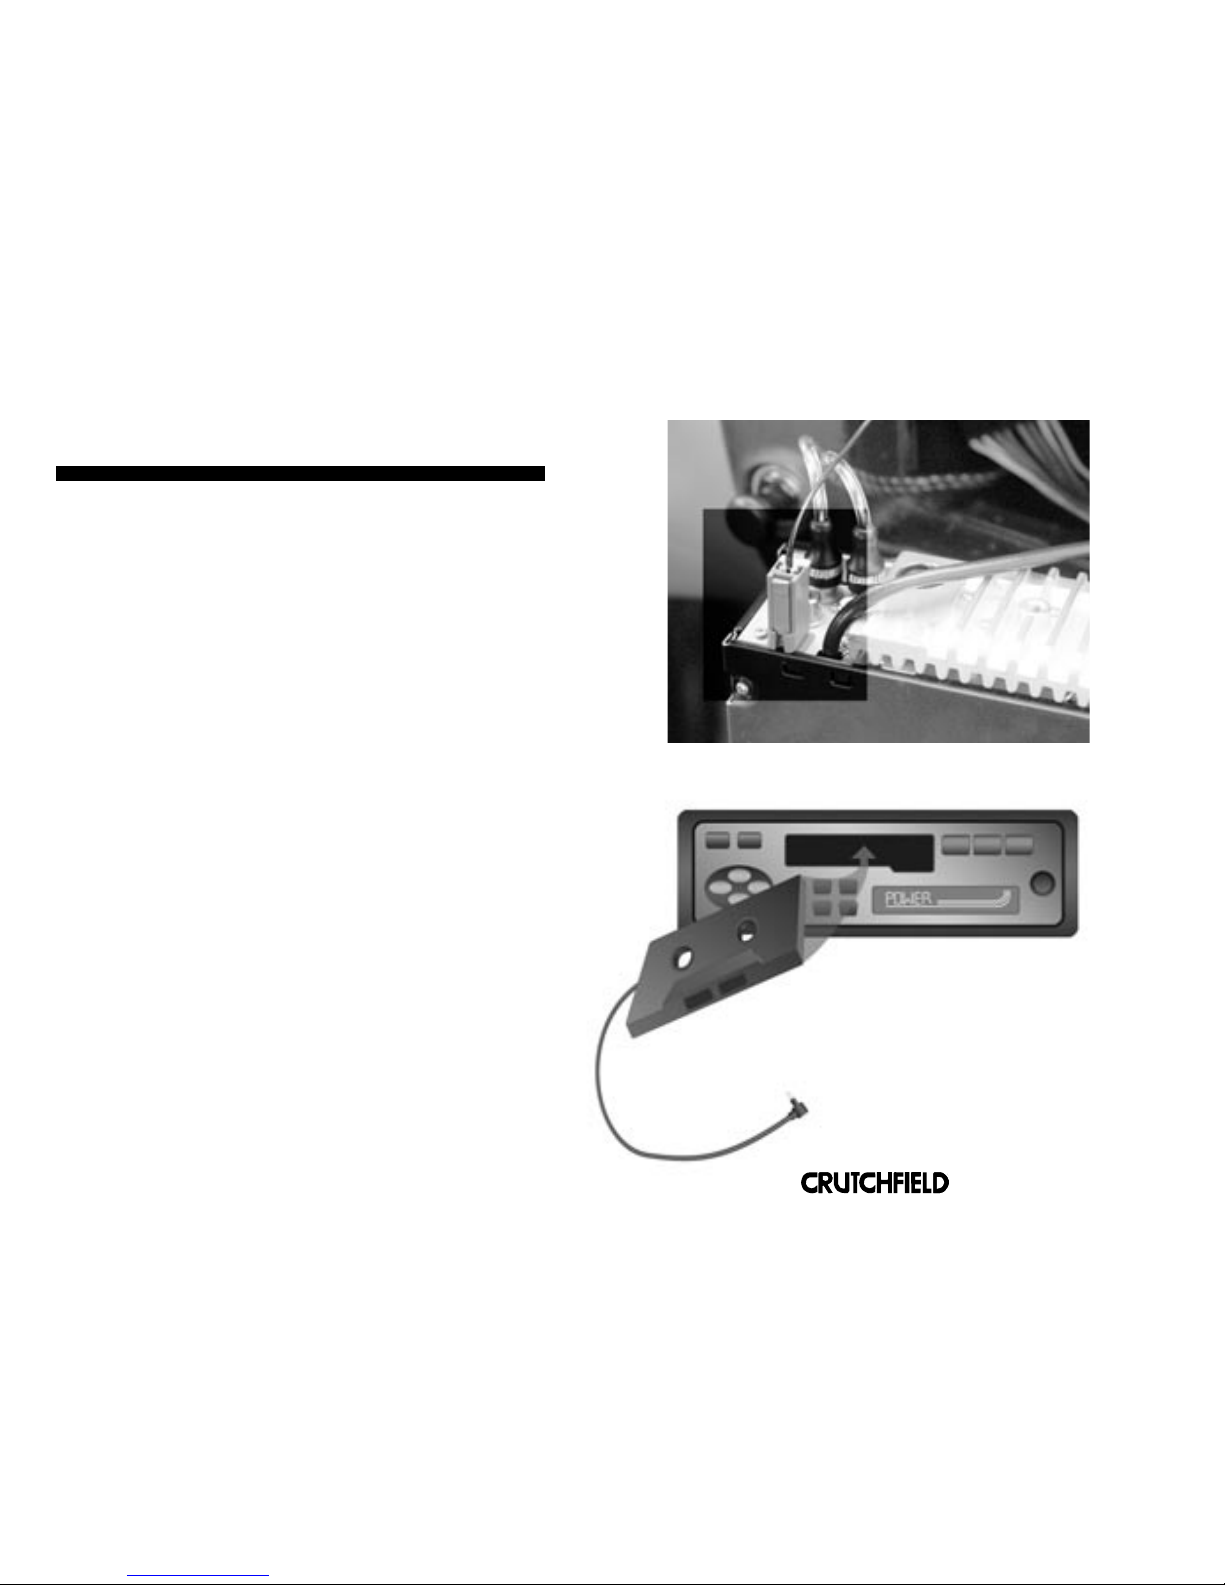
A plug-and-play satellite radio
car kit may include all of the
following: a cradle, an antenna,
a DC power adapter, a mini-
jack-to-RCA patch cord, and a
cassette adapter.
When deciding where to mount a plug-and-play tuner, be sure that you can easily see and reach
the controls, and that the tuner will not interfere with other dash controls.
Always be careful when drilling or cutting in a vehicle.
Be aware of things such as wiring, windows, fuel lines
and safety devices. Check drilling/cutting depth and loca-
tion to avoid damage to vehicle appearance.
CAUTION:
!

000SRADIG
3
®
Copyright 2005 Crutchfield Corporation
Vehicle-specific mounting kits let you install select satellite radio tuners
(or controller/displays) in hard-to-fit vehicles without modifying the dash.
These typically bolt to the dash frame and offer a backing plate for mounting
the tuner’s cradle (you’ll still need the tuner’s car accessory kit; you just won’t
use the included mounting hardware).
There are three advantages to vehicle-specific mounts:
1. Vehicle-specific mounts fit in convenient spots (selected by the
manufacturer) that do not interfere with dash features such as climate
controls and air-conditioning vents.
2. Vehicle-specific mounts are designed to blend-in well visually.
3. Since vehicle-specific mounts are bolted into place, the installation is more
sturdy and permanent-looking than standard adhesive-pad methods.
Installation of a vehicle-specific mount varies from vehicle to vehicle. In general,
though, you’ll likely have to engage in some dash disassembly and reassembly.
The instructions included with the mount will guide you through the process for
your vehicle.
Once you’ve installed the mount, you will need to attach the vehicle kit cradle to
the bracket. This can be done by matching the bolt pattern on the bracket with
the small screw holes on the back panel of the tuner’s cradle and using the
screws that come with the mount. You can also choose to use the self-adhesive
pad to attach the cradle to the mount arm, though this is less secure than
using screws.
Note: Vehicle-specific mounts are not available for all vehicles. Check our online
fit database by clicking on “What fits my car?” at Crutchfield.com or call a Sales
Advisor to see if we have one for yours.
Vehicle-specific mounts bolt to the dash frame and provide a convenient platform for
mounting a plug-and-play tuner.
Optional Vehicle-specific Mounts
Always be careful when drilling or cutting in a vehicle.
Be aware of things such as wiring, windows, fuel lines
and safety devices. Check drilling/cutting depth and loca-
tion to avoid damage to vehicle appearance.
CAUTION:
!
000SRADIG
4
Part of the appeal of plug-and-play tuners lies in the simplicity of their
connections. Power, for example, is supplied through a DC power adapter.
You simply plug one end in the appropriate place on the cradle, then plug
the other end into your vehicle’s DC power outlet (cigarette lighter).
Antenna Connection for Plug-and-Play Tuners
The antenna connection brings the satellite signal to the tuner. The antenna
connection is straightforward: the antenna’s connector, called a FAKRA plug,
simply inserts into the appropriate input on the cradle.
Signal Connections for Plug-and-Play Tuners
There are three options for getting the sound from your satellite radio tuner
to your in-dash receiver:
1. Cassette adapter
2. FM modulator
3. RCA patch cables
Cassette adapter
If you have an in-dash cassette deck, you can use a cassette adapter (often
included with the car accessory kit) to input the sound. Simply plug the
mini-jack end into the cradle’s audio output, and insert the cassette adapter
in the deck.
FM modulators
There are two types of FM modulators: wireless and wired.
Many newer plug-and-play tuners feature built-in wireless FM modulators.
All you have to do is tune your FM stereo to an unused frequency, engage
the modulator on the tuner, and select the corresponding frequency. The
tuner then “broadcasts” the signal wirelessly over that frequency; your re-
ceiver’s antenna picks it up the way it would any FM signal. The drawbacks
include the potential for interference, and the fact that you might have to
change broadcasting frequencies as you move into new areas which feature
stations on different frequencies.
Wired FM modulators plug directly into the back of your receiver. One end
goes into the receiver’s antenna input; the antenna input goes into the FM
modulator. The plug-and-play tuner then connects to the modulator via its
audio output. As with the wireless modulator, the satellite signal is “broad-
cast” over an unused frequency. This type of modulator is less susceptible
to interference than its wireless counterpart, but you still might have to
change stations when traveling.
Connecting A Plug-and-Play Tuner
A satellite radio antenna connection
(also called a FAKRA plug).
Cassette adapters are easy to use
and take from vehicle to vehicle.
®
Copyright 2005 Crutchfield Corporation
5
To install a wired FM modulator, first find a good mounting location. Keep in mind
that you will need to access your factory radio through its antenna input, as well as
connect the satellite radio tuner to the modulator.
Most FM modulators require a 12-volt connection to a switched (on/off) power
source. Since you have to remove your radio to get to the antenna input, you’ll have
easy access to the power and ground wires in your factory radio harness. If you don’t
want to splice into your factory wires, you can make the power connections at your
fuse panel. Look for empty fuse holders and insert fuse taps, which help you connect
wire to the fuse panel. You’ll also have a black ground wire that must be secured be-
neath a nearby screw that makes contact with bare metal on the body of the vehicle.
Following the instructions on your Crutchfield MasterSheet™ (available for most
vehicles), remove your receiver from the dash and unplug the antenna from the rear
of the unit. Plug the vehicle’s antenna cable into the antenna input on the FM modu-
lator. Next, run the output of the modulator to your receiver’s antenna input (certain
vehicles require an antenna adapter — use the online Vehicle Selector or call a Sales
Advisor to inquire about a specific vehicle). If this leaves slack in your antenna lead,
tie it up so it won’t interfere with safe vehicle operation.
Install the satellite radio tuner and make all of the audio connections at the FM
modulator. Determine which of the available modulation frequencies is least likely
to be shared by a strong local radio signal and tune the modulator to it before you
mount the hideaway box (on some models you can change this setting on the fly).
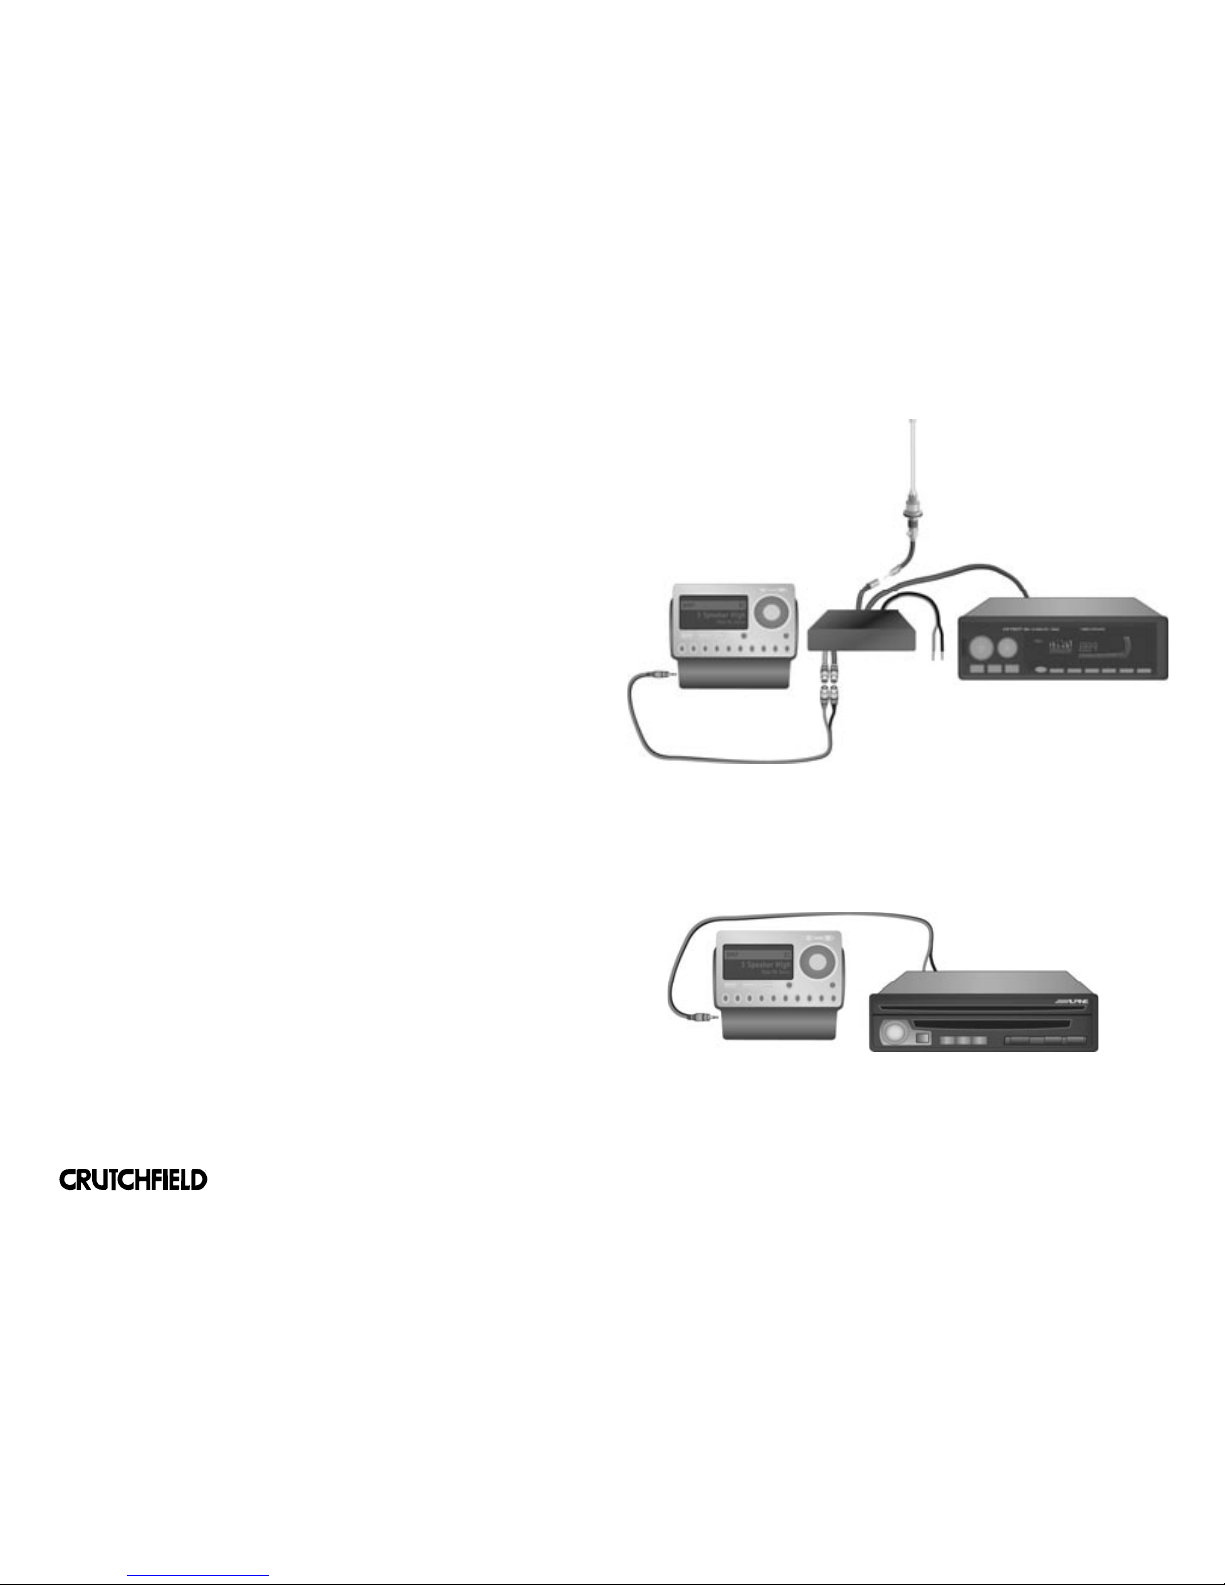
RCA patch cables (auxiliary input)
If your in-dash receiver has an auxiliary audio input, you can take advantage of the
option that gives you the best sound of all: RCA patch cables. You need to run the
cables from the cradle (they plug in here via a mini-jack connection) to your receiver’s
auxiliary inputs. You’ll get the fullest bandwidth response, and your system won’t be
susceptible to radio-wave interference.
Using an auxiliary input to connect a satellite radio tuner will
give you the best sound quality.
Satellite radio tuner connected via
wired FM modulator.
000SRADIG
®
Copyright 2005 Crutchfield Corporation
6
There are two types of dedicated in-car tuners: universal tuners and tuners that work with
a compatible, same-brand in-dash receiver.
Universal in-car tuners
Universal satellite radio tuners can connect to any stereo via a built-in wireless FM
transmitter or a wired FM modulator. Universal tuners include a wired display/control
module that must be mounted in or near the dash. The FM
modulator installs as described above. The wired display/control
unit usually comes with a flush-mount cradle and the necessary
hardware to permanently mount to your dash.
Aftermarket in-car tuners
Aftermarket satellite tuners connect to a compatible, aftermarket
receiver’s changer-input port using an included proprietary cable.
The receiver controls all of the tuner’s functions, while the single
connection provides the satellite radio signal to the receiver, and
power to the tuner. This wiring and control convenience make a
dedicated tuner a viable and attractive satellite radio option.
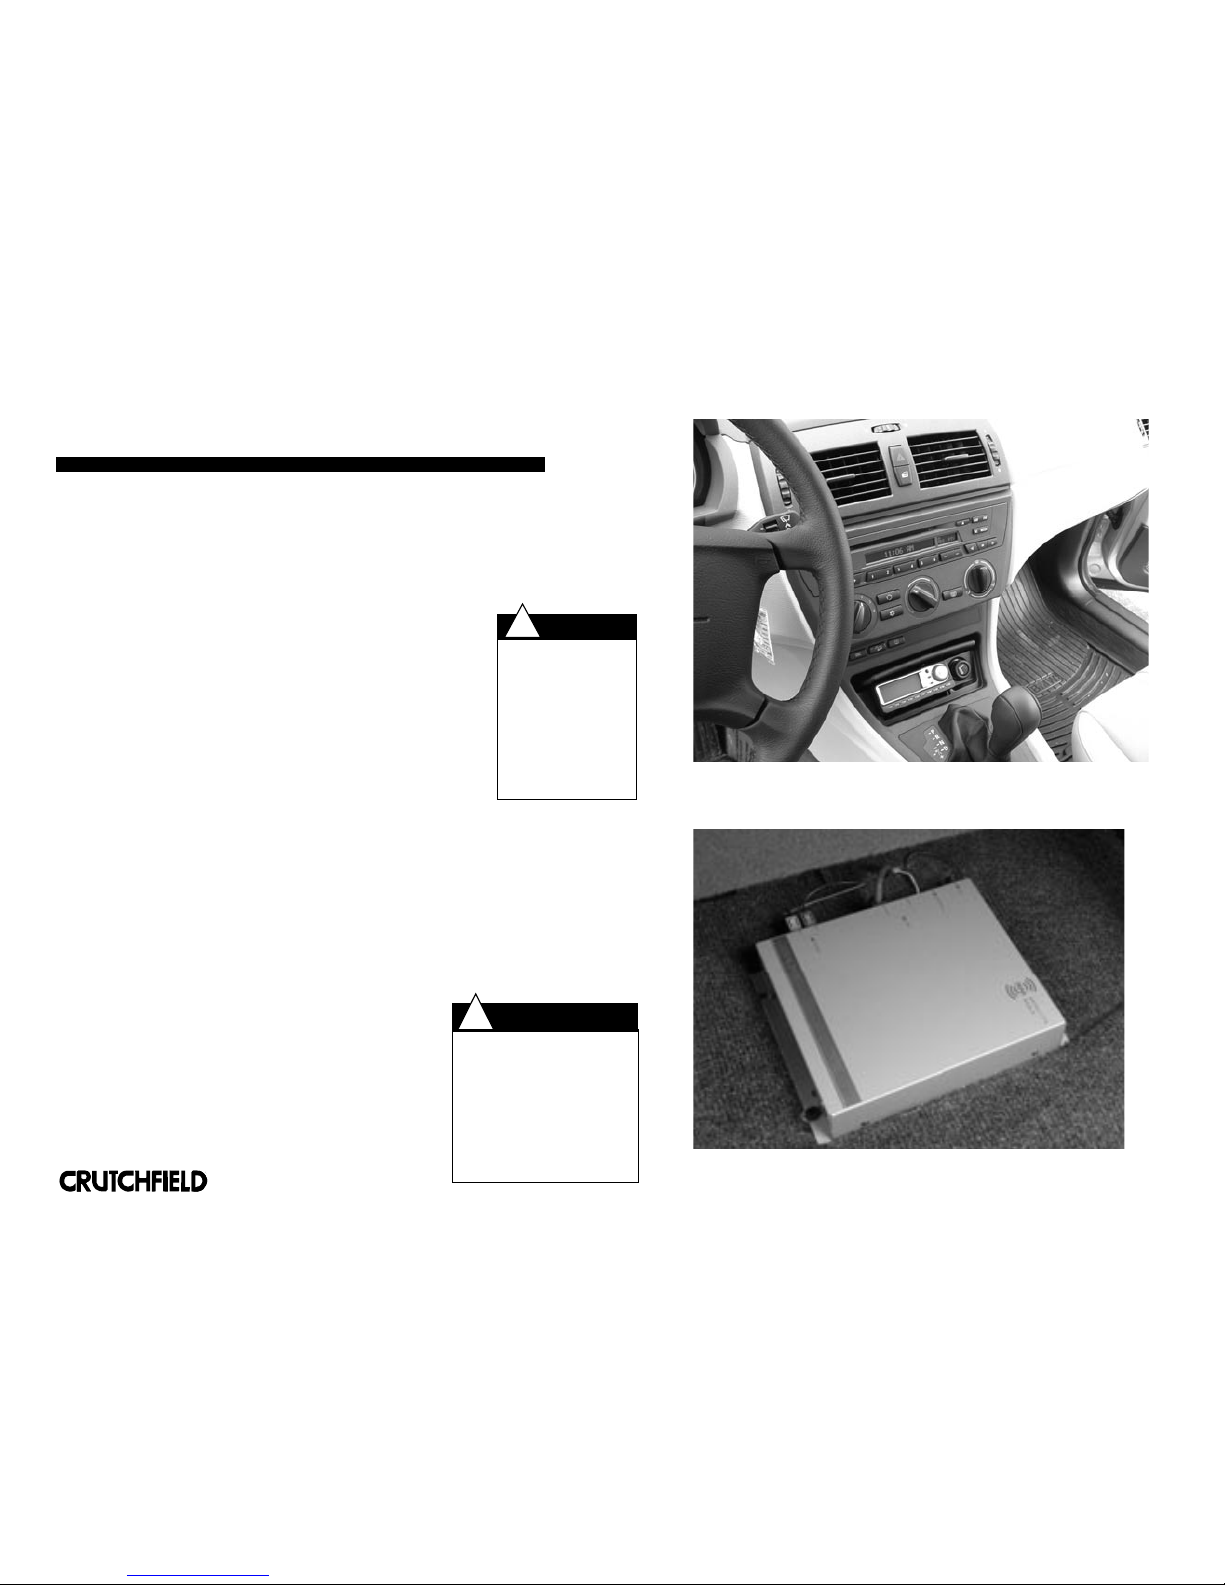
The tuner box itself installs much like a CD changer. The first
thing you need to do is find a good location for it. Under the pas-
senger seat is the most common location. However, you should take into account the fact
that you need to run the antenna cable to the tuner, and the tuner cable to your receiver,
so finding a spot convenient for both is ideal.
The tuner box has four mounting feet, one on each corner. Once you’ve found the spot in
which you’d like to mount it, mark the location of the feet. You’ll then have to drill holes
for the screws (which are usually included with the tuner). Note: before drilling, check
beneath the mounting location to make sure you don’t puncture the fuel tank, fuel lines,
transmission or brake lines, etc. If all is clear, drill away. Then all you have to do is secure
the box in place with the screws.
To ensure neat cable runs that are out of sight, you might
have to remove trim panels and pull up some of your
vehicle’s carpet. Though not difficult, this should be done
carefully. Once the cables are connected, and the tuner is
mounted, you’re ready for satellite radio.
Under a front seat is the most popular location for mounting a dedicated
satellite radio tuner. Cut slits in the carpet and you can run the wires
directly to the receiver.
Always be careful when
drilling or cutting in a
vehicle. Be aware of
things such as wiring,
windows, fuel lines and
safety devices. Check
drilling/cutting depth
and location to avoid
damage to vehicle
appearance.
CAUTION:
!
✔ Check that wires do not
interfere with window opera-
tion.
✔ Test window and door lock
operation.
✔ Make sure seats and seat
belts are secured to
manufacturers specifications.
✔ Check brake light wiring
connection and test operation.
SAFETY CHECK
!
000SRADIG
Dedicated In-Car Satellite Radios
A universal satellite radio tuner comes with a wired display/control unit that
mounts permanently, for a sleek, factory installation look.
®
Copyright 2005 Crutchfield Corporation

7
Installing a Satellite Radio Antenna
The antenna is a vital element of your satellite radio setup; without it, you can’t
receive the signal. The best place to mount the antenna is on the roof of your
vehicle, as far from obstructions (such as roof racks) as possible. This will ensure
the best possible signal reception and reduce instances of signal dropout.
Most new satellite radio antennas feature magnetic bases which secure tightly to
your vehicle’s roof. Some also incorporate self-adhesive pads, but these are not as
easy to remove and are generally not used unless the installation is, without a doubt,
permanent.
The biggest challenge is running the antenna cable into the vehicle, and strategies
for doing so vary depending on the type of vehicle in which you’re installing the
system.
Passenger cars
The most common strategy is to mount the
antenna on the roof, then run the cable under the
weather-stripping around the back window. This
often allows you to run the cable into the trunk
without exposing it. From there, you can run the
cable along with the existing wires into the cab of
the vehicle, all the way to the tuner box. You might
have to remove some trim paneling and pull up
some of your vehicle’s carpet in order to run the
cable unseen to the tuner box.
Pickup trucks
The most popular option is to mount the antenna on
the roof, remove the third brake light (or bed light),
route the antenna cable into the vehicle through this
opening, then replace the light. In a few cases, this
might require extensive panel removal in the truck
in order to get the cable to the tuner box, but it
provides an excellent, water-tight option.
SUVs
SUVs offer perhaps the easiest antenna solution.
With the tailgate open, the cable can be run
underneath the weather stripping, then under the
carpet all the way to the tuner box.
For a visual overview of these processes, be sure
to check out CrutchfieldAdvisor.com’s satellite radio
installation video. It’ll give you a good idea of the
work that goes into installing an antenna in various
types of vehicles.
Installing A Satellite Radio Antenna
000SRADIG
®
Copyright 2005 Crutchfield Corporation
Other Crutchfield Car Receiver manuals


Popular Car Receiver manuals by other brands


Kenwood
Kenwood KRC-640 instruction manual

JVC
JVC KD-ADV38J Installation & connection manual

Pioneer
Pioneer FH-P800BT - Premier Radio / CD Operation manual

Pioneer
Pioneer Super Tuner IIID DEH-P5800MP installation manual

Boss Audio Systems
Boss Audio Systems 814CA user manual

Pioneer
Pioneer DEH-P600 Service manual


