Crutchfield 000PERIG User manual

Tools Needed: (depending upon vehicle)
000PERIG
Revision 3/9/05
▲
®
Copyright 2005 Crutchfield Corporation
IMPORTANT
Before starting, compare items on your invoice with items received. Carefully check through packaging material. If
any item is missing, please call: Crutchfield Customer Service at 1-800-955-9091
Peripherals Installation Guide
A note about wiring: In addition to the tools listed, your
peripheral installation may require power and ground wiring,
plus RCA cables, terminals, and a remote turn-on lead. The
easiest way to get all of these items is in an amplifier wiring
kit, available at crutchfield.com.
Flat Blade
Screwdriver
Phillips
Screwdriver Panel Tool
Pliers Drill & Bit Set Utility Knife
Wire Stripper/
Crimp Tool Torx Driver Set
Socket &
Ratchet Set
Although reasonable attempts are made to verify the accuracy of the information
contained in this guide, it is presented without warranties or guarantees of any
type due to the constantly changing nature of this type of information and running
changes in vehicle production. Any person or entity using this information does so
at his or its own risk. If you find that our instructions do not apply to your vehicle,
or if you have questions, do not continue with your installation. Contact our toll-
free technical support for assistance (Tech phone number is on your invoice).
As with any car audio/video installation, your first
step is to disconnect the negative terminal of your car
battery to prevent short circuits. Check your MasterSheet™ (if
available) or vehicle owner’s manual for specific directions. In
some vehicles, disconnecting the battery may require you to
re-enter a security code or have the dealer reset the internal
computer.
!
*000PERIG*

000PERIG
2
®
Copyright 2005 Crutchfield Corporation
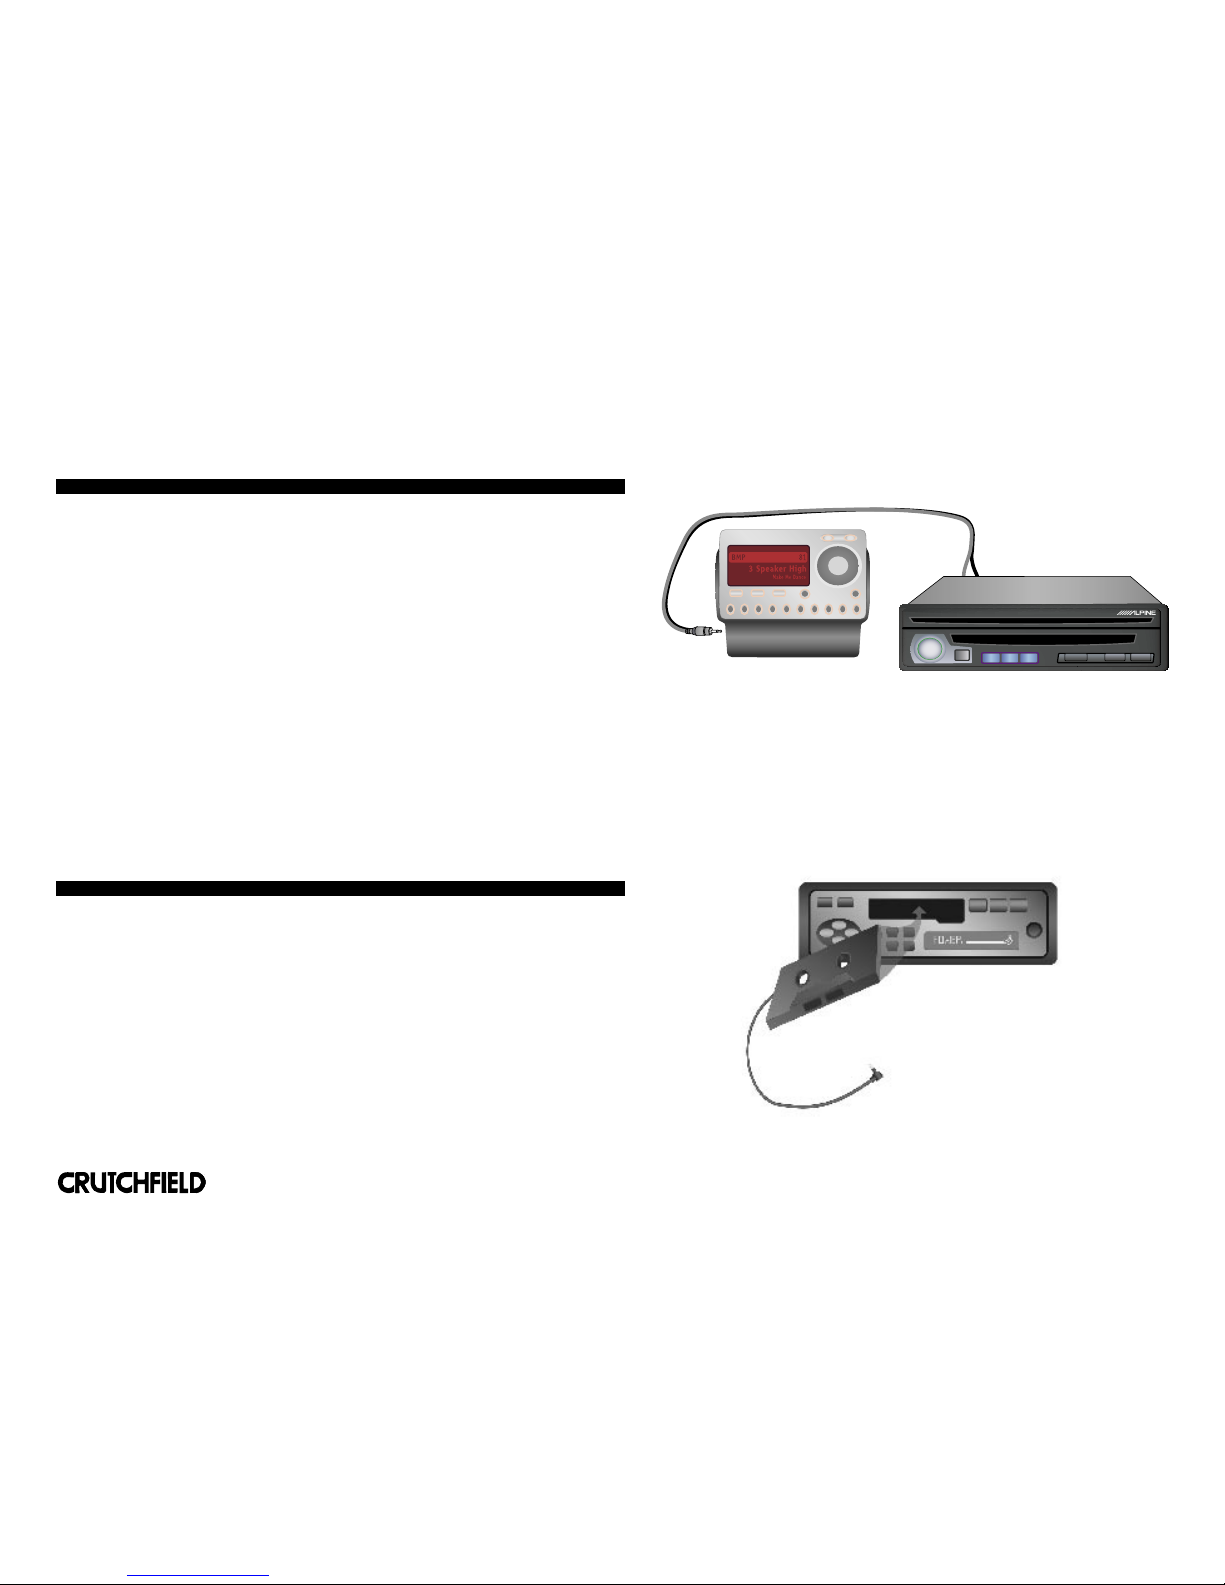
Configurations for Connecting a CD Changer to
Your In-dash Receiver
Aftermarket receiver to same-brand changer
Connecting a same-brand CD changer to an aftermarket receiver requires mounting the
changer (securing it in the location that you choose), running the proprietary cable, and
then making a connection at the back of the receiver. You’ll need to remove the receiver
from the dash to access the rear of the receiver’s housing — refer to your Crutchfield
MasterSheet™ (available for most vehicles) for instructions on removing the receiver.
Note: When connecting a same-brand peripheral to a receiver, be certain that the
components are able to work together. Sometimes the proprietary operating
protocol, plug, or software change over time within a brand. If you have any
questions about the compatibility of a receiver/peripheral combination, contact
a Sales Advisor.
Factory receiver with changer controls to factory-matched CD changer
CD changer/adapter packages from USA SPEC work with the factory sound systems
of many vehicles. An adapter cable (included) runs from the changer to the port on
the back of the factory radio. Availability of these packages changes frequently, as do
makes and models of compatible vehicles. Click "What Fits My Car" online at
crutchfield.com or contact a Sales Advisor to learn more about the specific options
available for your vehicle.
Factory receiver with changer controls to aftermarket changer via vehicle-
specific adapter
If your factory receiver has built-in controls for a CD changer or other peripheral source,
you may be able to connect an aftermarket changer via a vehicle-specific adapter.
These adapters are available for a number of vehicles. Installation involves connecting
the adapter to the aftermarket CD changer and to the factory receiver. Some vehicles
already have a factory-installed CD changer cable, so the vehicle-specific adapter is
connected at the changer location (typically in the trunk). In most vehicles, you will have
to run the cable from the changer up to the dash (see page 6).
Vehicle-specific adapters allow you to connect an aermarket changer to a factory stereo
with changer controls.
FM1

000PERIG
3
®
Copyright 2005 Crutchfield Corporation
If your factory or aftermarket receiver doesn’t have changer controls, an auxiliary input, or an
available adapter, you can add an external source to your system with an FM modulator (sometimes
called an RF, or radio frequency, modulator). A wireless FM modulator transmits the source signal to
your receiver over a standard FM frequency, which you can tune on your receiver.
A wired FM modulator offers slightly better performance, since it plugs into the antenna input of
the receiver.
Installing wired FM modulators
To install a wired FM modulator, first find a good mounting location. Keep in mind that you will need
to access your factory radio through its antenna input, and connect the peripheral source to the
modulator. Common locations include the trunk, under a seat, behind an interior panel, and in the
cavity behind the receiver (see page 5).
FM modulators require a 12-volt connection to a switched (on/off) power source. Since you have to re-
move your radio to get to the antenna input, you’ll have easy access to the power and ground wires in
your factory radio harness. If you don’t want to splice into your factory wires, you can make the power
connections at your fuse panel. Look for empty fuse holders and insert fuse taps. Attach your 12-volt
power wire, which normally comes out of the FM modulator hideaway box, to the fuse tap. You’ll also
have a black ground wire that must be secured beneath a nearby screw that makes contact with bare
metal on the body of the vehicle.
Following the instructions on your Crutchfield MasterSheet™ (available for most vehicles), remove
your receiver from the dash and unplug the antenna from the rear of the unit. Plug the vehicle’s
antenna cable into the antenna input on the FM modulator. Next, run the output of the modulator to
your receiver’s antenna input (certain vehicles require an antenna adapter — use the online Vehicle
Selector or call a Sales Advisor to inquire about a specific vehicle). If this leaves slack in your
antenna lead, secure it with a wire tie to prevent interference with safe vehicle operation.
Install your new component and connect its audio output at the FM modulator. Determine which of
the available modulation frequencies is least likely to be shared by a strong local radio signal and
set it on the hideaway box before you mount the unit (on some models you can change this setting
on the fly).
FM Modulators
FM modulators connect
between your vehicle’s
antenna and receiver,
allowing you to add a
variety of audio sources to
your system.
Playlists
Browse
Extras
Settings
Backlight
iPod
>
>
>
>
MENU FM1
Playlists
Browse
Extras
Settings
Backlight
iPod
>
>
>
>
MENU
FM1
Satellite radio tuner connected
via wired FM modulator.
MP3 player connected via
wired FM modulator.
Wireless FM modulators
Installation is even easier with a wireless FM modulator, allowing you to make connections without
removing your receiver or running extra wires. The trade-off, however, is in sound quality. While wire-
less modulators are convenient, they are susceptible at times to outside interference and static.
Installation is easy — just connect the modulator to your source and plug in its cigarette lighter
power adapter.
✔ Check that wires do not interfere with vehicle operation.
SAFETY CHECK
000PERIG
An auxiliary input makes it easy to connect almost any aftermarket peripheral to your
receiver, preserving the sound quality of the original source. Depending on your receiver,
you’ll either have a 1/8” mini jack or a pair of RCA connectors on the back of the unit.
Some models offer a mini jack input on the front panel of the receiver, which can be
great for connecting a portable player that you’ll be taking in and out of the car. Some ra-
dios require an adapter to convert the CD changer port into an auxiliary input, so check
your manual or call a Sales Advisor if you have any questions.
To connect a peripheral via an auxiliary input, install your new component (connecting it
to power and ground if needed; the AUX IN only receives the audio signal). Run a cable
from the audio out of the peripheral to your receiver. If your input is located on the rear
of your receiver, remove it from your dash using the instructions in your vehicle’s
Crutchfield MasterSheet™ (available for most vehicles). It may be convenient to connect
an extension cable to the rear auxiliary inputs, and to position the cable’s female inputs
at an easy-access location in your vehicle. This allows you to plug in your component
(you may need a mini jack to RCA adapter) without removing the receiver every time.
Then, set the receiver to recognize the new AUX IN connection (if necessary).
Auxillary Inputs
Using an auxiliary input to connect a
peripheral source will give you the best
sound quality.
A wired cassette adapter provides a convenient way to add a peripheral to a
cassette-based audio system. In fact, it’s a great way to connect a portable player or sat-
ellite radio tuner to a rented or leased car, since you don’t need to remove the receiver
or disturb the installation in any way. A cassette adapter, however, is a less-than-perfect
solution compared to a permanent installation because it doesn’t provide power for your
source, won’t sound as clear as a direct-wired connection, and clutters your dash with
unsightly wires.
With that in mind, connecting a cassette adapter is a relatively simple installation. The
cassette unit loads into your receiver and trails a cord with a 1/8” mini jack plug on the
end. Just connect your source, plug it into the adapter, power it up (with either batteries
or a cigarette lighter adapter), and go.
Cassette Adapters
Cassette adapters are easy to use and to
move from vehicle to vehicle.
4
®
Copyright 2005 Crutchfield Corporation
000PERIG
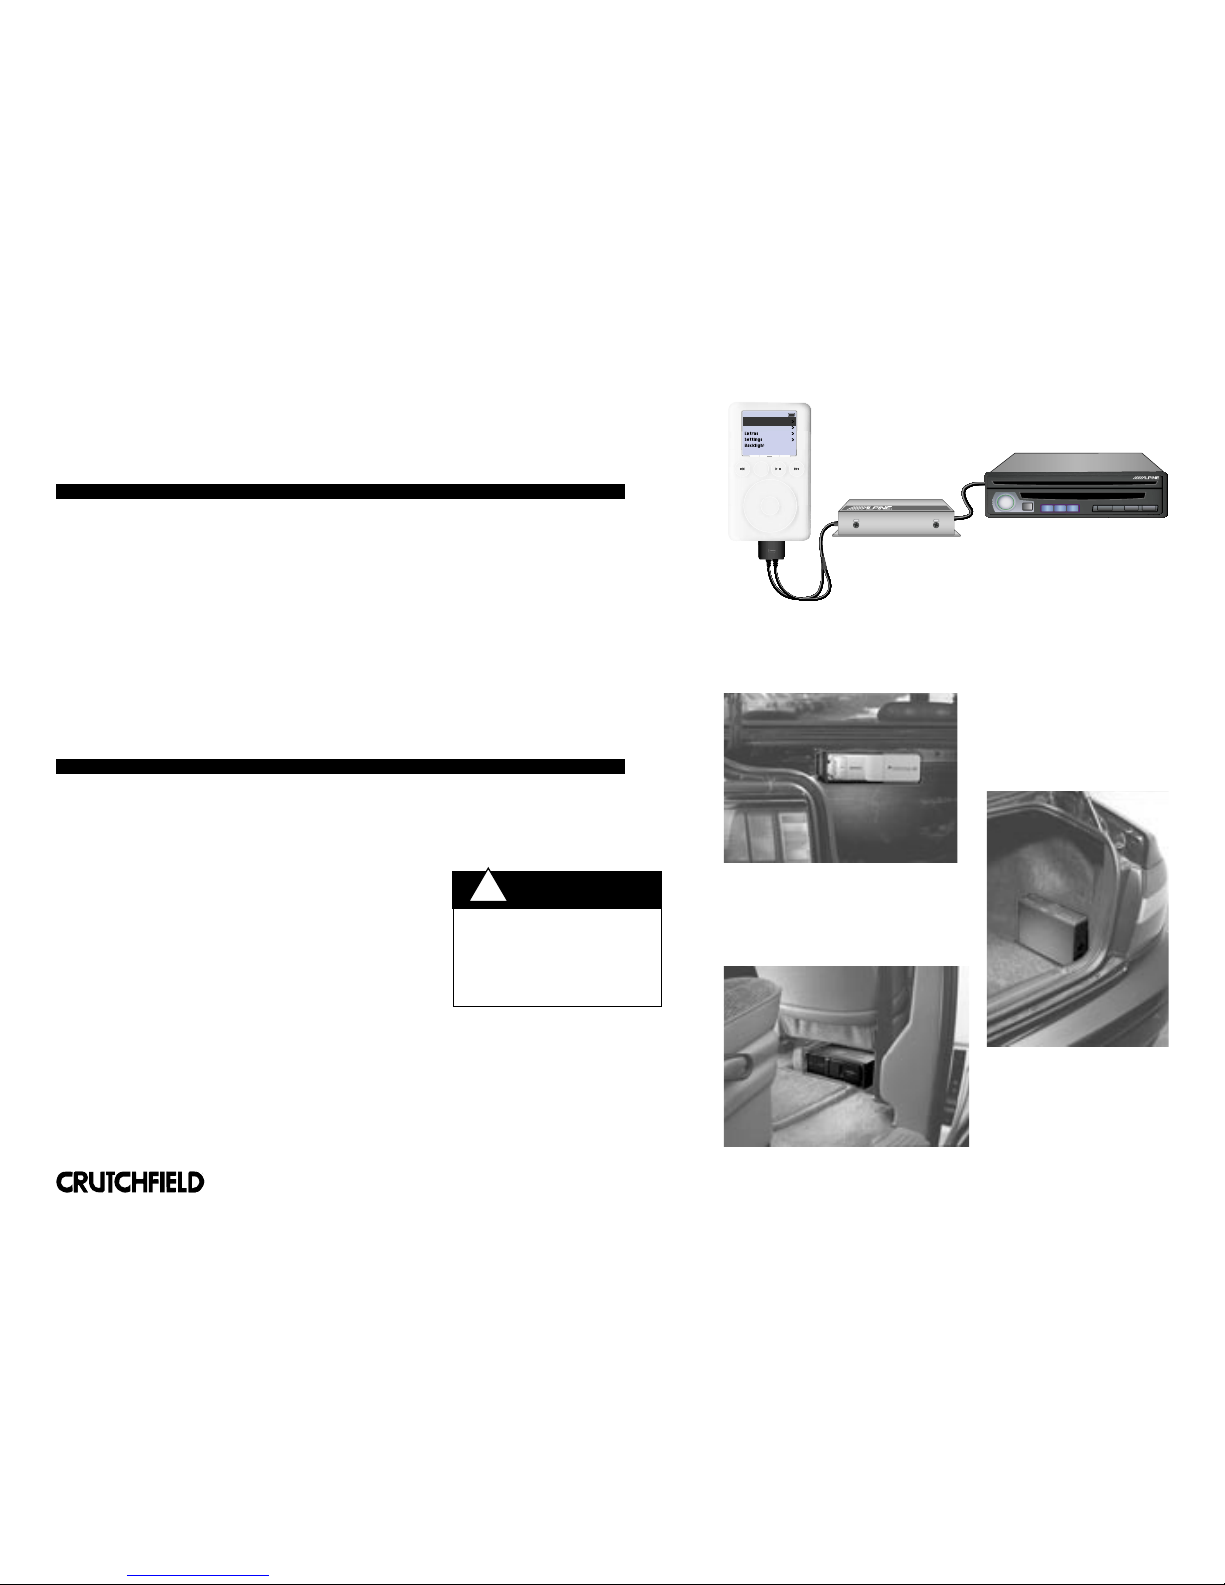
As portable music players like the Apple iPod Music Player have become more popular, mobile
audio manufacturers have sought ways to integrate them into the car without sacrificing sound
quality or usability.
Many manufacturers now offer a hideaway box that allows users to listen to their iPod through
their car speakers, control song and folder selection from the receiver’s display, and charge
the iPod’s batteries via a single connection. The compact box typically connects to the
changer input on the rear of a compatible, same-brand receiver, and connects to the iPod's
dock connector with a 6-pin FireWire cable. The box can be secured under a front seat (or any
convenient location) with self-tapping screws or Velcro® strips. See our iPod Installation Guide
for more details.
Trunk
If you plan to suspend a CD changer or hideaway box from the bottom of the rear deck, first
make sure the component won’t interfere with the torsion bar of the trunk lid. Observe how it
moves as you close the lid before you settle on the exact mounting spot.
Many changers come with mounting brackets that connect
to the vehicle with bolts or screws. Get a helper to attach
the nuts to the mounting bolts while you hold the changer
in place. Drill holes in the deck and run the bolts through to
secure your CD changer. If your changer mounts with
self-tapping screws instead, you might be able to handle this
step by yourself.
Under a seat
When mounting a peripheral source component under a seat, be certain that the component
is well-ventilated and that it will not interfere with any seat adjustment controls. You may find
it necessary to remove the seat to access the floorboard. If you use self-tapping screws or
drill to set holes for securing the component to the vehicle, make sure you know what you’re
drilling into. Check that the gas tank, brake line, and other parts are not on the other side
of where you are drilling/screwing. Most components also include the option of using Velcro
strips.
Mounting Tips:
iPod Adapters
Playlists
Browse
Extras
Settings
Backlight
iPod
>
>
>
>
MENU
Playlists
Browse
Extras
Settings
Backlight
iPod
>
>
>
>
MENU
Apple iPod connected via an aermarket interface to an
aermarket receiver.
CD changer mounted to the bottom of
the rear deck.
Changer mounted on the
trunk floor.
CD changer mounted under a seat.
5
®
Copyright 2005 Crutchfield Corporation
Always be careful when drilling or
cutting in a vehicle. Be aware of
things such as wiring, windows, fuel
lines and safety devices. Check drill-
ing/cutting depth and location to
avoid damage to vehicle appearance.
CAUTION:
!
If you’re mounting your peripheral source in the trunk, you’ll probably want to run the
signal/controller cable(s) from the in-dash receiver down one side of your car. You’ll have
to remove your receiver from the dash to access the changer connection. If you also
have an amplifier in the trunk, run the source’s cables on the side opposite the amp’s
12-volt power cable; you’ll be less likely to introduce engine noise into your system.
In most cars, you’ll be able to find a hole or crevice to slide the cable from the trunk into
the passenger compartment. You may have to remove the rear seat to find it. To hide
the cable beneath your carpeting, you will have to remove the door scuff. As you pass
the cable along the floorboard, make sure it doesn’t sit too close to a seat rail, where it
could be pinched or damaged when the seat is adjusted.
If you’re running the cable along the driver’s side, you’ll want to make sure it doesn’t end
up in the way of the pedals, the steering column, or hood latch. Tie it firmly in place with
wire ties and coil up any excess cable, to ensure safe operation of the vehicle.
Remember to test the new source thoroughly before you fully reinstall your in-dash
receiver.
See below and page 7 for tips on removing panels to conceal cables.
Cable Routing
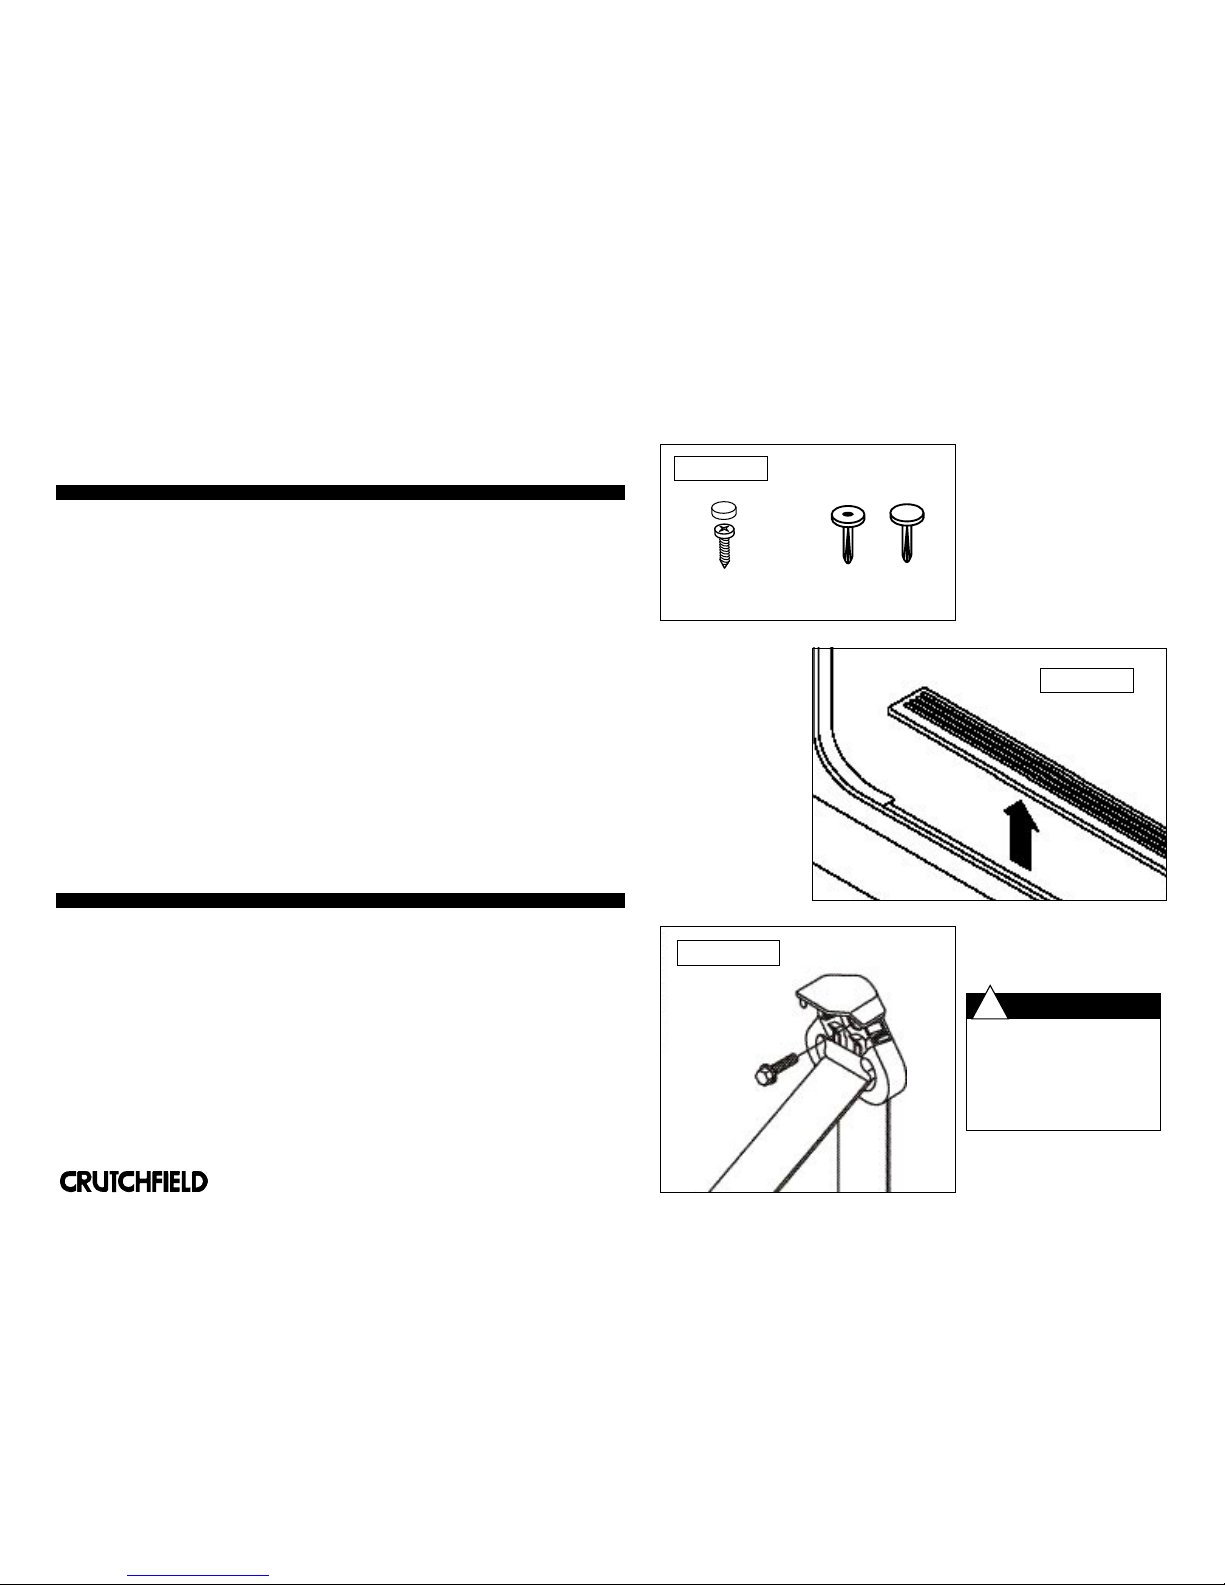
The instructions below address, in general, what panels may need to be removed and
how they typically come off. Often, panels can be pried up at edges. Screws and
retaining clips might also be present that will require removal (Figure 1). To prevent
damage, use a panel removal tool available at crutchfield.com. Always use care when
removing panels.
Panel Removal
Door Scuff Plate removal
The plates are usually removed by prying up the edges to release clips. Some vehicles
will have screws present which will need to be removed (Figure 2).
Seat Belt removal
A seat belt may be located on the panel that needs to be removed. Most seat belt an-
chor covers pry off. The seat belt anchor is secured with a large nut or bolt (Figure 3).
(Continued on next page)
000PERIG
6
FIGURE 1
Screw w/ Cover Retaining Clips
Door Scuff Plate
FIGURE 2
Seat Belt Cover/Anchor
FIGURE 3
The seat belt is
usually secured
with a large hex
head or Torx bolt.
®
Copyright 2005 Crutchfield Corporation
✔ Check that wires do not
interfere with safe vehicle
operation.
✔ Make sure seats and seat
belts are secured to
manufacturers specifications.
SAFETY CHECK
!

Pillar Trimpanel removal
Remove seat belt if present. Remove screw covers, screws and plastic re-
taining clips, if present. Pry up edges of panel to remove (Figures 4 & 5).
Kickpanel removal
Look for screws and pry-out retaining clips to remove. Pry out edges of
panel to release and remove (Figure 6).
Routing wire behind dash
Route wire behind dash and secure with plastic wire ties. Be sure that
wire does not interfere with any moving parts to ensure safe operation of
vehicle.
Routing wire for components and power connections
Determine desired locations for each component. Use the most direct
route for wires. Remove panels necessary to route and conceal wires.
Test system before reinstalling panels.
000PERIG
7
Lower Pillar Trimpanel
FIGURE 4
Upper Pillar Trimpanel
FIGURE 5
Kickpanel
FIGURE 6
®
Copyright 2005 Crutchfield Corporation
✔ Check that wires do not interfere with safe vehicle
operation.
✔ Make sure seats and seat belts are secured to
manufacturers' specifications if removed.
SAFETY CHECK
!
Panel Removal (Continued)
Tech Tips
• Changer connection may be found at tuner amp module for select
Ford vehicles, or in the trunk area at the factory changer location.
The factory changer cable plug is usually found underneath the trunk
carpet. Volkswagen Jetta and select Volkswagen vehicles may have a
dummy plug over the changer cable, which must be removed before
connection is made.
•Most USA SPEC remote mount changers will not mount in factory
location. Velcro strips may be used to keep changer in place instead
of drilling screw holes.
•RF modulated changers can use the factory stereo power wires.
•GM or Chevrolet vehicles may have a factory mini antenna plug. An
antenna adapter will be required when installing an RF modulated
changer.
Table of contents
Other Crutchfield Car Receiver manuals


