DAYLIFF Mower-P Installation and operation manual

MOWERS
Mower-P Mower-S
Operating & Maintenance
Manual


SPECIFICATIONS
1.
1
2.
SYMBOLS & WARNINGS 2
3. OPERATION 5
4. MAINTENANCE & STORAGE 8
5. TERMS OF WARRANTY 10
© Davis & Shirtliff Ltd 2022
Contents herein are not warranted
3.1. Operating Controls 5
3.2. Assembly Instruction 6
3.3. Engine Starting 6
4.1. Engine 8
4.2. Blade 8

Dayliff MOWERS are high specification rotating blade type mowers suitable for general
lawn maintenance in residential and small commercial applications. They are available
in either self-propelled or push versions. Hand push MOWER-P models feature a 45cm
grass cutting width while for powered MOWER-S models it is 50cm. Other features
include:-
• Reliable and economical 4-stroke OHV vertical Euro V compliant petrol engines
with recoil start and 0.9 litre fuel tank
• Seven position adjustment that provides for grass cutting heights between 25 to
75mm
• Robust frame fitted with large size 20cm front and 25cm rear wheels for ease of
manoeuvring
• Strong collapsible tubular operating handle for compact storage fitted with easy to
use self-closing engine control bar
• Options of mulching, rear grass collection or side grass discharge
• Large capacity 70L nylon bag grass collector with plastic cover
Dayliff MOWERS are robust and highly effective quality products carefully designed to
make lawn mowing easy and are the ideal solution for all lawn care requirements.
Congratulations on selecting the Dayliff Mower. They are manufactured
to the highest standards and if operated correctly will give many years
of efcient and trouble free service. Careful reading of this Installation
Manual is therefore important, though should there be any queries they
should be referred to the equipment supplier.
1. SPECIFICATIONS
Mower-P Mower-S
1

2. SYMBOLS & WARNINGS
User must read the instruction manual before operation of the
Dayliff mower.
Model
Engine Model
Max/Rated Power (HP)
Displacement (cc)
Drive
Cutting Width (”)
Dimensions (LxW) mm
Dry Weight (Kg)
Mower-P
GK150FE
4/3.5
18
34
150
Hand Push
Mower-S
GK170FE
4.5/4
20
37
954x610850x575
175
Self Propelled
Ensure the blade and all moving parts are stopped before
cleaning, repairing or inspecting the machine.
Before carrying out any operation, stop the engine and
disconnect the spark plug cap.
Keep hands and feet away from the cutting blade.
After the mower has stopped, the blade will continue to rotate
for a while. Do not move the mower until it has stopped
completely.
Use safety equipment such as safety googles and boots when
mowing
Do not mix gasoline and oil with a four-stroke engine. The
mower has two separate storage tanks for oil and fuel.
2
Do not run the engine in an enclosed and/or poorly ventilated
area else the engine may emit carbon monoxide which is
harmful.
WARNING
NOTE
WARNING
WARNING
DANGER
WARNING
CAUTION
WARNING

The lawn mower is to be used exclusively for cutting natural
grass. Any other use can cause danger to the user and damage
to the mower.
WARNING
The mower is to be operated by a qualied personnel without
mental incapacitation.
WARNING
The user is responsible for the safety of other people in the
working area. Children and animals are to be kept at a safe
distance away from the mower in use.
WARNING
Before mowing, remove all foreign objects from the lawn
which may be thrown by the machine. Be on the look out for any
foreign object which may have been missed.
WARNING
Before mowing, place the grass catcher in position.
WARNING
Before mowing, make sure that the blade and the blade xing
screws are securely fastened. When cutting edges requires
resharpening, this must be done evenly on both sides, in order
to prevent any imbalance. If the blade is damaged it must be
replaced.
WARNING
Do not use the lawn mower when it is raining or when the grass
is wet.
The lawn mower should be operated only when there is
sufcient light.
Particular precautions must be taken while mowing on slopes .
Mow across the slopes and not uphill or downhill.
3
Turn off the engine if the mower is to be left unattended.
Do not lift the rear of the mower while starting the engine. Also
do not place hands and feet underneath the deck or into the
rear discharge chute while the engine is running.
Do not interfere with the rated speed of the engine.
CAUTION
For Mower-S disconnect the self propelled system before
starting the engine.
WARNING
Always use the lawn mower with the grass catcher or/and the
deector in position.
WARNING
Stop the engine before emptying the grass catcher or adjusting
the cutting height.
WARNING
4
If the mower vibrates in an abnormal way take the mower to
an authorized service centre.
WARNING
Fill up the tank with a funnel, do the operation outside. Do not
smoke. Do not use mobile phone.
WARNING
Fill up with gasoline and oil before starting the engine. Never
open the cap of the fuel tank to add gasoline while the engine
is running or still hot.
WARNING
Do not start the engine if there is some gasoline spread
around, take the mower away from the area where gasoline
has been spilt and avoid any contact from a hot source until
spilt gasoline is completely removed
WARNING
5
Tighten the fuel tank cap and close tightly the jerry can cap.
WARNING
3. OPERATION
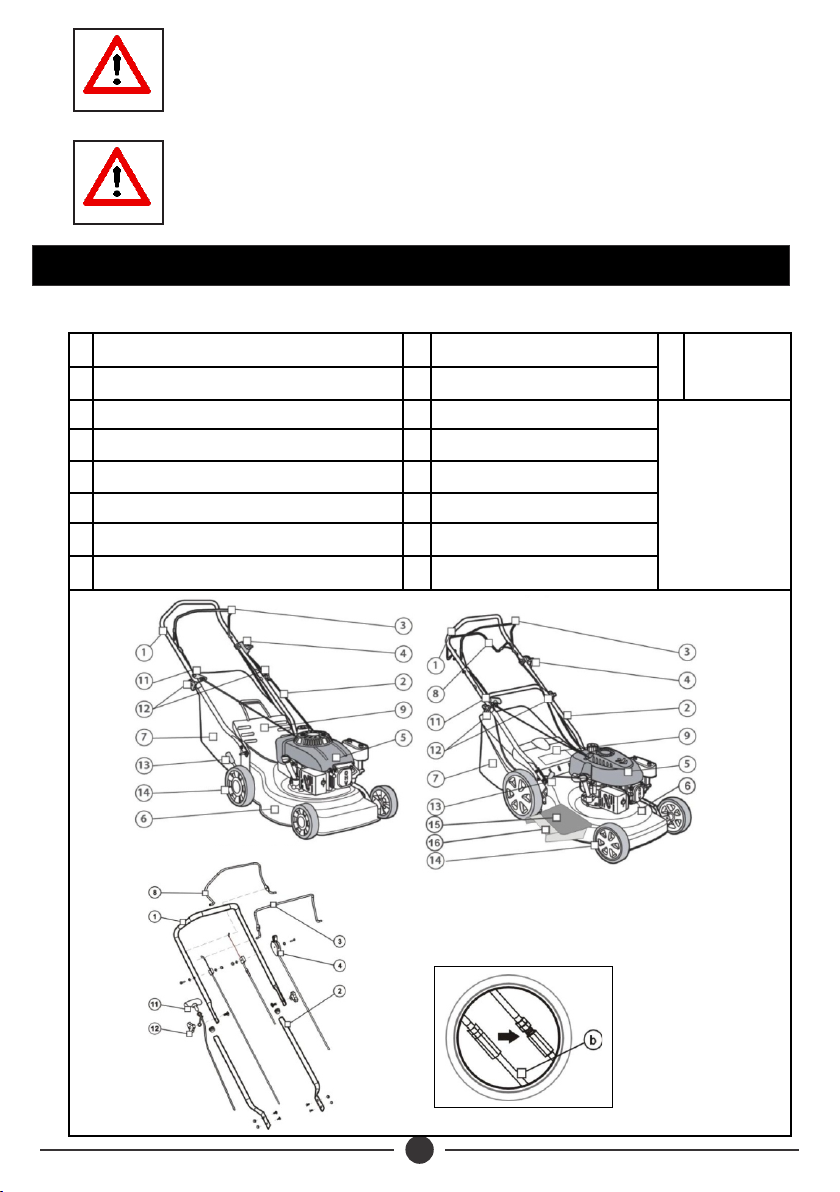
3.1 Operating Controls
1. Upper Handle
2. Lower Handle
3. Engine Control Bar
4. Throttle Control
5. Engine
6. Cutter
7. Grass Catcher
8. Propeller Bar
9. Deflector
10. Mulcher
11. Recoil Starter
12. Nut Knobs
13. Height Adjustment Lever
14. Wheels
15. Side Cover
16. Discharge Open
bDrive
Cable
Hand Push Mower
Fig 1
Mower with Side Discharge

3.2 Assembly Instructions
• Put the metallic frame inside the grass catcher and fit in position.
• Pull the deflector and place the grass catcher in its place.
Grass Catcher
• Place the mulcher inside the grass evacuation place.
Mulching Option
• Open out the handle and screw the handles parts with the two screws and plastic nuts.
• Join upper and lower handle with the two nut knobs and its screws provided.
• Put the recoil starter on the right of the handle and fix the cable with the plastic collar.
• Introduce the rope of the recoil starter on its support guide rope.
Handle
Wheels dependent adjustment:
• Set the desired height, tightening wheel by wheel at the same high position.
Central Height Adjustment
• Set the desired height by pulling and turning the height adjustment lever.
Cutting Height Adjustment
• Pull upwards the side cover, attach the discharge open onto the deck and release the
side cover .
Side Discharge Option
6
Fig 2
Metallic Frame
Deflector
Mulcher
Grass Catcher
Grass
Catcher
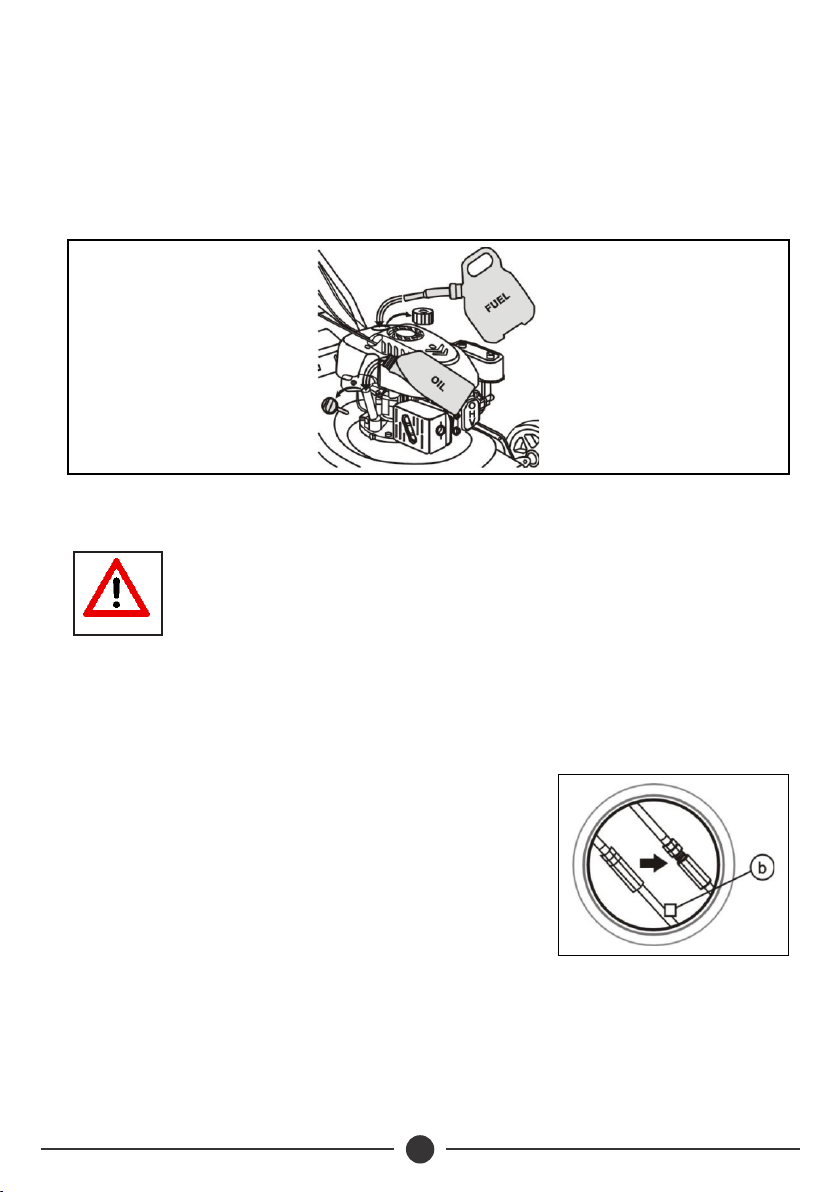
3.3 Engine Starting
Engine is delivered without engine oil: add 0.6 litres of oil
before starting the engine.
CAUTION
Once the mower has been set up properly, start the engine as follows:
• Put the throttle control on the START position.
• Take the engine control bar and maintain it against the superior handle, pull on the
recoil starter handle until you can feel resistance and then pull hard
• Put the lever on RUN position.
• Blade is in action as soon as the engine starts. While the machine is working, maintain
the throttle control in working position. The engine will stop as soon as you release the
engine control bar.
7
Fig 3
ŸTo engage the self propelled system, pull the propeller bar of the upper handle and
maintain it engaged together with the engine control bar .
ŸIf the drive system does not engage and disengage correctly, check the handle for
correct assembly. Make sure that all parts are in good condition and that the fasteners
are tight.
ŸThe drive system can slip if the drive cable is too loose.
ŸIf the drive system slips shorten the cable by turning the
cable nut and test the drive system.
ŸIf the drive system still slips repeat the adjustment and
test until the drive system does not slip.
ŸBefore mowing, make sure the drive system will
correctly disengage and that the mower will stop. If the
drive system does not disengage, take the lawn mower
to an authorized service centre for checking.
ŸEnsure that all cables are firm enough.
Regularly check the self propelled system. Polish and grease
the gears in the wheels.
CAUTION
Fig 4
ŸMake sure that all nuts, bolts and screws are kept well tightened to keep the lawn
mower in a safe operating condition.
ŸNever store the lawn mower filled with gasoline in an enclosed area where gasoline
fumes could reach a strong heat source or a flame. Allow the engine to cool down
before storing it.
ŸIn order to reduce risk of fire, clean the lawn mower particularly the engine, the
muffler and the fuel tank. Remove all traces of grass leaves or excess grease.
ŸCheck the condition of the deflector and the grass catcher, frequently replace them if
there is any damage.
4. MAINTENANCE & STORAGE
Stop the engine and unplug the spark plug before any repair
or maintenance operation which includes removing and
emptying grass catcher, chute, changing blades adjusting
cutting heights among others.
WARNING
8
4.1 Engine
Do not leave a running mower unattended.
WARNING
ŸWear thick gloves before mounting or sharpening the blade. Be sure that the bandlade
is always well balanced.
ŸCheck regularly the oil level and add some oil or replace it if necessary.
ŸFrequently check the lawn mower and make sure that all grass deposits are removed
from beneath the deck.
ŸLubricate the wheel axle and the bearing with grease regularly.
ŸFor a clean cut, the blade should always be sharpened and well balanced.
ŸAt regular intervals all bolts and screws should be checked if tight. Worn off or badly
tightened nuts and bolts can cause damage to the engine and the frame.
After hitting a foreign object, stop the engine and check if the
mower is damaged. Take the mower to an authorized service
centre if necessary.
WARNING
4.2 Blade
Wear gloves, stop the engine and unplug the spark plug
before proceeding with below operations
WARNING
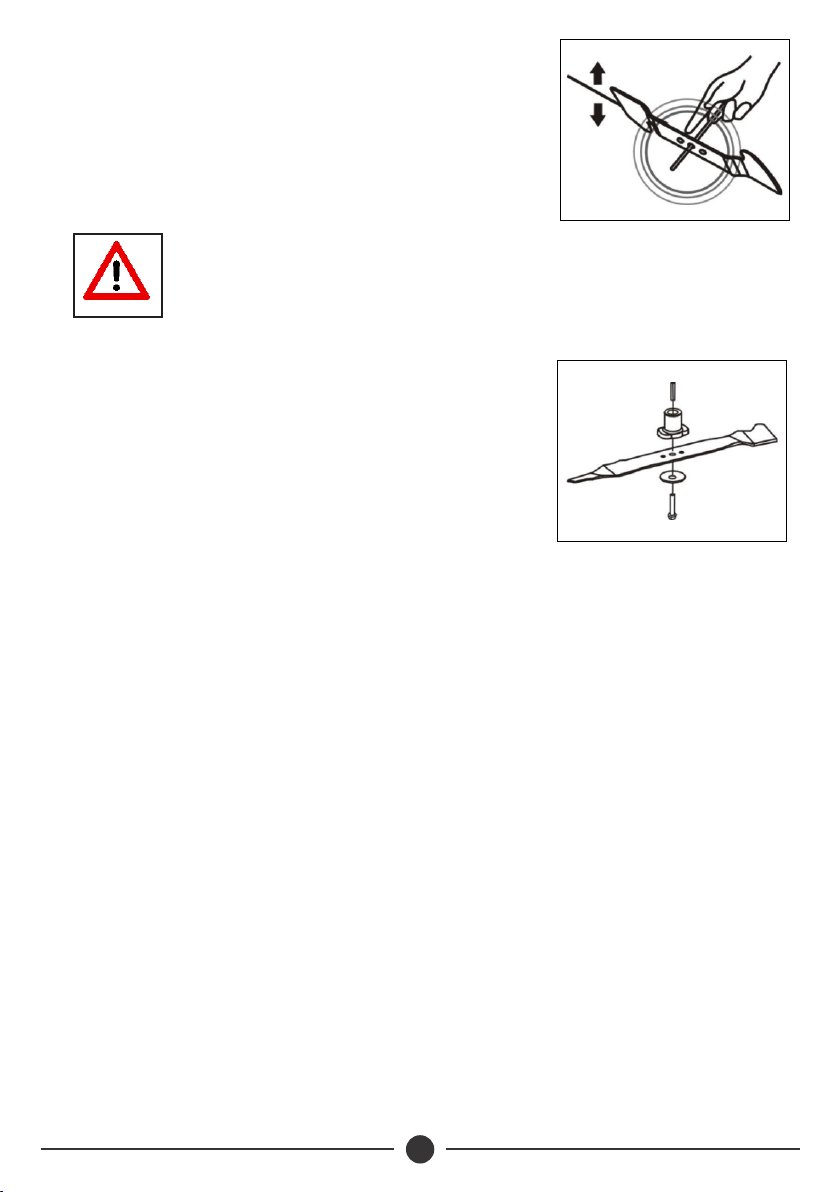
The blade is made of pressed steel for optimum
performance, it should be well sharpened about every 25
hours of work.
• A small spindle (2 or 3mm of diameter) should be
introduced in the central hole of the blade: which
should stay horizontal. If the blade does not stay
horizontal, balance it by taking off some metal on the
lower side.
Use only Dayliff original spare parts. Any other spares parts
can lead to serious damage to the lawn mower and void the
warranty.
WARNING
• To remove the blade, unscrew it, check the blade
support and change all spare parts if they are worn out
or damaged.
• To sharpen the blade, place it in a vice and file the
cutting edge evenly.
• When reassembling the blade, make sure that the
cutting edges face in the direction of the engine’s
rotation. The blade screw must be tightened to (37Nm)
with an appropriate tool.
9
Fig 5
Fig 6

5. TERMS OF WARRANTY
ii) Standard Warranty
General Terms
If equipment failure occurs in the normal course of service having been competently
installed and when operating within its specified duty limits warranty will be provided
as follows:-
ŸUp to 1 year - The item will be replaced or repaired at no charge.
The warranty on equipment supplied or installed by others is conditional upon the
defective unit being promptly returned free to a Davis & Shirtliff ofce and
collected thereafter when repaired. No element of site repair is included in the
warranty and any site attendance costs will be payable in full at standard chargeout
rates. Also proof of purchase including the purchase invoice must be provided for a
warranty claim to be considered.
I) General Liability
• In lieu of any warranty, condition or liability implied by law, the liability of Davis &
Shirtliff (hereafter called the Company) in respect of any defect or failure of
equipment supplied is limited to making good by replacement or repair (at
the Company's discretion) defects which under proper use appear therein and
arise solely from faulty design, materials or workmanship within a specified
period. This period commences immediately after the equipment has been
delivered to the customer and at its termination all liability ceases. Also the
warranty period will be assessed on the basis of the date that the Company is
informed of the failure.
ŸThis warranty applies solely to equipment supplied and no claim for
consequential damages, however arising, will be entertained. Also the warranty
specifically excludes defects caused by fair wear and tear, the effects of careless
handling, lack of maintenance, faulty installation, incompetence on the part of
the equipment user, Acts of God or any other cause beyond the Company's
reasonable control. Also, any repair or attempt at repair carried out by any other
party invalidates all warranties.
10


INS482A-01/22
This manual suits for next models
1
Table of contents


