DELTA-SPORT 304198 User manual
5
I
J
K

6
M
L
N
7
P
O
Q

8
Contents/Tartalomjegyzék/Kazalo/Obsah
Biztonsági utasítások – gyermekeket
fenyegető veszélyek ........................................ 19
A csomag tartalma .......................................... 19
Műszaki adatok ............................................... 19
Rendeltetésszerű használat ........................... 20
Biztonsági utasítások ............................... 20 - 21
Elemek cseréje ................................................. 21
A stepper összeszerelése ................................ 21
A számítógép kezelése .................................. 22
Edzési tudnivalók .................................... 22 - 24
Nyújtó gyakorlatok ................................ 24 - 25
Gyakorlatok gumikötelek nélkül .................... 25
Gyakorlatok gumikötelekkel .................. 26 - 27
Ápolás, tárolás ................................................ 27
Tudnivalók a hulladékkezelésről ................... 27
Az elemek ártalmatlanítása ........................... 27
A garanciával és a szerviz lebonyolításával
kapcsolatos útmutató ...................................... 27
Safety information – risks for children ........... 10
Package contents ............................................. 10
Technical data .................................................. 10
Intended use ..................................................... 10
Safety information ................................... 11 - 12
Replacing the batteries .................................... 12
Assembling the stepper ................................... 12
Operating the computer ......................... 12 - 13
Training instructions ................................. 13 - 15
Stretching exercises ................................. 15 - 16
Exercises without straps ................................... 16
Exercises with straps ................................ 16 - 18
Maintenance, storage ..................................... 18
Disposal ............................................................ 18
Dispose of batteries carefully ......................... 18
Notes on the guarantee and
service handling .............................................. 18
Varnostni napotki – nevarnosti za otroke ..... 28
Obseg dobave ............................................... 28
Tehnični podatki ............................................... 28
Predvidena uporaba ........................................ 28
Varnostni napotki .................................... 29 - 30
Zamenjava baterij .......................................... 30
Montaža steperja ........................................... 30
Upravljanje računalnika ............................ 30 - 31
Napotki za vadbo .................................... 31 - 33
Raztezne vaje ........................................... 33 - 34
Vaje brez elastičnih vlečnih trakov .................. 34
Vaje z elastičnimi vlečnimi trakovi ............ 34 - 36
Nega, vzdrževanje ........................................ 36
Napotki za odlaganje v smeti ....................... 36
Odstranjevanje baterij ................................... 36
Napotki za garancijo in
izvajanje servisne storitve ....................... 36 - 37
Bezpečnostní pokyny – Nebezpečí
pro děti ............................................................ 38
Obsah balení .................................................. 38
Technické údaje .............................................. 38
Použití dle určení ............................................. 38
Bezpečnostní pokyny ............................. 38 - 40
Výměna baterií ................................................. 40
Montáž stepperu ............................................ 40
Ovládání počítače .................................... 40 - 41
Obecné pokyny pro cvičení ..................... 41 - 43
Protahovací cviky ..................................... 43 - 44
Cvičení bez tažných pásů .............................. 44
Cvičení s tažnými pásy ............................ 44 - 45
Ošetřování a skladování ................................ 46
Poyny k likvidaci ............................................. 46
Likvidace baterií .............................................. 46
Pokyny k záruce a průběhu služby ............... 46

9
Obsah/Inhaltsverzeichnis
Bezpečnostné pokyny -
Nebezpečenstvá pre deti .............................. 47
Rozsah dodávky ............................................. 47
Technické údaje .............................................. 47
Určené použitie .............................................. 47
Bezpečnostné pokyny ............................ 48 - 49
Výmena batérií ................................................ 49
Montáž steppera ............................................ 49
Ovládanie počítača ......................................... 50
Pokyny k cvičeniu .................................... 50 - 52
Naťahovacie cvičenia ............................ 52 - 53
Cvičenie bez gumových expanderov ... 53 - 54
Cvičenia s gumovými expandermi ........ 54 - 55
Ošetrovanie, skladovanie .............................. 55
Pokyny k likvidácii .......................................... 55
Likvidácia batérií ............................................. 55
Pokyny k záruke a priebehu servisu ..... 55 - 56
Sicherheitshinweise Gefahren für Kinder ..... 57
Lieferumfang .................................................... 57
Technische Daten .................................... 57 - 58
Bestimmungsgemäße Verwendung ............... 58
Sicherheitshinweise ................................. 58 - 59
Batterie austauschen ...................................... 59
Montage des Steppers .......................... 59 - 60
Bedienung des Computers ...................... 60 - 61
Trainingshinweise ..................................... 61 - 62
Dehnungsübungen ................................. 62 - 64
Übungen ohne Zugbänder ............................ 64
Übungen mit Zugbändern ..................... 64 - 66
Pflege und Wartung ....................................... 66
Hinweise zur Entsorgung ............................... 66
Entsorgungsmaßnahmen Batterien ................ 66
Hinweise zur Garantie und
Serviceabwicklung .................................. 66 - 67
10
Congratulations!
With your purchase you have decided on a high-
quality product. Get to know the product before
you start to use it.
Carefully read the following instructions.
Use the product only as described and only for the
given areas of application. Keep these instructions
safe. When passing the product on to a third
party, always make sure that the documentation is
included.
Safety information – risks
for children
• This apparatus may be used by
children from 8 years of age
upwards, as well by persons with
diminished physical, sensory or
mental abilities, or those with little
experience and knowledge, if they
are supervised or instructed with
regard to its safe use, provided they
also understand potential risks.
• Children may not play with the
apparatus.
• Cleaning and maintenance may not
be carried out by children without
supervision.
Package contents (Fig. A)
1 x Swing-Stepper
2 x strap with handle
2 x plastic foot with support surfaces
2 x self-tapping screw
1 x adjusting screw
1 x Allen key with Phillips screwdriver
1 x battery (1.5V LR03, AAA)
1 x instructions for use
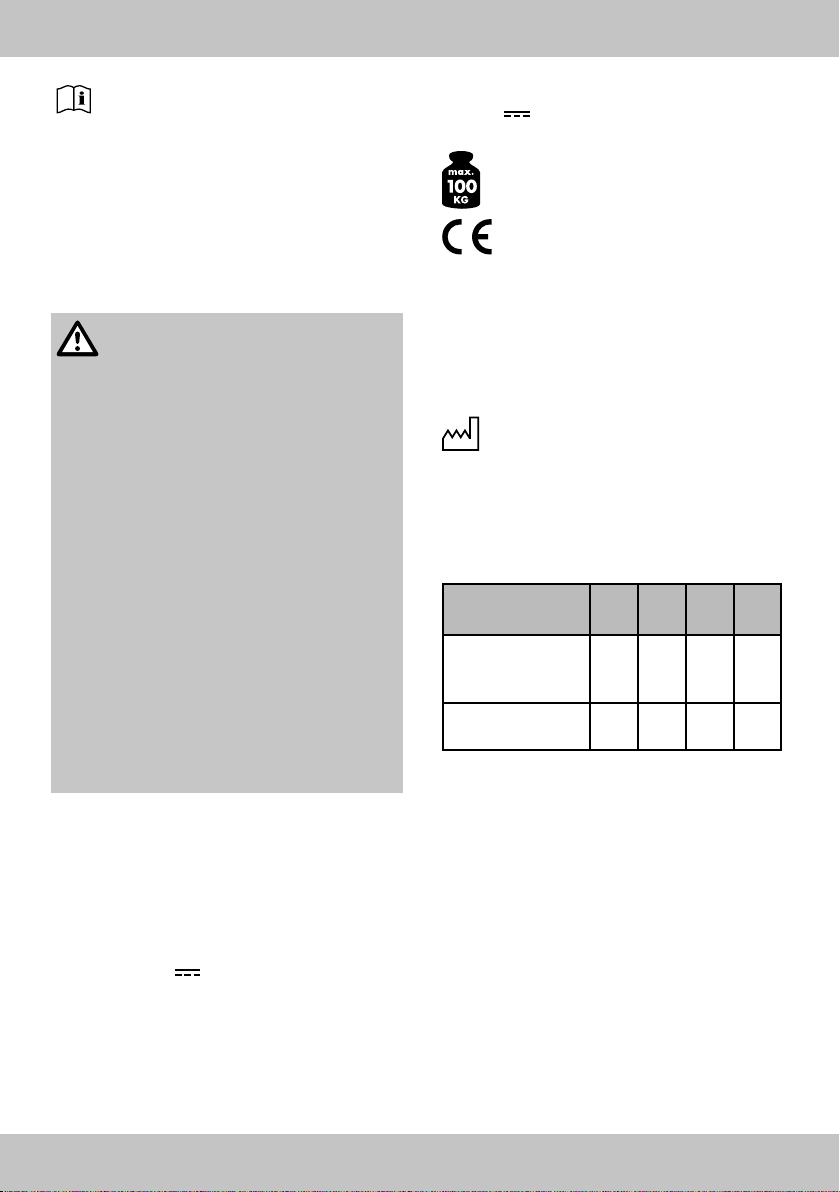
Technical data
Measurements: approx. 52 x 24.5 x 52cm
(W x H x D)
Weight: approx. 9.050kg
Energy supply:
1 x 1.5V LR03, AAA
Rated power consumption: 0.09mW
Maximum load: 100kg
Delta-Sport Handelskontor GmbH hereby
declares that this product complies with
the following basic requirements as well as other
relevant statutory provisions:
2014/30/EU – EMC Directive
2011/65/EU – RoHS Directive
Full declarations of conformity are available under
http://www.conformity.delta-sport.com/
Date of manufacture (month/year):
09/2018
Device class: HC (for use in private households,
exactitude C)/not intended for therapeutic training
Tested according to: DIN EN ISO 20957-1:
2014, DIN EN ISO 20957-8, DIN 32935
Strength table of straps
Adjusted length
(in cm) 60 70 80 90
Maximum Stretch
length (in cm)
approx.
165 165 165 165
Force (N) approx. 31 27 23 19.5
The tolerance range for the force is approx. 20% (+/-).
Stepping motion
The stepper facilitates a stepper-determined
stepping motion.
Brake resistance system
The stepper uses a speed-dependent system.
Intended use
The item is intended to be used exclusively as
training equipment, and is approved for installation
and use in the home only.
GB

11GB
Safety information
General risk
• Please ensure that the packaging materials do
not become a deadly trap for a child (risk of
suffocation).
• Never let small children play with the battery.
Swallowing can cause serious harm to your
health.
• Keep children away from the pedals during
training sessions (risk of being crushed).
• The item is not a toy. When not in use, please
store it so that it is inaccessible to children.
• Maximum load: The item is designed for a
maximum body weight of 100kg.
• Observe the maximum stretch length of the
straps. The stretch length may not be adjusted
beyond the marking (MIN.).
• No adjustment devices which may hinder the
user’s movements may protrude from the item.
The item must be positioned in an area that gives
you enough space for training. An area of at
least 2 x 2m is necessary.
• Position the item on an even and level surface,
so that it is stable during training, and does not
“wobble”.
• Please check that the item is in optimum
condition before each use. Do not use it if this is
not the case.
Defective parts must be replaced, as otherwise
function and safety are impaired.
• Repairs may only be performed by authorised
specialists.
• Only original spare parts may be used.
• The item may only be used with appropriate
gym shoes.
• There must be a clear space of approx. 0.6m
around the training area (Fig. E).
• The elastomers of the expander should be
protected from direct sunlight.
Risk of burns!
• The hydraulic dampers become hot during
training. Do not touch them immediately after
training under any circumstances.
Risks due to incorrect/excessive
training!
• Please ensure that you observe all the
instructions in the chapter entitled “Training
Instructions”.
Material damages!
• Oil could leak out of the hydraulic dampers. To
avoid staining of floors or carpets, place the item
on a level, non-slip surface.
• Prevent fluids from penetrating the computer. The
sensitive electronics could become damaged.
Protect the computer from direct sunlight.
• Check regularly to make sure all bolted
connections are tight! Self-securing nuts cannot
come loose through vibration.
This characteristic is, however, only guaranteed
when tightened once only. In the event that the
stepper is dismantled, all self-securing nuts must
be replaced.
• When the item is not in use for an extended
period, remove the battery from the computer.
These could otherwise leak and cause damage.
• We recommend using an underlay during
training, to prevent damage to the floor.
Battery warning notice!
• Remove the batteries when they are flat, or if the
item is not in use for an extended period.
• Do not use different types or brands of batteries,
or combine new and used batteries, nor use
batteries with different capacities, as these can
leak and cause damage.
• Ensure the polarity (+/-) is correct when inserting
the batteries.
• Replace all batteries at the same time and
dispose of the old batteries as prescribed.
• Warning! Batteries may not be charged or reac-
tivated by any other means, taken apart, thrown
into fire or short-circuited.
• Always keep batteries out of reach of children.
• Do not use rechargeable batteries!
• Cleaning and maintenance may not be carried
out by children without supervision.
• Clean the battery and device contacts as need-
ed and before inserting.
• Do not expose the batteries to extreme condi-
tions (e.g. radiators or direct sunlight). Otherwise
there is an increased risk of leakage.
• Batteries can be life-threatening if swallowed.
Therefore, always store them out of reach of
small children. Medical attention must be sought
immediately if a battery has been swallowed.

12 GB
Danger!
• Handle damaged or leaking batteries with
extreme caution and dispose of them properly
as soon as possible. Wear gloves when doing
so.
• If you come into contact with battery acid, wash
the affected area with soap and water. If battery
acid gets in your eye, rinse it with water and
seek medical attention immediately!
• The connection terminals must not be short-circuit-
ed.
Replacing the batteries
CAUTION! Observe the following instruc-
tions to avoid mechanical and electrical
damage.
Danger!
There is a battery LR03 in the item. You can replace
the battery if it stops working.
1. Raise the display on the side, and carefully re-
move it. The battery is at the back of the display.
2. Slide the battery carefully out of the battery
casing and replace with a new one.
Note: Make sure that the battery is inserted prop-
erly and completely in its casing.
3. Insert the display and the cable connections into
the casing once again.
Note: Make sure that the display is correctly
inserted in the casing once again.
Assembling the stepper
Step 1:
Insert both plastic feet into the pipe on the back of
the frame. The ribbed contact surfaces lie on the
floor and the sharp ends point backward (Fig. C).
To anchor it, a self-tapping screw is inserted into the
pre-drilled hole on the underside of the frame.
Note: Make sure that the pre-drilled hole in the
frame and the plastic foot are placed exactly on
top of each other.
Step 2:
The adjustable screw is screwed into the thread on
the front of the stepper.
With the help of this screw, you may adjust the step
height of the tread surfaces.
To increase the step height, turn the adjustable
screw in a clockwise direction. To lower the step
height, turn the adjustable screw in an anticlock-
wise direction.
Step 3:
Remove the computer from the stepper by pulling
it upwards.
Place the supplied battery in its appropriate com-
partment on the underside of the computer. Ensure
that the polarities are correctly aligned.
Connect the computer to the connector on the
casing and insert it once again. Make sure that the
cable does not get pinched during this procedure.
Step 4:
Observe the maximum stretch length of
the straps.
The shorter the straps, the greater the effort expend-
ed.
• Shorten the straps by locking the rubber hose
with the safety ball into place (Fig. B).
IMPORTANT! Make sure not to shorten
the straps too far. Do not go past the
“MIN.” marking!
• Hook the metal hook into the eyelet on the step-
per frame and screw in the fastener on the hook
tightly (Fig. D).
Important! Before training, check that
the straps are securely fitted, and that
the hook is safely and tightly screwed
in. Caution! The eyelets are secured for
tensile loads upwards only, and may not
be subjected to transverse loads. There is
a risk of injury, or damage to the stepper.
When you are not training with the straps, unhook
them from the eyelets to avoid tripping over them.
Check whether all screws and nuts are securely
tightened.
Operating the computer
The stepper meets accuracy grade C, i.e., there is
no claim to accuracy in the computer displays.
Turning the item on and off
When you start exercising or operating the pedals,
the computer switches on automatically. If the
stepper is out of operation for approx. 4 minutes,
the computer switches off automatically.

13GB
Resetting the display
The display is on 0 only when used for the first
time. With all subsequent training sessions, the
computer continues counting from the last time
you trained. To reset the display, keep the MODE
button pressed down until all symbols can be seen
at the same time.
To reset the total number of training steps (TTR),
remove the battery.
Training instructions
General
Consult with your doctor before you start training!
Goal-setting
Various goals can be achieved through
appropriate training:
• Improvement in your general fitness levels
• Increase in endurance
• Improved feeling of well-being
Success is essentially dependent on the following
points, which we would particularly like to bring to
your attention:
• Regular training and sufficient duration of
training sessions
• Appropriate nutrition
• Monitoring your training milestones
Who can train?
If you haven’t trained or participated in sport
for an extended period, have cardiovascular or
orthopaedic problems, take medication, or are
pregnant, you should consult your doctor before
you commence training. Tell him/her which
training equipment you intend using. Undergo
an examination to ascertain which training
programmes are suitable for you. To be safe, take
the operating instructions with you, so that your
doctor may put together an individual training
programme with you.
In general, every physically healthy person,
whether young or old, can begin a fitness training
programme, if he/she has consulted a doctor
beforehand.
Note!
Incorrect or excessive training can
endanger your health.
Display
The top row displays:
1. “STOP”, if training is paused;
2. The number of steps per minute (projection)
Selecting the mode
The 4 modes are displayed on the bottom row.
Briefly press the MODE button to change from one
mode to the next.
1. “TMR”: Training time to date, from 0:00 to
99:59
2. “REPS”: Number of steps completed during the
current training session from 0 to 9999
3. “CAL”: Calories burned* from 0 to 9999
4. “TTR”: Number of training steps since inserting
the battery, from 0 to 9999
* The calculation is based on pre-programmed
standard values, that serve as a guideline only.
The calories burned through use of the straps is not
considered.
You may display all the training data, one after the
other. To do this, press the “MODE” button a few
times, until the “TMR” row blinks. The display will
then automatically change from mode to mode
every 5 seconds.
Entering training goals
You may enter one or more goals:
- Duration of training (TMR)
- Number of steps (REPS)
- Calorie consumption (CAL)
1. Hold the MODE button down until “0:00
(TMR)” appears in the bottom row and the first 0
blinks (approx. 7 secs.).
2. To enter your training duration, press the MODE
button several times, until the display shows the
required duration in minutes.
3. After a few seconds the display will show the
next mode (REPS). Press the MODE button, to set
the amount of steps in increments of 10.
4. You may set the desired calorie consumption in
the next mode (CAL) in increments of 10.
5. Now you may start with your training. The com-
puter counts down the pre-programmed values
to “0:00”.
6. As soon as the pre-programmed goal is reached,
the computer ceases to count for approx. 10
seconds. Afterwards, the computer starts again
at 0.

14 GB
Load
Intensive workouts make demands on the entire
body, and not merely the leg muscles.
The body, especially the heart and circulatory
system, requires time to adapt to the changes
brought on by the training sessions. For this reason,
it is important to increase levels slowly, and to
ensure that appropriate breaks are taken during
and after training.
Ensure that you train at an appropriate level, i.e.
one in which you do not over-strain yourself. Listen
to your body; end the workout immediately if you
feel unwell, are short of breath or experience
dizziness.
You are exercising at the correct level if you can
have a normal discussion during your training
session.
Cool-down/Relaxation
A cool-down, i.e. a relaxation programme is as
important as a warm-up regime. Always end your
training session appropriately; reduce your pace
and effort level, and do light stretching exercises
when you have dismounted the item. In this way,
your pulse has time to calm down, and your body
is able to recover more effectively for further efforts.
The duration of recovery periods between training
sessions should be based on your fitness level.
Avoid excessively high training intensities,
to prevent over-training. Excessive strain can cause
health problems and lead to death. If you feel
fatigue or weak ness, cease training immediately.
To determine your individual training intensity,
you may use the following calculation formula
to ascertain your approximate maximum heart
frequency (MHF):
MHF = 220 – your age
Depending on your training goal, there are 5
training zones within which you may push the effort
level to your maximum heart frequency.
Zones
Regeneration zone = 50–60 % of the MHF
Fat-burning zone = 60–70 % of the MHF
Carbohydrate-burning zone = 70–80 % of the
MHF
Anaerobic zone = 80–90 % of the MHF
Warning zone = 90–100 % of the MHF
• Regeneration zone/health zone
This training is aimed at basic physical fitness. It
consists of longer endurance exercises, which are
to be performed slowly. It is especially suitable
for beginners and/or people in weak physical
condition.
• Fat-burning zone
Optimized for fat-burning, the workout is designed
for strengthening the cardiovascular system. In this
zone, the body burns proportionately the most
kilojoules from fat. During your training session, you
should feel relaxed and be able to converse.
• Carbohydrate-burning zone
In this zone, more carbohydrates are burned than
fat. The training effort is more strenuous, but also
more effective.
Mounting the stepper
Press one pedal down completely with your foot,
so that the pedal arm rests on the floor frame on its
stopper.
Then climb onto the foot pedal of the pedal which
is in the bottom position.
Then put your other foot onto the other pedal which
is leaning upward.
Dismounting
Press one pedal completely down with one foot, so
that the one pedal arm rests on the floor frame on
its stopper.
Then take your foot from the pedal which is
pointing upward, and place it on the floor. Then
take your foot from the pedal which is pointing
downward.
Movement of the stepper during
training
Your stepper simulates climbing stairs.
The swing effect causes the pedals not only to
move up and down, but also to swing to the left
and right.
Muscle groups exercised
When exercising without the straps, it is mainly the
leg and buttocks that are exercised.
During exercises when you use both the stepper
and the straps, you strengthen your buttocks, leg,
arm and shoulder muscles.

15GB
During exercises where you do not step, but use
the straps, you strengthen your arm and shoulder
muscles.
Body posture
Please ensure that you keep your body straight
during training sessions. Avoid a hollow-back
posture at all costs.
Important: During exercising, keep con-
stant abdominal tension and keep your
upper body erect!
If you maintain an even stepping motion, the pedal
arm stoppers should not touch the floor frame. Just
before standing up each time you step, shift your
body weight from one leg to the other. It can also
be helpful if you let your arms swing at a slight
angle to your upper body while stepping in a
rhythmic motion.
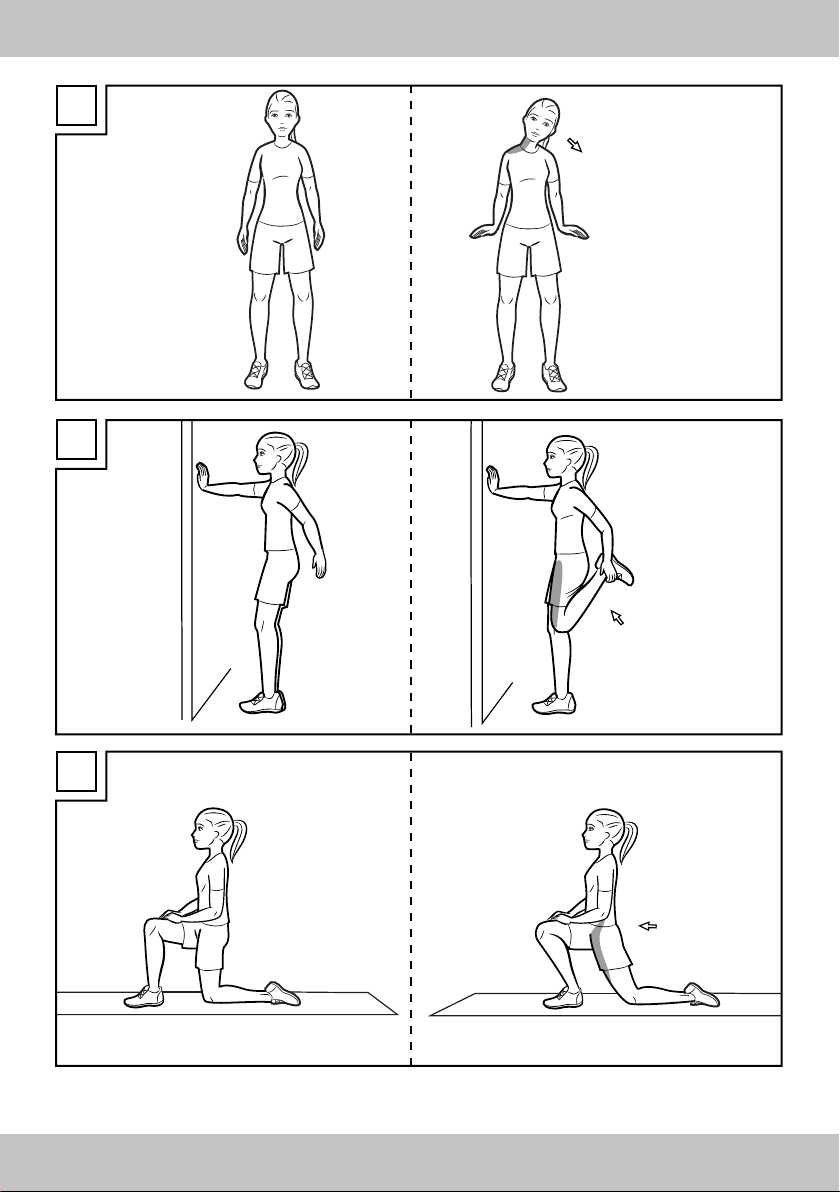
Stretching exercises
Stretching the lower back muscles
(Fig. F)
Starting position
1. Get down on all fours.
2. Position your hand and knee joints under your
shoulders and buttocks.
End position
3. Tighten your stomach muscles and roll your back
into an arch like a cat, until you feel the stretch in
your entire back.
4. Keep your eyes directed on your hands.
5. Stay in this position for a moment and then go
back to your starting position.
6. Repeat this exercise 2–3 times in three sets.
Important: Keep your back and pelvis
straight in the all-fours position.
Stretching the backs of the thighs
(Fig. G)
Starting position
1. Lie with your back on the floor. Your legs are
stretched out in a relaxed position.
End position
2. Tense your stomach muscles and lift one leg
straight up into a vertical position.
3. Grab your upper thigh with your hands and pull
it towards you more to increase the stretch.
4. Your toes point downward while your other leg
stays stretched on the ground.
5. Stay in this position for a moment and then go
back to your starting position.
6. Repeat this exercise 2–3 times in sets of three,
and then change legs.
Important: Some people have very short
rear thigh muscles. If this applies to you,
you may use a towel to help pull your
thigh towards yourself.
Stretching the chest muscles (Fig. H)
Variation 1
Starting position
1. Place one underarm and one elbow on a wall,
with your hand facing upwards. The upper and
lower arm must form a right angle.
End position
2. Keeping your arm on the wall, turn your upper
body slightly away from the wall.
3. Repeat this exercise 2–3 times in sets of three
and then change sides.
Variation 2
Starting position
1. Stretch both underarms up and to the sides, so
that upper and lower arms form a right angle.
2. Lean slightly in a stepping stance in front of a
door frame.
End position
3. Press your upper body forwards carefully, so that
you feel the stretch in your chest area.
4. Repeat this exercise 2–3 times in three sets.
Important: Hold the stretch for 5 seconds.
Stretching the neck muscles (Fig. I)
Starting position
1. Stand up straight.
End position
2. Tilt your head to the side towards your shoulder,
while simultaneously pulling the other shoulder
down. You should feel the stretch on the side of
your neck.
3. Stay in this position for approx. 5 seconds and
then go back to your starting position.
4. Repeat this exercise 2–3 times in sets of three,
and then change sides.
Important: Keep your head looking
straight forward, without twisting your
neck. Performing this exercise in front of
a mirror will facilitate the correct posture.

16 GB
Stretching the front thigh muscles
(Fig. J)
Starting position
1. Tighten your stomach muscles while standing up
straight.
2. Avoid a hollow back position by pulling your
pelvis upwards.
3. For better support you may lean against a wall
with one hand.
End position
4. Holding the tension, grab one ankle and pull it
towards your buttocks. Keep your legs parallel
during this movement.
5. The stretch should be felt on the front upper thigh
of the bent leg.
6. Stay in this position for approx. 5 seconds and
then go back to your starting position.
7. Repeat this exercise 2–3 times in sets of three,
and then change legs.
Important: Some people have very short
front thigh muscles. If this applies to you,
you may use a towel to pull your foot
toward yourself.
Stretching the hip flexor (Fig. K)
Starting position
1. Lunge forward and put your back leg on the
ground, with your shin on the floor.
2. Upper and lower parts of the front leg make a
right angle, and your arms rest on the front leg.
End position
3. With a straight, upright back, push your pelvis
forward and towards the floor, so that you can
feel the stretch in the hip area of your back leg.
4. The front knee should not jut out over your toes.
5. During this movement, make sure that your back
leg and your hip make a straight line, and you
don’t turn your pelvis outward.
6. Stay in this position for approx. 5 seconds and
then go back to your starting position.
7. Repeat this exercise 2–3 times in sets of three,
and then change legs.
Important: Keep your back straight
during the exercise.
Stretching the inner thigh (Fig. L)
Starting position
1. Stand with your legs wide apart, and bend out
one leg from this wide-legged stance.
2. Place your hands lightly on your hips.
End position
3. Stretch the other leg to the side, and shift your
body weight onto the bent leg.
4. Keep the foot of the stretched leg on the floor, so
that you feel the stretch in the inner upper thigh
of the outstretched leg.
5. Stay in this position for approx. 5 seconds and
then go back to your starting position.
6. Repeat this exercise 2–3 times in sets of three,
and then change legs.
Important: Keep your back and pelvis
straight during the exercise.
Exercises without straps
For thighs, calves and buttocks
(Fig. M)
Starting position
1. Stand with your feet on the stepper.
End position
2. Tighten your buttocks and stomach muscles.
3. Press down alternately on the pedals with your
feet. Your arms should move back and forth
naturally, as if you were walking or climbing
stairs.
4. Your head is an extension of your spine and
your upper body is upright.
5. Increase the intensity by gradually raising your
arms.
6. Repeat this exercise 10-15 times in three sets.
Important: Your arms swing in the
opposite direction of your legs, and your
pelvis remains straight.
Exercises with straps
Notice for training with straps!
The strap may be stretched to a
maximum of 165cm. Otherwise, it could
become damaged and injure the user.
The longer you stretch the strap, the more
energy you need to expend.
The correct grip
Ensure that your grip is always kept level
when pulling the straps.
Do not bend your wrist joints, as you
would overstrain them.

17GB
Exercises
For all the following exercises, please
note:
• Take hold of the handles.
• Execute the movements in a controlled
fashion.
• Keep your arms tense.
• Before each training session, check
whether the fastenings of the rope
hooks are tightly closed.
• The duration of the exercise sets should
be based on your personal fitness level.
Divide the exercises into multiple sets
and pause between individual sets.
We recommend 3 sets per exercise, with
the duration of the repetitions orientated
according to your fitness level.
For arms, shoulders, legs and
buttocks (Fig. N)
Starting position
1. Stand with your feet on the stepper.
2. Take hold of the straps. The backs of your hands
are pointing upwards.
End position
3. Tighten your arm and stomach muscles and
buttocks.
4. Lift your left arm, slightly bent, in front of you to
shoulder height, while you press the right pedal
down with your foot.
5. Drop your left arm, and lift your right one at the
same time, while pressing the left pedal down
with your foot.
6. Your head is an extension of your spine and
your upper body is upright.
7. Repeat this exercise 10–15 times in sets of three.
Important: Your arms swing in the
opposite direction of your legs, and your
pelvis remains straight.
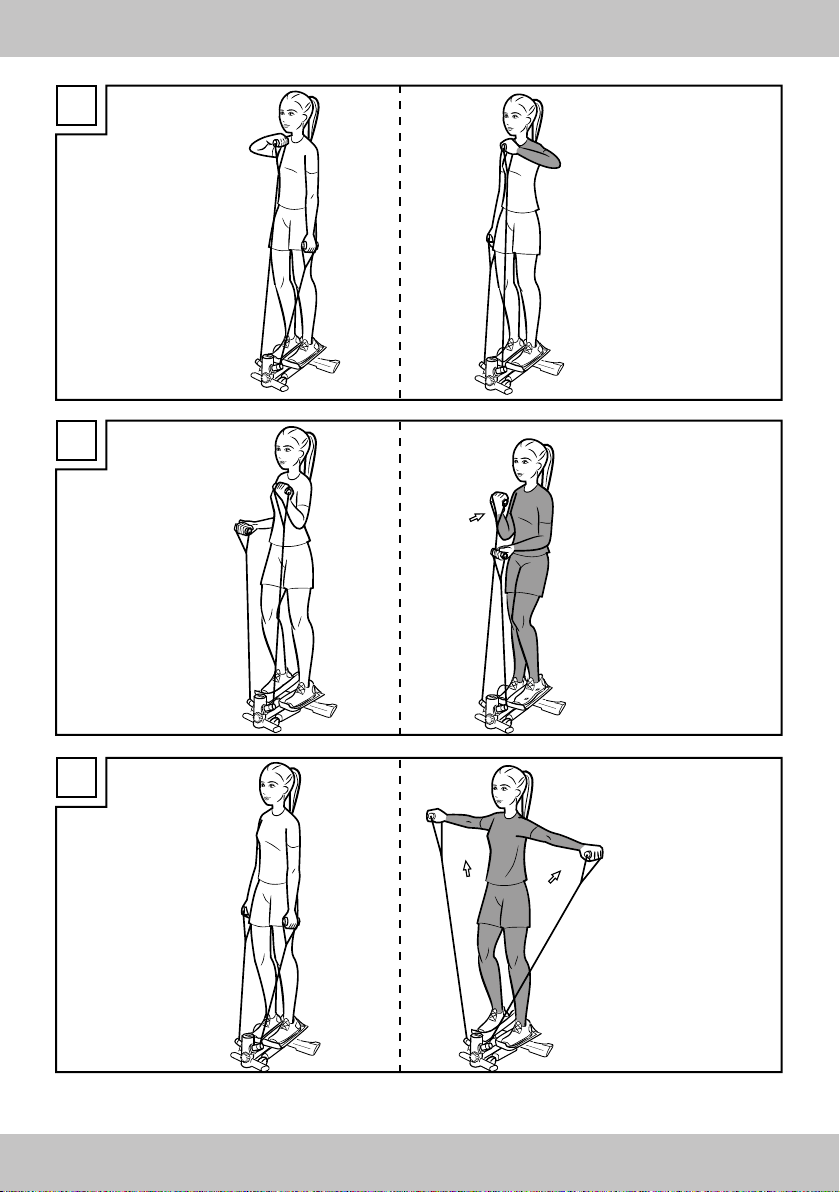
For the arms, especially for the
shoulders (Fig. O)
Starting position
1. Stand with your feet on the stepper. The pedals
are not needed for this exercise.
2. Take hold of the straps and hold your hands at
hip-height.
End position
3. Tighten your arm and stomach muscles.
4. Pull your right arm towards your chin. While
doing this, pull your elbow up sideways to
shoulder height, with the back of your hand
facing upwards.
5. At the same time, lower your left arm.
6. Stay in this position for a moment and then go
back to your starting position.
7. Now, pull your left arm up towards your chin.
While doing this, pull your elbow up sideways
to shoulder height, with the back of your hand
facing upwards.
8. At the same time, lower your right arm.
9. Repeat this exercise 10–15 times in sets of three.
Important: During this exercise, keep
your upper body and pelvis straight.
For the arms, legs, buttocks and
especially the upper arms (Fig. P)
Starting position
1. Stand with your feet on the stepper.
2. Take hold of the straps and hold your hands at
hip-height. Your elbows remain close to your
body. The palms of your hands are pointing
upwards.
End position
3. Tighten your arm and stomach muscles.
4. Lift your right underarm up, at the same time
pressing the left pedal down with your foot.
5. Lift your left underarm up now, pressing the right
pedal down with your foot at the same time.
6. The right arm is lowered down at the same time.
7. Repeat this exercise 10–15 times in sets of three.
Important: During this exercise, keep
your upper body and pelvis straight.
For the back, shoulders, chest, legs
and buttocks (Fig. Q)
Starting position
1. Stand with your feet on the stepper.
2. Take hold of the straps and hold your hands
close to your body at the sides.
End position
3. Tighten your buttocks and stomach muscles.
4. Press down alternately on the pedals with your
feet. Your arms should move back and forth
naturally, as if you were walking or climbing
stairs.
5. Your head is an extension of your spine and
your upper body is upright.

18 GB
6. With outstretched arms, pull the straps up to
shoulder height, and then lower them again. The
palms of your hands are pointing downwards.
7. Repeat this exercise 10–15 times in sets of three.
Important: During this exercise, keep
your upper body and pelvis straight.
Variation: Perform the exercise with the
palms of your hands facing upwards.
Maintenance, storage
Please remember that regular maintenance and
cleaning contribute to the safety of your stepper
and mean that you will enjoy using your stepper for
a long time. Always store the product in clean and
dry condition at room temperature. Only use water
to clean and wipe it dry with cleaning cloth.
IMPORTANT! Never clean the product with
aggressive cleaning agents.
Disposal
Dispose of the article and the packaging materials
in accordance with current local regulations. Packa-
ging materials such as foil bags are not suitable to
be given to children. Keep the packaging materials
out of the reach of children.
Devices that are marked with the symbol
shown here may not be disposed of with
domestic waste. You are obliged to dispose
of these kinds of used electrical and electronic
devices separately. Ask your local authority about
possible methods for regulated disposal. Remove
the batteries from the article before disposing of it.
Dispose of batteries carefully
Please note: Batteries are hazardous
waste and may not be disposed of with
domestic waste by law. You can hand over
used batteries free of charge at local collection
points or at retail outlets. Special containers are
provided here for this purpose.
Notes on the guarantee and
service handling
The product was produced with great care and un-
der constant supervision. You receive a three-year
warranty for this product from the date of purchase.
Please retain your receipt.
The warranty applies only to material and work-
manship and does not apply to misuse or improper
handling. Your statutory rights, especially the
warranty rights, are not affected by this warranty.
With regard to complaints, please contact the
following service hotline or contact us by e-mail.
Our service employees will advise as to the
subsequent procedure as quickly as possible. We
will be personally available to discuss the situation
with you. Any repairs under the warranty, statutory
guarantees or through goodwill do not extend
the warranty period. This also applies to replaced
and repaired parts. Repairs after the warranty are
subject to a charge.
IAN: 304198
Service Great Britain
Tel.: 0800 404 7657
E-Mail: deltaspor[email protected]

19
Gratulálunk!
Vásárlásával egy kiváló minőségű termék mellett
döntött. Az első használatba vételt megelőzően
ismerkedjen meg a termékkel.
Ehhez figyelmesen olvassa el a
következő használati útmutatót.
Csak a leírásnak és csak a megadott felhasználási
területeknek megfelelően használja a terméket. Ezt
a útmutatót jól őrizze meg. Amennyiben a terméket
harmadik személynek továbbadja, adja át neki a
teljes dokumentációt is.
Biztonsági utasítások –
gyermekeket fenyegető
veszélyek
• Az eszközt csak akkor
használhatják gyerekek (8 éves
kortól) és olyan személyek, akik
nincsenek fizikai, érzékszervi
vagy mentális képességeik teljes
birtokában, illetve akik híján
vannak a tapasztalatoknak és
tudásnak, ha felügyeletet kapnak
vagy elmagyarázták nekik az
eszköz biztonságos használatát
és tisztában vannak a hozzá
kapcsolódó veszélyekkel.
• Gyermekek nem játszhatnak az
eszközzel.
• Tisztítást és felhasználói
karbantartást gyermek felügyelet
nélkül nem végezhet.
A csomag tartalma (A ábra)
1 x swing-stepper
2 x gumikötél fogóval
2 x műanyag láb felfekvőfelülettel
2 x lemezcsavar
1 x beállítócsavar
1 x belső hatlapú kulcs keresztnyílású
csavarozóval
1 x elem (1,5 V LR03, AAA)
1 x használati útmutató
Műszaki adatok
Méretek: kb. 52 x 24,5 x 52 cm (SZÉ x MA x MÉ)
Súly: kb. 9,050 kg
Energiaellátás:
1 x 1,5 V LR03, AAA
Névleges fogyasztás: 0,09 mW
Maximális terhelhetőség: 100 kg
A Delta-Sport Handelskontor GmbH
kijelenti, hogy a termék megfelel az
alábbi általános követelményeknek és az egyéb
vonatkozó rendelkezéseknek:
2014/30/EU – Elektromágneses összeférhetőségi
irányelv
2011/65/EU – ROHS irányelv
A teljes megfelelőségi nyilatkozat a következő
címen kapható meg: http://www.conformity.
delta-sport.com/
Gyártási dátum (hónap/év):
09/2018
Eszközosztály: HC (magán háztartásban
használható, C pontosság)/nem terápiás edzési
célra
Ellenőrzéshez felhasznált szabványok: DIN EN
ISO 20957-1: 2014, DIN EN ISO 20957-8,
DIN 32935
Edzőgumi erőtáblázat
Beállított hossz
(mm) 60 70 80 90
Maximális Nyúlás-
hossz (cm) kb. 165 165 165 165
Erő (N) kb. 31 27 23 19,5
Tűréstartomány az erőhöz kb. 20 % (+/-).
Lépő mozgás
A stepperrel független lépő mozgás végezhető.
Fékellenállás rendszer
Ez a stepper sebességfüggő rendszer.
HU

20
Rendeltetésszerű használat
A termék kizárólag edzőgépnek használható, csak
otthoni felállításra és használatra engedélyezett.
Biztonsági utasítások
Általános veszély
• Vigyázzon, nehogy halálos balesetet okozzon
gyermeknek a csomagoló fólia (fulladásveszély).
• Ne engedje, hogy kisgyerek játsszon
az elemmel. Az elem lenyelése súlyos
egészségkárosodáshoz vezethet.
• Edzés közben tartsa távol a gyermekeket a
pedáloktól (beszorulásveszély).
• A termék nem gyermekjátékszer. Ha nem
használják, tárolja gyermekek számára nem
elérhető helyen.
• Legnagyobb terhelhetőség: A termék legfeljebb
100 kg-os testsúlyú személy általi használatra
készült.
• Vegye figyelembe a gumikötelek maximális
nyúláshosszát. A nyúláshosszúságot nem
szabad a jelölésen (MIN.) túlra állítani.
• A termékről nem állhat ki olyan állítószerkezet,
amely akadályozhatja a használó mozgását. A
terméket olyan területen állítsa fel, ahol van elég
hely az edzéshez. Legalább 2 x 2 m-es terület
szükséges.
• Helyezze a terméket vízszintes, sík felületű
aljzatra, hogy edzés közben stabilan álljon és
ne billegjen.
• Minden használat előtt ellenőrizze a termék
épségét. Ellenkező esetben ne használja.
A meghibásodott alkatrészeket ki kell cserélni,
mert rontják a működést és a biztonságot.
• Javítást csak engedélyezett szakemberek
végezhetnek.
• Csak eredeti pótalkatrészeket szabad használni.
• A terméket csak sportcipővel szabad használni.
• Az edzőterület körül kb. 0,6 m nagyságú
szabad területnek kell lennie (E ábra).
Égési sérülés veszélye!
• A hidraulikus csillapítók edzés közben
felforrósodnak. Semmiképp ne érjen hozzájuk
közvetlenül edzés után.
Rosszul végzett/túlzott edzés
veszélye!
• Feltétlenül kövesse az Edzési tudnivalók című
fejezet figyelmeztetéseit.
Dologi károk!
• A hidraulikus csillapítók szivárgásától
olaj jelenhet meg. A talaj vagy szőnyeg
bepiszkolódásának elkerülése érdekében
egyenes, csúszásmentes aljzatra állítsa a
terméket.
• Akadályozza meg, hogy folyadék kerüljön a
számítógépbe, mert az érzékeny elektronikában
kárt tehet. Óvja a számítógépet a közvetlen
napsugárzástól.
• Ellenőrizze rendszeresen az összes csavar és
anya helyét. Az önzáró anyák rezgés hatására
nem oldanak ki.
Ez a tulajdonság azonban csak egyszeri
meghúzás esetén biztosított. Ha a steppert
szétszerelik, az összes önzáró anya helyett újat
kell visszaszerelni.
• Ha hosszabb ideig nem használja a terméket,
vegye ki az akkumulátort a számítógépből,
nehogy kifolyjon és kárt okozzon.
• Javasoljuk, hogy edzés közben használjon
alátétet a padló sérüléseinek elkerülésére.
Elemekkel kapcsolatos
figyelmeztető utasítások!
• Vegye ki az elemeket, ha elhasználódtak vagy
ha hosszabb ideig nem használják a terméket.
• Ne használjon különböző típusú, márkájú, új
és használt vagy eltérő teljesítményű elemeket
egyszerre, mert kifolyhatnak és ezzel kárt okoz-
hatnak.
• Berakáskor vegye figyelembe a pólusokat (+/-).
• Egyszerre cserélje ki az összes elemet, és előírás-
szerűen selejtezze le a régieket.
• Figyelmeztetés! Tilos újratölteni, más eszközökkel
újra aktiválni, szétszerelni, tűzbe dobni vagy
rövidre zárni az elemeket.
• Az elemeket gyermekek elérési távolságán kívül
tartsa.
• Ne használjon újratölthető elemet!
• Tisztítást és felhasználói karbantartást gyermek
felügyelet nélkül nem végezhet.
• Szükség esetén és behelyezés előtt tisztítsa meg
az elem- és a készülékérintkezőket.
HU

21HU
• Ne tegye ki az elemeket szélsőséges feltételek-
nek (pl. fűtőtest vagy közvetlen napsugárzás),
mert növekszik a kifolyásveszély.
• Az elemek lenyelése életveszélyes lehet. Ezért
az elemeket gyermek számára nem elérhető
helyen tárolja. Elem lenyelése esetén azonnal
orvosi segítséget kell igénybe venni.
Veszély!
• Rendkívül óvatosan kezelje a sérült vagy kifolyt
elemet, és előírásszerűen, azonnal selejtezze le.
Viseljen közben védőkesztyűt.
• Ha elemsavval érintkezik, vízzel és szappannal
mossa meg az érintett helyet. Ha elemsav kerül
a szemébe, vízzel mossa ki és azonnal forduljon
orvoshoz!
• A csatlakozó csipeszeket nem szabad rövidre
zárni.
Elemek cseréje
FIGYELEM! Tartsa be a következő utasítá-
sokat a mechanikus és elektromos károk
elkerülésére.
Veszély!
LR03 elemet tartalmaz a termék. Ha az elem már
nem működik, akkor cserélje ki.
1. Emelje fel oldalt a kijelzőt és óvatosan vegye le.
Az elem a kijelző hátoldalában van.
2. Óvatosan tolja ki a lemerült elemeket a rekesz-
ből és tegyen be helyettük újat.
Megjegyzés: Ügyeljen rá, hogy az elem teljesen
belemenjen a tartójába.
3. Csatlakoztassa vissza a kábeleket és a kijelzőt
a házra.
Megjegyzés: Ügyeljen rá, hogy a kijelző rende-
sen visszailleszkedjen a házba.
A stepper összeszerelése
1. lépés:
Dugja be a két műanyag lábat a csőbe az állvány
hátoldalán. A bordás felfogó felületek a talajon
fekszenek, hegyes végükkel néznek hátrafelé
(C ábra).
Rögzítéshez az állvány alsó felén egy-egy lemez-
csavart kell a meglévő furatba csavarozni.
Megjegyzés: Kérjük, ügyeljen arra, hogy a váz
előre kifúrt furata és a műanyag láb egymás fölé
kerüljön.
2. lépés:
A beállító csavart a stepper elülső oldalán kell a
menetbe csavarni.
A csavar segítségével lehet a lépőfelületek emelke-
dési magasságát beállítani.
Az emelkedési magasság növeléséhez forgassa a
beállító csavart az óramutató járásával megegye-
ző irányba. Az emelkedési magasság csökkenté-
séhez forgassa a beállító csavart az óramutató
járásával ellentétes irányba.
3. lépés:
Felfelé húzva vegye le a számítógépet a stepper-
ről.
Helyezze be a kapott elemeket a számítógép alján
található megfelelő rekeszbe. Ügyeljen a megfele-
lő polaritásra.
Kapcsolja rá a számítógépre a ház csatlakozódu-
gót és helyezze vissza. Kérjük, ügyeljen, nehogy
becsípődjön a kábel.
4. lépés:
Vegye figyelembe a gumikötelek max.
nyúláshosszát.
Minél rövidebbre állítja be a gumikötelet, annál
nagyobb az erőkifejtés.
• Rövidítse a gumiköteleket úgy, hogy rögzíti a
gumitömlőt a biztosító gömbbel (B ábra).
FONTOS! Ügyeljen arra, hogy ne rövidít-
se meg túlságosan a gumiköteleket. A
MIN. jelölést nem szabad túllépni!
• Akassza be a fémhorgot a stepper vázán lévő
karikába és a csavarral húzza meg a horgon
lévő zárat (D ábra).
Fontos! Ellenőrizze edzés előtt a gumi-
kötelek biztonságos felszerelését és a
kampó biztonságos becsavarozását.
Figyelem! A szemeket kizárólag felfelé
ható húzóerő kifejtésére tervezték, ke-
resztirányban nem szabad terhelni őket.
Sérülésveszély keletkezik vagy károsod-
hat a stepper.
Ha nem a gumikötelekkel edz, akassza ki őket a
szemből, nehogy botlásveszélyt okozzanak.
Győződjön meg róla, hogy minden csavar és anya
biztosan meg van húzva.

22
3. Néhány másodperc után a kijelzőn a következő
üzemmód (REPS) lesz látható. A MODE gomb
megnyomásával 10-es lépésekben beállítható a
lépésszám.
4. A kívánt kalóriafelhasználás a következő mód-
ban (CAL) adható meg 10-es lépésekben.
5. Az edzés ekkor elkezdhető. A számítógép a
beállított értékről visszaszámol a „0:00” értékig.
6. A beállított érték elérésekor a számítógép kb. 10
s-ig nem számol tovább. Végül 0-ról indul újra.
Kijelző nullázása
A kijelző csak első üzembe vételkor áll 0-án. Az
összes ezt követő edzés alkalmával a számítógép
onnan folytatja tovább a számlálást, ahol az utolsó
edzést befejezte. A kijelző nullázásához tartsa az
üzemmód gombot olyan hosszan nyomva, amíg az
összes jel egyszerre látható nem lesz.
A teljes lépésszám (TTR) visszaállításához távolítsa
el az elemet.
Edzési tudnivalók
Általános tájékoztatás
Mielőtt edzeni kezdene, keresse fel orvosát!
Célkitűzés
Megfelelő edzéssel különféle célok érhetők el:
• Az általános fittség javítása
• A kitartás növelése
• Még jobb közérzet
Az edzés eredménye lényegében a következő
pontoktól függ, amelyeket feltétlenül figyelmébe
szeretnénk ajánlani:
• Rendszeres és megfelelő hosszúságú edzés
• Megfelelő táplálkozás
• Az edzési eredmény ellenőrzése
Ki edzhet?
Ha már hosszabb ideje nem űzött semmilyen
sportot, szív-, keringési vagy ortopédiai gondokkal
küzd, gyógyszert szed vagy gyermeket vár, akkor
az edzés megkezdése előtt keresse fel orvosát.
Mondja el, milyen edzőkészüléket kíván használni.
Vizsgáltassa meg magát, hogy megtalálja a
saját magának megfelelő edzőprogramot. A
biztonság kedvéért vigye magával ezt a használati
útmutatót, hogy orvosával egyéni edzésprogramot
állíthassanak össze.
A számítógép kezelése
A stepper C pontossági osztálynak felel meg,
azaz a számítógép képernyőjén a kijelzés
pontosságával szemben nincs semmilyen igény.
Be- és kikapcsolás
Az edzés megkezdésekor, pl. a pedálok
használatakor a számítógép automatikusan
bekapcsolód. A számítógép automatikusan
kikapcsol, ha kb. 4 percig nem használják a
steppert.
Kijelzés
A felső sorban jelenik meg:
1. „STOP”, ha megszakad az edzés;
2. A lépések percenkénti száma (felszorozva)
Üzemmód kiválasztása
A 4 üzemmód az alsó sorban jelenik meg. Az
üzemmódok közötti váltáshoz nyomja meg röviden
a MODE gombot.
1. „TMR”: Eddigi edzés ideje 0:00 és 99:59 között
2. „REPS”: Az aktuális edzés lépésszáma 0 és
9999 között
3. „CAL”: Az elégetett kalória* 0 és 9999 között
4. „TTR”: Az edzési lépések száma az elemek
berakása óta 0-9999
* A számítás előre beprogramozott standard
értékeken alapul, amelyek csak iránymértékként
szolgálhatnak. A gumikötelek használatával
felhasznált kalóriát nem veszi figyelembe.
Az összes edzési adatot egymás után ki lehet
jelezni. Nyomja meg ehhez annyiszor a „MODE”
gombot, amíg a „TMR” mező villogni nem kezd.
A kijelző 5 másodpercenként automatikusan átvált
egyik módból a másikba.
Edzési célok megadása
Több célt is megadhat:
– Edzési időtartam (TMR)
– Lépések száma (REPS)
– Felhasznált kalória (CAL)
1. Tartsa az üzemmód gombot lenyomva addig,
amíg az alsó sorban meg nem jelenik a „0:00
(TMR)” felirat és az első 0 villogni kezd (kb. 7 s).
2. Az edzésidő megadásához nyomja meg any-
nyiszor az üzemmód gombot, amíg a kijelző a
kívánt időtartamot nem mutatja percben.
HU

23HU
Alapvetően bárki elkezdheti az erőnléti edzéseket,
aki testileg egészséges, legyen az illető akár
fiatal, akár idős, amennyiben előzőleg orvosával
egyeztetett.
Figyelmeztetés!
A rosszul végzett vagy túlzásba vitt edzés
veszélyeztetheti egészségét.
Terhelés
Az erőteljes edzés az egész szervezetet igénybe
veszi, nem csak az izomzatot.
A testnek – különösen a szívnek és a keringésnek
– időre van szüksége, hogy alkalmazkodjon az
edzés jelentette változásokhoz. Emiatt fontos, hogy
a terhelést csak lassan növelje, és figyelni kell
edzés közben és utána a megfelelő szünetekre.
Olyan teljesítményi tartományban eddzen, ami
nem veszi igénybe a teljes erejét. Hallgasson a
szervezetére, fejezze be az edzést, ha nem érzi jól
magát, nem kap levegőt vagy szédülést érez.
Akkor edz jól, ha edzés közben még rendesen tud
beszélgetni.
Levezetés/lazítás
Ugyanolyan fontos a levezetés, ill. a lazítás, mint a
megfelelő bemelegítés. Fokozatosan fejezze be az
edzést; csökkentse az erőkifejtést és az eszközről
leszállva végezzen nyújtó gyakorlatokat. Így lassan
megnyugszik a pulzus és a szervezet jobban tud
regenerálódni a további igénybevételhez.
Az egyes edzési egységek közötti pihenési
szakaszok hossza mindig az edzettségi állapothoz
igazodjon.
Kerülje a túl erős edzést,
nehogy túlerőltesse magát. A túlerőltetés
egészségügyi gondokat okozhat és halálhoz
vezethet. Kifáradáskor vagy gyengeség érzésekor
azonnal hagyja abba az edzést.
Az egyéni edzéserősség meghatározásához
a következő számítással meghatározható a
körülbelüli legnagyobb pulzusszám (MHF):
MHF = 220 – életkor
Edzési céltól függően a maximális pulzusszámra
támaszkodva 5 edzési zóna van, amelyen belül
végezhető az edzés.
Zónák
Regenerációs zóna = a maximális pulzus
50-60 %-a Zsírégető zóna = a maximális pulzus
60-70 %-a Szénhidrátégető zóna = a maximális
pulzus 70-80 %-a
Anaerob zóna = a maximális pulzus 80-90 %-a
Veszélyzóna = a maximális pulzus 90-100 %-a
• Regenerációs zóna/egészségi zóna
Az edzés célja az alapkondíció. Hosszabb, lassan
végzendő állóképességi terhelésből áll. Különösen
kezdőknek és gyenge erőnlétű személyeknek
ajánlott.
• Zsírégető zóna
Optimalizálja a zsírégetést, a szív és keringési
rendszer erősítésére szolgál. Itt égeti el a szervezet
arányaiban a legtöbb zsírból származó energiát.
Edzés közben nyugodtnak kell éreznie magát,
tudnia kell beszélgetni.
• Szénhidrátégető zóna
Itt több szénhidrát ég el, mint zsír. Az edzés
megerőltetőbb, de hatékonyabb is.
Fellépés a stepperre
Nyomja le egészen az egyik pedált a lábával
úgy, hogy a pedálkar ütközője az alapállványra
feküdjön.
Utána lépjen fel a leengedett pedálkar
lépőfelületére a lábával.
A másik lábát tegye a másik, ferdén felfelé álló
lépőfelületre.
Leszállás
A stepperen állva az egyik lépőfelületet nyomja
teljesen lefelé úgy, hogy a pedálos karos ütköző a
vázon feküdjön.
Utána vegye le a lábát a ferdén felfelé álló lépőfe-
lületről és tegye a talajra. Utána lépjen le az alsó
lépőfelületről is.
A stepper mozgása edzés közben
A stepper a lépcsőn járást utánozza.
A lengő hatás révén a lépőfelületek nem csak fel
és le mozognak, hanem a külső oldalakon balra és
jobbra is kilengenek.
Igénybe vett izomcsoportok
A gumikötél nélküli gyakorlatok alapvetően a láb-
és farizmokat edzik.

24
A lépcsőzés és gumikötél együttes használatával
végzett gyakorlatok erősítik a fart, a lábakat, a
karokat és a vállizomzatot.
Azok a gyakorlatok, amelyek közben Ön nem
lépeget, hanem a gumiköteleket használja, a kar-
és vállizomzatot erősítik.
Testtartás
Ügyelni kell arra, hogy edzés közben egyenesen
tartsa a testét. Feltétlenül el kell kerülni a háton a
lordosis kialakulását.
Fontos: Gyakorlat közben a has végig
feszes, a felsőtest egyenes!
Egyenletes lépcsőzésnél a pedálkar ütközőnek
valójában nem szabad az alapállványhoz érnie.
Mindig röviddel ezelőtt végezze el a testsúly
áthelyezést az egyik lábról a másikra. Segít az is,
ha karjait kissé meghajlítva a lépcsőzés ritmusában
engedi a felsőtest előtt lengeni.
Nyújtó gyakorlatok
Az alsó hátrész nyújtása (F ábra)
Kiindulási helyzet
1. Menjen le négykézláb állásba.
2. Helyezze karját és könyökét a válla, ill. csípője
alá.
Véghelyzet
3. Feszítse meg a hasizmot és görbítse a hátat, mint
a macska, amíg a feszülést az egész hátában
nem érzi.
4. Arca nézzen a keze felé.
5. Maradjon egy pillanatig ebben a helyzetben,
majd térjen vissza a kiindulási helyzetbe.
6. 2-3-szor ismételje meg a gyakorlatot és három
sorozatot végezzen.
Fontos: Négykézláb állásban a hátát,
derekát tartsa egyenesen.
A hátsó combizomzat nyújtása
(G ábra)
Kiindulási helyzet
1. Feküdjön hátával a padlóra. Lábak lazán kinyújt-
va.
Véghelyzet
2. Feszítse meg a hasizmot és emelje fel egyik
lábát függőlegesen felfelé.
3. Fogja át karjaival a combját és húzza jobban
magához, hogy erősebb legyen a nyújtás.
4. Lábujjak lefelé néznek, miközben a másik láb
nyújtva továbbra is a talajon fekszik.
5. Maradjon ebben a helyzetben egy pillanatig,
majd térjen vissza a kiindulási helyzetbe.
6. Legalább 2-3-szor ismételje meg a gyakorlatot
és három sorozatot végezzen, utána lábcsere.
Fontos: Vannak olyan személyek, akik-
nek nagyon megrövidült a hátsó combiz-
ma. Ha Önnél is ez a helyzet, segíthet,
ha a combját egy törülközővel húzza
magához.
A mellizomzat nyújtása (H ábra)
1-es változat
Kiindulási helyzet
1. Támassza falnak az alsó karját és a könyökét,
tenyere felfelé nézzen, közben a felső és alsó
kar derékszöget alkosson.
Véghelyzet
2. Továbbra is a falhoz érve felsőtestét kissé fordít-
sa el a faltól.
3. Legalább 2-3-szor ismételje meg a gyakorlatot
és három sorozatot végezzen, utána másik
oldalra is.
2-es változat
Kiindulási helyzet
1. Nyújtsa ki mindkét alkarját oldalt felfelé, hogy a
felső és alsó kar derékszöget alkosson.
2. Harántállásban dőljön neki könnyedén egy
ajtókeretnek.
Véghelyzet
3. Tolja felsőtestét finoman előre, hogy érezze a
feszülést a mell területén.
4. 2-3-szor ismételje meg a gyakorlatot és három
sorozatot végezzen.
Fontos: Kb. 5 másodpercig maradjon
nyújtó helyzetben.
A nyaki izomzat nyújtása (I ábra)
Kiindulási helyzet
1. Álljon fel egyenesen.
Véghelyzet
2. Döntse fejét oldalra a váll irányába, közben
húzza lefelé a másik vállat ezzel egyidejűleg. A
nyújtást a nyaka oldalsó részén kell éreznie.
3. Tartsa ezt a helyzetet kb. 5 másodpercig, majd
térjen vissza a kiindulási helyzetbe.
HU
Table of contents
Languages:
Popular Stepper Machine manuals by other brands
ICON Health & Fitness
ICON Health & Fitness NordicTrack FREESTRIDE TRAINER FS9i user manual

Crivit
Crivit Z29550 Assembly and Safety Advice

Impex
Impex HERS MS-93 owner's manual

Fortis
Fortis FSELMNEPSPA user guide

Egojin
Egojin Swing Stepper 7020 Assembly instructions

Life Fitness
Life Fitness ARCTIC SILVER 93SW parts manual

