Digimate LTV-3210H User manual


Contents
Basic TV Features
SAFETY WARNINGS ................................................................................. 4
1BEFORE YOU START.............................................................................. 5
1-1 What’s in the Box .........................................................................5
1-2 Optional Accessories .....................................................................6
1-3 Front view....................................................................................7
2YOUR LCD TV AT A GLANCE................................................................. 8
2-1 Control panel ...............................................................................8
2-2 Rear view ....................................................................................9
3YOUR REMOTE CONTROL AT A GLANCE............................................. 11
4BASIC LCD TV SETUP........................................................................... 14
4-1 Connecting to the Aerial Antenna ...................................................14
4-2 Using the Remote Control (Basic Operation)......................................14
4-3 Connect the power cable .............................................................15
4-4 Inserting Batteries into the Remote Control ........................................16
4-5 Turning ON the Power .................................................................17
4-6 Tuning Channels Automatically (Auto installation)................................18
4-7 Programmed swap ......................................................................19
4-8 Tuning Channels Manually (Manual installation).................................20
5CONNECTING EXTERNAL DEVICES ..................................................... 21
5-1 Connecting a SCART Device .........................................................21
5-2 Connecting a Composite Device ....................................................22
5-3 Connecting a Component Device ...................................................23
5-4 Connecting a VCR Using Coaxial (RF) .............................................24
5-5 Connecting a Computer ...............................................................25
5-6 Connecting a HDMI Device ..........................................................26
6ADJUSTING SETTINGS ........................................................................ 27
6-1 Basic Operations ........................................................................27
6-2 Using the Multi Picture Feature........................................................30
6-3 Using the On-screen Display (OSD).................................................31
6-4 OSD Menus and Options .............................................................32

7ADVANCED SETTINGS........................................................................36
7-1 Setting the Sleep Timer ................................................................ 36
7-2 Sorting the Channels................................................................... 37
7-3 Renaming Your Channels............................................................. 38
7-4 Removing Unwanted Channels (Manual installation).......................... 39
7-5 Delete Channels......................................................................... 40
7-6 Blocking Channels...................................................................... 41
7-7 Setting a Password ..................................................................... 42
7-8 Displaying Teletext ...................................................................... 43
TROUBLESHOOTING AND SUPPORT ........................................................44
PRODUCT SPECIFICATIONS .....................................................................46
TAKING CARE OF THE LCD TV ................................................................. 47

Safety warnings
Damage
Never use your TV if it is damaged in any
way. Always place your TV on a flat level
surface avoiding anywhere, which may be
subject to strong vibration.
Weather
It is advisable to unplug the aerial during an
electrical storm.
Moisture
Do not allow your TV to be exposed to rain,
moisture, and dust. If any liquid is spilt into
your TV, it can cause serious damage. If you
spill any liquid into your TV, switch it off at the
mains immediately. Contact your store.
Interference
Do not place your TV on or near appliances,
which may cause electromagnetic interference
(TV or Hi-Fi speakers). If you do, it may
adversely affect the working of the unit, and
cause a distorted picture or sound.
Temperature
Avoid extremes of temperature, either hot or
cold, place your TV well away from heat
sources such as radiators or gas/electric fires.
Ventilation
The TV must be well ventilated. Do not cover
your TV or position in a small confined space.
It is recommended that you leave a 10cm gap
all around your TV.
Batteries
Young children easily swallow batteries. Do
not allow young children to play with the
remote control unit.
Covers
Do not remove any fixed covers as this may
expose dangerous voltages.
Standby
Do not leave your TV in standby for long
periods of time e.g. overnight or while on
holiday.
ATTENTION!
If a bright stationary image is
left on any TV for a long enough period of
time, (longer than 4 hours continuous display),
it is possible that some screen burn may result -
this leaves a shadow of the image on the
screen even after the original image has been
removed. Stationary images to watch out for
are:
•
TV games with static scenes (background
scores, time remaining, etc.)
•
Programmed channel identifiers shown in
corner of TV screen and the red interactive
logo on BBC channels via satellite
•
DVD on-screen logos and displays (e.g.
the logo displayed during audio CD
playback)
•
Radio station identifier screen on satellite
If a still picture cannot be avoided, then
reduce the brightness and contrast levels of
the picture to minimize any damage that might
occur.
WARNING:
An LCD panel and/or video
monitor may be installed in a motor vehicle
and visible to the driver if the LCD panel or
video monitor is only used for vehicle
information, system control, rear or side
observation or navigation.
If the LCD panel or video monitor is used for
television reception, video or DVD play, it
must be installed to the rear of the driver’s seat
where it will not be visible, directly or
indirectly to the operator of the motor vehicle.

5
English
1 BEFORE YOU START
1-1 What’s in the Box
When you receive your LCD TV, unpack it carefully, and check to make sure you have all the
items below.
REMOTE CONTROL
AND
TWO AAA BATTERIES
POWER CORD
USER’S MANUAL
1 23

Chapter 1 Before You Start
6
English
1-2 Optional Accessories
The following are optional accessories you may purchase for your LCD TV:
CABLE KITS
Cable kits consist of cables of various lengths for connecting audio and video devices
to your LCD TV. Below are some examples.
RCA audio cable
SCART cable
RCA composite video cable
VGA video cable

Chapter 1 Before You Start
7
English
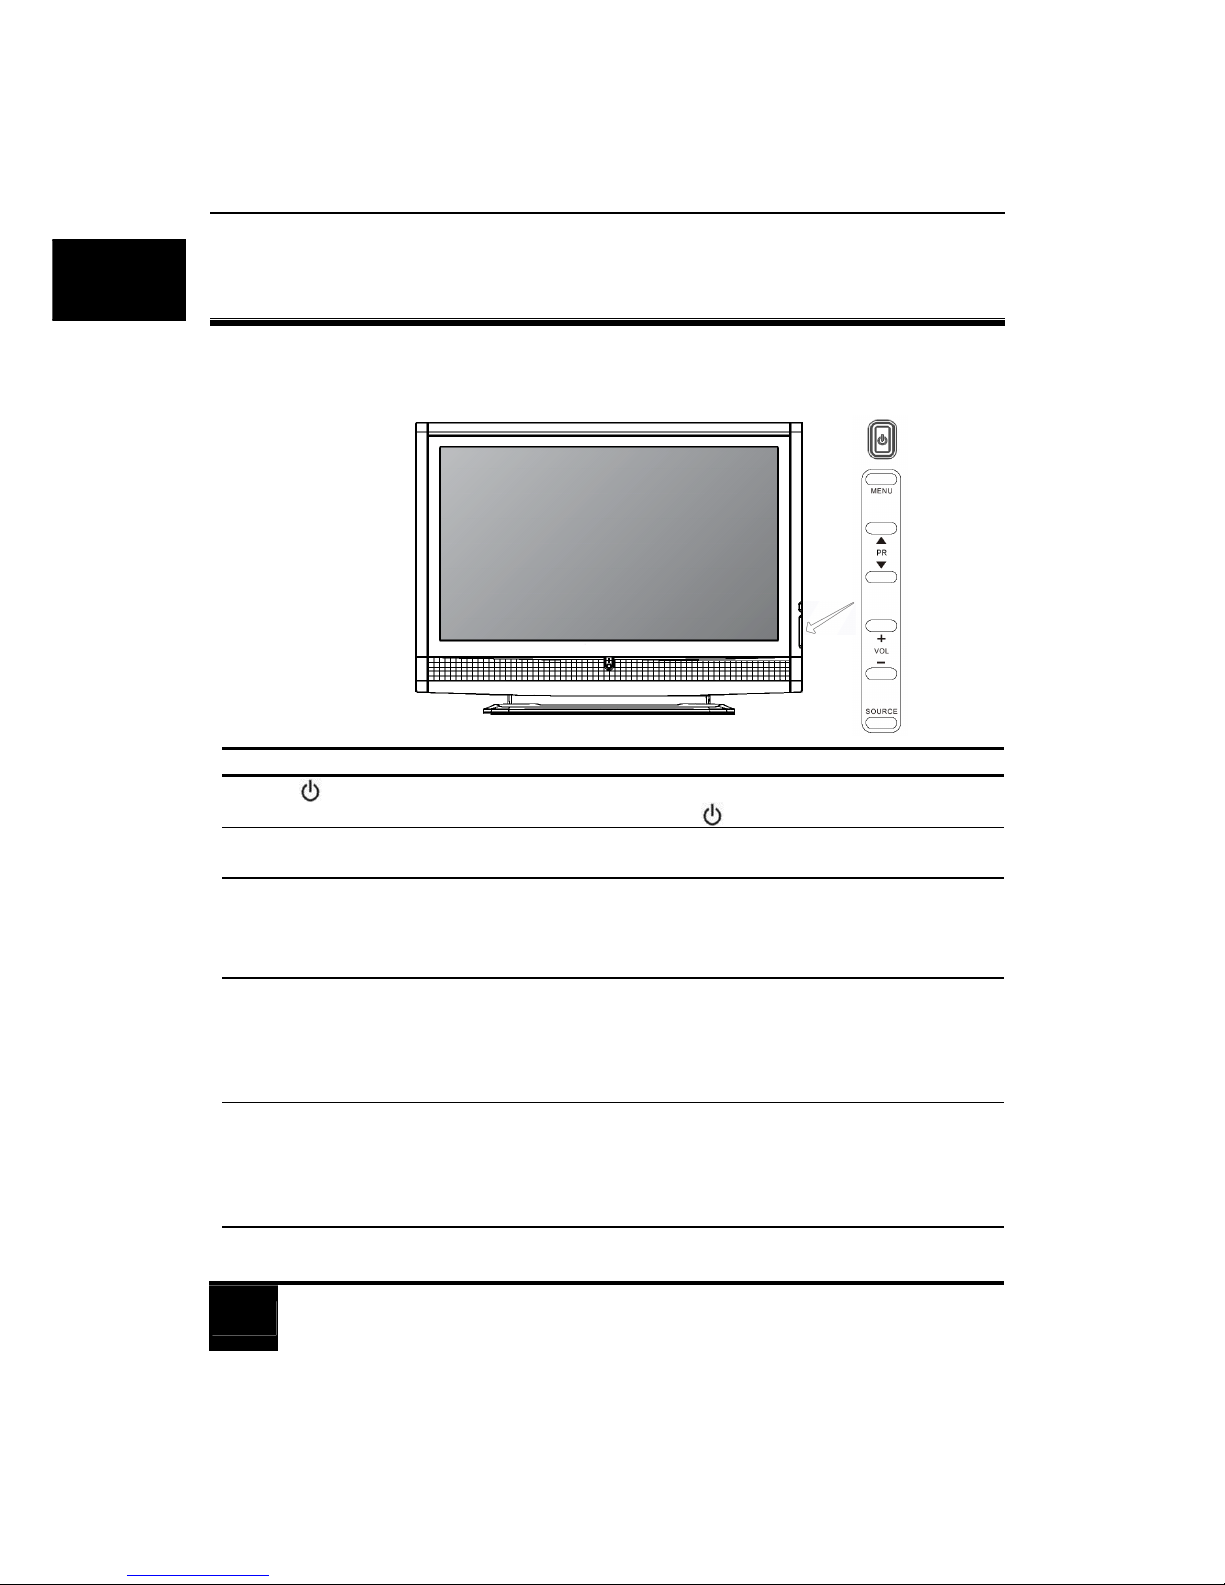
1-3 Front view
NO. NAME DESCRIPTION
Speakers High-fidelity speakers for generating high-quality sounds.
Power indicator Lights up green when the TV is powered on.
Lights up red when the TV is in standby mode.
Remote control
sensor window Receives command signals from the remote control. Do not
obstruct the sensor by placing any objects in front of it, which
will hinder the reception of signals.
8
English
2 YOUR LCD TV AT A GLANCE
2-1 Control panel
NO. NAME DESCRIPTION
(Power/
standby) button
Toggles the TV between standby mode and on. (Performs the same
action as the Power/standby button on the remote control.)
MENU button Displays the OSD menu if not visible, or exits the current menu if displayed.
(Performs the same action as the MENU button on the remote control.)
PR (Program) S/T
buttons
Sequentially selects the previous or next turned TV program. (Performs
the same action as the Program S/Tbuttons on the remote control.)
In the OSD menu, moves the selection highlight up or down.
(Performs the same action as the T/Sbuttons on the remote control.)
VOL (Volume) +/–
buttons
Adjusts the volume level of the speakers. (Performs the same
action as the Volume +/- buttons on the remote control.)
In the OSD menu, moves the selection highlight left or right or
changes settings. (Performs the same action as the W/Xbuttons
on the remote control.)
Source button Cycles through possible input signal sources. (Performs the same
action as the SOURCE button on the remote control.)
In the OSD (On-Screen Display) menu, selects the highlighted
menu item to enter a submenu. (Performs the same action as the
OK button on the remote control.)
Chapter 2 Your LCD TV At A Glance
9
English
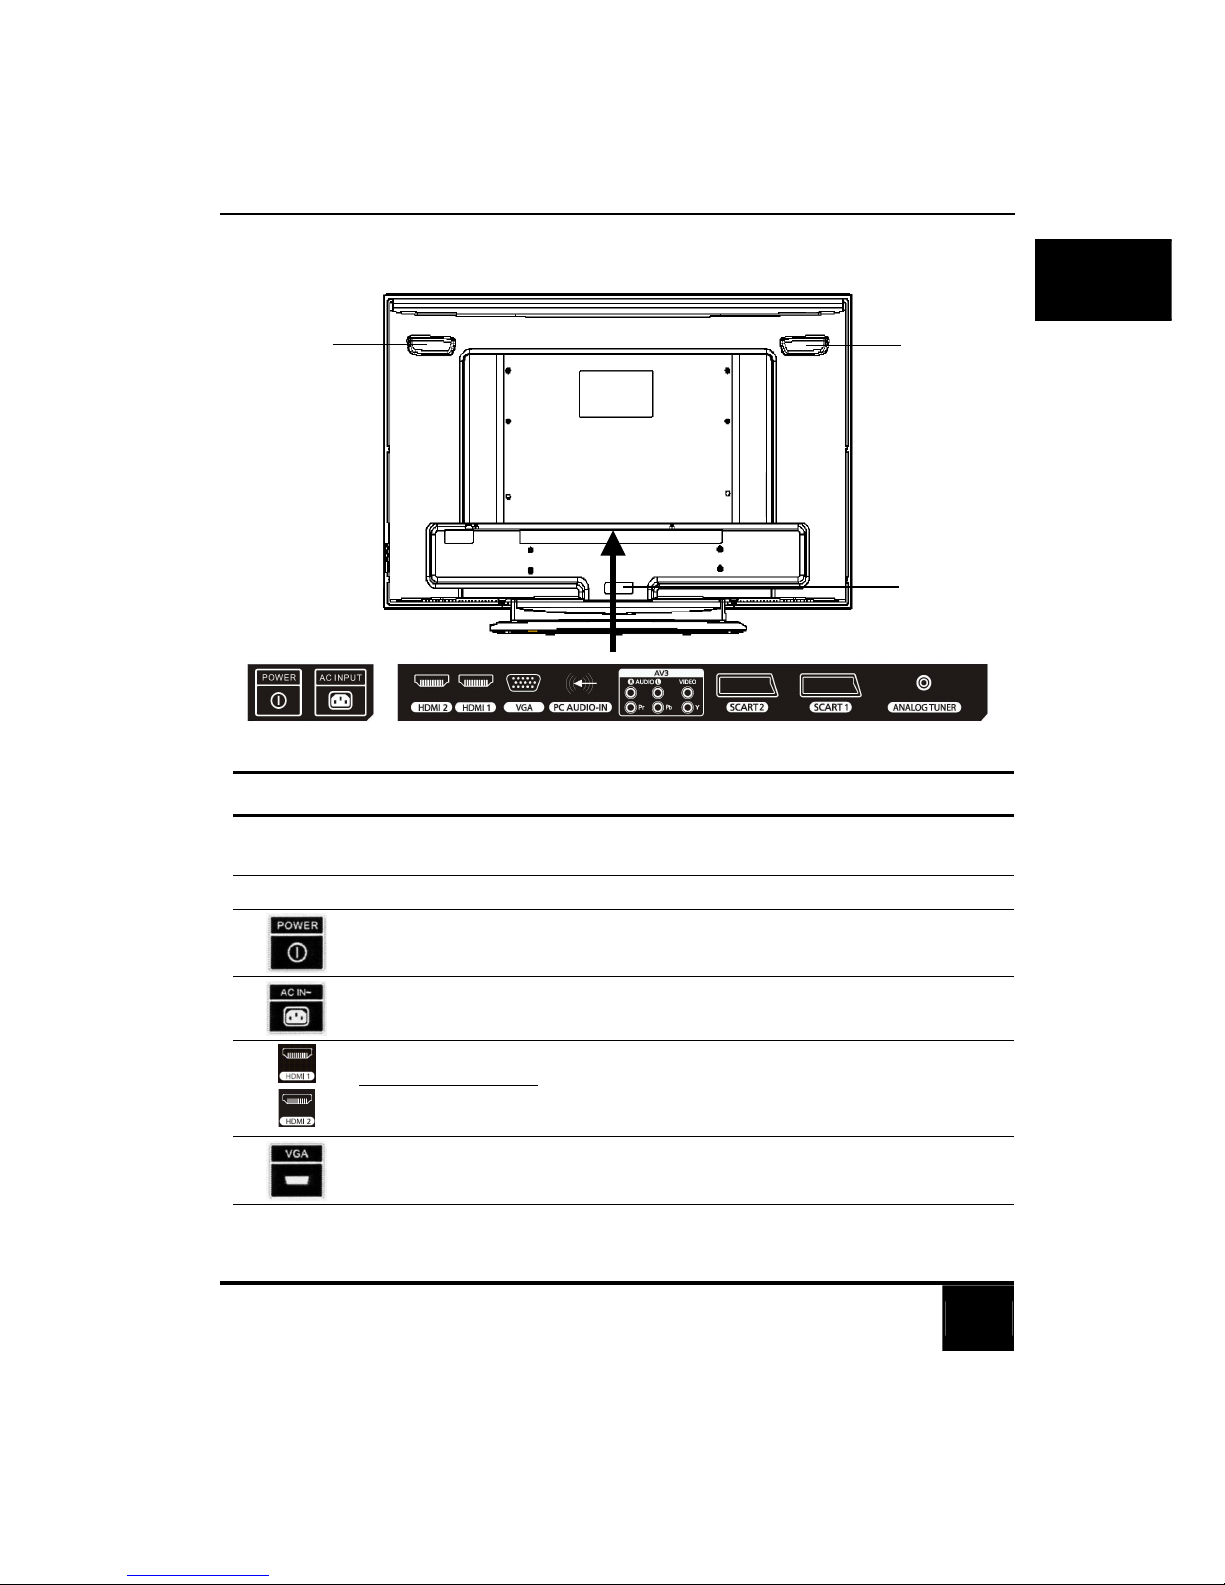
2-2 Rear view
The actual positions of the input sockets may vary depending on your model of purchase.
NO./ICON NAME DESCRIPTION
Carrying handle Use these handles when moving the TV to another
location by hand.
Cable holder Holds cables in place.
Main power switch Turns the main power source of the TV on or off.
AC power input Connect to the AC power cable.
HDMI 1
HDMI 2
Connect to a DVI digital video or HDMI digital
audio/video output of your digital source device. See
“5-6 Connecting a HDMI Device” on page 26.
VGA Connect to a PC’s VGA (D-Sub) output. See “5-5
Connecting a Computer” on page 25.

Chapter 2 Your LCD TV At A Glance
10
English
PC AUDIO-IN Connect to the audio output of either a VGA or DVI
digital video output as appropriate for your source
device.
AV VIDEO Connect to the Composite video output as appropriate
for your AV source device. See “5-2 Connecting a
Composite Device” on page 22.
AV YPbPr Connect each to the component video (YPbPr) outputs
of an appropriate video source device. See “5-3
Connecting a Component Device” on page 23.
AV AUDIO L/R Connect each to the composite or component audio
outputs of an appropriate video source device to match
that of each composite or component video input. See
“5-2 Connecting a Composite Device” on page 22
and “5-3 Connecting a Component Device” on
page 23.
SCART 1
SCART 2
Connect each to the SCART input of an appropriate
device. See “5-1 Connecting a SCART Device” on
page 21.
TUNER Connect to your antenna TV/CATV cable system. see
“4-1 Connecting to the Aerial Antenna” on page
14.
11
English
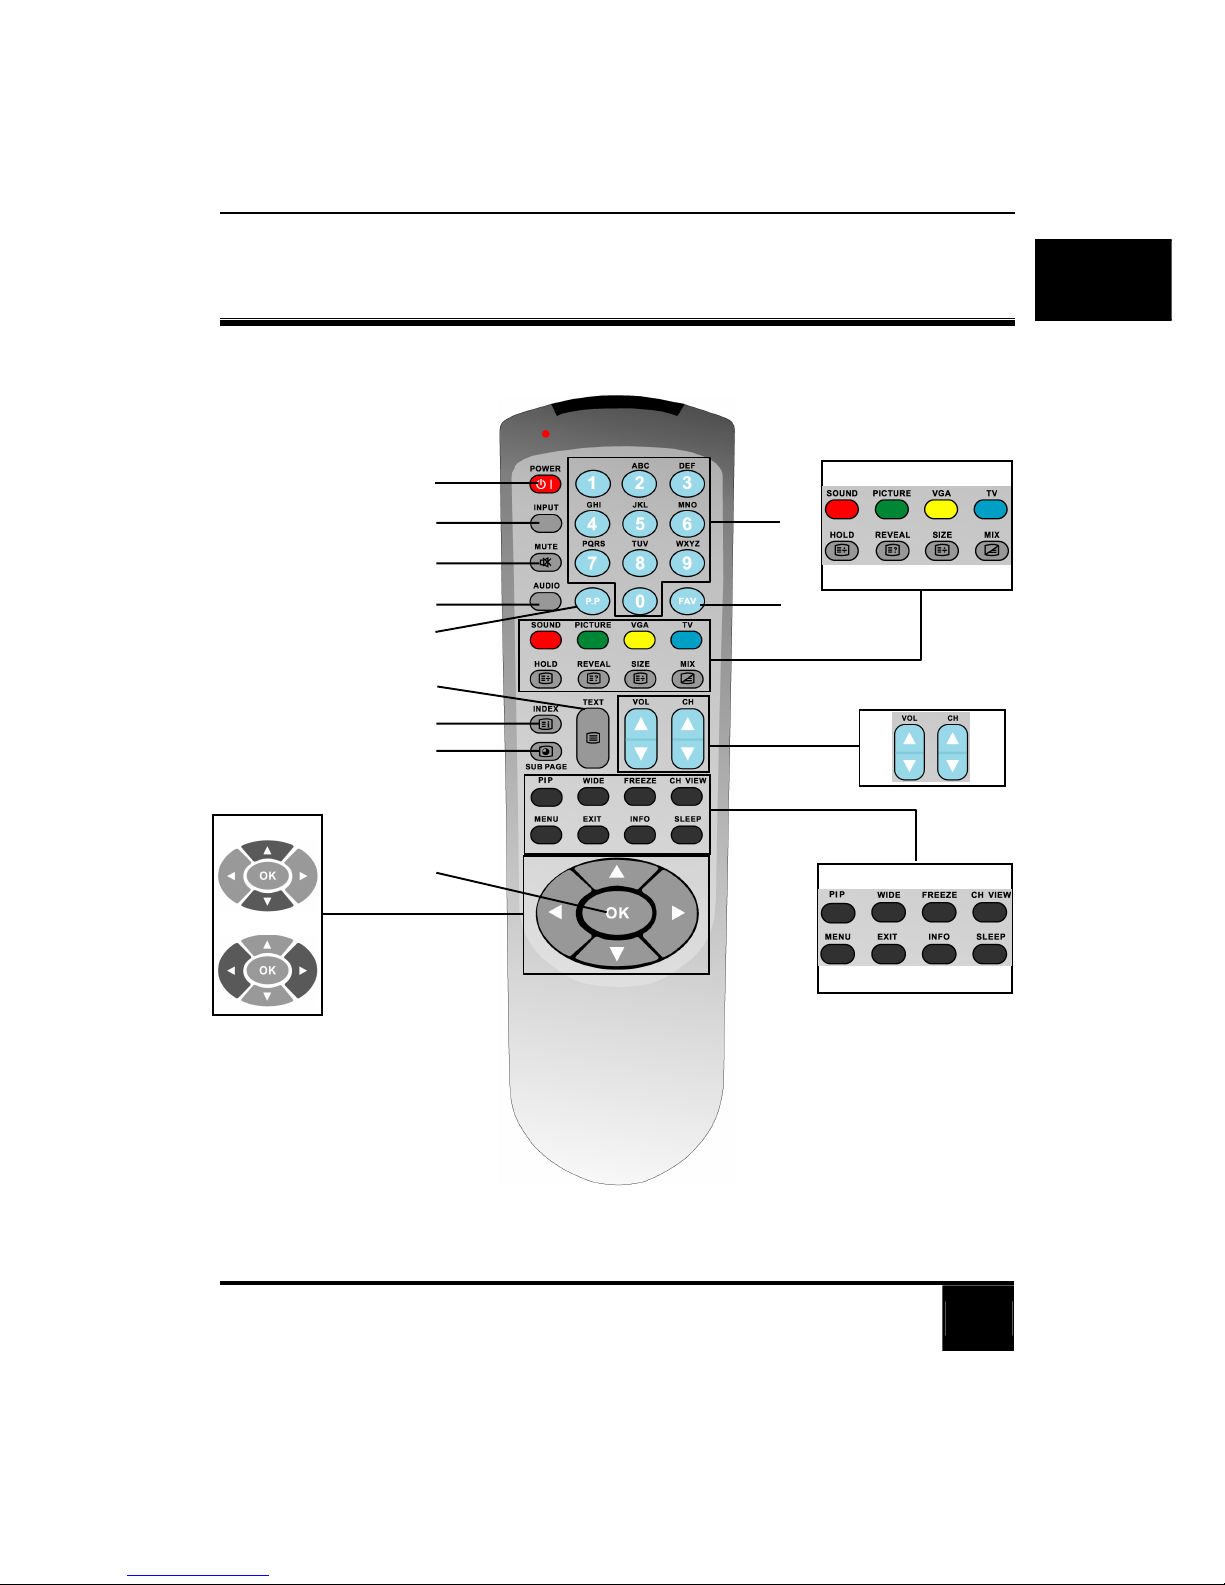
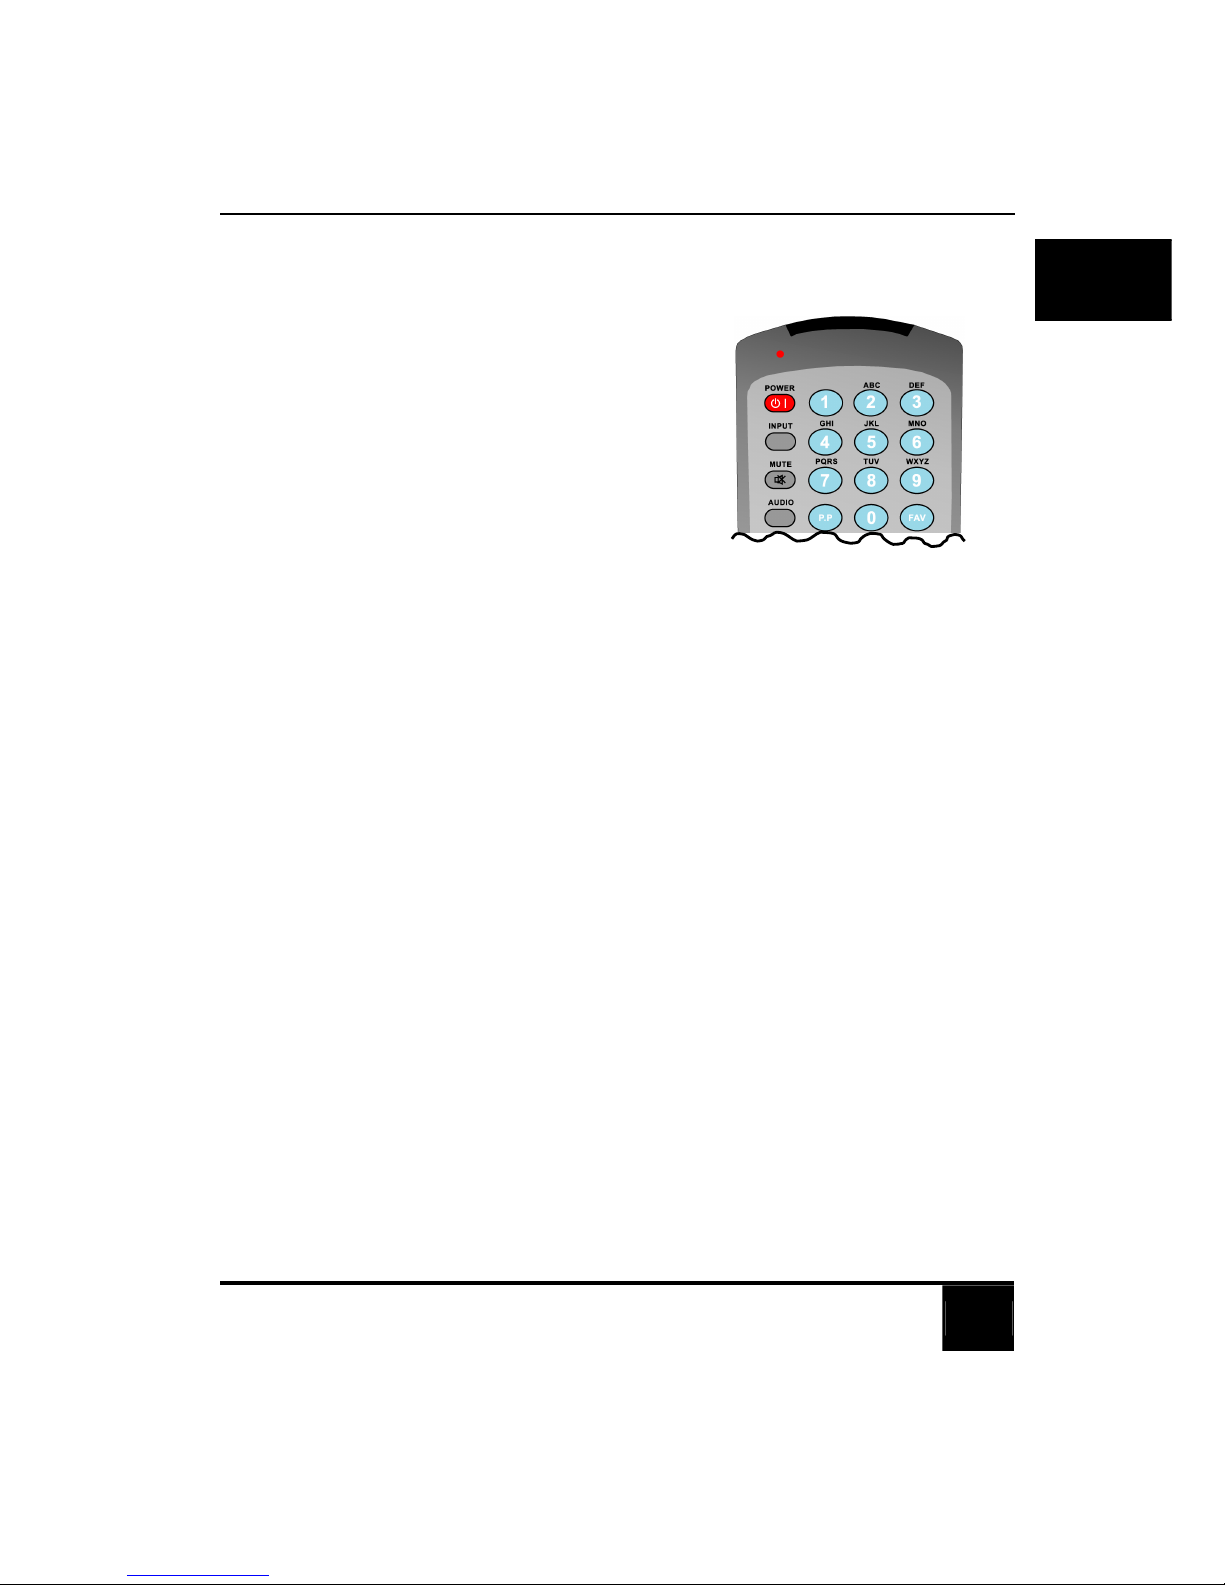
3 YOUR REMOTE CONTROL AT A GLANCE
30
31
2
3
5
6
16
17
18
29
4
7
8 9 10 11
12 13 14 15
21 22 23 24
25 26 27 28
19 20
1

Chapter 3 Your Remote Control At A Glance
12
English
ITEM NAME DESCRIPTION
1Power Turns the system ON / into Power.
2INPUT Changes the input source.
3MUTE Mutes or restores the sound volume.
4NUMBER PAD Selects a channel or enters a password.
5AUDIO Changes the audio output.
6P.P Recalls the last viewed channel (Previous Page/Previous
Programmed).
7FAV Displays the favorites feature for selecting programs from a list.
8SOUND Toggles the sound options; RED.
9PICTURE Toggles the picture options; GREEN.
10 VGA Changes the input source to VGA; YELLOW.
11 TV Changes the input source to TV; BLUE.
12 HOLD Temporarily holds the current teletext page.
13 REVEAL Displays hidden information.
14 SIZE Selects the size of the text in Teletext mode.
15 MIX Displays Teletext superimposed on top of the TV image.
16 TEXT Toggles ON/OFF Teletext mode.
17 INDEX Brings up the initial Teletext page.
18 SUB PAGE Turns ON/OFF the display of sub pages for Teletext.
19 VOL Increases/decreases the volume.
20 CH Changes the channel.
21 PIP Change to the PIP display Mode.
22 WIDE Selects the picture format (Panoramic, Zoom, 4:3, 16:9) that
best meets your viewing requirement.

Chapter 3 Your Remote Control At A Glance
13
English
23 FREEZE Freezes the display image.
24 CH VIEW Displays the channels in nine-square display
25 MENU Displays menus for TV and other options.
26 EXIT Exits from the on-screen display (OSD) or its menus.
27 INFO Shows the current status of your LCD TV, such as the video
input source and audio status.
28 SLEEP Turns on the sleep timer.
29 OK Works as the ENTER button.
30 UP / DOWN Navigates up and down in the OSD menus.
31 LEFT / RIGHT Navigates left and right in the OSD menus.

14
English
4 BASIC LCD TV SETUP
4-1 Connecting to the Aerial Antenna
Connect the outdoor aerial (antenna) cable lead or your cable TV box to the TUNER
(UHF/VHF-CATV) jack on the rear of your LCD TV using the supplied RF (coaxial) lead.
See 2-2 Rear view for location.
4-2 Using the Remote Control (Basic Operation)
Insert 2 x AAA batteries into the remote control.
Point the remote control towards the remote control sensor window located on the front
of your LCD TV. Make sure no objects are in the line of aim; otherwise, the remote
control may not operate properly.
Antenna cable

Chapter 4 Basic LCD TV Setup
15
English
4-3 Connect the power cable
1. Locate the power cable from the packaging, unwrap it, and plug the appropriate
end into the AC IN socket on the rear of the TV (at illustrated below).
2. Connect the other end into an appropriate wall power outlet, and switch it on (if
switched).
The type of power cable plug and socket illustrated may differ from the type
used in your region.
Only use an appropriate power cable for your region. Never use a power
cable, which appears damaged or frayed. Never change the plug type on a
power cable. Be aware of total loading when using extension cords or
multiple outlet power boards.
WARNING! This LCD TV has been en
g
ineered and manufactured with the hi
g
hest
priority on safely, however improper use can result in potential
electrical shock or fire hazard.
Power outlet
Power cable
Chapter 4 Basic LCD TV Setup
16
English
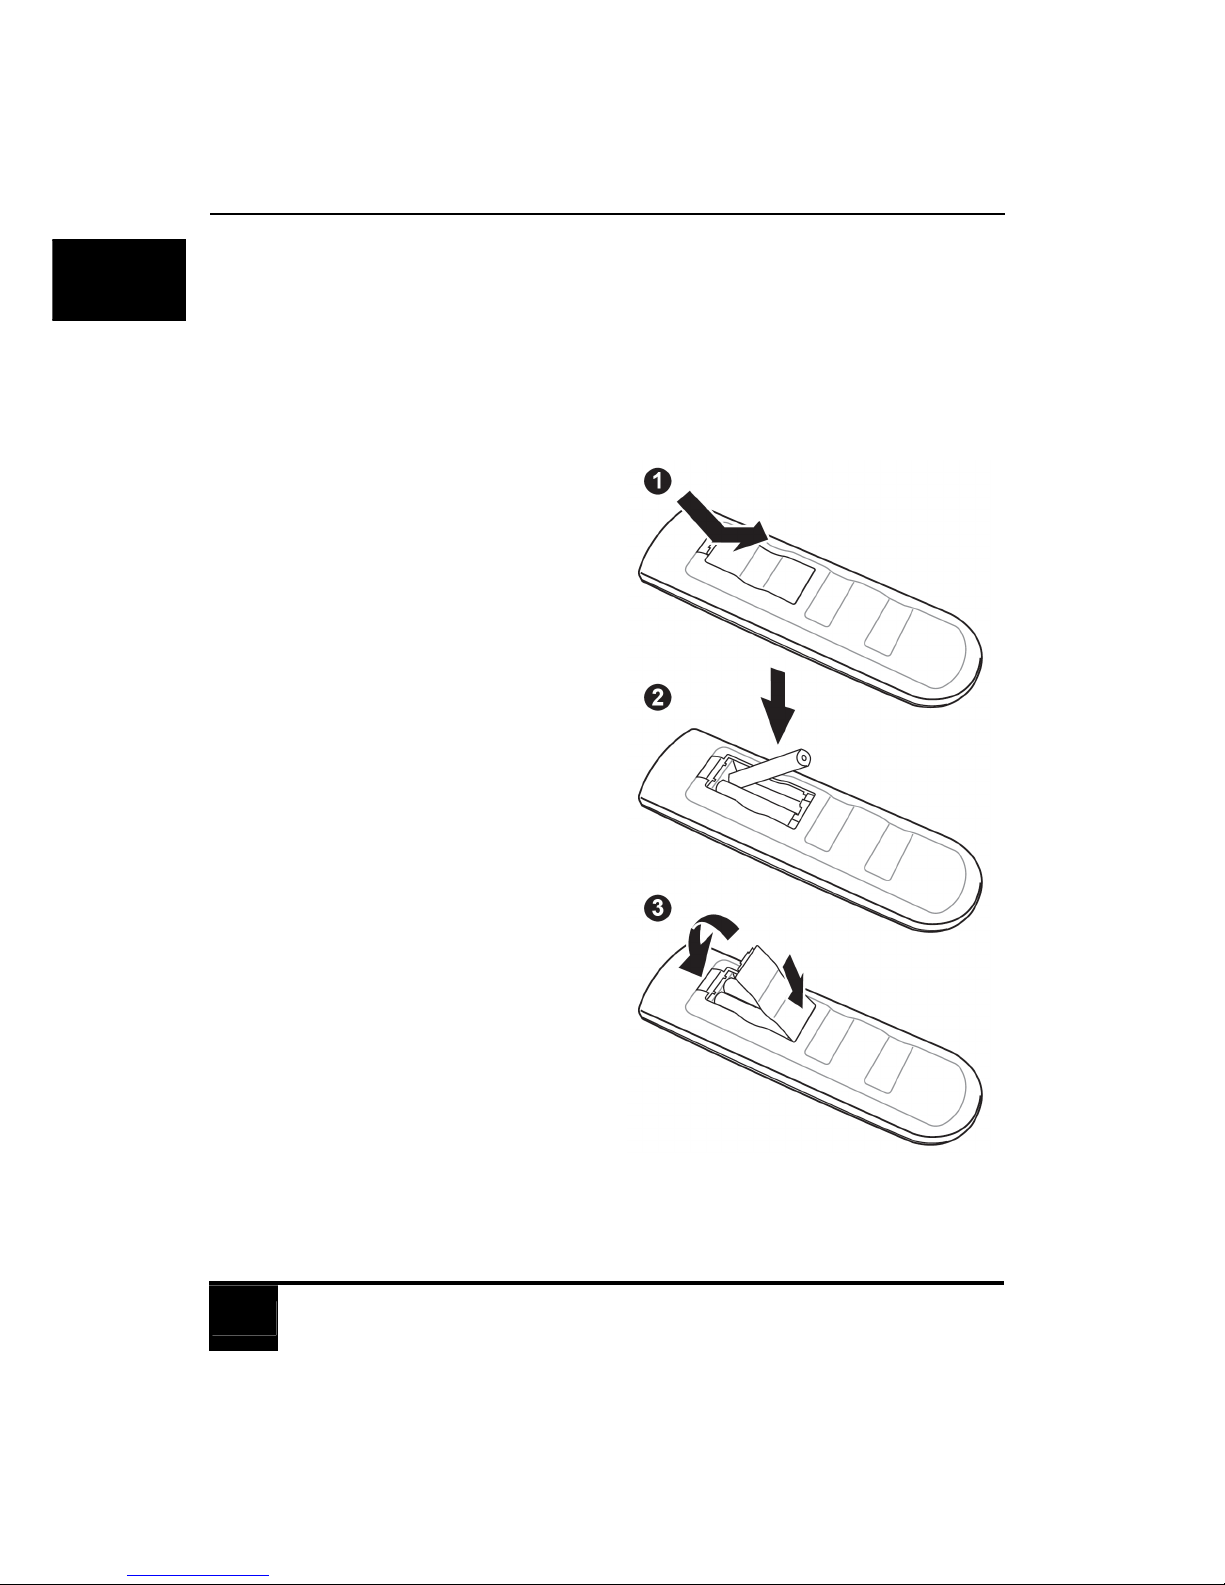
4-4 Inserting Batteries into the Remote Control
Before using the LCD TV set for the first time, insert two AAA batteries (supplied).
When the batteries become depleted and the remote control fails to operate, replace
the batteries with new batteries.
TO INSERT BATTERIES
1. Remove the battery cover on the
back of the remote control.
2. Insert two AAA batteries into the
remote control.
Make sure that you match the + and
- on the batteries with the + and -
symbols inside the battery
compartment.
3. Close the battery cover by aligning
it with the base of the remote control
and sliding it back into place.
Chapter 4 Basic LCD TV Setup
17
English
4-5 Turning ON the Power
Press the POWER button on the front of your LCD
TV (see 2-1 Control panel for location). The
status LED on the front turns green, and the unit
turns on.
- OR -
Press the POWER button on your remote control.
The status LED on the front turns green, and the
unit turns on.
WARNING! For added protection during a lightning storm or when it is left
unattended or unused for long periods of time, unplug your LCD TV
from the wall outlet and disconnect the aerial or cable system.
Chapter 4 Basic LCD TV Setup
18
English
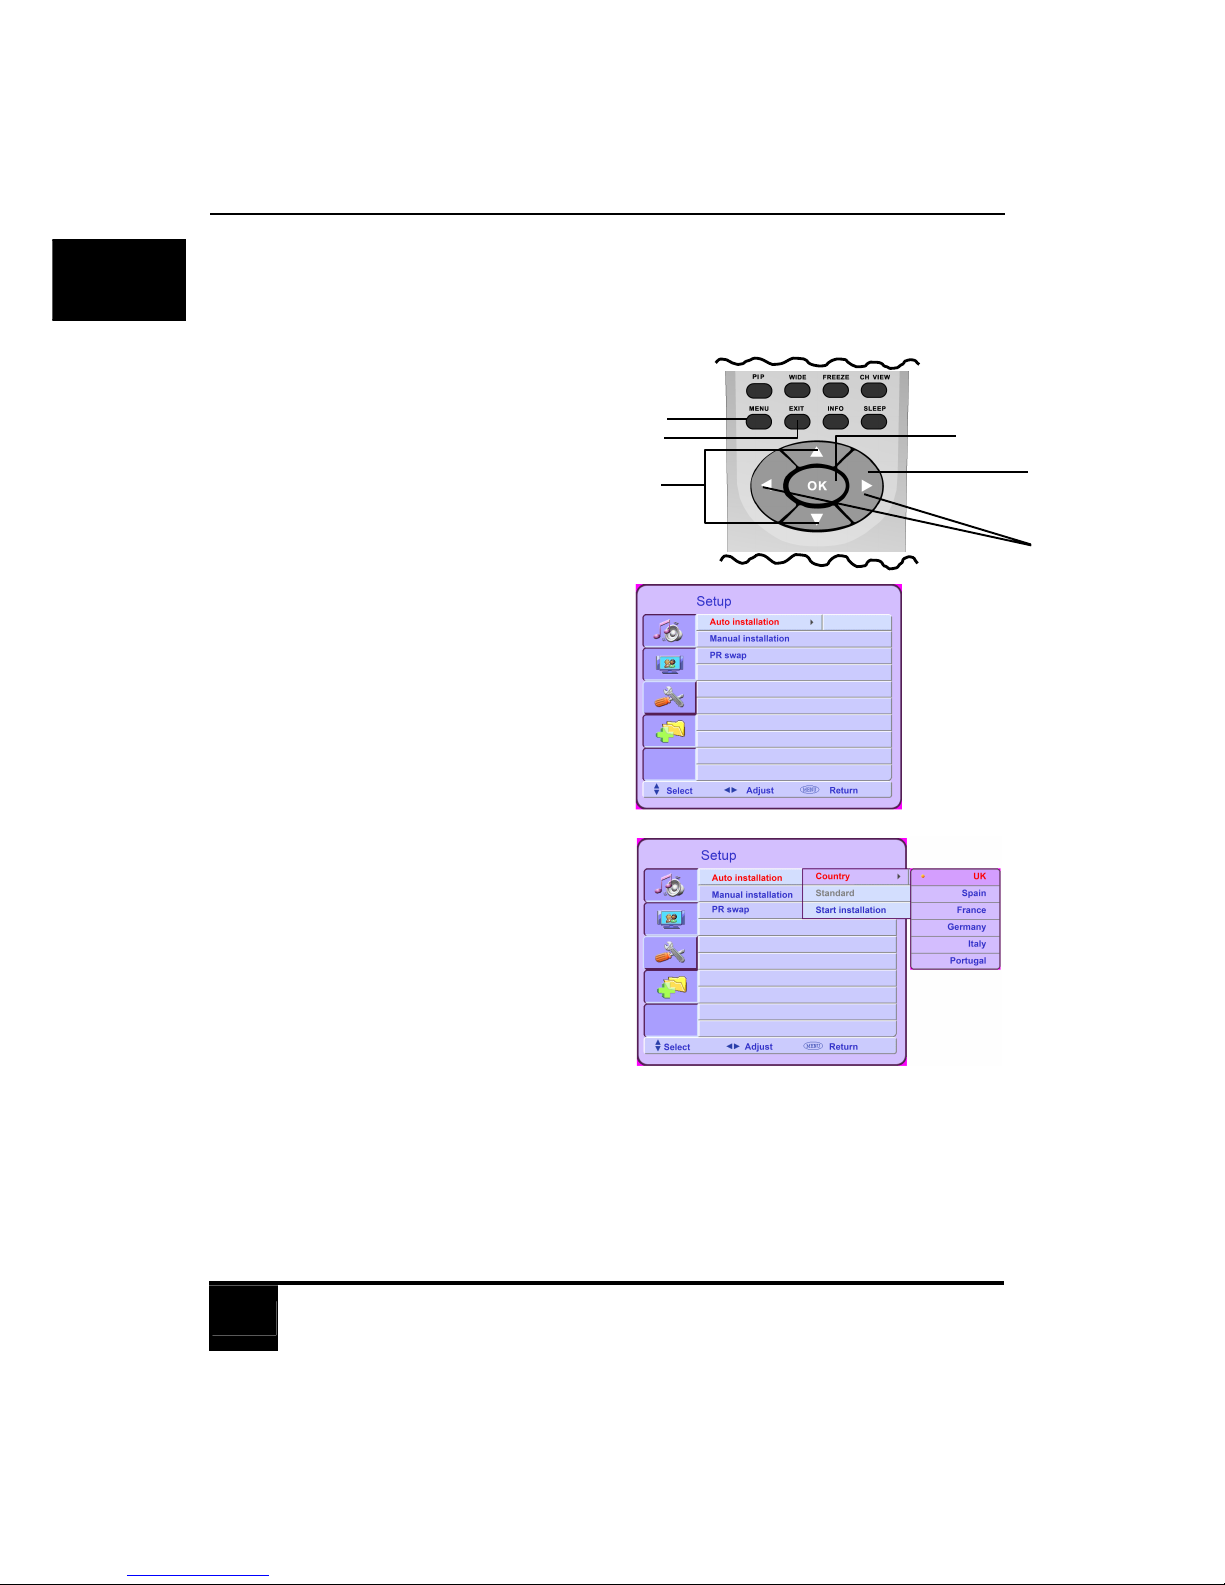
4-6 Tuning Channels Automatically (Auto installation)
Use this option to quickly add all channels that have a signal to the channel list.
1. Press the MENU button on the remote
control to open the OSD.
2. Press the S/Tbuttons to select Setup
Menu.
3. Press the Xbutton to open the menu.
4. Press the S/Tbuttons to select Auto
installation.
5. Press the Xbutton to open the Auto
installation submenu.
6. Press the Xbutton again to open the
Country menu.
7. Press the S/Tbuttons to highlight your
Country.
8. Press the W/Xbuttons to select your
country and press the OK button.
9. Press the EXIT button to return to the Auto
installation submenu.
10.Press the S/Tbuttons to select Start
installation.
11.Press the Xbutton to enter the sub menu.
12. Press S/Tbutton to highlight “YES”
and press OK button to confirm.
The LCD TV will search for all available channels. This will take a few minutes.
Once all available channels have been found, the tuning menu will disappear from your
TV screen. You will now need to sort the channels - to do this go to next page, “4-7
Programmed swap”.
1
2
4
7
10
12
3
5
6
11
8
8
12
9
Chapter 4 Basic LCD TV Setup
19
English
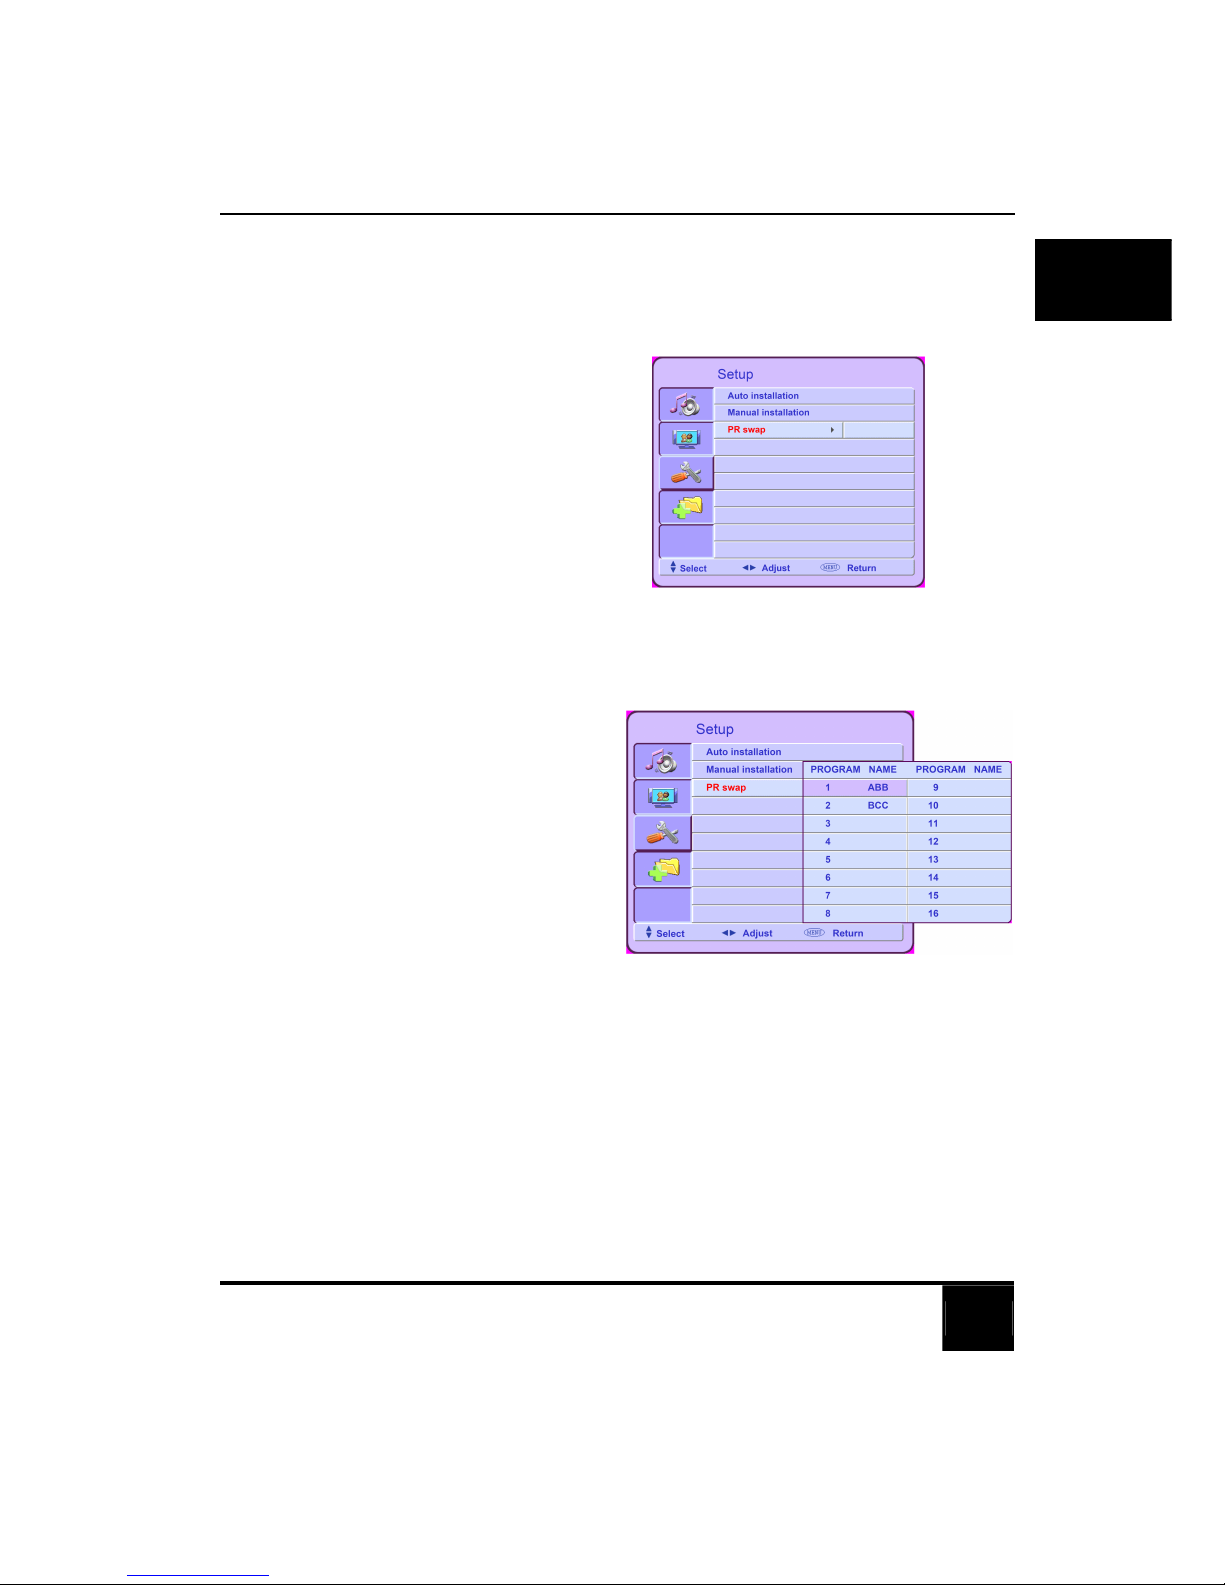
4-7 Programmed swap
To access the PR swap menu:
1. Press the MENU button. The Main Menu
will appear.
2. Press the S/Tbuttons to highlight Setup
Menu.
3. Press the Xbutton to open the menu.
4. Press the S/Tbuttons to highlight PR
swap.
5. Press the Xbutton to open the submenu.
To sort the channels so that, for example, ABB is stored as number “1”, follow the steps
below:
1. Press the S/Tbuttons to find your first
chosen channel e.g. ABB.
2. Press the OK button to highlight in
pink.
3. Press the S/Tbuttons to move the
channel to your selected position e.g.
“1”.
4. Press the OK button, and the channel
name will change from pink to white.
5. Repeat steps 1-4 for all the channels
you want to watch. When complete,
press the EXIT button repeatedly until
the menu disappears.
Now you will be able to select programmers using the number pad or the CH S/Tbuttons
on your remote control.
Chapter 4 Basic LCD TV Setup
20
English
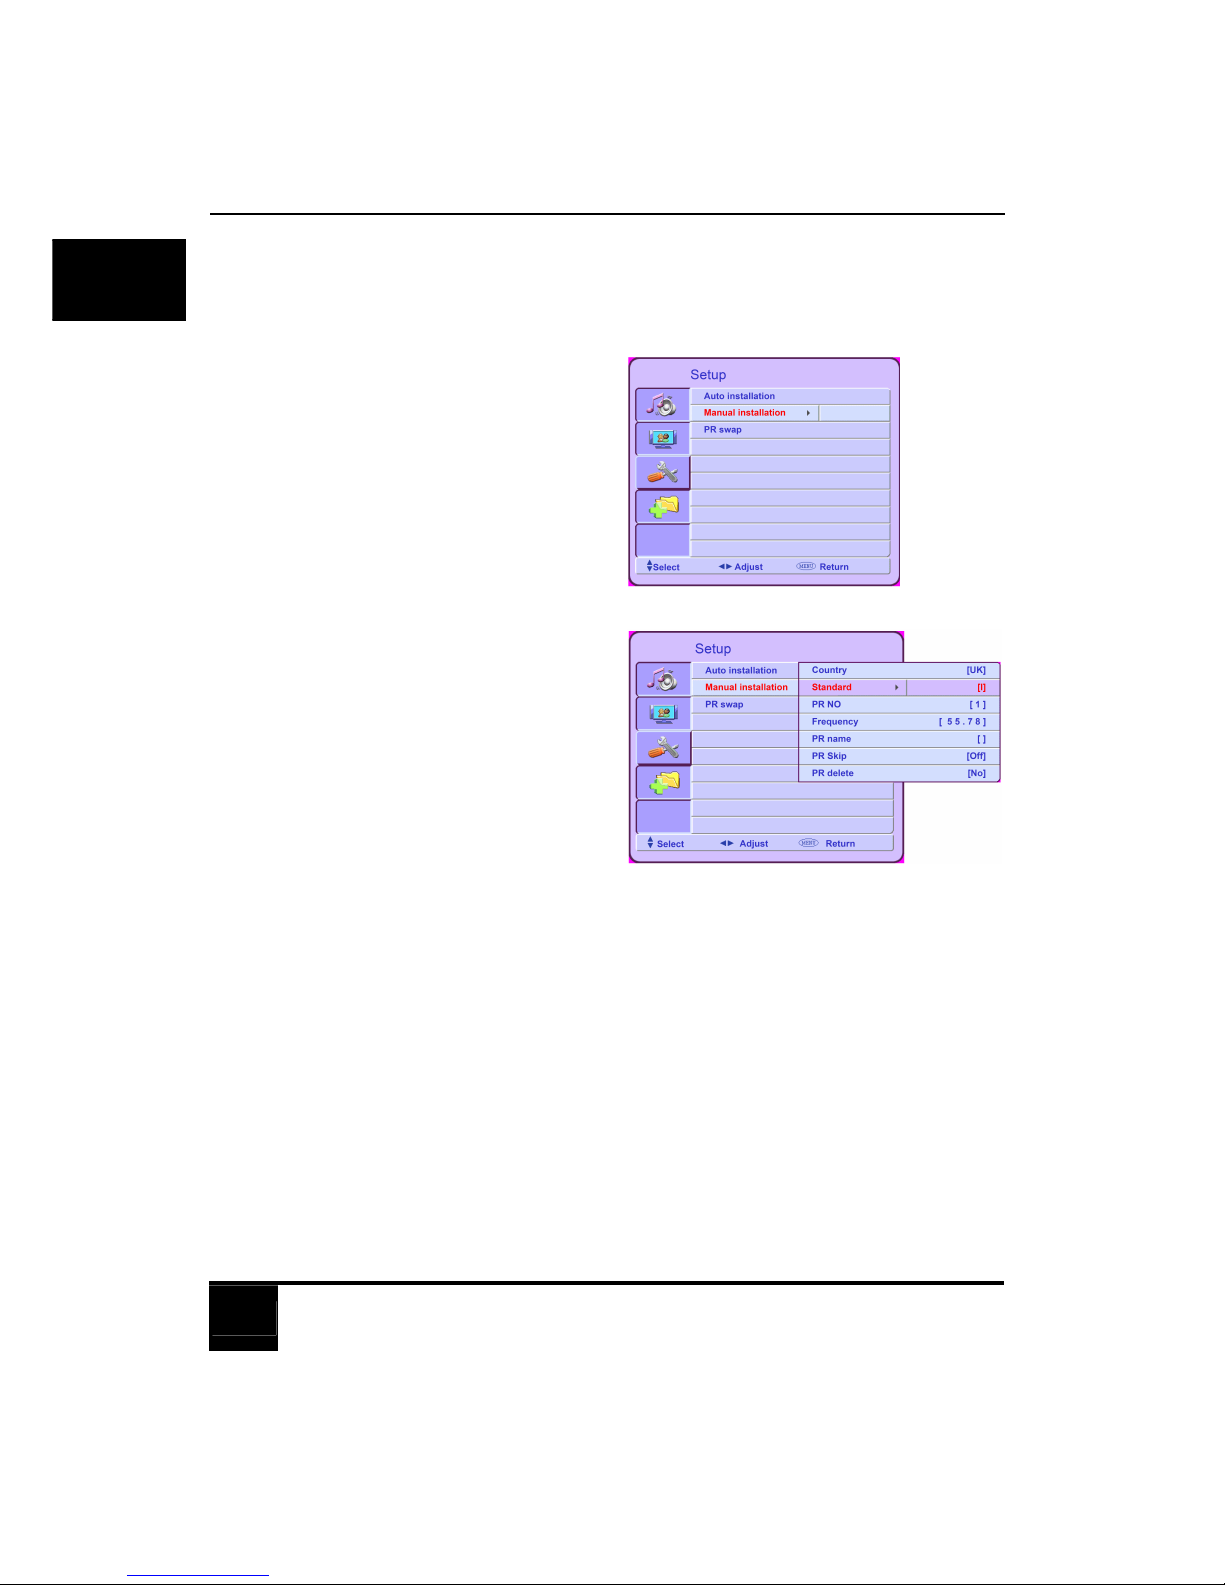
4-8 Tuning Channels Manually (Manual installation)
Use this option to add certain channels to the channel list.
1. Press the MENU button on the remote
control to open the OSD.
2. Press the S/Tbuttons to select Setup
Menu.
3. Press the Xbutton to open the menu.
4. Press the S/Tbuttons to select Manual
installation.
5. Press the Xbutton to open the submenu.
6. Press the S/Tbuttons to select the
method to use for search.
7. Use the Xbutton to select setting for the
method selected.
To change the settings for the channel
name or frequency, enter the numbers
and/or characters. Press the OK button
when finished.
8. Press the EXIT button to close the OSD.
Table of contents
Other Digimate LCD TV manuals


