Digital Life U2AUDIO7-1 User manual

External USB 7.1 Sound Box DigitalLife
U2AUDIO7-1
Version: V5.1
Operating Instruction
Bedienungsanleitung
Guide de l'utilisateur
Guía del usuario
Guida per l'uso
Support / Unterstützung / Soporte / Support / Supporto
EN: For warranty information, go to:
DE: Garantieinformationen finden Sie unter:
ES: Si desea obtener información sobre la garantía, visite:
FR: Pour consulter les informations sur la garantie, visitez:
IT: Per informazioni sulla garanzia, accedere a:
support@digitallife.shop

EN - Safety Measures
(1) If product has an exposed circuit board, do not touch the product under power. (2) If Class 1 Laser
Product. Laser radiation is present when the system is open. (3) Wiring terminations should not be made
with the product and/or electric lines under power.(4) Product installation and/or mounting should be
completed by a certified professional as per the local safety and building code guidelines.(5) Cables
(including power and charging cables) should be placed and routed to avoid creating electric, tripping or
safety hazards.
DE - Sicherheitsmaßnahmen
(1) Wenn beim Produkt eine Platine offen sichtbar ist, berühren Sie es nicht, wenn es unter Strom steht.
(2) Bei Laserprodukten der Klasse 1, ist Laserstrahlung bei einem offenen System vorhanden. (3) Die
Kabel sollten nicht terminiert werden, wenn das Produkt und/oder die elektrischen Leitungen unter
Strom stehen. (4) Die Installation und/oder der Aufbau von Produkten sollten gemäß der örtlichen
Sicherheits- und Gebäudecoderichtlinien von einem Experten durchgeführt werden. (5) Kabel
(einschließlich Strom- und Ladekabel) sollten ordnungsgemäß verlegt werden, um Gefahren in Hinblick
auf Strom, Stolpern oder Sicherheit zu verhindern.
ES - Medidas de Seguridad
(1) Si el producto tiene la tarjeta de circuitos expuesta, no lo toque si está conectado a la corriente. (2) Si
es un Producto Láser Clase 1, hay radiación por láser cuando el sistema esté abierto. (3) No se deben
hacer terminaciones de cableado cuando el producto y/o las líneas de electricidad estén con corriente. (4)
Un profesional con la debida certificación debe llevar a cabo el montaje o la instalación del producto,
según las directrices locales de seguridad y códigos de construcción. (5) Los cables (incluyendo los cables
de alimentación y carga) deben colocarse e instalarse para evitar peligros eléctricos, de seguridad o
tropiezos.
FR - Mesures de Sécurité
(1) Si l’un des circuits imprimés du produit est visible, ne pas touchez le produit lorsqu’il est sous tension.
(2) Si le produit est Laser de Classe 1, le rayonnement laser est présent lorsque le système est ouvert. (3)
Les terminaisons de câblâge ne doivent pas être effectuées lorsque le produit et/ou les câbles électriques
sont sous tension. (4) L’installation et/ou le montage du produit doit être réalisé par un professionnel
certifié et dans le respect des normes locales et du code de construction local. (5) Les câbles (y compris les
câbles d’alimentation et de chargement) doivent être placés et acheminés de façon à éviter tout risque
électrique, de chute ou de sécurité
IT - Misure di Sicurezza
(1) Se il prodotto ha un circuito stampato visibile, non toccare il prodotto quando è acceso. (2) Prodotto
laser di Classe 1. Quando il sistema è aperto sono presenti radiazioni laser. (3) I terminiali dei fili elettrici
non devono essere realizzate con il prodotto e/o le linee elettriche sotto tensione. (4) L’installazione e/o
il montaggio dei prodotti devono essere eseguiti da un tecnico professionale certificato che conosca le
linee guida locali sulle norme edilizie e sulla sicurezza.

External 7.1 USB Sound Card English
Model No.:U2AUDIO7-1
Introduction
This External USB Sound Card offers a high quality solution for upgrading desktop or laptop sound.
Providing a robust USB audio experience, the USB sound card connects to a host computer through a
single USB 2.0 connection, to deliver impressive external audio capability that can instantly be swapped
between systems, without having to open the computer case for installation. It supports analog and
digital audio for 2 to 7.1 channel audio applications.
Note: The S/PDIF optical pass-through port on the audio adapter supports 2-channel audio.
Packaging Contents
1 x USB Audio adapter
1 x USB A-B cable
1 x Software CD
1 x Instruction Manual
System Requirements
• An available USB port
• Windows® 10 / 8 / 7
Up-to-date operating instructions
Download the latest operating instructions from www.digitallife.shop or scan
the printed QR code.
Features
• Full 7.1 audio outputs via 3.5mm mini-jacks
• Optical S/PDIF input (pass through) and output
• Dual microphone input
• Built-in volume control buttons
• Full-duplex recording and playback
• Supports 44.1 and 48 KHz sampling rates for analog playback and recording or 48 KHz for SPDIF
Installation of the driver and connection
• Switch your computer on and wait until the operating system has finished booting.
• Place the CD included in the delivery in an appropriate drive on your computer.
• The software will then ask you to connect the U2AUDIO7-1 to the computer.
• Connect it using the USB cable enclosed to a free USB2.0 port on your computer or to a USB hub on a
USB hub with power adapter.
The U2AUDIO7-1 is a so-called high-power USB device and thus requires a current
exceeding 100mA. This means that the U2AUDIO7-1 will normally not work when it is
connected to a USB hub without a power adapter!
• The driver and software installation continues.
• The operating system may need to be restarted, after completing the installation!
• If your computer already has a sound card, you can switch between the installed sound card and the HD
Sound Box in the Windows Control Panel.
Normally, after connection to the computer, the U2AUDIO7-1 is the sound card that is preferred.

Tips & Notes
•At Window’s safe mode, the USB interface will not work (or it is limited to enabling the continued use
of a USB mouse / keyboard). The U2AUDIO7-1 cannot be used in this case.
•If necessary, select the correct sound card from the Windows Control Panel (internal sound card or
onboard sound or the U2AUDIO7-1). After connecting the U2AUDIO7-1 to the computer, it is normally
activated automatically and ready for use. The power LED lights up.
•The desired input (e.g. Line-In, Mic-In) must be selected in the Control Panel before it is possible to
record. For example, if you want to record using a microphone (or use a microphone for a voice function
in multi-player games), the microphone input must be selected in the Control Panel.
•With the sound recorder integrated in Windows, you can test the sound recording, adjust the
microphone recording level or check if the system settings are correct.
•To play back via all of the loudspeakers, the appropriate software (e.g. DVD player software) and
appropriate sources (e.g. films) are of course required.
Technical Specifications
Chipset ID C-Media - CM6206
Audio Specifications
8CH 16-bit DAC Channels (7.1 Surround Sound)
Supports 44.1 and 48 KHz sampling rates for analog playback and
recording or 48 KHz for SPDIF
3.5mm output connectors for Front, Surround, Rear, Centre/bass
Connector Type(s) 1 - USB B (4 pin) Female
External Ports 2 - Toslink (SPDIF, Optical) Female
8 - 3.5 mm Mini-Jack (3 Position) Female
OS Compatibility Windows® 10 / 8 / 7
Note The audio adapter’s SPDIF optical pass-through port supports
2-channel audio, this port does not support 5.1 or 7.1 audio.
LED Indicators 1 - Microphone Mute
1 – Power / Activity
Color Black
Dimension 100 x 65 x 22mm
Product Weight 85g
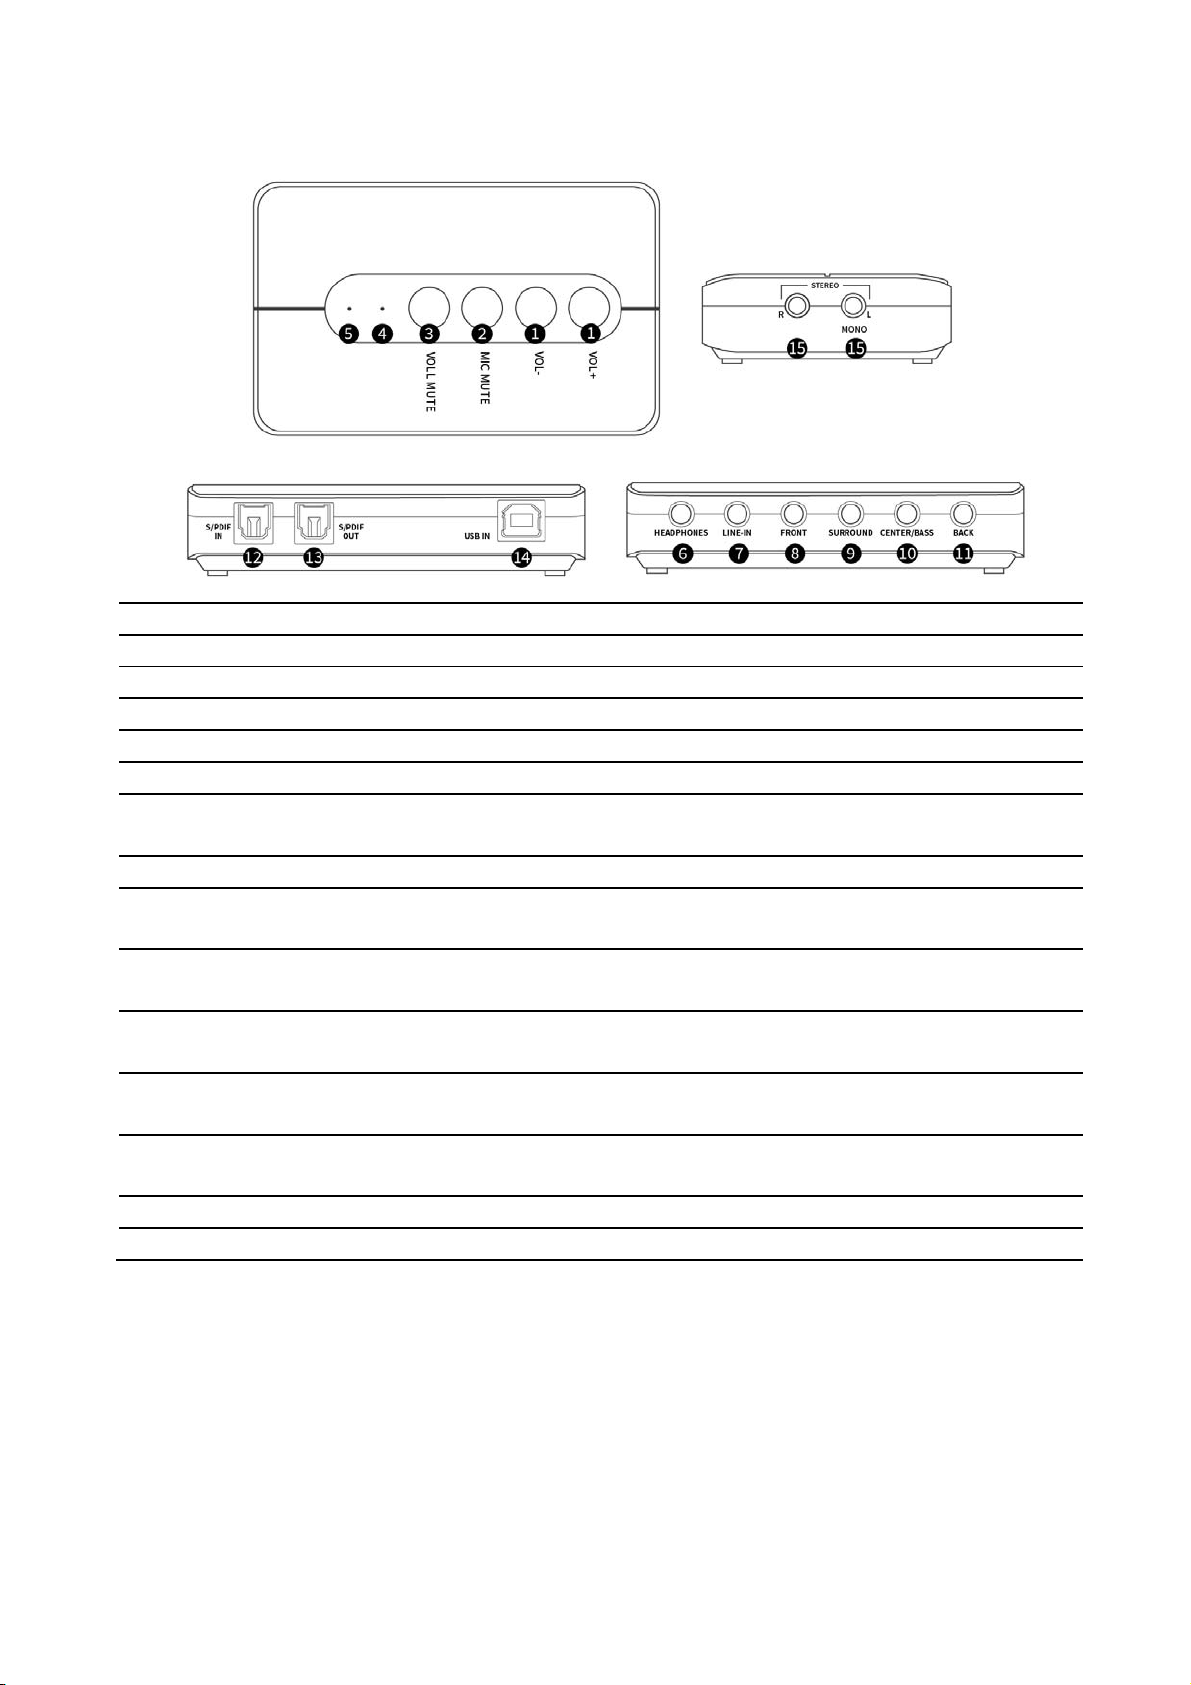
Product Preview
1. VOL+ / VOL- Increases or decreases audio output volume.
2. MIC Mute To mute/un-mute microphone.
3. VOL Mute To mute/un-mute audio outputs.
4. Mic Mute LED When the microphone inputs are muted, the light will turn on.
5. Power/ Activity LED The light will be on when the system is powered up.
6. HEADPHONES Connect to headphone.
7. LINE-IN Connect to tape/CD/DVD Player, or other audio sources for output
mixing and/or recording.
8. FRONT Connect to Front speakers (via external amplifier).
9. SURROUND Connect to Surround speakers while in 4/6/8 channel modes (via
external amplifier).
10. CENTER/ BASS Connect to Center/Bass speakers while in 6/8 channel modes (via
external amplifier).
11. BACK Connect to Rear speakers while in 8 channel mode (via external
amplifier).
12. S/PDIF IN Connect to the digital optical output of external audio device via a
Toslink cable. The signal only passes through to the S/PDIF OUT.
13. S/PDIF OUT Connect to the digital optical input of an external audio device via
a Toslink cable.
14. USB Connector Plugs into the system’s USB port.
15. MIC IN Mic (1) + Mic (2)

Externe USB Soundkarte mit SPDIF Didital Audio Deutsch
Model No.:U2AUDIO7-1
Dieser vielseitige externe USB Soundkarten pter ist die High-Quality-Lösung zum Aufrüsten Ihres
Desktop- oder Laptop-SoundsDie USB-Soundkarte bietet ein robustes USB-Audioerlebnis und wird einfach
an einen freien USB 2.0-Anschluss des Hostcomputers angeschlossen, um beeindruckende externes Audio-
Funktion zu bieten. Außerdem kann sie praktisch und schnell von einem System zum anderen umgesteckt
werden, ohne dass das Computergehäuse geöffnet werden muss.
Hinweis: Der optische SPDIF-Passthrough-Anschluss des Audioadapters unterstützt Zweikanal-Audio.
Verpackungsinhalt
• 1 x U2AUDIO7-1
• 1 x USB A-B-Kabel
• 1 x Software-CD
• 1 x Benutzerhandbuch
Systemanforderungen
• Ein freier USB-Anschluss
• Windows® 10 8 / 7
Aktualne Instrukcje obsługi
Pobierz najnowsze instrukcja ze strony http://www.digitallife.shop/ ub zeskanuj
kod QR. Postępowaćzgodnie z instrukcjami, podanymi na stronie internetowej.
Merkmale
■Alle 7.1-Audio-Ausgänge über 3,5-mm-Minibuchsen.
■Optische S/PDIF-Eingänge (durchgeschleift) und -Ausgänge
■Zwei Mikrofoneingänge
■Eingebaute Lautstärkeregler
■Vollduplex-Aufnahme und -Wiedergabe.
■Unterstützt Samplingraten von 44,1 und 48 KHz für analoge Wiedergabe und Aufzeichnung oder 48
KHz für SPDIF
Installation der Treiber, Anschluss
• Starten Sie Ihren Computer und warten Sie, bis das Betriebssystem vollständig geladen ist.
• Legen Sie dann die mitgelieferte CD in das entsprechende Laufwerk Ihres Computers ein.
• Die Software fordert Sie daraufhin auf, die USB-SoundBox mit dem Computer zu verbinden.
• Schließen Sie sie über das mitgelieferte USB-Kabel an einen freien USB2.0-Port Ihres Computers an oder
an den USB-Port eines USB-Hubs mit Netzteil.
Die USB-SoundBox benötigt als sog. Highpower-USB-Gerät einen Strom von mehr als
100 mA. Das bedeutet, dass die USB-Soundbox an einem USB-Hub ohne Netzteil
normalerweise nicht funktioniert!
•Die Treiber- und Software-Installation wird daraufhin fortgesetzt.
•Am Ende der Installation ist möglicherweise ein Neustart des Betriebssystems erforderlich.
•Wenn Ihr Computer bereits über eine Soundkarte verfügt (z.B. Onboard-Sound des Mainboards), so
kann bei Windows in der Systemsteuerung zwischen der bisherigen Soundkarte und der SoundBox
umgeschaltet werden.
Tipps & Hinweise
•Unter DOS oder im abgesicherten Modus von Windows funktioniert USB nicht (oder nur eingeschränkt
für USB-Tastatur/-Maus). Die U2AUDIO7-1 kann hier nicht betrieben werden.
•Wählen Sie ggf. in der Systemsteuerung von Windows die richtige Soundkarte aus (interne Soundkarte
bzw. Onboard-Sound bzw. die USB-SoundBox). Nach dem Anstecken der U2AUDIO7-1 an den Computer ist
diese normalerweise automatisch aktiviert und funktionsbereit. Die Power-LED leuchtet auf.
•Der gewünschte Eingang (z.B. Line-In, Mic-In) muss in der Systemsteuerung ausgewählt werden, bevor
hier eine Aufnahme erfolgen kann. Wenn Sie z.B. über Mikrofon eine Aufnahme machen wollen (oder
dieses für eine Sprachfunktion bei Multiplayer-Spielen nutzen möchten), so muss der Mikrofoneingang in
der Systemsteuerung ausgewählt werden.
•Mit dem bei Windows integrierten Audiorecorder können einfache Aufnahmeversuche gemacht werden,
um den Mikrofonpegel richtig einzustellen bzw. um zu überprüfen, ob die Einstellungen in der
Systemsteuerung richtig vorgenommen worden sind.
•Für die Wiedergabe über alle Lautsprecher ist natürlich eine dafür geeignete Software (z.B. DVD-
Abspielsoftware) und natürlich auch entsprechendes Quellmaterial (z.B. Filme) erforderlich.
Technische Spezifikationen
Chipset ID C-Media - CM6206
Audiospezifikationen
8 16-Bit-DAC-Kanäle (7.1 Surround-Sound)
Unterstützt Samplingraten von 44,1 und 48 KHz für
analoge Wiedergabe und Aufzeichnung oder 48 KHz für
SPDIF
3,5 mm Ausgangsanschlüsse für Front, Surround, Rear,
Center/Bass
Steckverbindertyp(en) 1 - USB B (4-polig) Buchse
Externe Ports 2 - Toslink (SPDIF, optisch) Buchse
8 - 3,5 mm Mini-Jack (3 Positionen) Buchse
Betriebssystemkompatibilität Windows® 10 / 8 / 7
LED-Anzeiger 1 - Mikrofon stumm
1 - Stromversorgung/Aktivität
Farbe Black
Produktdimension 100 x 65 x 22mm
Produktgewicht 85g
Marken und Urheberrechte
DigitalLife ist eine Marke oder eingetragene Marke von Shenzhen Shi QiHeng DianZi ShangWu YouXian
GongSi. Alle anderen Marken und eingetragenen Marken sind Eigentum der jeweiligen Rechteinhaber.

Produktvorschau
1. VOL+ / VOL- Erhöht oder verringert die Lautstärke des Audio-Ausgangs.
2. MIC Mute Drücken Sie diese Taste, um die Stummschaltung des Mikrofons
ein- oder auszuschalten.
3. VOL Mute Drücken Sie diese Taste, um die Stummschaltung des Audio-
Ausgangs ein- oder auszuschalten.
4. Mic Mute LED Wenn die Mikrofoneingänge stumm geschaltet sind, leuchtet
die LED.
5. Power/ Activity LED Die LED leuchtet, wenn das System eingeschaltet ist. Wenn
eine Aktivität erkannt wird, blinkt die LED.
6. HEADPHONES Schließen Sie Ihre Kopfhörer an.
7. LINE-IN Anschluss für Tonband/CD/DVD-Player oder andere
Audioquellen für die Ausgabe oder Aufzeichnung.
8. FRONT Anschluss für Frontlautsprecher (über externen Verstärker).
9. SURROUND Anschluss für Surround-Lautsprecher in 4/6/8-Kanal-Modi (über
externen V)erstärker).
10. CENTER/ BASS Anschluss für Center/Bass-Lautsprecher in 4/6/8-Kanal-Modi
(über externen Verstärker).
11. BACK Anschluss für Rück-Lautsprecher in 4/6/8-Kanal-Modi (über
externen Verstärker).
12. S/PDIF IN
Verbindung zum digitalen optischen Ausgang des externen
Audio-Geräts über Toslink-Kabel. Das Signal durchläuft nur
S/PDIF OUT.
13. S/PDIF OUT Verbindung zum digitalen optischen Eingang des externen
Audio-Geräts über Toslink-Kabel.
14. USB Connector Plugs into the system’s USB port.
15. MIC IN Mic (1) + Mic (2)
Tarjeta de Sonido 7.1 USB Español
N.º de Modelo:U2AUDIO7-1
Esta versátil Tarjeta de Sonido/Adaptador de Sonido USB Externo ofrece una solución de alta calidad que
permite actualizar el sonido de un ordenador portátil o de escritorio. Ofrece una excelente experiencia
de sonido USB. Una vez conectada a un ordenador principal mediante una única conexión USB 2.0, esta
tarjeta brinda una experiencia de sonido externo asombrosa con la ventaja de que se puede intercambiar
entre sistemas instantáneamente sin necesidad de abrir el gabinete del ordenador para la instalación.
Nota: El puerto pass-through por fibra óptica SPDIF del adaptador es compatible con audio de dos
canales, pero no con audio 5.1 o 7.1.
Contenido de la Caja
• 1 x U2AUDIO7-1
• 1 x Cable USB A-B
• 1 x Disco Compacto de Software
• 1 x Manual de Instrucciones
Requisitos del Sistema
• Un puerto USB disponible
• Windows ® 10 / 8 / 7
Instrucciones de funcionamiento actualizadas
Descargue las últimas instrucciones de funcionamiento de nuestro sitio web http://www.digitallife.shop/
o escanee el código QR impreso.
Características
■Salidas de audio 7.1 a través de mini-jacks de 3,5mm
■Entrada (pass through) y salida S/PDIF óptica
■Doble entrada de micrófono
■Botones de control de volumen incorporados
■Full-duplex para grabar y reproducir a la vez
■Es compatible con las frecuencias de muestreo 44,1KHz y 48KHz para
reproducción y grabación análoga, o 48KHz para SPDIF
Instalación del Software
Windows 7/8/10
1. Conecte el Adaptador de Sonido USB dentro de una ranura USB disponible.
2. Coloque el disco compacto con los controladores en la unidad CDROM. Haga clic en el botón Iniciar
(Start) sobre la barra de tareas y dé clic sobre Ejecutar (Run). Escriba “X: \setup.exe”. (Asumiendo que ha
colocado el disco compacto en la unidad CD-ROM, etiquetada como D)
3. Siga las instrucciones en la pantalla, para completar la instalación del software.
4. Reinicie su sistema. Una vez que ha reiniciado la computadora, el Adaptador de Sonido USB está ahora
listo para usarse.
5. Los parámetros de los Dispositivos de Audio y Sonido en el Panel de Control (o la aplicación) podrían
necesitar ser modificados para hacer que el Adaptador de Sonido USB sea el dispositivo de audio
predeterminado, antes de dar salida a cualquier audio.

Vista Previa del Producto
1. VOL+ / VOL- Incrementa o disminuye el volumen de la salida (output) de audio.
2. MIC Mute Presione este botón para silenciar/no silenciar el micrófono.
3. VOL Mute Presione este botón para silenciar/no silenciar las salidas
(outputs) de audio
4. Mic Mute LED Cuando las entradas (inputs) del micrófono son silenciadas, la luz
se encenderá.
5. Power/ Activity LED La luz se encenderá cuando el sistema sea encendido. La luz
parpadearácuando se detecte actividad.
6. HEADPHONES Conectar al auricular
7. LINE-IN Conectar al Reproductor de cassette/CD/DVD u otras fuentes de
audio, para la mezcla de salida y/o grabar.
8. FRONT Conectar a los altavoces frontales (vía amplificador externo).
9. SURROUND Conectar a los altavoces de sonido envolvente, mientras se está en
los modos de canal 4/6/8 (vía amplificador externo).
10. CENTER/ BASS Conectar a los altavoces graves/centro, mientras se está en los
modos de canal 6/8 (vía amplificador externo).
11. BACK Conectar a los altavoces traseros, mientras se está en el modo de
canal 8 (vía amplificador externo).
12. S/PDIF IN
Conectar a la salida (output) óptica digital del dispositivo de audio
externo, a través de un cable Toslink. La señal sólo pasa a través
de S/PDIF OUT.
13. S/PDIF OUT Conectar a la entrada (input) óptica digital de un dispositivo de
audio externo, a través de un cable Toslink.
14. USB Connector Se conecta al puerto USB del sistema.
15. MIC IN Mic (1) + Mic (2)

Especificaciones Técnicas
ID del Conjunto de Chips C-Media - CM6206
Especificaciones de
Audio
8 canales DAC de 16 bits (sonido envolvente 7.1)
Es compatible con las frecuencias de muestreo 44,1KHz y 48KHz
para reproducción y grabación análoga, o 48KHz para SPDIF
Conectores de 3,5mm para el sonido de la parte frontal,
envolvente, posterior y centro/bajo
Tipo(s) de Conector(es) 1 - USB B (4 pines) Hembra
Puertos Externos 2 - Toslink (SPDIF, fibra óptica) Hembra
8 - Enchufe mini-
j
ack de 3,5mm (3 posiciones) Hembra
Compatibilidad OS Windows® 10 / 8 / 7
Nota
El puerto pass-through por fibra óptica SPDIF del adaptador es
compatible con audio de dos canales, pero no con audio 5.1 o
7.1.
Indicadores LED 1
–
Encendido / Actividad
1 - Silenciador de Micrófono
Color Black
Dimensión del producto 100 x 65 x 22mm
Peso del Producto 85g
Derechos de Autor y Marcas
DigitalLife es una marca registrada de Shenzhen Shi QiHeng DianZi ShangWu YouXian GongSi y/o sus
filiados. Todas las demás marcas comerciales y marcas comerciales registradas son propiedad de sus
respectivos propietarios.
Adaptateur Audio USB 7.1 Français
Modèle N°:U2AUDIO7-1
Cette carte son USB externe, adaptateur audio polyvalent offre une solution de haute qualité pour la
mise à niveau du système sonore d'un ordinateur de bureau ou portable. La carte son USB offre une riche
expérience audio USB; elle se connecte à un ordinateur hôte via une simple connexion USB 2.0. Cette
solution fournit une capacité audio externe impressionnante qui peut s’installer instantanément sur des
systèmes, sans avoir à ouvrir le boîtier de l’ordinateur.
Remarque : Le port SPDIF optique pass-through de l’adaptateur audio prend en charge l’audio à deux
canaux ; ce port ne prend pas en charge l’audio 5.1 ou 7.1.
Cntenu de l’Emballage
• 1 x U2AUDIO7-1
• 1 x Câble USB A-B
• 1 x CD Logiciel
• 1 x Manuel d’instruction
Configuration Requise
• Port USB disponible
•Windows® 10 / 8 / 7
Mode d'emploi actualisé
Téléchargez les instructions actualisées du mode d'emploi via le lien http://www.digitallife.shop/ ou
scannez le code QR illustré.
Caractéristiques
■Sorties audio 7.1 complètes via Mini-Jack 3,5 mm
■Entrée (passthrough) et sortie S/PDIF optique
■Boutons intégrés pour le contrôle du volume
■Enregistrement et lecture en mode duplex complet
■Prend en charge les taux d'échantillonnage 44,1 et 48 KHz pour la lecture
ou l'enregistrement analogiques ou 48 KHz pour le SPDIF
Installation des pilotes, raccordement
•Démarrez votre ordinateur et attendez jusqu’à ce que le système d'exploitation soit complètement
chargé.
•Insérez ensuite le CD joint dans le lecteur correspondant de votre ordinateur.
•Le logiciel vous demandera ensuite de raccorder la U2AUDIO7-1 à l'ordinateur.
•Raccorder celle-ci à un port USB2.0 libre de votre ordinateur ou à un port USB d'un concentrateur USB
avec bloc d’alimentation en utilisant le câble USB fourni.
En tant qu’appareil USB de haute puissance, la U2AUDIO7-1 nécessite un courant de plus
de 100 mA. Ce qui signifie que la U2AUDIO7-1 ne peut normalement pas fonctionner
lorsqu’il est raccordé à un concentrateur USB sans bloc d’alimentation !
• L’installation des pilotes et du logiciel est alors poursuivie.
• Après l´installation, il faut, le cas échéant, redémarrer le système d’exploitation.
• Si votre ordinateur dispose déjà d’une carte son (par ex. carte son onboard de la carte mère), cela vous permet, avec
Windows par ex., de commuter dans le Panneau de configuration entre l’ancienne carte son et la U2AUDIO7-1.

Conseils et Indications
•Normalement, USB ne fonctionne pas sous DOS ou en mode sécurisé de Windows (ou uniquement de
façon limitée pour le clavier et la souris USB). La SoundBox USB ne peut pas être utilisée ici.
•Choisissez, si nécessaire, dans le panneau de configuration de Windows la carte son correcte (carte son
interne ou carte son Onboard ou SoundBox USB). Après le raccordement de la SoundBox USB à
l’ordinateur, celle-ci est normalement active automatiquement. La LED d’alimentation s’allume.
•Sélectionner l’entrée souhaitée (par ex. Line-In, Mic-In) dans le Panneau de configuration, avant
d’effectuer tout enregistrement. Si vous souhaitez par ex. effectuer un enregistrement à l’aide du
microphone (ou d’utiliser ce dernier pour une fonction vocale dans des jeux multijoueurs), l’entrée
microphone doit alors être sélectionnée dans le Panneau de configuration.
•Avec l’enregistreur audio intégré dans Windows, vous pouvez effectuer des essays d’enregistrement
afin de régler le volume du microphone ou afin de vérifier si les réglages dans le panneau de
configuration ont été correctement effectués.
•Un logiciel (par ex. un logiciel de lecture de DVD) et le bien sûr le matériel source (par ex. Des films)
sont requis pour pouvoir effectuer une lecture sur tous les haut-parleurs.
Spécifications Techniques
ID du chipset C-Media
–
CM6206
Spécifications audio
1. 8 canaux DAC à 16 bits (son surround 7.1)
2. Prend en charge les taux d’échantillonnage 44,1 et 48 KHz pour
la lecture et l’enregistrement analogiques ou 48 KHz pour le SPDIF
3. Connecteurs de sortie 3,5 mm pour enceintes avant, surround,
arrière et ncorpo/caisson de graves
Types de connecteur 1
–
USB B (4 broches) Femelle
Ports externes 2
–
Toslink (SPDIF , optique) Femelle
8
–
Mini-
j
ack 3,5 mm (3 positions) Femelle
Compatibilité système
d’exploitation Windows® 10 / 8 / 7
Remarque
Le port SPDIF optique pass-through de l’adaptateur audio prend
en charge l’audio à deux canaux ; ce port ne prend pas en charge
l’audio 5.1 ou 7.1.
Indicateurs lumineux 1
–
Alimentation/activité
1 – Désactivation du microphone
Couleur Black
Dimension du produit 100 x 65 x 22mm
Poids du produit 85g
Droit des Qarques et Droit d'auteur
DigitalLife est une marque déposée d' Shenzhen Shi QiHeng DianZi ShangWu YouXian GongSi et/ou de
ses filiales. Tous les autres droits d'auteur et marques sont la propriété de leursauteurs respectifs.

Aperçu du produit
1. VOL+ / VOL- Augmente ou diminue le volume de sortie audio.
2. MIC Mute Appuyez sur ce bouton pour désactiver/activer le microphone.
3. VOL Mute Appuyez sur ce bouton pour désactiver/activer les sorties audio.
4. Mic Mute LED Lorsque les entrées microphone sont désactivées, la lumière
s’allume.
5. Power/ Activity LED La lumière s’allume lorsque le système est en fonctionnement. La
lumière clignote lorsqu’une activité est détectée.
6. HEADPHONES Connecter un casque.
7. LINE-IN Connecter un lecteur Cassette/CD/DVD, ou d’autres sources audio
pour un Mixage de sortie et/ou l’enregistrement.
8. FRONT Connecter un haut-parleur avant (via un amplificateur externe).
9. SURROUND Connecter des haut-parleurs Surround en mode 4/6/8 canaux (via un
amplificateur externe).
10. CENTER/ BASS Connecter alors que des hautparleurs Centre / Basses en mode 6/8
canaux (via un amplificateur externe).
11. BACK Connecter des haut-parleurs arrière en mode 8 canaux (via un
amplificateur externe).
12. S/PDIF IN Connectez la sortie numérique optique de l’appareil audio externe
via un câble Toslink. Le signal ne passe que par le S/PDIF OUT.
13. S/PDIF OUT Connectez l’entrée numérique optique d’un appareil audio externe
via un câble Toslink.
14. USB Connector Se branche sur le port USB du système.
15. MIC IN Mic (1) + Mic (2)

Scheda Audio 7.1 USB Esterna Italiano
Modello N.:U2AUDIO7-1
Grazie alla SoundBox USB potete godervi la vostra collezione di musica e video con il sourround 7.1. Il
collegamento avviene semplicemente tramite una porta USB disponibile. Grazie all'elevato numero di
ingressi e uscite potete collegare in modo semplice dispositivi audio quali microfoni, strumenti musicali,
impianti stereo, amplificatori o altoparlanti attivi e quindi espandere ulteriormente il vostro PC o
notebook che diventerà una centralina multimediale.
Nota: La porta pass-through ottica SPDIF dell’adattatore audio supporta audio a due canali; questa porta
non supporta audio 5.1 o 7.1.
Incluso nella consegna
• Adattatore USB ad audio
• Cavo USB
• CD di installazione
• Manuale di istruzioni
System Requirements
• An available USB port
• Windows® 10 / 8 / 7
Istruzioni per l’uso Aggiornate
Aprire il sito internet http://www.digitallife.shop/ in un browser od
effettuare la scansione del codice QR raffigurato sulla destra.
Caratteristiche
■Output audio a 7.1 canali tramite mini-jack da 3,5 mm
■Ingresso e uscita S/P-DIF ottico (pass through)
■Doppio ncorpo microfono
■Pulsanti controllo volume ncorporate
■Registrazione e riproduzione Full Duplex
■Supporta velocità di campionamento comprese tra 44,1 e 48 KHz per la registrazione e la riproduzione
in analogico o 48 KHz per SPDIF
Driver Installation
1. Plug the USB Sound Adapter into an available USB port.
2. Place the Driver CD into the CD-ROM drive. Click the Start button on the taskbar and click Run. Type
“X: \Setup.exe”. (Assuming you have placed the CD in CD-ROM drive labeled as D).
3. Follow the on-screen instructions to complete the software installation.
4. Restart your system. Once you have rebooted the computer, the USB Sound Adapter is now ready to be
used.
5. The Sound and Audio Devices settings in Control Panel (or the application) may need to be changed to
make the USB Sound Adapter the default audio device before it outputs any audio.

Anteprima del Prodotto
1. VOL+ / VOL- Press this button to mute/un-mute audio outputs.
2. MIC Mute Press this button to mute/un-mute microphone.
3. VOL Mute Increases or decreases audio output volume.
4. Micr Mute LED When the microphone inputs are muted, the light will turn on.
5. Power/ Activity LED The light will be on when the system is powered up. The light will
blink when activity is detected.
6. HEADPHONES Connect to headphone.
7. LINE-IN Connect to tape/CD/DVD Player, or other audio sources for output
mixing and/or recording.
8. FRONT Connect to Front speakers (via external amplifier).
9. SURROUND Connect to Surround speakers while in 4/6/8 channel modes (via
external amplifier).
10. CENTER/ BASS Connect to Center/Bass speakers while in 6/8 channel modes (via
external amplifier).
11. BACK Connect to Rear speakers while in 8 channel mode (via external
amplifier).
12. S/PDIF IN Connect to the digital optical output of external audio device via a
Toslink cable. The signal only passes through to the S/PDIF OUT.
13. S/PDIF OUT Connect to the digital optical input of an external audio device via
a Toslink cable.
14. USB Connector Plugs into the system’s USB port.
15. MIC IN Mic (1) + Mic(2)
Specifiche Tecniche
Chipset ID C-Media - CM6206
Specifiche audio
8 canali DAC a 16 bit (tecnologia audio surround 7.1)
Supporta velocità di campionamento comprese tra 44,1 e 48
KHz per la registrazione e la riproduzione in analogico o 48
KHz per SPDIF
Connettori di uscita da 3,5 mm per i diffusori anteriore,
posteriore, surround, centrale/bassi
Tipo/i connettori 1 - USB B (4 pin) Femmina
Porte esterne 2 - Toslink (SPDIF, ottico) Femmina
8 - Mini-
j
ack da 3,5 mm (3 posizioni) Femmina
OS Compatibility Windows® 10 / 8 / 7
LED Indicators 1 - Microphone Mute
1 - Power/Activity
Colore Black
Dimensione prodotto 100 x 65 x 22mm
Peso prodotto 85g
Incluso nella
confezione
1 - Adattatore USB ad audio
1 - Cavo USB
1 - CD di installazione
1 - Manuale di istruzioni
Copyright e Marchi Registrati
DigitalLife è un marchio registrato di Shenzhen Shi QiHeng DianZi ShangWu YouXian GongSi e/o delle
sue affiliate. Tutti gli altri marchi registrati o non registrati citati nel presente documento sono di
proprietà esclusiva dei rispettivi titolari.

JOIN
DigitalLife
AS DISTRIBUTOR/RESELLER
Please feel free write your Willings to
http://www.digitallife.shop/
You WIN From Cooperation with DigitalLife
1. Order as Amazon Business Membership - Saving More
2. DigitalLife secure order with DDP Terms shipment at UK, and Germany.
3. DigitalLife can present compulsory documents: CE/ROHS/FCC Certificates.
DigitalLife is confident of that you can do more professional business locally
Importer / Importeure / Importadores / Importateur / Importatori
Shenzhen Shi QiHeng DianZi ShangWu YouXian GongSi
Manufacturer / Hersteller/ Fabricante/ Fabricant
Fly Kan Tech Co., Ltd (HK)
FCC Statement
This equipment has been tested and found to comply with the limits for a Class B digital device, pursuant
to part 15 of the FCC Rules. These limits are designed to provide reasonable protection against harmful
interference in a residential installation. This equipment generates, uses and can radiate radio frequency
energy and, if not installed and used in accordance with the instructions, may cause harmful interference
to radio communications. However, there is no guarantee that interference will not occur in a particular
installation. If this equipment does cause harmful interference to radio or television reception, which can
be determined by turning the equipment off and on, the user is encouraged to try to correct the
interference by one or more of the following measures:
(1) Reorient or relocate the receiving antenna. (2) Increase the separation between the
equipment and receiver. (3) Connect the equipment into an outlet on a circuit different
from that to which the receiver is connected. (4) Consult the dealer or an experienced
radio/ TV technician for help.
This device complies with part 15 of the FCC Rules. Operation is subject to the following two conditions:
(1) This device may not cause harmful interference. 2) This device must accept any interference received,
including interference that may cause undesired operation.
Any changes or modifications not Expressly approved by the party responsible for compliance could void
the user’s authority to operate the equipment.
Disposal of Old Electrical & Electronic Equipment (Applicable in the European Union and other European
countries with separate collection systems).
This symbol on the product or on its packaging indicates that this product shall not be
treated as household waste. Instead it shall be handed over to the applicable collection point
for the recycling of electrical and electronic equipment. By ensuring this product is disposed
of correctly, you will help prevent potential negative consequences for the environment and
human health, which could otherwise be caused by inappropriate waste handling of this product. The
recycling of materials will help to conserve natural resources. For more detailed information about
recycling of this product, please contact your local Civic Office, your household waste disposal service or
the shop where you purchased the product.
The product carries the CE Mark
This is a class B product. In a domestic environment, this product may cause radio
interference, in which case the user may be required to take adequate measures.

DigitalLife®
E: support@digitalife.shop
W: www.digitallife.shop
Other manuals for U2AUDIO7-1
2
Table of contents
Languages:


