Dogtrace DOG GPS X30 User manual

Dogtrace GPS
APP FOR
ANDROID
GPS TRACKING SYSTEM
SISTEMA DI LOCALIZZAZIONE GPS
GPS SYSTÈME DE REPÉRAGE
LOKALIZATOR GPS DLA PSÓW
POLSKI FRANÇAIS ITALIANO ENGLISH

2
ENGLISH
DECLARATION OF CONFORMITY
We:
VNT electronics s.r.o.
Dvorská 605
563 01 Lanškroun
IČO: 64793826
declare under own responsibility that the product:
Dogtrace
DOG GPS X30 a X30T
is in compliance with the essential requirements and other relevant
provisions of Directive 2014/53/EC, meets requirements of General
Licence of The Czech telecommunication oce according to general
licence no. VO-R/10/05.2014-3 and corresponds to the following standards:
ETSI EN 301 489-1 V1.9.2
ETSI EN 301 489-3 V1.6.1
ETSI EN 300 220-2 V.2.4.1
ETSI EN 60950-1 ed.2:2006 /A1:2010 /A11:2009 /A12:2011 /A2:2014/Cor.1:2012
EN 62479:2010
The product is safe under conditions of standard use in accordance
with the user guide.
This declaration of Conformity is created in exclusive responsibility of producer.
In Lanškroun 1. 9. 2018
Ing. Jan Horák
executive director
Tel.: +420 461 310 764
info@dogtrace.com
www.dogtrace.com
Thank you for purchasing the product DOG GPS of the trademark Dogtrace
from VNT electronics s.r.o., Czech Republic.
Before using your product, please read the instructions in this user guide carefully
and keep it for future reference.
Hereby, VNT electronics s.r.o., declares that this Dogtrace DOG GPS X30
is in compliance with the essential requirements and other relevant provisions
of Directive 2014/53/EC.

3
ENGLISH
2 Important advice ........................................................4
3 ECMA ...................................................................4
4 Introduction .............................................................5
4.1 DOG GPS X30 features ................................................... 5
4.2 DOG GPS X30 application ................................................ 6
4.3 Package contents ........................................................ 6
4.4 Optional accessories ..................................................... 6
5 Equipment description . . . . . . . . . . . . . . . . . . . . . . . . . . . . . . . . . . . . . . . . . . . . . . . . . . . 7
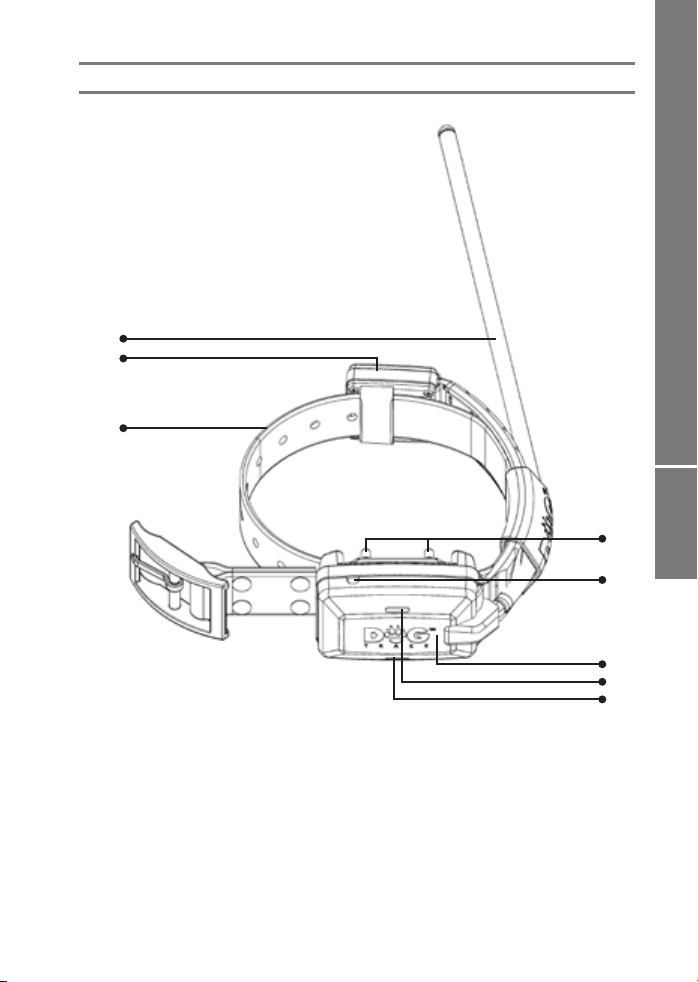
5.1 Transmitter (collar) ....................................................... 7
5.2 Receiver (handset) ....................................................... 7
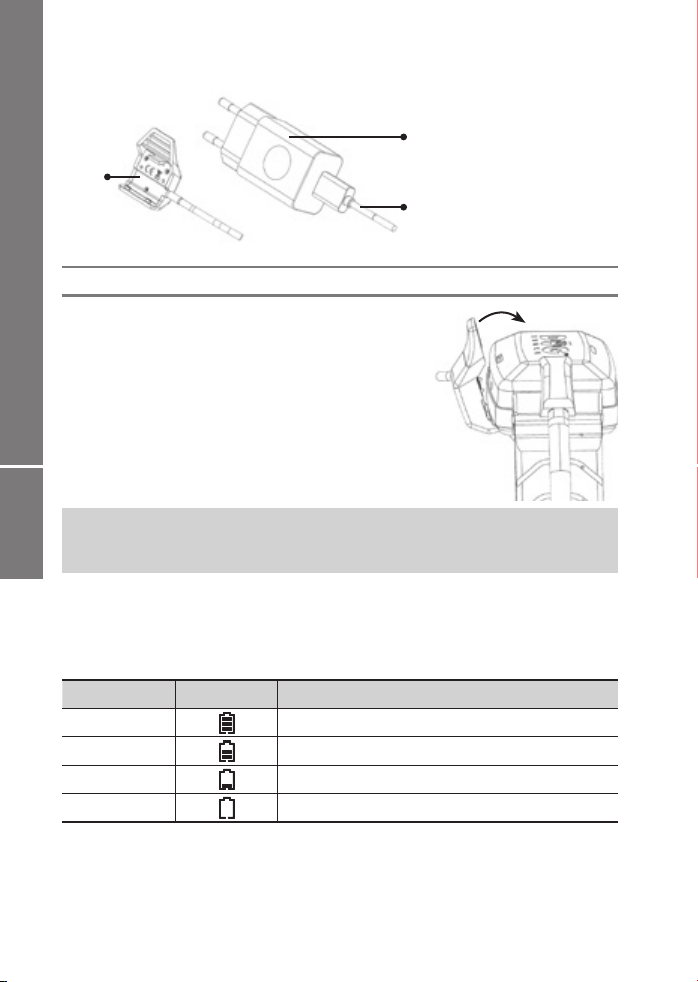
5.3 Power adapter and cable with charging clip ............................. 10
6 Preparing transmitter (collar) ........................................... 10
6.1 Charging the transmitter ................................................ 10
6.2 Checking battery charge status ......................................... 10
6.3 Turning on/o .......................................................... 10
6.4 Frequency of position updating (transmission) .......................... 11
6.5 Selecting contact points ................................................ 11
6.6 Fitting the collar ........................................................ 11
7 Preparing receiver (handset) ........................................... 12
7.1 Charging the receiver ................................................... 12
7.2 Checking battery charge status ......................................... 12
7.3 Setting the receiver ..................................................... 13
7.4 Receiver MENU ......................................................... 13
7.5 Pairing – encoding transmitter (collar) with receiver (handset) . . . . . . . . . . . . 14
7.6 Pairing – encoding another receiver (handset) with your receiver ......... 14
7.7 Setting the sound volume .............................................. 15
7.8 Digital compass calibration ............................................. 15
7.9 Channel selection ...................................................... 16
8 DOG GPS X30 feature .................................................. 17
8.1 Tracking ................................................................ 17
8.2 Training ................................................................ 18
8.3 Compass feature – determining the North ............................... 19
8.4 FENCE – acoustic boundary ............................................. 19
8.5 WAYPOINT – saving receiver’s location ................................... 20
8.6 BEEPER feature ......................................................... 20
8.7 CAR mode .............................................................. 22
9 Dogtrace GPS application .............................................. 23
9.1 Pairing the receiver (handset) with mobile telephone .................... 23
10 Maximum GPS range and accuracy ..................................... 24
11 Troubleshooting ....................................................... 24
12 Device maintanance ................................................... 25
13 Technical data ......................................................... 25
14 Displayed texts on LCD ................................................. 26
15 Warranty Terms and Conditions ........................................ 28
16 Certicate of Warranty ................................................ 112
1 CONTENT

4
ENGLISH
Please read this Operating Manual carefully before using the product.
Do not leave the neck collar transmitter on a dog for more than 12 hours a day.
Long-term effects caused by the collar and contact points on the dog's skin may
cause irritation. If this occurs, do not use DOG GPS until all traces of irritation
disappear.
Do not place the receiver or the transmitter near objects sensitive to magnetic
field, as this may cause permanent damage.
Do not place the receiver near any device, which is generating magnetic field as it
may affect the internal digital compass.
The receiver and the transmitter include a rechargeable Li-Pol battery. If the DOG
GPS is not used for long time, its batteries must be recharged every 12 months.
Do not charge the batteries at temperatures above 40 °C – explosion hazard.
Protect the Li-Pol battery from damage by sharp objects, high mechanical pressure
or high temperatures as it could cause the battery bursting into flames or explode.
Use only the original batteries; different batteries may damage the product or
cause the batteries to explode.
Use only the original power adapter with charging clip for charging the receiver
and transmitter batteries.
Dispose of used batteries in designated locations.
Person fitted with cardiac pacemaker (pacemaker, defibrillator) must take
appropriate precautions as the DOG GPS emits specific static magnetic field.
Some mobile phones have modified operating system Android and cannot be
paired with DOG GPS X30 devices. It is not a defect of the DOG GPS X30 product.
Try to pair it with a different mobile phone or tablet.
VNT electronics s.r.o., manufacturer of Dogtrace professional
training tools for dogs, is the proud and active member of the
Electronic Collar Manufacturers Association (ECMA).
ECMA, based in Brussels, was founded in 2004 at the initiative of the largest
manufacturers of electronic training aids for dogs. The aim of all members of this
association is to develop and produce quality and reliable training systems that
ensure safety of the animal and improve communication between the owner and
his/her dog. When purchasing ECMA-compliant electronic collars, owners can be
sure that all products are designed to protect the safety of their animals. Operating
and training manuals of all members of the association contain instructions and
advice for the safe use of electronic training aids to enable all owners to use their
training systems eectively, responsibly and humanly. All ECMA members’ products
meet the latest technical standards and safety parameters and their adherence is
strictly monitored.
2 IMPORTANT ADVICE
3 ECMA

5
ENGLISH
4 INTRODUCTION
DOG GPS X30 is a device for tracking (locating) your dogs for up to 20 km. It consists
of the transmitter located on the dog’s collar and the receiver (handset) on which
the dog handler tracks the distance and direction towards the dog’s location. The
transmitter gets its position from the GPS satellites, which send the position data to
the dog handler’s receiver via the radio frequency (RF) signal. The transmitter may
include training module (X30T set), which enables the stimulation pulse to be sent
from the receiver for up to 20 km.
The receiver may be connected to a mobile phone or tablet (using the Android
operating system) via wireless communication and all paired devices may be viewed
using the Dogtrace GPS application on the map.
The DOG GPS X30 also has additional features – compass, FENCE – acoustic boundary,
which provides information that the dog moved beyond the set distance from the
receiver. It also has the BEEPER feature, which simply enables to determine whether
the dog is moving or standing still. The receiver facilitates saving its current position
and then navigating to that position (waypoint feature).
4.1 DOG GPS X30 features
Range between the transmitter and the receiver is up to 20 km in direct visibility
(depending on terrain, vegetation and other factors)
Tracking up to 13 dogs, hunters or waypoints
Highly sensitive GPS in the receiver and transmitter
Clearly legible receiver display – in direct sunlight and in the dark
Waterproof receiver and transmitter
Long battery life
2 acoustic signal modes – training / localization
15 stimulation pulse levels (GPS X30T only)
Light mode for identifying dog in the dark (GPS X30T only)
Switching channels for communication between the transmitter and receiver
Compass feature
FENCE – acoustic boundary to set the area for the dog
BEEPER – detection of dog in motion/standing still
Waypoint – option to store 13 GPS receiver coordinates – navigation to these
points
CAR mode – mode for using the receiver (handset) in the vehicle
The receiver is compatible with transmitters (collars) X20 / X20+ (some functions
are limited)
ECMA is convinced that electronic training collars, whilst responsibly used and in
combination with reward and praise, are eectual and humane training aids for
professional dog training, training of dogs with problematic behaviour, but also for
everyday home use.
For more information, please visit the following website: www.ecma.eu.com.

6
ENGLISH
4.2 Dogtrace GPS application
View all devices (dogs, other dog handlers, waypoints) on the map
On-line and off-line maps
Compass
Recording routes of all devices
Indication of dog barking with recording to the route on the map
Acoustic signal
DOG GPS X30T – stimulating impulse and light function
4.3 Package contents
Receiver including Li-Pol 1850 mAh battery
Clip for hanging the receiver on a belt and two screws
Transmitter including Li-Pol 1850 mAh and the belt
Set of contact points, 2 pcs 10 mm, 2 pcs 17 mm (GPS X30T only)
Dual power adapter, two USB cables with GPS charging clip
Test discharge lamp (GPS X30T only)
Cord for handing the receiver
Operating Manual and Certificate of Warranty
Equipment bag
4.4 Optional accessories
Replacement transmitter and receiver
Training module
Different colour belts
Li-Pol 1850 mAh battery
Power adapter with USB cable and GPS clip
Replacement silicone buckles for the transmitter – black, orange

7
ENGLISH
1
8
3
2
7
5
4
6
5 EQUIPMENT DESCRIPTION
5.1 Transmitter (collar)
1. Transmitter
2. Indicator lights
3. Charging contacts
4. Training module with contact points (GPS X30 only)
5. Target (half-round red dot) for applying magnet
(switching on/o the transmitter)
6. RF aerial
7. GPS aerial
8. Belt (collar)
5.2 Receiver (handset)
1. - 5. Push buttons (see table, Page 8)
6. RF aerial
7. GPS aerial
8. Display
9. Target (half-round red dot) indicating location
for magnet to switch the transmitter on/o
10. Clip for hanging on a belt
11. Point for attaching neck cord
12. Charging contacts

8
ENGLISH
53
8
11
11
11
12
10
9
1
42
7
6
Button Short press Long press
1Turning display
backlight on/o
Switching the transmitter
on/o
2 Training audible beep tone Training audible beep tone
3 Back to the main screen FENCE Enabling the FENCE feature
4 Upwards MENU Entering MENU (setting)
5 Downwards CODE
Pairing – encoding the
transmitter with the receiver/
storing the waypoints
2+3 + Stimulation impulse
3+5 + – digital compass
calibration
2+4 + Location beep tone

9
ENGLISH
Display
1. Receiver (handset) GPS position
accuracy
2. Transmitter (collar) GPS position
accuracy
3. Another transmitter GPS position
accuracy
4. RF signal strength received from a
transmitter
5. RF signal strength received from
another transmitter
6. Direction indicator to the paired
transmitter
7. Number of selected paired transmitter
8. Number of another paired transmitter
9. Receiver battery charge status
10. Transmitter battery charge status
11. Another transmitter battery charge
status
12. Distance between the transmitter
and receiver
13. Compass – direction towards the
magnetic North
14. Vibrating or acoustic BEEPER on one
of the transmitters
15. Active FENCE on one of the dogs
16. Active BEEPER
17. Active FENCE
18. Wireless communication with
mobile phone is active
19. transmission channel to full capacity
20. another paired receiver (dog
handler)
1
2
3
5
4
12
17
16
20
13
18
14
15
11
10
19
6
8
7
9Receiver information
panel
Main navigation panel
- for currently selected
transmitter (collar
Transmitter (collar)
information panel – for
another paired transmitter
in sequence

10
ENGLISH
WARNING: Charge the battery at temperatures between 0 °C to 40 °C. Use only
the original power adapter supplied by the manufacturer for charging as using
dierent one may lead to irreparable battery damage.
6.1 Charging the transmitter
GPS transmitter includes Li-Pol battery, which must
be charged before the first use.
1. Remove dirt from charging contacts. Connect the
charging clip to the transmitter (see figure).
2. Connect cable to the power adapter, which is then
plugged into the mains.
3. Orange indicator light is illuminated.
4. Charging takes approximately 3 hours.
5. Orange light goes off when charging is finished.
6.2 Checking battery charge status
Flashing indicator lights located on the top of the transmitter (see Paragraph: 5.1
Equipment Description – Transmitter) or the battery symbol on the receiver (handset)
display are used to check the battery charge status.
Charge status Receiver Transmitter
100% Green indicator light
70% —
40% Simultaneously green and red indicator lights
10% Red indicator light
6.3 Turning on/o
Magnetic switching system, activated by applying magnet, is used for switching the
transmitter on/o. The magnet is tted in the receiver where the red target is located
(half-round red dot located on the bottom of the receiver).
6 PREPARING TRANSMITTER COLLAR
1
2
3
5.3 Power adapter and cable with charging clip
1. Power adapter
2. USB cable
3. Charging clip

11
ENGLISH
NOTE: More frequent updating of the dog’s position results in quicker discharging
of the transmitter battery.
Turning on:
1. Place the red target located on the bottom of the receiver to the red target on
the transmitter for approximately 1 second – the red indicator light comes on and
subsequently the green indicator light is lit.
2. After the green indicator light is lit, move the receiver away from the transmitter.
The green indicator light starts flashing.
Turning off:
Proceed in the same manner as for switching on.
1. Place the red target located on the bottom of the receiver to the red target on the
transmitter for approximately 1 second – the green indicator light comes on and
subsequently the red indicator light is lit.
2. After the red indicator light is lit, move the receiver away from the transmitter. The
transmitter stops flashing.
6.4 Frequency of position updating (transmission)
DOG GPS X30 enables selecting the updating frequency of your dog's position.
When the collar transmits its position more frequently, the location of the dog is
known more frequently.
1. Switch off the transmitter (collar).
2. Place the red target located on the bottom of the receiver to the red target on the
transmitter for 3 seconds – the transmitter starts beeping. Select the updating
frequency according to the number of beeps – see the table below.
3. Select the frequency by moving the receiver away from the transmitter when the
required number of beeps is heard.
Number of beeps 1 2 3
Updating frequency [s] 3 6 9
6.6 Fitting the collar
Fit the collar with the GPS transmitter to the dog so that the GPS and RF aerials are
pointing upwards (see gure). The collar must be suciently tightened as not to
rotate on the dog's neck but to enable the dog to naturally breathe and receive food.
If the training module (X30T kit) is part of the transmitter, it is essential to ensure
6.5 Selecting contact points (GPS X30T)
Stainless contact points are used for the transmission of stimulation pulses from the
transmitter to the dog's skin. Each pack contains two types. If your dog has short
hair use the short contact points, use the longer ones if you have dog with longer
or thicker hair. Screw the contact points onto the transmitter screws – see Fig. 5.1
Transmitter (collar) in the Equipment Description paragraph, Page 7. Tighten the
contact points by hand. Do not use pliers or other tools for tightening as it may cause
irreparable damage to the product.

12
ENGLISH
7.1 Charging the receiver
GPS transmitter includes Li-Pol battery, which must
be charged before the first use.
1. Remove dirt from charging contacts. Connect the
charging clip to the receiver (see figure).
2. Connect cable to the power adapter, which is
then plugged into the mains.
3. Display shows gradually increasing number of
horizontal bars in the battery symbol.
4. Charging takes approximately 3 hours.
5. Battery is fully charged when the battery symbol
is full – see below.
WARNING: If the collar is too loose, the transmitter is likely to move and repeated
friction may irritate your dog’s skin. Furthermore, in this case, the contact points
may not touch the skin surface in required manner and consequently, the
training module may not function correctly. We do not recommend keeping the
dog’s collar at the same place for several hours as it could cause skin irritation. If it
is necessary for your dog to wear the collar for a long time, change the position of
the transmitter on the neck regularly. If the collar with the transmitter is too tight,
it may cause pressure sores where the contact points touch the skin. If this occurs,
do not use the training module until all traces of irritation disappear.
7.2 Checking battery status
The battery status in the receiver is indicated
by the battery symbol in the receiver
information panel – the top line of the
display.
Charge status Receiver
100%
70%
40%
10%
WARNING: Charge the battery at temperatures between 0 °C to 40 °C. Use only
the original power adapter supplied by the manufacturer for charging as using
dierent one may lead to irreparable battery damage.
7 PREPARING RECEIVER HANDSET
good contact between the contact points and
the dog's skin. We recommend tting the collar
on a dog at rest. If the dog has long or dense hair,
it is advisable to cut the coat at the point where
contact points touch the skin or use the longer
contact points. Long-term eects caused by the
collar on the dog's skin may cause irritation. If this
occurs, do not use the DOG GPS until all traces of
irritation disappear.

13
ENGLISH
7.3 Setting the receiver
Switching on/off – hold the push button for 2 seconds
To select a dog, press / .
To turn the display backlight on/off, briefly press , the backlight will be lit
for 15 minutes, then switches off automatically.
* Displayed when Boar Mode is set ( )
MENU level Description
is given in
Paragraph
1 2 3 4
–
–
8.2
/
/
–
–
–
–
–
–
– 8.6
–
–
* – m
* / / / s
– 7.7
/ 9.1
/ 7.6
/ 7.9
/ 8.7
7.4 Receiver MENU
Long press of the MENU push button enters settings of several features. Another
long press of the MENU push button conrms the selected menu item. To return to
the higher level, press the push button briey.
The following table shows the full MENU structure.

14
ENGLISH
7.6 Pairing – encoding another receiver (hand set) with your receiver
DOG GPS X30 enables pairing of other dog handlers’ receivers with your receiver
and then track their position. Updating the position of other dog handlers in your
receiver takes place every 60 seconds.
Turn on another receiver to transmit its position before pairing your receiver with
this receiver commences.
1. Long press the MENU push button on the receiver you wish to track.
2. Select by using / arrows and long press MENU again.
3. Select and by repeatedly pressing return to the main screen.
Now, you may start pairing this receiver with yours.
1. Turn on your receiver and the second receiver you wish to track – transmitters
(collars) in your vicinity must be turned o.
2. Hold the CODE push button on both receivers for 2 seconds.
3. On your receiver, select the position to which you wish to pair the second
transmitter (collar) using / arrows. If the position is empty (at given position
there is no paired transmitter, receiver or saved waypoint), the
message is shown on the display.
NOTE: To delete one of the paired transmitters (collars), receivers or waypoints
from the receiver’s memory, carry out pairing without the transmitter turned on.
After approximately 20 seconds, the message appears at the given
position.
NOTE: The receiver X30 is possible to pair with X20 / X20+ transmitters (collars). It
is not possible to send training commands to these collars. Some other functions
are limited.
7.5 Pairing – encoding transmitter (collar) with receiver (handset)
1. Turn on the receiver and transmitter you wish to pair together – switch other
devices o.
2. Hold the CODE push button on the receiver for 2 seconds.
3. Select the position to which you wish to pair the transmitter (collar) by using /
arrows. If the position is empty (there is no paired transmitter, receiver or saved
waypoint), the message is shown on the display.
4. Hold the CODE push button again for 2 seconds.
5. Move the transmitter close to the receiver with the RF aerials parallel to each
other.
6. After pairing, the message is displayed and to is
lit on the display (according to the selected position to which the transmitter is
paired).
7. If you wish to pair another transmitter, repeat the procedure from Point 3.
8. To exit the coding mode press .

15
ENGLISH
7.8 Digital compass calibration
For viewing the exact direction to the transmitter collar, it is crucial that the calibration
is carried out correctly. If the device does not indicate the correct direction even with
the maximum GPS accuracy (two bars on both signal indicators on the display),
the calibration may not have been carried out for a long time or was carried out
incorrectly.
7.7 Setting the sound volume
Receiver’s sound volume may set to ve levels.
1. Long press the MENU push button and select using / arrows.
2. Select sound volume level using / .
3. By repeatedly pressing return to the main screen.
Fig. 1 Fig. 2 Fig. 4Fig 3
NOTE: Carry out calibration in an open area, away from objects that emit
magnetic eld – buildings, cars, overhead and underground power lines.
Calibration procedure
If you know the direction to the North magnetic pole, you may go straight to Point 2.
1. To commence the calibration procedure simultaneously press both bottom push
buttons and for two seconds. Then rotate the device several times around
each of the three axes (see Figs. 1, 2 and 3). Finish calibration by pressing the back/
return push button. To refine calibration proceed as per Point 2.
2. Find the North using the compass on the display and turn the receiver so that
the aerial points to the North (see Fig. 4). To commence the calibration procedure
simultaneously press the both bottom push buttons and for two seconds.
4. Hold the CODE push button on your receiver again for 2 seconds.
5. Move both receivers close to each other with the RF aerials parallel to each other.
6. After pairing, the message is displayed and to is lit
on the display according to the selected position to which the receiver is paired.
7. To exit the coding mode press on both receivers.

16
ENGLISH
NOTE: Channel switching is only possible for X30/X30T receivers and transmitters
(collars). If any X20 or X20+ collars are paired on the receiver, the receiver will not
enable channel switching.
7.9 Channel selection
The number of active transmitters (collars) in the vicinity is restricted. In the event
that a large number of DOG GPS transmitters are transmitting at the same time, some
dog position messages send to your receiver may be lost. To increase the number of
active transmitters in one area, set the updating frequency to 9 seconds (Paragraph
6.4). Nevertheless, if the position messages are lost, this status will be indicated on
the DOG GPS X30 receiver by the symbol next to the RF signal strength indication.
In this case, switch your transmitters (collars) and the receiver to another channel.
To change a channel, all transmitters (collars) must within close proximity – up to a
maximum of 10 meters.
1. Turn on all transmitters and the receiver on which you wish to change channel.
2. Long press the MENU push button on the receiver.
3. Select using / arrows and long press the MENU push button
again.
4. Firstly, currently selected channel is displayed; to change press / and select
reverse or .
5. Long press the MENU push button to conrm the selection. Each transmitter will
successively beep to indicate channel switching.
WARNING: The accuracy of the navigation rosette depends on the correct
calibration of the digital compass. In the event that inaccurate indication of the
dog’s direction from you occurs, carry out calibration again.
The digital compass calibration will be lost if the receiver is located in the vicinity
of another object’s or device’s magnetic eld; in such event, the compass must
be recalibrated.
Fig. 5 Fig. 6 Fig. 7
3. Carry out at least 10 rotations as per Figs. 5 and 6, whilst still pointing to the
North. For quality calibration, each single rotation should be carried out with a
slight deviation from the direction northwards (see Fig. 7). Greater number of and
slower rotations will result in better calibration. Press the back/return push button
to finish.

17
ENGLISH
WARNING: If other receivers (dog handlers) are paired with your receiver, you will
no longer be able to track them after changing the channel.These hunters would
also have to switch their receivers and transmitters to the same channel.
8.1 Tracking
The transmitter (collar) and the receiver (handset) have built-in GPS receiver by
which both detect their position. The transmitter sends information about its positi-
on by means of the radio signal (RF) to the receiver, which shows the direction and
dog’s distance from the handler on the display.
Receiver display is divided into three parts:
Receiver information panel – top line displays the receiver’s data – battery charge
status, GPS position accuracy, magnetic north direction (compass), switching on
the BEEPER and FENCE features relating to one of the paired dogs.
Main navigation panel – middle display section provides information about the
currently selected transmitter (other receiver). Illuminated pointer arrow shows
the direction to the tracked dog location. In the middle of the display, distance
between the dog and the handler is shown. Different dogs are displayed by using
the / push buttons.
Transmitter information panel – bottom line shows data relating to the next
paired transmitter in sequence – battery charge status, RF signal strength, GPS
position accuracy.
8 DOG GPS X30 FEATURES
NOTE: If the dog’s direction and distance indicator ashes, the receiver has not
received the GPS data for a long time or the receiver/transmitter has no GPS
signal. In such case, the direction and distance to the last known position is
indicated on the display.
WARNING: If the direction indicator does not point correctly towards your dog,
recalibrate the digital compass.
Status indicated on the receiver’s display:
– Receiver has not received information from the transmitter relating to
the dog's position for a long time.
– If the RF signal strength indicator ashes, it signies that it has received
location data from the selected collar.
– If only the RF aerial ashes – it does not receive any RF signal from the transmitter.
– Receiver or transmitter does not have the GPS position.
6. If the channel is changed correctly message will show on all transmitters’
displays. If the change fails, the message will appear on the display.
Repeat the whole procedure from the step number 4.
7. By repeatedly pressing return to the receiver’s main screen.
8. Make sure that you receive RF signals from all your transmitters on your receiver. If
no, try switching the channel again to the desired receiver / .

18
ENGLISH
8.2 Training
This feature enables correction of undesirable behaviour up to the distance of
20 km. The basic DOG GPS X30 kit enables using the acoustic command. DOG GPS
X30T (training) kit is enhanced by the use of the correction stimulation impulse.
Another feature of the training kit is the light indication of the dog in the dark with
the aid of powerful LEDs.
Acoustic signal (tone):
The basic DOG GPS X30/X30T kit has two types of acoustic signal.
The training acoustic signal ( ) is used as the sound command, which
may precede the stimulation impulse and it is a very effective deterrent. Replaces
whistle, whose volume the dog perceives in the same manner, even though it is far
away.
Localization acoustic signal ( ) acoustic signal is used to locate the dog
in dark or dense growth. This signal is audible up to the distance of 30 m.
This command is activated by the push button. Switching between the training
( ) and localization ( ) tones is carried out in the MENU.
1. Long press the MENU push button.
2. Select the item by using / arrows; long press the MENU push
button to confirm.
3. Select the transmitter (collar) position you wish to set – to ; long press
the MENU push button.
4. Select by using / arrows, long press the MENU push button.
5. Select the required type of acoustic signal ( / ).
6. By repeatedly pressing return to the main screen.
– No paired transmitter at the given position.
– Receiver and transmitter are closer to each other than the accuracy of the
GPS position.
Stimulation impulse (IMPULSE): (ONLY GPS X30T)
This feature enables to activate warning in the transmitter (collar) in the form of safe
stimulation impulses transmitted by the two contact points. Stimulation impulses do
not hurt the dog. Impulse is very unpleasant to the dog, and consequently, will soon
make connection between the oral command, acoustic signal and uncomfortable
feeling on the neck.
Setting the impulse strength is carried out in MENU in the same manner as the
selection of weak/strong acoustic signal, with the difference that in Point 4, select
and in Point 5 select the impulse strength where 0 is without impulse,
1 is the weakest impulse and 15 is the strongest impulse.
This command is sent to the transmitter (collar), which is selected on the receiver
(handset) navigation main panel by simultaneously pressing the + FENCE push
buttons.
NOTE: Locating acoustic signal can also be activated by pressing simultaneously
following buttons + .

19
ENGLISH
TIP: If the stimulation impulse is send to a dog using mobile phone application,
the strength of the stimulation impulse for this dog is automatically adjusted to
the set value in the receiver and vice versa.
Light feature (flash): (ONLY GPS X30T)
The light feature may be used to locate the dog in the dark. The function is activated
in MENU. The start-up procedure is the same as for the selection of the acoustic
signal volume strength, with the difference that in Point 4, is selected and
in Point 5, is selected. A simpler option is to activate the feature in the Dogtrace
GPS application.
8.3 Compass feature – determining the North
The N symbol indicates the direction of the magnetic north. If the two arrows are
simultaneously lit, direction to the North is between them.
8.4 FENCE – acoustic boundary
The FENCE feature alerts you when the dog moves beyond the set area boundary,
which is adjustable within the range of 30 m to a maximum of 2 km from the receiver.
The FENCE feature may be activated for more dogs; settings are stored for each dog
separately.
If the dog moves beyond the set boundary, the receiver will emit long intermittent
beeping and the circle, for this dog, located under the direction indicator will ash
on the receiver display. To nd out which dog has crossed the set boundary, switch
between paired transmitters until you nd the ashing circle.
When this feature is turned on, the receiver must have good GPS signal:
1. Select the dog number for which you wish to enable FENCE on the main navigation
panel.
2. Long press the FENCE push button.
3. Set the acoustic boundary distance by / arrows.
4. Press briey to return to the main screen.
After the feature is turn on, FENCE is displayed on the main panel display. The top
line of the display shows FENCE if the feature is activated on at least one of the
collars paired with the receiver.
If the receiver starts to emit shorter intermittent beeping, it signies that the
transmitter (collar) or the receiver does not have the GPS or RF signal. This may
happen if the dog enters building where no GPS signal is available, the RF signal is
out of range or the dog's transmitter battery is at.
WARNING: Receiver should have the strongest GPS signal to ensure that the
FENCE feature is accurate. If the signal is weak, indication that dog crossed the
boundary will not be accurate (given by the GPS accuracy).
NOTE: To use the FENCE and tracking features simultaneously, pair one dog into
two positions in the receiver. Then, in one of the positions the FENCE feature may
be activated and use the second one for tracking.

20
ENGLISH
8.6 BEEPER feature
The BEEPER feature is mainly used by gamekeepers/hunters to distinguish the
intensity of movement or the presence of a dog near wild pig.
If the transmitter (collar) is turned on and the dog is in motion, the BEEPER message
ashes in the main navigation window on the receiver display. If the dog does not
move or is near wild pig, the BEEPER is lit continuously. In the top line of the display,
the BEEPER indicates status when the sound or vibration indication is selected for at
least one dog on the receiver.
Setting the BEEPER feature:
The BEEPER feature must be set correctly before hunting commences.
1. Long press the MENU push button, select and confirm by pressing and
holding the MENU push button.
2. Select the transmitter (collar) for which you wish to set BEEPER. Long press the
MENU push button.
WARNING: By saving the waypoint to a position where you have a paired
transmitter or other receiver, will delete the transmitter (receiver) from the
receiver's memory.
8.5 WAYPOINT – saving receiver’s location
The waypoint feature enables saving the GPS coordinates of the current receiver
(handset) location. Subsequently, you may navigate to the saved location.
Saving waypoint:
1. Hold the CODE push button on the receiver for 2 seconds.
2. Select position to which you wish to save the waypoint by / arrows. If the
position is empty (at given position there is no paired transmitter, other receiver
or saved waypoint), the message is shown on the display.
3. Hold the MENU push button for 2 seconds to show .
4. Press the push button to return to the main screen.
To navigate to the saved waypoint, select in the main navigation panel by /
arrows the saved location.
Deleting waypoint:
1. Switch off all transmitters (collars) in the receiver vicinity.
2. Hold the CODE push button on the receiver for 2 seconds.
3. Select position you wish to delete by / arrows.
4. Hold the CODE push button for 2 seconds – after approximately 20 seconds the
message is displayed.
5. Press the push button to return to the main screen.
Turning o FENCE:
1. Select the dog number for which you wish to disable FENCE on the main
navigation panel.
2. Press and hold the FENCE push button.
3. Set OFF by / arrows.
4. Press briey to return to the main screen.
Other manuals for DOG GPS X30
1
This manual suits for next models
1
Table of contents
Languages:
Other Dogtrace GPS manuals