Dominox DEO62XS Manual

DEO62XS - DEO66XS - DEO66F/XS
ANKASTRE FIRIN KULLANIM VE
BAKIM TALİMATLARI
OPERATING AND MAINTENANCE INSTRUCTIONS
FOR BUILT-IN OVENS
DEO62BK-XS - DEO66BK-XS


1
Contents
Introduction ............................................................................................... 1
Switching on the first time ......................................................................... 1
Suggestions................................................................................................. 1
A close look................................................................................................ 2
Use............................................................................................................. 3
Cooking table............................................................................................. 7
Cleaning and maintaining the oven............................................................. 8
Service........................................................................................................ 10
Safety warnings .......................................................................................... 10
Installation .................................................................................................. 12
Installation instructions............................................................................... 13
Connection to power mains ...................................................................... 13
Technical data............................................................................................. 14
Introduction
Thank you for choosing a product.
Before using the appliance, please read the warnings and instructions in this manual. This will
make it easier to operate and also prolong its service life. Keep this booklet for further
reference.
Switching on the first time
When using the oven for the first time, run it empty with the temperature knob set to
maximum and the door open for at least 40 minutes – make sure the room is well
ventilated during this procedure.
The odour produced during this procedure is produced by the evaporation of the substance
used to protect the oven during the period between manufacture and installation. The oven
can be used normally once this first procedure has been completed.
Suggestions
When cooking food, do not place it in the oven when the oven is cold; rather, allow it to
reach the set temperature before placing the food in it.
During cooking, never place pans or containers directly on the oven floor; place them on
the provided grills or drip trays in one of the five provided shelves; Failure to observe this
precaution can damage the oven's internal enamelling.
Do not cover the walls of the oven with aluminium foil, especially in the lower part of the
cooking compartment.
Any repairs must be done by Franke authorised service centre.
In case of need, contact our local service centre and use only original spare parts.
Your oven uses a special enamel which is easy to keep clean; make sure to clean it
frequently to avoid baking on dirt and cooking residue.
Self-cleaning panes (if any) can be cleaned with soap and water (see cleaning instructions).
Note: - before switching on the oven, read the Timer Instructions.
- if the oven is equipped with an automatic cooking or switching off programmer, select
the “manual” option indicated by the symbol to use the oven manually .
Timer Instruction....................................................................................... 5-6
Dominox
Dominox

2
A close look
Control Panel
Program selector knob
Selects the mode of operation of the oven depending on the type of
cooking desired. When the knob is set to a program, the oven's internal
light lights up to show that the oven is on.
Timer / Programmer
Dominox ovens have a variety of methods of monitoring and controlling
cooking times, consult pag.4 for specific detailed instructions; after you
have identified the type of control provided by your oven, you will find full
instructions on how to use it
Thermostat indicator light
Highlighted by the symbol this indicates that the electrical heating
elements are on. The indicator light turns off when the set temperature
has been reached, and turns back on again when the heating elements are
switched on again. Use this light to check that the oven is at the correct
temperature before inserting the food.
Temperature regulator knob (Thermostat)
Sets the temperature required for the type of food being cooked, and
ensures that it is kept constant throughout the cooking cycle. To select
the temperature, turn the knob clockwise so that the index mark
indicates the temperature in question. Maximum temperature is around
260°C.
Drip tray and grille guides
Used for locating the grilles and drip trays in the fiveavailable positions (1
to 5 starting from the bottom); the cooking table indicates
which position gives best results for each type of cooking.
Drip tray
Normally used for collecting juice from roasts or for cooking food
directly; the drip tray can be removed from the oven if not required. The
drip trays are constructed in AA enamelled food safe steel.
Grid
Used for supporting pans, pastry moulds, and any containers other than
the provided drip trays, and especially for cooking with the meat and fish
grill and fan grill functions, toasting bread, etc.
A
B
C D
E
F
G
H
I
I
H
G
DEO62XS
AE
B
C
F
AE
B
D
F
F
B
DEO66XS
DEO66 F/XS
DEO62BK-XS DEO66BK-XS

3
Use
This oven combines the advantages of traditional “static” natural convection ovens with
those of modern “fan ovens”. It is an extremely versatile appliance which allows for easy
and safe selection of 5 different cooking methods. Use knobs (B) and (F) on the control
panel to select the program and temperature. For best results from your Dominox
oven, consult the cooking table pag. 19.
Cooling fan
In order to reduce the temperature at the front of the oven, the control panel and side
panels, Dominox ovens are equipped with a cooling fan which automatically turns on when
the oven is hot. When the fan is running, you will notice hot air blowing from the front of
the oven between the front panel and the oven door; Dominox has made sure that the air jet
does not disturb the kitchen environment and that noise is kept to a minimum.
To protect the surrounding kitchen units, the fan keeps running after cooking
until the oven has cooled down.
Cooking programmes
Top Element only
Select termostat tempereture from between 50°C to 250 °C for keeping
coo
ke
d food
warm or gently reheating.
Bottom Element only
Select the desired tempereture between 50°C to 250 °C. Suitable for very slow cooking and
warmi
ng up of food.
Natural static cooking
Set the thermostat knob (F) to between 50°C and Max (250°C).
The heat source is both above the food (roof heating element) and below it (floor heating
element). This is the traditional cooking method which results in uniform cooking on a
single shelf.
Fan cooking Set the thermostat knob (F) to between 50°C and Max (250°C).
This turns on the top (roof) element, the bottom (floor) element and the fan.
The resulting constant, even heat cooks and browns the food uniformly. With this mode,
you can also cook various dishes at the same time, on up to a maximum of 2 different rack
heights.
Grill The thermostat knob (F) should normally be set to Max (250°C), although a
lower temperature can be set, in which case grilling will be slower.
The grill heating element at the top of the oven turns on. In this case the fast surface cooking due
to infrared radiation keeps the interior of the meat tender; the grill can also be used quickly
toasting up to 9 slices of bread. Dominox ovens, for safety reasons, are intended to grill food with
the oven door completely closed.
Warning: the grill heating element is very hot when in use; take care not to touch it
accidentally when handling the food; Dominox has designed the opening of the oven
compartment in such a way as to protect your hands.

4
End Cooking Timer Knob
The end cooking timer is a practical device that turns
the oven off automatically at a set time, ranging from
one to 90 minutes. To use the end cooking timer, the
ringer must be wound up by turning knob (C) almost
one full turn clockwise; now turn back to the time
setting you require (align the index mark on the front
panel with the corresponding number on the knob).
When the cooking time has expired, in addition to the
timer ringing, the oven is automatically turned off.
N.B. The oven will stay hot at around the set
temperature for a considerable period of time after it
has been switched off; to avoid overcooking or
burning the food, remove it from the oven
immediately.
Warning: to use the oven in manual mode, i.e. without using the end cooking
timer, you should align the symbol on the knob with the reference mark
on the control panel. When the oven is turned off, the end cooking timer can
be used just like a normal minute minder.
C
Fan grill cooking
The thermostat knob (F) should normally be set to Max (250°C), although a
lower temperature can be set, in which case grilling will be slower.
The grill heating element at the top of the oven turns on, as well as the fan. This combines
unidirectional heating with fan driven distribution of the air throughout the oven. It thus
prevents burning the surface of the food and increases penetration of the heat. This
function gives excellent results for mixed meat and vegetable kebabs, sausages, pork ribs
and lamb chops, devilled chicken, quail with sage, pork fillets, etc...
Defrost:
When the termostat is in off position, perform the oven in upper+bottom+fan position or
gril+fan position

5
TIMER SETTING
The electronic cooking timer
Your digital timer is an electronic timing module that makes the
food in the oven ready for servicing when you want. All you need
to do is to program the cooking duration and the time when you
want your food to be ready.
When the timer is first powered up 12.00 appears on the display.
icon flashes. In this case the oven will not work as the contacts
of the clock relay are open.
The electricity current is transmitted to the heating elements
through the alarm clock. Press to manually operate the oven.
Oven clock / timer works the same way as the normal clock. In the
event of power failure the clock is reset. If the electricity current is
less than 50 Hz the clock will be slow. This is not a defect of the
clock. In such cases set the clock again.
Note: You don’t have to set the real time of the day for manual and
semi automatic cooking with your oven. For full automatic
programming you should set the real time of the day.
With the clock of your oven
1. You can set the cooking time from 0 to 10 hours.
2. You can set the alarm time between 00:00 and 23:59 hours.
3. You can set the oven to full automatic, semi-automatic or
manual cooking.
4. You can use it for warning purposes
ALARM DURATION SETTING
With this function you can get your alarm clock beep after a period
set by you.
1) Select alarm setting 2) Enter time with + or – keys 3) Time will be displayed mode.
(eg:5 minutes) after a few seconds.
When the set period ends the alarm starts beeping. You can stop
the alarm by pushing any button.
ALARM VOLUME SETTING
You can select the 3-level volume of your oven by pressing the
button. Alarm volume is changed with every push on the key.
Note: By factory default, volume is set to the highest. In the event
of power failure, the volume setting will be reset to the factory
default, if changed.
DISPLAY BRIGHTNESS SETTING
You can select the 3-level display brightness setting by pressing
the button. The display brightness setting will change with
every push on the key.
Note: By factory default, the brightness is set to the highest. In the
event of power failure, the brightness setting will be reset to the
factory default, if changed.
IN THE EVENT OF POWER FAILURE
In the event of power failure your oven will be switched off for
safety reasons. This is indicated by the flashing of the hand icon
on the display. All current cooking programmes will be deleted.
Display shows 12:00 and the clock should be set. First switch on
the oven by pressing the button (see Clock setting).
SETTING THE REAL TIME OF THE DAY
Time setting can only be done when there is no active cooking
programme. Press the button. Two dots between the hour
and minute start flashing; you can set the clock forward by + and
backward by -. Longer pressing on these keys will change the
clock faster.
1) Select clock setting
mode 2) Set the time with + or –
keys 3) Display will be fixed
after 5 seconds.
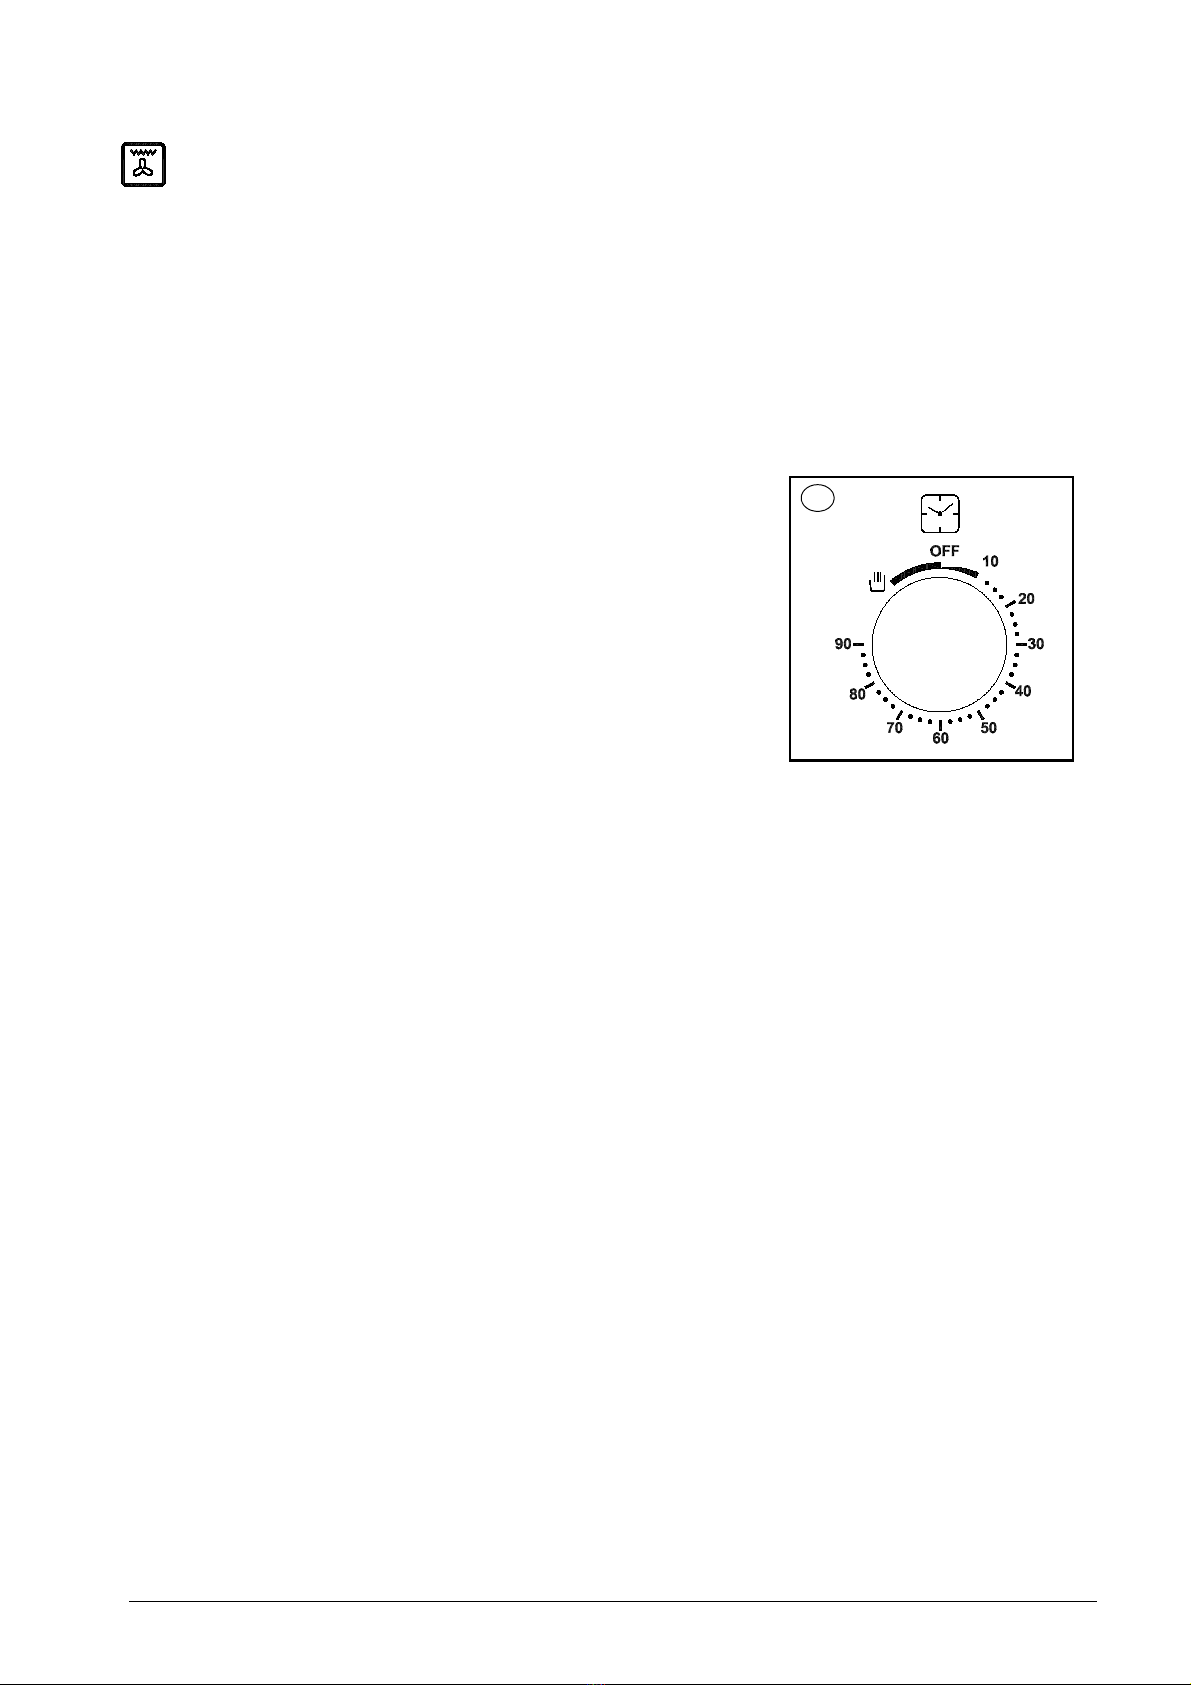
COOKING WITHOUT A PROGRAM (MANUAL)
It means that you start and finish
cooking without making any
programming. If there is any
programme in the memory you need
to reset the programme. Press the
button to reset.
1. If there is a programme in the memory, it will be reset when the
button is pressed and manual cooking will be started.
2. After putting in the oven the food that you want to cook set the
oven control button to the concerned position shown in the
cooking table.
3. Your oven works manually. Check your food with certain
intervals and finish cooking by switching the oven control button
to off (zero) position (since there is no programme).
Now you finished cooking. Your food is ready for servicing.
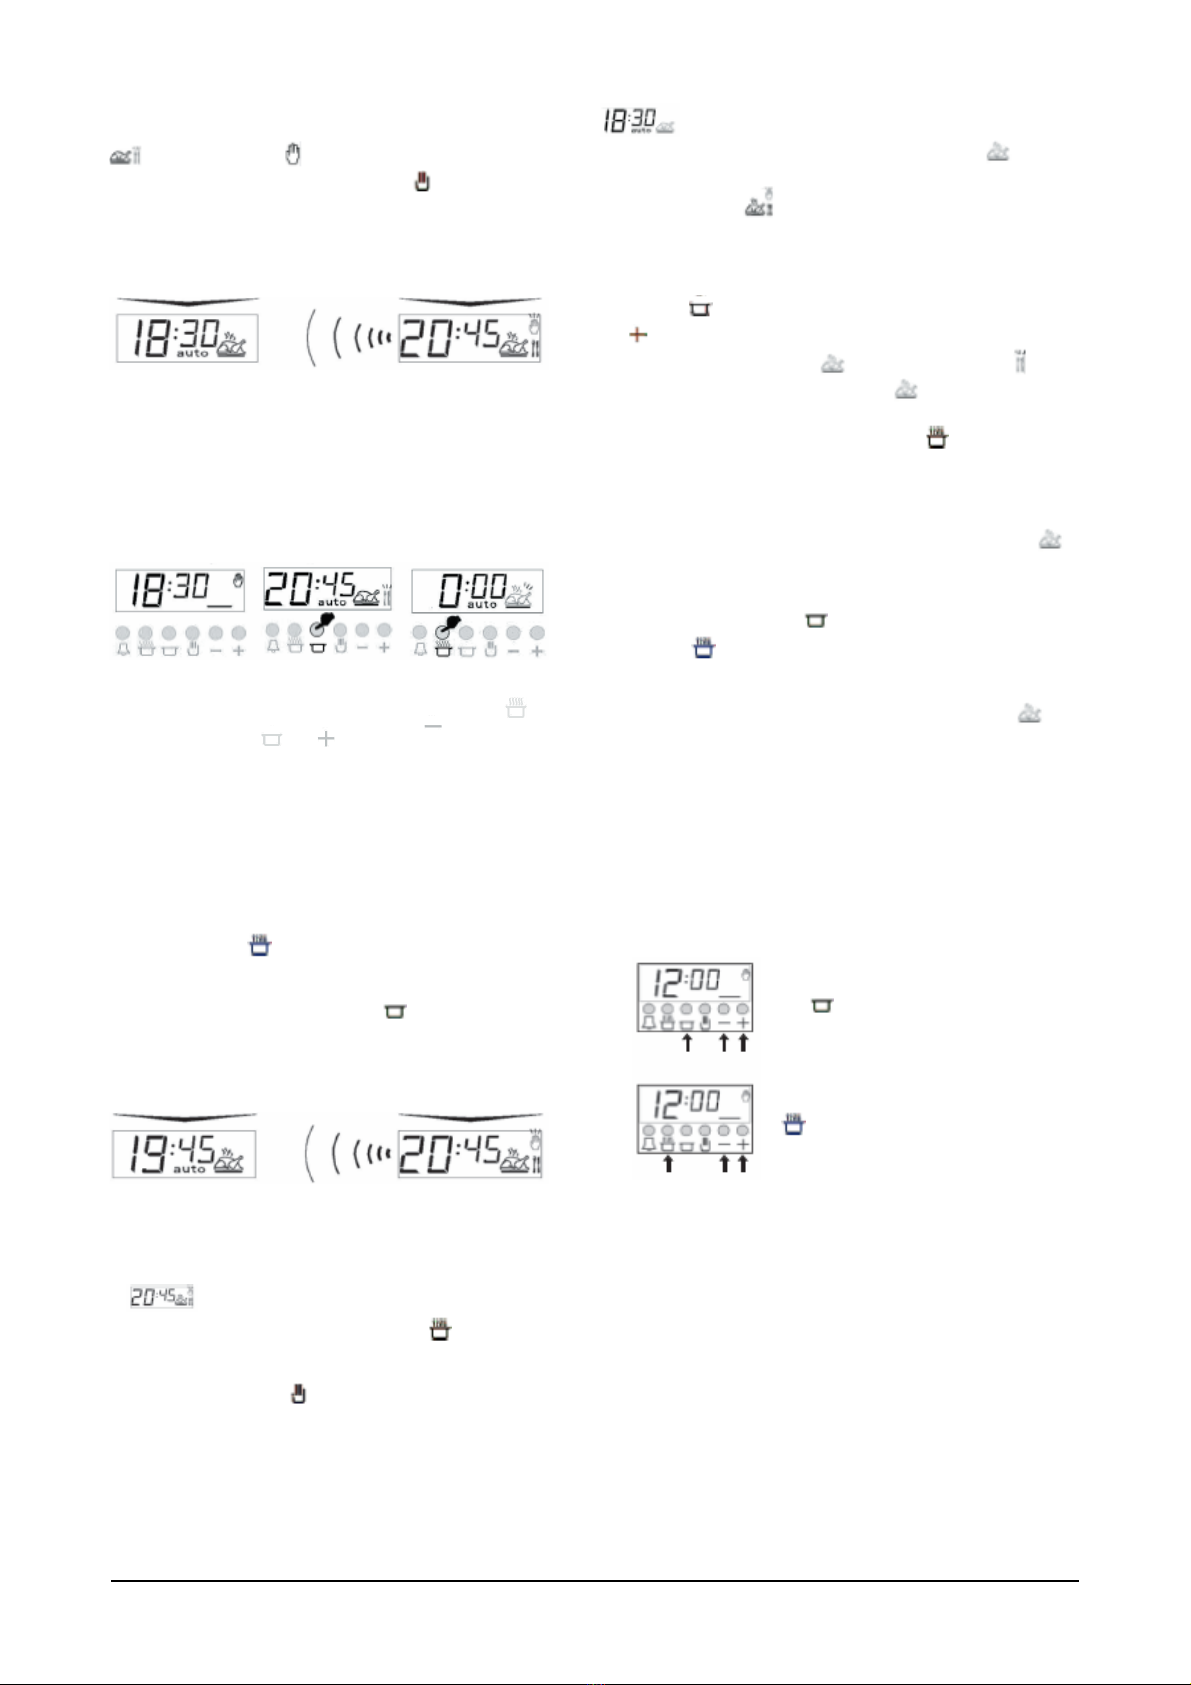
SEMI AUTOMATIC PROGRAMMING
It is the instant start of cooking and stopping after a
predetermined period. In this programme, you need to enter the
cooking time.
1) The time is 18:30 2) Switch to the cooking 3) Enter the time length.
time setting mode by + or - keys.
1. Switch the oven selector switch and thermostat button to the
positions indicated on the cooking table.
2. Enter the cooking time by pressing the (+) button in 5 seconds
after pressing the button. You can reduce the time by the (-)
button. During setting icon starts flashing and after 5
seconds the display is fixed showing the time.
THE FLASHING HAND ICON INDICATES THAT THE OVEN IS SWITCHED OFF
AND THAT YOU NEED TO PRESS THE BUTTON TO SWITCH TO THE
NORMAL POSITION. 3. As an example you can enter the desired period as 2 hours 15
minutes. Cooking starts. After 5 seconds clock setting will appear
on the display. You can view the remaining time by pressing the
button any time during cooking.

6
4. After entering this value the clock will switch off the power and
the alarm will beep. HAND icon will start flashing. You can silence
the alarm beep by pressing any button. Current time of the day,
sign and a flashing sign will appear on the display.
If you wish to restart the oven press the button and then the
oven will start working manually.
6. Cooking will end by bringing the oven control button to off (0)
position.
The display to be shown when the
cooking starts
The display to be shown when the
cooking finishes
When the cooking programme is completed, audible warning is on and will remain
on for 7 minutes if not switched off before.
You have finished the semi automatic cooking. Your food is ready
for servicing.
AUTOMATIC PROGRAMMING
With this programme, cooking duration and the time to finish
cooking are programmed beforehand. Current time of the day
must be set before starting programming.
1) The time is 18:30 2) You want the food
to be ready at 20:45.
You can set the finish
time by pressing the
and buttons.
3) You can set the
cooking time by
pressing the and
buttons. Let’s
enter the cooking time
as 1:00 hour.
After 1:00 hour power will be switched off and the oven stops.
Alarm starts beeping.
The display to be shown when the
cooking starts
The display to be shown when the
cooking finishes
When the cooking programme is completed, audible warning is on and will remain
on for 7 minutes if not switched off before.
7. When the 1 hour cooking finishes, alarm starts beeping at the
preset level. Alarm can be stopped by pressing any button.
8. sign is shown.
9. If you wish to restart the oven press the button. The oven
starts working manually.
NOTE: If your press the button during semi automatic and full
automatic programming the programmes in the memory will be
cancelled and your oven operates manually.
10. Cooking will end by bringing the oven control button to off (0)
position.
You have finished the semi automatic cooking. Your food is ready
for servicing.
Your oven is in standby mode and the display shows
as the current time of the day and standby signs. The
oven will not work. It starts working at 19:45 and the icon is
displayed with the current time. The oven works for 1:00 hour and
stops at 20:45. The sign appears with the end hour.
1. Prepare the food that you want to cook and put it in the oven.
Bring the oven selector switch and the thermostat button to the
position shown in the cooking table.
2. Press the button. Enter the end time of cooking by pressing
the button In 5 seconds. Let’s enter the end time as 20:45.
While entering the time, auto sign and the flashing sign
appear with the time. After 5 seconds sign and the word
“auto” appear on the display. The oven is in operation.
3. Enter the cooking time by pressing first the button and then
the (-) button. The display is automatically set for 2:15 hours
cooking time. Let’s say that we want to set the cooking time as
1:00 hour. We can change the time as 1:00 instead of 2:15 hours
by pressing the (-) button. In 5 seconds after making the setting,
the current time of the day (18:30), the word “auto” and the
sign appear. The oven will switch to the standby mode and it will
not work.
4. When the oven is in standby mode, you can view the end time
of cooking by pressing the button and the cooking time by
pressing the button.
5. The oven starts working after 1 hour and 15 minutes, that is at
19:45. While the oven is in operation the 19:45 auto is
displayed. The oven works for 1 hour as the entered time is 1
hour.
NOTE: The cooking time entered should be less than the
difference between the current time of the day and the end time
of cooking. Otherwise the oven will not switch to standby mode
and it will work until the end of cooking time.
6. By pressing the button, the remaining time can be viewed.
After 5 seconds the display switches to the clock mode and the
current time of the day is displayed. The end of cooking time will
appear on the display by pressing the button.
Changing the cooking time after programming.
You can change the cooking time and the end of cooking time
while your oven is in operation.
To change the end time of cooking:
The new value is entered by pressing
the button and using the (+) and (-)
keys.
To change cooking time:
The cooking time is displayed while the
button is pressed. Press the “+” or
“-“ keys to set the new cooking time..

7
Cooking table
Note: the instructions in the table below result from cooking tests carried out by a team of professional chefs.
They are only given as a guideline and can be changed according to personal tastes.
Setting the
selector
knob
Type of food Weight
(Kg) Shelf
position Pre-
heatingtime
(min.)
Setting the
C°
thermostat
knob
Cooking
duration
(min.)
Natural
static
cooking
Lamb
Roast Pork
Roast Veal
Omelette
Fruit
Hake-Sea bream-Turbot
Ordinary bread
Pies
Freshwater fish
Polenta with sauce
Soft Fruit Pies
Ricotta Cakes
Plain Cakes
Vegetables
1
1
1
1
1
1
1
1
1
1
0.5
1
0.5
0.5
3
3
3
2
3
3
2-4 cont.
2
3
2
4
2
4
2
9.5
9.5
10.5
10.5
9.5
9.5
9.5
10.5
10.5
9.5
9.5
9.5
9.5
9.5
180
180
200
200
180
180
175
200
200
180
180
180
180
180
95-100
70-80
140-150
25-30
25-30
20-25
25-30
35-40
30
25-30
25-30
25-30
60
35-40
Fan cooking Saddle of pork
Roast Veal
Baked rabbit
Crescia Marchigiana
(quick flat bread)
Omelettes
Baked Lobsters
Hake-Sea Bream-Trout
Ordinary Bread
Potato Bread
Yellow Saffron Bread
Freshwater fish
Baked Vegetable Dishes
Tuna
Fruit Pies
Savoury Pies
Baked Vegetables
1
1
1
1
0.5
0.5
1
1
1
1
0.5
1
1
1.5
1
1
3
2
2
2
3
3
2-4 cont.
2-4 cont.
3
2
2
2-4 cont.
2
2
3-5 cont.
3-5 cont.
9
10
9.5
10
10
10
7.5
9
9
10
8.5
10
9
9
9
9
180
200
190
200
200
200
150
180
180
200
170
200
175
175
180
180
75-80
80
55-65
25-30
25
20-25
25-30
25-30
20-25
30-35
25-30
25-30
20
30-35
30-35
40
Grill Chicken Wings
Chops
Scallops
Roast Potatoes
Freshwater fish
Tomatoes au Gratin
Eel kebabs
Turkey kebabs
1
0.8
0.5
1
1
0.5
0.5
0.5
4-5 cont.
3
3 or 4
3
3 or 4
2 or 3
3
4
7
7
7
7
7
7
7
7
Max
Max
Max
Max
Max
Max
Max
Max
25-30
20-25
14-16
20-25
25-30
20
20-25
20-25
Fan grill
cooking
Chicken legs
Pork Ribs
Guinea Fowl
Sea bream en papillote
Chicken
Quails
Sausages
Vegetables
1
0.5
1.2
1
1.5
0.8
1
1
4 or 5
4
4
3
3
4
4
4 or 5
11
15
15
8.5
15
15
15
15
220
Max
Max
200
Max
Max
Max
Max
20-25
40-45
30-35
20
35-40
30-35
20-25
10-15

8
Cleaning and maintaining the oven
Important
Before maintaining the oven, always remove the power plug from its mains socket or
switch off power with the master power switch.
– The stainless steel and enamelled parts of the oven will stay as good as new if regularly
cleaned with water or special detergents, make sure to dry them carefully after
cleaning.
– Never use scouring pads, steel wool, muriatic acid or other products which could
scratch or mark the surface. Do not use steam cleaners.
– Stains on the base of the oven, due to various cooking products (sauces, sugar, egg
white and fats) are always produced by spills and splashes. Splashes occur during
cooking and the result of cooking at too high a temperature, while spills are due to the
use of insufficiently capacious cooking vessels or an incorrect estimate of increases in
volume during cooking. These two problems can be solved by using cooking vessels
with high borders or by using the provided drip tray. As regards cleaning the lower part
of the oven, clean off any stains when the oven is still slightly warm; the longer you
delay cleaning them off, the harder it is to remove them.
Cleaning the oven door
– The oven door must be cleaned, both inside and out, when the oven is completely cold using
hot water. Do not use abrasive cloths. Clean the glass with special detergent.
– Clean the enamelled surfaces, and the oven interior, with hot water and non-abrasive
detergent.
Replacing the oven light
Dominox ovens are equipped with a circular lamp positioned on the top left at the back of
the compartment.
Replace the oven light as follows:
- Switch off power to the appliance with the master power switch used in connecting the
oven to the mains supply, or by removing the plug from the mains socket, if it can be
reached.
- Unscrew the glass cover (A).
- Unscrew the bulb and replace with a high temperature resistant bulb (300°C) of the
following type:
Voltage: 220/230V - 50Hz
Power: 15W
Fitting: (E14) small
- Refit the glass cover (A) and reconnect the power supply.
A

9
Removing the oven door
Removal oven door for easy cleaning
Before cleaning the oven door, we advise you to follow below steps to
seperate oven door from the oven body:
1. Open the door completely. Dismount the locking part on the hinge by
lifting with screwdriver.
2. Push the locking part in the direction of the glass door to the hinge body.
3. Open the glass door to the back slightly and insert the locking part
to it’s place on hinge. Make sure that this is done on both for left and
right hinges.
4. Lift the door slightly and pull the door with your two hands to
seperate from the oven.
Inserting the oven door
After cleaning, for inserting oven door to oven body it is recommended
to apply below steps:
1. Hold the door in open position and insert the hinge to hinge counter part.
2. Open the glass door to the back slightly for getting the locking part
and then push ahead and lock with screwdriver.
3. Open and close the door to make sure that it has been fitted
correctly.
Don't work the oven unless install the glass door

10
Service
In case of malfunction, contact a Franke T
echnical Service Centre (see attached list).
Do not call in unauthorised technicians.
When contacting the Service Centre, quote the following information:
–Typeoff
ault;
– Appliance model (Art.);
– Serial number (S.N.);
This information is given on the appliance dataplate on the warranty certificate.
Safety warnings
Always contact a Franke Technical Service Centre in the following conditions:
To ensure safe, efficient operation of the appliance:
• always have the appliance serviced by a Franke Authorised Service Centre
• always insist on the use of original spare parts
• The appliance is designed for non-professional, domestic use; do not attempt to
modify its specifications.
• The dataplate is marked with symbols indicating the countries for which the
instructions apply
• The electrical safety of the oven is only guaranteed when the appliance is effectively
earthed, as required by established legislation.
• Do not touch the heating elements or the door when the oven is on, as they
reach very high temperatures. Keep children away from the oven when it is in
use.
Do not allow children to touch:
- the controls or the appliance itself;
-the packing elements (bags, polystyrene, staples, etc.);
- the oven in use, and immediately after use, while it is still hot;
- the appliance when not in use (at which time the otherwise hazardous components are
no longer a source of risk).

11
Do not:
- touch the appliance with wet hands or other parts of the body;
- use the appliance when barefoot;
-pull the appliance or power cable to remove the plug from the power socket;
- use the appliance in an unsuitable or hazardous manner;
- block the ventilation and cooling vents;
- route the power cables of other appliances across the hot parts of the appliance;
- expose the oven to atmospheric agents (rain, sun);
- use the oven to store objects of any kind;
- use flammable fluids in the proximity of the appliance;
- use adapters, multiple-sockets and/or extension leads;
- install or repair the appliance without the aid of an authorised technician.
- installation (to the manufacturer's instructions);
- doubt regarding the operation of the appliance;
- replacement of the power socket if incompatible with the appliance's plug,
Contact a Franke Authorised Service Centre in the following cases:
- immediately after having removed the packaging, if you have doubts about the
condition of the appliance;
- replacement of or damage to the power cable;
- malfunction or poor operation; always insist on original spare parts.
Observe the following precautions:
- only use the appliance for cooking food, and for no other purposes;
- before cleaning or servicing the oven or in case of malfunction, disconnect the
appliance from the electrical power supply;
- use oven gloves for placing cooking dishes in the oven or removing them;
- since the ends of the door handle may be hotter due to jets of hot air, always grasp it at
its centre;
- always check that the control knobs are in the off position when the oven is not in use;
- should you decide to stop using the oven, disconnect it from the mains.
• The manufacturer is not liable for damages resulting from: incorrect installation,
improper, incorrect or unreasonable use.
contact with your electrician.

12
Installation
Important: insta
llation must be done in compliance with established standards and
regulations. It must be done by a Franke Technical Service Centre
Kitchen unit requirements
For built-in units, the components
(plastic materials and wooden
veneer) must be assembled with
heat resistant adhesive (max
100°C): unsuitable materials and
adhesives can result in warping and
failure of the adhesive. The unit
must allow sufficient room for the
electrical cabling. The unit must be
robust enough to support the
weight of the appliance.
The oven must be securely installed
in the compartment. The oven may
be installed in a column unit or
underneath the top of a modular
unit, so long as sufficient ventilation
is provided.

13
Installation instructions
Connection to power mains
Dominox ovens are equipped with a three pole power cable with free terminals.
If the oven is permanently connected to the power supply, install a device to ensure that it
is disconnected from the power supply, with a contacts opening distance (of at least 3
mm) to ensure total disconnection in conditions of category III overvoltage. Make sure:
a) the plug and socket are suitable for a 16A current
b) both are easily accessible and positioned so that no live part can be accessed when
inserting or removing the plug
c) the plug can be easily inserted
d) when plugged in, the oven doesn't rest against the plug when installed in the cabinet
e) the same socket must not be used for two plugs
f) a 3 x 1.5 mm2 cable typeH05VV-F should be used to replace
the power cable
g) the polarity of connection of the free terminals must be
respected
(Brown=Phase – Blue=Neutral – YellowGreen=Earth)
N.B: make sure that the characteristics of your power system
(voltage, maximum power and current), are compatible with
those of your Dominox oven.
Place the appliance in the compartment; secure the oven to the unit with
the 4 screws provided, through the holes in its side panels.
If the oven is to be fitted underneath a cooktop, first turn the cooktop
assembly (R) to the right or left so that the oven fits properly.
BLU
MARRONE
BROWN
BLUE
GIALLO-VERDE
YELLOW-GREEN
LN

14
Technical data
INFORMATION FOR USERS
Pursuant to the article of Legislative Decree n. 15, of 25th July, “Actuation of Directives 2002/95/
EC, 2002/96/EC and 2003/108/EC, concerning a reduction in the use of dangerous substances in
electric and electronic appliances, as well as waste disposal”
The symbol of the barred dustbin shown on the appliance indicates that at the end of its useful life it must be
collected separately from other waste.
The user must therefore contact a waste sorting company specialized in the collection of electronic and
electrical appliances, to consign the product.
Proper waste sorting for subsequent recycling of parts and materials, and disposal compatible with the
environment contributes to prevent possible negative effects on public health and the environment and
facilitates the reuse of the materials used to produce the appliance.
Improper disposal may subject the user to the fines indicated in the Legislative Decree. n. 22/1997” (article 50
and thereafter of Leg. Decree n. 22/1997).
Useable dimensions of the oven:
435 mm. wide
424 mm. deep
315 mm. high
Useable volume of the oven:
58 litres
Consumption (static operation):
0.84 kWh
Consumption (fan operation):
0.79kWh
Power voltage and frequency:
220-240V ~ 50-60Hz
Total power and fuse rating:
2,500kW - 16A
Heating element power:
roof 1200 W
floor 1300 W
grill 2000 W
fan 30 W
oven light 1 x 15 W
tangential fan 15 W
The appliance complies with the
following EU Directives:
– 73/23/EEC (2006/95/EC)
of 16/01/2007 (Low Voltage);
– 89/336/EEC (2004/108/EC) of
31/12/2004 (Electromagnetic
Compatibility)
Energy Class: A

15
İçindekiler
Giriş............................................................................................... 15
İlk çalıştırma .................................................................................. 15
Öneriler ......................................................................................... 15
Yakından görünüm ........................................................................ 16
Kullanım şekli ................................................................................ 17
Örnek pişirme tablosu ................................................................... 21
Fırının temizliği ve bakımı............................................................. 22
Yardım........................................................................................... 24
Güvenlik uyarıları.......................................................................... 24
Kurulum......................................................................................... 26
Montaj talimatları........................................................................... 27
Elektrik şebekesine bağlantı......................................................... 27
Teknik Veriler................................................................................. 28
Giriş
Bir Dominox ürününü seçtiğiniz için teşekkürler.
Cihazıkullanmadan önce, kullanma kılavuzunda yer alan uyarıve tavsiyeleri
dikkatlice okumanızıtavsiye ederiz. Böylelikle cihazıdaha uzun süre verimli bir şekilde
kullanabilir ve muhafaza edebilirsiniz. Bu kullanma kılavuzunu gerektiğinde kullanmak
üzere özenle saklayınız.
İlk çalıştırma
Fırınıilk kez kullanmadan önce, içi boşolacak şekilde sıcaklık ayar düğmesini
maksimuma getirerek en az 40 dakika süreyle, kapısıaçık olarak ve bulunduğu
mekan iyi havalandırılacak şekilde çalıştırınız.
Bu işlem esnasında çıkacak koku, fırının üretim ile montaj aşamalarıarasındaki
süreçte fırınıkoruma amacıyla kullanılan maddelerin buharlaşmasınedeniyle ortaya
çıkan kokudur. Bu işlem tamamlandığında fırın kullanıma hazırdır.
Öneriler
Pişireceğiniz yemeği fırın soğukken değil, seçmişolduğunuz sıcaklığa eriştikten sonra
fırına koymak daha iyi sonuç verecektir, böylece yemekleriniz daha lezzetli olacaktır.
Pişirme sırasında, kaplarıve tencereleri asla doğrudan fırın tabanına koymayınız,
bunlar fırındaki 5 kattan birinde bulunan ızgaraların veya tepsilerin üzerine
yerleştirilmelidir; bu talimata riayet edilmemesi halinde, fırının iç emayesi zarar görebilir.
Fırın panellerini, özellikle de iç pişirme bölmesinin panellerini, asla alüminyum
folyo ile kaplamayınız.
Gerekli onarımlar,
Bu gibi durumlarda en yakın yardım merkezimizi arayınız ve sadece orijinal yedek
parça kullanılmasınıtalep ediniz.
Dominox marka fırınınızda kolay temizlenen özel emaye kullanılmıştır, bununla
birlikte fırınısıkça temizleyerek kalan yemek artıklarının tekrar pişirilmesini
önlemek oldukça yararlıdır.
Otomatik temizlemeli paneller (eğer fırında mevcutsa) su ve süngerle
temizlenmelidir (temizlik talimatlarına bakınız).
NOT: - fırınıyakmadan önce zamanlayıcısaatinin kullanımına ilişkin talimatları
okuyunuz.
- Eğer fırın otomatik pişirme ve kapatma programlayıcısıile donatılmışsa, fırını
manuel olarak kullanmak için SIMGESIYLE BELIRTILEN ‘MANUEL’
SEÇENEĞINI SEÇMEK GEREKLIDIR.
Franke yetkili servis personeli tarafından yapılmalıdır.
Z aman Saati Kullanımı.................................................................. 19-20

16
Yakından görünüm
Kontrol Paneli
Program seçme düğmesi
Yapılacak pişirme türüne göre fırının çalışma şeklini seçmeye
yarar. Bu düğme, herhangi bir program üzerine getirildiğinde,
fırının çalışmakta olduğunu belirten fırın dahili lambasıyanar.
Dakika sayacı/ Programlayıcı
Dominox fırınlarıürün yelpazesinde, her bir ürünün detaylı
talimatlarıverilmişolan çeşitli kontrol sistemleri ve pişirme süreleri
yönetimi mevcuttur; fırın fonksiyonlarından doğru şekilde
yararlanabilmek için fırınınızda bulunan kontrol tipini belirlemek
yeterli olacaktır.
Termostat ikaz lambası
Sembol , fırın rezistanslarının çalışmakta olduğunu gösterir. Bu
lamba, ayarlanan sıcaklığa ulaşıldığında söner ve fırın yeniden
ısınmaya başladığında tekrar yanar. Yiyecekleri fırına koymadan
önce, fırının gerekli sıcaklığa ulaşıp ulaşmadığınıkontrol ediniz.
Sıcaklık ayar düğmesi (Termostat)
Yapmak istediğiniz yemek cinsine göre en uygun sıcaklığın
seçilmesini ve pişirme süresince sıcaklığın sabit kalmasınısağlar.
İstenilen sıcaklığıseçmek için, düğmedeki ok işaretini istediğiniz
rakama gelinceye kadar saat yönüne çeviriniz. Maksimum sıcaklık
yaklaşık 260°C'dir.
Tepsi ve ızgara kılavuzları
Bunlar, ızgara ve tepsileri doğru şekilde 5 değişik pozisyonda
(alttan başlayarak 1'den 5'e kadar) yerleştirmeye yarar; örnek
pişirme tablosunda, fırının her kullanım şekline göre
ideal pozisyonla ilgili bilgileri bulabilirsiniz.
Tepsi
Normalde ızgara pişirim sırasında akan yağve soslarıtoplamaya
veya üzerinde doğrudan pişirme yapmaya yarar; tepsi, pişirme
sırasında kullanılmayacaksa fırından çıkarılmalıdır. Tepsi, gıda
amaçlıkullanıma uygun “AA” tipi emaye çeliktendir.
Izgara
Yemeklerinizin bulunduğu sahanların, hamur işi kalıplarının ve
fırınla beraber verilmiştepsiden farklıdiğer tüm kapların üzerine
konulduğu taşıyıcılar olarak, ya da et-balık, fanlıızgara ve ekmek
kızartma gibi fonksiyonlarda kullanılır.
A
B
C D
E
F
G
H
I
F
B
I
H
G
AE
B
C
F
AE
B
D
F
DEO62XS DEO66XS
DEO66 F/XS
DEO62BK-XS DEO66BK-XS

17
Kullanım şekli
Bu fırında, geleneksel fırınlardaki doğal “statik” konvansiyonel pişirme avantajlarıyla
modern fırınlardaki güçlendirilmiş“fanlı” pişirme avantajlarıbir arayagetirilmiş
bulunmaktadır.Son derece kullanışlıbir fırın olup, 5 farklıpişirme türü arasından
seçim yapmanıza imkan tanır. Kontrol paneli üzerindeki (B) ve (F) düğmeleri
vasıtasıyla istenilen sıcaklıklar ve farklıprogramlar seçilebilir. Dominox fırınınızıen
iyi şekilde kullanabilmek için bilgilendirme sayfasınıinceleyiniz.
Soğutma fanı
Dominox fırınları; fırın kapağı, kontrol paneli ve yan panellerin maruz kaldığı
sıcaklığıazaltmak amacıyla fırın sıcakken otomatik olarak devreye giren bir
soğutma fanıile donatılmıştır. Bu fan çalışırken, fırının ön kısmından ve
kapağından dışarıdoğru üflenen bir hava hissedilebilir; bu havanın fırın ortamında
rahatsızlık yaratmamasına ve gürültü seviyesinin mümkün olduğunca düşük
tutulmasına özen gösterilmiştir.
Fırına yakın olan eşyaların da korunmasıamacıyla fırın yeterince
soğuyana kadar bu fan çalışmaya devam edecektir.
Pişirme programları
Doğal statik pişirme
Termostat düğmesi (F), 50°C ile Maks. (250°C) sıcaklıklarıarasında
ayarlanmalıdır.
Isıtma işlemi hem yukarıdan (üst rezistans), hem de aşağıdan (alt rezistans)
yapılır. Bu geleneksel pişirme fonksiyonudur ve sadece tek raf üzerinde
yemeklerinizin homojen olarak pişirilmesini sağlar.
Fanlıpişirme
Termostat düğmesi (F), 50°C ile Maks. (250°C) sıcaklıklarıarasında
ayarlanmalıdır.
Üst rezistans (tavan), alt rezistans (taban) ve fırın iç fanıdevreye girer.
Sabit ve eşit dağılımlısıcaklık, yemeği her noktadan pişirir ve kızartır. Maksimum
2 katıkullanmak suretiyle, aynıanda birbirinden farklıyemekler pişirmek de
mümkündür.
Izgarada pişirme
Termostat düğmesi (F) normalde Maks. pozisyonunda (250°C) bulunmalıdır,
ancak bunun altında bir sıcaklığıseçmek de mümkündür; bu durumda
ızgara işlemi daha yavaşgerçekleşecektir.
Fırının üst tarafında yer alan ızgara rezistansıdevreye girer. Bu şekilde, kızıl ötesi
ışınlarla yemeğin yüzeyi hızlıbir şekilde pişerken, etlerin iç kısımlarının yumuşak
kalmasısağlanır; aynızamanda 9 dilime kadar ekmekle tost yapmak için de ızgara
pişirme fonksiyonunu kullanmak mümkündür. Dominox fırını, güvenlik bakımından
sadece fırın kapağıkomple kapalıdurumdayken ızgara yapmaya izin verecek şekilde
tasarlanmışve üretilmişlerdir.
Dikkat: Izgara rezistansıçalışırken çok sıcaktır; yemekleri koyarken ve çıkartırken
bunlara kazara temastan kaçınınız; bununla birlikte, Dominox fırının ağız kısmı,
elleri mümkün olduğunca koruyacak şekilde tasarlamıştır.
Sadece Üst ısıtıcı çalışır.Sıcak hava üstten kazana yayılarak üst kısmın pişmesini
sağlar.
o
veya yemeklerin ısıtılması açısından kullanıma uygundur.
Isıtma işlemi aşağıdan (alt rezistans) yapılır.
Taban Rezistans
Ust Rezistans
50 C ile 250 C arasında istenilen sıcaklığı seçiniz. Bu tip pişirme çok yavaş pişirme
o

18
Fanlıızgara pişirme
Termostat düğmesi (F) normalde Maks. pozisyonunda bulunmalıdır,
ancak bunun altında bir sıcaklığıseçmek de mümkündür; bu durumda
ızgara işlemi daha yavaşgerçekleşecektir.
Fırının üst tarafındaki ızgara rezistansıdevreye girer ve fan çalışmaya başlar. Tek
yönlü ısıyayılımına, fırın içindeki havanın fanla sağlanan sirkülasyonu da eklenir.
Bu durum, ısının derine işleme gücünü arttırarak yemeklerin yüzey kısımlarının
yanmasınıönler. Et ve sebzelerle yapılan şişlerde, sosis-sucuk türlerinde, kuzu
pirzolalarında, bazıtavuk ve bıldırcın yemeklerinde vs. fanlıızgara fonksiyonu ile
çok iyi neticeler alınabilir.
Pişirme sonu dakika sayacıdüğmesi
Pişirme sonu dakika sayacı, 1 ila 90 dakika
C
arasında önceden belirlenmişbir zaman dilimi
içinde seçilen süre dolduğunda fırınıotomatik
olarak kapatan yararlıbir tertibattır. Pişirme sonu
dakika sayacının ve ikaz sinyalinin ayarlanması
için, düğmenin (C) saat yönünde bir tur
döndürülmesi gerekmektedir; daha sonra geri
dönerek, ön paneldeki işaret ile dakikalarıbelirten
sayılardan birisine denk getirerek istemiş
olduğunuz süreyi ayarlayabilirsiniz. Ayarlanan
sürenin sonunda, uyarızilinin çalmasıyanısıra
fırın da otomatik olarak kapanacaktır.
NOT: Fırın kapandıktan hemen sonra ve fırının
içinde uzun bir süreyle, ayarlanan pişirme
sıcaklığına yakın bir sıcaklık olacaktır; dolayısıyla yemeklerin fazla pişmesini yada
yanmasınıönlemek için piştikten sonra fırından çıkarılmalarıuygun olacaktır.
Dikkat: Fırınımanuel fonksiyonda, yani pişirme sonu programlayıcısını
devre dışıbırakarak kullanmak için, düğme üzerindeki oku ön paneldeki
simgesi üzerine getirmek gerekir. Fırın kapalıolduğu zaman, pişirme
sonu programlayıcısınınormal bir dakika sayacı(saati) gibi
kullanabilirsiniz.
Buz Çözme:
Termostat kapalı iken alt üst rezistans+fan veya gril+fan pozisyonuna getirdiğinizde
buz çözme sağlanır.
This manual suits for next models
4
Table of contents
Languages:
Other Dominox Oven manuals
Popular Oven manuals by other brands

GEAppliances
GEAppliances JRS04 Use and care guide

Hotpoint
Hotpoint DXB 83 K Instructions for installation and use

Electrolux
Electrolux EOY 5851 AAX Troubleshooting

Marta
Marta MT-EO4284A user manual

Blodgett
Blodgett SG3240E Installation operation & maintenance

SCHOLTES
SCHOLTES FP T5.1 operating instructions