Dragon Strand Large Clearside Enclosure User manual

Caution 1: Do not over-tighten screws! Tighten the screw until it is fully seated in the frame and stop
turning when the screw is tight. Forcing the screw beyond this point will strip the hole.
Caution 2: Beware of slipping with the screwdriver and punching a hole in the screen/clearside material.
Tighten the screws rmly and deliberately, but do not rush yourself or press harder than necessary.
Success Hint: Open a screw bag only when it is required and store screws in a bowl.
Assembly Note: Except for the Bottom Frame, the panel side with the sticker is the inside of the cage.
Assembly Note: Rattling inside a cage frame is normal and can be ignored. is is the pop rivet end.
Assembly Instructions: Large Clearside Enclosure
Pre-Assembly: Attach Vine Holders, Dragon Ledges, and Misting Nozzle Hardware
Cage Panels:
(A) Back Panel
(B) Right Panel (with hinges attached)
(C) Bottom Frame
(D) Le Panel (with latch tabs attached)
(E) Top Panel
(F) Plastic Floor Panels (You will have 2 of these)
(G1) Upper Face Panel
(G2) Service Door
(H) Door Dragon Ledges Screw Pack
(Dragon Ledges)
Vine HoldersScrew Pack
(Cage)
Packing List :
Carefully unpack the box and nd each item.
Tools Needed for Assembly:
Phillips Head Screwdriver
Scissors (to unwrap parts)
Bowl (to hold screws)
A) Install Dragon Ledges: Please reference Dragon Ledge Install Instructions
B) Misting Nozzle Hardware: Misting nozzle mounting hardware must be pur-
chased from the misting nozzle manufacturer. If you are using a misting system
and are using a support wedge please install the hardware at this time. e wedge
may cover one of the Vine Holder pre-drilled holes
C) Attach Vine Holders: ese attach to the top panel and will provide a conve-
nient anchor to loop articial vines. Find the two pre-drilled holes on the Top
Panel (E) and attach the vine holders using the screws included in the vine holder
bag. If one of the pre-drilled holes is covered by a misting nozzle mounting wedge
then you have to option of leaving that vine holder o or placing the vine holder
in another location and rmly screwing it in place using the self-tapping screw.
D) Remove Stickers: If you desire to remove the frame stickers, carefully pry as
much o as possible and use Goo Gone or WD-40 to rub o the adhesive.
Dragon Ledges
Misting Wedge Vine Holders
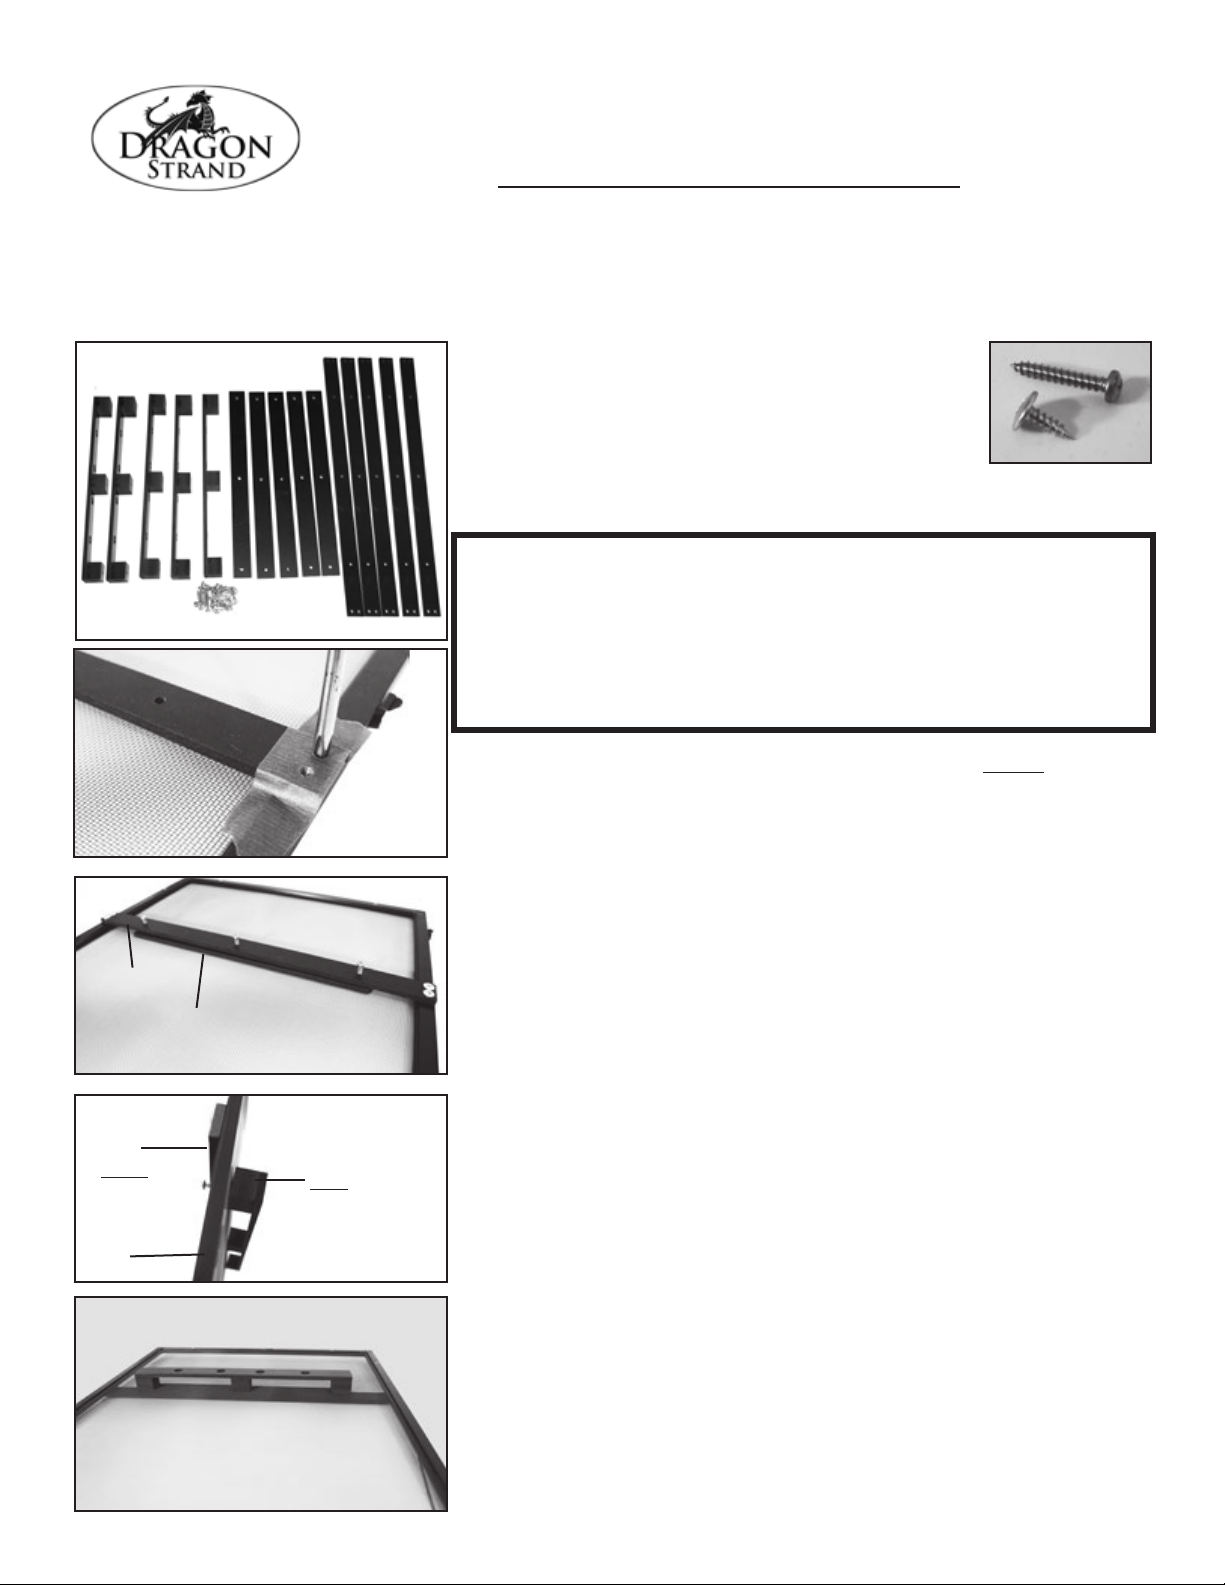
1) Construct cage core with
Back Panel (A), Top Panel (E),
and Bottom Frame (C). Use
3/4” screws from cage screw
bag. Bottom Frame sticker is
on outside. Other panels are in-
stalled with stickers on inside.
2) Add Side Panels (B) and (D)
with 3/4” screws. Stickers are
on the inside top of the panel.
Attach to Top Panel (E) rst
to avoid slipping and possible
screen damage to Top Panel.
3) Complete Front by rst installing the Service Door
(G2) with two 3/4” screws from the sides. en install the
Upper Face Panel (G1). Finally, lay the door in and use
four athead 1/4” screws to attach to hinges.
4) Slide in Floor Panel (F)
Your Large Clearside Enclosure is complete!
042317
15 x
1”
20 x
1/2”
26 x
3/4”
4 x
1/4”

Dragon Ledges
Installation Instructions
Introduction. Your Dragon Ledges allow you to create an internal landscape for your cage. ese solid anchors
distribute weight to the frame instead of the screen or clearside material. Using these ledges you are free to hang
plants or create interior landscapes. An instructional video is available online at
http://www.youtube.com/watch?v=ZSElJOUdi00
Contents. Each Large Keeper Bundle contains 5
horizontal Dragon Ledges for the sides and back.
Qty: 5 (A) Ledge
Qty: 5 (B) Spacer
Qty: 5 (C) Horizontal Back Brace
Qty: 20 (D) Short screw (1/2”)
Qty: 15 (E) Long Screw (1”)
1. Position your rst Back Brace in the desired location on the outside of the screen
or clearside panel. (Panel label stickers are all on the inside)
2. You may use masking tape to hold the Back Braces in place. In this step you can
move them around until you are happy with their location and then tape them
down. e Back Brace does not weigh much so standard masking tape is all that
is needed
3. Once you are happy with placement, use a Phillips head screwdriver, pen, or any
other small object to open a hole in the tape for the Back Brace mounting hard-
ware.
4. Insert a short screw into the hole as much in the center of the mounting hole as
possible. Press rmly on the short screw and slowly twist it into the aluminum
frame of the cage. Make sure you are stable and do not slip.
5. Fasten the screw in a couple of turns to rmly lodge it and then carefully remove
the masking tape (if used) from around the screw and Back Brace.
6. Continue to twist the screw in until it is tight. Do not over tighten the
screw as you will strip the aluminum framing.
7. Fasten in the second mounting screw using the same method of starting the screw
as with the rst one.
8. Repeat steps 3 through 7 for the other side
9. Slip in the Spacer between the Back Brace and the screen. Hold it in place by drop-
ping three long screws into the Back Brace mid-holes and aligning the Spacer so
the screws go into the three pre-drilled holes along the length of the Spacer.
10. Carefully push the tip of rst long screw to barely poke through the screen or clear
PVC.
11. Bring the Ledge from the inside and sandwich the screen (or clear PVC) between
the Spacer on the outside. Align the screw tip with the pre-drilled hole in the
Ledge footing. Fasten half way.
12. Repeat steps 10 and 11 with the other two long screws and then fully tighten all
screws.
13. Your Dragon Ledge is installed. Repeat for your other Dragon Ledges!
Warning: Care must be taken in all steps as slipping with a screw driver or any
other tool may cause damage to the cage. If done carefully and slowly, installation
should be able to be accomplished with no damage or scratches. Screws may be
driven directly into the aluminum frame with a rm pressure. Dragon Strand is not
responsible for slipping and damage to the wall panel. If you have any doubt as to
your ability to accomplish this then create pilot holes through only the rst layer of
the frame using a drill bit smaller than the screw. Contact Dragon Strand with any
questions regarding installation. For additional help email: dragonstrand@gmail.com
A B C
DE
Steps 1 - 3
Steps 4-9
Steps 10-12
Completed!
052916
Back Brace on
OUTSIDE of cage screen
Back Brace and Spacer on
OUTSIDE of cage screen
Back
Brace
Spacer
Ledge goes on
inside of cage screen
Back Brace
&
Spacer
on outside of
cage screen
Cage screen
panel
} Screw bag
Screw
Bag
Table of contents