Eastwood 14293 User manual

20-GALLON PARTS WASHER
INSTRUCTIONS
Part #14293

The Eastwood 20-Gallon Parts Washer is specifically designed with heavy-duty components and a quality powder coated finish to provide years of trouble free service. Fea-
tures include a 20-gallon capacity tub (12-gallon actual capacity), a flexible metal “gooseneck-type outlet wand, re-useable filter, and a detachable
“flow-through” cleaning brush and hose extension.
WARNINGS
• Do not use solvent based or flammable cleaning agents in this parts washer. The recirculating pump is designed to operate with water-based
cleaning agents only. Solvents will destroy the pump and could present a fire hazard.
• Do not use paint or powder dissolving solutions that would remove the powder coated finish of the Tub and components.
• Never let parts washer run while unattended. Clogging of the filter and resulting overheating of the pump motor can occur.
• Always plug into a properly grounded outlet.
• For indoor use only.
• Always wear chemical resistant gloves and adequate eye protection.
SPECIFICATIONS
• 120 Volt AC, 60hz current requirement.
• Maximum pump capacity @ outlet: 1 gallon per minute.
• 20 gallon tub capacity, 12 gallon operating capacity
PARTS
A(4) Legs
B(1) Tub with attached lid
C(1) Bag of hardware
(24 screws, nuts
& lockwashers)
D(1) Storage tray
E(1) Pump box with power cord
F(1) Pump box lid
G(1) 4” x 4” x 1/4” pump inlet
fi l t e r m e d i a
H(1) Pump Inlet Filter Cover
I(1) Parts tray
J(1) Small Parts Bin
K(1) Flexible, positionable metal
“Gooseneck” fluid outlet
tube with nozzle
L(1) Flow-through Parts
Cleaning Brush and
hose extension
2Eastwood Technical Assistance: 800.544.5118 >> techelp@eastwood.com
A
B
C
D
EF
G
H
IJ
K
L

To order parts and supplies: 800.345.1178 >> eastwood.com 3
ASSEMBLY
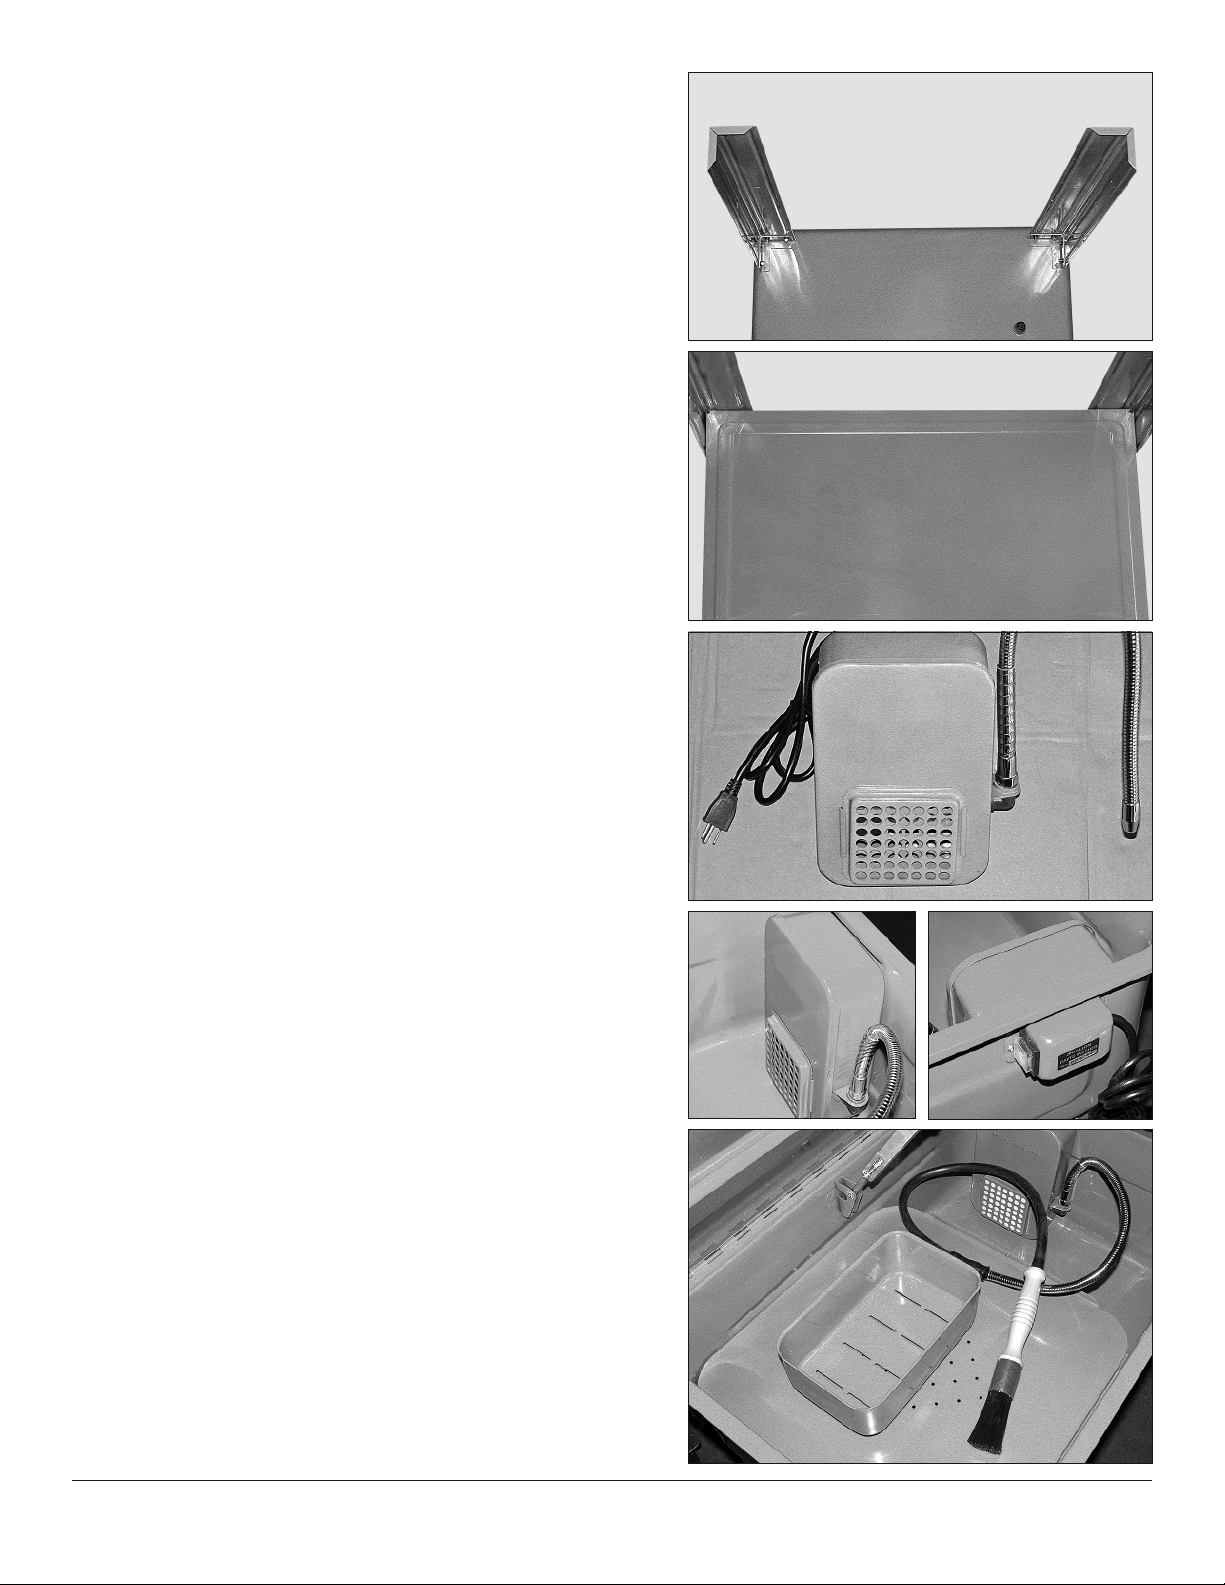
1. With spring loaded lid closed, place Tub unit upside down on a non-scratching surface
(cardboard, carpet etc.).
2. Attach each of the 4 legs with 4 sets each of 6mm screws, lockwashers and nuts to the
brackets on the Tub unit (Fig 1).
3. Attach Storage Tray to holes located mid-way of 4 legs with 2 sets each of
6mm screws, lockwashers and nuts (Fig 2).
4. Thread the fitting of the Flexible Metal “Gooseneck” fluid outlet tube onto the Pump outlet
(Fig 3).
5. Place the Pump Box Lid over the open Pump Box with fluid intake perforations and raised
ribs downward and over pump. Snap into place (Fig 3).
6. Place white fibrous 4” x 4” Filter Media pad into the perforated Filter Media Cover and
slide into place under raised-ribs of the Pump Box Lid (Fig 3).
7. Return the Tub unit to the upright position on its legs and open the spring-
tensioned lid.
8. Route the power cord of the Pump Box Assembly through the rectangular opening on the
side of the Tub Unit with the Inlet Filter downward and facing inward.
The Power Switch is visible through the rectangular opening. Hook the raised offset tab
on the rear of the Pump Box Assembly over the bottom edge of the rectangular opening
(Figs 4-5).
9. Check to see that the Tub drain plug is tightly installed.
10. Place the Parts Cleaning Tray over the ledges on the walls of the tub (Fig 3).
11. Make sure the Nozzle of the Flexible Metal “Gooseneck” Fluid Outlet Tube is
facing in toward the center of the Tub and downward (Fig 3).
12. The installation of the included Flow-through Parts Cleaning Brush and hose extension is
optional. The molded fitting on the hose end opposite the brush
may be slipped into place over the Fluid Outlet Tube Nozzle (Fig 3).
13. Be sure the Nozzle or Brush outlet is facing in toward the center of the Tub
and downward.
14. Fill unit with suitable, water-based degreasing solution sufficiently to cover the entire Inlet
Filter (approx. 12 gallons). Important Note: Follow degreasing solution mixing, usage and
safety label instructions carefully before using.
15. Plug power cord into an approved, grounded and GFI equipped 120 Volt AC,
60hz. Outlet.
16. Turn Power Switch to the “On” position. The Parts Washer is now ready for use.
Fig. 1
Fig. 1
Fig. 2
Fig. 2
Fig. 3
Fig. 3
Fig. 4
Fig. 4
Fig. 5
Fig. 5
Fig. 6
Fig. 6

© Copyright 2013 Easthill Group, Inc. Instruction part #14293Q Rev. 3/13
If you have any questions about the use of this product, please contact
The Eastwood Technical Assistance Service Department: 800.544.5118 >> email: techelp@eastwood.com
PDF version of this manual is available online >> eastwood.com/14293manual
The Eastwood Company 263 Shoemaker Road, Pottstown, PA 19464, USA
US and Canada: 800.345.1178 Outside US: 610.718.8335
Fax: 610.323.6268 eastwood.com
OPERATION
• Place parts to be cleaned on the Parts Tray. Small parts may be placed in the Small Parts Bin.
• Allow cleaning solution to flow completely over the part surface, wetting it completely. Allow time for solution to soften any grease and debris
then use the Flow-through Parts Cleaning Brush to remove stubborn deposits.
• Let excess solution to drain from parts then remove from washer and rinse in warm water.
• When done, turn pump to the off position, close lid and unplug unit.
MAINTENANCE
• Unplug unit and remove filter after every hour of cleaning. Clean more often if removing excessively heavy deposits of grease and grit.
NOTE: Failure to clean filter will result in diminished fluid flow, cleaning effectiveness and eventual pump motor failure.
To clean filter: remove Filter Cover and 4” x 4” square Filter Media. Rinse thoroughly in warm water, let dry and replace.
• If it becomes apparent that the filter requires cleaning more often, it is likely that the cleaning solution needs to be replaced and an accumulation
of sediment from the Tub bottom needs to be removed.
To drain solution: Using a 13mm wrench, remove drain plug and drain cleaning solution into suitable containers and dispose of properly.
TROUBLESHOOTING
• If filter cleaning does not restore pump performance, an accumulation of dirt and grit may be present in the Pump and/or Flexible Metal “Gooseneck” Fluid
Outlet Tube.
- Unplug unit and remove pump and filter assembly from Tub.
- Remove Flexible Metal “Gooseneck” Fluid Outlet Tube and check for obstructions lodged in tube and remove.
- Remove Pump Box Lid.
- Remove screws attaching front section of pump housing exposing impeller. Clean debris from impeller.
- Re-assemble Pump, Filter and Fluid Outlet Tube and replace assembly on Tub.
Table of contents
Other Eastwood Washer manuals
Popular Washer manuals by other brands

LG
LG WV 14 VP Series owner's manual

Candy
Candy GO 4 1064 D User instructions

Meganex
Meganex MEG25 instruction manual

STODDART
STODDART Culinaire EVO40ST Specification, installation and operation manual

Bosch
Bosch WGG254A0ES User manual and installation instructions

Candy
Candy Grand O GC 2D User instructions